How to transfer web hosting from one company to another: 6 easy steps
Dec 22, 2025
/
Tamara J. & Saulius L.
/
13 min Read
If you find it’s time to switch hosting providers but are unsure of where to start, this is the right article for you.
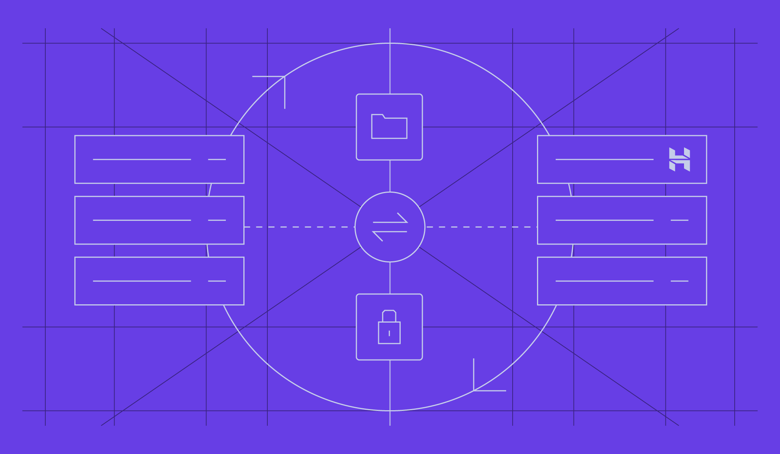
Migrating your website to a new hosting service doesn’t have to be a difficult task, as long as you choose the right approach.
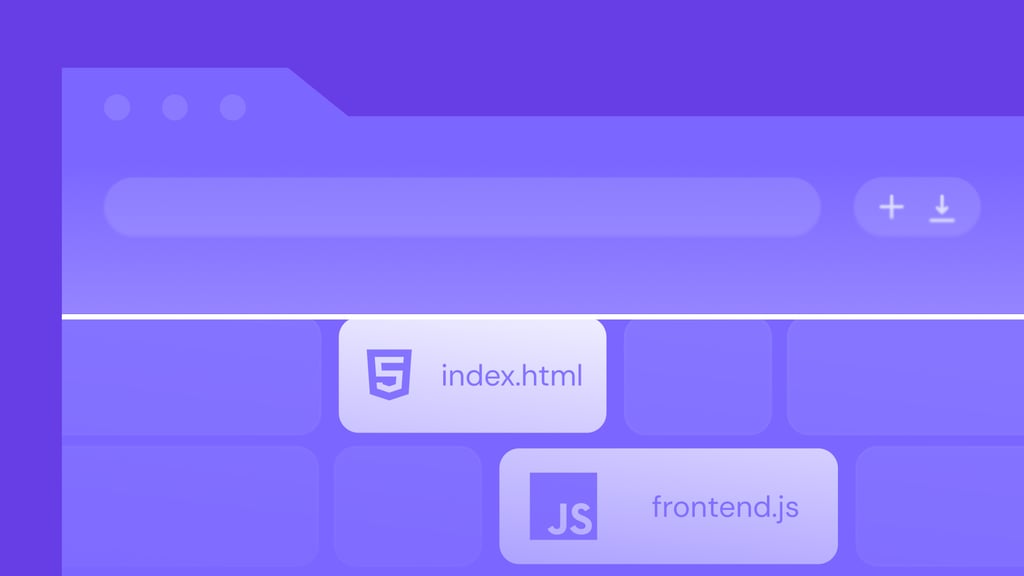
One of the options is to transfer your website manually. This includes such procedures as downloading your backups and uploading them to the new server as well as pointing your domain name.
Another way is to request transfer assistance from the new web host. We recommend going this route, if available, since it’s the most convenient approach for beginners with limited technical knowledge or busy site owners with little time to spare.
Alternatively, for those who run a WordPress site, we’ll explain how to switch web hosts using a migration plugin.
In this article, we explain how to transfer web hosting from one company to another in the manual approach and with a plugin.
Download all-in-one WordPress cheat sheet
How to Transfer Web Hosting From One Company to Another
To transfer your website manually to another hosting company, complete these 6 steps:
- Purchase the new hosting
- Download your backup files
- Download your website’s database
- Import the files and database to your new hosting account
- Point your domain name to the new server
- Review your site before it goes live
Let’s dive deeper into each one.
1. Get New Hosting
Before actually moving a website to a new hosting service, you need to choose a new web host. Ideally, find a hosting company that offers a free site migration service to simplify the transfer process.
Also, remember that the new web host significantly impacts your hosting experience in the long run, not just when conducting a migration. It’s therefore important to evaluate these long-term factors before finalizing your decision.
Here are just a few crucial aspects to consider when choosing a web hosting company:
- Reliable performance. Choose a web host that guarantees high uptime and conducts regular maintenance.
- Security. Ensure that your web host has clear and comprehensive cybersecurity strategies to keep your site and its data safe. These include using the latest software and implementing up-to-date security measures like SSL encryption and secure CDNs.
- Website-creation tools. Choose a new web host that supports numerous platforms, whether you use a content management system (CMS) like WordPress or coded the website from scratch. Also, make sure that your new host offers tools that can ease integration.
- Comprehensive features. The web hosting market is highly competitive, so look for a service provider that stands out from the crowd by offering valuable extras. These may include money-back guarantees, 24/7 customer support, and free website transfers.
- User experience. Look for a new web host that offers a great user experience with an intuitive interface and well-designed tools, like Hostinger’s hPanel.
- Value for money. Make sure to evaluate both the initial and long-term costs of a hosting provider. Find one that offers scalable plans at different price points so that you can find one that suits your budget.
Alongside your search for a new host, look closely at the types of hosting plans on offer and the resources they provide. For example, here are some of the most popular hosting services to consider:
- In shared hosting, several sites share one server and its resources. It’s a great option for beginners with small websites that receive low traffic volumes. With shared hosting, your web host conducts server monitoring, updates, and backups.
- Using VPS hosting, a website receives dedicated resources from a virtual partition of a physical server. It’s an excellent option for medium to large websites that need performance stability and resource flexibility. At Hostinger, you can purchase a VPS at different price points. The highest-tiered plans offer more comprehensive features and resources.
- Cloud hosting is where a website runs on multiple virtual or cloud servers instead of just one physical server. It’s ideal for busy websites with high traffic volumes since cloud hosting offers high website uptime.At Hostinger, we offer three cloud hosting plans – Cloud Startup, Professional, and Enterprise.
- Managed WordPress hosting caters specifically to sites built on this CMS, offering specialized servers and resources to optimize WordPress sites. Many plans also come with built-in plugins and themes or WordPress-specific services, like Multisite support. If you’re looking for WordPress hosting services that have everything mentioned above, consider Hostinger.
Pro Tip
Looking for CMS-optimized hosting other than WordPress? Check out Hostinger's CMS web hosting packages! All Hostinger hosting plans include a 30-day money-back guarantee, giving you peace of mind during the trial period.
One last thing to do before making a final decision is to check web hosting reviews. You may find them on popular review websites such as Trustpilot, G2, Google My Business, or on the provider’s website directly.
Once you purchase a hosting plan with a new web host, ask them to perform direct website transfer between servers if the option is available.
If your new host doesn’t provide migration services, you’ll need to conduct a manual website transfer by following the step-by-step instructions in the next few sections.
2. Export Your Website’s Backup Files
The first step to manually transfer hosting is to create an entire site backup and save your website files. The goal here is to set it up on the new hosting account without errors or missing parts.
Doing this ensures that when your website goes live on the new hosting account, all its content, plugins, and themes remain the same.
Important! It’s crucial not to alter your site files or database once you download them. Doing so risks compromising the website’s structure, which can lead to errors and broken links.
Back Up Your Files via hPanel
In most cases, the control panel on your old hosting account should offer a full backup export option, which is the easiest way to do this. For example, hPanel has a feature that enables users to create a full backup in just a few clicks.
To download your website files on hPanel:
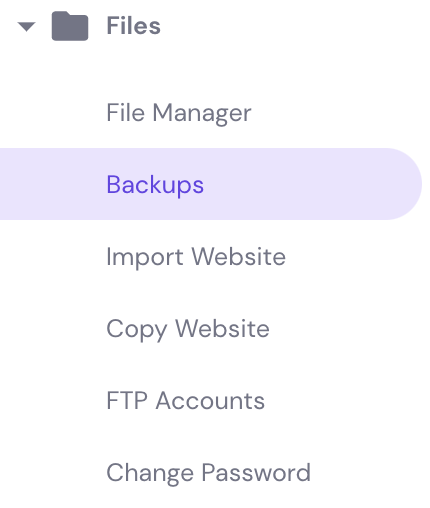
- Access your hPanel, then go to Files → Backups.
- Navigate to Files backups and click the Select button.
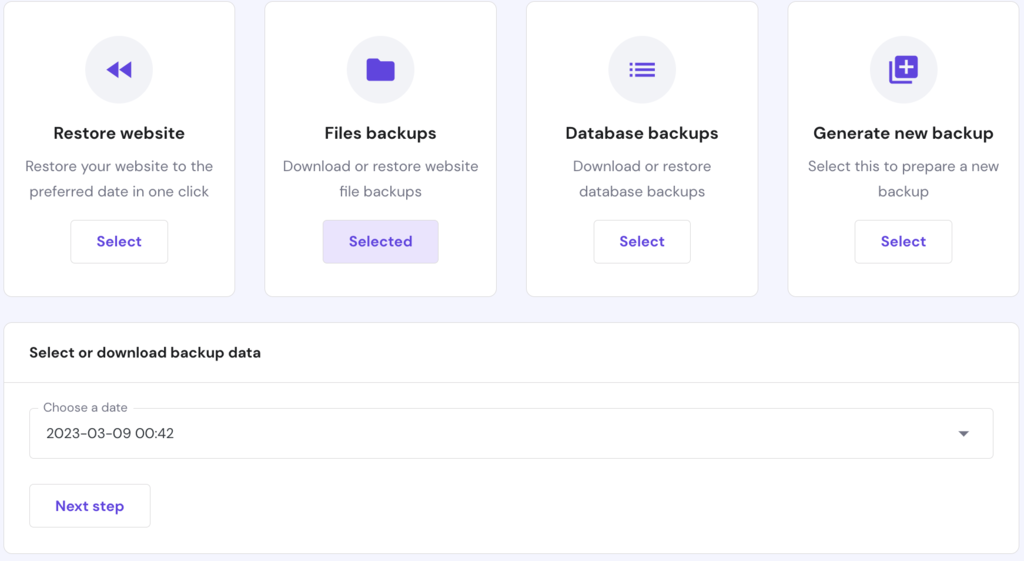
- Select the most recent date in the drop-down menu and click Prepare to Download.
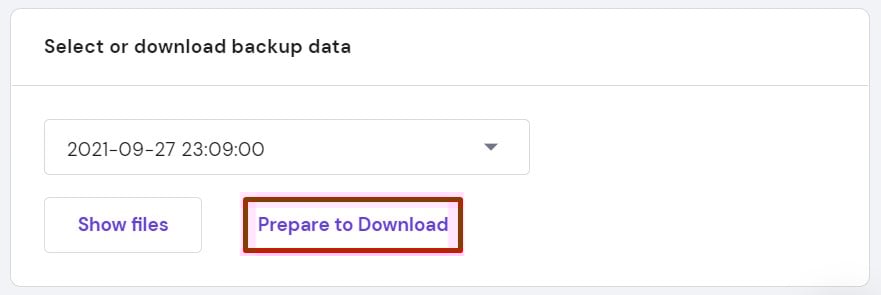
- Once the files are ready, you’ll receive a notification that will prompt you to download them.
Back Up Your Website Files Manually
If your current hosting provider doesn’t offer a simple backup feature, you’ll have to conduct a manual website backup. Before proceeding, make sure that you have access to a File Transfer Protocol (FTP) client, like FileZilla, to download the website files.
First, connect to the FTP server via an FTP client. Today, we will be using FileZilla.
- In hPanel, go to Files → FTP Accounts and gather your hosting account’s FTP details.
- Open FileZilla, go to File → Site Manager → New Site.
- Set Logon Type to Normal. Then, fill in your website’s FTP account details:
- Host – your site’s domain name.
- User – FTP account username.
- Password – FTP account password.
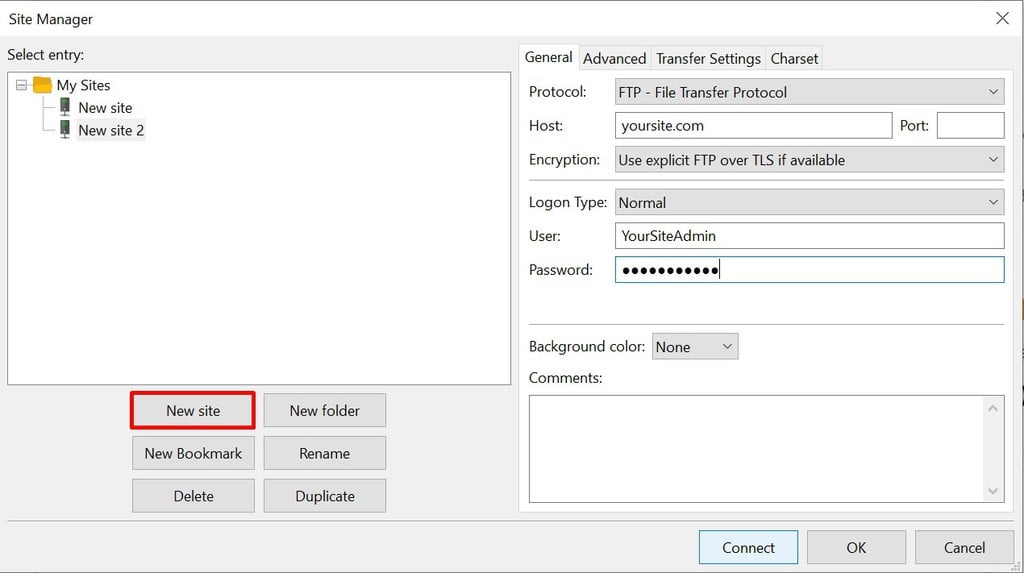
- Double-check the information and click Connect, then click OK.
Second, download the website files to your local computer.
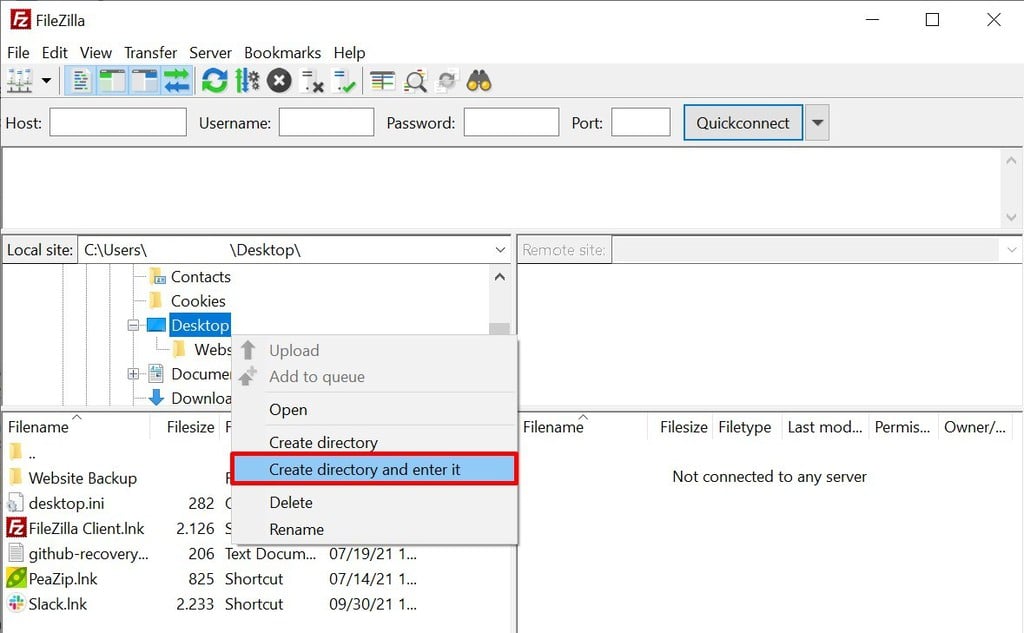
- On FileZilla, under Local site, select Desktop or a file in your computer that will store your website files.
- Right-click the chosen file and select Create directory and enter it. Then, name this new directory – for example, “website backup.” This will become the folder where your downloaded website files are stored.
- Navigate to Remote site and find your website’s public_html folder.
- Drag and drop the public_html folder to the Website Backup folder.
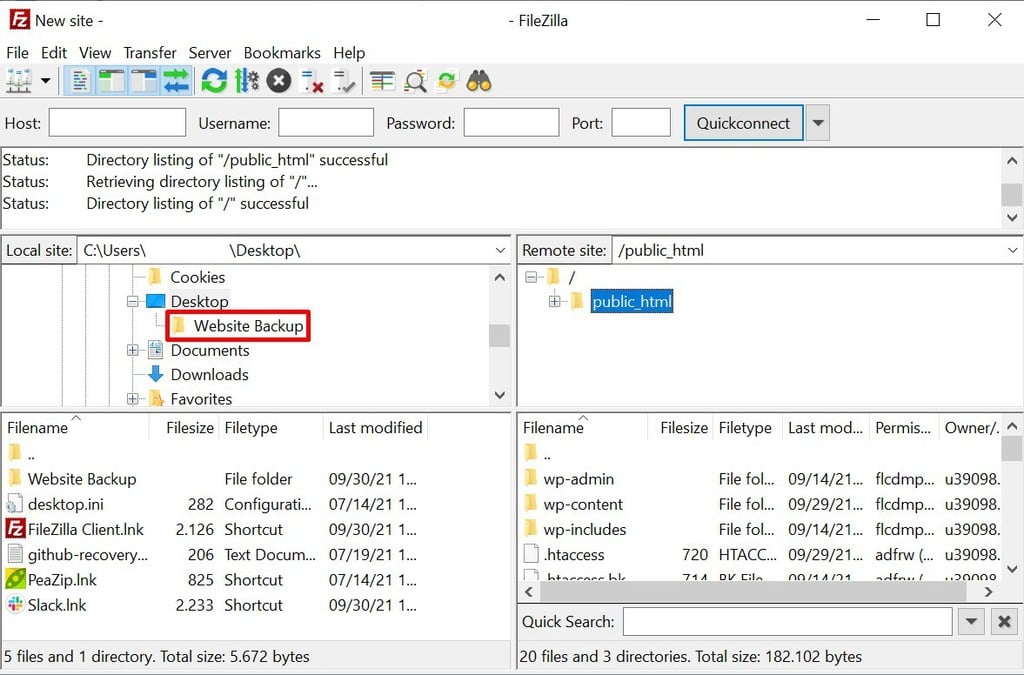
- Wait until the download is complete.
You should now be able to find the Website Backup folder containing the downloaded website files on your computer desktop.
3. Download Your Database Backups
Equally as important as your website files is its database. Here, we’ll share two methods on how to backup and download your database – manually and via hPanel.
Back Up Your Database on hPanel
Just like with files, navigate to your hPanel’s Files section and click Backups. Then to download your website database:
- Navigate to Database backups and click the Select button.
- Choose which backup data to download, then click Show databases.
- Select the most recent backup date and click Prepare to Download.
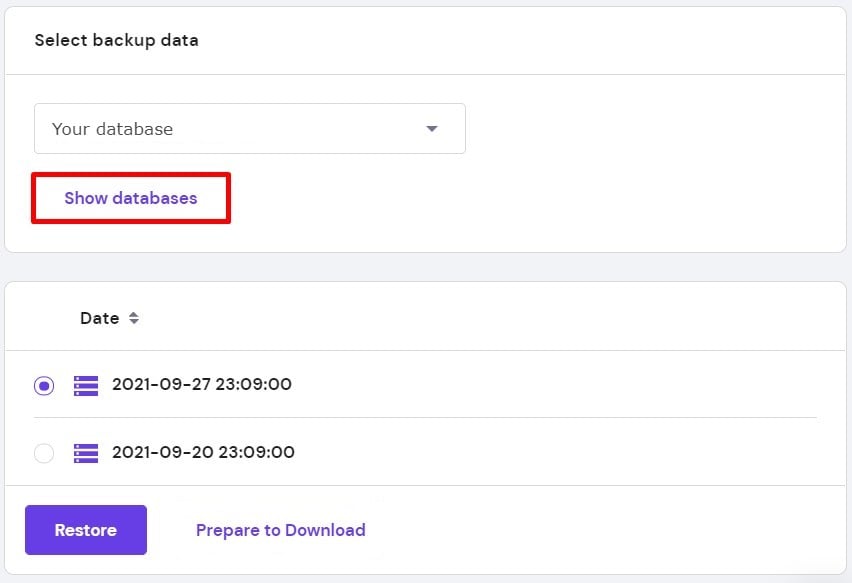
- Wait for a notification to appear, then click on it to download the database.
Back Up Your Website Database Manually
To do this step, you need access to your site’s phpMyAdmin, which can be found in the control panel of your old hosting account.
To demonstrate, we will use hPanel.
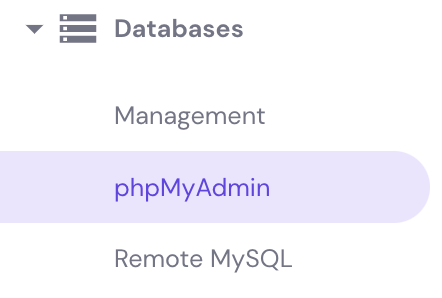
- Access your hPanel, then go to Databases → phpMyAdmin.
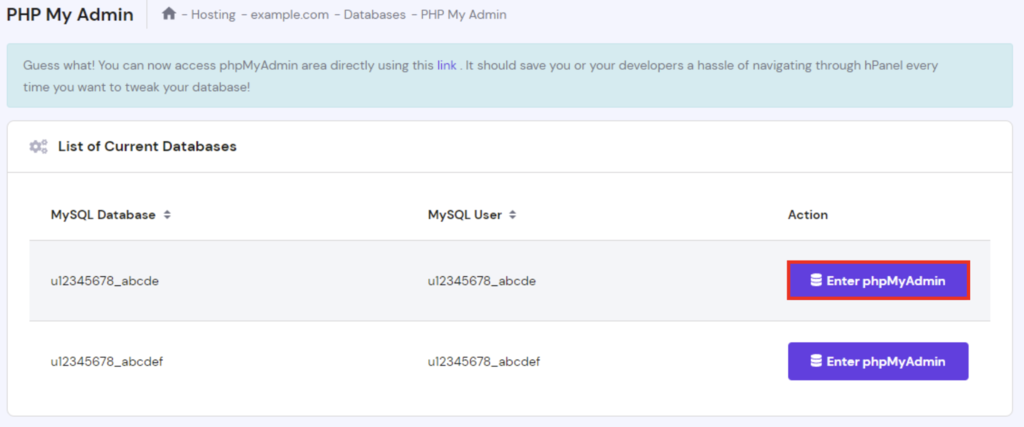
- Under the List of Current Databases, find your site database and click Enter phpMyAdmin.
- The phpMyAdmin screen will appear. Here, select all the files that make up your website database, then click Export.
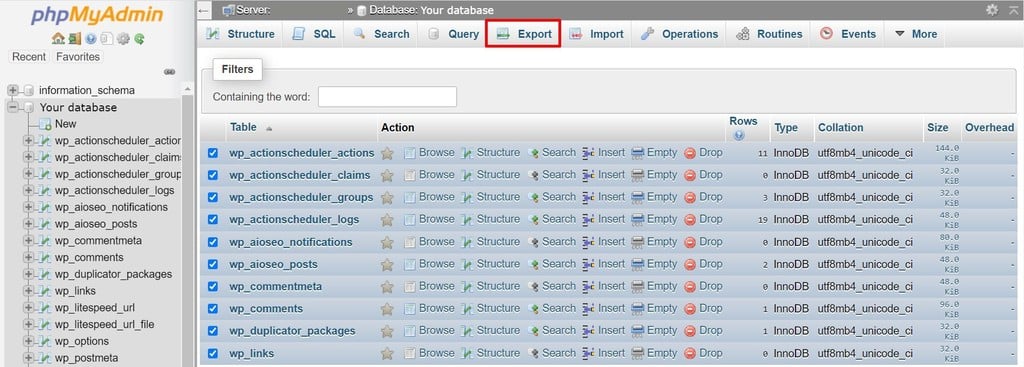
- Select Quick for the Export method and SQL in the drop-down menu under Format.
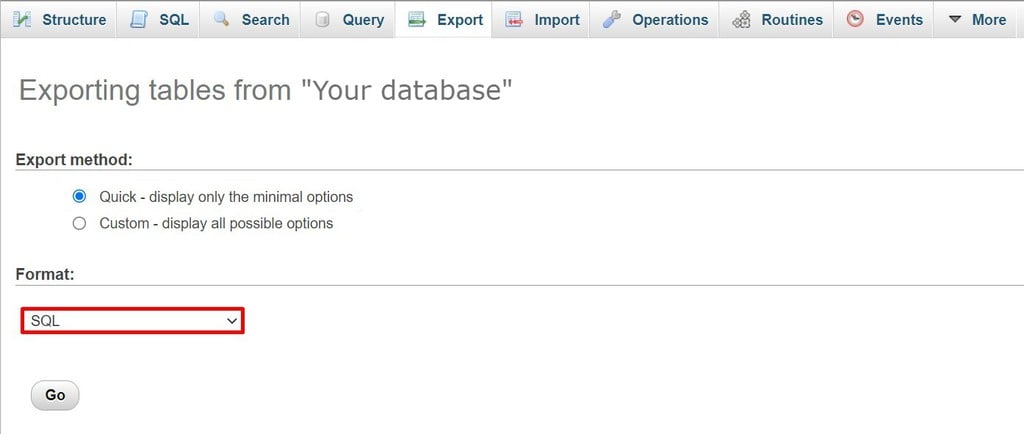
- Click Go to download the zipped file of your site’s SQL database.
4. Move the Files and Database to the New Host
The next step is to manually migrate your website’s files and database to the new provider. To do this, you’ll need access to your new hosting account’s FTP client.
Pro Tip
Since the database files are in a .zip format, decompress or unzip the files before continuing.
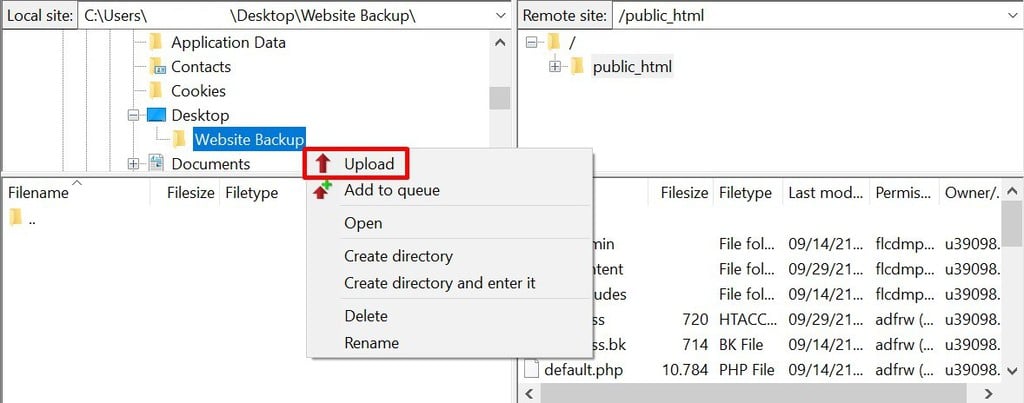
- Connect FileZilla to your new hosting account and navigate to the public_html folder in the Remote Site column.
- In the Local Site column, locate the folder with the site files you want to upload. In our case, this folder is Website Backup.
- Right-click the folder and select Upload.
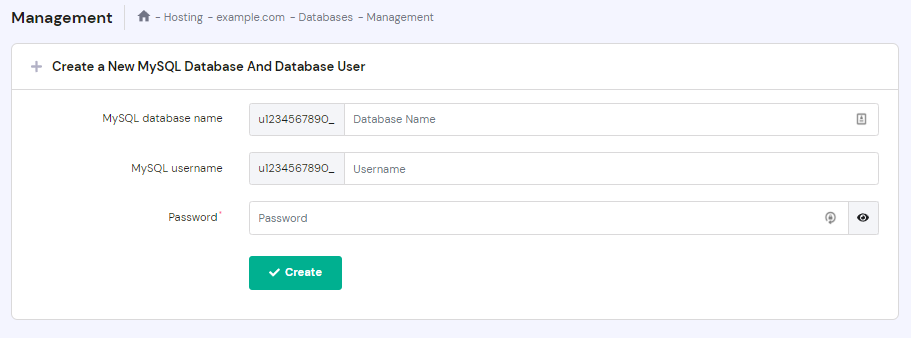
To upload your website database to Hostinger:
- Open your new account’s hPanel and navigate to Databases → MySQL Databases.
- Create a new database by entering the new database name, username, and password in the corresponding fields and click Create. Take note of these new credentials and make sure not to forget them.
- Head back to Databases and click on phpMyAdmin. Find your newly created database and click Enter phpMyAdmin.
- On the phpMyAdmin page, click the Import tab located at the top of the page.
- Click Choose File and select your website’s unzipped database files to upload.
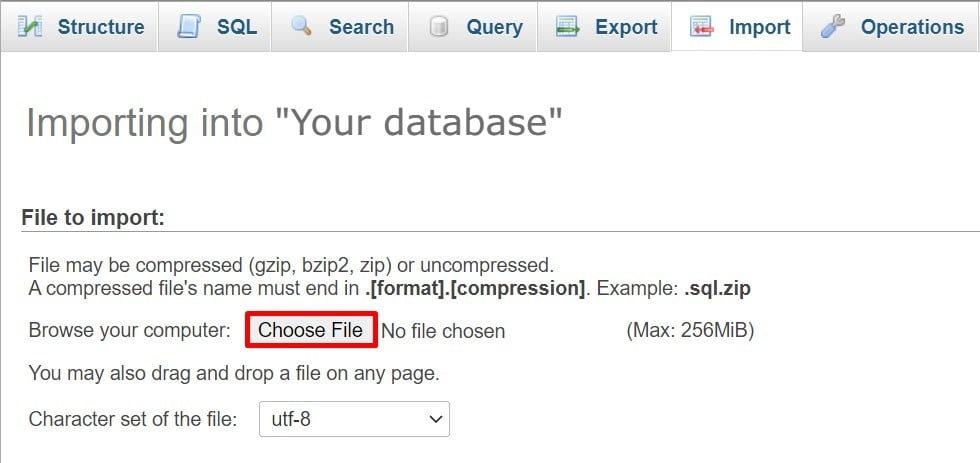
- Leave all settings as is and click Go.
If you are transferring a WordPress site, you need to update wp-config.php with your new database details. The information is available in your web hosting account’s root directory:
- On hPanel, navigate to Files → File Manager.
- Access the public_html folder, right-click the wp-config.php file, and select Edit.
- Add your new database details in these lines of code:
DB_NAME– database name.DB_USER– admin username.DB_PASSWORD– admin password.DB_HOST– database hostname. This is usually localhost, but may vary depending on the hosting provider.

- Save the changes.
5. Point Your Domain Name to the New Server
Let’s recap what we’ve completed so far. You now have a new host and have transferred your website’s files and database to a new account. You also have access to your new hosting account’s control panel.
Now you’ve reached the final step in your hosting transfer process – pointing your site’s domain name to the new server. To do this, you need to update your Domain Name System (DNS) settings. You may also purchase a new domain name if you’d like to change it, but it’s always a good idea to keep the old domain working as well.
This is a critical step when switching web hosts. If you don’t point your site’s domain to the new server, visitors won’t be able to access your website.
To put it simply, DNS translates websites’ domain names into IP addresses. A website’s DNS record essentially provides instructions to web browsers and informs them where to go to load web pages.
If you’re transferring to Hostinger, you’ll know that your domain is not yet pointing correctly if a message is displayed at the top of your hPanel saying, “Your domain is not pointing to Hostinger.”
If you don’t receive this pop-up message, follow the next steps to change your domain’s nameservers manually via hPanel. This will update your site’s DNS record to match the new IP address.
Additionally, you can initiate a domain name transfer to migrate your domain registration to your new provider. However, bear in mind this process will require you to pay a domain transfer fee.
1. Find the New Nameservers
Your new hosting provider usually has one or two nameservers. Access this information by navigating to Hosting → Plan details in your hPanel.
For example, Hostinger’s nameservers are:
- ns1.dns-parking.com
- ns2.dns-parking.com
Take note of these nameservers because you’ll need to enter them into your domain registrar’s control panel.
2. Replace Your Domain’s Old Nameservers
- Log in to the domain registrar where you bought the site’s domain.
- Look for the settings to configure the domain’s nameservers. It varies depending on each registrar, but you can often find this under Domain Management or Domain Overview.
- In your new account’s hPanel, go to Domains → [your domain name] → DNS / Nameservers and click Change Nameservers. Here, you have two options:
- Fill in the fields manually.
- Select Use Hostinger nameservers to use Hostinger’s default nameservers.

- Click Save.
Note that if there’s a discrepancy between the number of nameservers your new host provides, you should follow these tips:
- If your new host has two nameservers, but your registrar has four nameserver fields, simply enter the first two fields and leave the rest blank.
- If your hosting provider gives three nameservers, but your registrar only has two nameserver fields, simply enter the first two nameservers.
Pro Tip
You can also move your domain to Hostinger to keep everything in one place. For guidance, check out our domain migration guides on
3. Wait for DNS Propagation
Now it’s a matter of waiting for the new changes to take effect, which typically takes a few hours. However, note that DNS changes can take up to 24 hours to propagate.
To speed up the process, you can flush your DNS cache. This is especially useful after transferring hosting accounts to clear any corrupted or outdated DNS cache records.
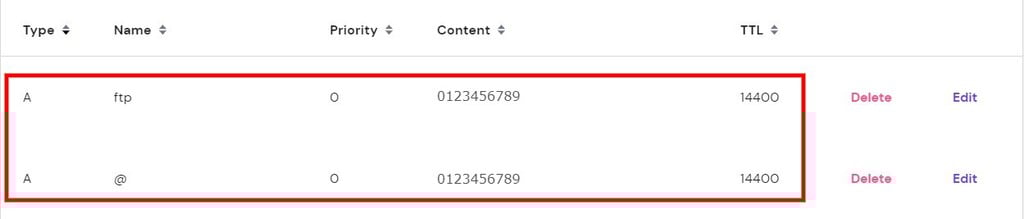
You can see if your site’s domain is already pointing to the correct nameservers by checking its DNS A record. Do this to see if your domain has the same IP address as the one provided by your new hosting provider:
- Access the hPanel and find your host’s IP address on the left sidebar. Take note of this.
- Then, head to Advanced → DNS Zone Editor.
- Under the Type column, navigate to A and check your domain’s A record value under Content. Make sure it has the same value as the IP address given by your web host.
6. Test and Review
After changing web hosts, it’s important to conduct some tests to ensure everything is operating properly before publishing your website.
In this section, we assume that you have completed all the previous steps successfully, and that your site’s domain is pointing to the new web host’s nameservers.
Now, look around and check that both the front and back-end of your site work seamlessly. Doing this also helps to avoid website downtime and identify errors so you can fix them before the site goes live.
On your hosting dashboard, navigate and explore the different sections to get a feel of your new control panel. Ensure that all the settings are configured to your website’s specifications, and maybe even move your email services to Hostinger while you’re at it.
From the front-end, browse all of your website’s pages. Make sure that all content such as images, text, and videos loads smoothly and correctly. Also, check if every feature, like contact forms, works properly.
If you find no errors, you are officially done with the manual hosting transfer process. Congratulations!
Other Ways to Transfer Your Website
In the following sections, we’ll cover how you can transfer hosting with a plugin if you run a WordPress website, or by requesting a migration service from your new host.
Transfer Your Website Using a Plugin
There are numerous WordPress migration plugins we recommend, like All-In-One WP Migration and Duplicator. Although the features vary with each plugin, they all work to simplify the website migration process.
Using a migration plugin is an excellent option for beginners and those with little to no technical knowledge. For example, All-In-One WP Migration enables you to upload databases, files, themes, and plugins to another server with just a few clicks. It even offers a drag-and-drop import function to further simplify the transfer process.
Similarly, Duplicator has a function that enables you to copy and clone your website to another host or staging area with no website downtime.
This plugin also offers a backup solution by bundling site files into a .zip format to optimize mobility and efficiency. Moreover, it comes with a file pre-configuration feature to simplify backups and transfers.
You can also check out our list of the best WordPress database plugins to help make your WordPress website transfer process easier.
Here’s an example of how you can transfer hosting for an existing website using Duplicator:
- Install the plugin on your old hosting account’s WordPress dashboard. There are two ways to do this:
- Conduct a manual install by downloading the plugin’s .zip file and uploading it to your dashboard by clicking Plugins → Add New → Upload Plugin.
- Install it via your WordPress dashboard by navigating to Plugins → Add New. Simply search for the plugin in the field on the top-right side of the screen and click Install Now.
- Click Activate on the plugin once it’s installed. Alternatively, Activate the plugin via Plugins → Installed Plugins.
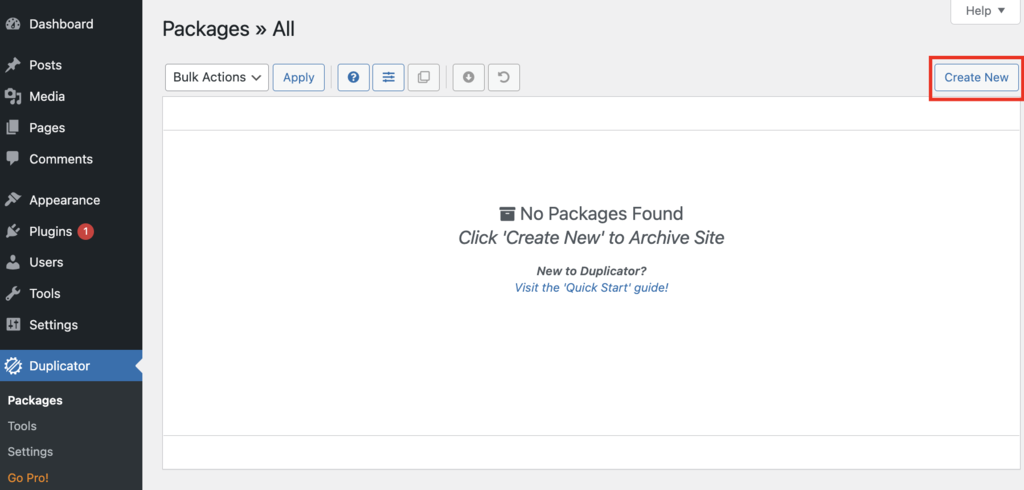
- Once activated, go to Duplicator → Packages on your WordPress dashboard’s left sidebar and click Create New.
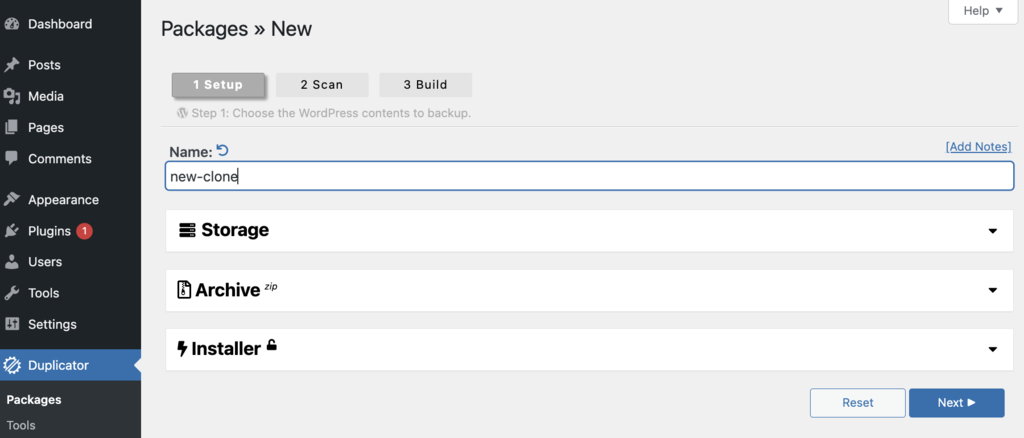
- Name your package and then click Next. Duplicator will scan for potential issues before going to the next step.
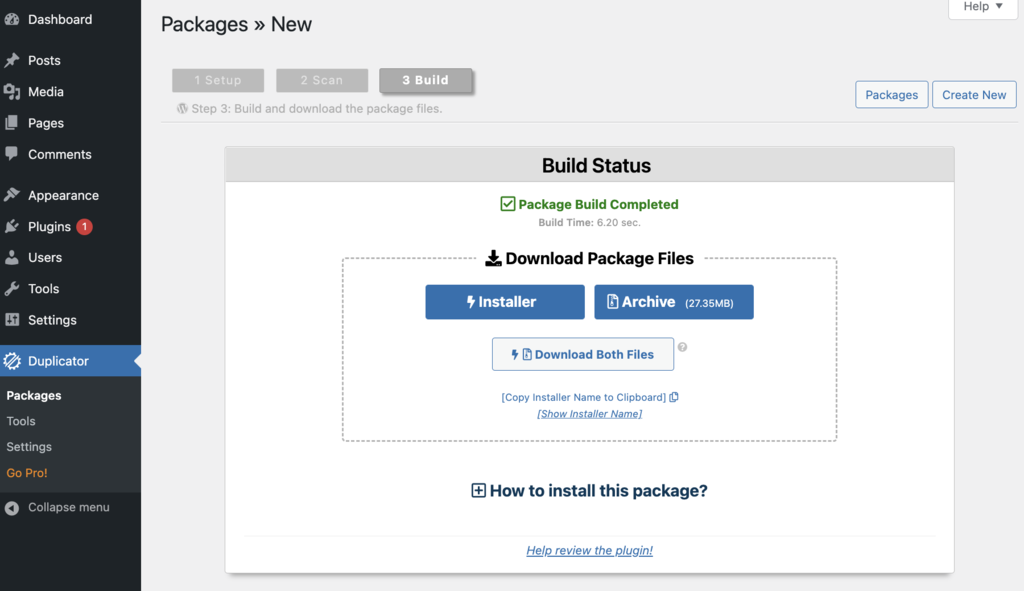
- Once the scan is done, click Build to let Duplicator create your package.
- Wait until this process is complete, then select the Download Both Files option to download a website backup .zip file and an installer.php file to your computer. They will enable you to upload the website to the new hosting account.
Next, upload the .zip and installer.php files to your new hosting account’s root directory or public_html folder. You can do this via an FTP client such as FileZilla, which we covered in step three of this article.
On the other hand, this step becomes much simpler if you’re transferring to Hostinger:
- On the hPanel, go to Website → Import Website.
- Click Choose a file and select the website backup .zip file.
- Follow the prompts given to configure and complete the migration.
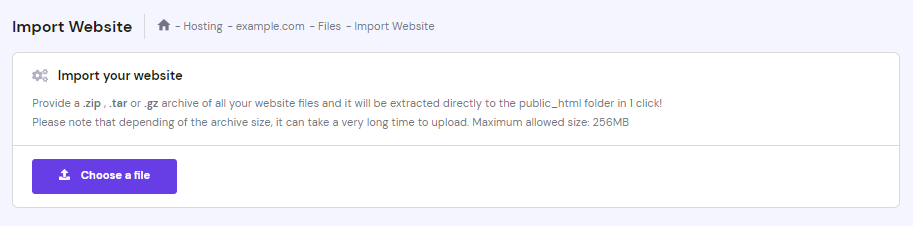
This process extracts your website’s files directly to the public_html folder, so you don’t have to worry about going through the extra steps of manual migration.
Request a Migration from Your New Host’s Support Team
The simplest way to transfer website hosting is by picking a new web host that offers a free migration service. However, note that not all hosting providers offer this service, and even less provide it for free.
If you run a WordPress site, you’ll have more luck finding hosting providers who offer website migration at no extra charge. For non-WordPress sites, however, the availability of free migration services decreases significantly.
For example, Bluehost offers a migration service for $149.99, while DreamHost charges $99.
At Hostinger, we offer site migration services at no additional cost for those who purchase any of our website hosting plans.

Outsourcing your site migration task to us takes just three simple steps.
1. Sign Up for a New Web Hosting Plan
To request a new migration, all you need is an active hosting account. So, make sure you buy web hosting with us and have access to your site’s hPanel.
Alternatively, request the migration while setting up your new hosting account during the sign-up process.
Important! Note that we currently do not offer migration services for VPS hosting.
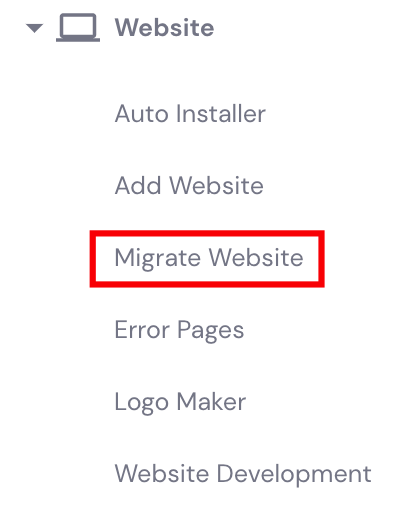
2. Request Migration and Provide Site Details
After activating your new hosting plan, log in to your account’s hPanel. Then, navigate to Website → Migrate Website and click Add request.
Here, select the control panel you need migration from. Hostinger divides this section into three – WordPress, cPanel, or other control panels.
Then, fill in the sections with your site and account details. These include the domain your site is migrating to, your previous hosting provider, and your account’s username and password.
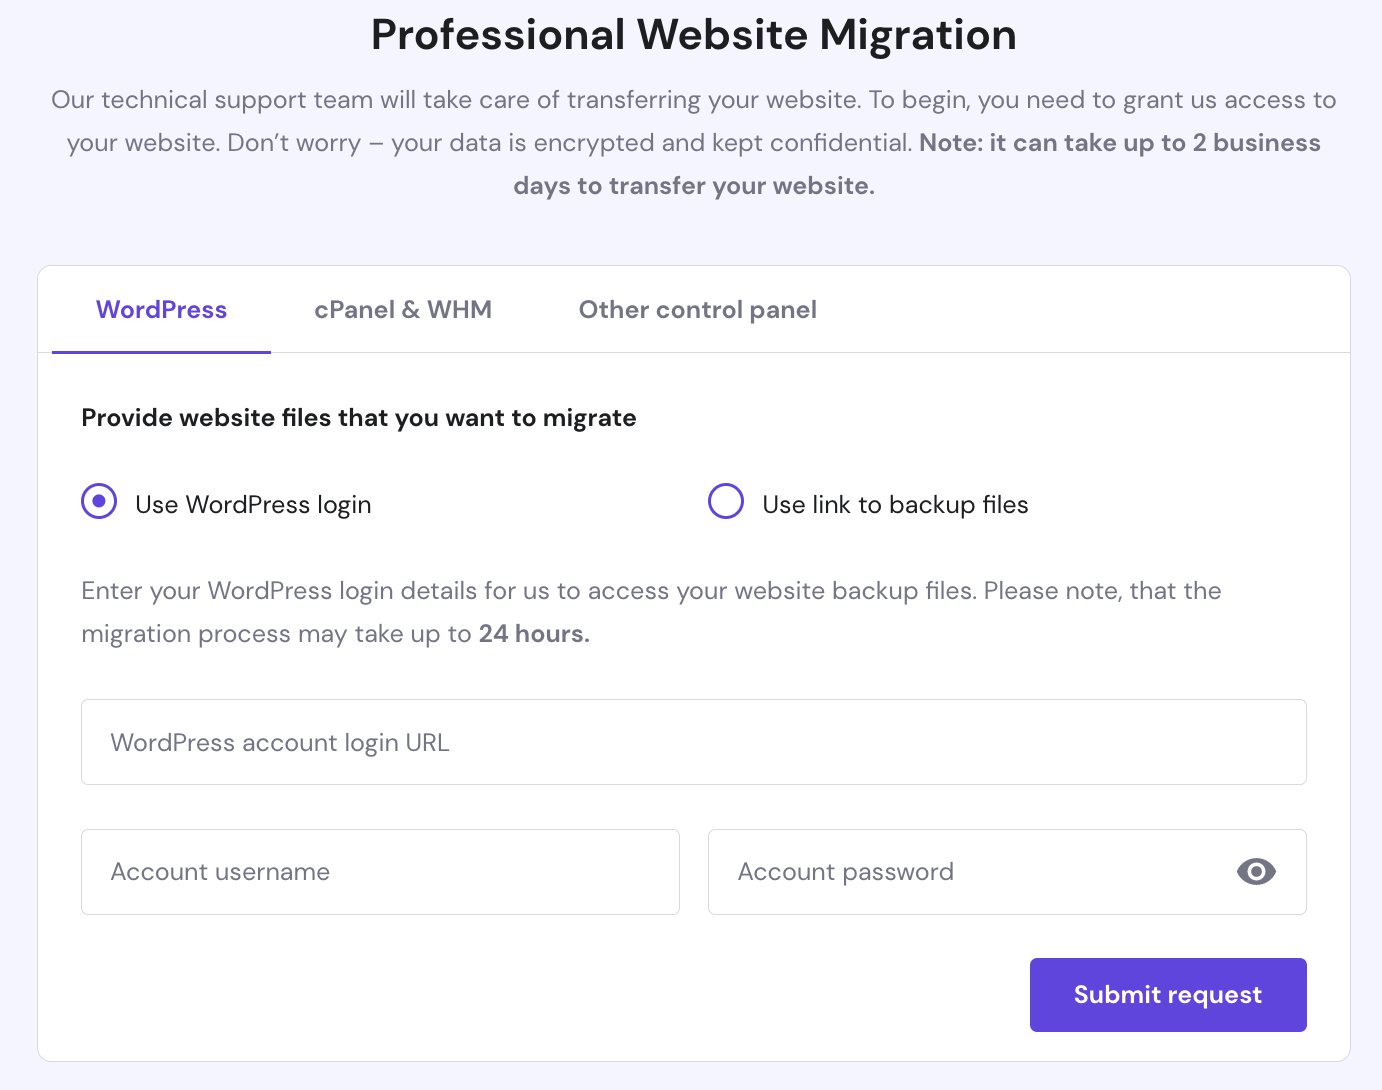
Double-check that the information you provided is correct, then click Add request.
3. Wait and Review
Now it’s time for Hostinger’s site migration specialists to do their work. You can check your request status on the Migration Requests page where you submitted it in the first place.
While you wait for this process, start exploring hPanel to prepare for your new hosting experience.
You can also check out our Knowledge Base and navigate through the many hosting topics available, or contact our Customer Success for more information.
Pro Tip
Looking for more specific website migration guides? Check out our articles on:
How to Transfer Web Hosting: Summary
Transferring your website to a new host isn’t a complicated task. In this article, we showed you some of the different ways to migrate hosting.
The options include doing it manually, requesting a migration service from your new host, or using a plugin if you run a WordPress site.
The easiest way to transfer web hosting is to outsource the task to your new hosting provider. So, when shopping for a new host, make sure to choose one that offers site migration services.
And in case you are still not sure which hosting provider to pick, we prepared the comparison of the popular web hosts to help you out:
We hope this article helped your hosting transfer process. If you have any questions, feel free to leave a comment below or contact our support team.
How to Transfer Web Hosting FAQs
How Do I Know if I Need to Transfer My Web Hosting?
Consider transferring your web hosting if you experience frequent downtime, slow loading times, insufficient storage or bandwidth, inadequate customer support, or if your current host lacks essential features for your website. Additionally, if you need better scalability, more control, or lower costs, transferring may be necessary.
How Do I Choose a New Web Hosting Company?
When choosing a web hosting company, consider factors such as reliability, uptime guarantees, server performance, scalability options, customer support quality, pricing, available features, and user-friendly control panel. Read reviews, compare plans, and assess your website’s needs to make an informed decision.
All of the tutorial content on this website is subject to Hostinger's rigorous editorial standards and values.

Tamara is a Content Editor and digital marketing enthusiast with 2+ years of experience in the IT industry. She loves sharing tips and tricks about SEO, web development, and eCommerce to help others navigate the online sphere. In her spare time, Tamara enjoys exploring new cities. Follow her on LinkedIn.

As VP of Product at Hostinger, Saulius oversees Web Hosting Platform & Tools, Managed WordPress, and WebPro Experience. Saulius enjoys observing users through their daily life activities, looking for problems to solve, and building products that make users more efficient online, help them spend more time on the things they love, and leave all the rest for technology to solve. Follow him on LinkedIn.