How to cancel a HostGator account and transfer your services
Dec 22, 2025
/
Akshay K.
/
7 min Read
HostGator is a popular web hosting provider known for its varied hosting packages and easy setup process. However, when it comes to canceling a HostGator subscription, the procedure isn’t as straightforward.
This step-by-step guide is designed to walk you through the HostGator account termination process.
We understand how critical this decision is for your website. As such, we’re here to make canceling HostGator a hassle-free experience for you.
Download guide to using Hostinger
How to cancel a HostGator account
Now, let’s dive into the step-by-step guide on how to successfully cancel your HostGator account and move to a different provider.
1. Back up your website data
Before you move ahead with the HostGator cancellation procedure, it’s crucial to safeguard your digital assets and prepare for your switch to a new hosting service.
The first step in a smooth transition is making copies of your valuable website data. Ensure you create backups of all essential files, databases, and other important data.
Log in to your HostGator cpanel and scroll down the Files section. Next, click on the Backup option.
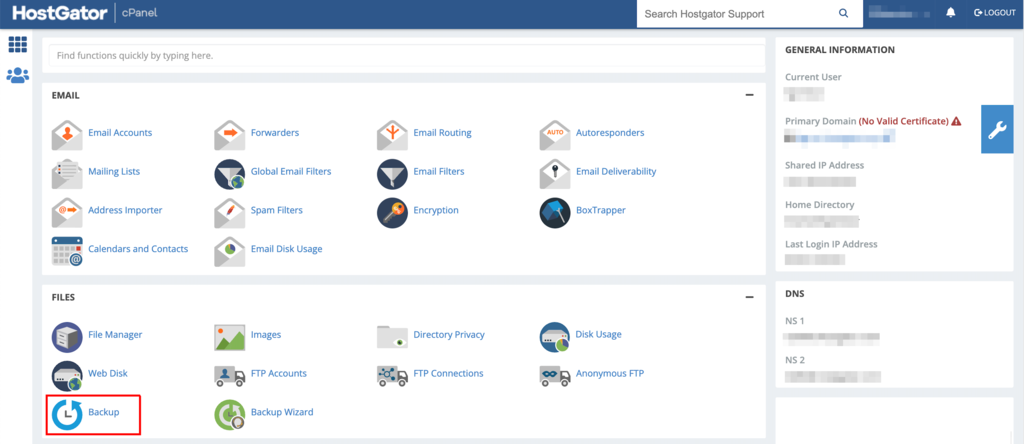
It will open the Full Backup window. Here, click on the Download a Full Account Backup button.

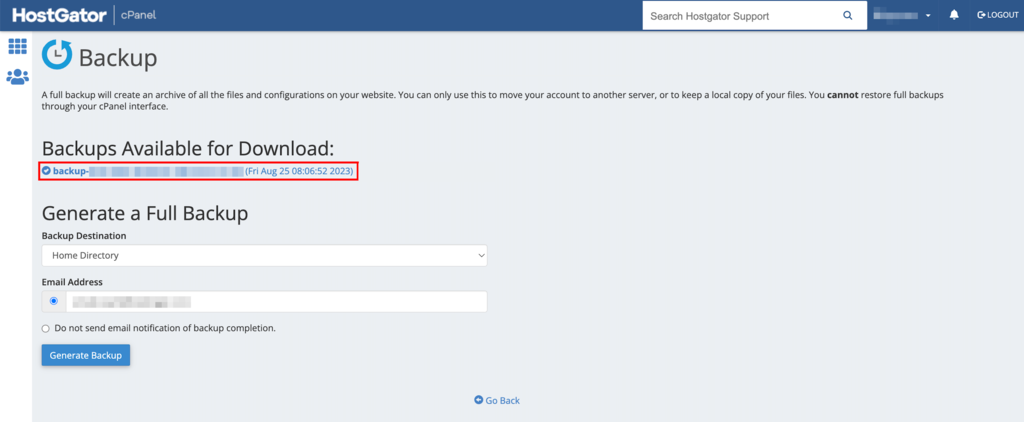
In the next window, select the most recent backup version you want to download from under Backups Available for Download and choose where you would like to save the backup on your computer.
2. Turn off auto-renewal
All HostGator purchases automatically renew towards the end of your billing cycle. As such, turning off the auto-renewal feature before you close your HostGator account is crucial.
It will prevent your hosting plan from automatically renewing and incurring charges as you prepare to close your account and switch to a new host.
Pro Tip
We suggest you cancel automatic renewal at least 30 days before your hosting plan expires. HostGator products are typically billed 10-15 days before their expiration dates.
How to turn off auto-renewal
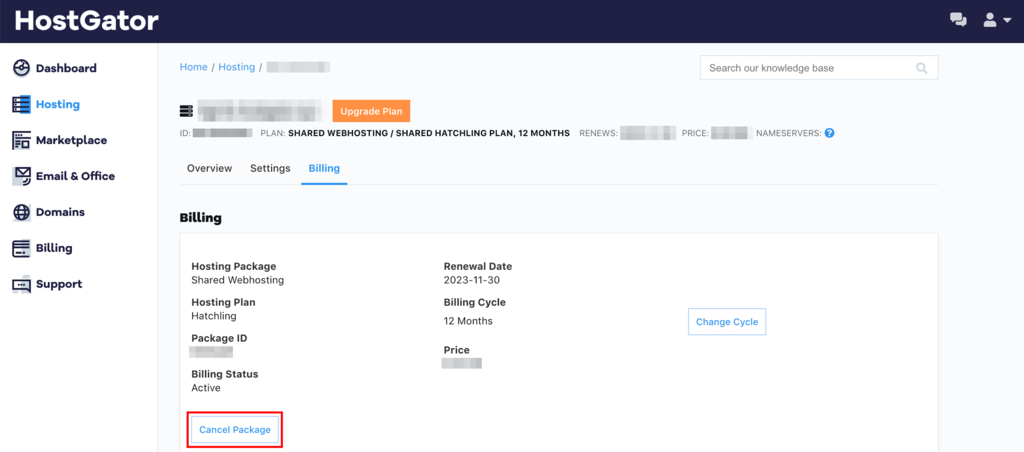
Log into your account, and from the left-hand menu, click on Hosting.
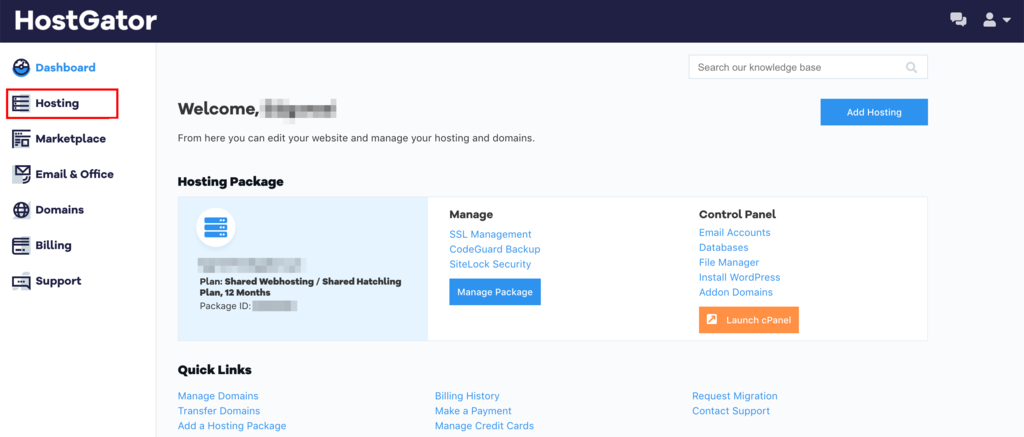
On the Hosting section screen, click on the Manage link provided below your primary domain.

In the Hosting Details page that opens, go to the Billing tab and click on the Cancel Package button at the bottom.
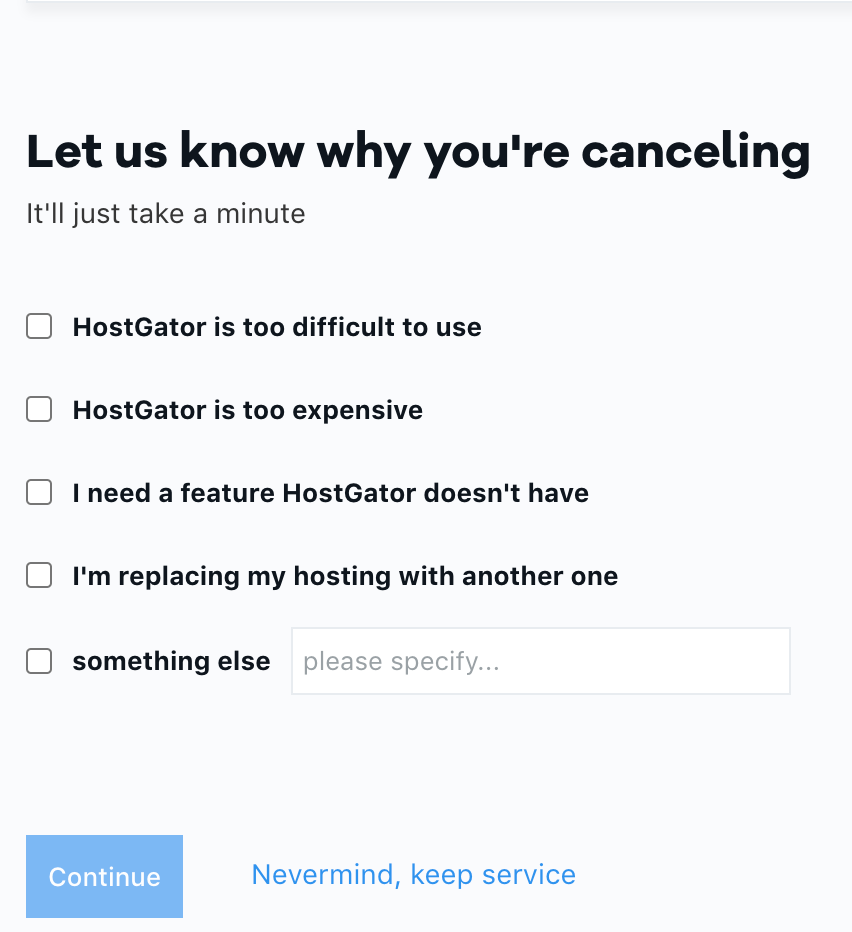
You will then be taken to the cancel hosting page and asked to complete a short cancellation form.
Select your reason from the checklist or fill in your reason in the something else text box and click Continue.
Next, you’ll see a pop-up requesting confirmation to cancel your HostGator account renewal. To proceed, simply click on the Finish Canceling button.
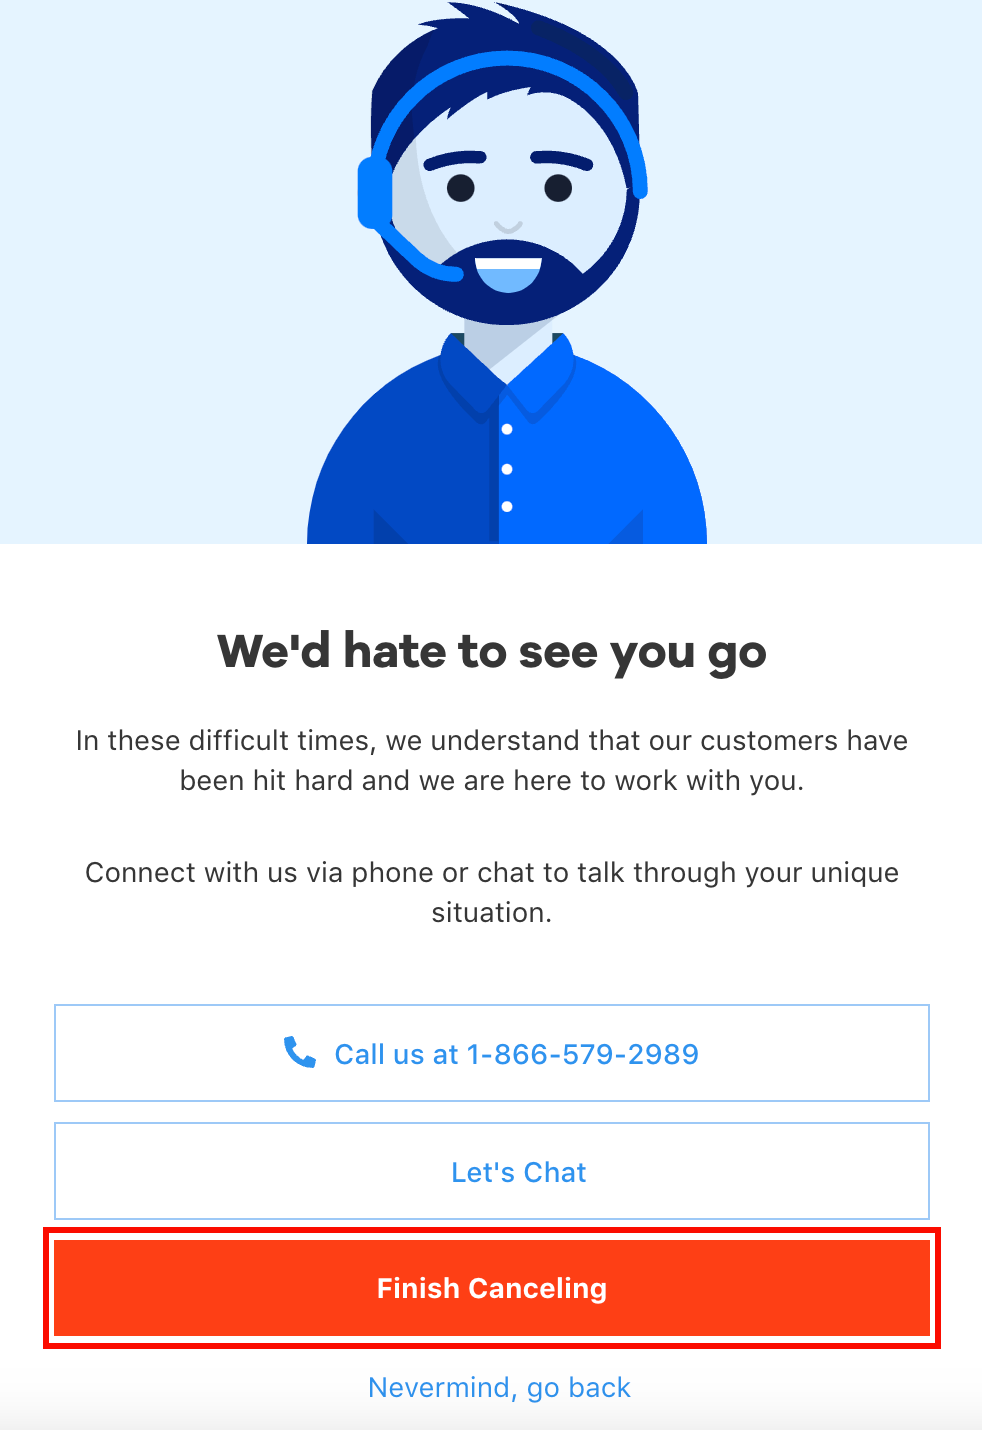
Important! Turning off auto-renewal will only disable the automatic charges on your account. Your account will remain active until the service expires.
After confirming the cancellation of auto-renewal, a success bar will appear at the bottom of the page to indicate that the action is being processed.
3. Transfer domain
After you’ve backed up all the files, the next step towards canceling your HostGator account is transferring your domain to a new web host. This step is crucial to avoid any complications related to domain ownership.
Things to Keep in Mind
– You can’t transfer a domain within 60 days after registering or transferring it or updating the registrant contact’s organization or name.
– You may be subject to additional fees if your domain name is younger than 12 months.
How to start the transfer from HostGator
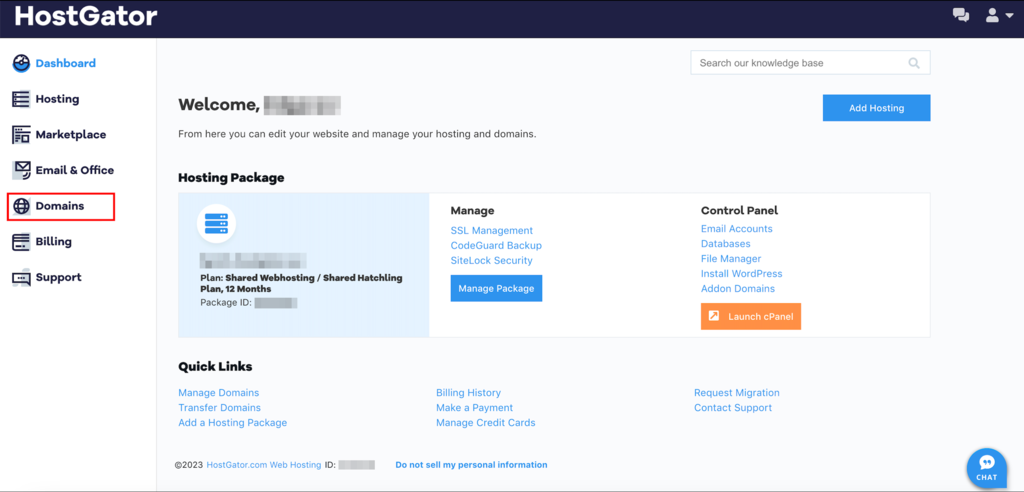
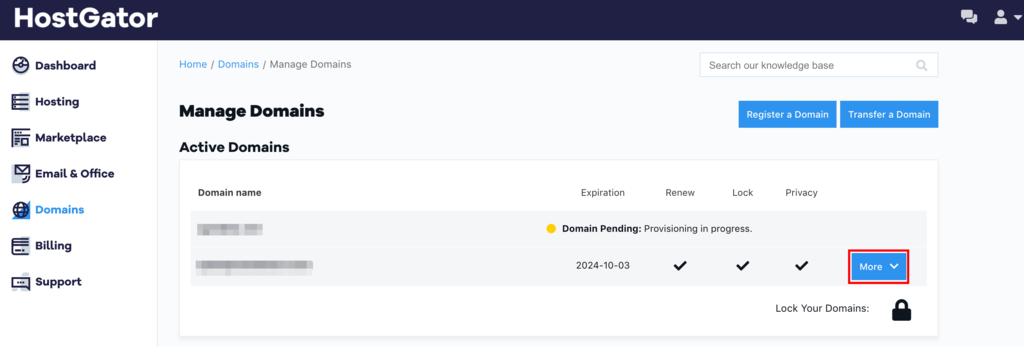
Start by logging into your HostGator Customer Portal and navigating to the Domains section on the left-hand menu.
If you have multiple active domain names, select the More option next to the one you want to transfer.
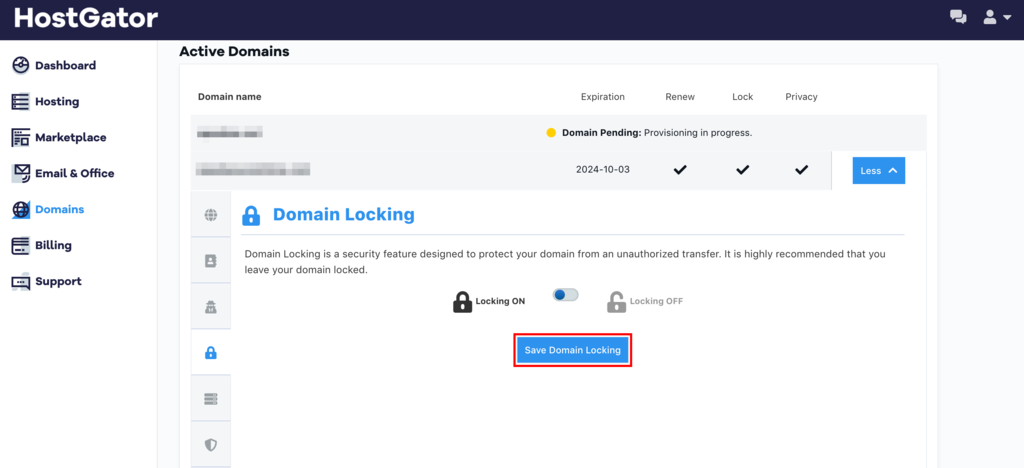
Next, click on the Domain Locking tab, unlock your domain by toggling the Domain Locking option to off, and click Save Domain Locking.
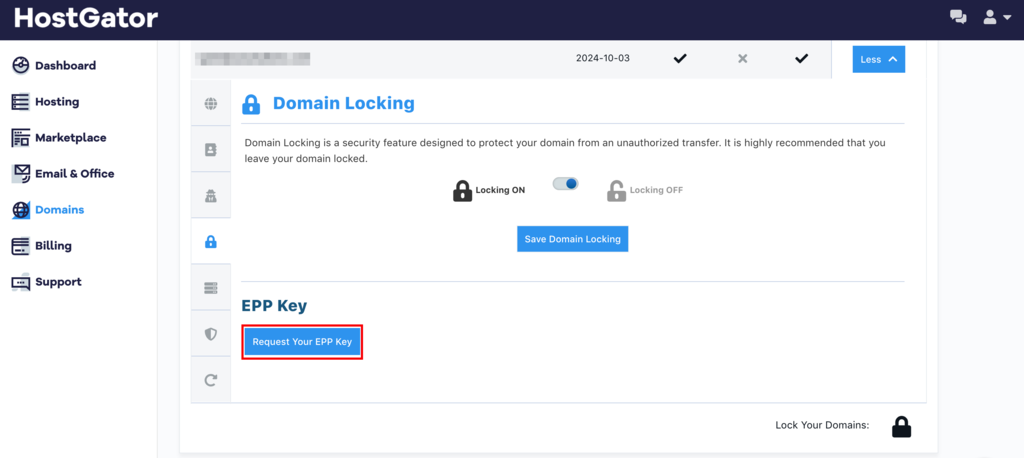
After unlocking your domain, the next step is to secure the Authorization/EPP code, which is essential for transferring your domain to a new hosting company.
You can get your EPP code by clicking the Request Your EPP Key button in the same tab.
Now, go to the Domain Privacy tab and turn off privacy protection by selecting the Public option and then clicking Save.
An optional step while initiating a domain switch from HostGator is to update your Nameservers or DNS records from the Name Servers tab.
Important!
Updating your Nameservers or DNS records without setting them up with your new host first could result in your website and email services being unavailable for 24-48 hours.
Once you finish the transfer steps, you can provide the EPP code to your new web host to initiate the transfer. Look for an email confirmation requesting your approval to transfer the domain name and proceed as instructed.
4. Contact HostGator support
With your domain secure, it’s time to formally start the cancellation process by contacting HostGator customer support.
You have a few options for contacting the support team: utilize their customer support portal, initiate a live chat, or just call them.
When you reach out, be explicit about your intention to cancel your HostGator account. Ask for guidance on the best way to proceed with the cancellation request, as the steps may vary depending on your specific hosting plan and any other services you’ve availed.
Being clear from the start helps streamline the cancellation process and avoids potential roadblocks.
5. Initiate cancellation
After you’ve consulted HostGator’s customer support, you’ll receive detailed instructions tailored to your hosting package, guiding you through the cancellation process.
Note that these steps can differ depending on the type of hosting plan you’re on and any additional services you’ve added.
- Provide reason for cancellation – you’ll first be asked to fill out a cancellation form asking why you want to cancel your account. Be prepared to provide a clear reason, which may expedite the process.
- Verify account ownership – as a security measure, you must prove you’re the owner. It usually involves answering some security questions or providing identification.
- Confirm cancellation – once your identity has been confirmed, you can officially cancel HostGator.
- Post-Cancellation Steps
- Receive confirmation – after you’ve completed the cancellation steps, you should get an email confirmation. It’s critical to read this confirmation carefully and note any essential details, such as the final date your services will be active.
- Review for outstanding charges – take a moment to ensure no pending invoices or financial obligations are associated with your hosting package. If there are, make sure to settle them to avoid any complications later on.
By following this structured approach, you’ll have a smoother experience when you cancel your HostGator account.
6. Confirm account closure
After you receive a HostGator account cancellation confirmation email, we recommend you take a follow-up as a precautionary measure.
Log back into your HostGator account dashboard as your billing cycle nears, and open your billing tab to confirm that no additional charges have been incurred.
This final verification acts as a safeguard against any unforeseen charges that might sneak up on you later.
7. Update contact information
Updating your contact information is essential if you’ve used the email address associated with your HostGator account for important communications or accounts on other platforms.
Once you deactivate your HostGator, you may lose access to this email, which could disrupt communications and cause you to miss out on important updates or verification steps for other services.
Updating your contact details beforehand ensures a smooth transition without interrupting your ongoing activities or communications.
How to migrate from HostGator to Hostinger
Hostinger offers free and automatic website migration services for an unlimited number of websites. Our Customer Success team will help make your website transfer process hassle-free and with minimal downtime.
We have two different migration flows for WordPress and non-WordPress websites. Follow the one that fits your website type.
Migrating a WordPress website to Hostinger
Here’s how to migrate a WordPress website to Hostinger:
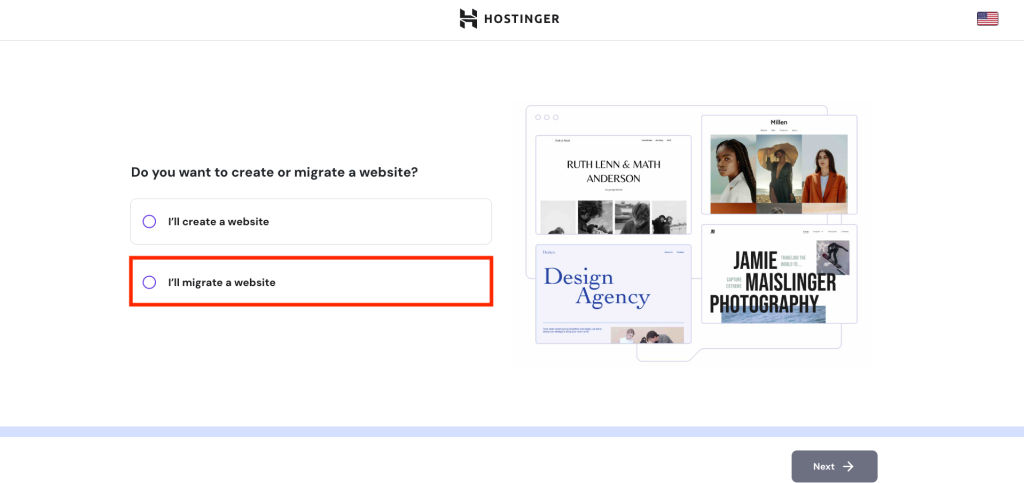
- Purchase one of our Managed WordPress hosting plans and start the onboarding process.
- When asked whether you want to create or migrate a website, select I’ll migrate a website and click Next.
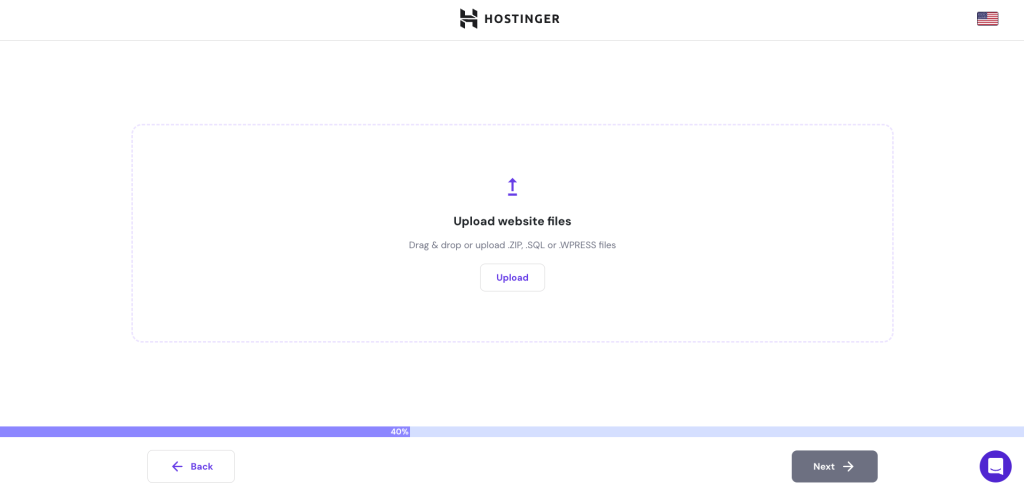
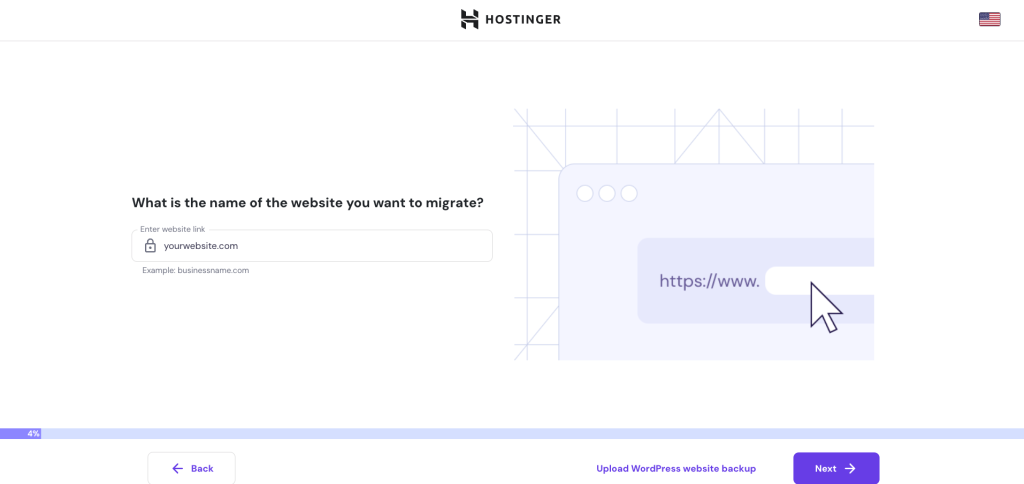
- Choose Upload WordPress website backup and enter your destination domain name.
- Upload the .tar.gz file from HostGator, and then follow the rest of the migration steps.
- After reviewing the migration summary, click Submit request. You can check the migration status on hPanel via Website → Migrate Website → Manage Migration Requests – it can take up to 48 hours to update.
- Complete the process by pointing your domain to Hostinger.

Migrate a non-WordPress website to Hostinger
The migration process for non-WordPress websites is slightly different. Here’s how:
- Purchase one of our hosting plans and follow the onboarding process until it asks for your website name. Enter your domain name and hit Next.
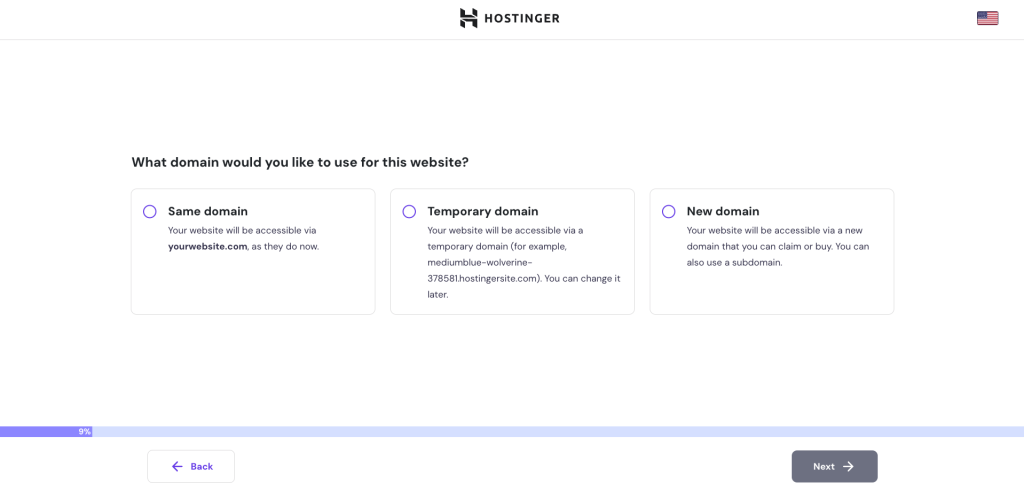
- Pick a domain for the migrated website, and click Next.
- Select the platform your website is currently on and select Next.

- Enter the login URL and your admin credentials.
- Follow the rest of the instructions and submit your migration request. The migration should be done within 48-96 hours.
Did you know?
Hostinger offers Drupal and Joomla hosting plans with tools optimized for their respective platforms.

Conclusion
Deciding to cancel your HostGator account is a significant step that could lead to a more efficient and effective web hosting experience with Hostinger.
Let’s summarize the key points for a smooth exit:
- Prepare for transfer – ready your domain and website files for migration to ensure you retain control over your assets.
- Contact HostGator support – clearly express your intention to cancel and request guidelines on how to proceed.
- Initiate cancellation – follow the specific instructions provided by customer support, which may vary based on the hosting services you’ve availed.
- Confirm account closure – verify that your account has been closed to avoid surprise charges.
- Update contact information – if you’ve used your HostGator email for crucial communications.
- Migrate website – moving a website from HostGator to Hostinger is easy through our website migration services, which come free with all our hosting packages.
We also recommend backing up all your HostGator data before initiating the cancellation. If you have any questions or need further clarification, please comment below.
How to cancel HostGator FAQ
Can I get a refund for my HostGator account?
HostGator offers a 45-day money-back guarantee for new hosting accounts, but this does not include domain registration fees, admin fees, or any add-ons. Make sure to initiate the refund within this period for eligibility.
Will I lose my website data if I delete my HostGator account?
Deleting your HostGator account will result in losing your website data stored on their servers. Therefore, you must create website backups and transfer your site to a new host before initiating the HostGator account closure process.
Are there any fees for canceling my HostGator account?
Generally, you do not incur any fees when you delete a HostGator account. However, additional fees may apply if you’ve registered a domain with them and wish to transfer it. Check the terms and conditions for your specific plan to determine your domain transfer fees.
All of the tutorial content on this website is subject to Hostinger's rigorous editorial standards and values.

Akshay is a Senior Content Writer who loves writing about technology. As a Computer Engineering graduate and a certified digital marketer, he aims to make tech easier for everyone. He also enjoys cooking, traveling, and learning new languages. Follow him on LinkedIn.