Any domain you own can be linked to a hosting plan at Hostinger, regardless of where it’s registered. This can be done by changing the domain’s DNS settings. First, perform the initial check-up, then the follow the steps below:
Step 1 – Check before pointing the domain
Before pointing the domain, make sure that:
-
You have full ownership and control of the domain name you want to connect to a website at Hostinger.
-
The domain is active—not expired or suspended by the registry.
-
You have access to the domain settings to edit DNS records:
-
DNSSEC is disabled—you can verify this using a DNSSEC Checker tool.
-
Check where at Hostinger you want to point your domain. Specific guides are available for Website Builder, Hostinger Horizons, VPS and cPanel. For web and cloud plans, continue to the next step.

Step 2 – Add the domain to your hosting plan
ℹ️ Skip this step if your domain is already connected to a site.
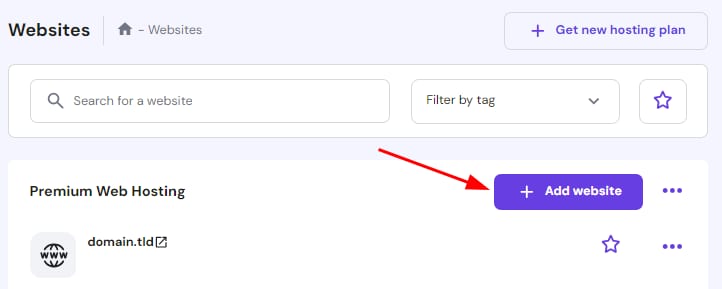
Go to the Websites section of hPanel and click on Add website:
Next, follow the onboarding process. Depending on your choices, you can enter your domain name during setup or use a temporary domain and connect your domain later. For more details on all available options, refer to this guide: How to add a website.
If you are adding a domain registered at Hostinger but owned by a different account, you will need to verify ownership.
Step 3 – Connect the domain to your hosting plan
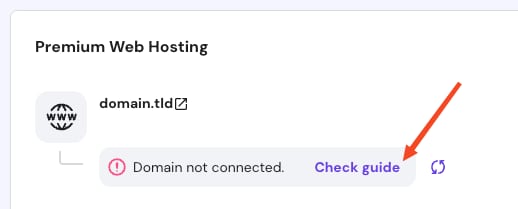
To retrieve your nameserver value and point the domain correctly, go to the Websites section of hPanel, find your website in the list, and click Check guide next to the Temporary domain or Domain not connected message:
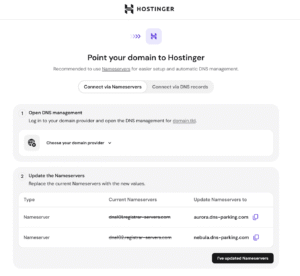
The wizard automatically detects your current DNS provider and provides a direct link to its login page. You can also select your provider manually if needed.
-
If the domain is registered at Hostinger on your account, no manual changes are needed—nameservers are already set to Hostinger values, and your hosting plan’s IP address will be detected automatically.
-
For domains registered on a different provider, you have two options to connect your domain 👇
Option 1 – Change the domain nameservers
This is the best option if you want to manage your domain’s DNS zone at Hostinger and use Hostinger for both hosting and email services.
Go to your domain provider’s platform and update the nameservers to the ones shown in this step. They will look similar to this:
You can use the copy button to quickly copy each nameserver and paste it into your domain provider’s settings.
The nameserver values provided in this step may vary depending on the domain. Always use the exact ones shown in your panel.
NOTE
-
Pointing your domain via nameservers will configure your email records to use Hostinger Email. If you use a different email provider, make sure to update the MX records after propagation. Also, review and update SPF, DKIM and DMARC records as needed.
-
For custom nameservers, although the DNS may appear as propagated, the nameservers will undergo validation and may take up to 24 hours to complete the process after you update them.
The system performs a Live DNS Checkup — it monitors your domain in real time and confirms as soon as the change is detected.
Option 2 – Change the A record
If you prefer to keep your domain’s DNS managed elsewhere—for example, if you’re using Cloudflare or your domain provider doesn’t support changing nameservers—you can point the domain using an A record.
On the page where the nameservers are shown, click on Connect via DNS record:
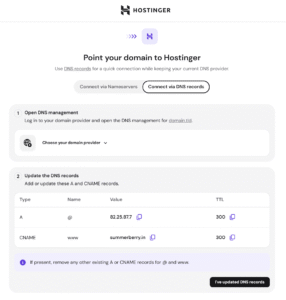
You can use the copy button to quickly copy and paste the correct IP addresses into your domain provider’s settings.
Go to your domain provider’s platform and follow these steps:
-
Delete any existing A and/or AAAA records for @
-
Delete any A or CNAME record for www
-
Create the new A records for @ and www pointing to the IP shown in this step.
The system performs a Live DNS Checkup — it monitors your domain in real time and confirms as soon as the change is detected.
NOTE
-
If you use this method, existing email records will remain unchanged. If you want to use Hostinger Email, set up the required DNS records manually.
Step 4 – Confirm the changes
Email notification (optional)
At this stage, you can enable an email notification to receive an alert once your domain starts pointing to Hostinger by marking the checkbox.
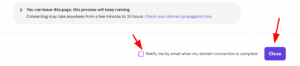
After updating your DNS settings with either method, you can click Close to return to hPanel.
At the end of the flow, a direct link to a DNS propagation checker is provided so you can monitor nameserver propagation progress.
Now, allow up to 24 hours for DNS propagation. Your website may be temporarily unavailable during this time; in most cases, the changes take effect within a few hours. Meanwhile, you can continue using the temporary domain to access your site.
You can also check the following video tutorial: