How to set up Cloudflare CDN on WordPress
Apr 23, 2025
/
Klara R. & Astari S.
/
12 min Read
Every second counts when it comes to a website’s loading time. Fast page speed improves user experience and rankings on search engine results pages (SERPs).
Luckily, WordPress is an extremely flexible CMS that lets you apply different improvements, including speed optimization plugins such as Cloudflare.
This tutorial will explain the steps to set up the WordPress Cloudflare plugin. We will also share the best practices when using this service for website optimization.
By the end of this tutorial, you will be able to speed up and secure your WordPress site using Cloudflare.
Download all-in-one WordPress cheat sheet
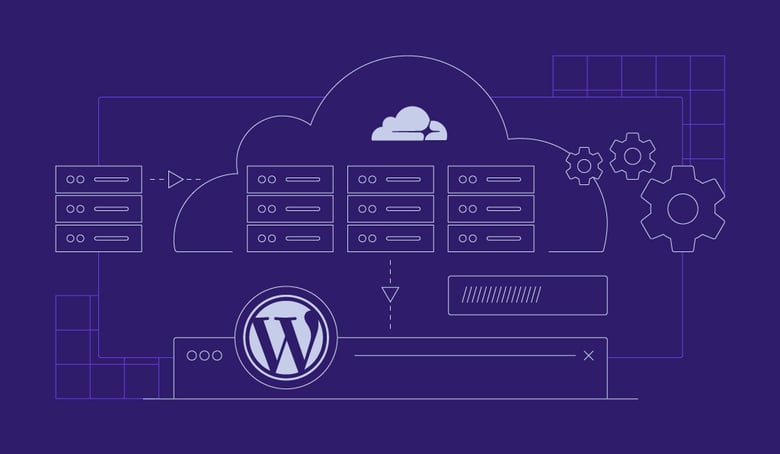
What Is the Cloudflare CDN
Cloudflare is a popular content delivery network (CDN). A CDN uses a group of servers worldwide to deliver websites’ content faster.
Cloudflare works by making copies of a website on proxy servers. Any request to access the website’s content will go to the server closest to the visitor’s location for faster processing.
In addition, this content delivery network service also protects your website against distributed denial-of-service (DDoS) attacks by monitoring all incoming traffic and blocking suspicious users.
How Does Cloudflare Help Your WordPress Website
Cloudflare mainly optimizes WordPress sites’ speed and security.
It can speed up your WordPress site by minimizing the distance between the visitor’s device and Cloudflare’s servers.
In addition, this CDN improves your website’s performance with features like image resizing and auto minification.
Cloudflare can also ensure your site’s data privacy by hiding your nameservers on domain registration lookup tools (WHOIS). Additionally, Cloudflare web analytics ensures security by showing the number of threats it detects and stops.
Setting up Cloudflare on WordPress
Follow these steps to set up this WordPress CDN on your site:
Important! Make sure to have access to your domain name registrar before setting up Cloudflare.
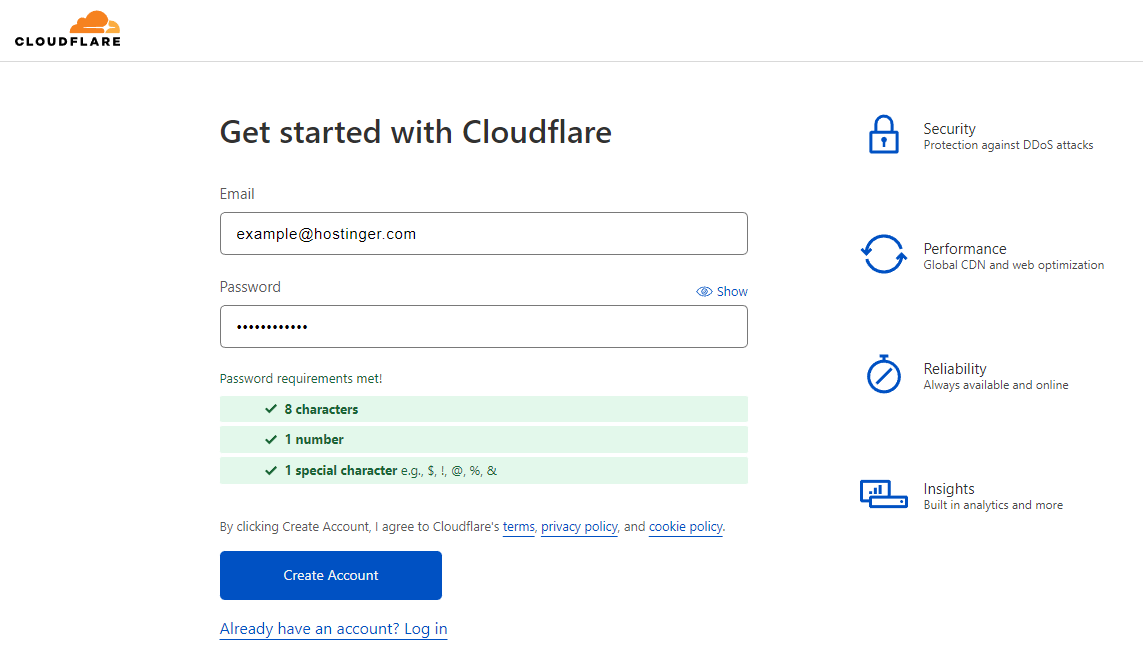
1. Creating a Cloudflare Account
Head to the Cloudflare website and click Sign Up to create a new account. Verify your email address before continuing to the next step.
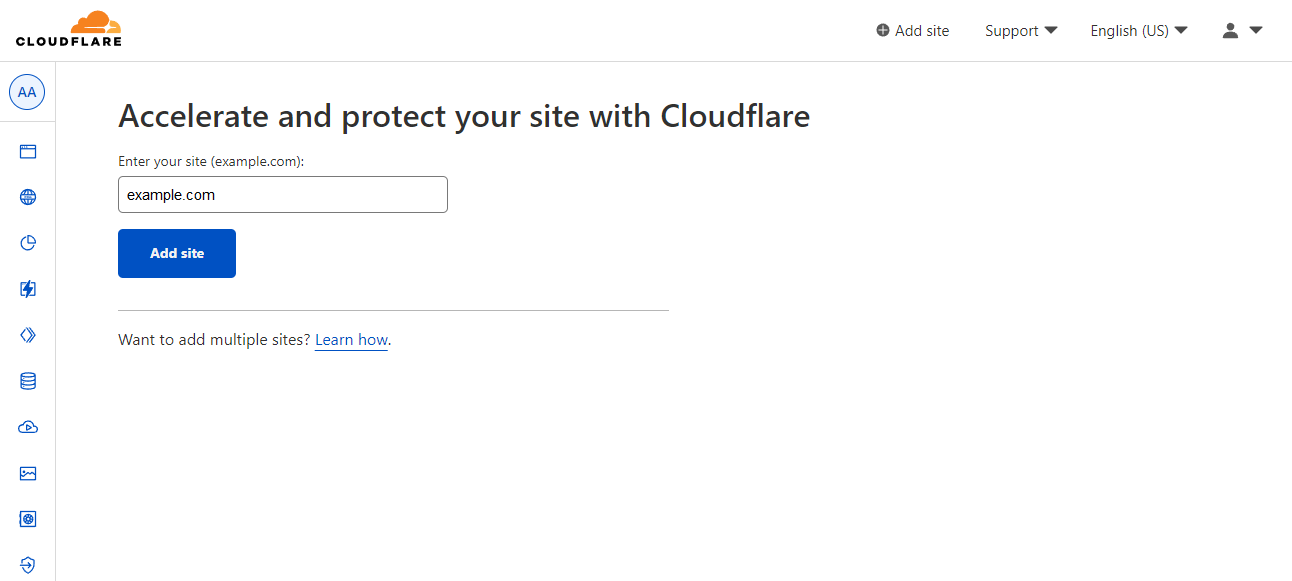
2. Adding a Domain Name to Cloudflare
Log in to your Cloudflare account and follow these steps to add your domain name:
- Click Add site at the top right of the Cloudflare dashboard.

- Enter your WordPress site’s URL and click Add site.
Important! To add multiple WordPress sites, click Learn how.
- Select a plan for your Cloudflare account. The free plan is suitable for small to medium WordPress websites. The premium plans have additional features for websites that handle more traffic:
- Pro – offers additional optimization features and cache analytics for $20/month.
- Business – comes with dedicated customer support and more advanced security features for $200/month.
- Enterprise – provides complete features for caching, security, and optimization. Contact Cloudflare’s customer service to get the exact pricing.

3. Checking Your Domain’s DNS Records
After adding your WordPress site, Cloudflare will automatically scan for common DNS records and add them to your account.
Sometimes, Cloudflare doesn’t necessarily find all records in the domain name system (DNS). Therefore, it will ask you to Review your DNS records.
First, make sure that the domain is pointed correctly by checking your A records. While checking your records, we also recommend enabling Cloudflare for www and non-www versions of your site.
To enable or disable Cloudflare for specific subdomains, toggle the button under Proxy status. Once you are done, press Continue to proceed to the next step.
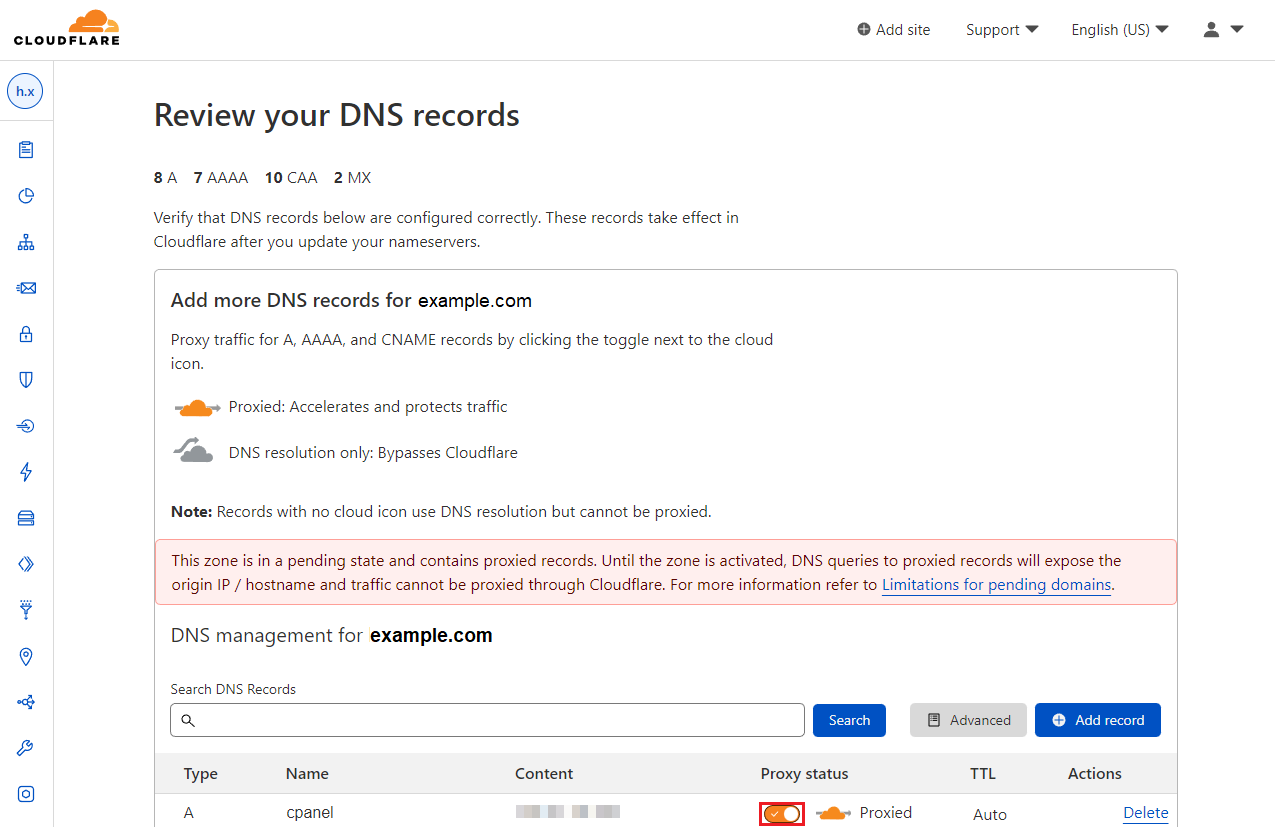
Important! We don’t recommend enabling Cloudflare for cPanel, mail, or FTP, as doing so can cause DNS issues.
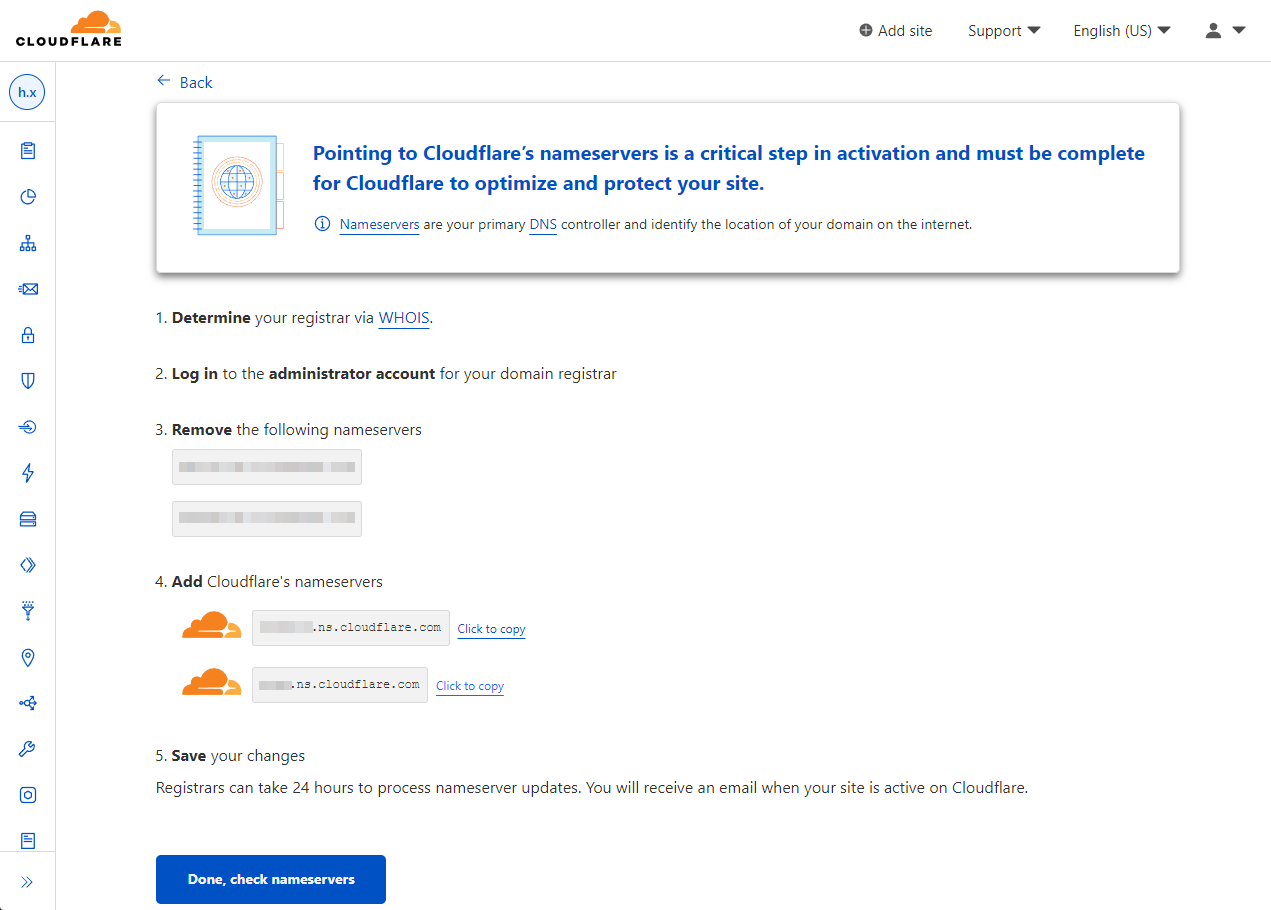
4. Pointing Your Domain Name to Cloudflare Nameservers
Cloudflare will direct you to change your nameservers. Copy both Cloudflare nameservers and head to your domain name registrar.
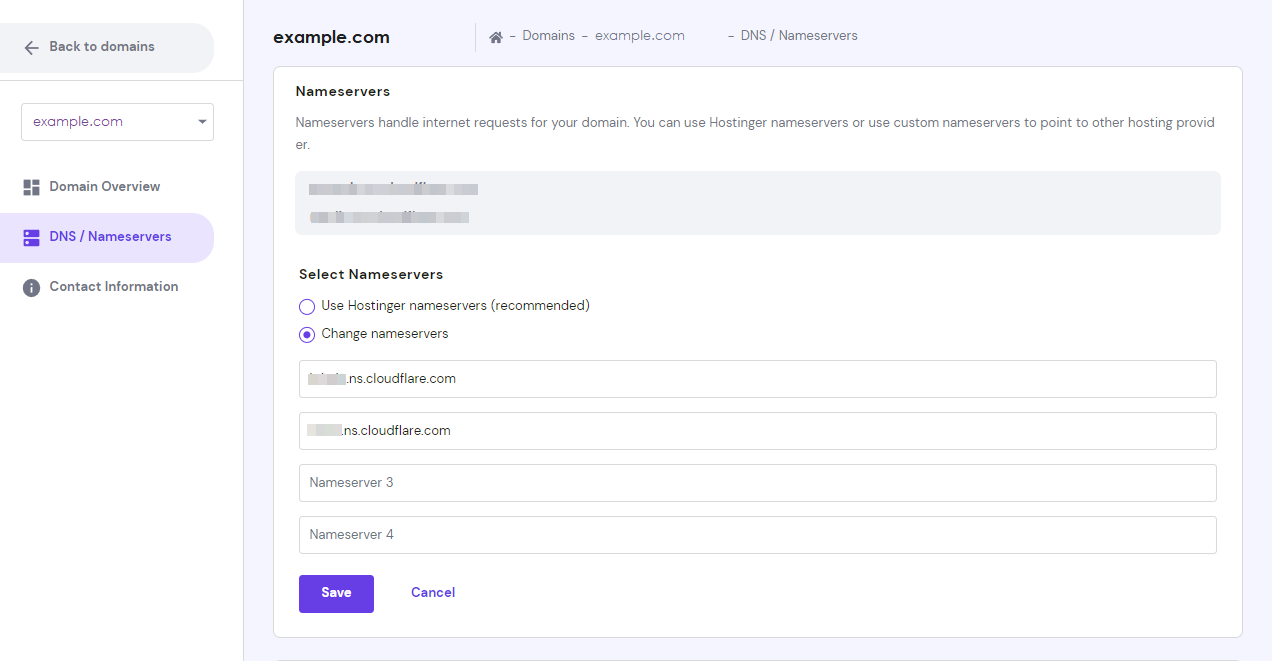
Depending on your domain name registrar, the steps of changing the nameservers may slightly differ. Here is how to change your nameservers with Hostinger:
- Log in to your Hostinger account and head to the Domains tab.
- Select the DNS/Nameservers section and click Change nameservers.
- Copy and paste Cloudflare’s nameservers in the first two fields and click Save to finalize the process.
Head back to the Cloudflare website and click Done, check nameservers.
Important! The domain might take up to 24 hours to propagate the new nameservers. You will receive a confirmation email from Cloudflare once the propagation is complete.
5. Configure the HTTPS Settings
Hypertext Transfer Protocol Secure (HTTPS) is an internet communication protocol that secures the data exchanged over a computer network.
A WordPress site with a Secure Socket Layer (SSL) certificate will show a padlock and https:// instead of http:// before its URL.
Cloudflare’s SSL/TLS encryption mode helps determine how to validate the SSL certificate in your origin server.
Follow these steps to configure Cloudflare’s HTTPS settings page and protect your WordPress site against potential data breaches:
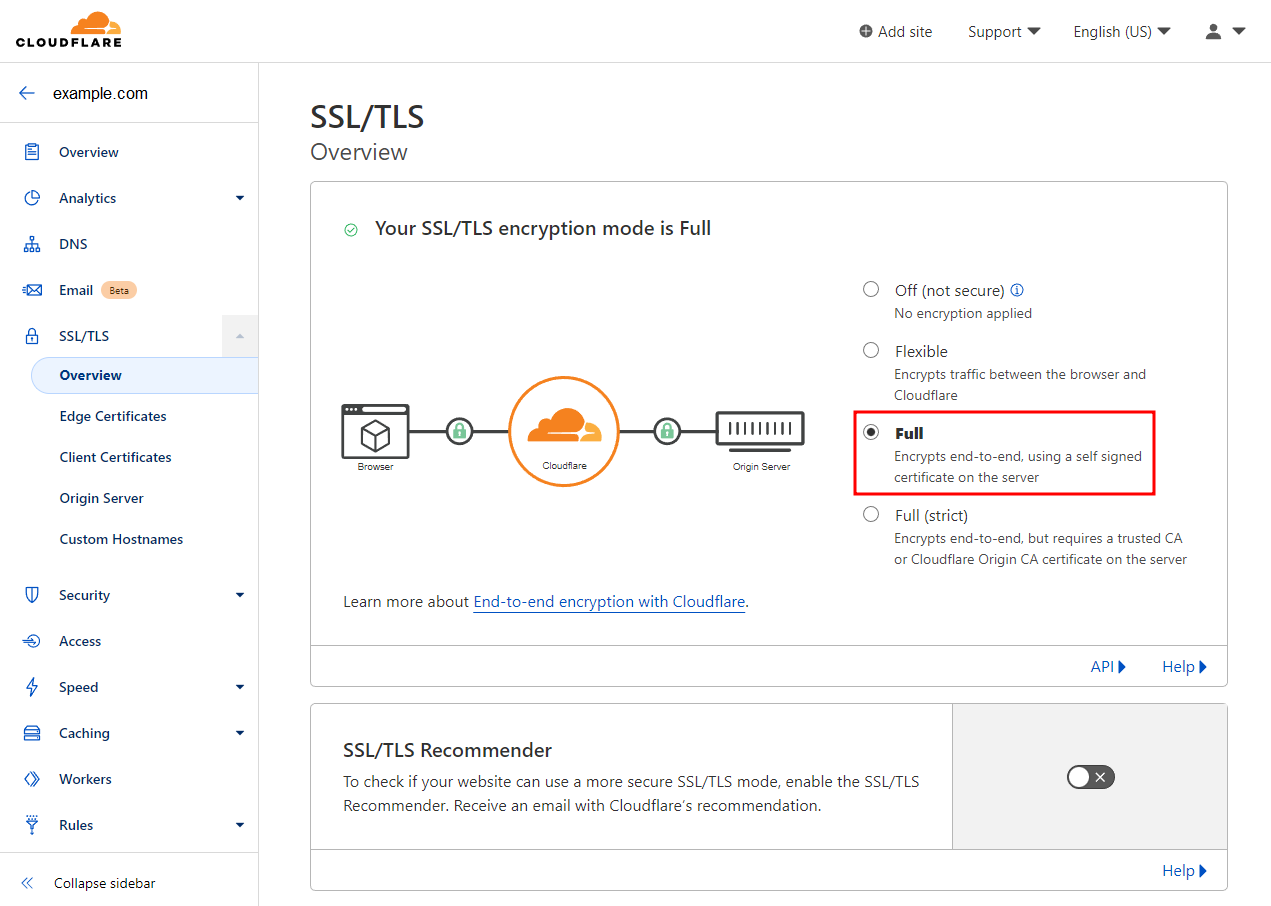
- On your Cloudflare dashboard, go to SSL/TLS → Overview and choose one of the SSL/TLS encryption modes:
- Flexible – encrypts traffic between visitors’ browsers and Cloudflare. This option is suitable for WordPress sites that do not have an SSL certificate.
- Full – provides end-to-end protection from your site to the visitor’s server. This option works best for WordPress sites with a self-signed SSL certificate.
- Full (strict) – enforces stricter requirements for origin certificates than the Full mode. We recommend choosing this option for WordPress sites with valid SSL certificates.
Important! If you aren’t sure which encryption mode to choose, use the SSL/TLS Recommender feature to get a suggestion.
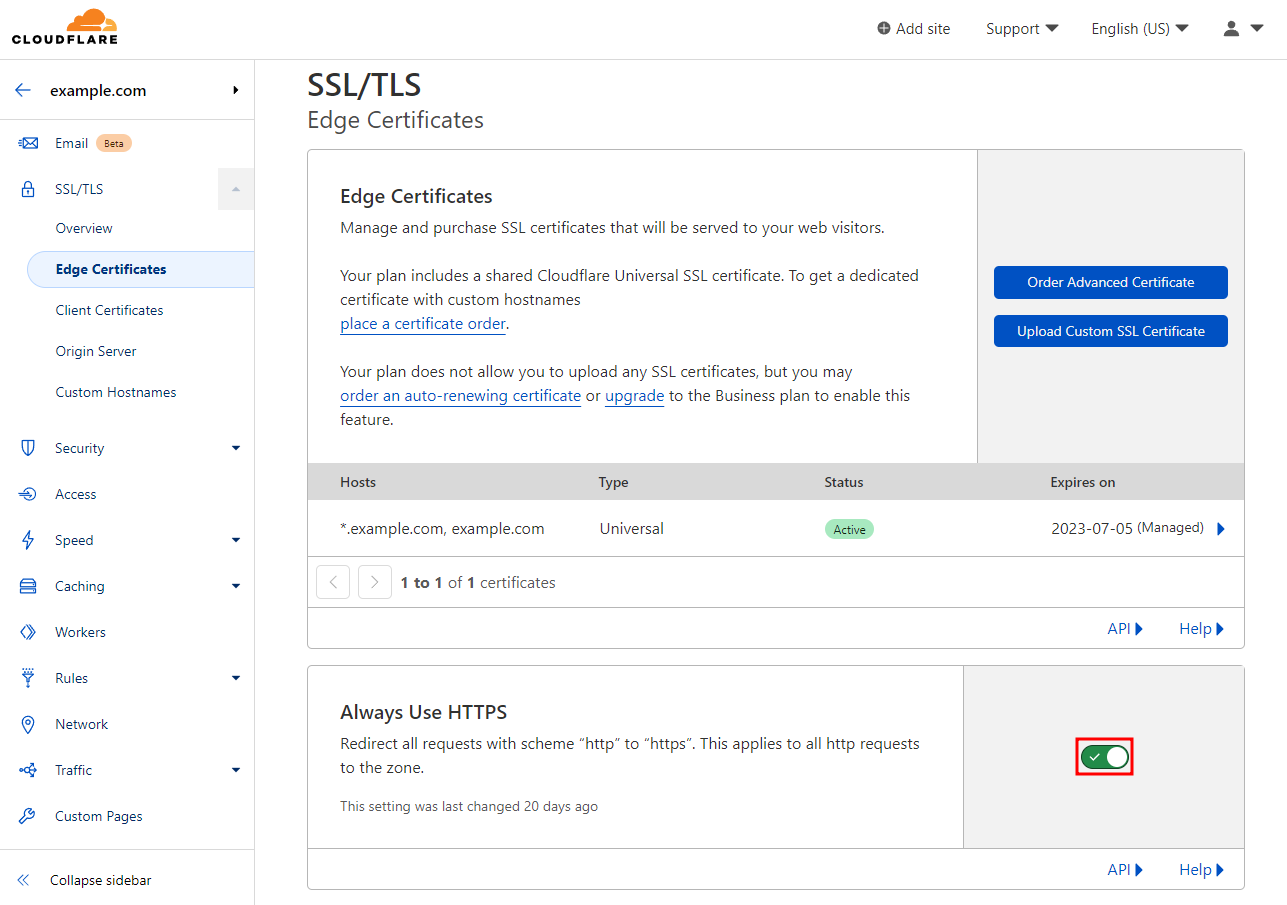
- Go to SSL/TLS → Edge Certificates and turn on Always Use HTTPS to direct all HTTP requests to HTTPS. This feature might take a while to work, but you will see a padlock icon next to the site’s URL once it is active.
Check if your web hosting provider offers free SSL certificates before purchasing. For instance, Hostinger’s web hosting plans include an unlimited free SSL certificate.
6. Installing and Configuring the Cloudflare WordPress Plugin
With the Cloudflare plugin, you can easily change its settings directly from the WordPress dashboard. First, head to your Cloudflare account to get the Application Programming Interface (API) key:
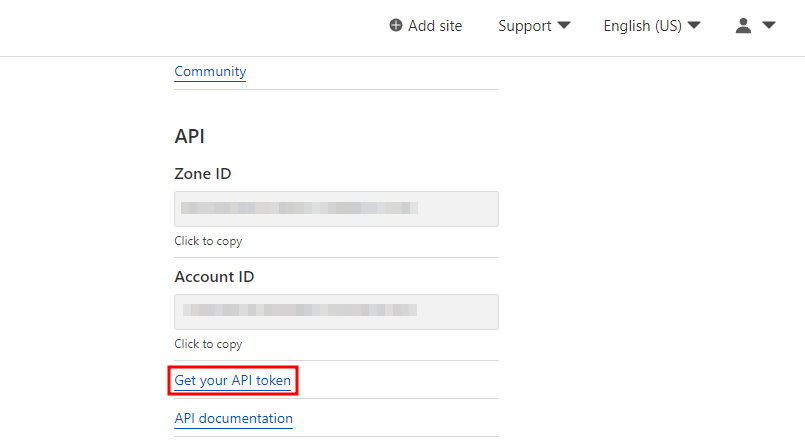
- Look for API at the bottom right corner of your Cloudflare dashboard. Click Get your API token to continue.
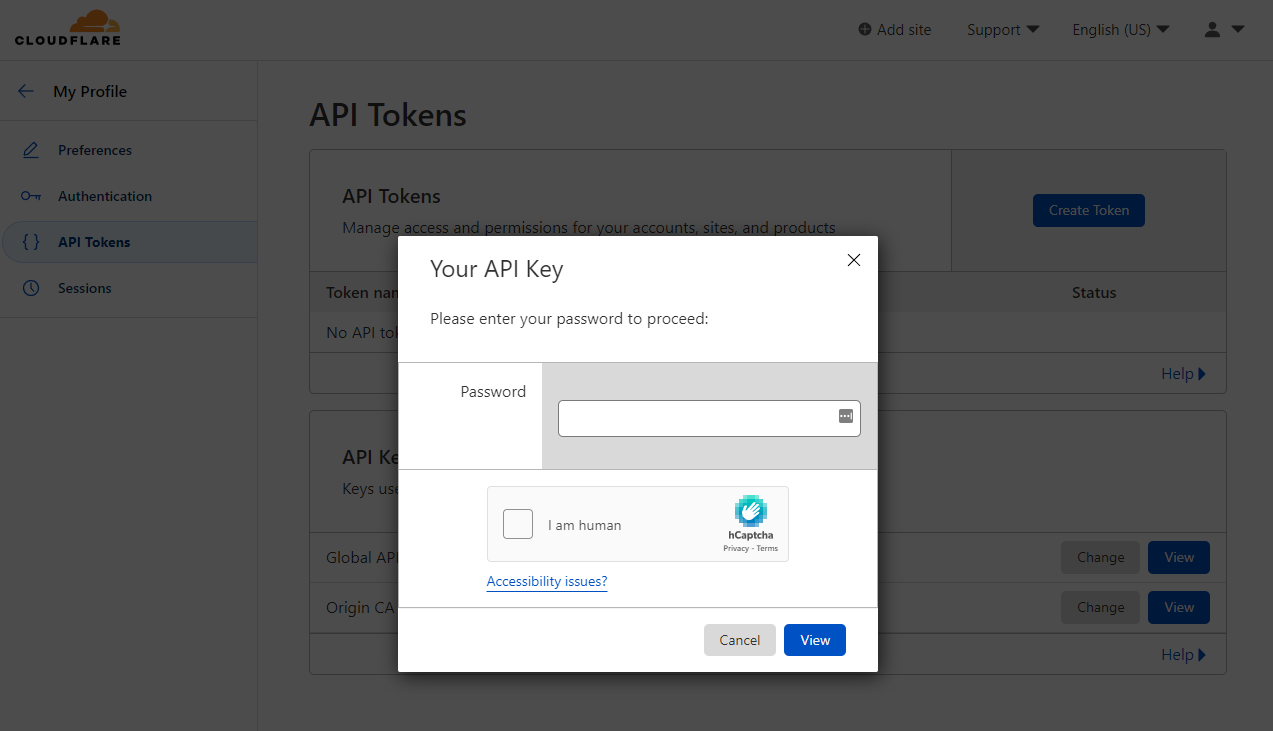
- Insert your Cloudflare account’s Password and click View. Copy the Global API key and head to your WordPress dashboard.
Head to your WordPress dashboard to continue configuring Cloudflare:
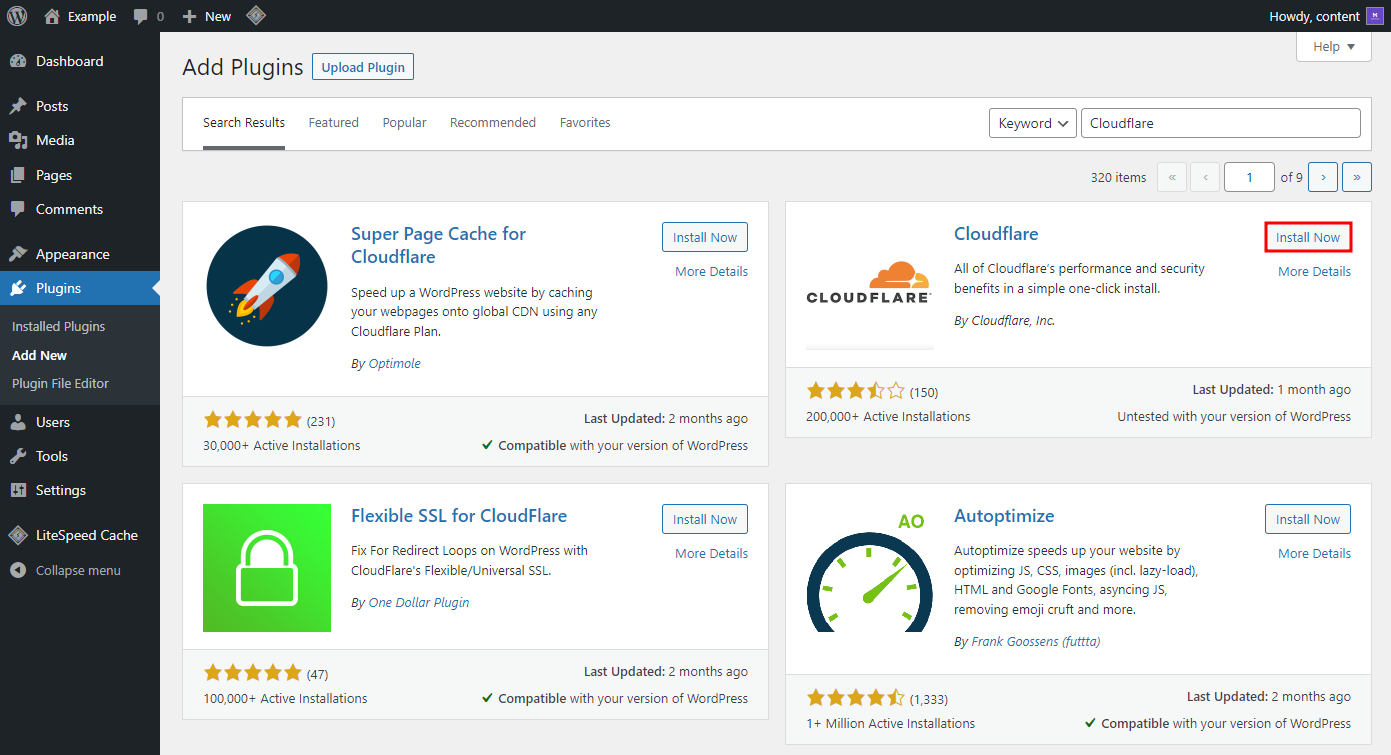
- Go to Plugins → Add New and search for the Cloudflare WordPress plugin. Click Install Now and Activate Cloudflare.
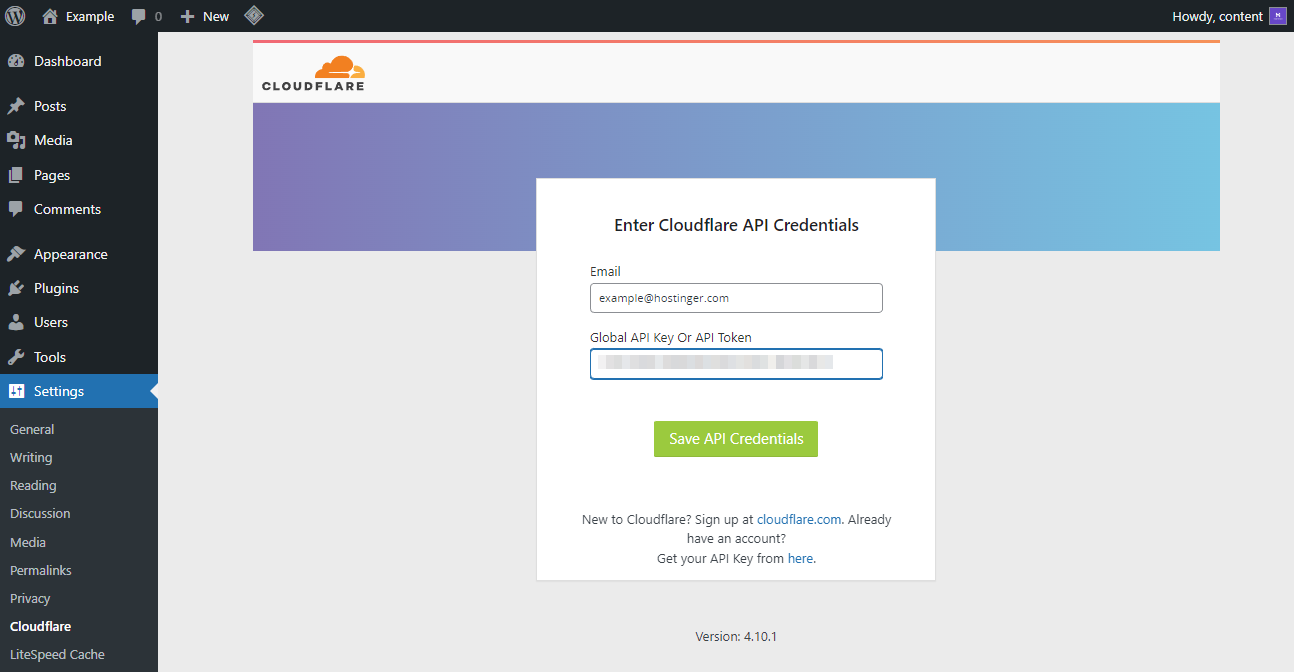
- Go to Settings → Cloudflare and click on Sign in here.
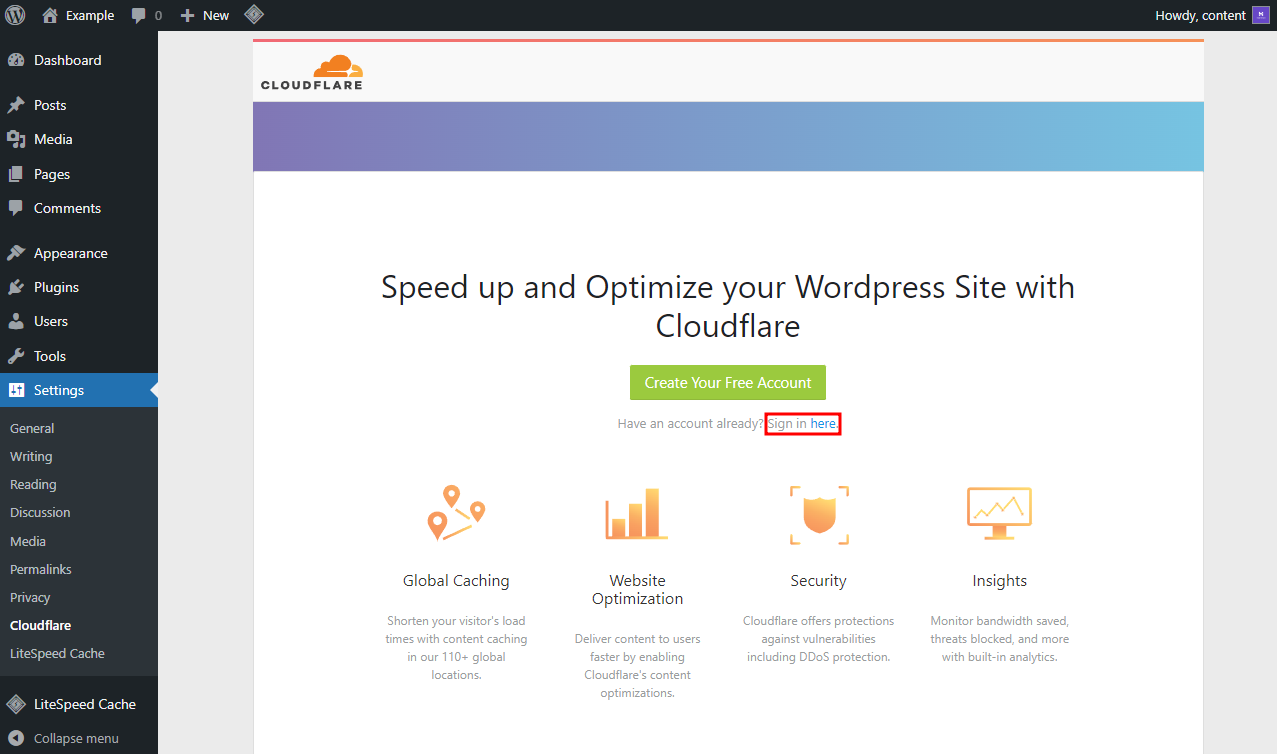
- Enter your Cloudflare account Email and paste the previously copied Global API key. Click Save API Credentials to continue.
Now, you can configure important Cloudflare settings on your WordPress dashboard.
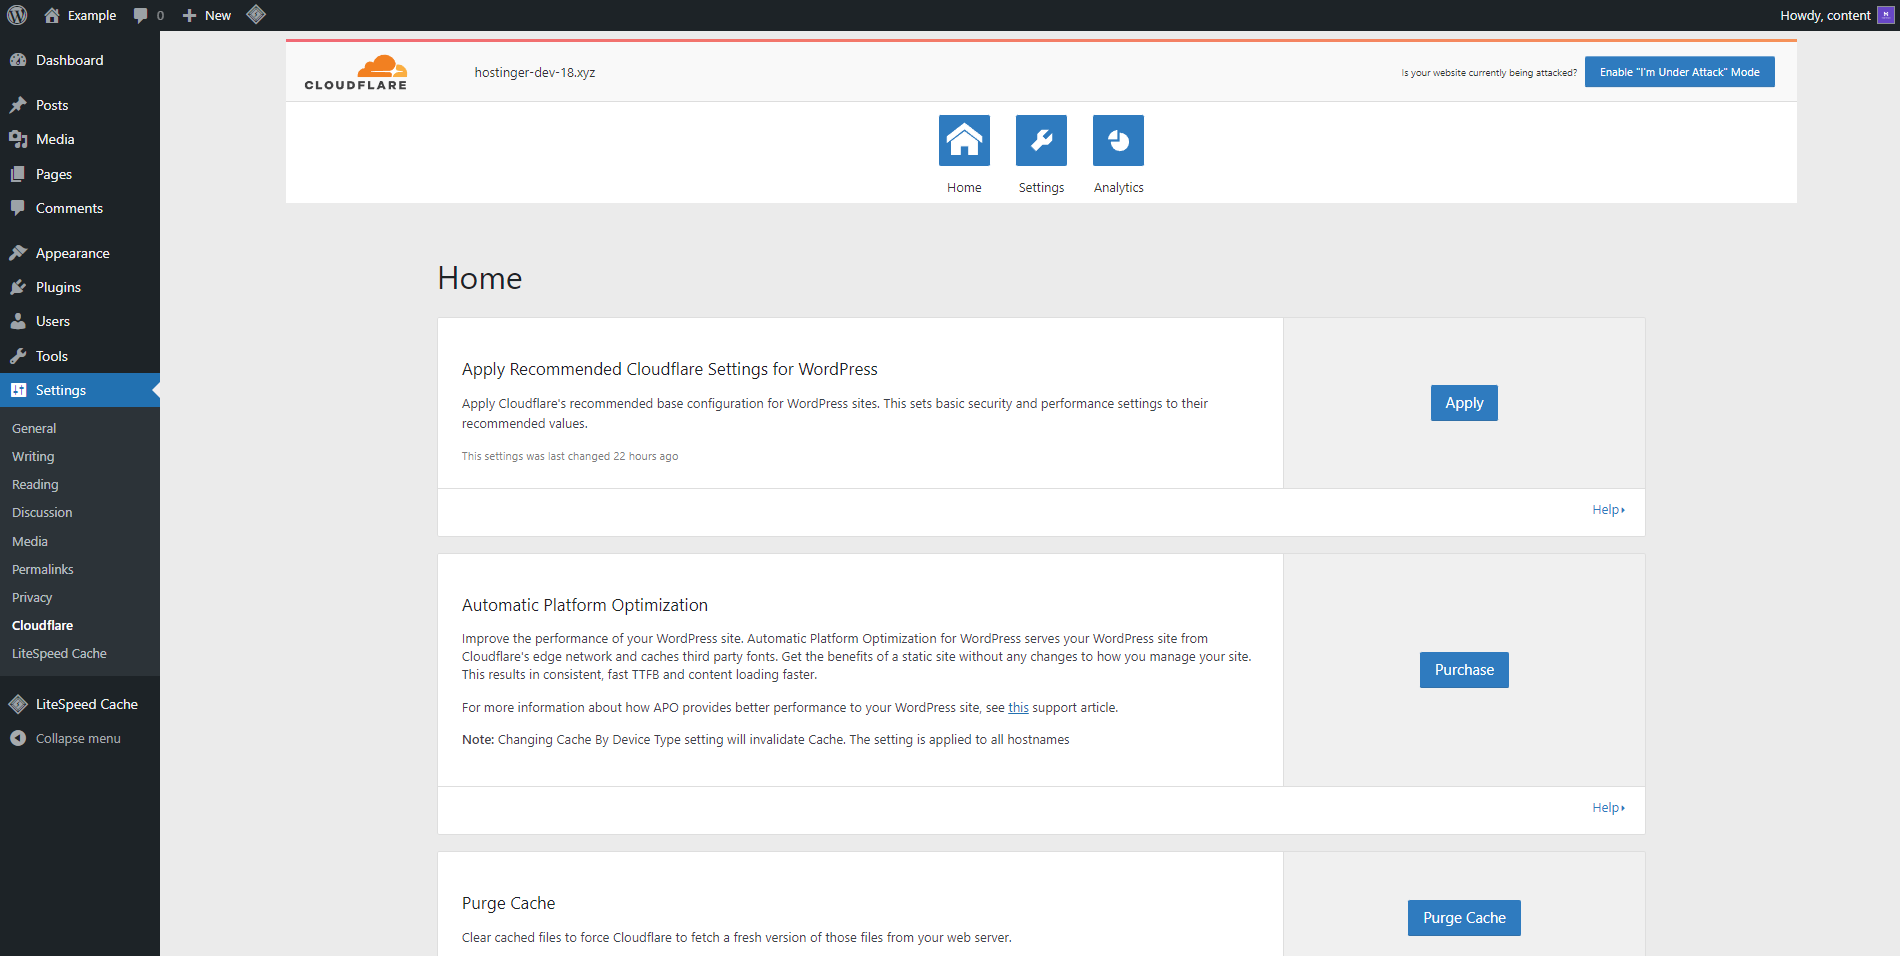
Some of the main features available on the Cloudflare WordPress plugin include:
- Recommended Cloudflare settings – automatically apply recommended Cloudflare settings to boost site performance.
- Cloudflare Automatic Platform Optimization (APO) – keeps copies of your WordPress site data to improve loading time. With APO, Cloudflare’s edge network stores static and dynamic content better than a traditional CDN service.
- Purge cache – deletes all previously stored information to fetch the newest versions from your server. With an automatic cache purge, you can cache updated content without slowing your loading time.
- Speed and security settings – configure features to boost performance, including the Development Mode, Security Level, and Automatic HTTPS Rewrites.
- Analytics – provides rich data powered by GraphQL. The WordPress Cloudflare plugin also gives the ability to filter data across multiple dimensions.

Other Cloudflare Features: An In-Depth Look
Here are ten key Cloudflare configurations for your WordPress site:
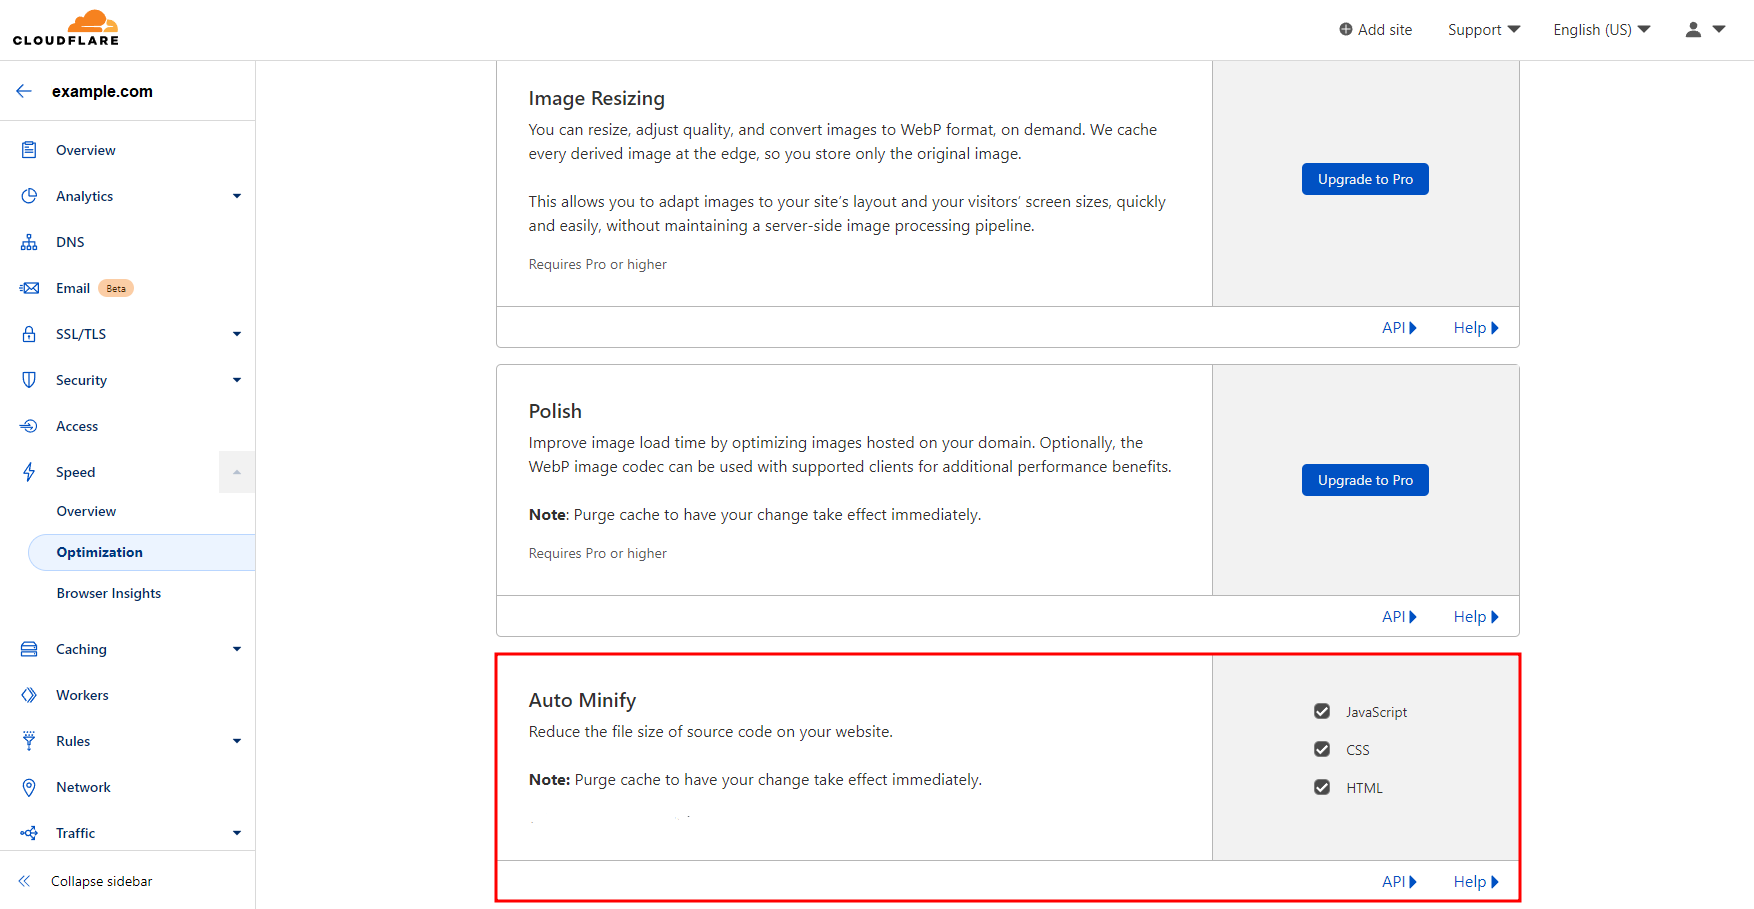
1. Auto Minify
The Auto Minify feature minifies JavaScript, CSS, and HTML files by removing unnecessary characters to improve page load times.
Cloudflare removes comments and empty lines from HTML files. For JavaScript and CSS, Cloudflare will only minify the cached files. Therefore, make sure to purge cache to see the changes on your WordPress website.
This optimization feature is available on all Cloudflare plans. To enable it, head to Speed → Optimization → Auto Minify and select the type of file you want to minify.
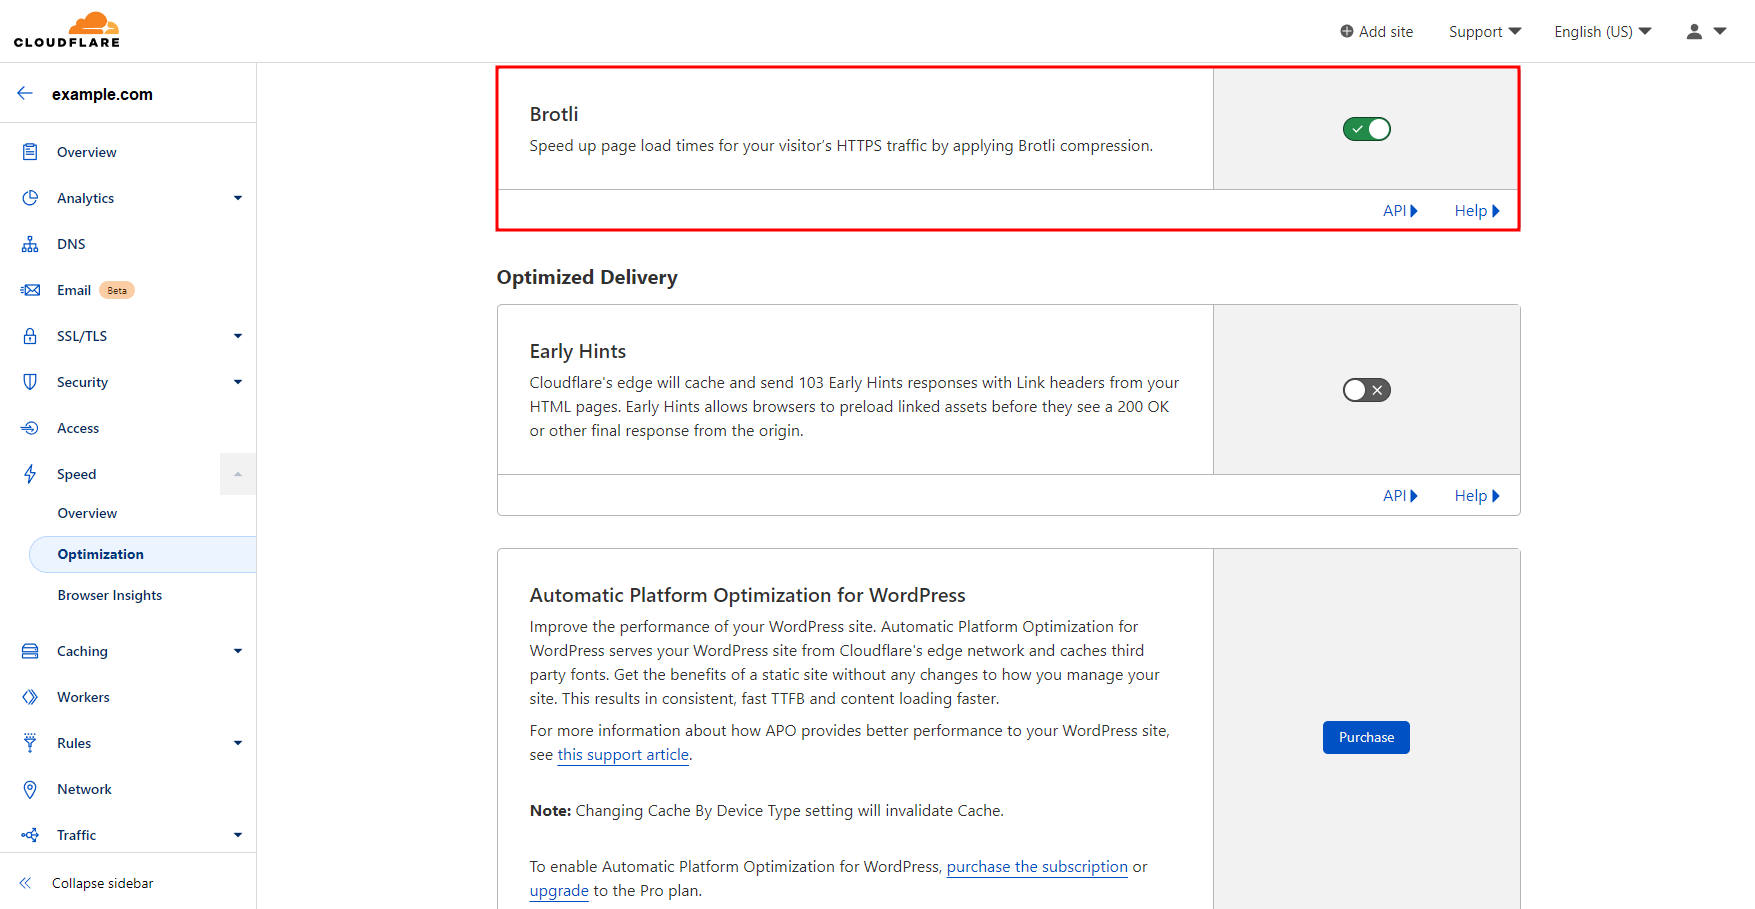
2. Brotli
Brotli is a compression feature that ensures quick data transfers between servers and browsers. It uses a dictionary to send keys instead of the full keywords.
Using the keys, Brotli compresses images, texts, and fonts to speed up page load times. On average, it has a much faster transfer time than GZIP compression.
Cloudflare uses Brotli compression as the preferred content-encoding method for all plans. If your server does not support this feature, this CDN will apply GZIP compression instead.
This feature is also available on all Cloudflare plans. To turn on this feature on your Cloudflare dashboard, head to Speed → Optimization → Brotli.
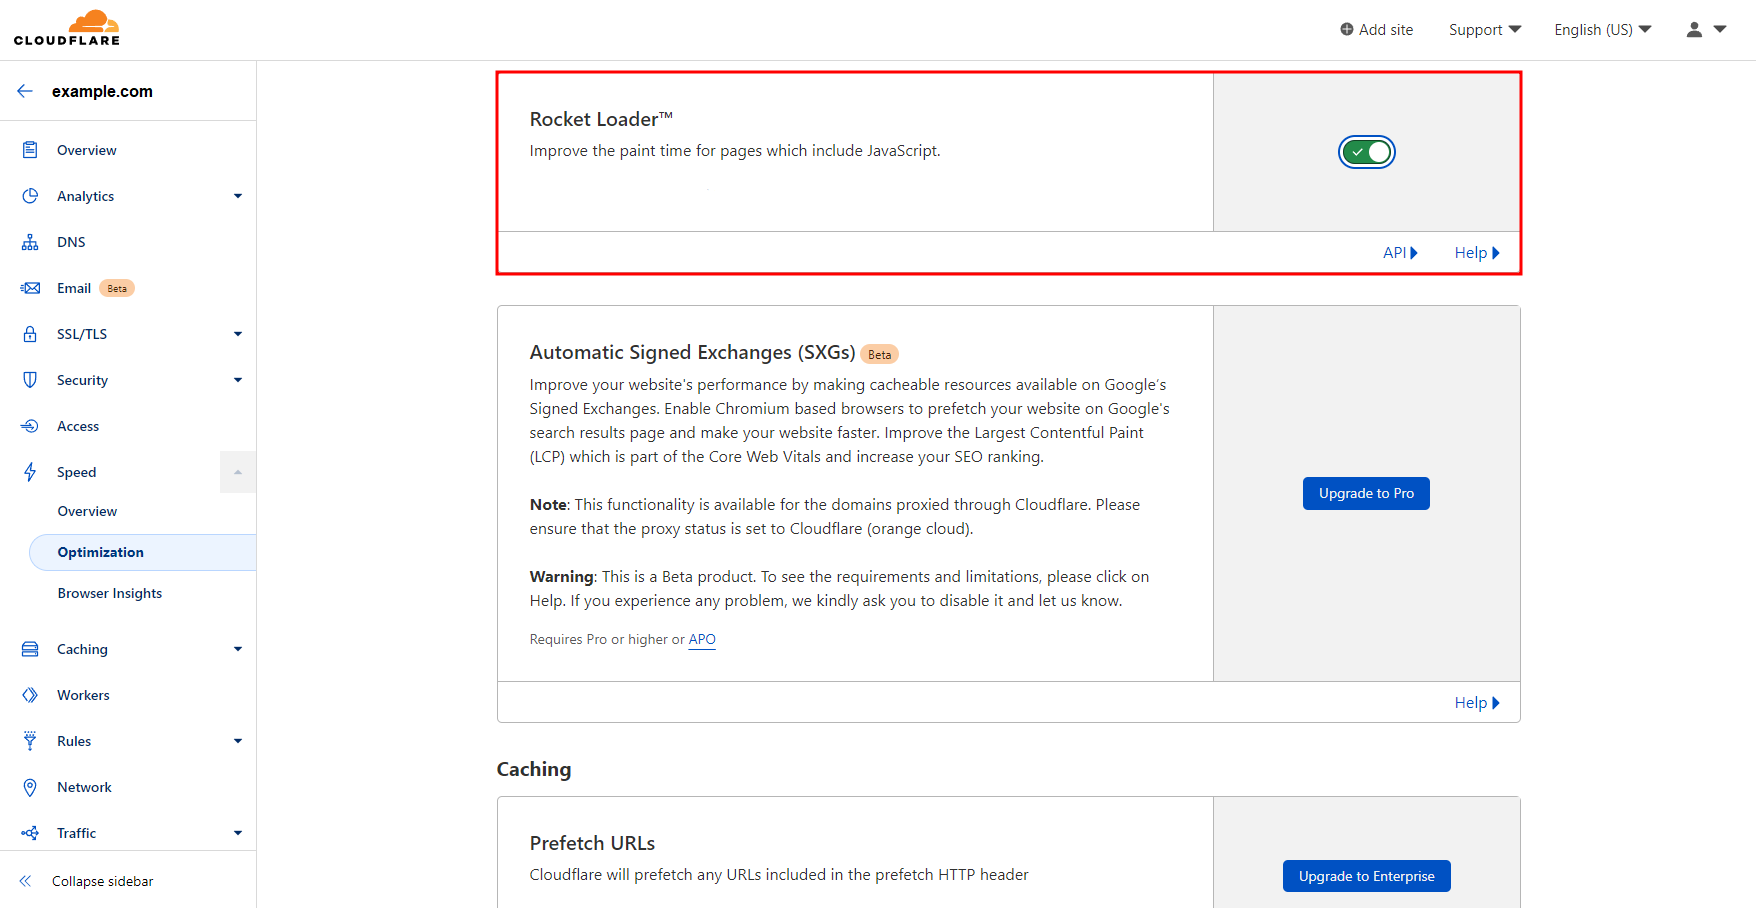
3. Rocket Loader
Rocket Loader shows content faster by deferring JavaScript code loading until after rendering your other content, such as texts, images, and fonts.
Cloudflare’s Rocket Loader feature mainly improves the following performance metrics for pages that use JavaScript:
- Time to First Contentful Paint (TTFCP) – marks the first point where a user can see something on the screen during the loading time.
- Time to First Meaningful Paint (TTFMP) – measures the time it takes to show the page’s primary content.
Cloudflare offers this feature for all users. To enable this optimization feature, head to Speed → Optimization → Rocket Loader.
4. Firewall
The Web Application Firewall (WAF) is one of Cloudflare’s security features that helps block potential online attacks and provide DDoS protection.
With machine learning, the WAF protects your WordPress site by preventing account takeover, stopping data leaks, and blocking logins with stolen credentials.
With this feature, WordPress users can create custom rules to control incoming traffic, such as filtering requests based on location and IP address.
To configure these Cloudflare settings, head to Security → WAF, and you will see four tabs:
- Firewall rules – create custom rules to control incoming traffic based on location, IP address, and user agent.
- Rate limiting rules – protect your WordPress site from malicious traffic by blocking client IP addresses that exceed your defined threshold.
- Manage rules – identify and remove any suspicious activity, such as common keywords in spam comments.
- Tools – create IP access rules and block specific users.

Some firewall features are available with the free Cloudflare account. However, most of them require at least the Pro plan.
5. Network
Cloudflare’s network settings help manage where to direct visitors and what they can do on your site. The proper configuration can improve your performance significantly. Here are some of the primary network features to consider:
- HTTP/2 – improves how Cloudflare sends HTTP requests and responses for faster page load times.
- HTTP/3 – uses QUIC, a new transport protocol that offers better security and reliability for your WordPress site.
- IPv6 compatibility – enables IPv6 on all subdomains. If your origin server has IPv6 records, enable Cloudflare for your AAAA records on the DNS settings.
- WebSockets – speeds up data exchanges within the open connection. Useful for real-time applications like live chats and online games.
- IP geolocation – includes your visitors’ country codes and maps IP addresses to countries. This feature is great for global websites with different localized content.
- Maximum upload size – sets the maximum data visitors can upload to your Cloudflare website in a single request. The free plan gets a 100 MB limit for each visitor, but you can get more with the Business plan or above.
- Response buffering – enables buffering responses from the origin server. Cloudflare will wait until the entire file is ready before forwarding it to the visitors.
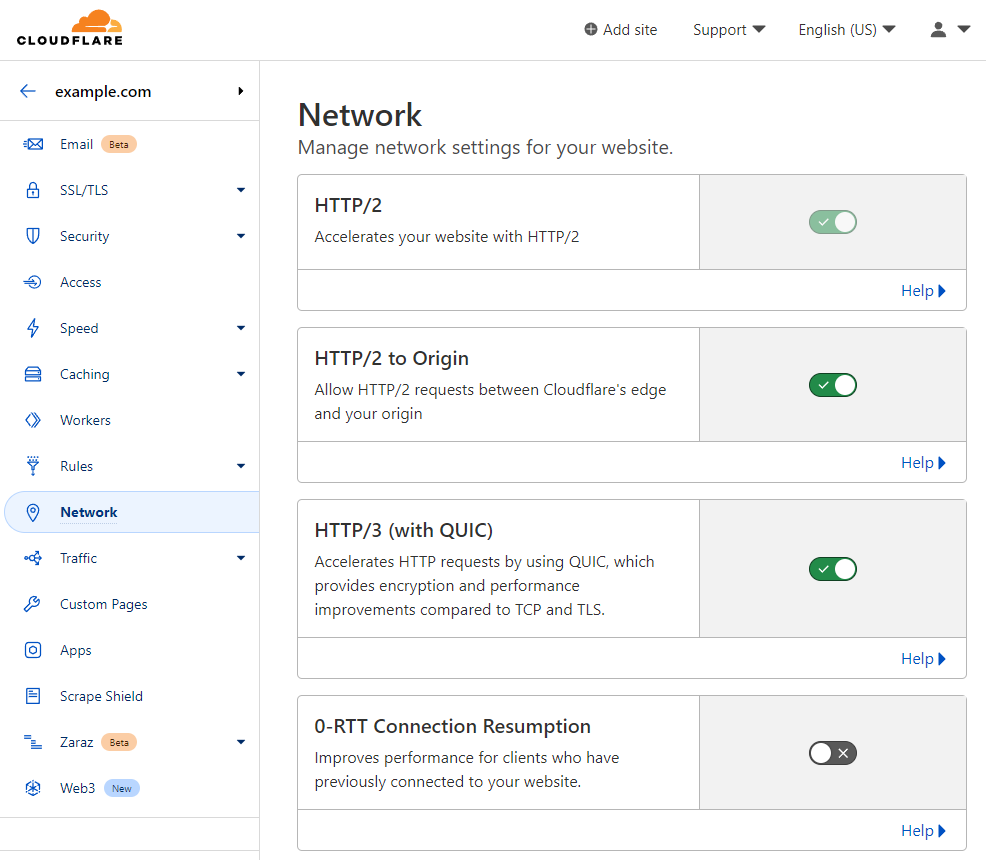
Most Network features are free except for Response buffering and True-Client-IP-Header, which are available only for Enterprise plan users.
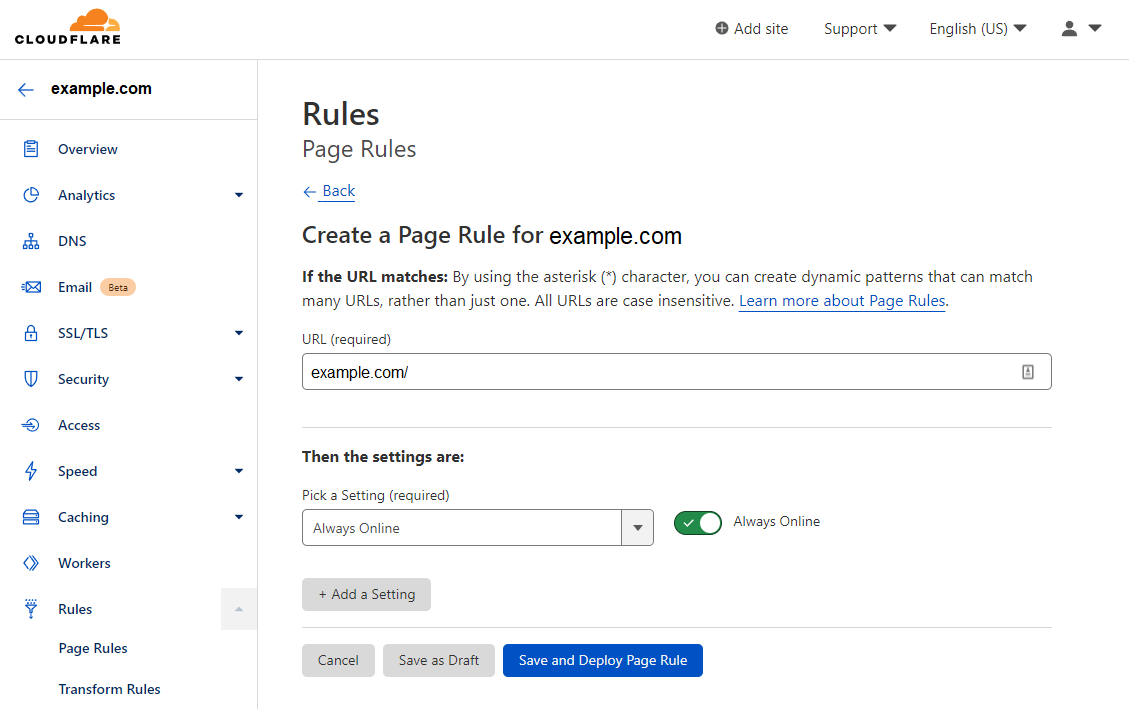
6. WordPress Page Rules Configuration
The page rules feature enables specific Cloudflare settings on your WordPress site. Cloudflare offers around 37 page rules – some are not available with the free plan.
Here are the steps to set up Cloudflare page rules:
- Head to Rules → Page Rules and click on the Create Page Rule button.
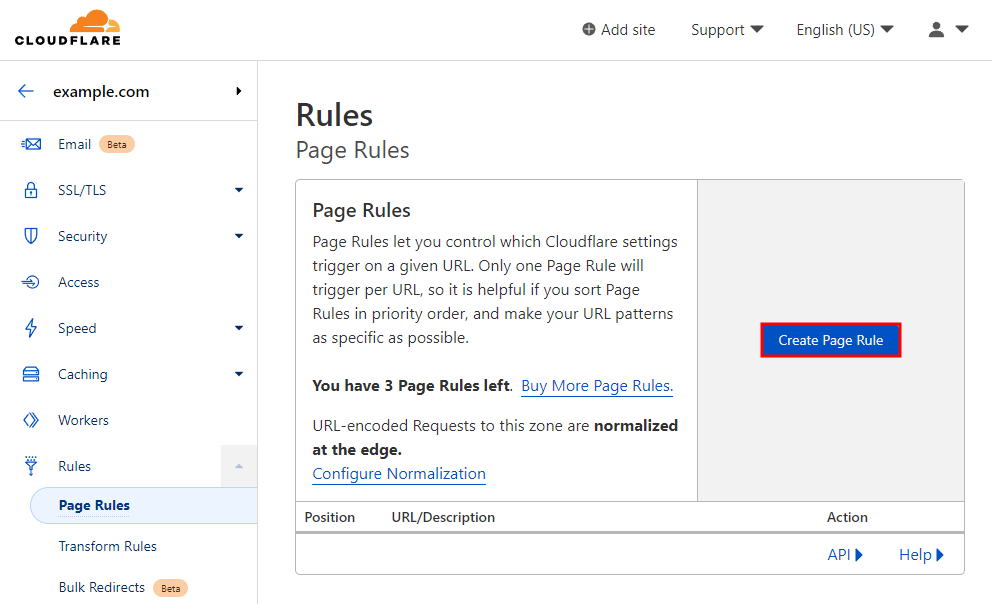
- Insert the URL for your page rule. If you want to add more than one rule for a specific page, click the Add a Setting button. Then, you can either Save as Draft to leave the rule disabled or Save and Deploy to enable it immediately.
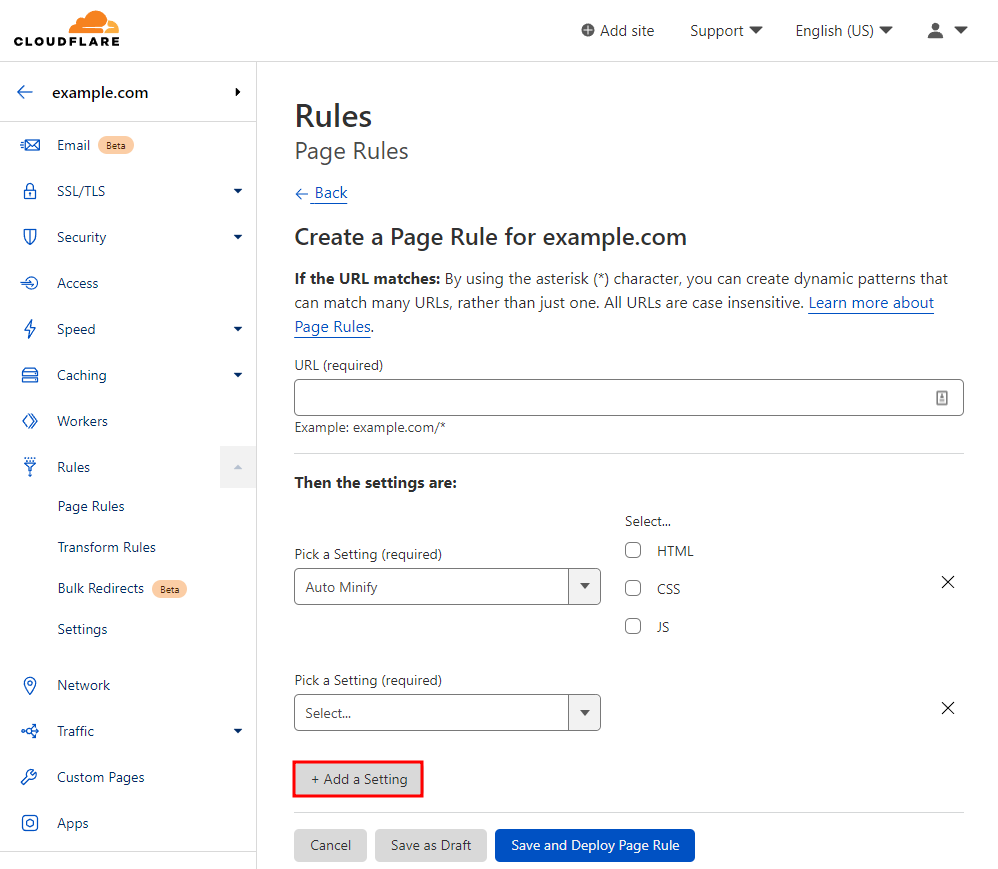
- Under Page Rules, you can reorder the Position and use the Settings icon to change the rule. If you choose to remove the rule, click the X button.
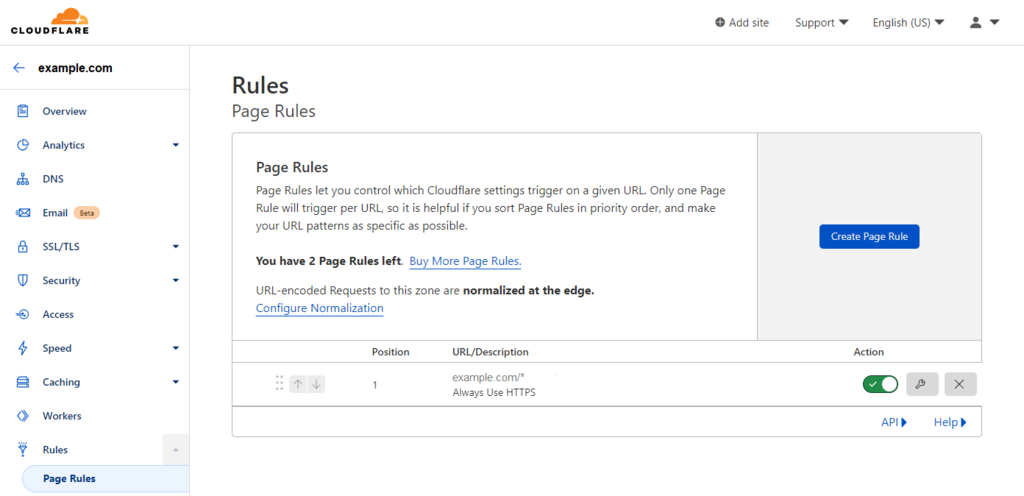
You can create up to three page rules with a free Cloudflare account. Upgrade to the Pro version to get 20 rules. If you need more, the Business and Enterprise plans offer 50 and 125 rules, respectively.
Here are some tips to take advantage of this feature for your WordPress sites:
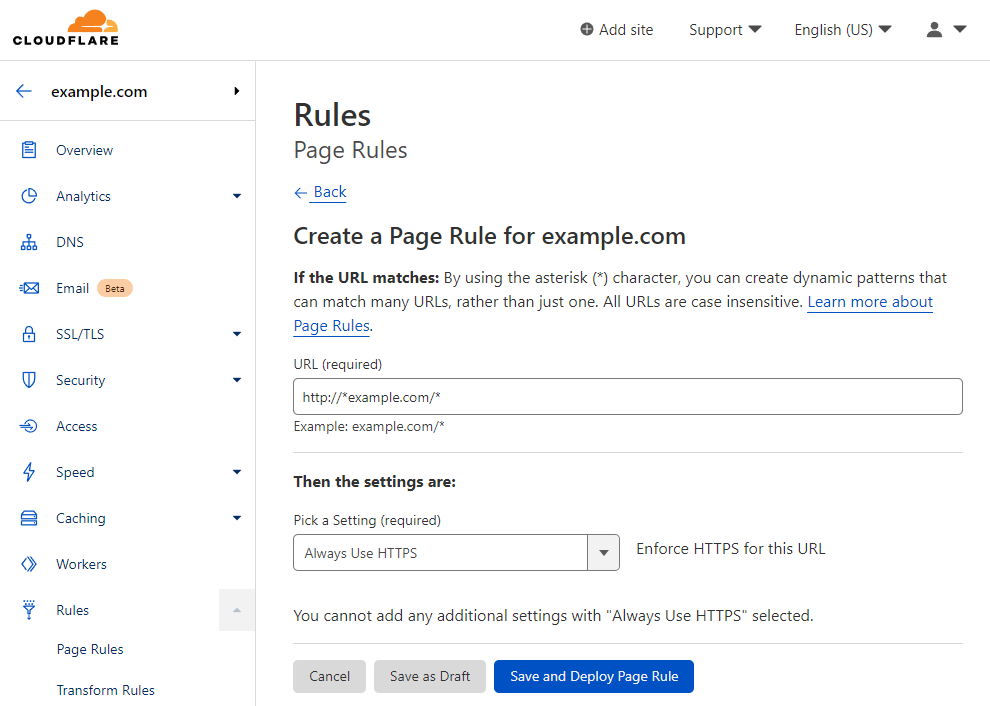
Always Use HTTPS
Use this rule to secure visitors’ connections by redirecting all variations of your website to the https:// version. Enter your WordPress site’s domain name in between two asterisks:
http://*example.com/*
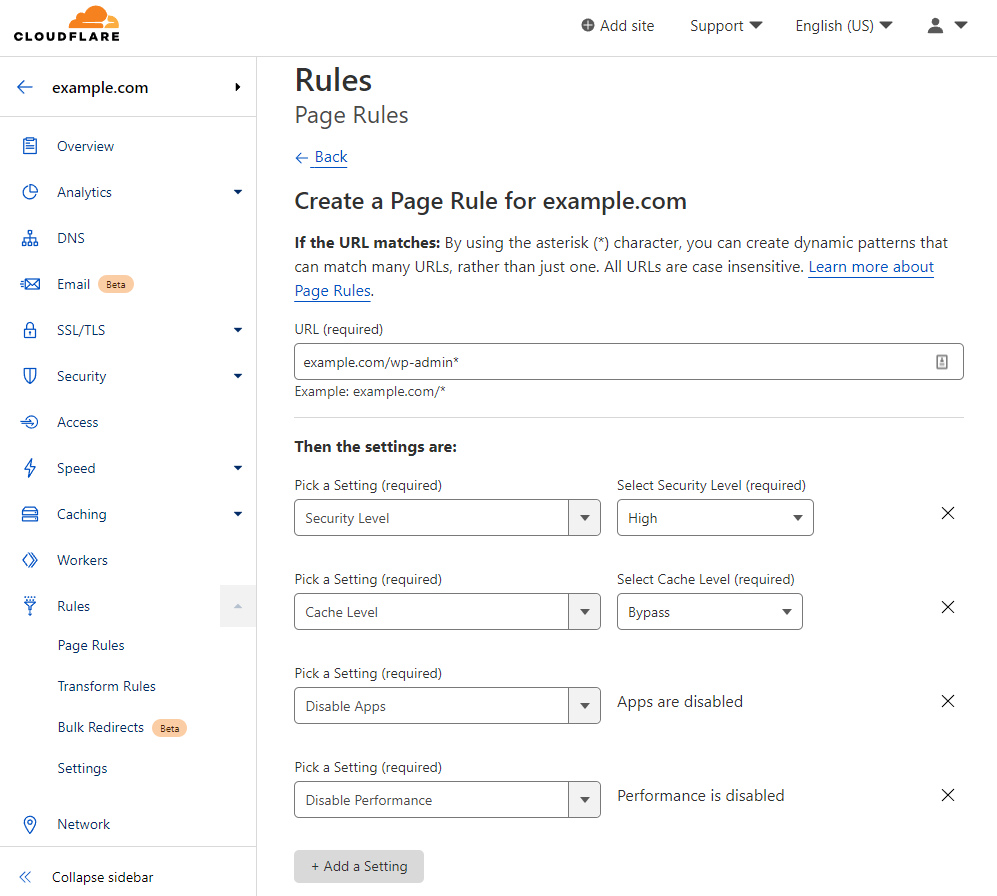
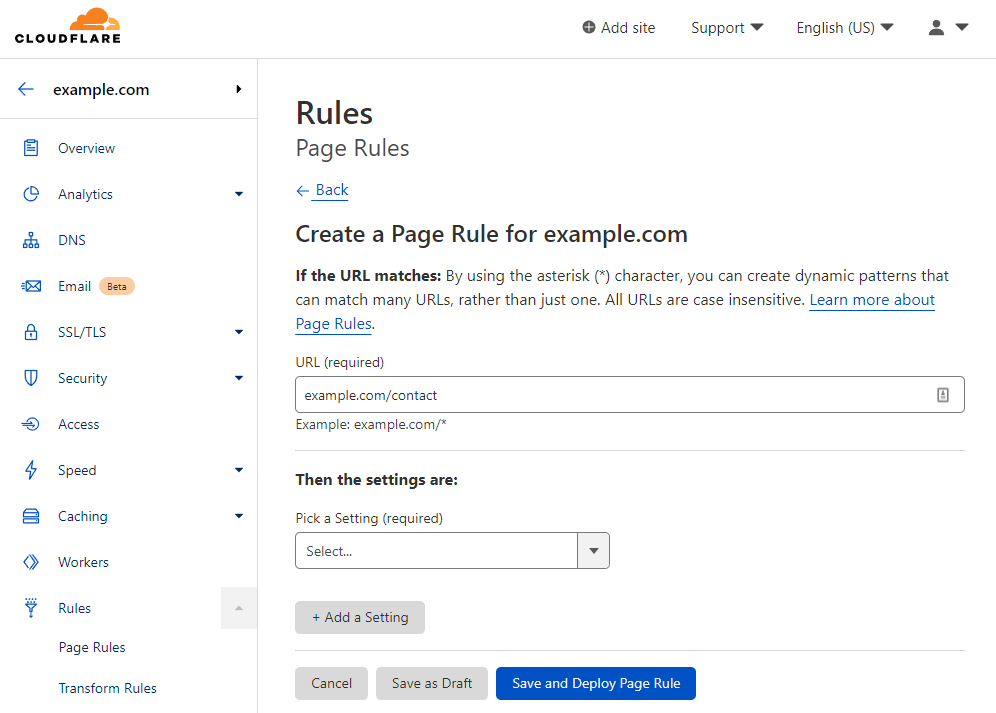
WordPress Admin Security and Cache Levels
Protect and speed up your WordPress admin by setting the Security Level to High and Cache Level to Bypass.
In addition, disabling Cloudflare Apps and Performance helps fix errors, as these features only speed up your site’s front-end.
Enter your WordPress login URL with an additional asterisk:
example.com/wp-admin*
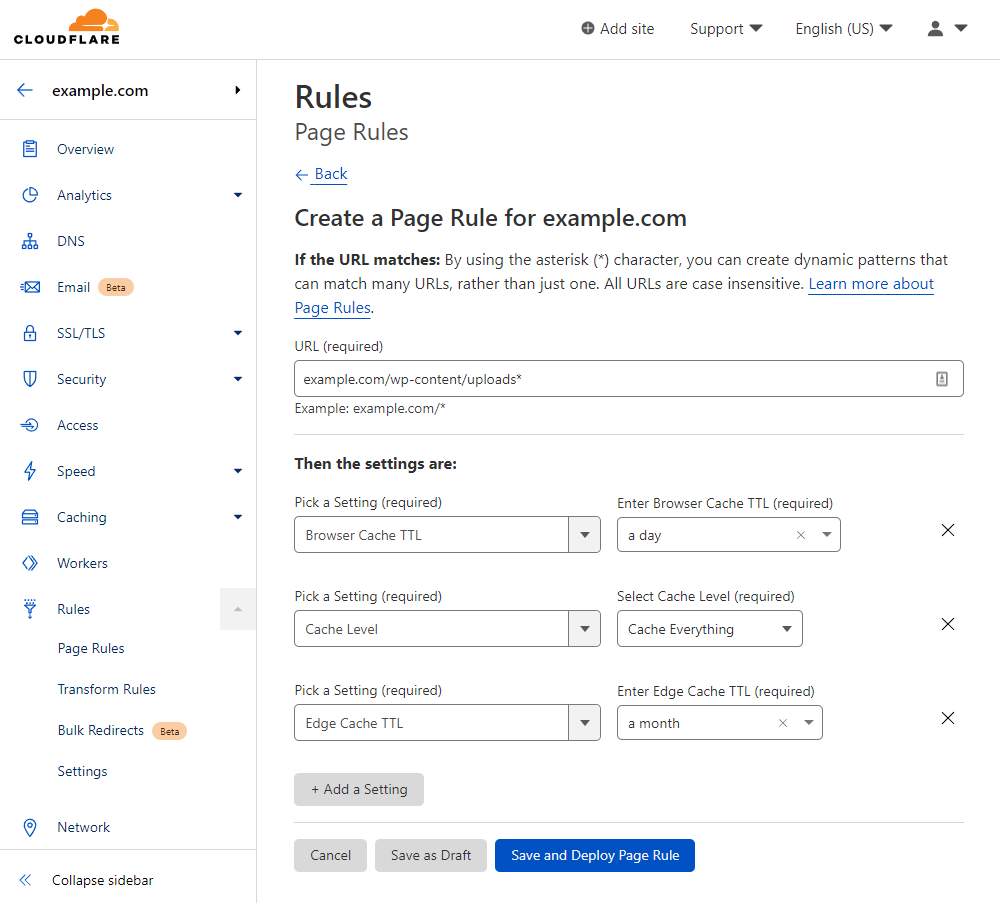
Bandwidth Control for WordPress Uploads
If you rarely change the files you upload to WordPress, save bandwidth by setting Edge Cache TTL to a month.
Then, change the Cache Level to Cache Everything to optimize the speed and the Browser Cache TTL to a day to show the most recent content of your site.
Here is what to use for the URL:
example.com/wp-content/uploads*
Always Online
This feature keeps your pages online if your server is experiencing downtime. Enable the Always Online feature for your most important URLs.
Email Obfuscation
Use the Email Obfuscation rule on your contact page or any page with contact information to hide your email address and prevent spam.
7. Image Resizing
The image resizing feature caches image files and minimizes their dimensions to boost your WordPress site’s performance.
This feature also automatically adjusts your images for mobile optimization. By enabling this Cloudflare feature, you can maintain a consistent website appearance.
To take advantage of this image optimization feature, subscribe to the Business plan. It comes with up to 100,000 image requests per month.
8. Mirage
Mirage helps websites load images based on the network connection and device type without altering the original resolution. For example, devices with smaller screens will show smaller images.
This Cloudflare feature speeds up loading time using the following methods:
- Image virtualizing – replaces images with low-resolution placeholders to render pages faster, allowing visitors to see content immediately.
- Request streamlining – combines multiple individual network requests for images into a single request.
To use this feature, you must at least have the Pro plan. Note that this feature might cause issues when displaying images with specific JavaScript code, such as for carousels and photo viewers.
9. Polish
This feature is only available with the Pro plan and above. The Polish feature improves your image load time by decreasing your file size using the following options:
- Lossless – reduces the size of image files without impacting their visual quality. This option removes unnecessary metadata from PNG and GIF files, such as their date, time, and camera manufacturer information.
- Lossy – compresses the file size of JPEG images by reducing their visual quality.
- Serve WebP images – shows the WebP version of the image, providing better performance over the original image format.
Make sure to purge your cache when changing the polish settings to see the changes.
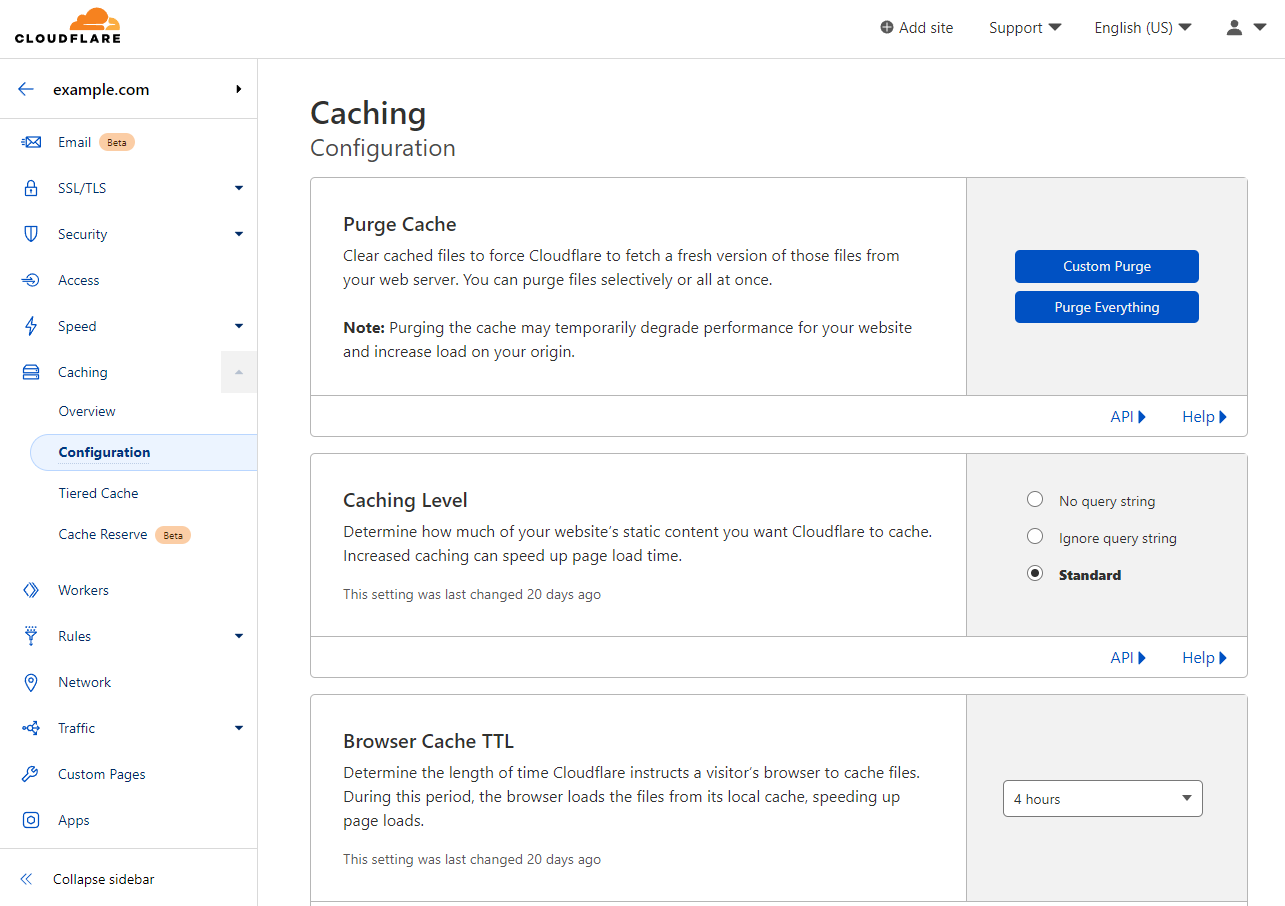
10. Caching
Caching stores copies of your static content in a temporary storage location so browsers can access them quicker.
Cloudflare can help cache web browsers to load sites faster. It also caches DNS servers to look for records more quickly.
To access this Cloudflare feature, head to Caching -> Configuration. Some of the main features include:
- Purge cache – clears cached files to get the newest version of your files from the server:
- Custom purge – clears cache from a specific URL.
- Purge everything – caches all the files on your website. We recommend purging individual pages to keep the site speed optimized.
- Caching level – determines the amount of static HTML content you want Cloudflare to cache. You can set Cloudflare CDN to cache static content according to these levels:
- No query string – delivers files from the cache when there is no query string, which is a part of a URL that assigns values to specific parameters.
- Ignore query string – delivers the same resource to all URLs, no matter the query string.
- Standard – delivers a different resource when the query string changes.
- Browser cache TTL – specifies how long cached files remain in your visitor’s browser. Having a longer expiration time means faster load times for returning visitors.
- CSAM scanning tool – allows website owners to identify and take action on any potential Child Sexual Abuse Material (CSAM).
- Crawler hints – provides high-quality data to search engines after making any changes. This feature prevents wasteful crawls.
- Always Online – shows limited copies of your web pages instead of errors whenever your server is unreachable.
- Development mode – temporarily bypasses Cloudflare cache to see real-time changes to your origin server.
In addition, Cloudflare has a settings page for Cache Analytics, Tiered Cache, and Cache Reserve. Some of these settings are only available with the premium version.
Cloudflare’s Most Common Errors
Sometimes, improper Cloudflare setup or incompatible features can cause errors to your WordPress site. Here are some of the most common Cloudflare errors:
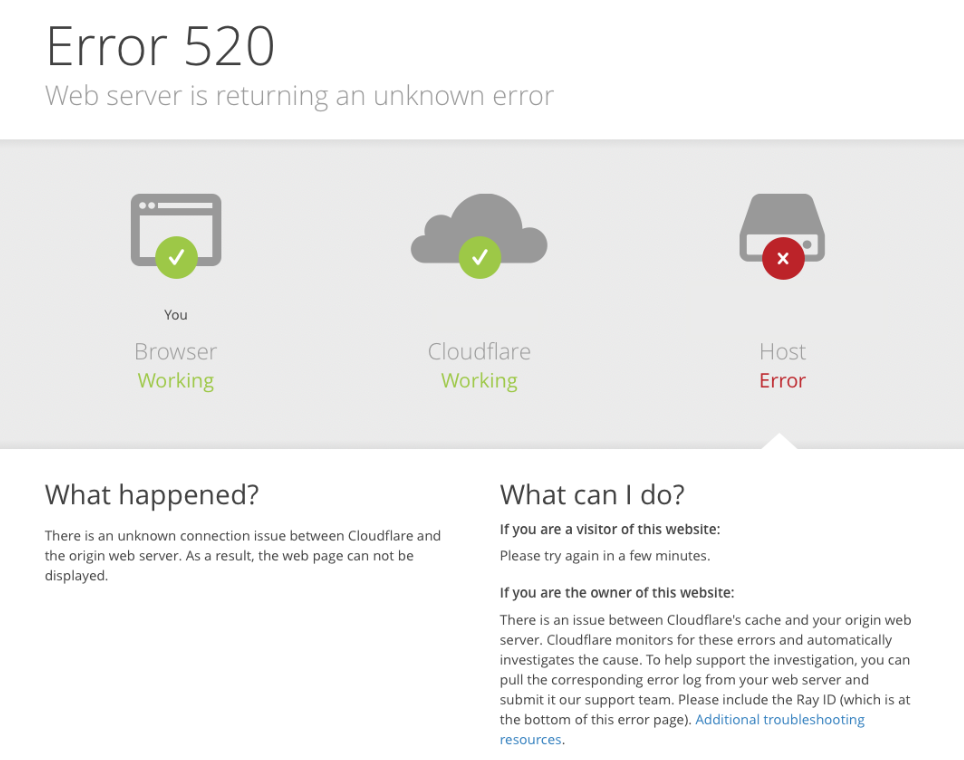
Error 520
Cloudflare error 520 happens when a server receives an invalid request. As a result, the web browser will show a “Web server is returning an unknown error” message.
An issue with the origin server is the main reason behind this error. For example, the origin server might crash or not allow connections with Cloudflare IP addresses.
Some methods to fix this issue are:
- Ensure that Cloudflare DNS records are correct.
- Disable your .htaccess file.
- Investigate your error logs.
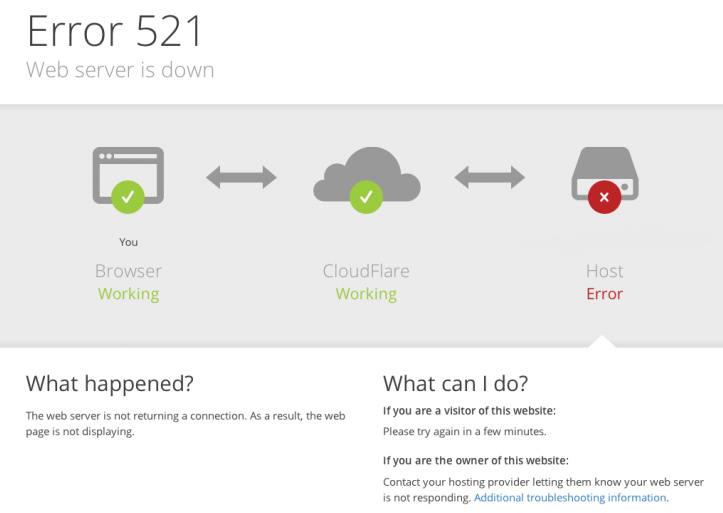
Error 521
Cloudflare error 521 shows the message “Web server is down”. This error often happens due to incorrect Cloudflare configuration, such as the wrong encryption mode with the SSL certificate.
If your WordPress site is showing this Cloudflare error, here are some methods to fix it:
- Check whether the origin server is running.
- Test your connection to the server.
- Check your Cloudflare encryption settings.
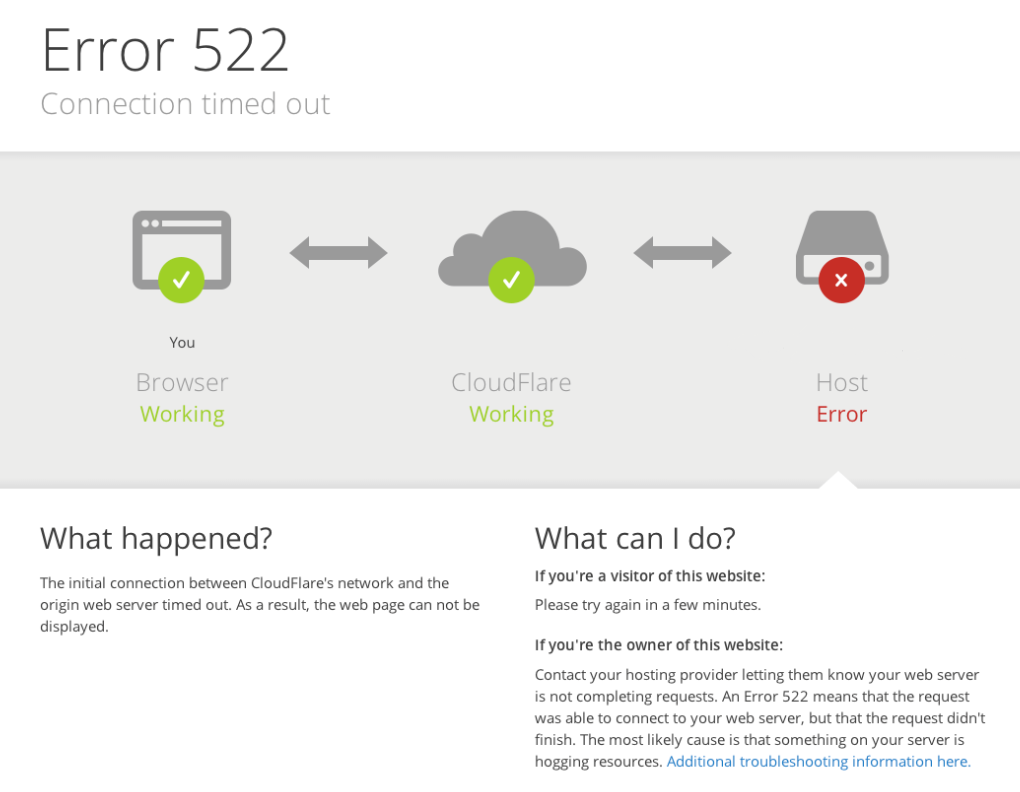
Error 522
Lastly, Cloudflare error 522, or “Connection timed out” happens when the server fails to respond to requests within a specified time.
This issue also means that the Transmission Control Protocol (TCP) handshake between the server and Cloudflare has failed.
Here are some ways to fix error 522:
- Check if the server is working.
- Review your Cloudflare DNS settings.
- Enable the Keep-Alive header.
Conclusion
Setting up Cloudflare on your WordPress site is pretty simple. We have shown the steps to configure Cloudflare on WordPress:
- Create a Cloudflare account and verify your email address.
- Add your WordPress domain name to Cloudflare.
- Check your domain’s DNS records in Cloudflare.
- Point your domain name to Cloudflare’s nameservers.
- Configure the HTTPS settings to secure your site.
- Install the Cloudflare plugin for easy configuration.
In addition, we have also explained how WordPress users can benefit from Cloudflare’s key features, such as image resizing and caching.
Sometimes, the wrong configuration can cause errors on your WordPress site. We have also shared the most common Cloudflare errors and ways to fix them.
After setting up Cloudflare integration on WordPress, try running a speed test to check your loading time.
Hopefully, this article has helped you install and manage Cloudflare on your WordPress site. If you have any questions or suggestions, feel free to leave us a comment.
Discover Other WordPress Plugins to Optimize Your Website
Best WordPress Plugins
Best WordPress SEO Plugins and Tools
Top Google Analytics WordPress Plugins
All of the tutorial content on this website is subject to Hostinger's rigorous editorial standards and values.

Klara is an eCommerce enthusiast. She has a passion for developing content and building websites. In her spare time, she enjoys traveling to experience different cultures. Klara is always looking to learn new things in the IT field, and she loves sharing her knowledge with others.

Astari is a digital marketing expert, with a focus on SEO and WordPress. She loves to share her wealth of knowledge through her writing, and enjoys surfing the internet for new information when she's not out in the waves or hiking a mountain. Her mission is to learn something new every day, and she firmly believes that there is no such thing as too much knowledge.


