How to add products in WooCommerce
Jul 04, 2025
/
Dennis H.
/
9 min Read

Adding products is one of the first things you’ll do when setting up your WooCommerce store. It’s how you turn your website into a fully functional online shop.
Clear, complete product listings help customers find what they need, understand what you’re selling, and feel confident enough to make a purchase. A well-optimized product page can also boost search rankings and reduce returns.
In this guide, you’ll learn how to add products in WooCommerce, from entering product details to organizing them with images, categories, and pricing.
1. Navigate to the WooCommerce product editor
With WooCommerce, an ecommerce product is a custom post type. Products are created similarly to how you create new pages or blog posts.
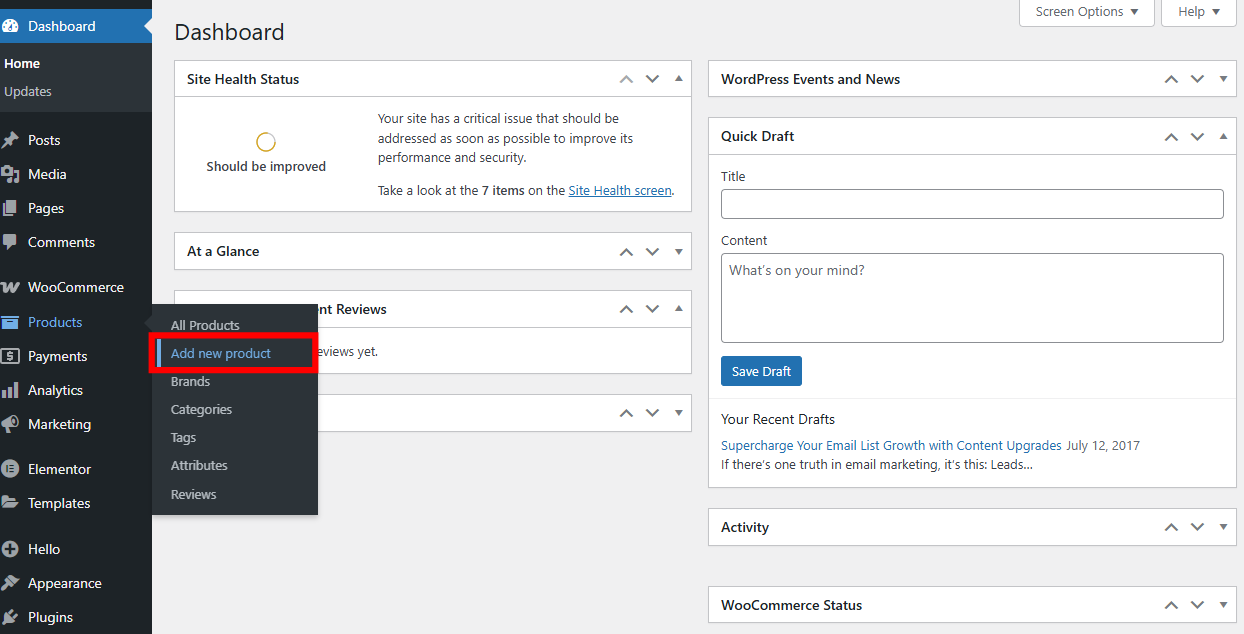
In your WordPress dashboard, go to Products → Add new product. This opens the WooCommerce product editor, where you’ll enter all your product information.
If you want to edit an existing product instead, go to Products > All Products.
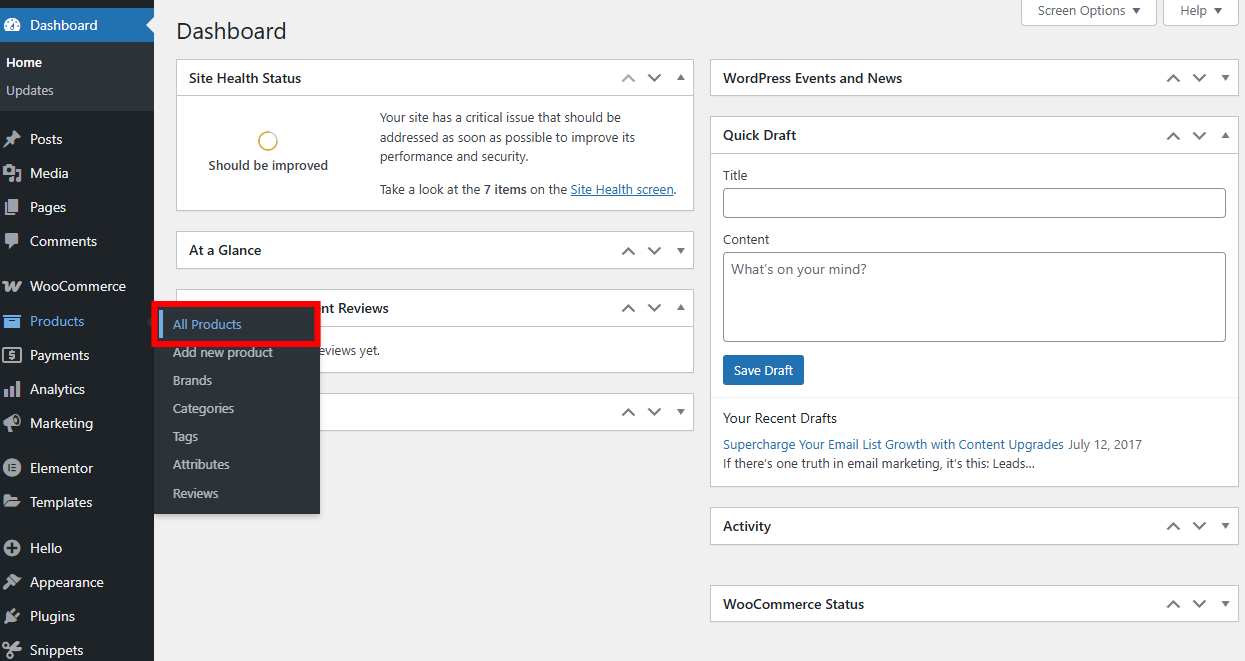
Then find the product you want to update and click the product’s name or the Edit link under its name.

This editor is where you’ll add everything from the product name and price to images, descriptions, and shipping details. Think of it as your product’s control center.
2. Add product name and description
Your first task is to give your product a name and write a description. These details help customers understand what they’re buying.
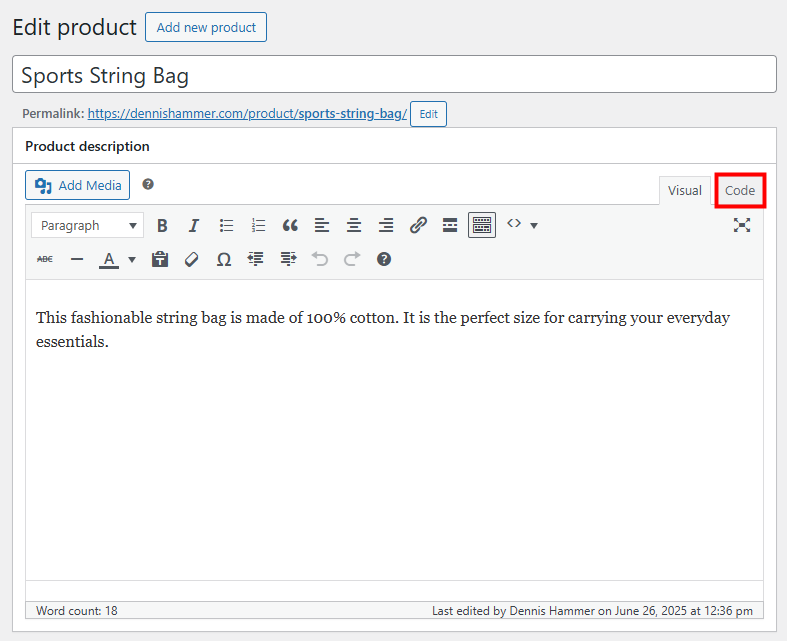
At the top of the product editor, you’ll see a field labeled Product name. This is where you type in the title of your product.
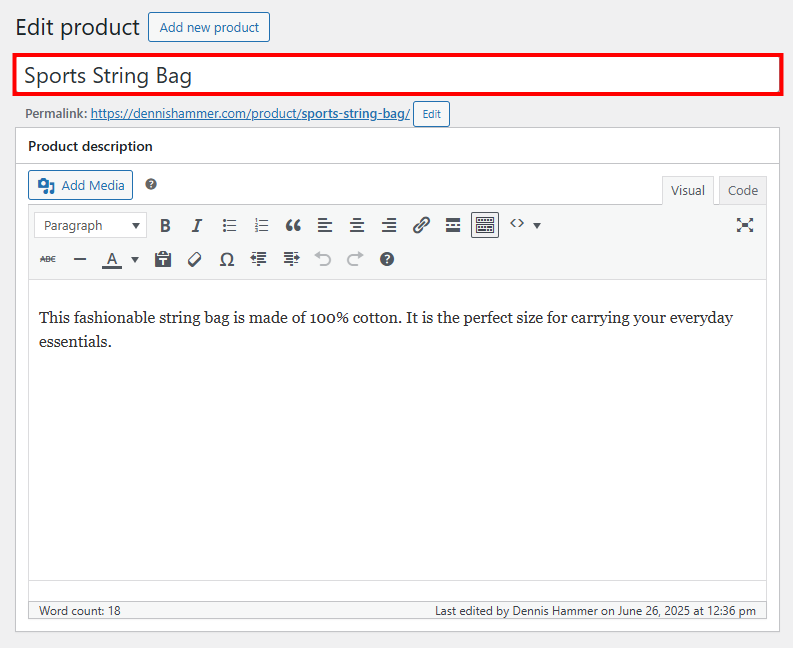
Just below the title, there’s a large text box for the Product description where you can give more details about the item.
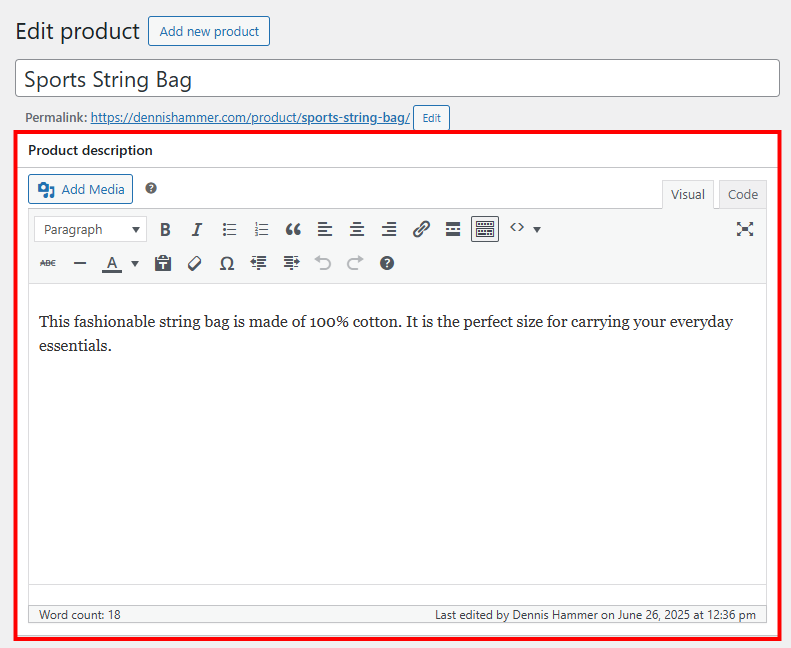
This is a standard WordPress text editor. You can add text formatting and images. You can even insert HTML by switching to the Code tab.
A good name and description can improve search visibility and boost sales. Here are a few best practices:
- Keep the name clear and specific – Use straightforward language that tells shoppers exactly what the product is. Instead of something vague like “Comfort Wear,” go for “Women’s Fleece-Lined Joggers Gray.” Clear names help both your customers and search engines understand your product.
- Highlight key features early – Mention the most important selling points in the first two sentences of your WooCommerce product description, such as materials, size, use case, or features. This helps customers decide whether the product meets their needs.
- Use bullet points for details – Break down technical specs or key features into a simple list. It makes the description easier to skim, especially on mobile devices.
- Focus on benefits, not just features – Don’t just say what the product is. Explain why it matters. For example, instead of “Made from stainless steel,” say “Stainless steel construction for long-lasting durability and rust resistance.”
- Include keywords naturally – Use relevant phrases like “cotton t-shirt” or “wireless headphones” in your description. This improves search visibility without sounding forced.
- Write like a human, not a robot – Avoid buzzwords or overly technical language unless it’s essential. Keep the tone friendly, helpful, and easy to understand.
- Format for readability – Use short paragraphs, headers, and bold text to break up large blocks of content in your WooCommerce product description. This makes the description more appealing and easier to read.
- Address common questions – Think about what shoppers might ask and answer it in the description, such as sizing info, how the product works, or what makes it different from similar items.
If you need help writing your descriptions, the Hostinger AI Content Creator can quickly generate compelling copy based on your product details.
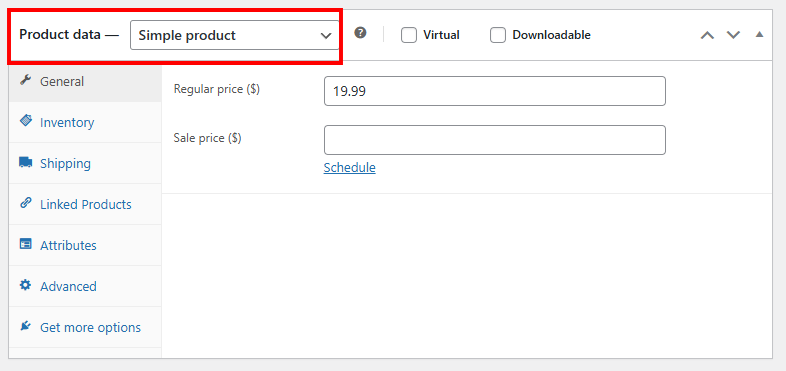
3. Add product data
The Product data section is one of the most important parts of WooCommerce product information management. It contains all the core settings that define how your product behaves, such as pricing, inventory, shipping, and variations.
Product type
The Product type setting determines which options appear in the tabs below it. Each product type suits different kinds of products, so picking the right one helps WooCommerce handle them correctly.
Here are the main WooCommerce product types:
- Simple – A basic physical product with no variations. Great for items like a single T-shirt or book.
- Grouped – A collection of related simple products displayed together. Useful for WooCommerce grouped products like a set of mugs sold individually or as a bundle.
- External/Affiliate – A product sold on another website. You add a link and WooCommerce sends customers there to buy it.
- Variable – A product with multiple options like size or color. Ideal for clothing, shoes, or anything with variations.
- Virtual – A product that doesn’t require shipping, like a service or booking.
- Downloadable – A digital product such as an ebook, file, or software. (Learn more about how to sell digital downloads.)
Choose a Product type by selecting the appropriate option from the dropdown menu. Check Virtual or Downloadable if those options apply to your product.
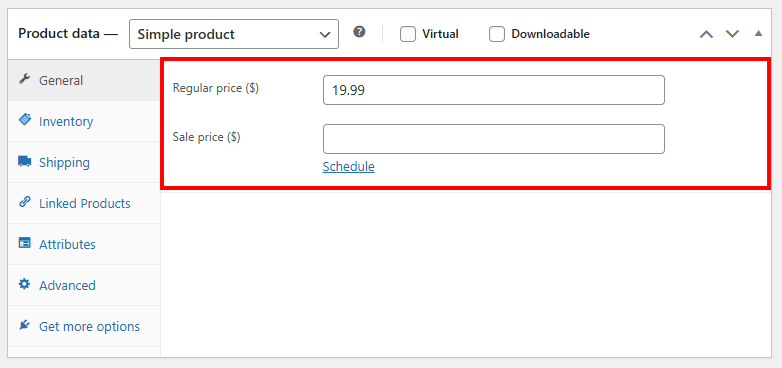
General tab
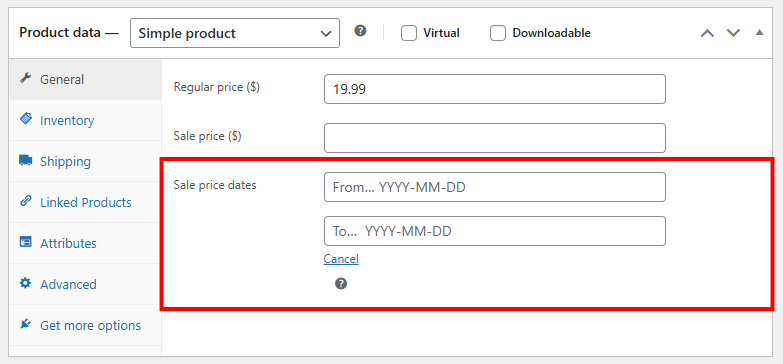
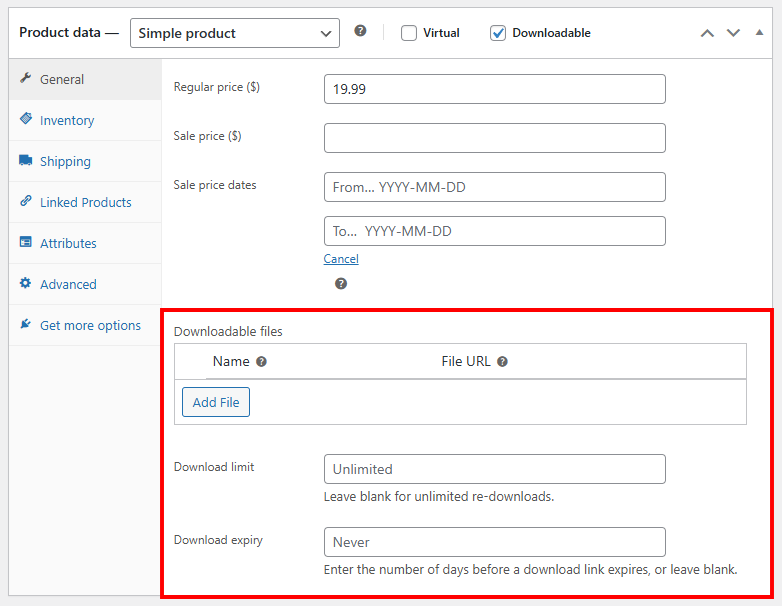
The General tab lets you set the regular price and (optional) sale price.
If you want to schedule a promotion, you can select start and end dates here.
If you set your Product type to Downloadable, this is where you can attach files to downloadable products and set download limits.
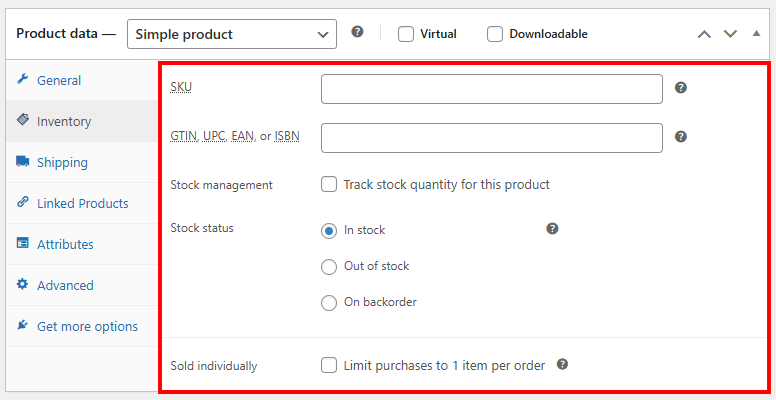
Inventory tab
In the Inventory tab, you can set the product’s SKU and other unique identifiers, manage stock levels, allow or disallow backorders, and limit purchases.
Shipping tab
If your product requires shipping, the Shipping tab is where you’ll enter weight, dimensions, and shipping class (if you use different rates for different types of items). Shipping details are essential for calculating delivery costs at checkout.
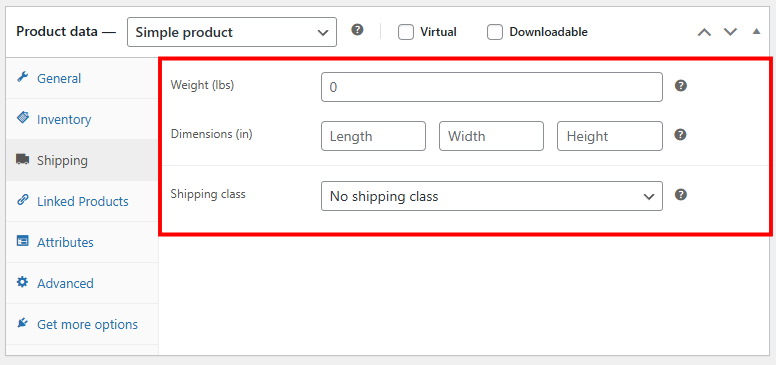
Shipping can be confusing, so check out our guide on how to set up shipping for your WooCommerce store.
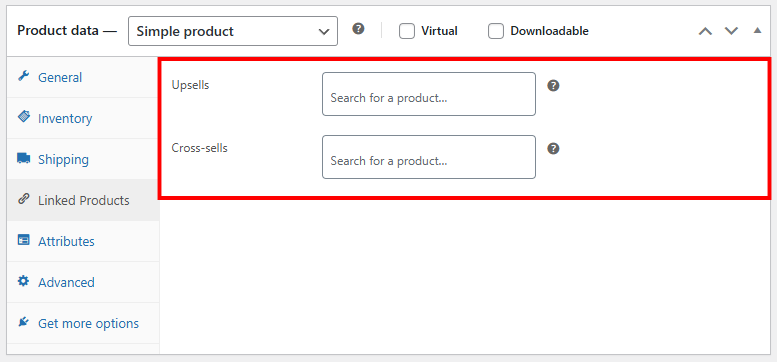
Linked products tab
Use this tab to connect products that complement or upsell the current product. You can add related products as upsells (products shown on the product page as alternatives) or cross-sells (suggestions shown in the cart). This is an easy way to boost your average order value.
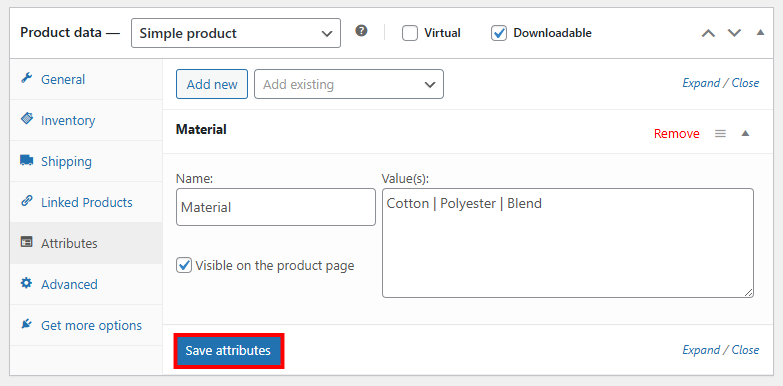
Attributes tab
Attributes define features like size, color, or material. Customers can filter by attributes on category pages. Attributes also power product variations that customers can select on product pages.
First, give your attribute a Name. For this example, we’ll use “Material.”
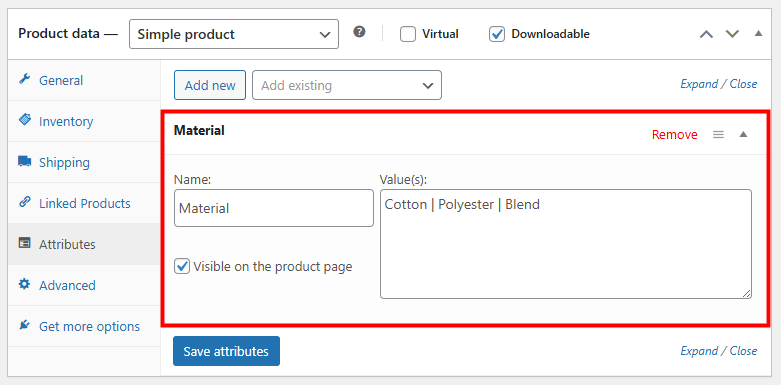
Enter values for your attribute separated by pipes. Then click Save attributes.
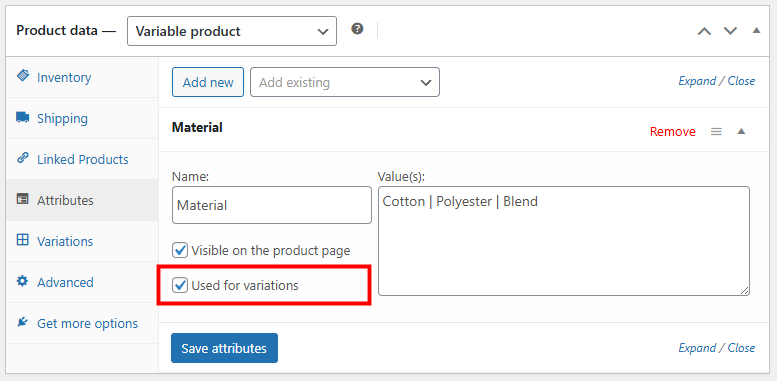
Variations tab
The Variations tab appears when you set your Product type to Variable. This tab lets you create multiple versions of a single product that customers can choose from. For example, a T-shirt that comes in different sizes and colors.
Before you can add variations, you’ll need to define attributes (like “Size” or “Color”) in the Attributes tab and check the box that says Used for variations.
In the Variations tab, click Generate variations. WooCommerce will automatically create a variation for each attribute value.
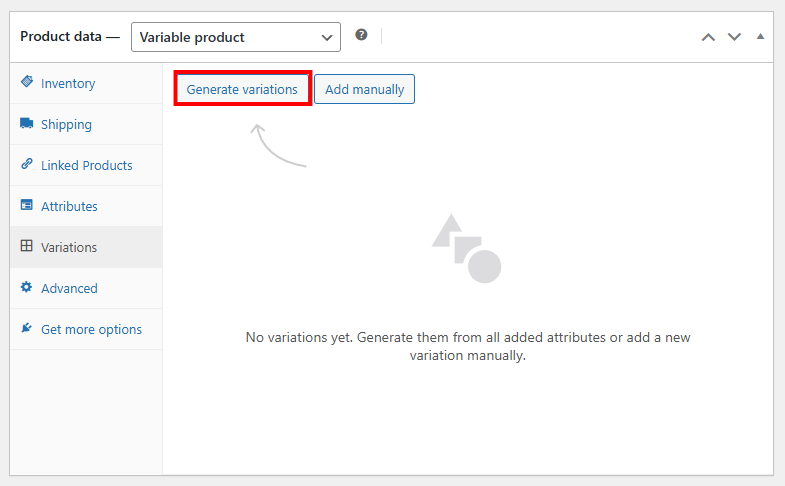
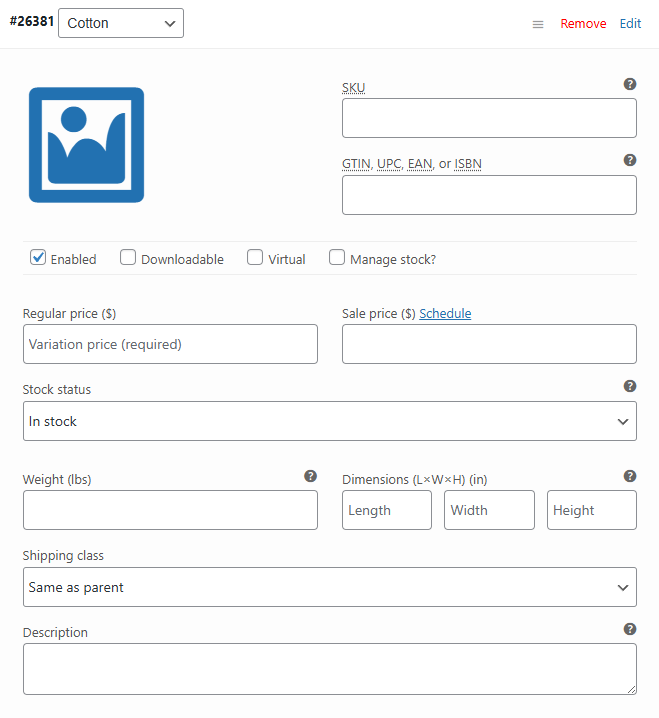
Expand a variation to edit its values.
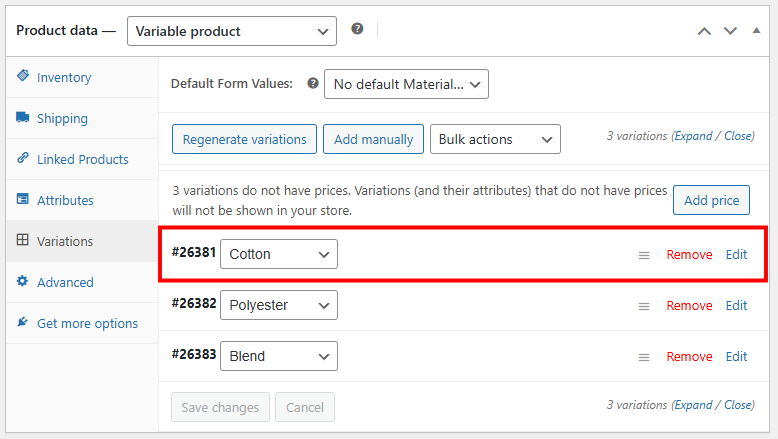
Here is where you set custom values for SKU, price, sale price (if any), stock status, weight, dimensions, shipping class, and description.
Advanced tab
The Advanced tab includes optional settings that give you more control over how your product behaves.
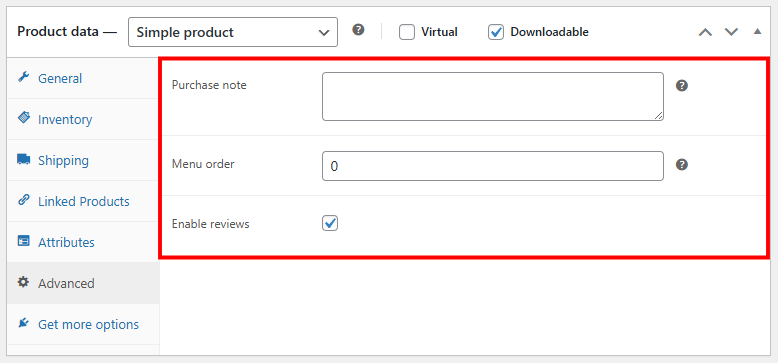
- Purchase note – Add a message that will be sent to the customer after they buy the product. You can use this to say thank you, provide instructions, or share important info about delivery or usage.
- Menu order – This controls where the product appears when you sort products manually in your store. Lower numbers show up first.
- Enable reviews – Check or uncheck this box to allow or disable customer reviews for the product.
4. Add product image
To help shoppers visualize your product, you’ll want to add high-quality images.
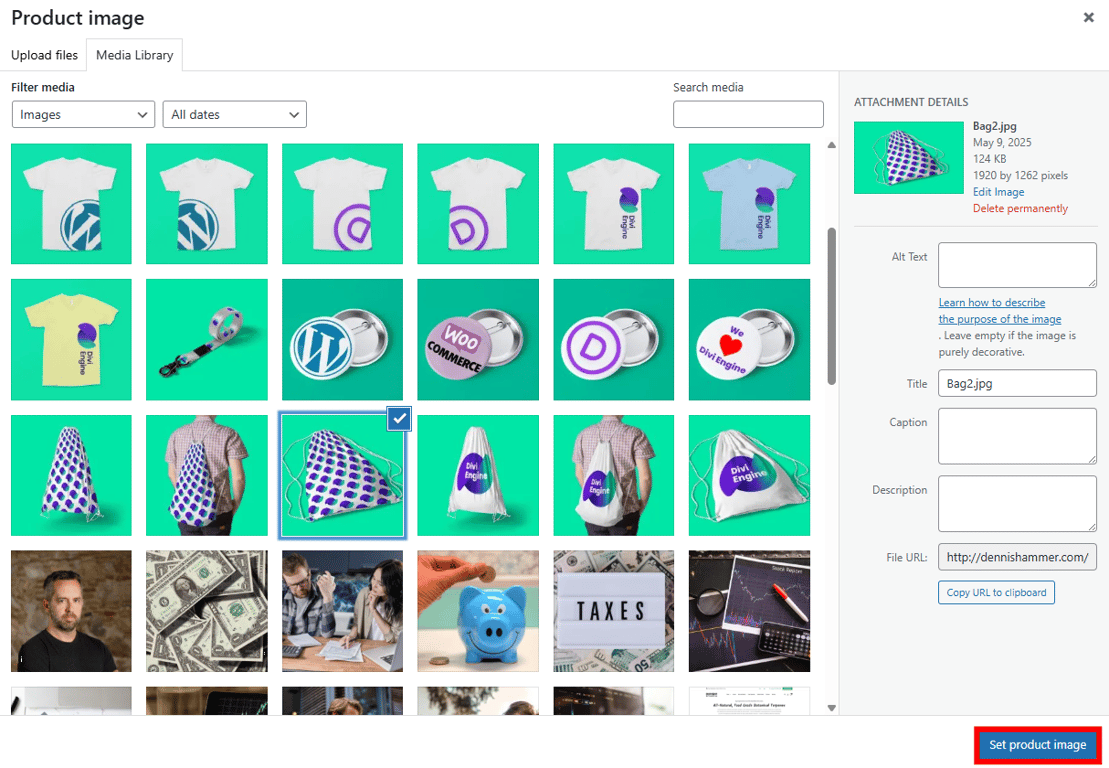
On the product editor page, look for the Product image section on the right-hand side of the screen.
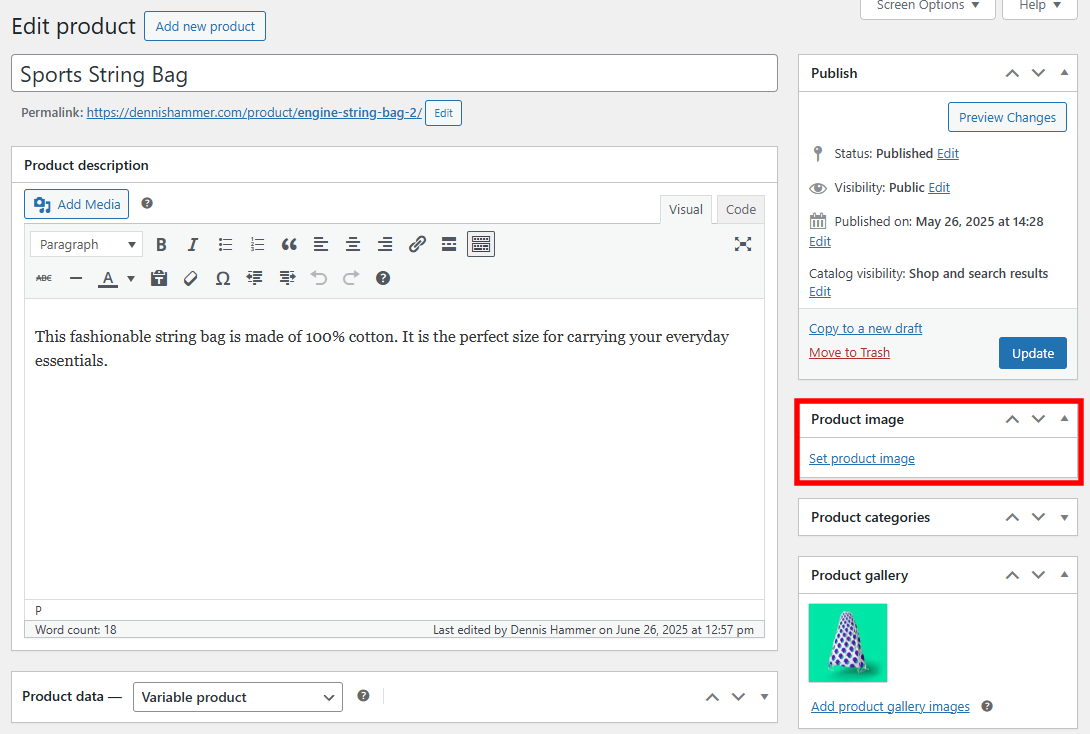
Click Set product image to upload or select the main photo that will represent the item in your store. This main image will appear on category pages and at the top of the product page.
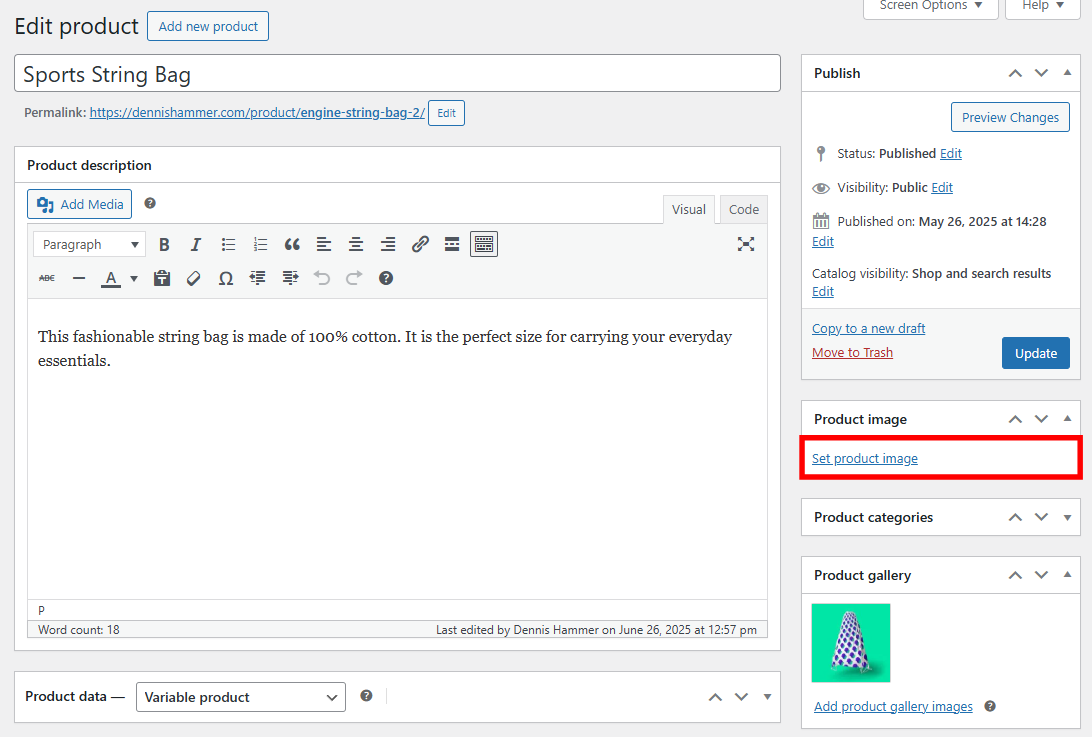
Choose the photo from your WordPress Media Library and click Set product image.
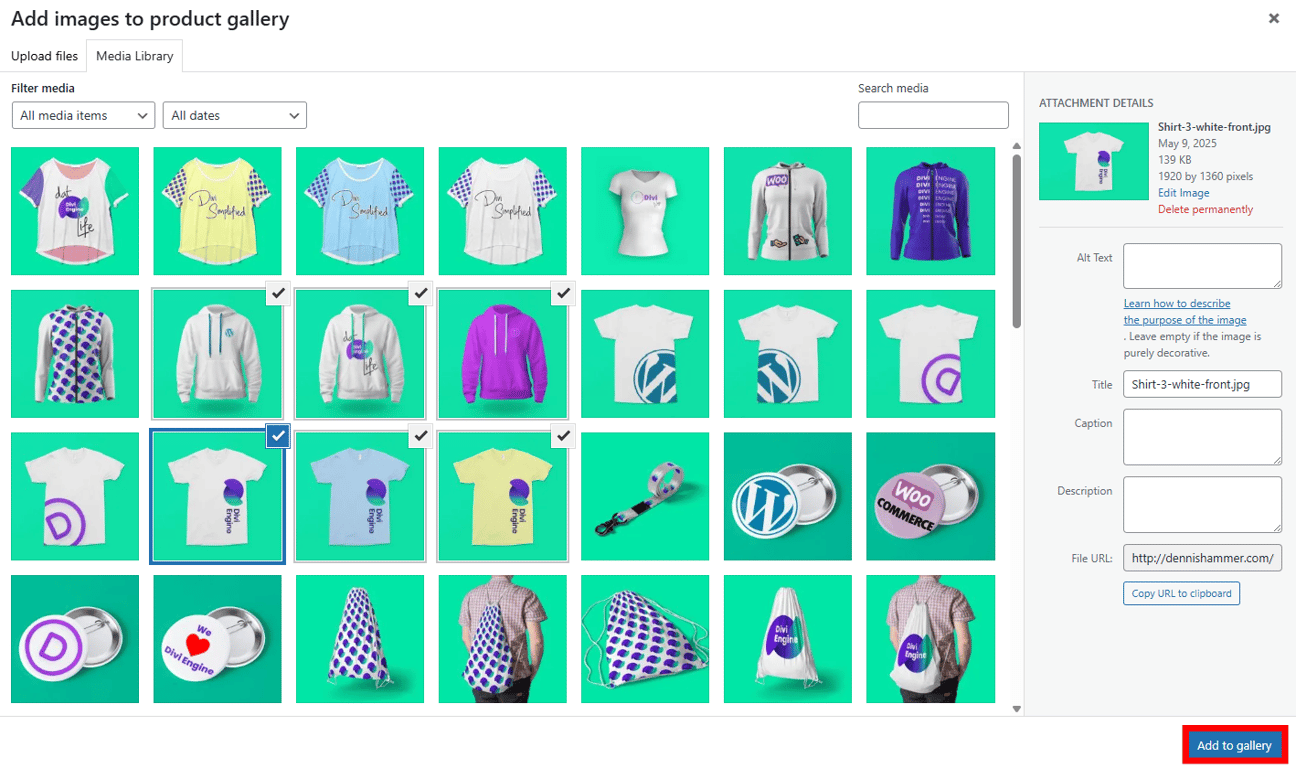
Below the Product image box, you’ll see the Product gallery section. This is where you can add additional images to show your product from different angles or in different settings. Gallery images will show as a slideshow or thumbnail set beneath the main image, but won’t be available on category pages by default.
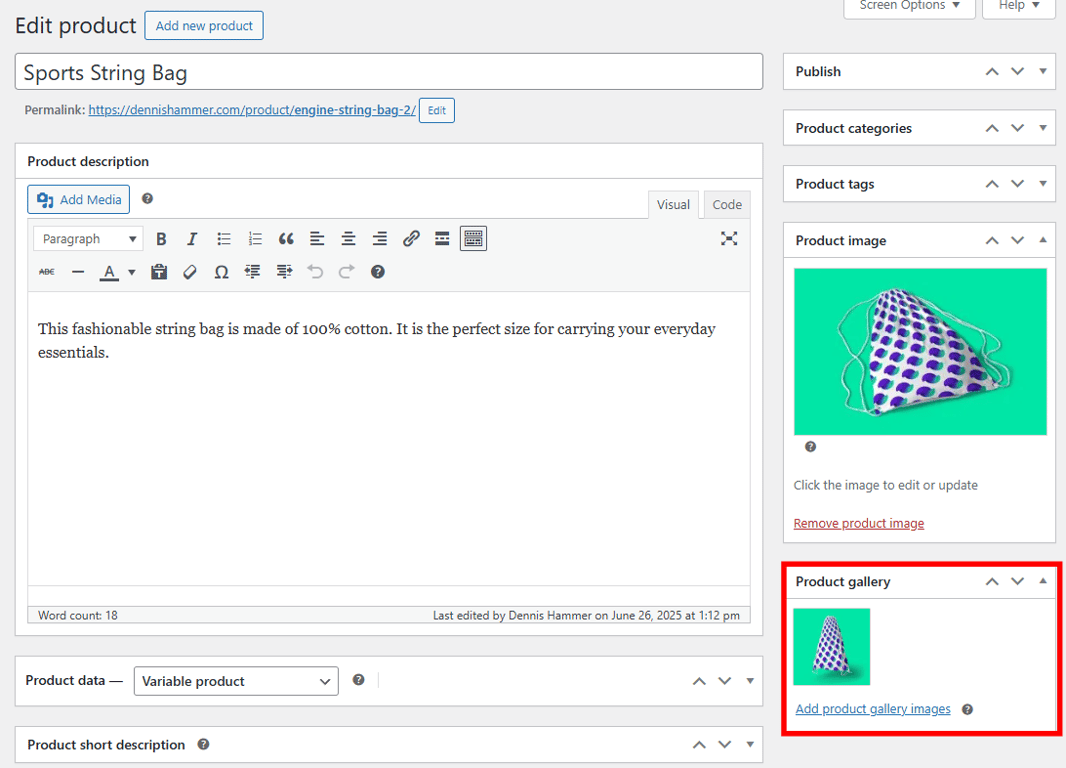
Click Add product gallery images to upload or select additional images.

Select your images from your WordPress Media Library by holding the CTRL button (Windows users) or the Command button (Mac users) and clicking multiple images.
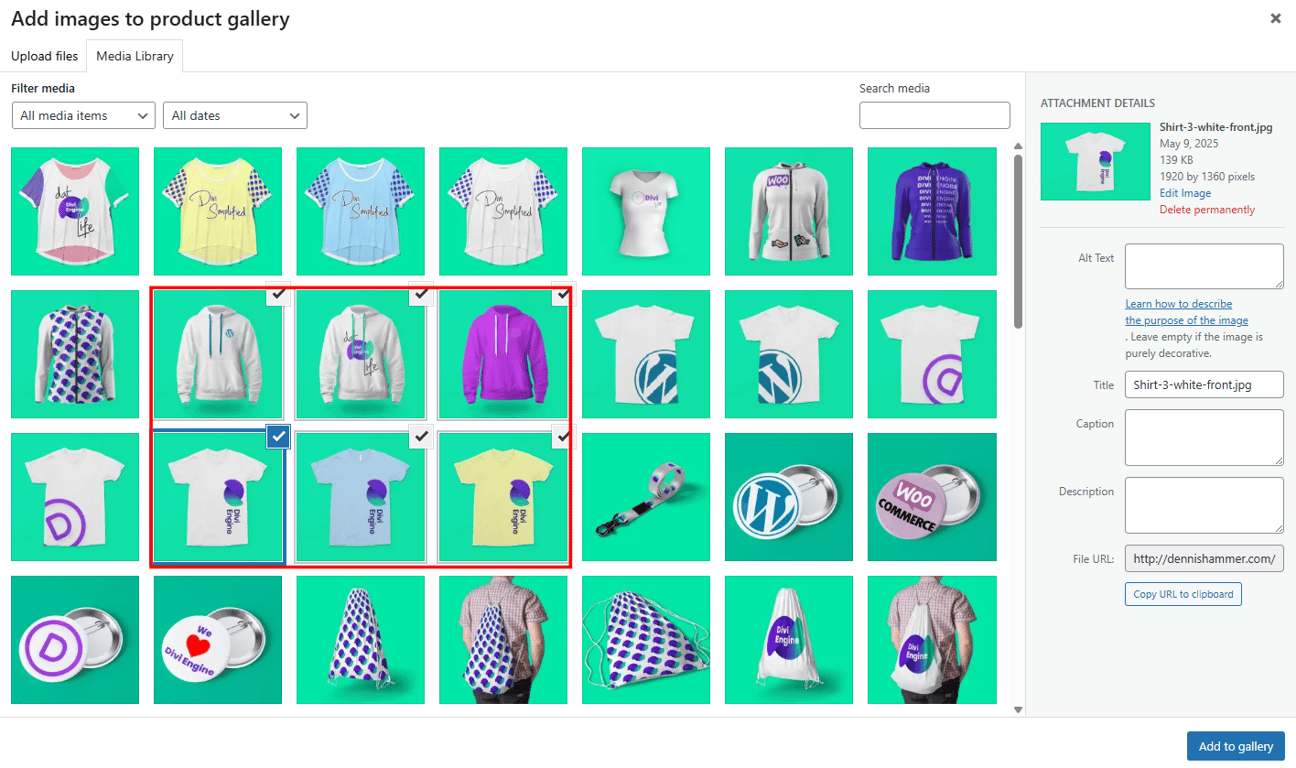
Click Add to gallery to include the images in your gallery.
5. Set product categories and tags
Categories and tags are tools for organizing your WooCommerce store. They help customers browse your products more efficiently and improve your store’s internal search and SEO performance.
Product categories are broad groupings that define your store’s structure. For example, a clothing store might use categories like “Men,” “Women,” or “Accessories.” Every product should belong to at least one category so it appears in relevant listings and filters.
Product tags, on the other hand, are more specific keywords that describe features, styles, or use cases. Tags aren’t hierarchical like categories. You might tag a product with “waterproof,” “eco-friendly,” or “summer collection” to help users discover it through keyword searches or tag-based navigation links.
To add a product to a category, find the Product categories box on the product editor page.
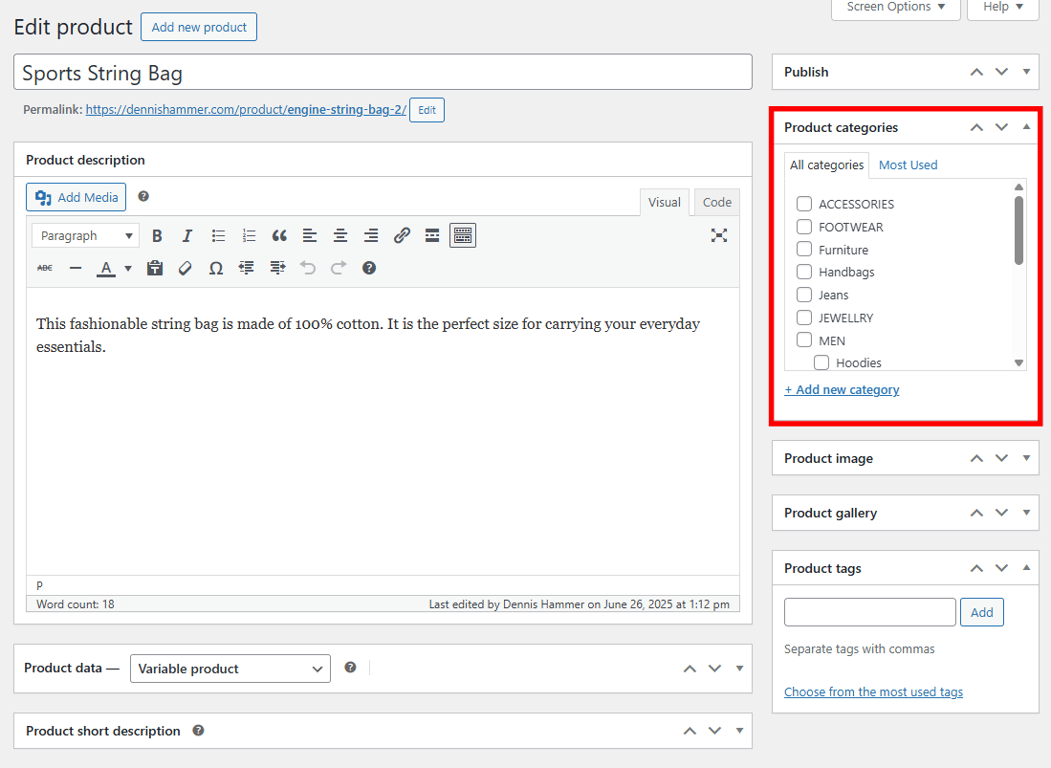
Check the box of any categories that make sense for your product.
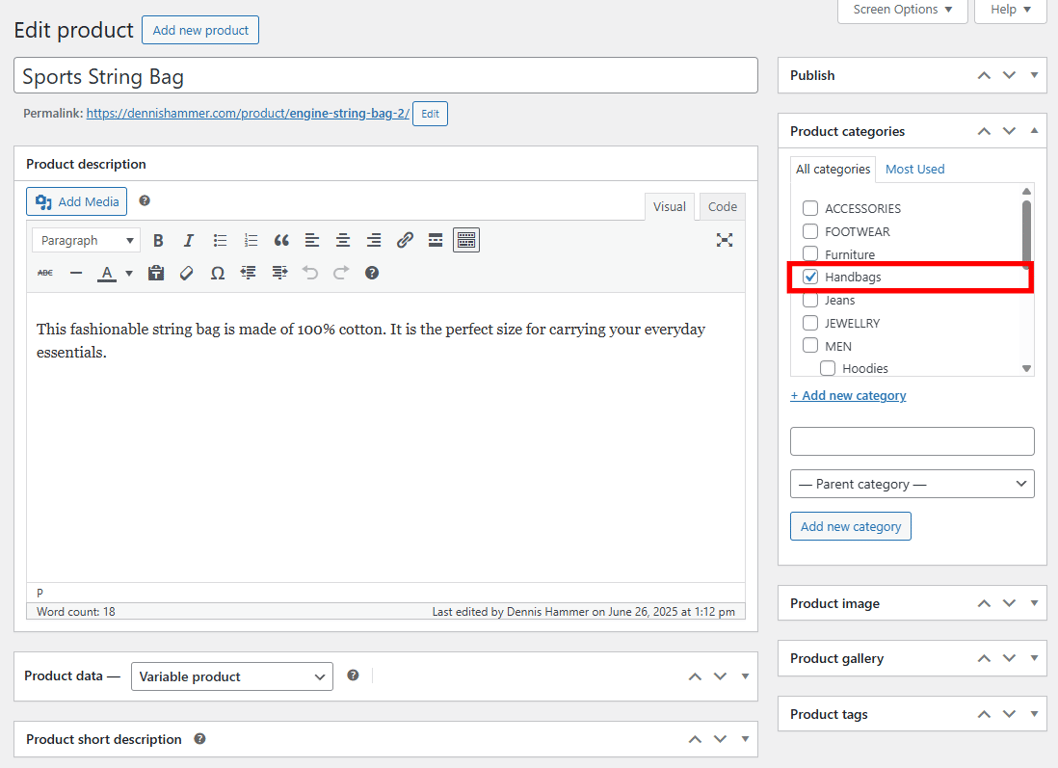
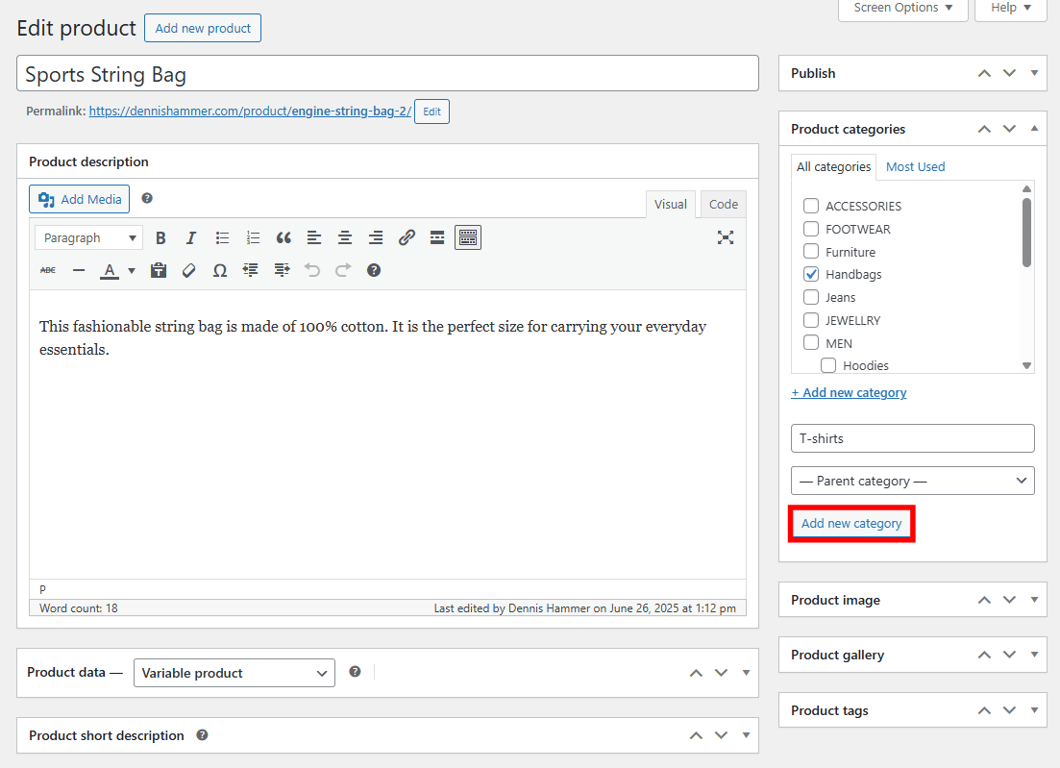
If you don’t have a relevant category, click the Add new category link.
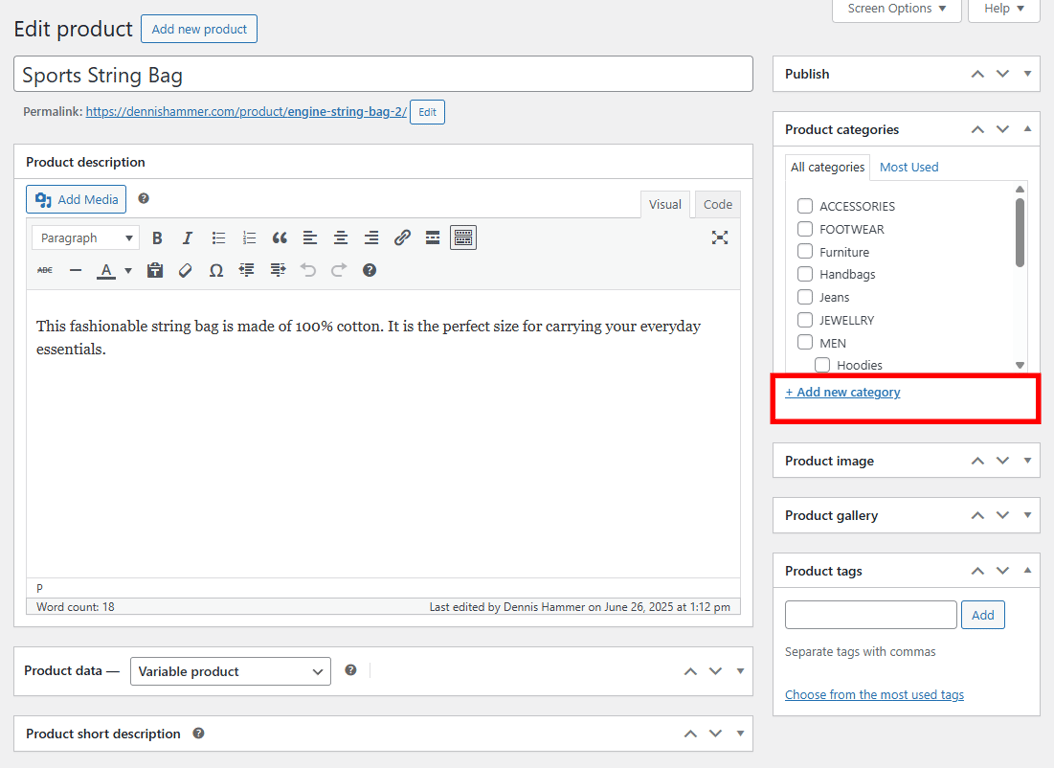
If you’re making a parent category, leave the dropdown menu on the default Parent category setting. If you want the new category to be a child of an existing category, select the name of the parent category from the dropdown menu.
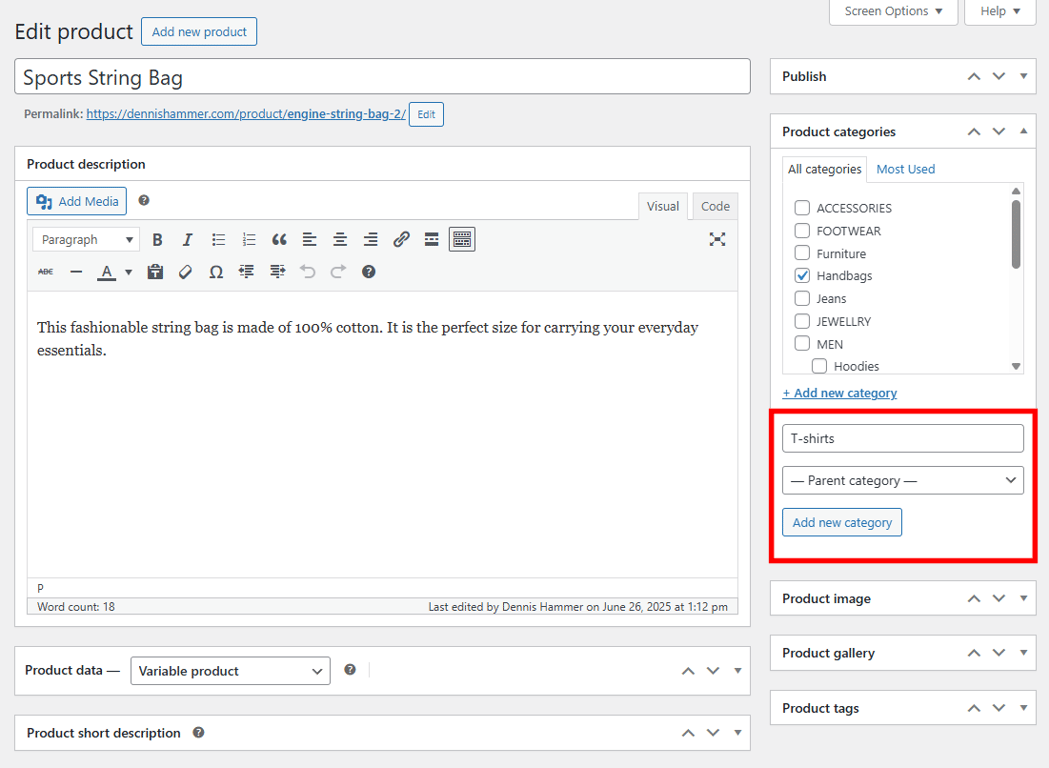
Click the Add new category button to add the new category to the category list.
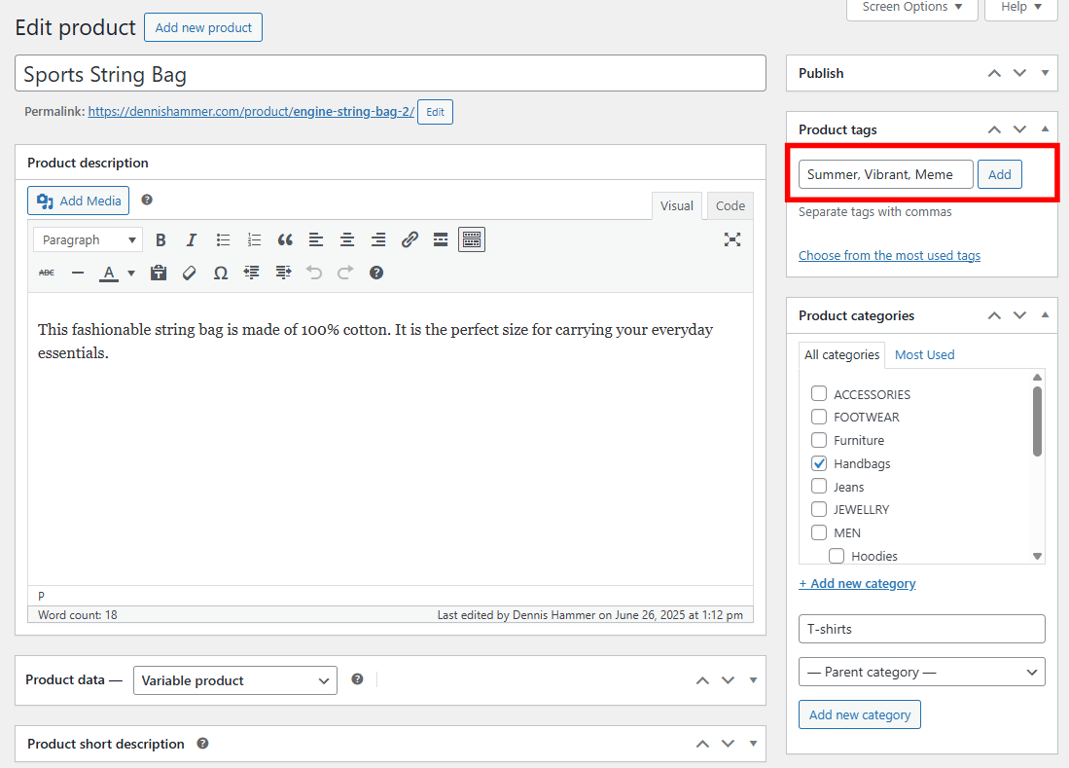
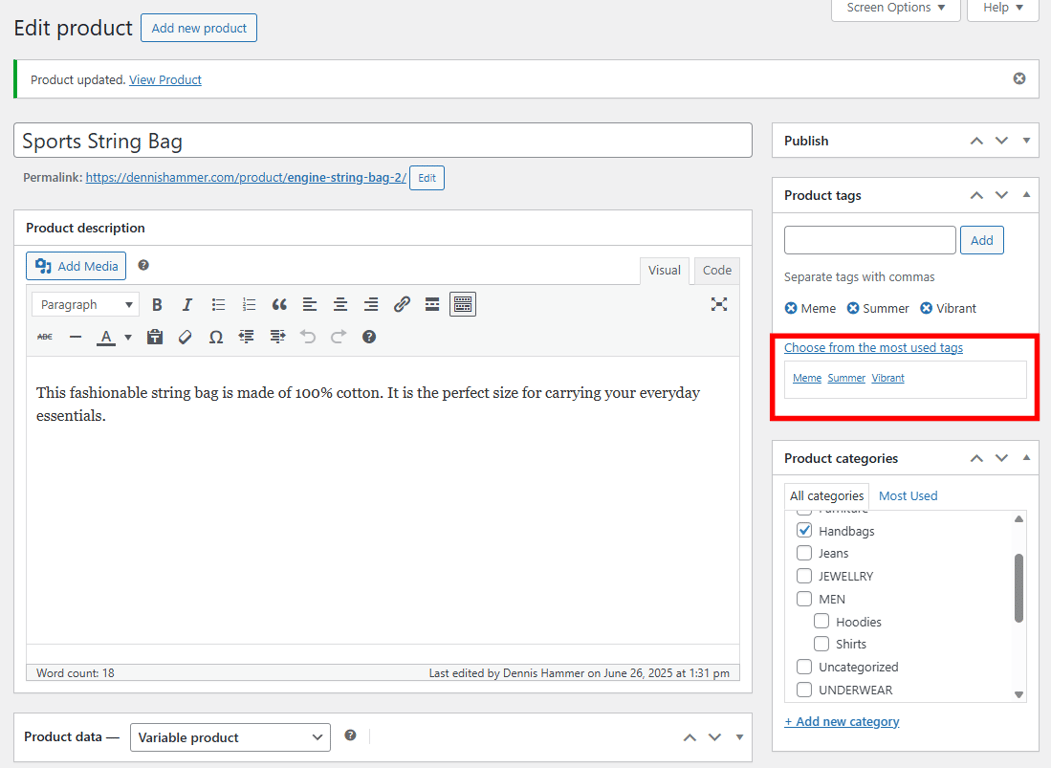
To add a tag to a product, find the Product tags box.
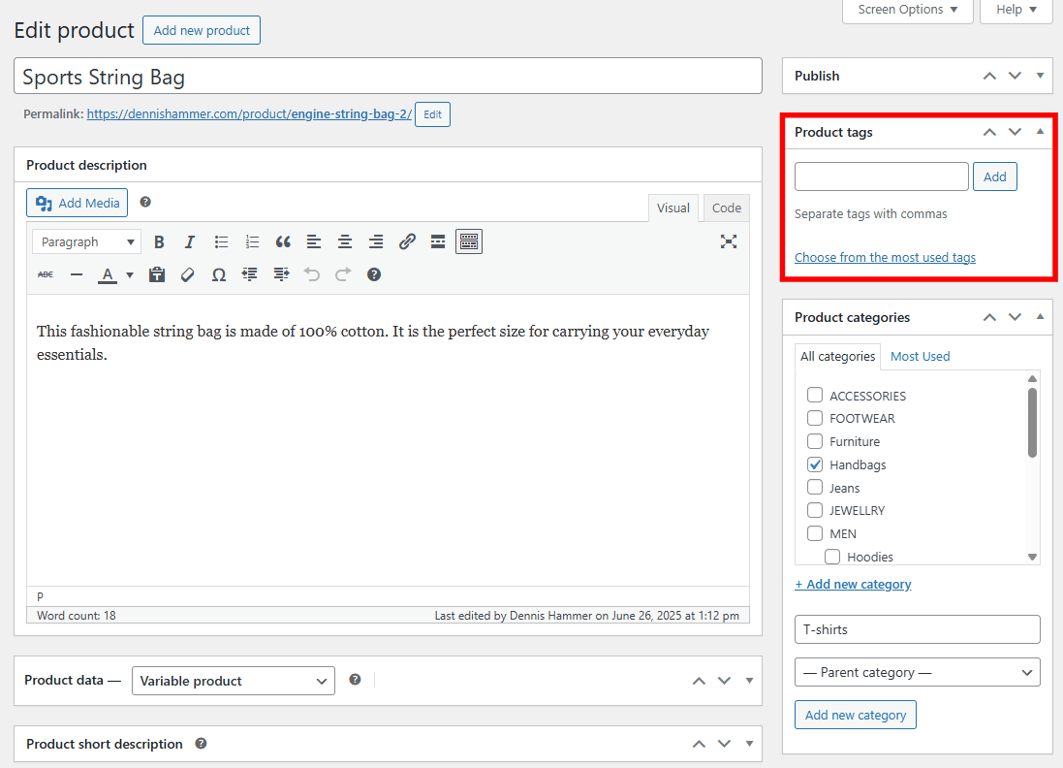
Enter tags for your products in the empty field, separated by commas, and click Add.
You can also press Choose from the most used tags to see a list of the most common tags you’ve used before.
For a deeper understanding of how these tools differ and how to use them, read our full guide on the difference between WordPress categories and tags.
6. Publish the product
Before you hit Publish, it’s important to review everything to make sure your product listing is complete and accurate.
Here’s a quick checklist to go through:
- Double-check the product name and description for spelling, clarity, and formatting.
- Verify the price and stock status under the Product Data section.
- Confirm product images are uploaded and displayed correctly.
- Make sure categories and tags are assigned so customers can find the product easily.
- Preview the product page using the Preview button to see how it looks to shoppers.
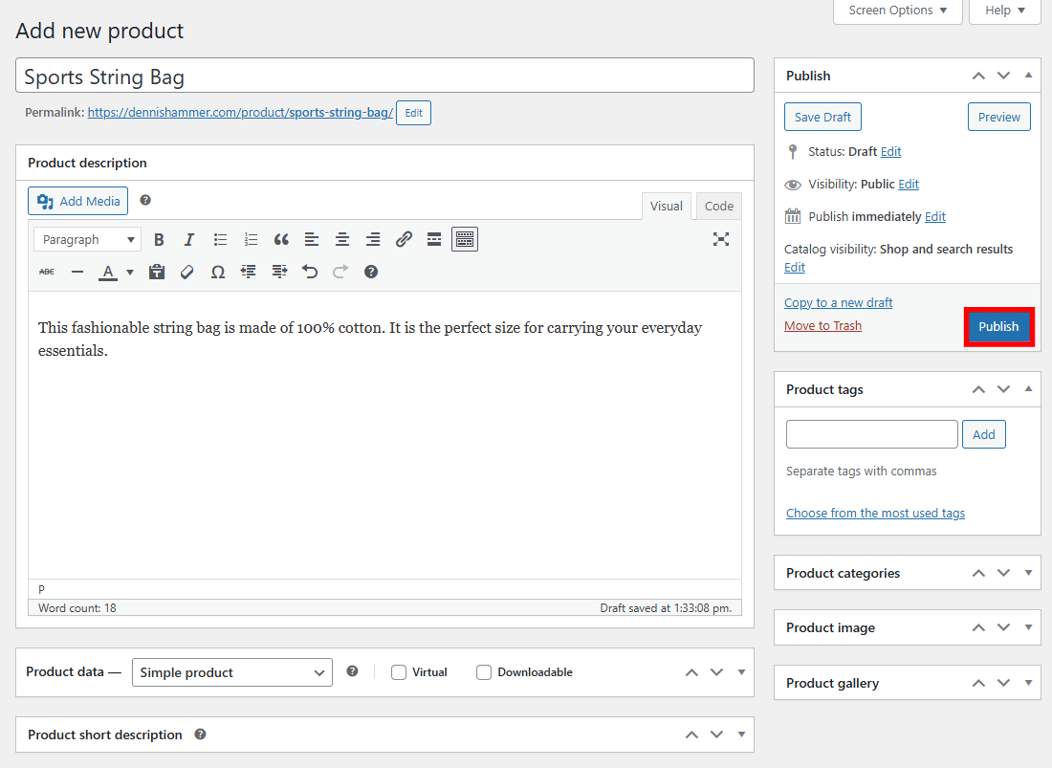
Once everything looks good, go to the Publish panel on the right side of the screen. You can publish the product immediately by clicking the Publish button.
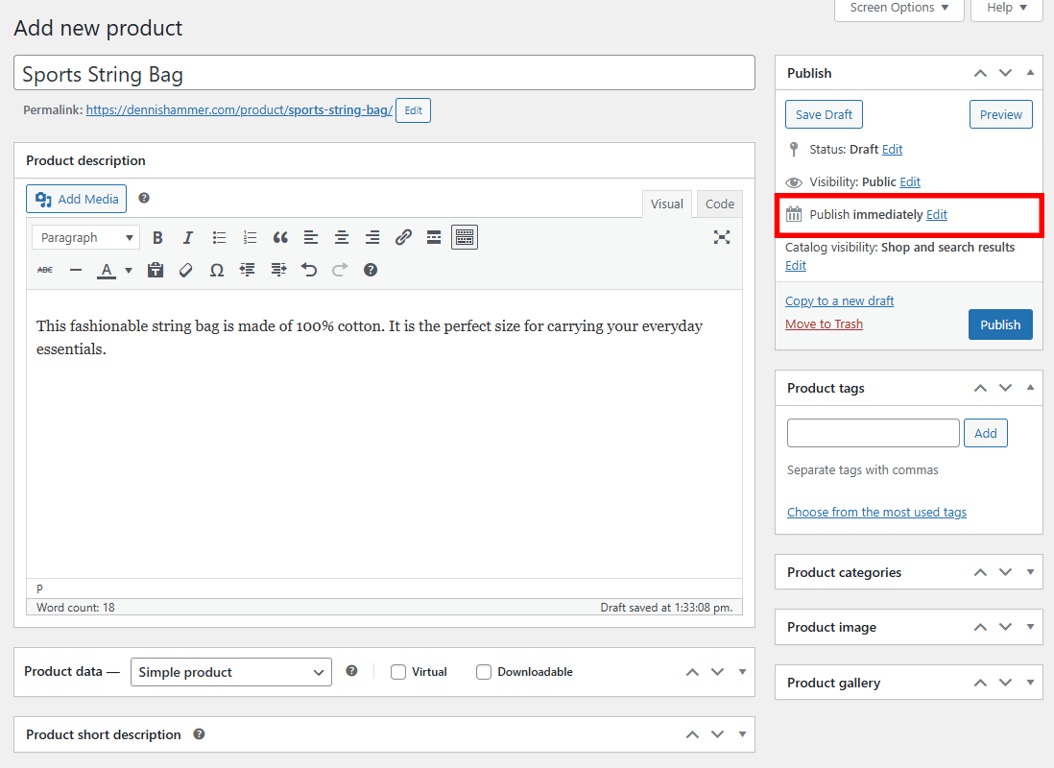
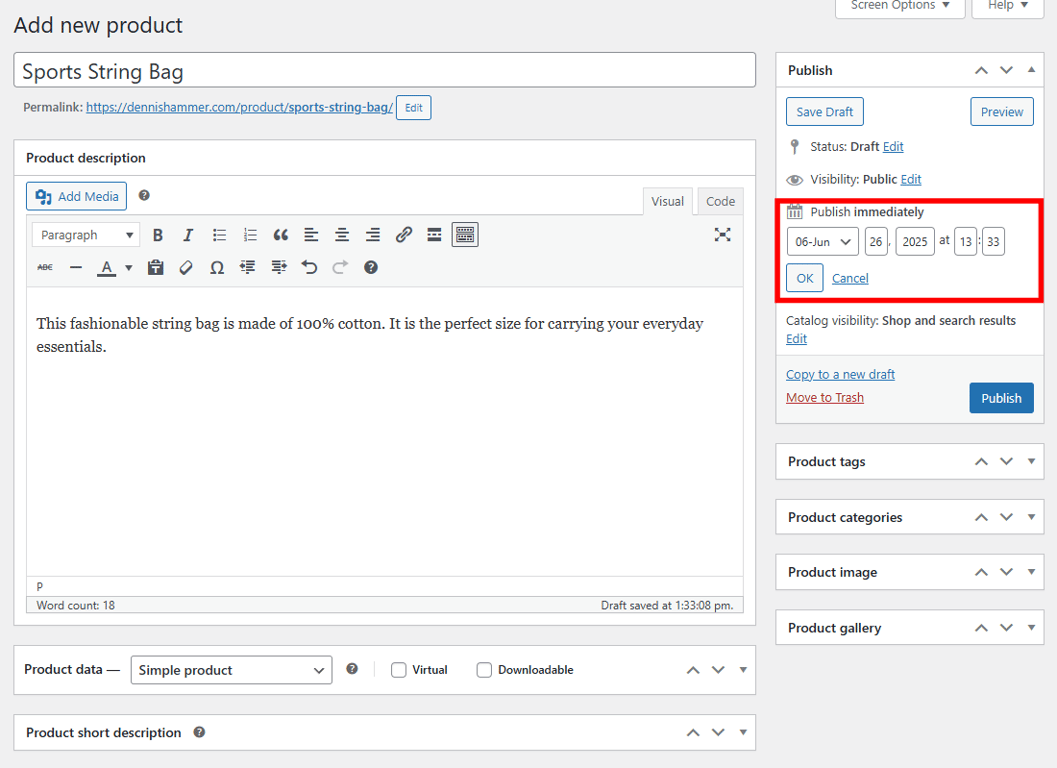
You can also schedule the product to publish at a later time. Click Edit next to Publish immediately.
Then use the date and time settings to choose when your product will go live.
How to optimize your product listing
A well-optimized product listing not only helps you stand out in search results, but it also increases the chances of turning visitors into buyers. Here are several proven ways to make your WooCommerce product pages more conversion-friendly.
Set the right price
Pricing a product is all about value and perception. Try to think beyond your costs about how your product adds value to your customers’ lives. Survey customer expectations, research your competitors, and consider psychological pricing principles.
In WooCommerce, you can set sale prices in the Product data box and even schedule them to run automatically during a specific period.
Use compelling product visuals
Your product photos are often the first thing customers notice. Use clear, high-resolution images with a neutral background and good lighting.
Show the product from multiple angles and include photos of it in use. If possible, add lifestyle images or short demo videos to give context. This builds trust and boosts conversion rates.
Most importantly, optimize your images so your site stays fast.
Include detailed product specifications
Customers want to know exactly what they’re buying. A vague description can lead to confusion and product returns. On the other hand, accurate descriptions create confident buyers.
Include any relevant specs like size, weight, color options, materials, or compatibility. For clothing, add a size chart. For electronics, include technical specs like voltage, battery life, or supported platforms.
Enable buyer reviews
User reviews build trust and provide social proof. Enabling reviews in WooCommerce lets buyers share their experience and answer questions future customers may have. Honest reviews – even if they aren’t perfect – make your store feel real and trustworthy.
Once you enable WooCommerce’s review feature, your next step is to encourage customers to leave feedback after their purchase.
Write a strong meta description
Use an SEO plugin or theme settings to add a clear, keyword-rich meta description for your product. This short summary shows up in search engine results and can influence whether someone clicks. Aim to describe the product in one sentence and highlight a benefit or feature that sets it apart.
Add FAQs to the product page
If customers often ask the same questions, add a short FAQ section to your product description. This can reduce hesitation and save you time answering emails. Common questions might cover shipping time, return policy, usage tips, or compatibility.
Use structured data (schema markup)
If your theme or SEO plugin supports it, enable product schema markup. This helps search engines understand your product page and can improve how it appears in search results, including rich snippets like price, rating, or availability, all of which can boost click-through rates.
What’s next?
Now that you know how to add products in WooCommerce, your store is ready to welcome customers. But adding products is just the beginning. To start driving sales, focus on improving your store’s performance.
Here are a few smart next steps:
- Set up payment gateways so customers can easily check out.
- Configure your shipping settings to offer accurate delivery options.
- Optimize your product pages with SEO best practices to attract more traffic.
- Promote your store through social media, email marketing, or ads.
- Track your performance using analytics and adjust based on what’s working.
Running a successful WooCommerce store takes ongoing effort, but every step you take brings you closer to your first sale. Keep learning and always look for ways to improve the experience for your customers.

All of the tutorial content on this website is subject to Hostinger's rigorous editorial standards and values.

Dennis Hammer is a content strategist, web developer, and WooCommerce store owner. He has extensive experience building and growing online stores for diverse audiences as well as crafting engaging and strategic storytelling content. Follow him on LinkedIn.


