Keep-alive: how does it improves website performance
Apr 23, 2025
/
Domantas G.
/
6 min Read
Enabling Keep-Alive can help to optimize website’s performance and deliver a better user experience. It allows a visitor’s browser to reuse a single TCP connection to load page content.
Keep-Alive is usually enabled by default on your origin server. But if this header is disabled, there are a few solutions to turn it on yourself.
This tutorial will show you the steps to enable Keep-Alive and files to prepare beforehand. It will also go over the reasons why you should activate Keep-Alive.

What Is Keep-Alive
Keep-Alive, also known as a persistent connection, is a communication pattern between a server and a client to reduce the HTTP request amount and speed up a web page.
When Keep-Alive is turned on, the client and the server agree to keep the connection for subsequent requests or responses open.
How Does Keep-Alive Work
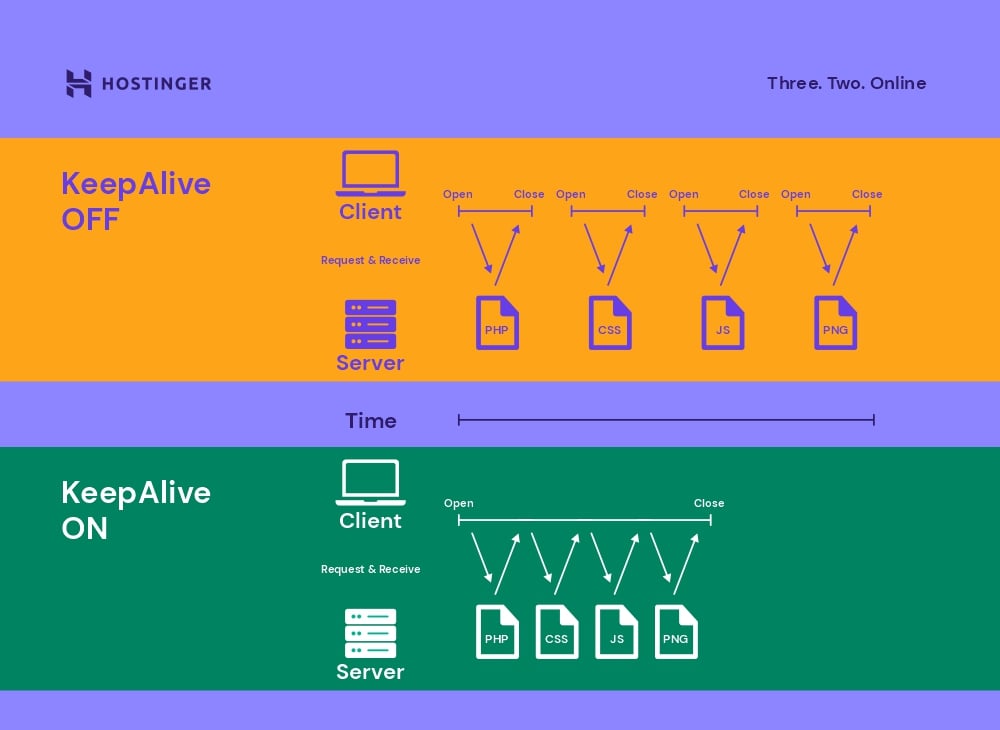
By default, HTTP connections close at the end of data transactions. This means that clients create a new connection to request each file of a page and servers close these TCP connections after sending the data.
However, if a server needs to respond to multiple HTTP requests simultaneously and serve a single file for each new TCP connection, the site page’s load time will be increased. This can lead to a poor user experience.
To overcome this issue, website owners need to enable the Keep-Alive header to limit the number of new connections.
By turning the Keep-Alive connection header on, clients can download all the content such as JavaScript, CSS, images, and videos through a single TCP connection instead of sending a different request for each file.
Here’s a picture to demonstrate how Keep-Alive works:
Advantages of Enabling Keep-Alive
Keep-Alive can improve website speed and performance as it maintains an open connection between a client and a server, saving the time needed to serve files.
Enabling Keep-Alive has additional benefits, such as:
- Reduced CPU and memory usage – using persistent connections will benefit web hosting users. As fewer HTTP requests are generated, it reduces the usage of server resources.
- HTTP pipelining – a client can deliver requests via the same TCP connection without waiting for the server to respond.
- Modern browser support – many browsers use persistent connections automatically as long as the destination servers support Keep-Alive. A modern browser typically allows six connections per domain.
- Increased SEO – enabling Keep-Alive improves site performance, which affects its search engine optimization (SEO) performance.
- Reduced network congestion – lowering the number of TCP connections between servers and clients frees up network bandwidth.
- Improved SSL/TLS performance – with Keep-Alive, an SSL/TLS connection only opens once, avoiding the need for additional handshakes and improving site latency.
Requirements Before Enabling HTTP Keep-Alive
The file you need to prepare before enabling the HTTP Keep-Alive header depends on what server you use and your access privileges.
Make sure that you have access to one of the following files before continuing this guide:
- .htaccess – a directory-level configuration file that can be used to change the functions and features of sites hosted on Apache.
- httpd.conf – the main configuration file of Apache. Note that you might not have access to this file if your website runs on shared hosting.
- nginx.conf – the main configuration file of the NGINX.
When you’re finished, follow these steps to enable Keep-Alive:
1. Test your Website’s Speed
Although many hosting providers have Keep-Alive enabled by default, some of them might have this header disabled for performance reasons.
To check whether Keep-Alive is enabled on your server, run a website speed test using a tool such as GTMetrix.

Hostinger users can also use the page speed test feature on hPanel to check if Keep-Alive is working properly. You can access it by opening the hPanel dashboard and then going to the Performance → Page Speed section.
Choose the website you want to test and the type of device. Click Analyze, then wait until the process is complete. If Keep-Alive is working properly, you should see a good score.
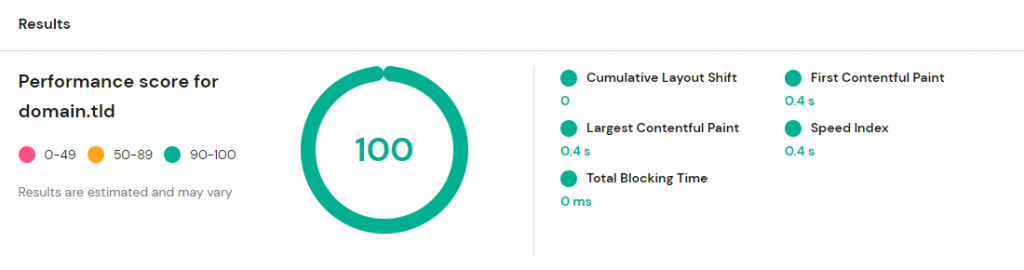
If the analysis tool shows that Keep-Alive is disabled, move to the next step.
2. Enable Keep-Alive
To enable Keep-Alive, you need to explicitly request it via the HTTP header by accessing .htaccess or the main configuration file of your web server. If you turn on Keep-Alive, the HTTP response header will show Connection: keep-alive.
The following tutorial will cover four different methods to enable Keep-Alive on your server.
Option 1 – Edit the .htaccess file
Enable Keep-Alive and override any server settings by adding the following code to your .htaccess file:
<ifModule mod_headers.c>
Header set Connection keep-alive
</ifModule>
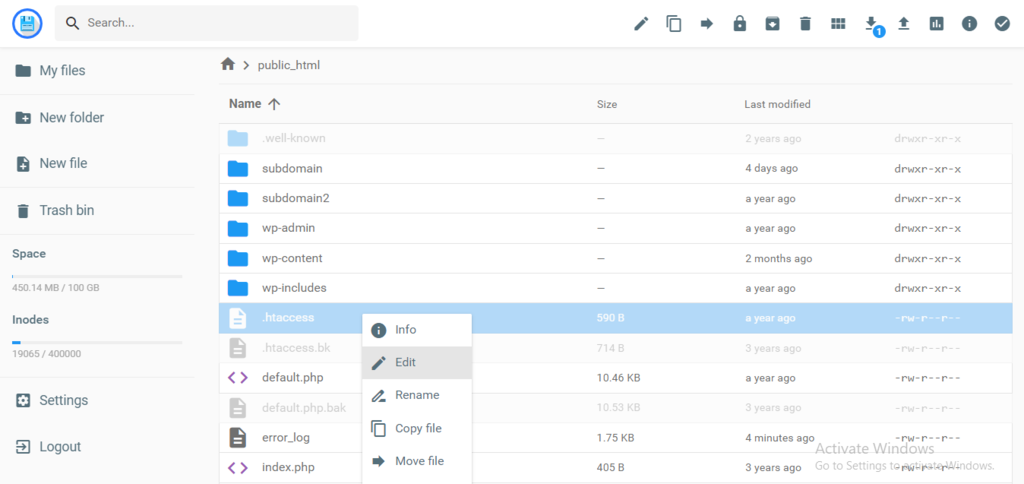
This method should work on most Linux-based shared hosting providers. If you use Hostinger, locate the .htaccess file using the File Manager.
To do that, open the hPanel dashboard, then click the File Manager button. You can find the .htaccess file under the public_html folder. Right-click on the file, then choose edit to add the code.
Make sure to test your website for any errors after editing the .htaccess file.
Option 2 – Enable Keep-Alive in Apache via httpd.conf file
If you have access to the Apache configuration file, it’s possible to enable the extension from there.
To locate the httpd.conf file, enter the following command into the command line:
find / -name httpd.conf
The following parameters affect Keep-Alive functionality in Apache, from enabling the persistent connection to defining the idle connection timeout:
- KeepAlive – set to
KeepAlive Onto enable the extension orKeepAlive Offto disable it. - MaxKeepAliveRequests – this directive sets the maximum number of user requests the server will maintain during each Keep-Alive connection. Consider setting its value to 50 requests for a single connection. Increase the limit if your server needs to deliver more responses.
- KeepAliveTimeout – this value specifies how long the server waits for new requests from a client. It’s recommended to keep the idle connection open for five or ten seconds and increase it if required. Setting this value too high may cause a high server load and waste memory resources.
Here is what the configuration should look like:
#
# KeepAlive: Whether or not to allow persistent connections (more than
# one request per connection). Set to "Off" to deactivate.
#
KeepAlive On

#
# MaxKeepAliveRequests: The maximum number of requests to allow
# during a persistent connection. Set to 0 to allow an unlimited amount.
# We recommend you leave this number high, for maximum performance.
#
MaxKeepAliveRequests 50

#
# KeepAliveTimeout: Number of seconds to wait for the next request from the
# same client on the same connection.
#
KeepAliveTimeout 10
Option 3 – Enable Keep-Alive Header in NGINX
As a web server and reverse proxy, NGINX has Keep-Alive enabled by default. In some cases, however, it may be disabled. Users can enable it using ngx_http_core_module.
Look for the value keepalive_disable – in most cases, this will be the reason why Keep-Alive is not working.
Before deleting the value to enable Keep-Alive, make sure to find out why it was disabled in the first place.
Option 4 – Enable Keep-Alive in Windows Server (IIS)
If you use a Windows-based server, enable the Keep-Alive extension through the command line.
The following command will enable it:
appcmd set config /section:httpProtocol /allowKeepAlive:true
If you wish to disable Keep-Alive, use:
appcmd set config /section:httpProtocol /allowKeepAlive:false
Windows Server users can also enable the Keep-Alive header by editing the configuration files directly or writing WMI scripts.
3. Test the changes
Once Keep-Alive is enabled, run another scan with GTMetrix or KeyCDN’s HTTP Header Checker to see whether the extension is active.
It’s also possible to check the HTTP header via the terminal using the following command:
curl -I http://example.com/example.php
In the following example, we’ll check the HTTP header of hostinger.com:
curl -i http://hostinger.com/index.php
This gives us the following results:
HTTP/1.1 301 Moved Permanently
Date: Tue, 27 Jul 2021 01:55:24 GMT
Transfer-Encoding: chunked
Connection: keep-alive
Cache-Control: max-age=3600
Expires: Tue, 27 Jul 2021 02:55:24 GMT
Location: /index.php
The Connection: keep-alive part shows that Keep-Alive is functional.

Conclusion
Enabling Keep-Alive is a great way to optimize your website as it helps improve speed and performance, ensuring faster load times and higher efficiency.
By turning the Keep-Alive header on, the client and server can reuse a single TCP connection for a number of requests and responses. This eliminates the need to establish new connections for each HTTP request or response.
Let’s recap the steps to enable the Keep-Alive header:
- Analyze your site – use a tool like GTMetrix to check whether Keep-Alive is functional.
- Enable Keep-Alive – access .htaccess or your server’s main configuration file to enable Keep-Alive via the HTTP header. Windows Server users can do this via the command line.
- Test the changes – run another scan to see if Keep-Alive is active.
We hope this article has helped you enable Keep-Alive. If you have any questions, let us know in the comment section below.
Learn more about boosting website speed
How to Leverage Browser Cache
What Is Website Caching and How to Clear It
How to Minify CSS, HTML and JavaScript
How to Enable GZIP Compression
How to Run a GTmetrix Speed Test
All of the tutorial content on this website is subject to Hostinger's rigorous editorial standards and values.

Domantas leads the content and SEO teams forward with fresh ideas and out of the box approaches. Armed with extensive SEO and marketing knowledge, he aims to spread the word of Hostinger to every corner of the world. During his free time, Domantas likes to hone his web development skills and travel to exotic places.