WooCommerce custom fields: A complete guide for store owners
Sep 18, 2025
/
Dennis H.
/
9 min Read

WooCommerce custom fields let you add extra information that doesn’t fit into the default product options. They help you improve the shopping experience for your customers with more relevant product data.
In this guide, we’ll explain what WooCommerce custom fields are, why they’re useful, and how to add them to your store using built-in tools, plugins, or custom code. You’ll also learn how to troubleshoot common issues.
What are WooCommerce custom fields?
WooCommerce custom fields let you add extra information to your product pages beyond what’s available by default.
Out of the box, WooCommerce gives you basic fields like product name, price, SKU, and description. But that’s not always enough. Your store may sell products that need more details, options, or personalization.
Custom fields help you fill those gaps. They can store just about any kind of data: technical specs, delivery estimates, care instructions, or even customer input like engraving text.
You can create custom fields for internal use (visible only in the admin area) or display them to customers right on the product page.
Limitations of default WooCommerce product fields
The default WooCommerce setup is simple by design. While that’s great for beginners, it can become limiting as your store grows or your product catalog becomes complex. Without custom fields, here’s what you can’t do:
- Add non-standard product data like dimensions, brand, material, ingredients, or technical specs that don’t have a default field.
- Let customers personalize a product by entering a name, custom message, or engraving text. They could even upload a file.
- Display extra product features like care instructions, shipping lead time, sustainability info, or compatibility notes.
- Store internal notes or special settings that only admins should see, such as restock dates or supplier codes.
- Attach conditional content based on product type, category, or user role, such as showing special instructions only for certain products.
- Create dynamic layouts by separating product data into different sections or tabs.
- Support complex filtering and faceted search on the shop or category pages using specific product attributes not built into WooCommerce.
- Capture extra data for reporting or exports, such as custom fields needed for third-party platforms or logistics systems.
Why do you need custom fields in WooCommerce?
Adding custom fields opens the door to a more flexible and user-friendly store. Here’s how:
- Improved product information – Give customers all the details they need to make a confident purchase.
- Better customer experience – Help shoppers understand your products at a glance, without digging through long descriptions.
- SEO advantages – Structured product data can improve how your pages appear in search results, especially when custom fields are used with schema markup.
- Support for personalization – Let customers add custom text, choose colors, or upload files to personalize their purchase.
- Simplified backend management – Store extra product data in a structured way that makes managing large inventories easier.
Real-world examples of WooCommerce custom fields
Still not sure what custom fields can do? Let’s look at three real examples.
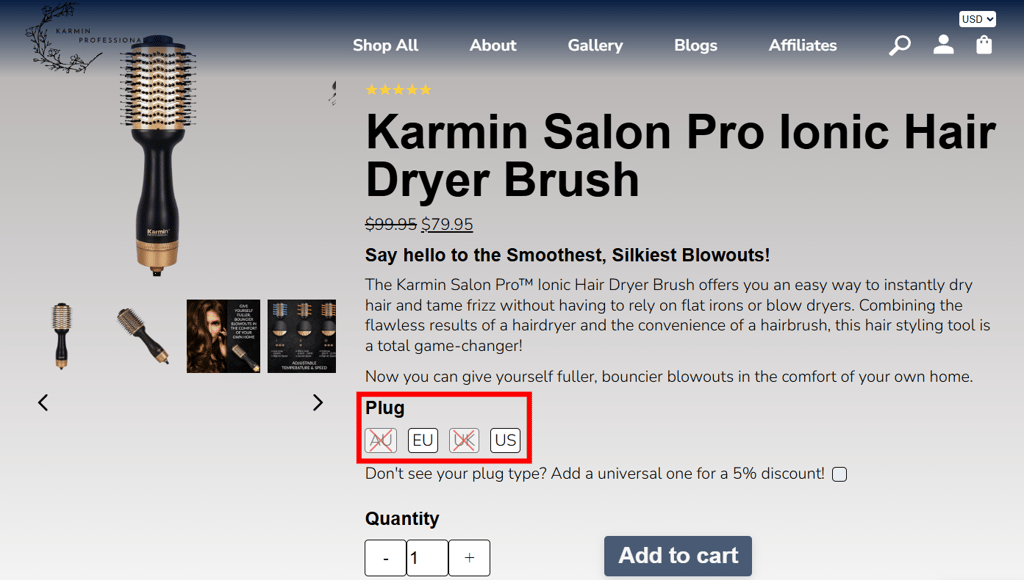
Karmin Professionals use a custom field on their product page to list the types of compatible plugs for their products.
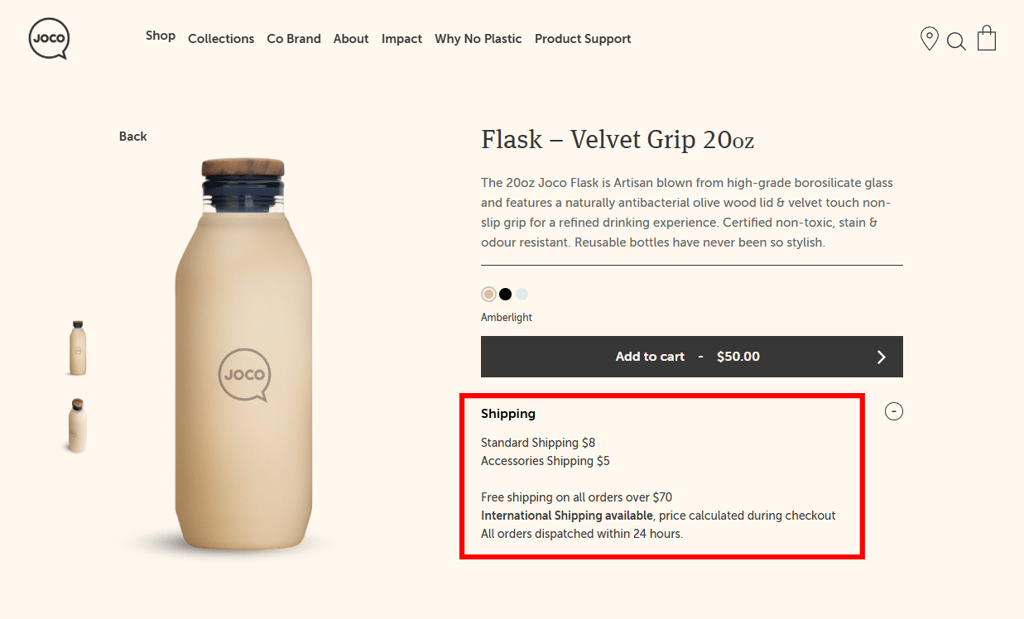
Joco Cups include a custom field beneath their “add to cart” button that details their shipping policy.
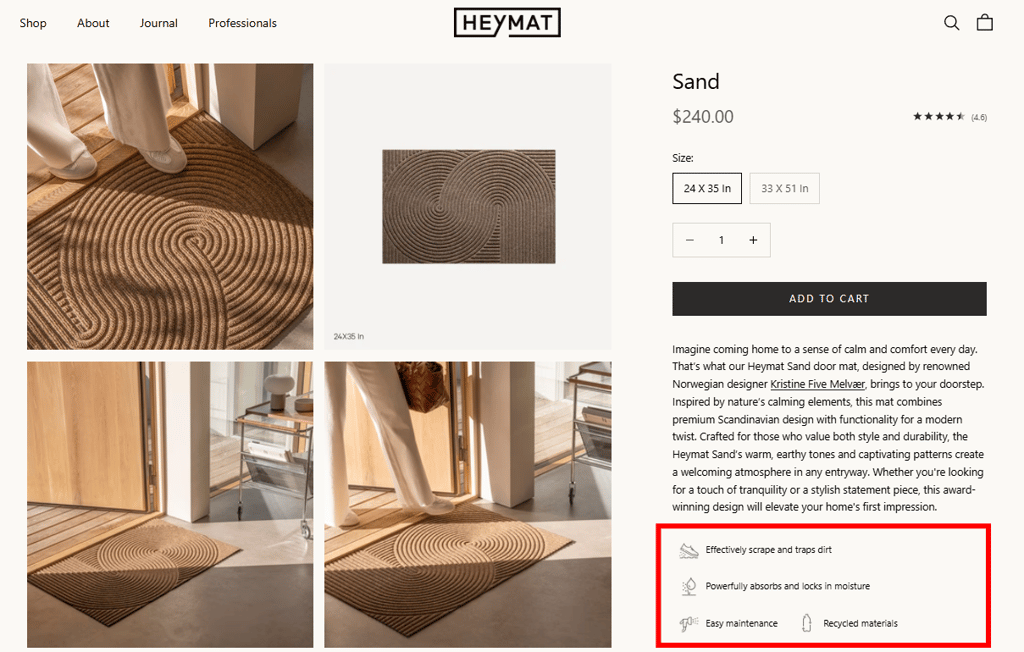
Hey Mat uses a custom field to display important features about each product.
How to add custom fields in WooCommerce
Now that you know why custom fields matter, let’s walk through three ways to add them to your WooCommerce store: using built-in options, installing a plugin, or writing custom code. Each with its own advantages and limitations.

Using built-in WooCommerce custom fields options
Creating custom fields with WooCommerce’s built-in tool is simple because it doesn’t require any additional plugins. However, it requires basic technical knowledge, isn’t very user-friendly, and doesn’t offer much flexibility for displaying fields on the front end.
The steps below apply to both the classic product editor and the newer WooCommerce Product Editor (introduced in WooCommerce 8.9). The interface may look slightly different depending on which editor your store uses.
For the classic product editor
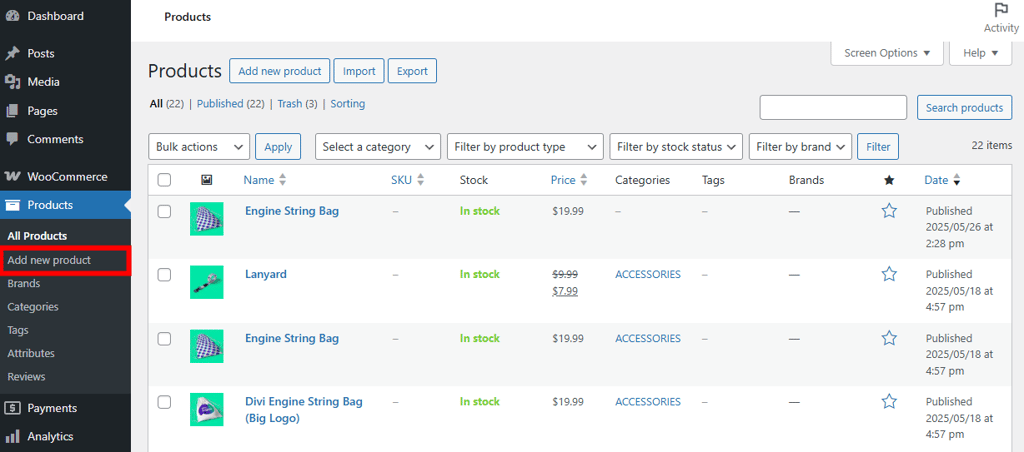
- Go to Products → Add new product in your WordPress dashboard. You could also edit an existing product.
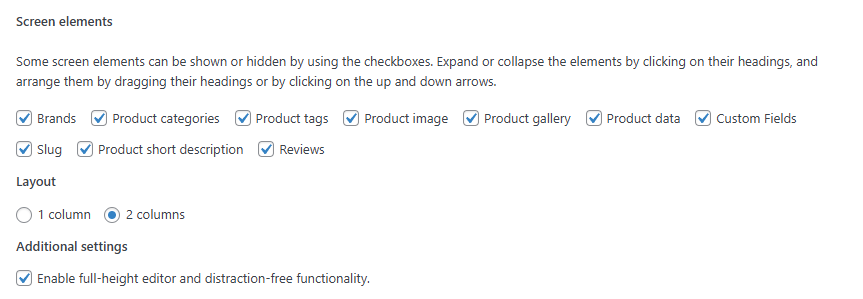
- On the product edit page, click the Screen Options button at the top-right corner of the page.
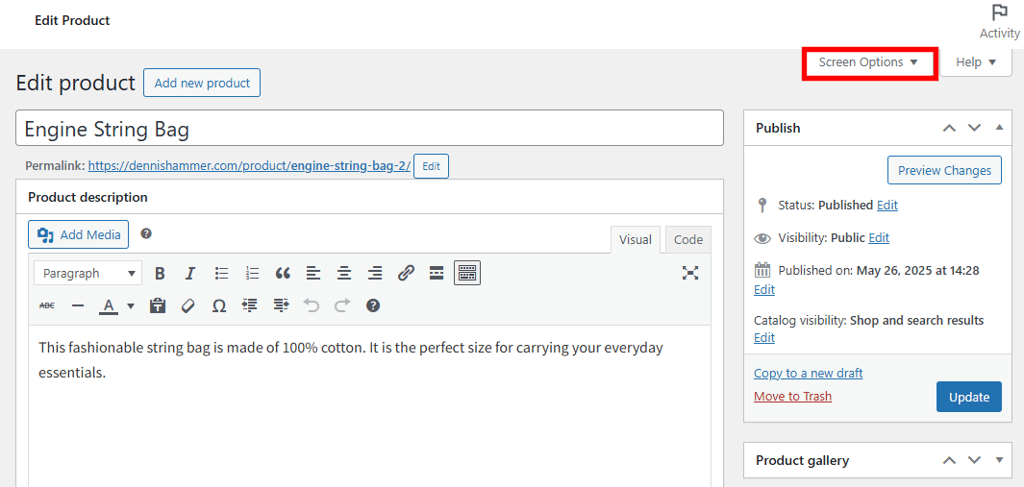
- Find and check the Custom Fields option to enable it for products.
- Scroll down the page until you find a new section called Custom Fields.
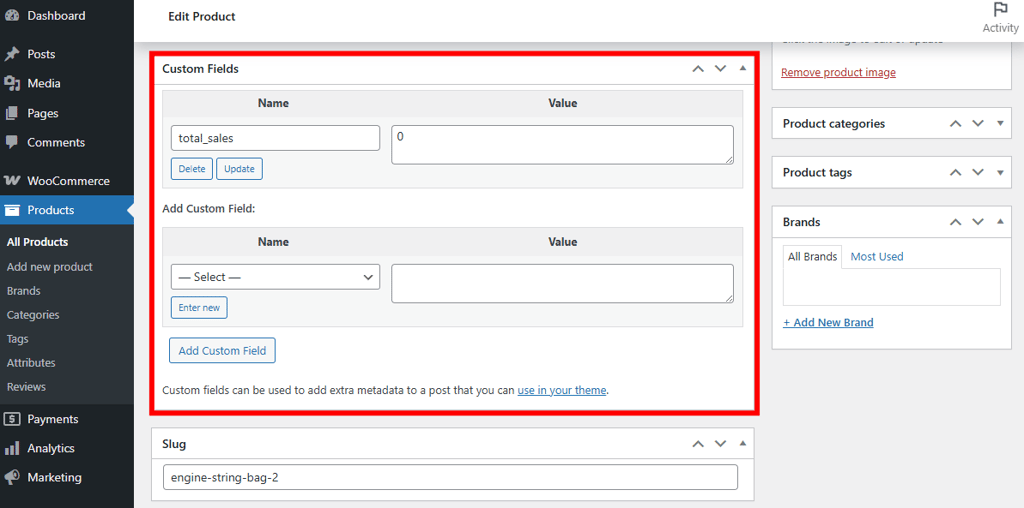
- Enter the name of a new field in the Name input box. This is only used for reference. It won’t be displayed on your site.
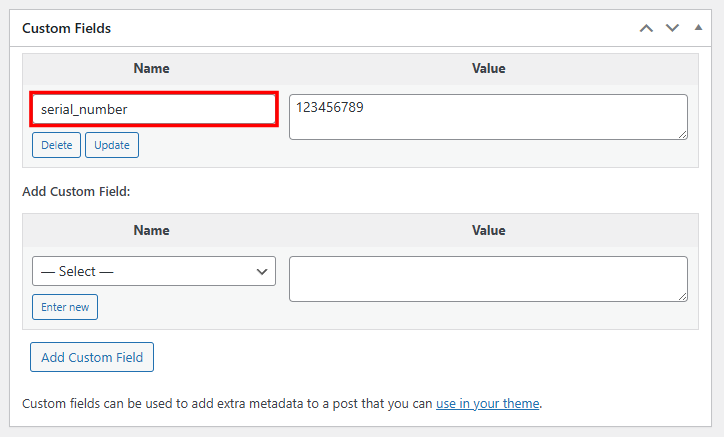
- Enter the value for the custom field in the Value input box. This can be anything relevant to the product. For example, you might include a serial number or unique specifications.
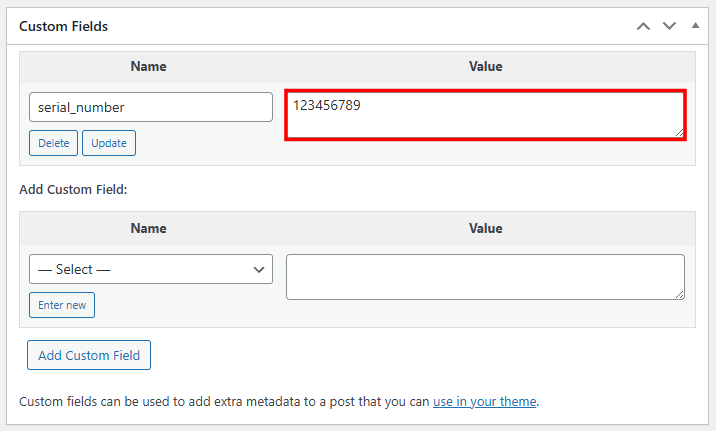
- Click Update to save the field.

- To add additional custom fields, use the Add Custom Field button.
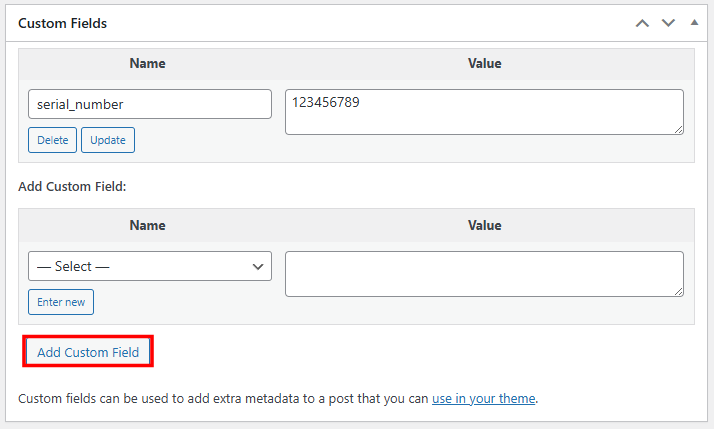
- Click Update at the top-right of the product editor when you’re finished.
For the new product editor:
- Go to Products → Add new product or edit an existing product.
- In the new editor interface, look for the Organization tab in the top row.
- Within the Organization tab, you’ll find a toggle for Custom fields.
- Enable the custom fields toggle to access the custom fields interface.
- Add your custom field name and value as described in the classic editor steps above.
- Save your product to store the custom field data.
Using a plugin to add custom fields
The most effective way to add custom fields is through a WordPress plugin. They’re easy to manage and don’t require any coding.
Free Options:
- Advanced Custom Fields (Free): Our top recommendation for its flexibility and ease of use. Works with any post type, including WooCommerce products.
- Advanced Product Fields for WooCommerce: A free plugin specifically designed for WooCommerce that offers basic custom field functionality without cost.
- Custom Fields Suite: Another free alternative that provides simple custom field capabilities.
Premium Options:
- Advanced Custom Fields Pro: The paid version of ACF ($49/year) offers additional field types, repeater fields, and advanced features.
- Product Add-Ons for WooCommerce: The official WooCommerce extension ($79/year) that integrates seamlessly with WooCommerce but only works on products.
- WooCommerce Extra Product Options: A popular third-party premium plugin with extensive customization options.
We recommend using Advanced Custom Fields (ACF) because it’s flexible without being complex, and you can use it on any post type, not just WooCommerce products.
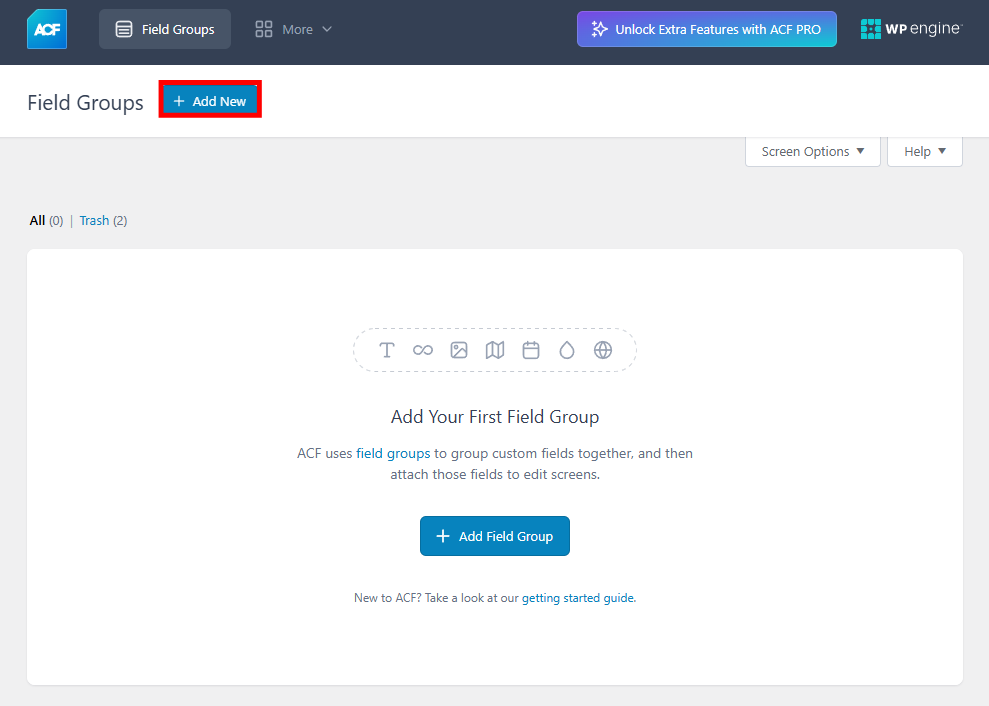
- After installing ACF, go to ACF → Field Groups.
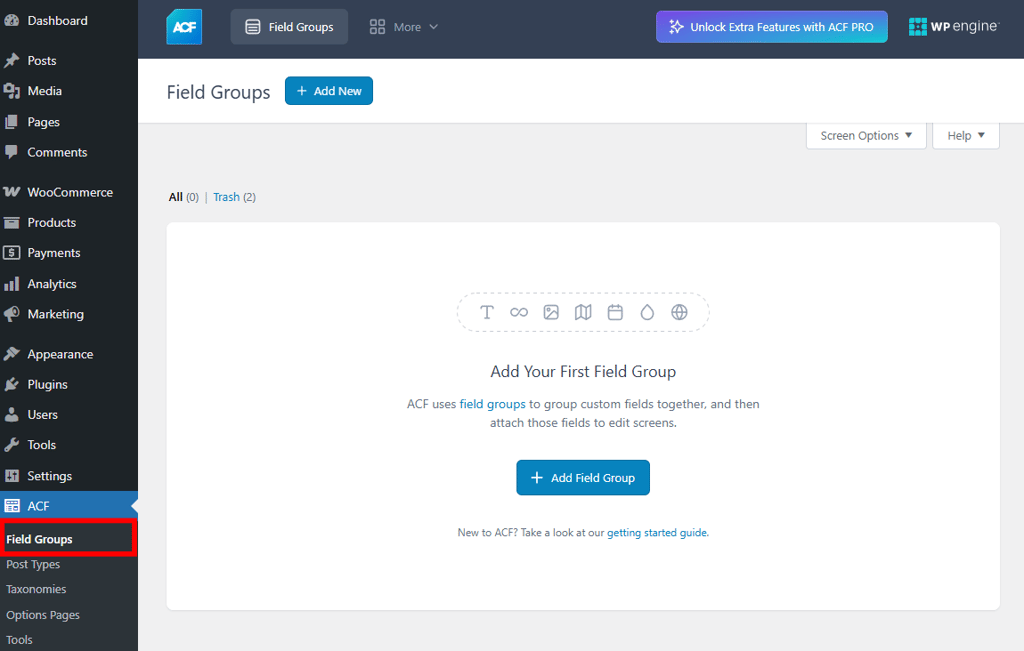
- Click the + Add New button (or the Add Field Group button).
- Give your field group a title. This is only for internal reference; it will not appear on your site’s front end.
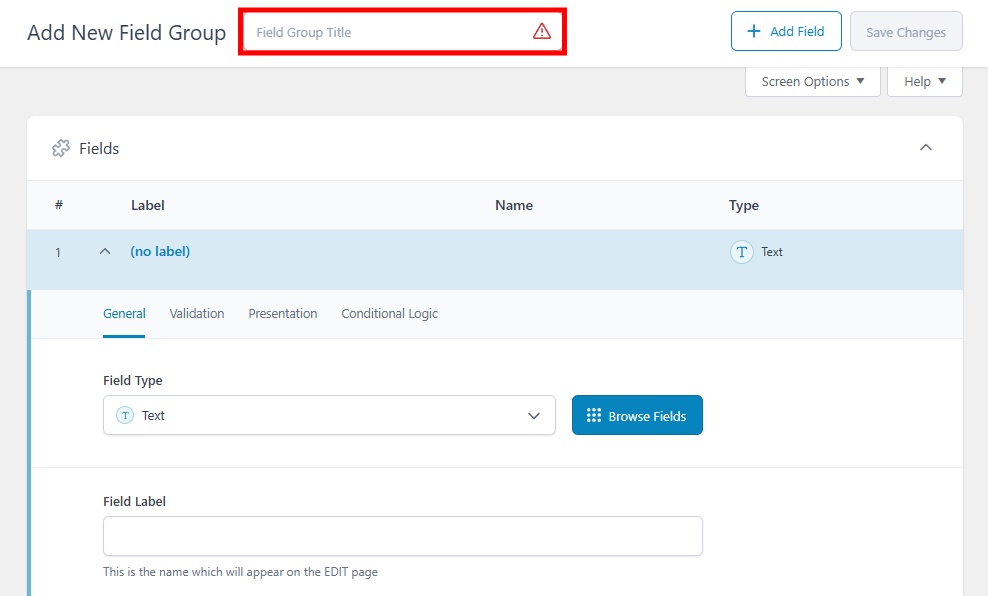
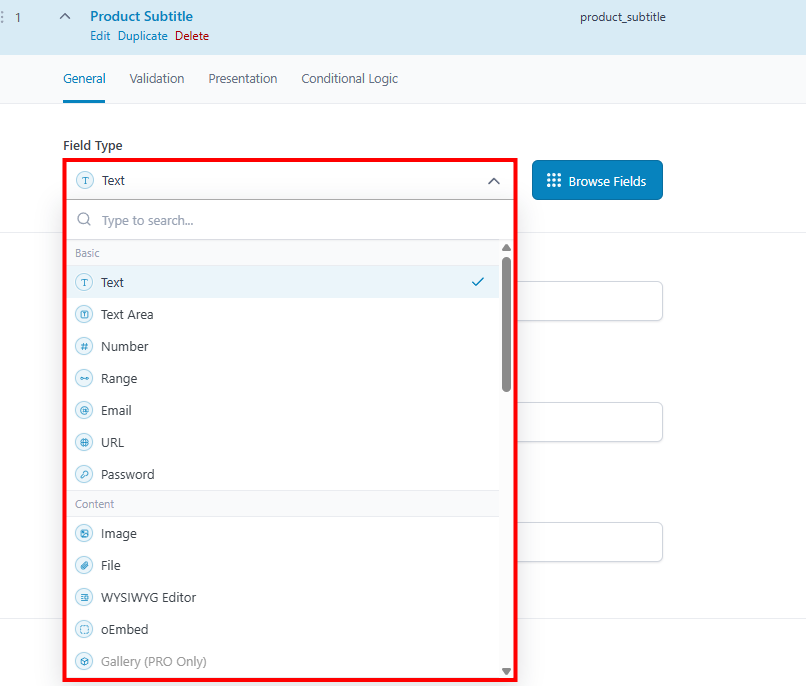
- Choose a Field Type. This refers to the kind of text box that will appear on the product editor. The most common types are text, text area, number, range, email, URL, and password. ACF also offers content, layout, and advanced fields.
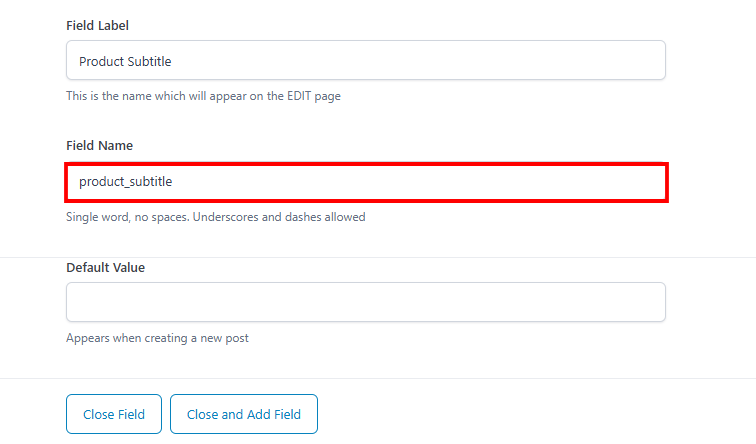
- Provide a Field Label. This is the name of the field in the backend product editor (so you know what kind of value to provide).
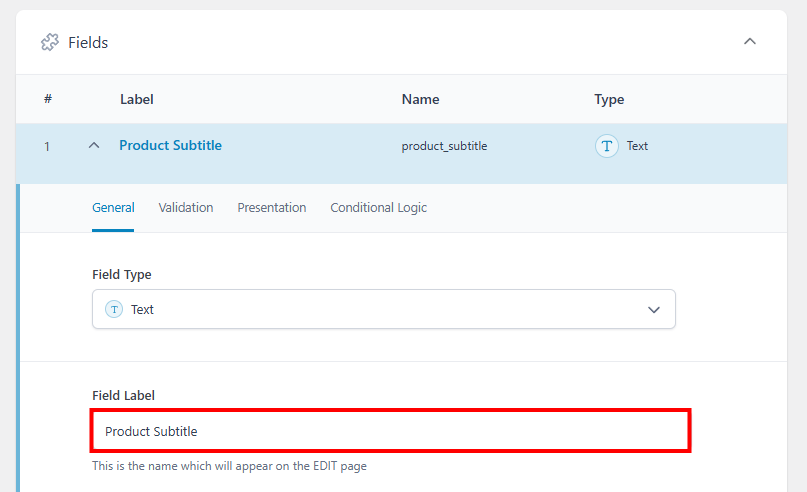
- The Field Name should automatically populate after you input a label. This is the unique identifier used in the WordPress database. It’s not used in the product editor or the frontend. You can change it if you like, but using a name that matches the label is ideal for simplicity in case you ever need to write a PHP snippet.
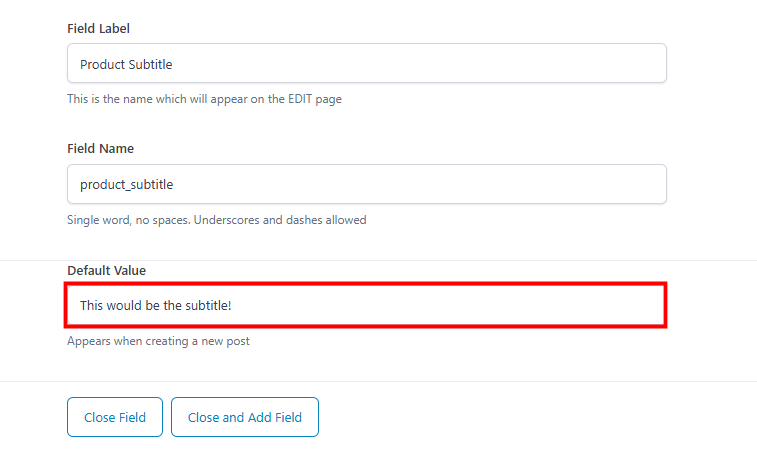
- Provide a Default Value. This helps you or anyone who edits products to know what kind of information is expected in the field.
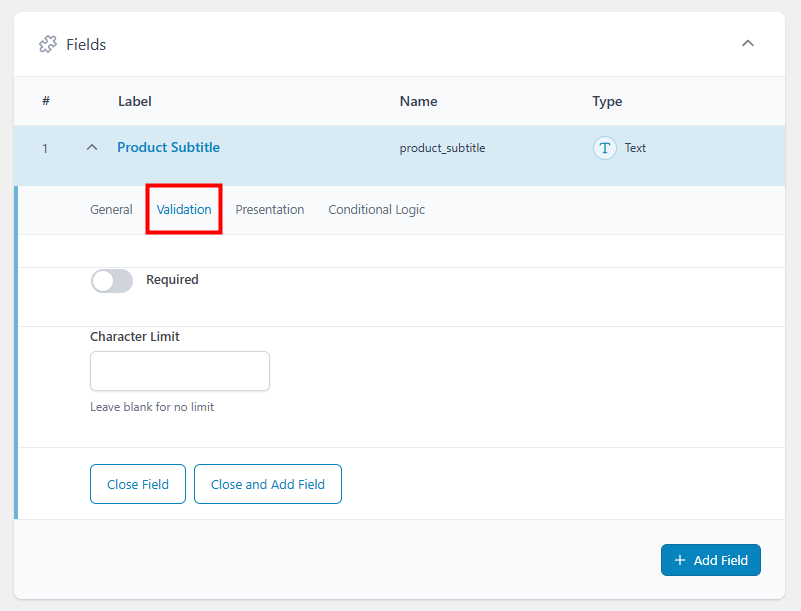
- Switch over to the Validation tab. Check the Required toggle if the user must input some value in this field. In the case of our example, the user would need to provide a subtitle for the product. Add a character limit if necessary.
- Move to the Presentation tab. Provide any instructions that will help editors use the field properly.
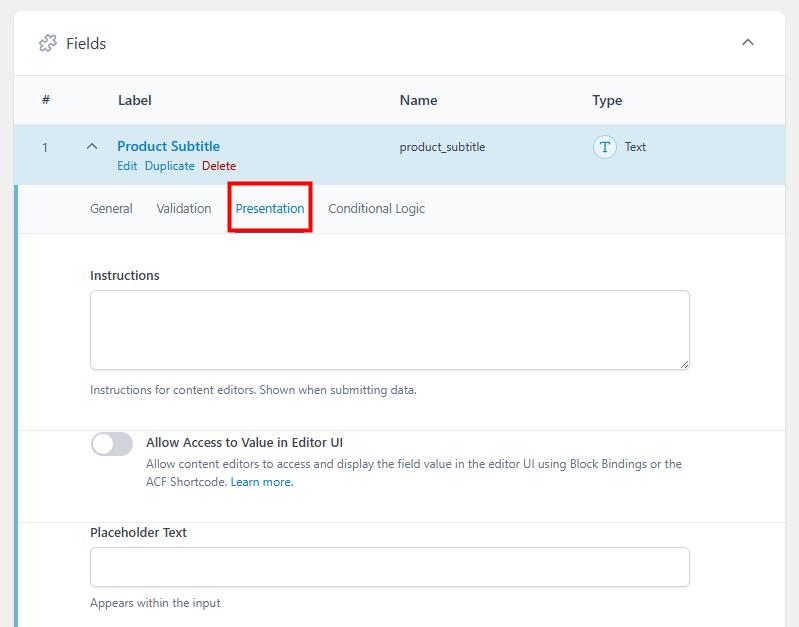
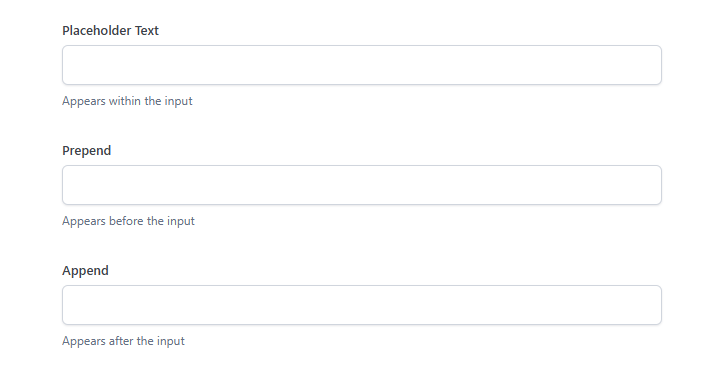
- Add placeholder text and any text you want to appear before and/or after the input.
- Set the Wrapper Attributes. Including a width will shorten the size of the field in the product editor. This makes your Field Group more compact. You can also include custom CSS classes or IDs that you want to carry over to the frontend of your site.

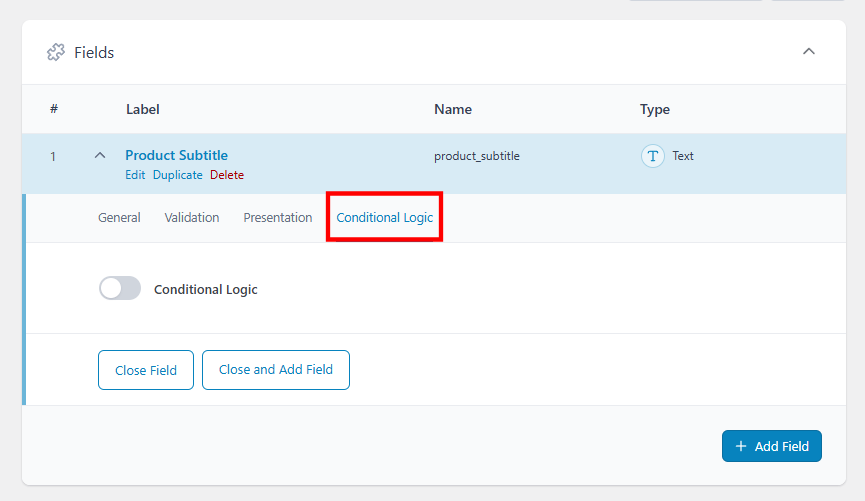
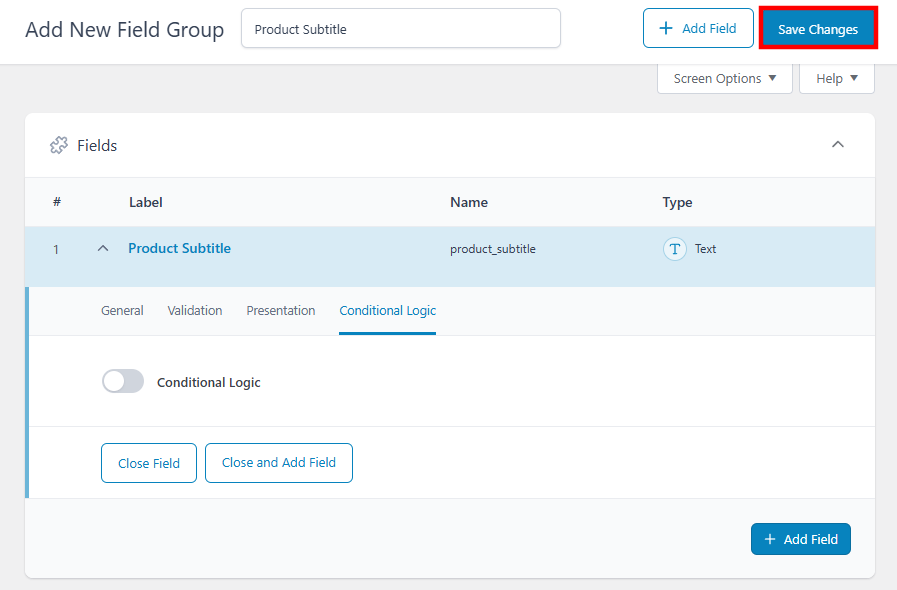
- Switch to the Conditional Logic tab and slide the toggle to the on position. Here, you can create any rules for displaying the field in the product editor. For example, you might want to show this field if another field has a specific value.
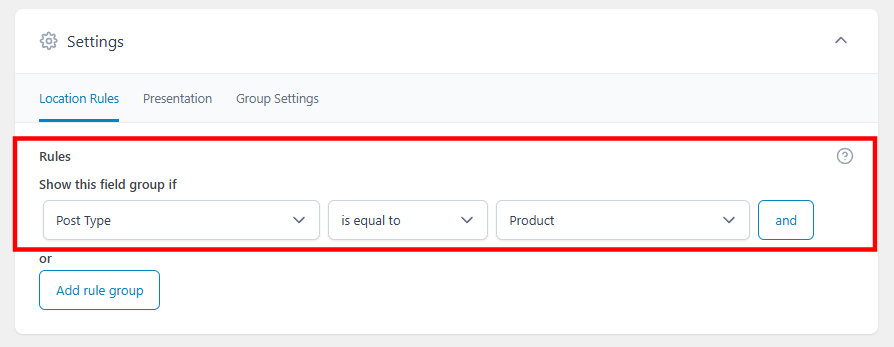
- Scroll down to the Settings section. The Location Rules tab lets you decide where to display the Field Group in your WordPress backend. To make the field appear on product pages, set the following rule: Show this field group if Post Type is equal to Product.
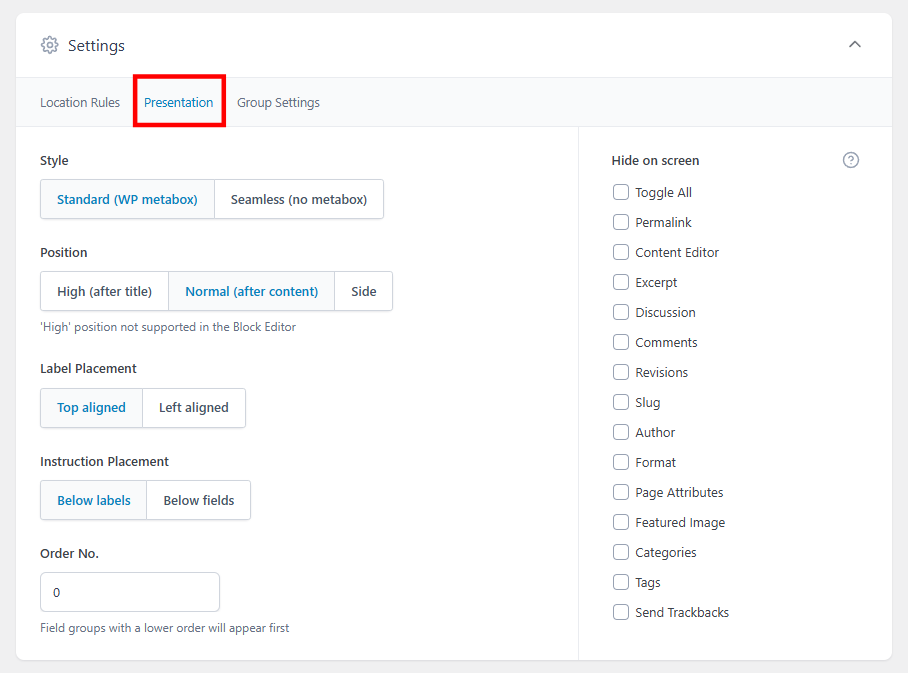
- In the Presentation tab, you can adjust the style and position of the Field Group and change the label placement.
- Click Save Changes at the top when you’re finished.
- Now you can visit the WooCommerce product editor to see your new custom field.
Using custom code
If you’re comfortable editing code, you can manually add custom fields to WooCommerce by placing a few snippets in your theme’s functions.php file. This method gives you full control over how fields are added, saved, and displayed, but it requires some basic PHP knowledge.
Important! We don’t recommend editing your functions.php file directly. Instead, use a plugin like Code Snippets that allows you to safely input blocks of code without damaging your website.
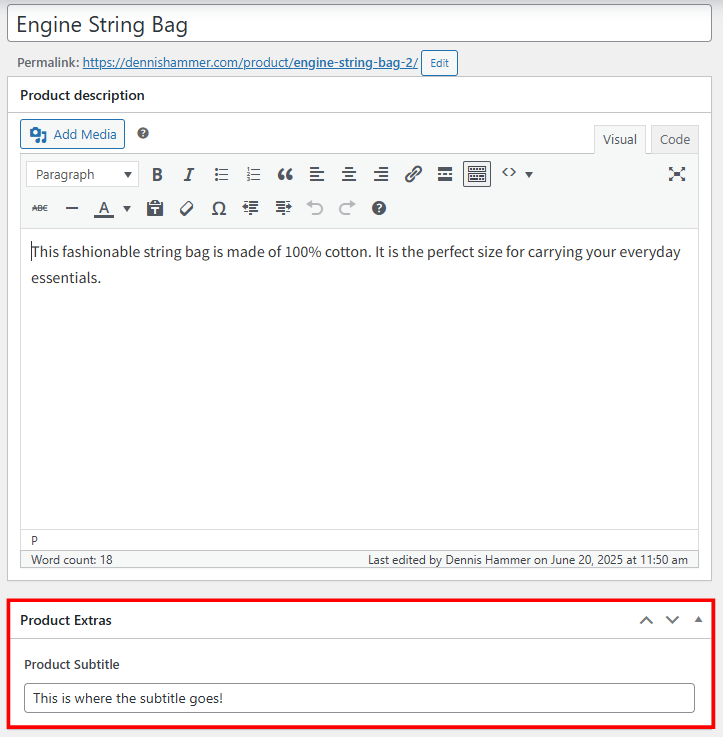
Paste in this code to add a custom field to the product editor. It’s based on three functions that add a field called “Product Subtitle.”
- The first function adds the custom field to the product edit screen.
- The second function saves the value to the WordPress database using update_post_meta.
- The third function retrieves and displays the saved value on the single product page using get_post_meta.
// Add custom field to product edit screen (admin)
add_action('woocommerce_product_options_general_product_data', 'add_custom_product_field');
function add_custom_product_field() {
    woocommerce_wp_text_input(array(
        'id'          => '_product_subtitle',
        'label'       => __('Product Subtitle', 'woocommerce'),
        'placeholder' => 'Enter a subtitle...',
        'desc_tip'    => true,
        'description' => __('This appears under the product title on the front end.', 'woocommerce')
    ));
}

// Save the custom field value to the database
add_action('woocommerce_process_product_meta', 'save_custom_product_field');
function save_custom_product_field($post_id) {
    if (isset($_POST['_product_subtitle'])) {
        update_post_meta($post_id, '_product_subtitle', sanitize_text_field($_POST['_product_subtitle']));
    }
}

// Display the custom field on the front-end product page
add_action('woocommerce_single_product_summary', 'show_custom_product_field', 6);
function show_custom_product_field() {
    global $post;
    $subtitle = get_post_meta($post->ID, '_product_subtitle', true);
    if (!empty($subtitle)) {
        echo '<p class="product-subtitle" style="font-size: 1.1em; color: #555;">' . esc_html($subtitle) . '</p>';
    }
}
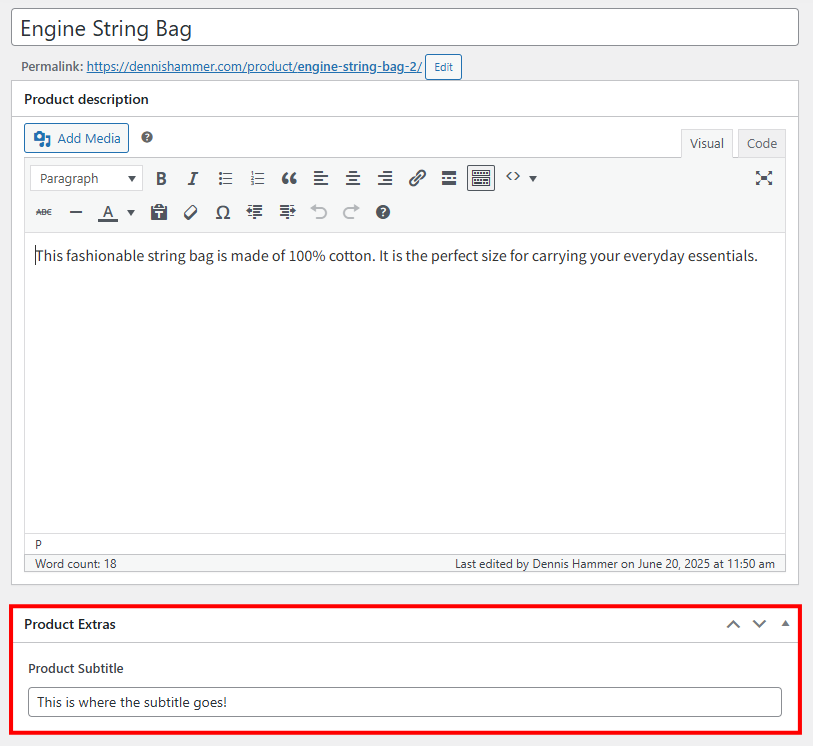
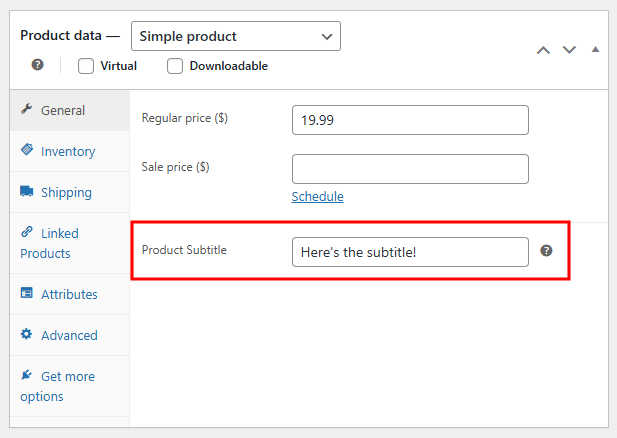
The field appears on the product editor page for every product in the Product Data box, General tab.
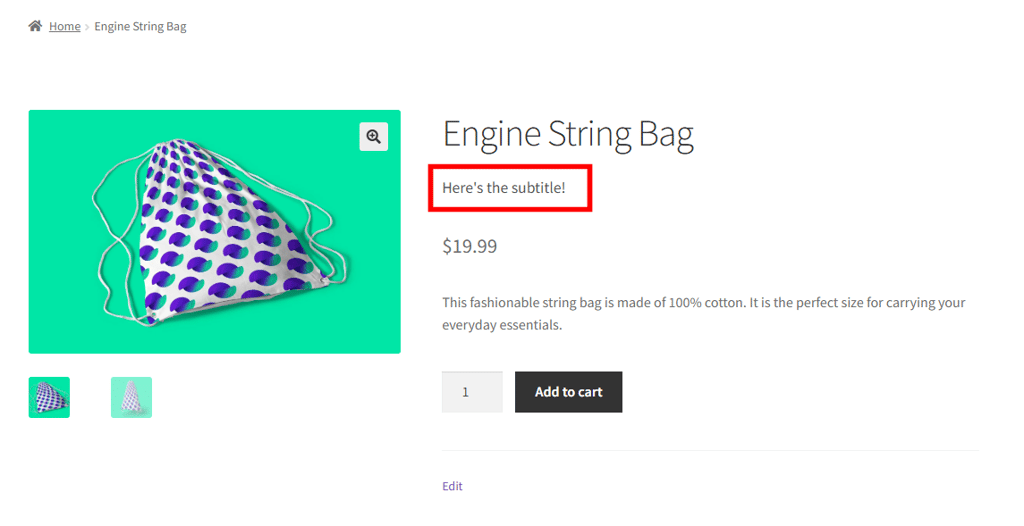
On the front end, the field’s value appears just below the product’s primary title.
How to display WooCommerce custom fields on the front end
Adding custom fields to a product is only half the job. If you want customers to see that information, you need to display it on the front end. How you do this depends on how you’re building your WooCommerce product page.
Using a page builder (like Elementor or Divi)
Many page builders offer built-in dynamic content features. This method is great if you’re not comfortable with code and want complete control over the design.
For example, in Elementor Pro, you can use the Dynamic Tags feature to insert custom field values anywhere on the page.
- Create a custom field using Advanced Custom Fields.
- Go to a WooCommerce product and supply a value for the field.
- Switch to Elementor and add a widget to your page, such as the Text Editor.
- Click the Dynamic Tags icon.

- Choose the ACF Field link from the dropdown menu.
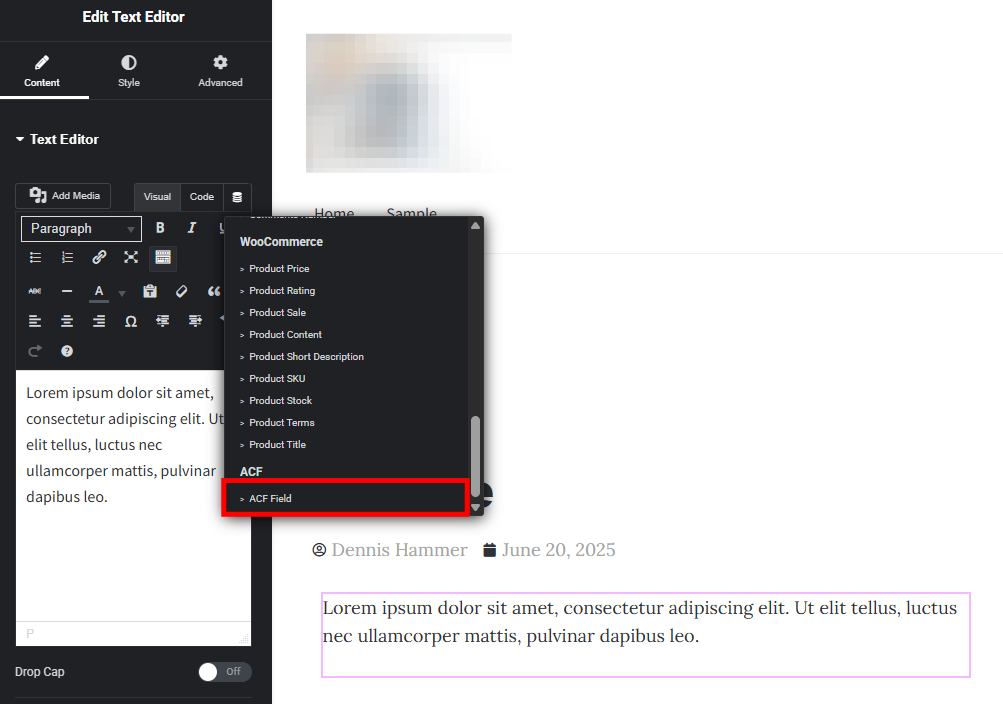
- Click the ACF Field box and choose the appropriate field from the Key dropdown menu.
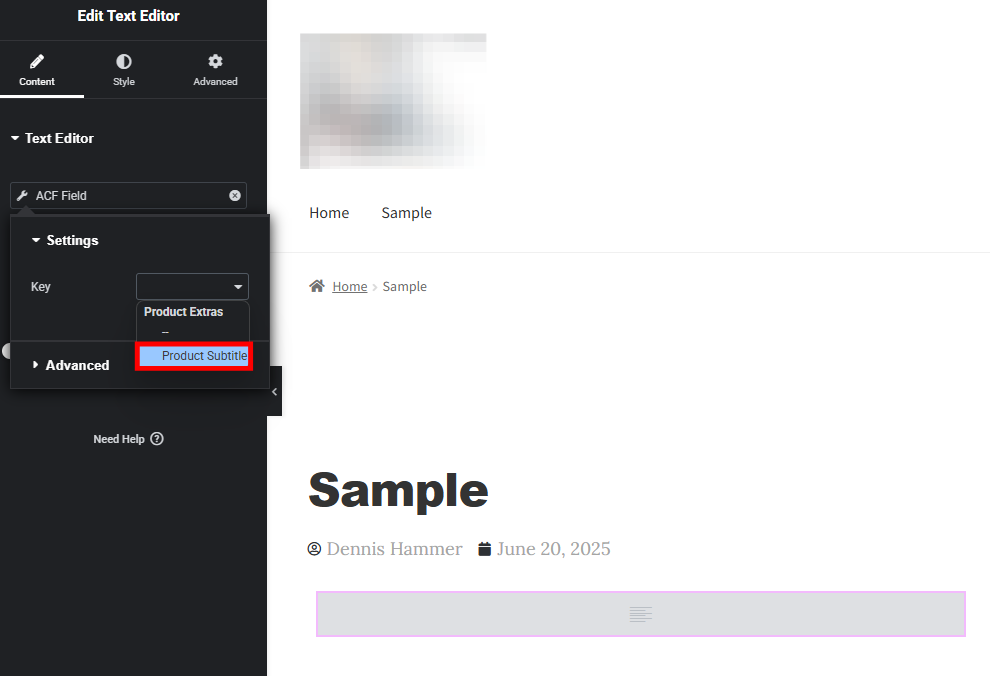
- The custom field’s value will appear on the page.
Using a custom theme or template
If you’re building your store with a custom theme (or using the default WooCommerce template files), you’ll need to edit the PHP code to show custom field values. Here’s how to do it with code.
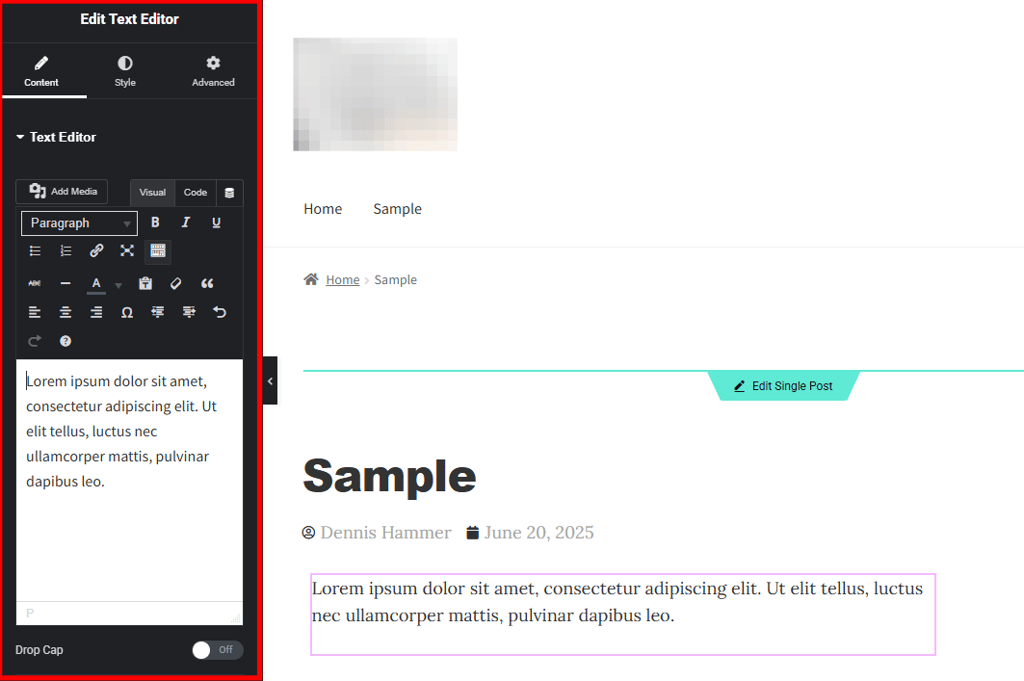
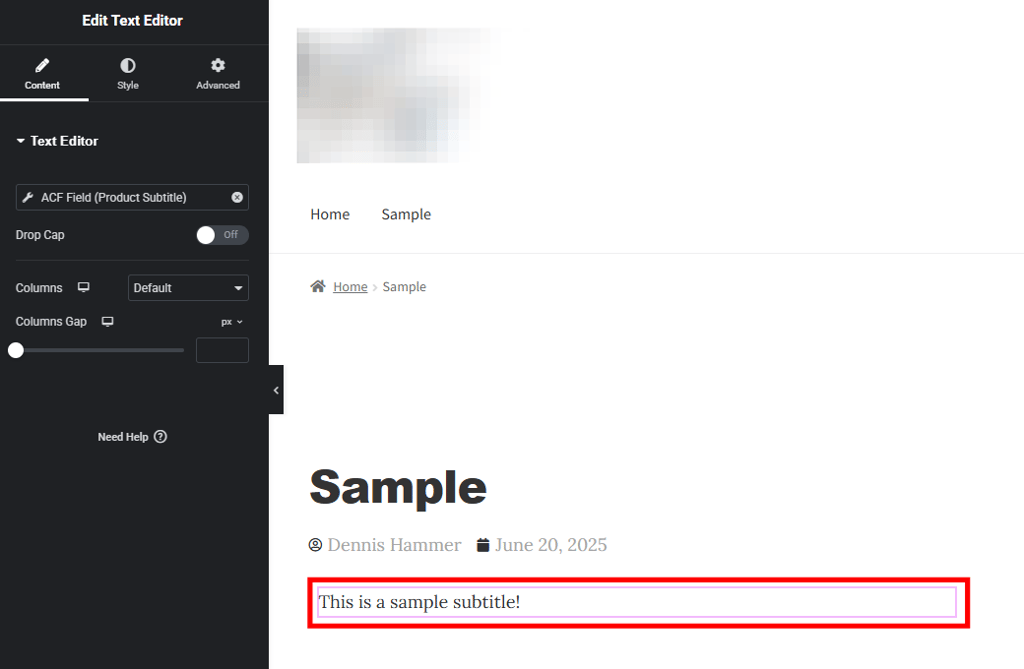
Let’s say you’ve added a custom field called _product_subtitle. You want the subtitle to show under the product title on the single product page.
Add the following code to your theme’s functions.php file (or a plugin like Code Snippets). This code uses WordPress action hooks to get the WooCommerce product summary area, pulls the value of the _product_subtitle custom field, and displays it as a paragraph below the product title.
You can change the hook’s priority to reposition the field: 6 would place it below the title. 11 would place it below the price, and 35 would place it after the “Add to Cart” button.
add_action('woocommerce_single_product_summary', 'display_product_subtitle', 6);

function display_product_subtitle() {
    global $post;
    $subtitle = get_post_meta($post->ID, '_product_subtitle', true);

    if (!empty($subtitle)) {
        echo '<p class="product-subtitle" style="font-size: 1.1em; color: #555;">' . esc_html($subtitle) . '</p>';
    }
}
Common issues and troubleshooting
Working with WooCommerce custom fields can be powerful, but you might run into a few hiccups along the way. Here are some common issues and how to fix them:
- Custom fields are not appearing on the product page – Double-check that your display code is hooked into the correct WooCommerce action (e.g., woocommerce_single_product_summary). Also, make sure the field has data, because an empty field won’t show anything.
- Field values aren’t saving – Make sure the ID in your custom field matches the key used in $_POST and update_post_meta(). Also, confirm that you’re using the correct hook: woocommerce_process_product_meta.
- Custom field shows but isn’t styled correctly – You may need to add custom CSS to your theme or child theme to style the output as needed. WooCommerce won’t apply any styles to your custom field by default.
- Plugin conflicts – If the custom field disappears or breaks when activating a plugin, disable plugins one by one to find the conflict. Conflicts often happen when plugins hook into the same WooCommerce actions.
- Changes not showing on the front end – Clear your site cache and browser cache. If you’re using a caching plugin or a CDN (like Cloudflare), purge those as well.
- Fields missing from variations or grouped products – Custom fields added with WooCommerce’s built-in tool only apply to simple products. To support variations or grouped products, you’ll need a more complex setup or use a plugin built for that purpose.
Conclusion
WooCommerce custom fields are a powerful way to enhance your product pages and give customers a more informative shopping experience.
Whether you use built-in options, a plugin, or write your own code, adding custom fields can help you display more useful product data, improve SEO, and streamline your store’s backend. They’re especially helpful for stores with unique product types or products that require customers to submit some input.
Ready to improve your WooCommerce store? Add your first custom field and see how much more flexible your product pages can be.
WooCommerce custom fields FAQ
Can customers input information in custom fields?
Yes, customers can input information in custom fields if those fields are set up for front-end use. This is common for personalized products, like engraving or custom messages. You can add these fields using plugins like Advanced Custom Fields, WooCommerce Product Add-Ons, or by adding code that collects and saves user input.
Can I add custom fields to WooCommerce product variations?
You can add custom fields to product variations, but it’s more complex than adding them to simple products. It usually requires custom code or a plugin that supports variation-level fields, like Advanced Custom Fields Pro or Custom Fields for Variations.
Can custom fields affect website performance?
In most cases, custom fields won’t affect performance. But if you use too many fields, load large amounts of data, or rely on poorly optimized plugins, it can slow down the admin or front end. Stick to lightweight solutions and always test your changes on a staging site first.
All of the tutorial content on this website is subject to Hostinger's rigorous editorial standards and values.

Dennis Hammer is a content strategist, web developer, and WooCommerce store owner. He has extensive experience building and growing online stores for diverse audiences as well as crafting engaging and strategic storytelling content. Follow him on LinkedIn.


