How to create a WordPress child theme + customization tips
Dec 22, 2025
/
Jordana A.
/
11 min Read

One of the biggest perks of using WordPress is that it has tons of themes to choose from. However, if you plan to customize your theme’s design or functionality, it’s a good idea to use a WordPress child theme.
In this article, we’ll cover how a WordPress child theme works and when to use it. You’ll also learn different ways to create and customize a child theme, as well as resolve common errors.
What is a WordPress child theme?
A WordPress child theme is a sub-theme that inherits the functionality, features, and style of the parent theme. It lets you make your own changes without altering the original theme. However, because of its dependency, a child theme can’t function without its parent theme.
How does a WordPress child theme work?
A child theme creates a separate directory that houses its own style.css and functions.php files. These are the core components used to customize the design and functionality of your site.
When someone visits your site, WordPress first loads the child theme. Any customizations or overrides in the child theme take priority. For anything not modified, WordPress uses the parent theme’s files.
For example, you can use a child theme to adjust the color scheme, create a unique page template, or add custom functionality without touching the parent theme.
This setup guarantees your changes are safe during theme updates and provides a safety net. If something goes wrong, you can deactivate the child theme and rely on the parent theme to keep your site running smoothly.
When do you need a child theme?
Using a child theme isn’t always necessary, but it’s highly recommended if you want to:
- Safely customize your theme’s design or functionality without affecting the parent theme.
- Create a new theme quickly by using the parent theme as a foundation.
- Simplify smaller modifications (like tweaking CSS or adding custom templates) without dealing with complex core files.
- Protect your customizations from being overwritten during parent theme updates.
- Maintain consistent branding by inheriting the parent theme’s design while making specific tweaks.
- Test new features without risking your site.
How to create a WordPress child theme
Creating a WordPress child theme is simple. This section covers how to do it manually, which gives you full control over the setup and keeps your site lightweight.
If you prefer using a plugin, skip to the next section.
Prerequisites
Before you start, make sure you have the following:
- A parent theme. Verify the parent theme you want to customize is installed and active on your WordPress website. We’ll use the default Twenty Twenty-Three theme for this tutorial. Check out our guide if you need help installing a WordPress theme.
- Access to your WordPress files. You can either use your web host’s File Manager or an FTP client like FileZilla. Hostinger’s File Manager can be accessed through hPanel.
- Website backup. Create a backup of your WordPress site before making any changes to avoid accidental data loss.
- A staging website. Setting up a WordPress staging environment lets you experiment freely without risking breaking the live site. Users on Hostinger’s WordPress Business plan and higher can use the built-in staging tool on hPanel.

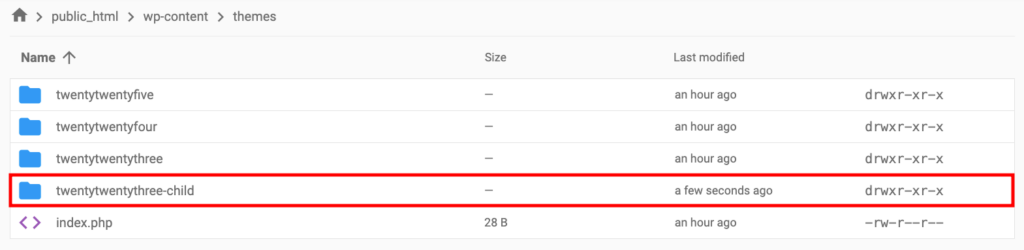
1. Create the child theme folder
First, let’s prepare the child theme folder to store all the assets. For this tutorial, we’ll use Hostinger’s File Manager, which you can access on the hPanel dashboard.
In the WordPress root directory (public_html), head to wp-content → themes. Next, create a new folder with a name similar to your current active theme. This will be your child theme folder.
2. Create the stylesheet file
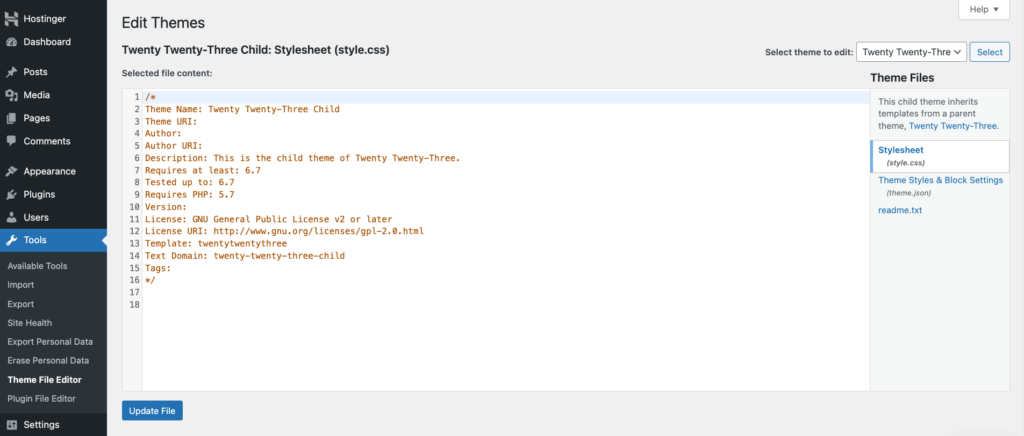
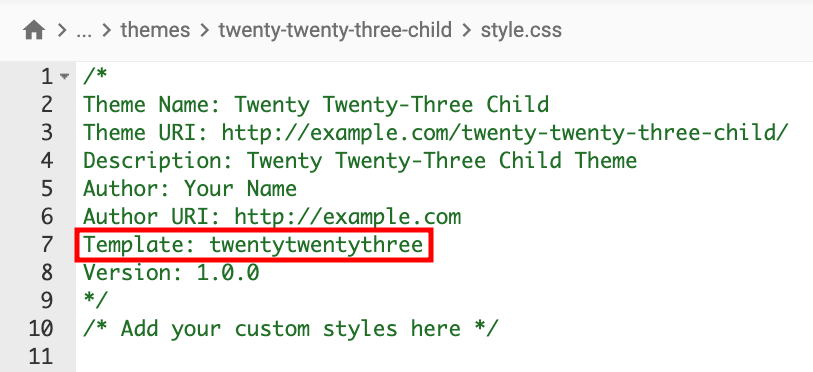
The stylesheet file, commonly known as style.css, controls the design and layout of your WordPress theme. It’s also where you define the relationship with the parent theme and override its styles.
Create a new style.css file in your child theme folder, then add the following code snippet to it.
/*
Theme Name: Twenty Twenty-Three Child
Theme URI: http://example.com/twenty-twenty-three-child/
Description: Twenty Twenty-Three Child Theme
Author: Your Name
Author URI: http://example.com
Template: twentytwentythree
Version: 1.0.0
*/
/* Add your custom styles here */
Replace the theme’s name, URI, description, and template with your actual parent theme’s details, then save the changes.
3. Create the functions.php file and enqueue the stylesheet
The functions.php file is the backbone of your theme’s features. It allows you to add custom functionality or modify existing features in the parent theme. This file is also responsible for queuing the parent theme’s styles and scripts, making sure they load and work correctly.
Create a new functions.php file in your child theme folder and add the following code snippet to import styles from the parent theme.
<?php
// Your code to enqueue parent theme styles
function enqueue_parent_styles() {
   wp_enqueue_style( 'parent-style', get_template_directory_uri() . '/style.css' );
}
add_action( 'wp_enqueue_scripts', 'enqueue_parent_styles' );
?>
Don’t forget to save the changes to the file.
4. Activate the child theme
If you create the style.css and functions.php files correctly, the child theme should appear on your WordPress website.
Head to Appearance → Themes from your admin dashboard, and click Activate on the child theme.
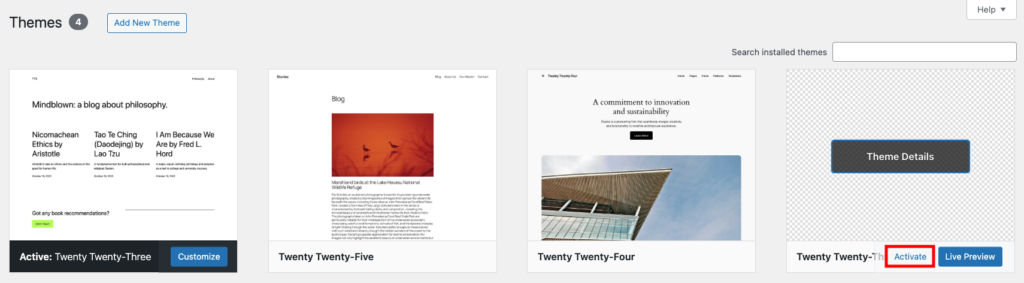
That’s it ‒ your WordPress website is now running on a child theme.
Pro tip
Does your child theme’s preview look a bit empty? You can fix that by uploading an image named screenshot.png to your child theme folder. This image will serve as the preview thumbnail for your theme in the WordPress dashboard.
Alternative ways to create a child theme
If you’d rather not edit your website files manually, a WordPress plugin can simplify the process. There are two ways to do it depending on your theme’s type, so make sure you pick the right one.
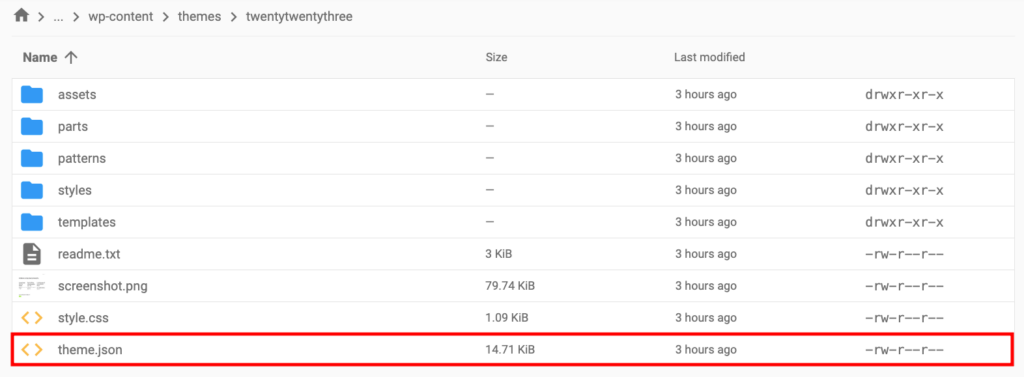
To check whether you’re using a classic or block theme, access your theme’s folder via File Manager or an FTP client and look for a file named theme.json. For example, the Twenty Twenty-Three theme has this file, which indicates that it’s a block theme.
Creating a child classic theme using a plugin
If you’re using a classic theme, follow these steps to create its child theme using WP Child Theme Generator:
- Install and activate the WP Child Theme Generator plugin. See our guide on installing WordPress plugins if you need help.
- Navigate to Appearance → Child Theme Gen from your admin dashboard.
- Select the parent theme from the drop-down field, then tweak the child theme’s details as needed. Make sure to check the Create and Activate option to automate the switch.
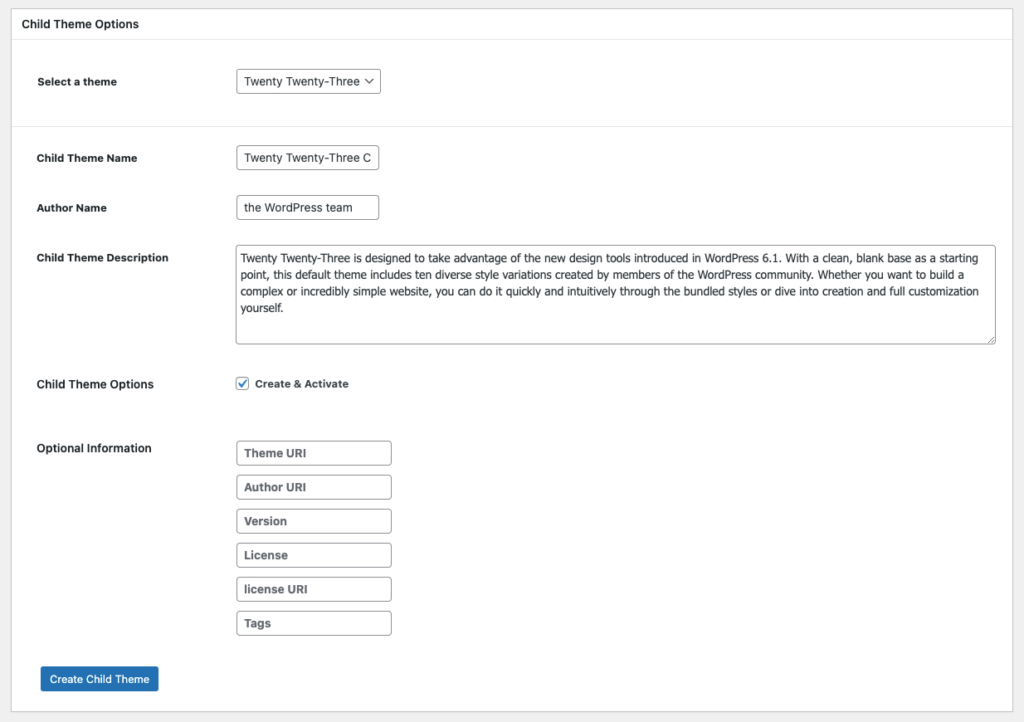
- After clicking Create Child Theme, the plugin will redirect you to the Themes page, showing the active child theme.
Keep in mind that while this plugin acknowledges block themes, it’s not designed to work optimally with them. If your parent theme is a block theme, we highly recommend the next method instead.
Creating a child block theme using a plugin
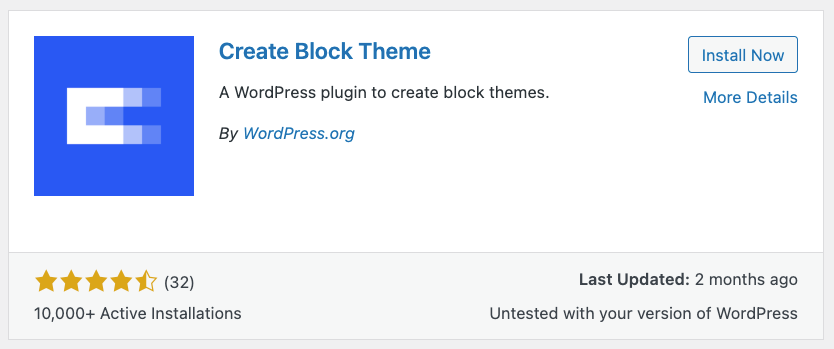
For this method, we’ll use a different free plugin called Create Block Theme. This plugin supports theme.json configuration, making it ideal for creating child themes from block themes. Here’s how:
- Install and activate the Create Block Theme plugin.
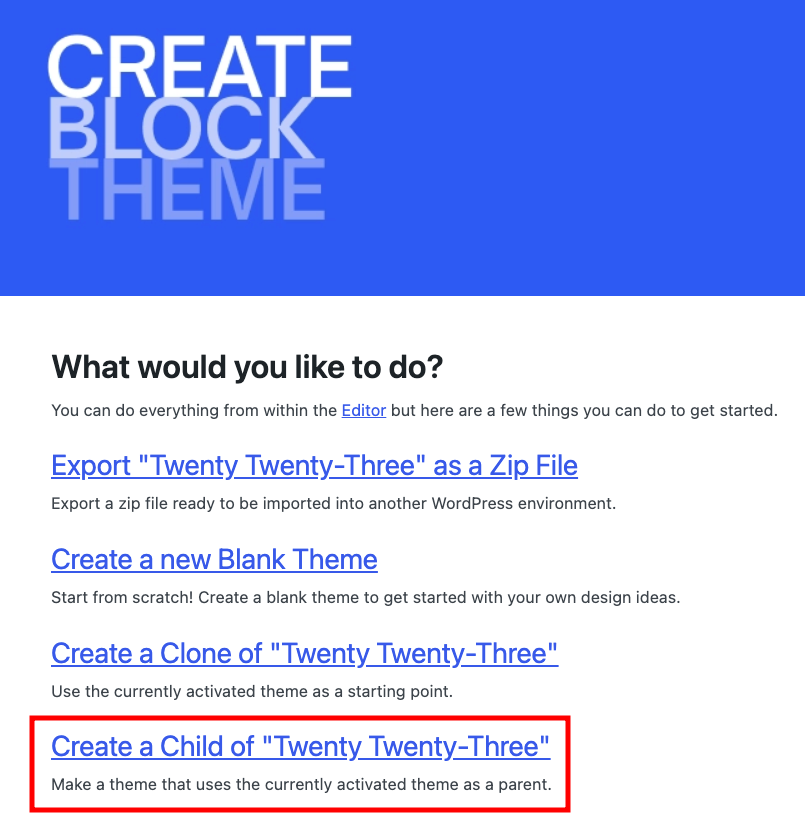
- Go to Appearance → Create Block Theme in your WordPress dashboard.
- The plugin provides several options for working with your active theme. For now, choose to Create a Child of “[your theme’s name].”
- Enter the child theme’s name, description, and author. Click Create Child Theme once you’re done.
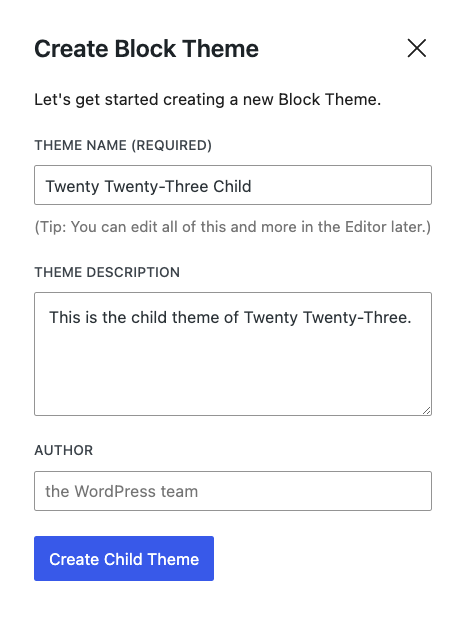
- If the process is successful, the plugin will show a confirmation message and take you to the Site Editor. You can double-check by going to Appearance → Themes to see that you’re now using a child theme.
How to customize the child theme
Now that you have a child theme, it’s time to customize it. These customization methods require some coding, so knowing CSS can make things easier.
If you’d rather not edit code, check out our top picks for the best WordPress page builder plugins to simplify the design process. You can also use the WordPress Gutenberg block editor to create custom blocks and reusable templates without coding.
Customizing the CSS
If you’re planning major changes to your child theme’s styles, editing the style.css file directly is the way to go. It keeps all your CSS in one place, making it easy to manage and export if needed. Plus, you can use external tools like code editors for features like syntax highlighting and version control.
On the other hand, the WordPress Theme File Editor is more convenient for quick changes. It lets you edit theme files right from your dashboard, which is ideal for users without FTP or File Manager access.
Go to Tools or Appearance and locate the Theme File Editor. Open the stylesheet on the right sidebar and click Update File after customizing it.
If you prefer to see a live preview of your changes before applying them, use the Theme Customizer for classic themes or the Site Editor for block-based Full Site Editing. Both are accessible under Appearance ‒ look for Customize or Editor.
Another way to add custom CSS to your child theme is by using a code manager plugin like WPCode. This method is great for reapplying code without the hassle of manual copying and pasting.
We cover each method in detail in the WordPress custom CSS tutorial ‒ check it out to learn more.
When it comes to styling, there are tons of CSS rules you can use to modify your child theme’s look and feel. Mix, match, and adjust as needed to create your desired design.
For example, this code snippet modifies the background color:
body {
background-color: #f3f3f3; /* Replace #f3f3f3 with your chosen color code */
}
To customize the sidebar color, use the following CSS code:
.sidebar {
background-color: #dddddd; /* Replace #dddddd with your desired color */
}
Here’s how you can update the fonts for your entire site:
body {
   font-family: 'Arial', sans-serif; /* Update to your chosen font */
   font-size: 16px; /* Set your desired size */
   color: #333333; /* Choose the color */
}
Check out our CSS cheat sheet for common CSS properties and values.
Download complete CSS cheat sheet
Adding custom code snippets to functions.php
This method only works for classic themes or hybrid themes that mix classic and block elements.
To customize your website’s functions, simply add or tweak existing PHP functions in your child theme’s functions.php file. Just like editing style.css, you can do this via File Manager or an FTP client, the Theme File Editor, or even a code manager plugin.
The kind of customization you can do with PHP functions varies.
For example, this code snippet combines the add_action() and enqueue_custom_styles() functions to enqueue a custom stylesheet:
function enqueue_custom_styles() {
wp_enqueue_style('custom-style', get_stylesheet_directory_uri() . '/css/custom-style.css');
}
add_action('wp_enqueue_scripts', 'enqueue_custom_styles');
With custom_dashboard_greeting(), you can include a custom greeting message on your WordPress admin dashboard:
function custom_dashboard_greeting() {
   echo "Welcome to your site! Have a great day.";
}
add_action('admin_notices', 'custom_dashboard_greeting');
With so many function pairings to try, we’ll let you dive in and get creative. To help you along the way, here are some tips to improve your results and make PHP customizations smoother:
- Document your code with comments. Use /* */ for multi-line comments or // for single-line comments to explain what your custom code does.
- Group and label your customizations. Organize your functions into sections using comments to make future customizations and debugging easier.
- Avoid hardcoding. Instead of embedding functionality, settings, or content into theme files or templates, use add_action() or add_filter() to inject custom functionality with WordPress hooks.
Modifying or adding template files
This method is ideal when you need to customize the layout, structure, or content of specific parts of your site and prevent theme updates from overwriting your changes.
First, access your parent theme’s folder using File Manager or an FTP client and open the templates folder. Find the file responsible for the functionality or design you want to change and copy it into the child theme.
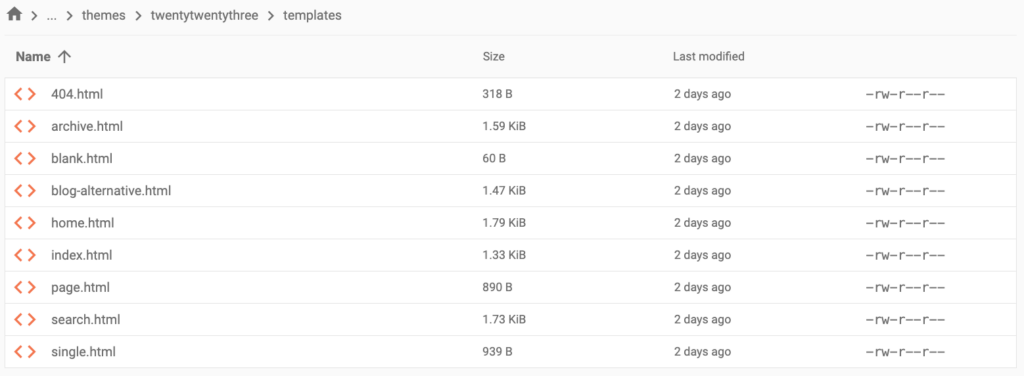
WordPress uses a specific template hierarchy to locate and load files based on their location and naming. Therefore, always keep the directory structure to make sure your changes work.
For example, if the page.html file is located in the parent theme’s templates folder, you’ll need to create a templates folder in your child theme and copy the file into it.
Once you have the base file ready in the child theme’s directory, make your modifications.
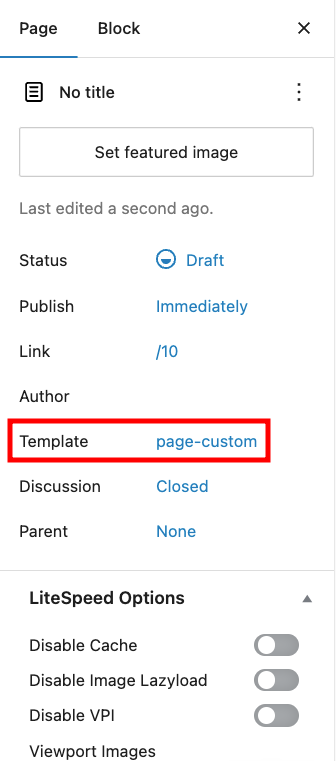
If you want to create a new page template file, copy the page.html file from the templates folder in the parent theme into the templates folder of your child theme and rename it. Then, add the template’s name at the top of the file:
<!--
Template Name: Custom Page Template
-->
For classic themes, the template will be written in PHP format. Follow the same steps to create a new .php file, and add the following code snippet at the top of the file to define the template name:
<?php
/* Template Name: Custom Page Template */
You can now select the new template in the WordPress editor under Page Attributes > Template.
Changing global styles using a theme.json file
If classic themes use functions.php to add functionality and manage features, block themes rely on a theme.json file to define global styles and settings (like typography, color palettes, and spacing).
In your child theme folder, create a new theme.json file if one doesn’t exist. Then, add only the changes you want to make. WordPress will automatically merge it with the parent theme’s theme.json, and anything in your child theme will override or add to the parent’s settings.
For example, add this code snippet to define a custom color palette for your entire site:
{
  "settings": {
    "color": {
      "palette": [
        { "name": "Primary", "slug": "primary", "color": "#3498db" },
        { "name": "Accent", "slug": "accent", "color": "#e74c3c" },
        { "name": "Background", "slug": "background", "color": "#f4f4f4" }
      ]
    }
  }
}
The code for setting custom typography, specifically font sizes, is similar:
{
  "settings": {
    "typography": {
      "fontSizes": [
        { "name": "Small", "slug": "small", "size": "12px" },
        { "name": "Medium", "slug": "medium", "size": "18px" },
        { "name": "Large", "slug": "large", "size": "24px" }
      ]
    }
  }
}
And here’s how to define the maximum width for content blocks like paragraphs and images:
{
  "settings": {
    "layout": {
      "contentSize": "800px",
      "wideSize": "1200px"
    }
  }
}
How to troubleshoot WordPress child theme errors
While child themes offer many advantages, here are some common issues to keep in mind and how to fix them.
The child theme doesn’t appear in the Themes section
Once the child theme’s folder and supporting files are set up, it should appear under Appearance → Themes. If it doesn’t, there’s likely an issue with the configuration in the stylesheet. This issue is more common for users who manually create their child theme.
To fix it, open style.css via File Manager or FTP and check that the Template parameter matches the parent theme’s folder name. You can verify the folder name by navigating to wp-content → themes in your root directory.
The child theme isn’t overriding the parent theme
If your changes in the child theme aren’t showing up, it’s often because the child theme isn’t properly enqueuing the parent theme’s stylesheet.
You can troubleshoot this issue by checking for typos in your functions.php file. Then, make sure the Template parameter in style.css points to the correct parent theme folder.
Caching can also be a culprit. Try clearing your browser cache first. If that doesn’t work, flush your website cache using plugins like LiteSpeed Cache or WP Rocket.
Another possibility is that the parent theme’s styles are overriding the child theme’s. To fix it, locate the conflicting CSS in your child theme and add the !important property to force your styles to take priority. For example:
h1 {
  color: red !important;
}
The !important property ensures your style overrides any conflicting ones, even if they have higher specificity. That said, use it sparingly, as it can make debugging and managing CSS harder.
The template files aren’t overriding parent files
This issue happens when WordPress doesn’t recognize or use the template files in your child theme to replace those from the parent theme.
First, verify the file naming convention. The template file in the child theme must have the exact same name as the file you’re trying to override in the parent theme.
Next, check the file’s location. Make sure to place the template file in the root of the child theme folder (/wp-content/themes/your-child-theme/), not in a subdirectory.
If that doesn’t work, try clearing the browser and site cache.
Conclusion
Using a child theme is a great way to turn a default WordPress theme into a custom solution that fits your needs. You can experiment with different features and designs while keeping it compatible with parent theme updates.
In this article, you’ve learned how to create and customize a child theme in WordPress, as well as troubleshoot common issues. We hope you’ll be able to get the most out of this powerful feature. Good luck!
If you have more questions, feel free to drop a comment below.
WordPress child theme FAQ
What is the difference between a parent theme and a child theme in WordPress?
A parent theme is the main template that controls a WordPress site’s design and functionality, while a child theme inherits its features. A child theme lets you customize the design without altering the parent theme files, so updates won’t overwrite your changes.
Can a child theme exist without a parent theme?
No, a child theme can’t function without its parent theme installed because it relies on the parent for core features and functionality. Without the parent theme, the child theme lacks the foundation it needs to work properly in WordPress.
How do I update a child theme?
To update a child theme, edit its files directly or add new ones as needed. Parent theme updates don’t overwrite child themes, so your customizations should stay intact. Just make sure the parent theme is always up-to-date for compatibility and security.
Does a child theme slow down WordPress?
A child theme doesn’t affect your WordPress site’s performance any more than its parent theme does, as it simply inherits its features. Just make sure any custom code you add is well-optimized and avoid duplicating stylesheets or functions already present in the parent theme.
All of the tutorial content on this website is subject to Hostinger's rigorous editorial standards and values.

Jordana is a Senior Content Writer with a background in Information Systems. She has over five years of experience in WordPress and is casually dabbling with PHP and MySQL. Her passion for writing and technology drives her to create tutorials for anyone wanting to build their online presence. Follow her on LinkedIn.


