How to transfer a domain from HostGator to Hostinger in 6 steps
Dec 22, 2025
/
Akshay K. & Klaudijus J.
/
5 min Read
Whether you seek better speed, more features, or a user-friendly control panel, Hostinger is an excellent HostGator alternative. Offering both website hosting services and domain registration, Hostinger provides a comprehensive solution for your online needs.
If you’ve moved your web hosting provider from HostGator to Hostinger, it’s more convenient to have your domain under the same roof.
This guide will outline the domain transfer process from HostGator to Hostinger to ensure a smooth migration.
Download guide to using Hostinger
How to transfer a domain to Hostinger from HostGator
We will walk you through the steps to transfer a domain name from HostGator to Hostinger.
1. Purchase a domain transfer at Hostinger
To make Hostinger your new domain registrar, purchase a suitable transfer package.
Go to Hostinger’s Domain Transfer page. Next, enter the domain name you wish to transfer in the field and click Transfer.
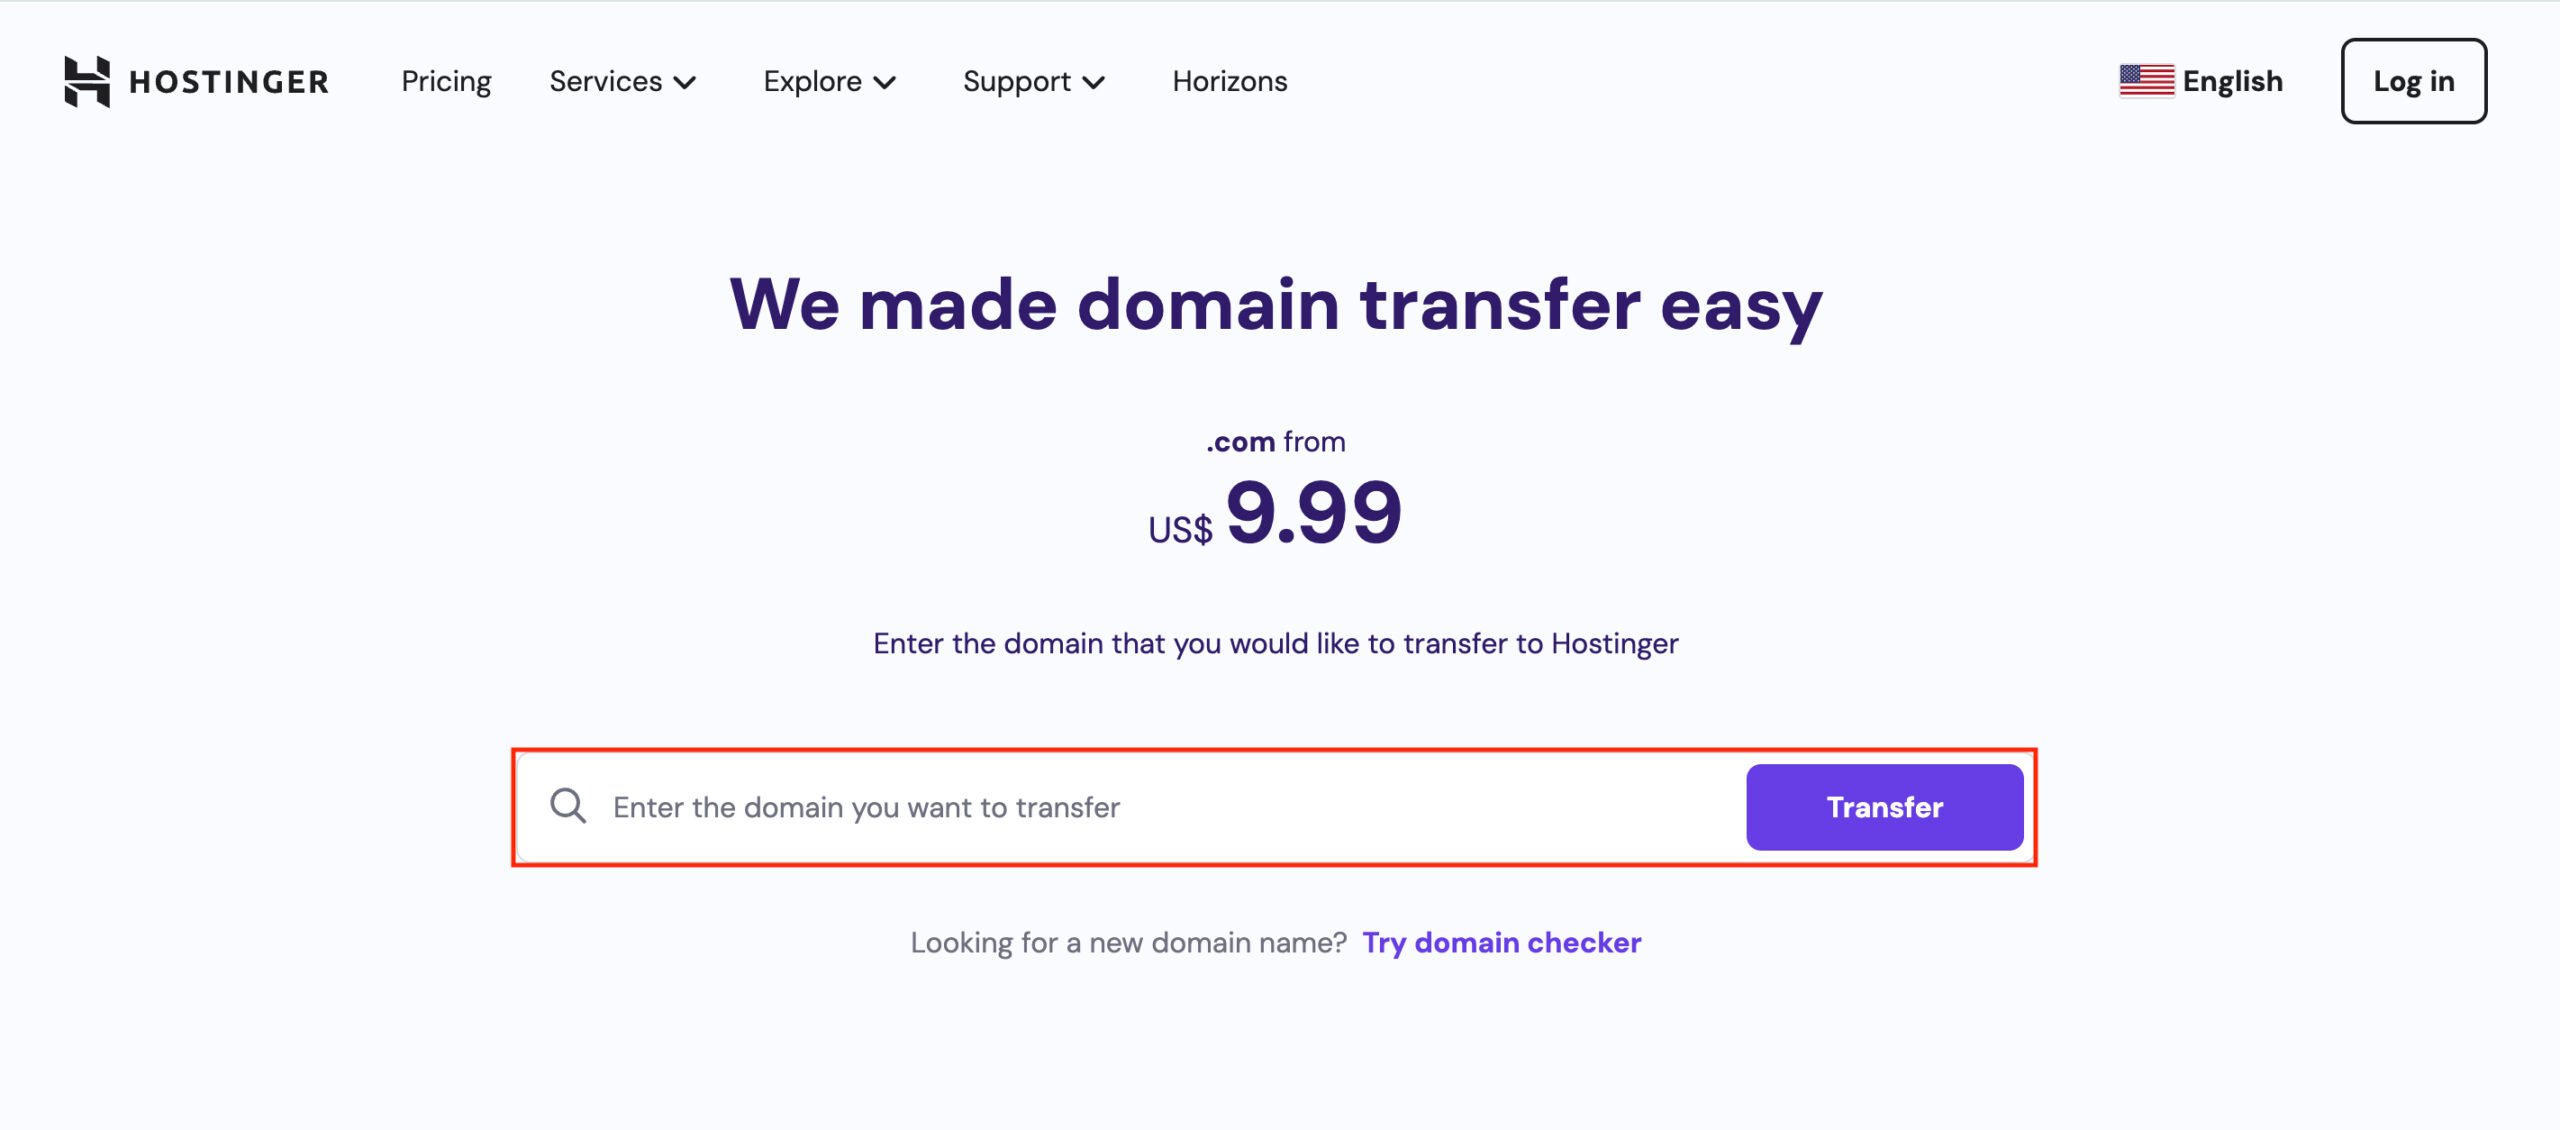
Fill in the necessary details in the next screen to pay for the domain transfer fees. If you’re a first-time Hostinger user, you can quickly set up your account before making the payment.
Suggested Reading
If you're unsure about what to look for when purchasing a domain or hosting plan, check out our articles on
What Is a Domain Name?
How to Buy a Domain Name
How to Choose a Web Hosting Plan
2. Update DNS settings
You must update your domain’s DNS settings on HostGator and point it to Hostinger’s nameservers.
Updating nameservers is crucial for minimizing downtime during the transfer process. It will keep your website online and accessible when switching to another domain registrar.
Important! After pointing your domain to a new hosting provider, it can take around 24 hours for the DNS settings to propagate globally.
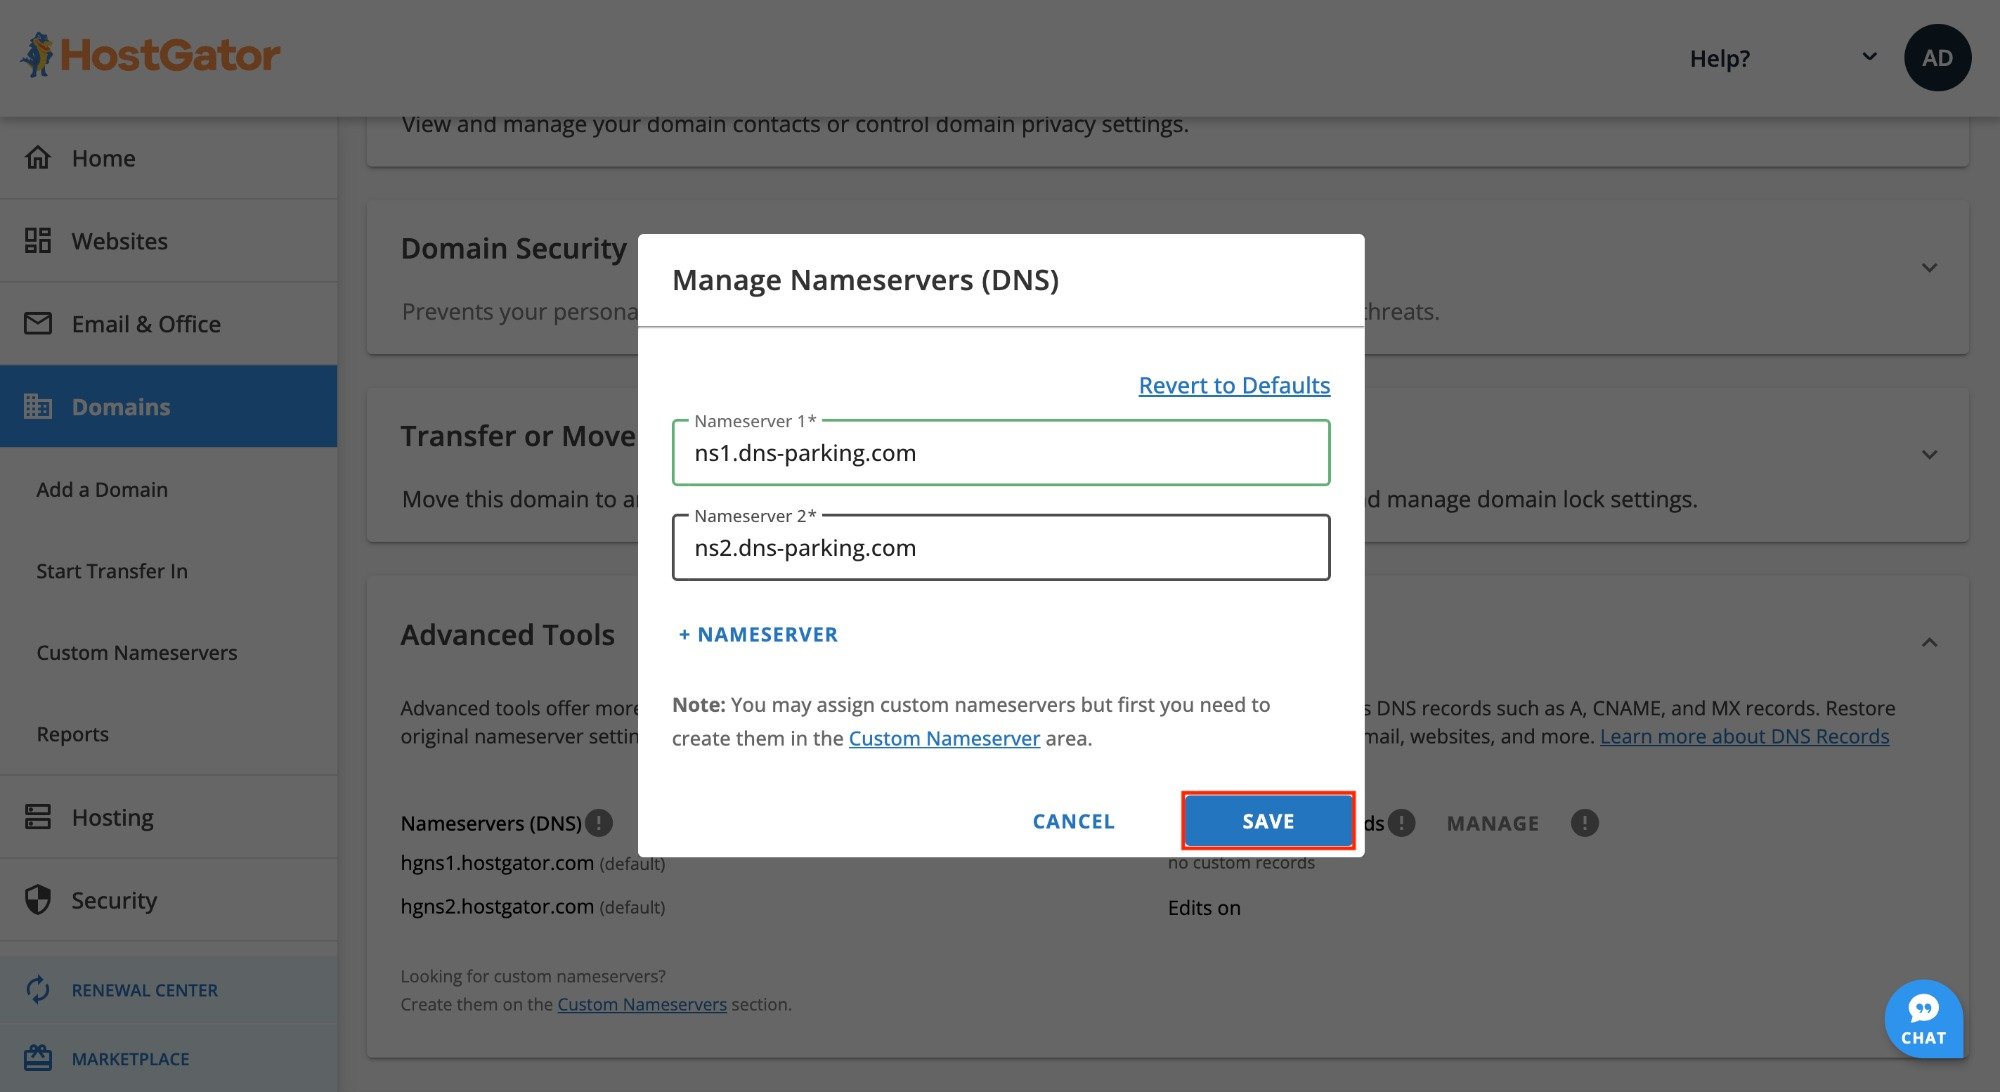
Hostinger utilizes two nameservers – each with a corresponding IP address – to maximize stability and connectivity. Usually, you only need to enter the nameserver names, but some registrars may ask for their IP addresses.
Follow these steps to point your HostGator domain to Hostinger’s nameservers:
- Copy these Hostinger nameserver details:
ns1.dns-parking.com (162.159.24.201)
ns2.dns-parking.com (162.159.25.42)
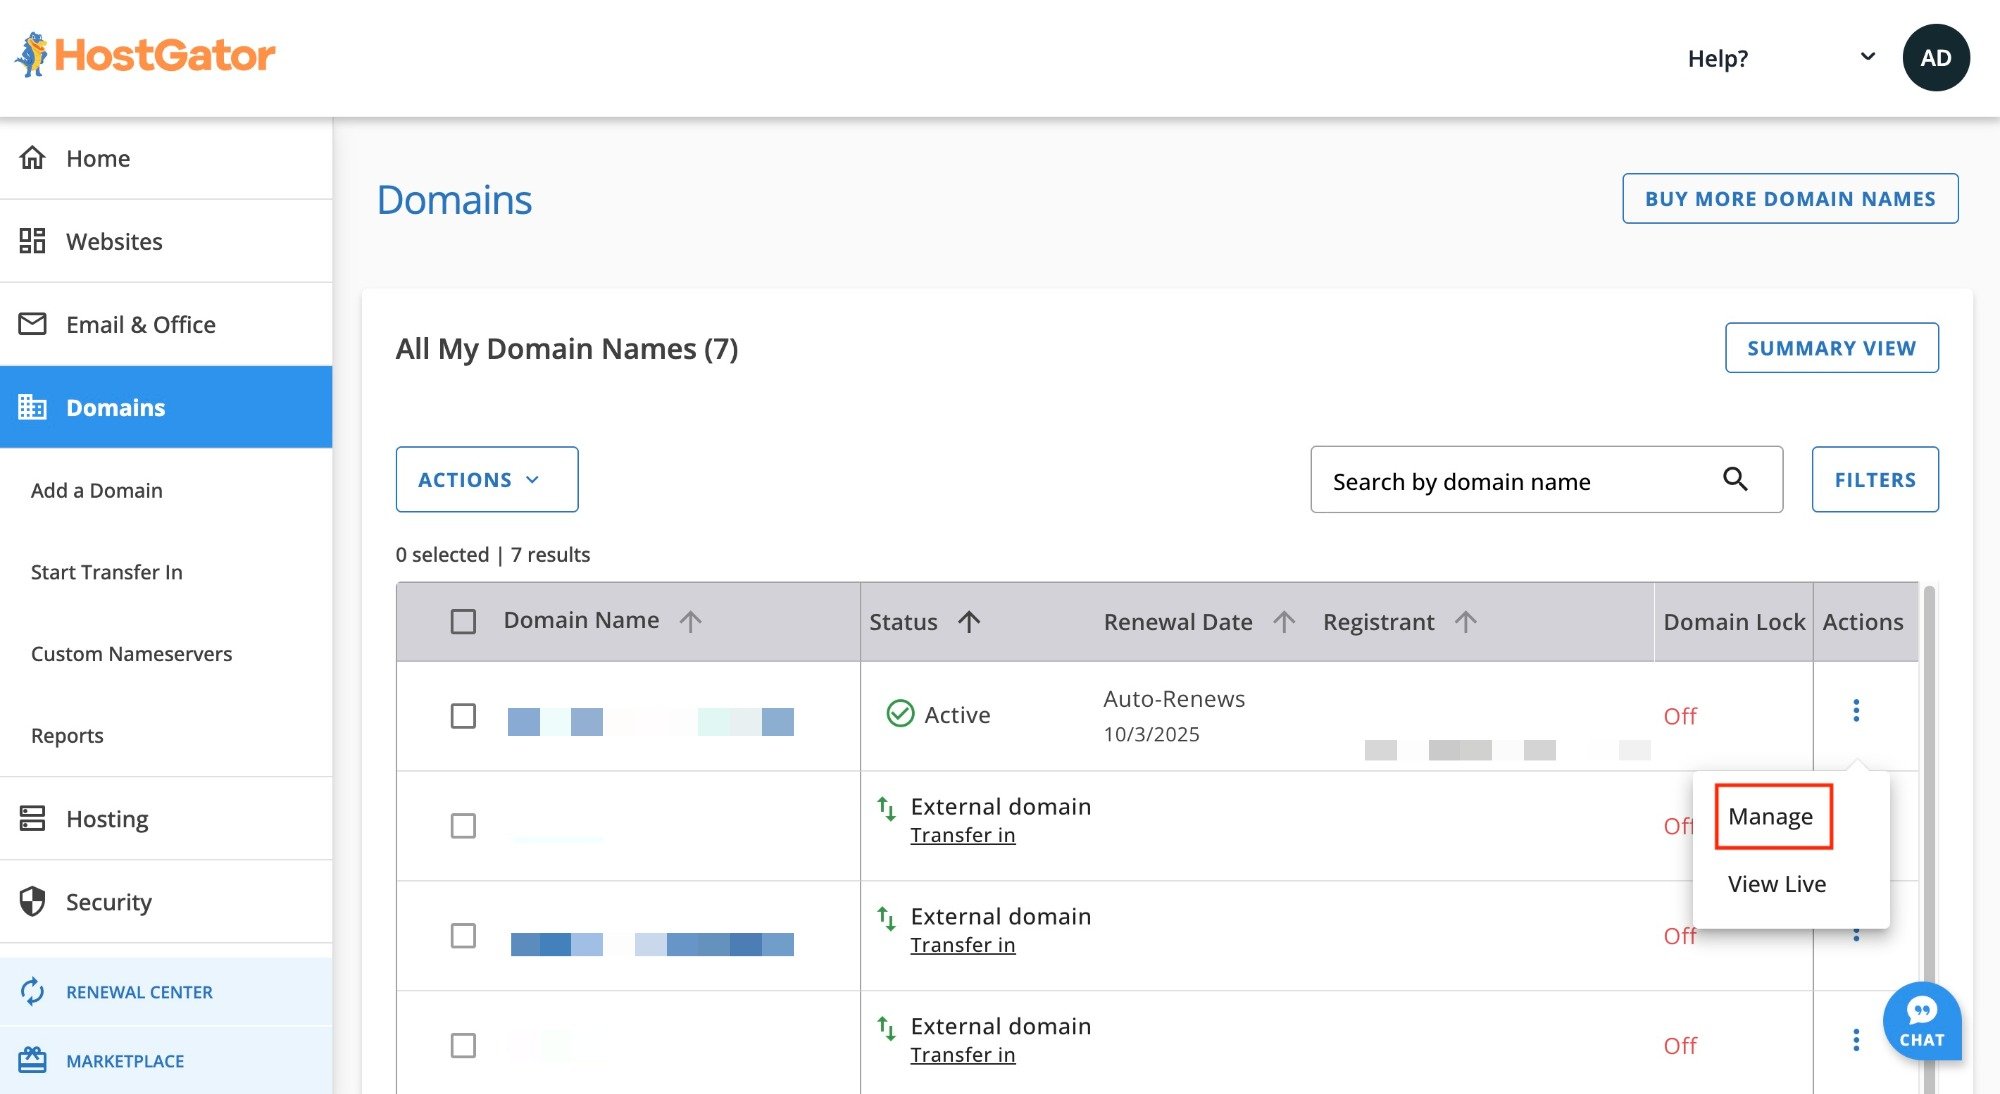
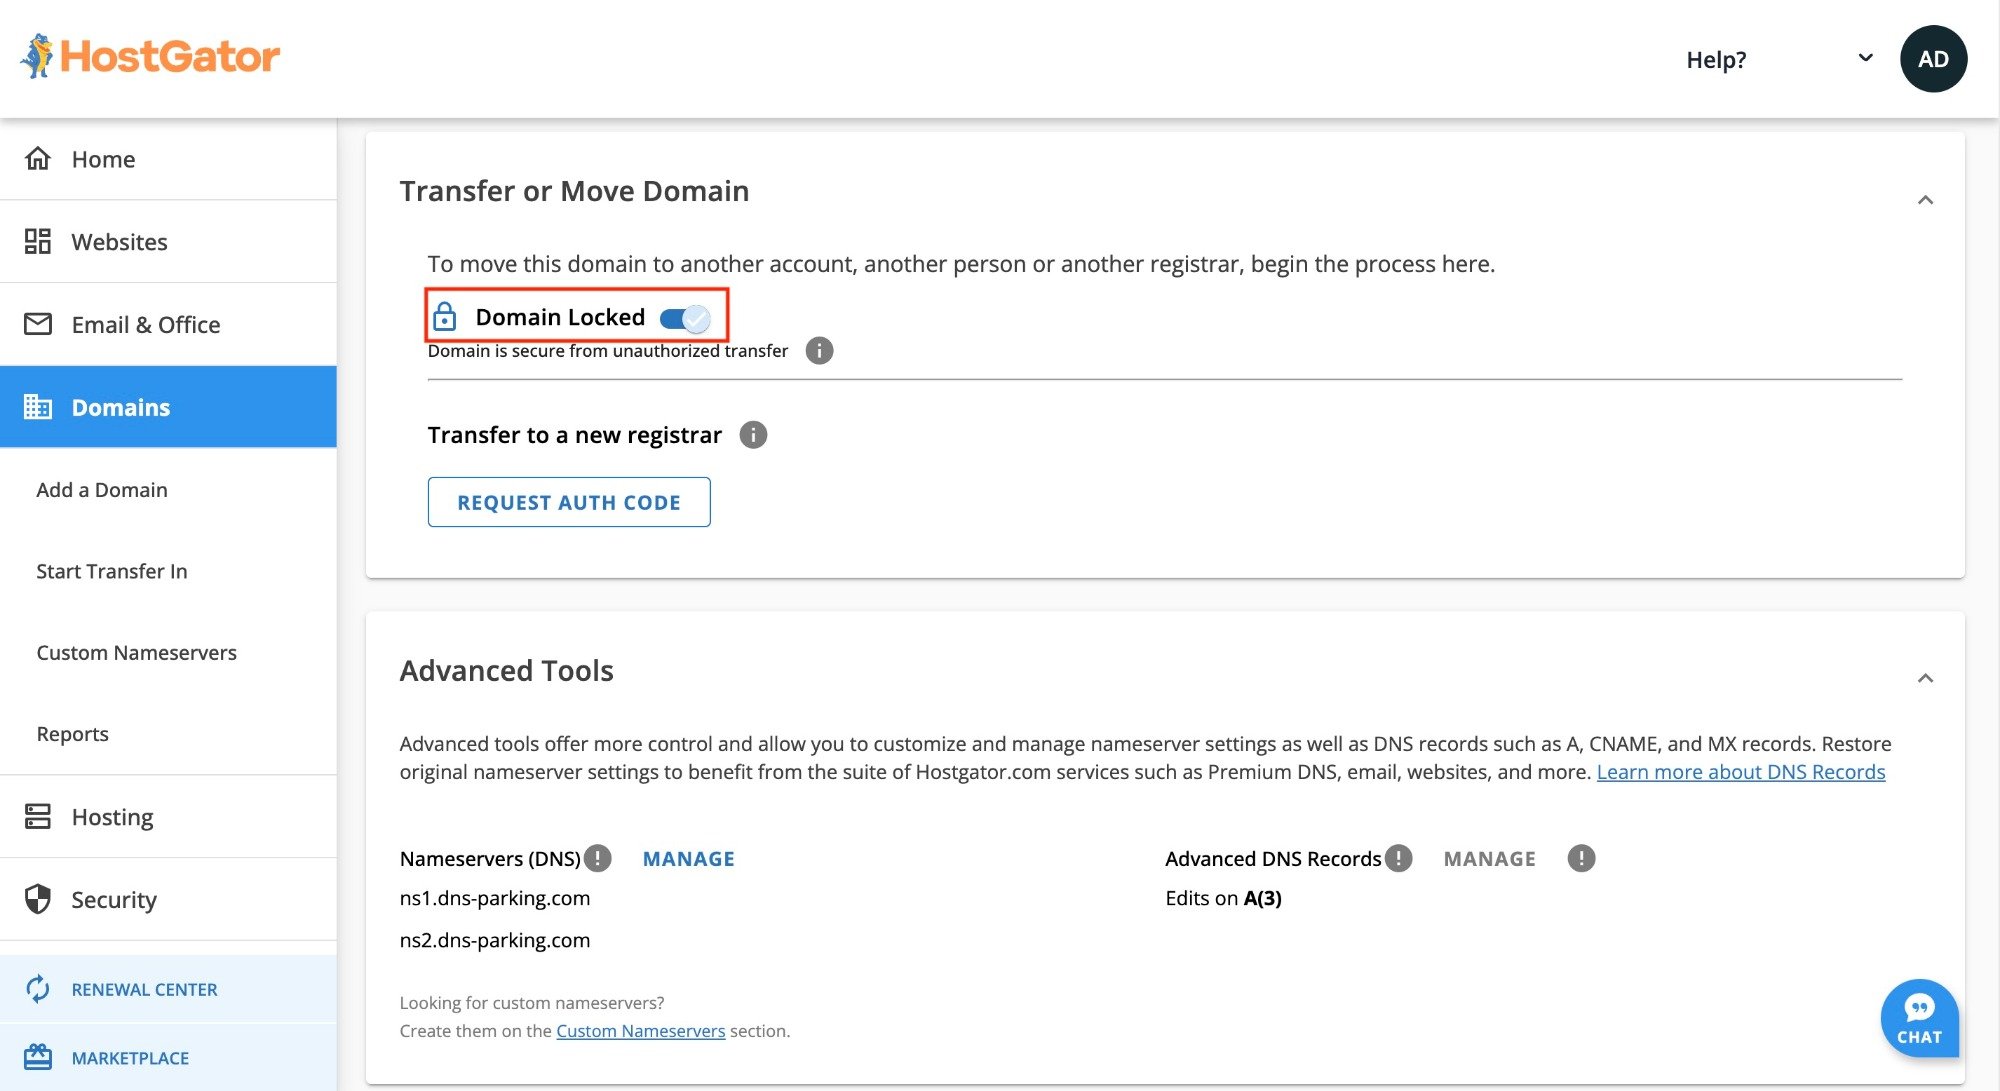
- Log in to your HostGator account and click on the Domains option on the left sidebar.
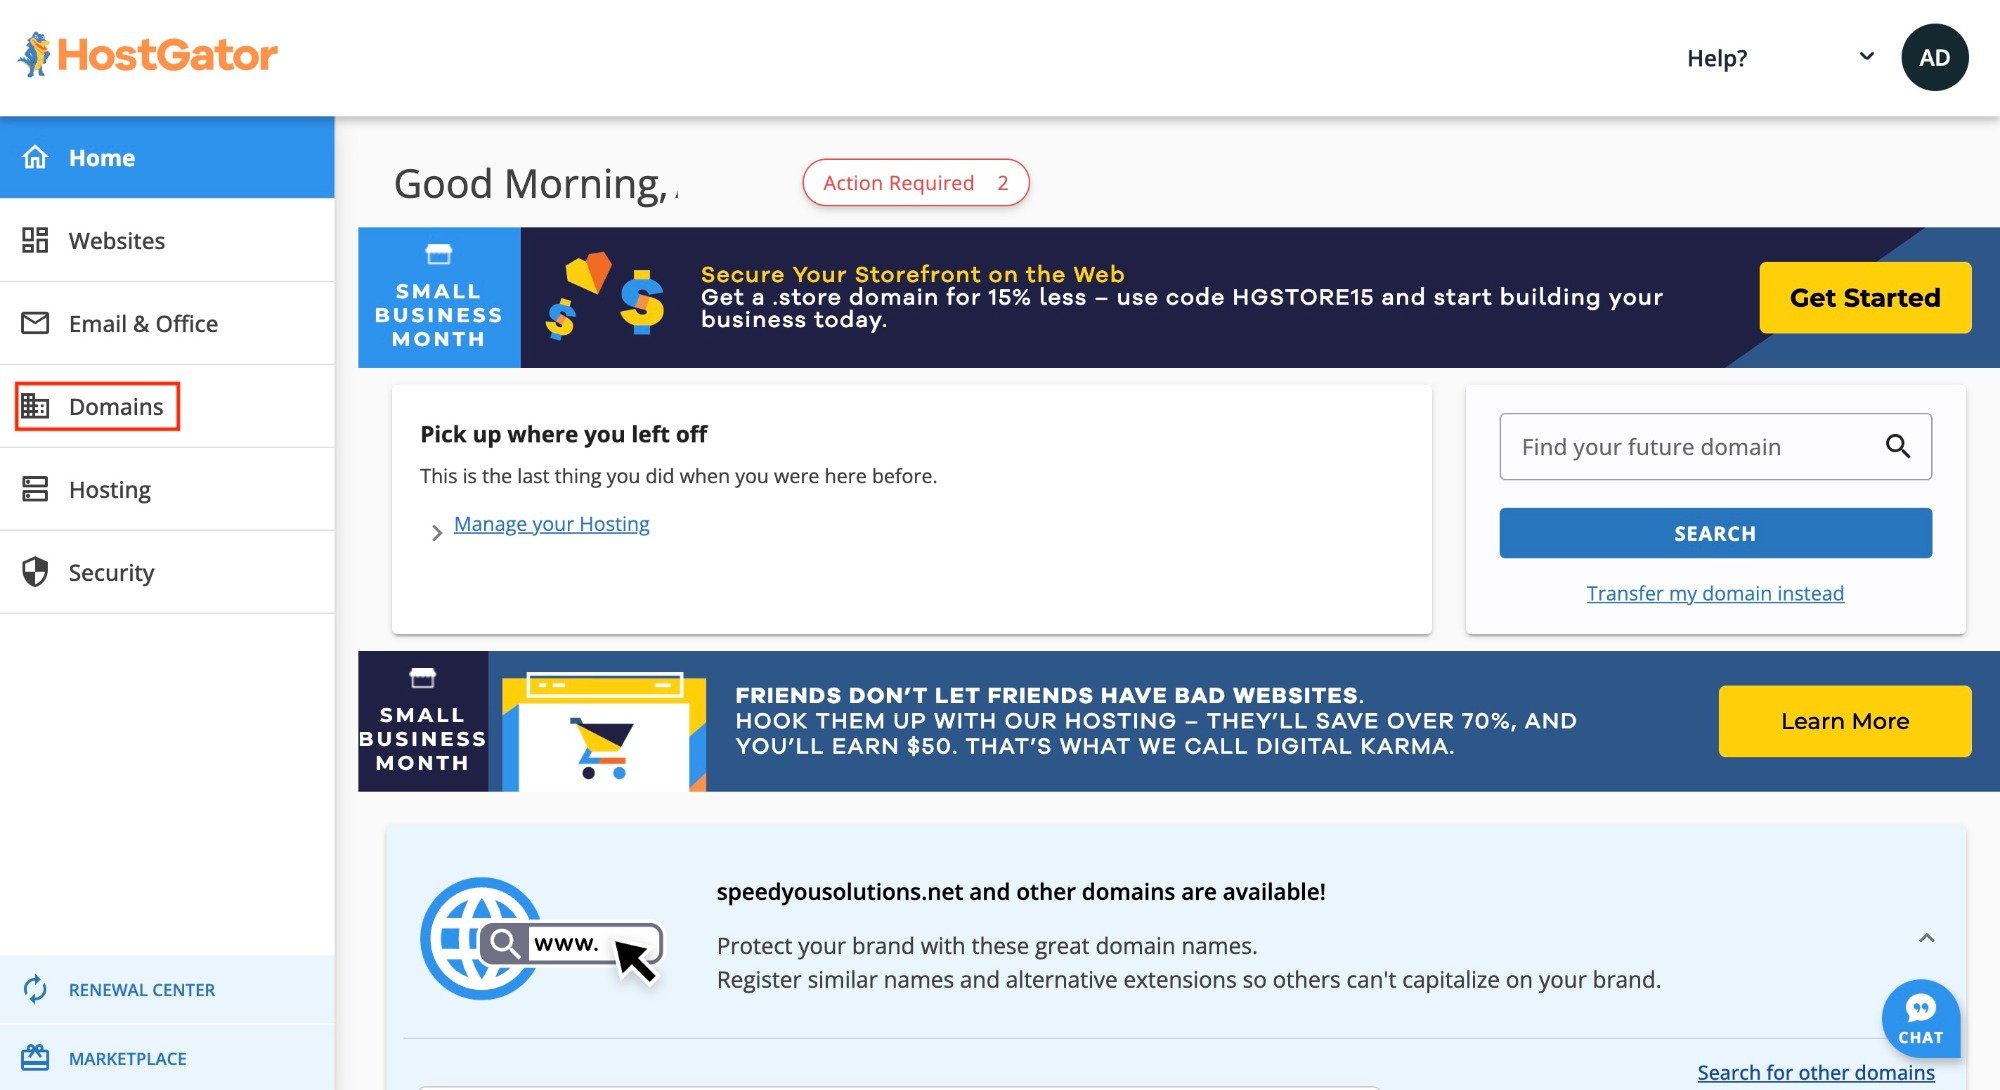
- Locate the domain you intend to transfer to Hostinger and click Manage under Actions to open the Domain Overview tab.
- Under Advanced Tools, click Manage next to Nameservers (DNS).

- In the new tab, input Hostinger’s nameservers in the fields, and click Save Name Servers.
Warning! If you don't update the nameservers prior to transferring the domain, you won’t be able to modify your DNS settings until after the transfer process is fully completed.
3. Unlock your domain
Next, you must unlock your domain at HostGator before you can initiate the transfer to Hostinger as the new registrar.
Important! Generic extensions such as .com, .net, .org, .info, .biz, .mobi, .cc, and .tv must be registered under your name for a minimum of 60 days before you can make a domain transfer request.
Here’s how you can disable the transfer lock:
- Navigate to the Domains section in your HostGator dashboard and find the domain you want to transfer.
- Click Manage under Actions to open the Domain Overview tab.
- Under the Transfer or Move Domain section, toggle off Domain Locked.
Important! Depending on your domain registrar and country of residence, you may need to disable WHOIS privacy to complete certain domain-related actions. Some domain packages include WHOIS protection by default, while others may require manual changes. If enabled, be sure to disable the WHOIS privacy settings.
4. Get the authorization code
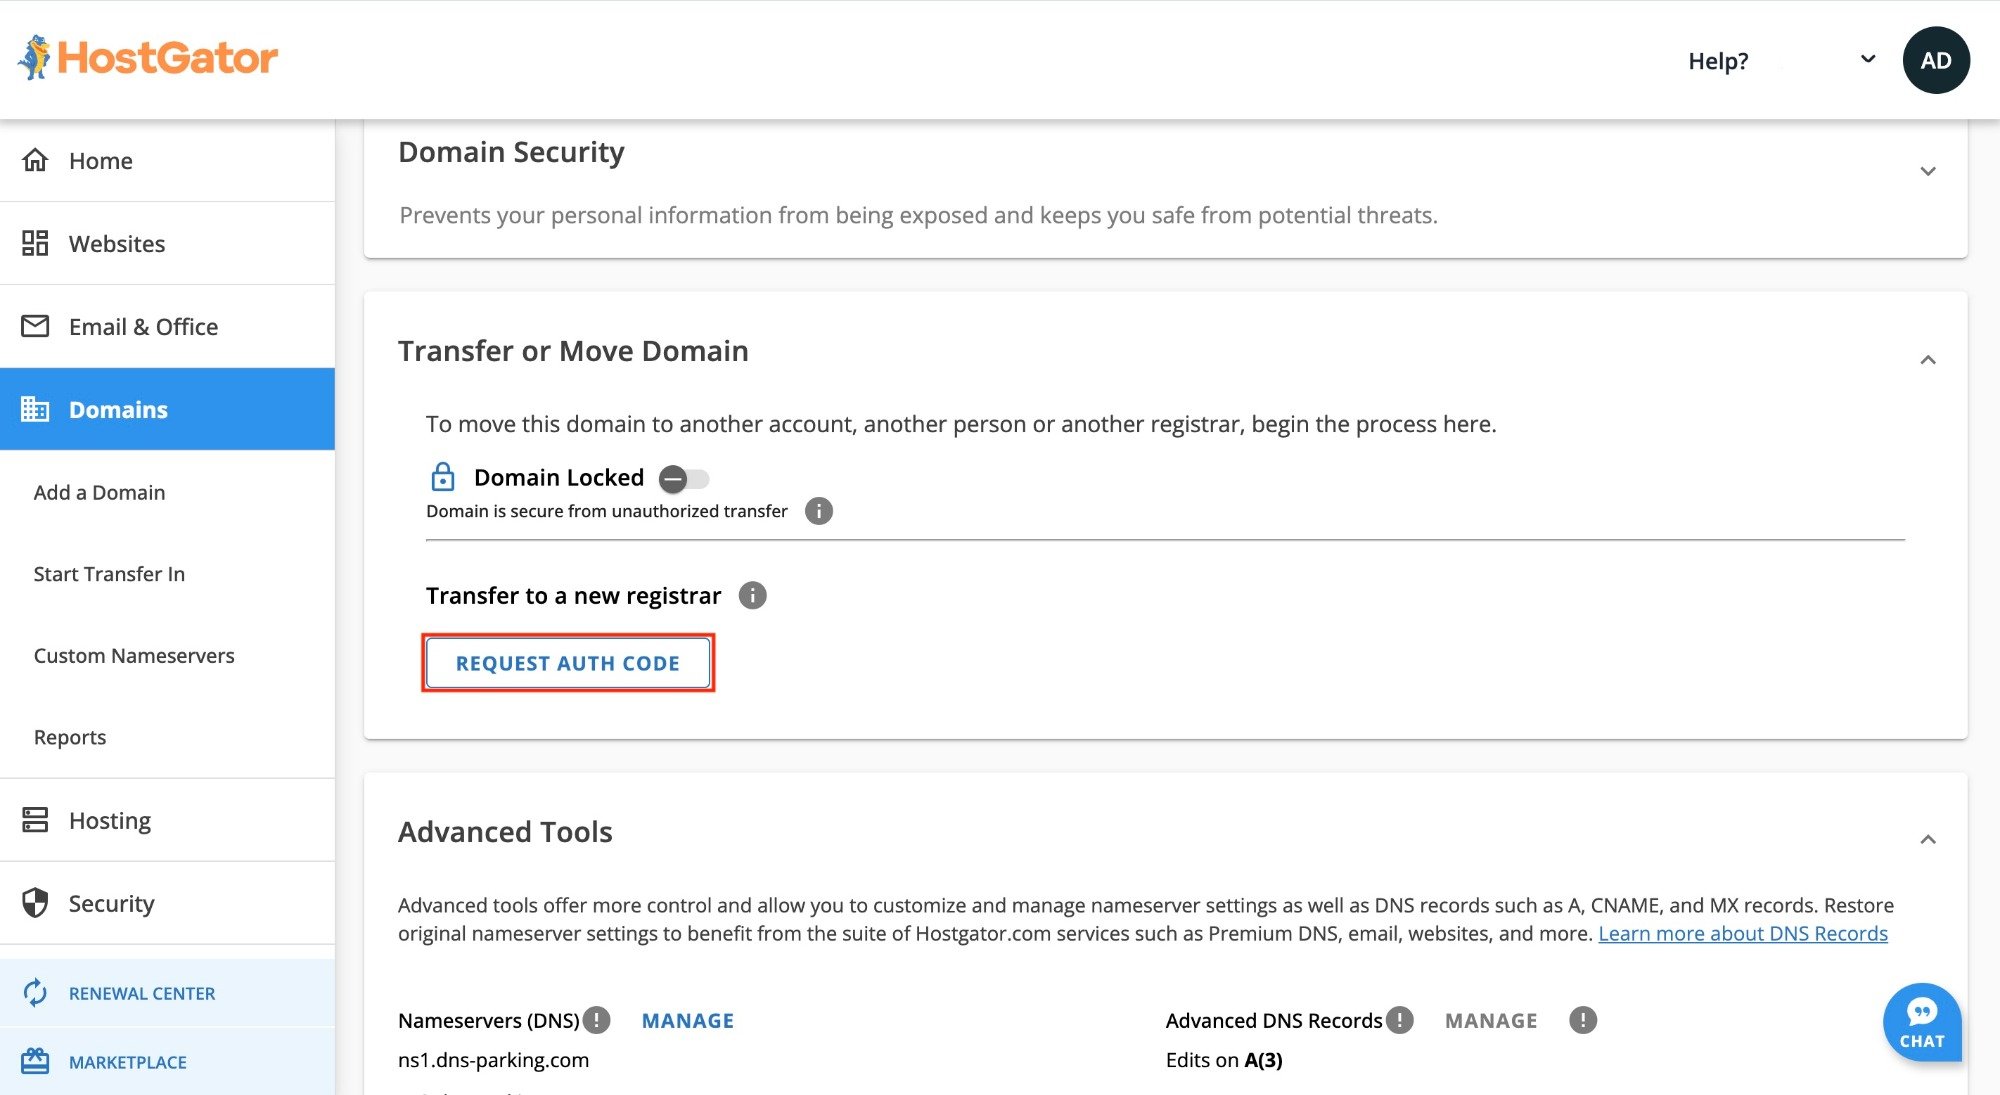
Once unlocked, obtain the domain’s authorization code from HostGator.
The auth code is a critical part of the domain transfer process and contains a unique sequence of characters. Its purpose is to prevent unauthorized transfers, so only the legitimate owner can initiate the migration.
In the Transfer or Move Domain section, click REQUEST AUTH CODE to view your transfer code and copy it on your computer.
Handle transfer authorization code with care. Only share it with your new domain registrar for a secure domain transfer process.
5. Initiate the transfer on Hostinger
Transferring your domain to Hostinger is a breeze once you’re equipped with the necessary EPP code and domain details. Here’s a step-by-step guide:
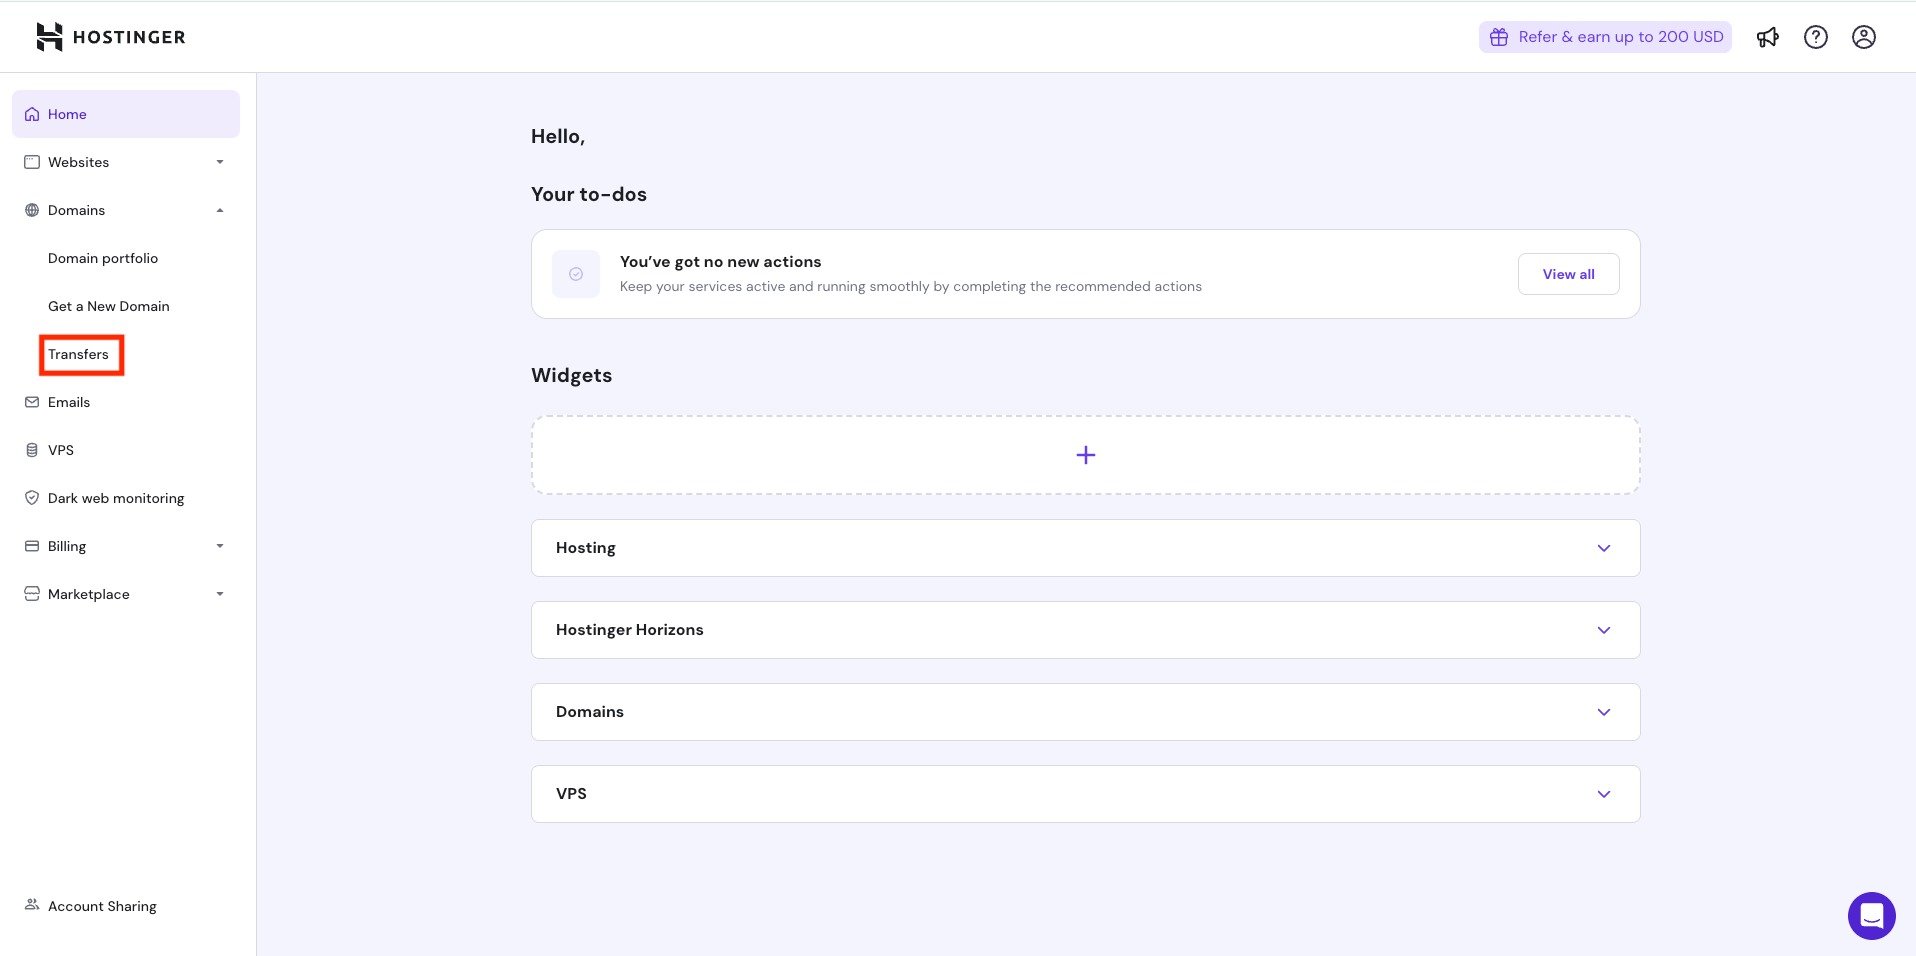
- Log into your Hostinger account and head to the Domains tab in the main dashboard.
- Initiate the transfer process by clicking the Transfers option.
- In the next screen, enter your domain name in the marked field and click on Transfer.
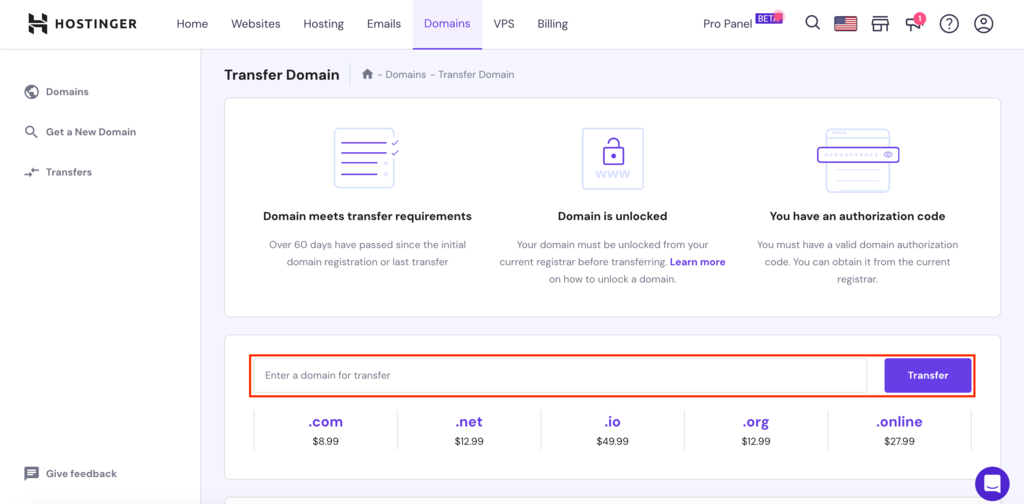
- Follow the rest of the prompts to ensure a successful domain transfer process.
Hostinger will send a confirmation message to the domain’s administrative email address to obtain the domain owner’s consent for the transfer. Follow the instructions in the email to confirm your HostGator to Hostinger migration.
6. Wait for the domain name transfer to complete
Domain transfers usually take 5-7 days to complete, depending on factors like domain extensions and registrar responsiveness. During this phase, patience is key.
To minimize the waiting period, make sure to check your emails frequently. Hostinger and possibly your current registrar will primarily communicate with you via email.
These emails may include domain status updates, requests for additional information, or instructions on the next steps. Promptly address any emails requesting actions or information to prevent delays in the transfer process.
It’s essential that you don’t miss out on any critical notifications. In addition to checking your main inbox, monitor your spam or junk folder, too.
You will receive a confirmation email once the domain has been successfully transferred. This email is the final indicator that your domain is now with your new registrar, Hostinger.
Conclusion
Transferring your domain from HostGator to Hostinger is not as difficult as it may seem. This comprehensive guide can help you through the journey.
Here’s a quick recap of the steps to transfer a domain to Hostinger:
- Purchasing a domain transfer – initiate the transfer process by selecting and buying a suitable domain transfer package from Hostinger.
- Updating nameservers – point your domain to Hostinger’s nameservers to ensure your website stays online.
- Unlocking your domain – domain locking is a useful security measure, but it needs to be toggled off for migration. In some cases, you may also need to disable WHOIS privacy protection, depending on your domain provider and location.
- Obtaining the transfer authorization code – this code ensures only the rightful owner can initiate the domain name transfer, providing added security.
- Initiating the transfer at Hostinger – with the authorization code in hand, initiate a migration request to Hostinger.
- Waiting for transfer completion – while waiting for the transfer to complete, keep an eye out for emails from your new or current registrar.
If you have any questions about switching domain registrars and its process, feel free to comment below.
Transferring domain from HostGator to Hostinger FAQ
Let’s address some commonly asked questions about the HostGator to Hostinger domain name transfer process.
How long does it take to transfer a domain from HostGator to Hostinger?
Usually, transferring a domain takes 5-7 days. The exact time may vary based on the domain extension and registrar procedures.
Will my website be down during the domain transfer?
No, your website shouldn’t experience downtime during the transfer if your nameservers are correctly pointed to your new registrar.
Can I transfer both my domain and web hosting from HostGator to Hostinger?
Yes, you can transfer both your domain and web hosting from HostGator to Hostinger. While the domain transfer process follows a standard procedure, canceling your HostGator account and migrating to Hostinger will involve moving website files, databases, and configurations.
All of the tutorial content on this website is subject to Hostinger's rigorous editorial standards and values.

Akshay is a Senior Content Writer who loves writing about technology. As a Computer Engineering graduate and a certified digital marketer, he aims to make tech easier for everyone. He also enjoys cooking, traveling, and learning new languages. Follow him on LinkedIn.

As Hostinger's Head of Domains, Klaudijus Januitis is a product leader but also a customer advocate ensuring the product meets user needs. He works closely with engineering, design, and marketing teams to develop and adapt the product and ensure alignment between product strategy and company goals. Klaudijus is also skilled in building relationships with registries and resellers to support joint marketing efforts and ensure successful partnerships. Follow him on LinkedIn.