Hostinger Ecommerce supports nine product types, from physical goods and digital downloads to gift cards, services, and donations, added directly from the Products page. Choose a product type from the Add product menu, fill in its details, and connect it to a sales channel to start selling.
Choose a product type
Head to Store Manager, go to Products, then click Add product to choose from three primary product types.
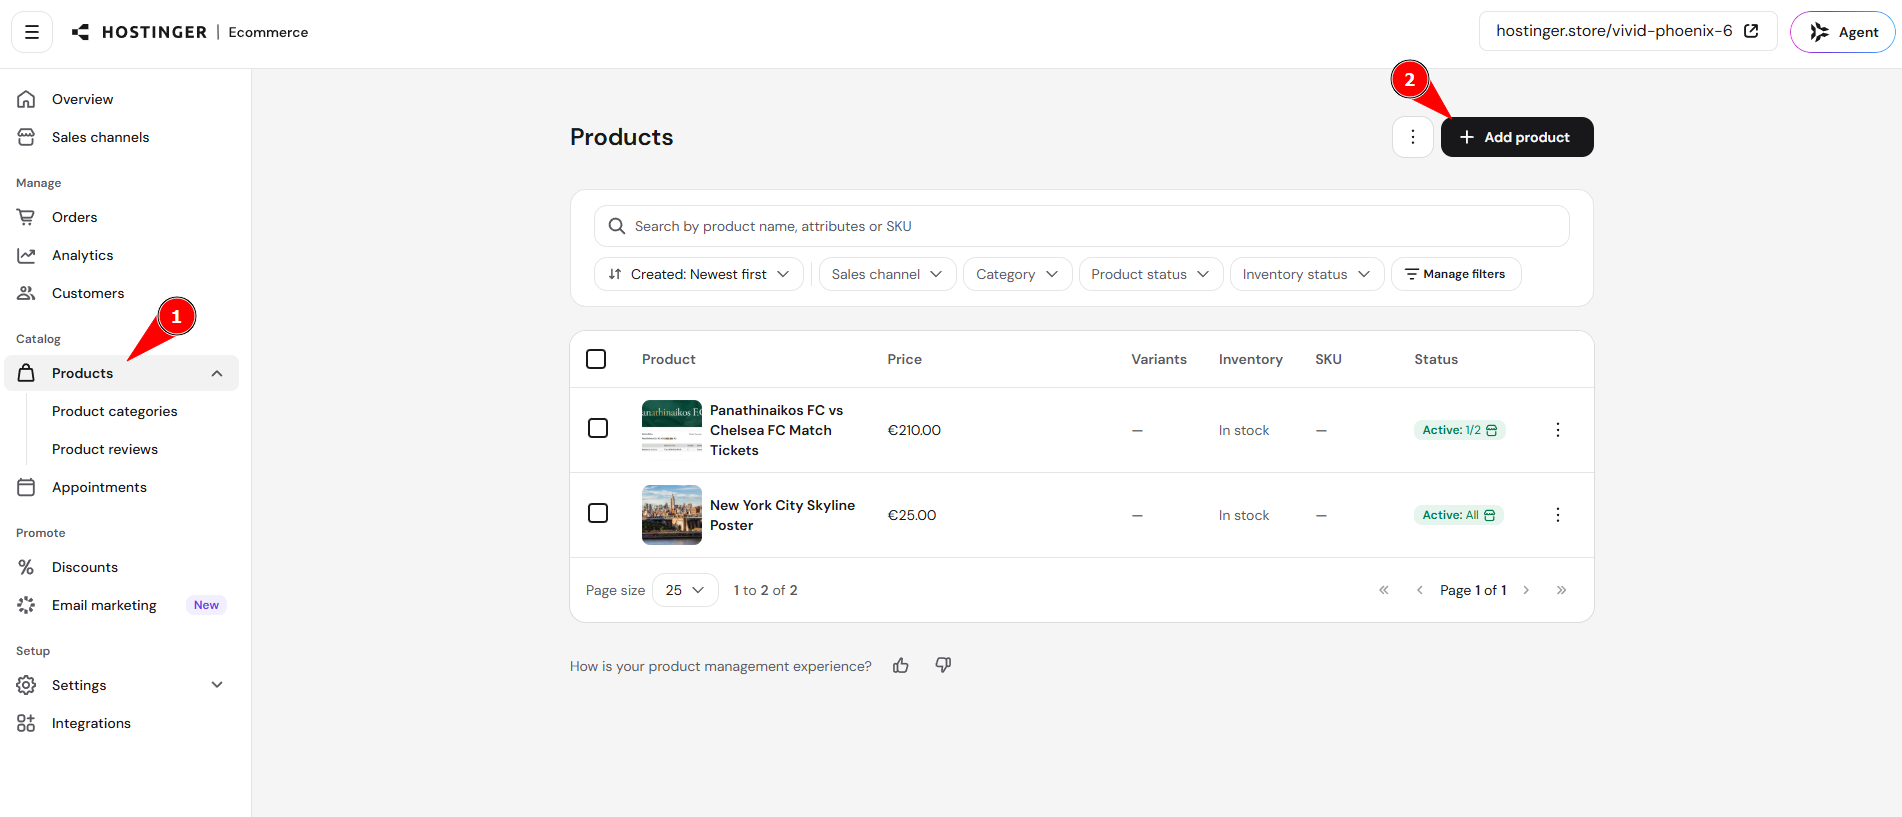
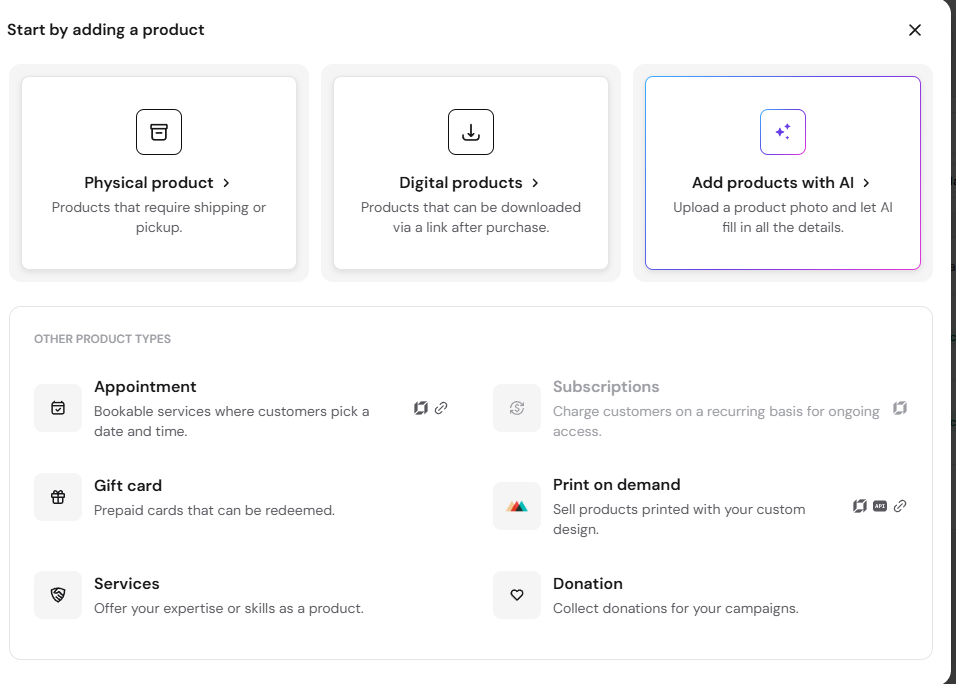
Here are the list under product types:
- Physical product – products that require shipping or pickup.
- Digital products – products that can be downloaded via a link after purchase.
- Add products with AI – upload a product photo and let AI fill in all the details, creating up to 10 products at once.
- Appointment – bookable services where customers pick a date and time.
- Gift card – prepaid cards that can be redeemed.
- Services – offer your expertise or skills as a product.
- Subscriptions – charge customers on a recurring basis for ongoing access.
- Print on demand – sell products printed with your custom design.
- Donation – collect donations for your campaigns.
Fields shared across product types
Physical product, Digital product, and Appointment forms share several common sections:
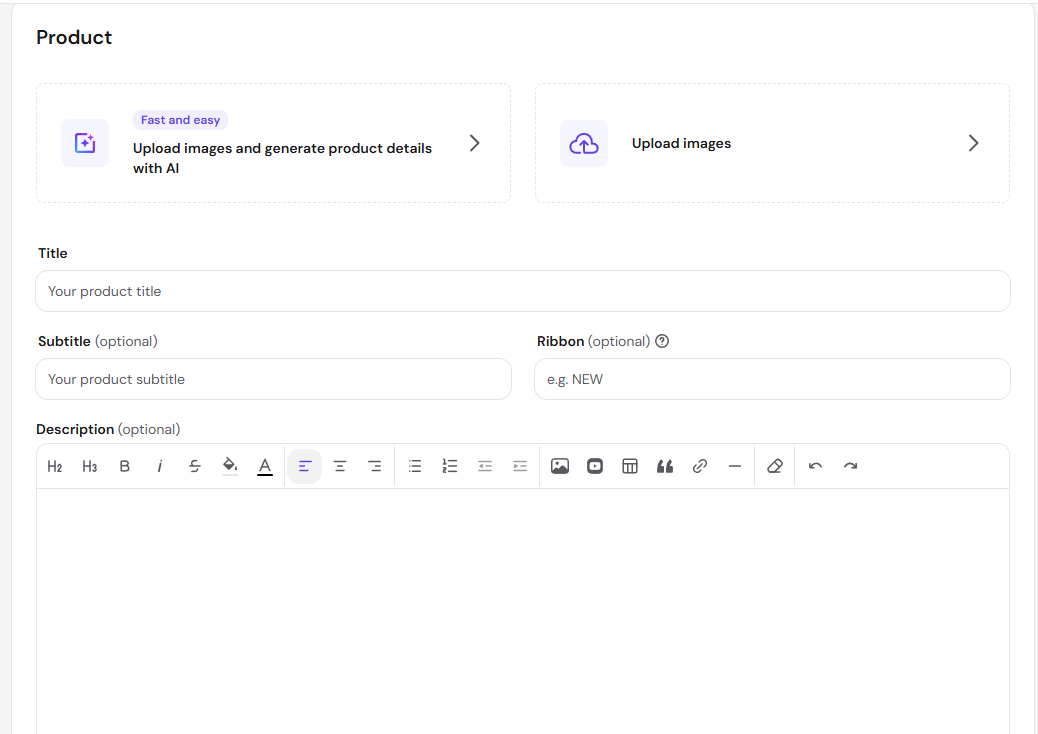
- Product details – add a Title, optional Subtitle, optional Ribbon (a small badge such as NEW), and an optional Description with rich-text formatting.
- Images – click Upload images and generate details with AI to generate a title, subtitle, and description from your product photos, or click Upload images to add photos manually.

- Sales channels – toggle each connected sales channel on or off to control where the product can be bought.

- Additional info sections (optional) – click Add info section to add more information about the product or your store policies.

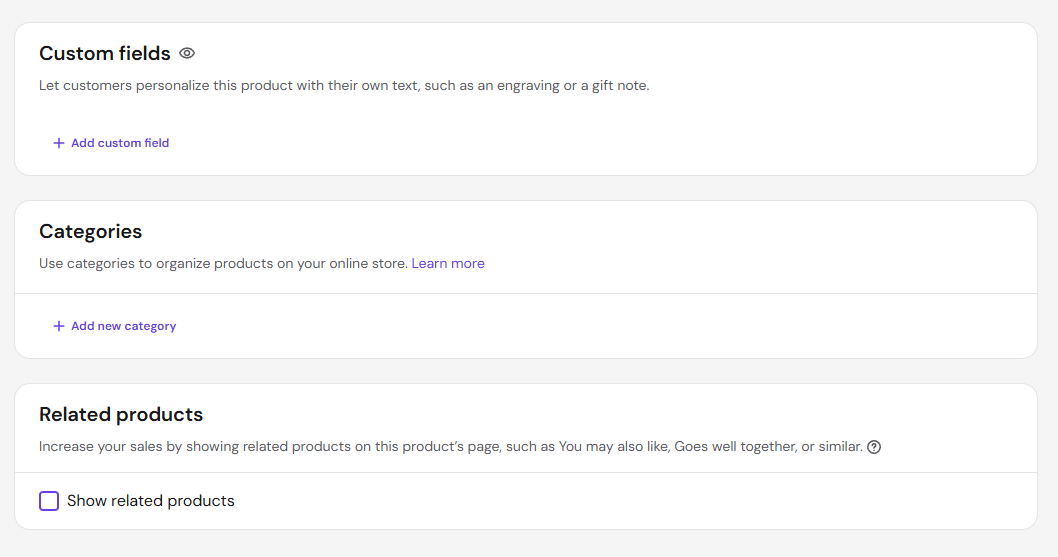
- Custom fields (optional) – click Add custom field to let customers personalize the product with their own text, such as an engraving or a gift note, at the time of purchase. Use the pencil and trash icons to edit or delete existing fields, and drag the handle (⠿) next to a field to reorder it. You can add up to 10 custom input fields per product.
- Categories (optional) – click Add new category to organize products for display on your website.
- Related products (optional) – toggle Show related products to display related products, such as “You may also like” or “Goes well together,” on the product page.



Click Save to publish the product, or Cancel to discard your changes.
Add a physical product
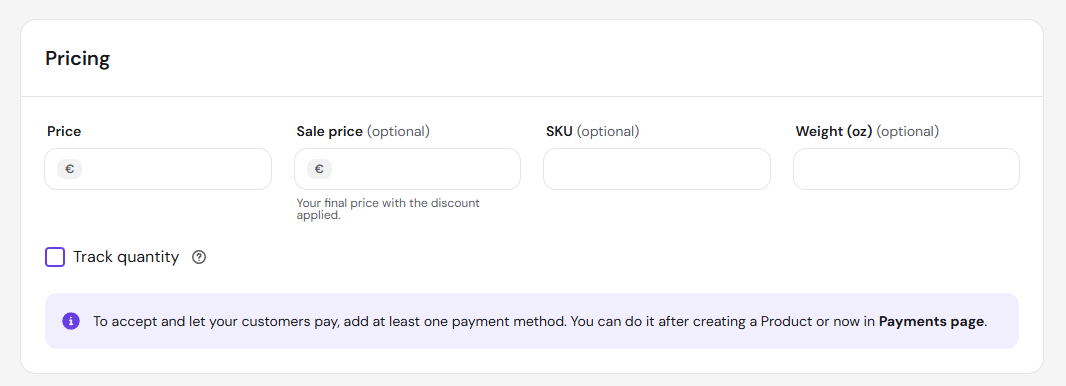
Physical products require shipping or pickup. In addition to the shared fields above, set:
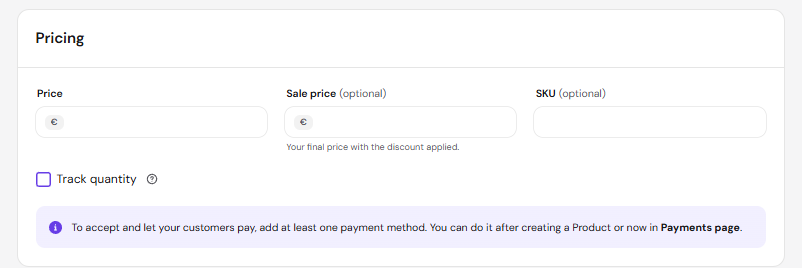
- Price – the product’s price.
- Sale price (optional) – your final price with the discount applied.
- SKU (optional) – a stock keeping unit for the product.
- Weight (optional) – the product’s shipping weight.
- Track quantity – enable this checkbox to manage stock levels for the product.

- Options – click Add option to manage variants such as size, color, or weight; Hostinger Ecommerce creates a unique, individually controllable variant for each combination.


NOTE
- Add at least one payment method before customers can pay for this product. Do this after creating the product, or now from Payments.
Add a digital product
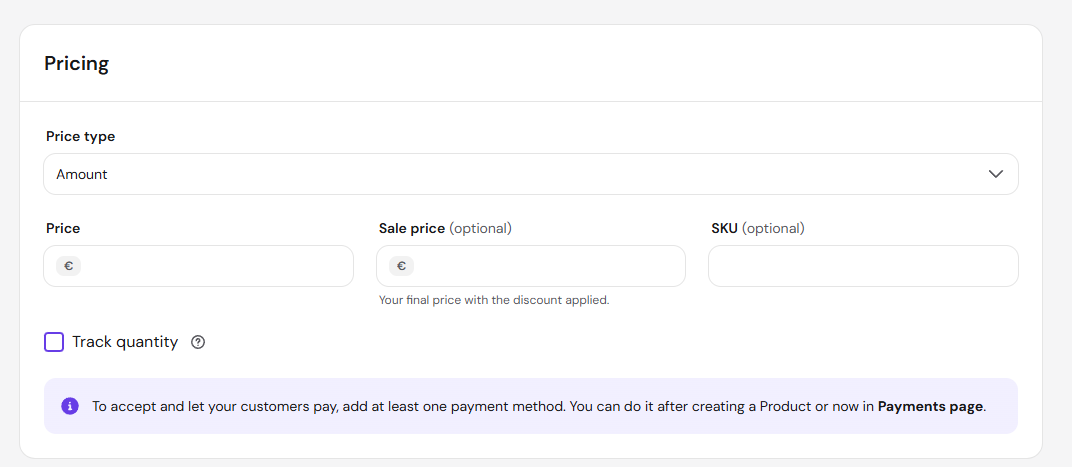
Digital products are delivered as a download link after purchase. In addition to the shared fields above, set:
- Price type – choose Amount as the pricing type.
- Price – the product’s price.
- Sale price (optional) – your final price with the discount applied.
- SKU (optional) – a stock keeping unit for the product.
- Track quantity – enable this checkbox to manage stock levels for the product.

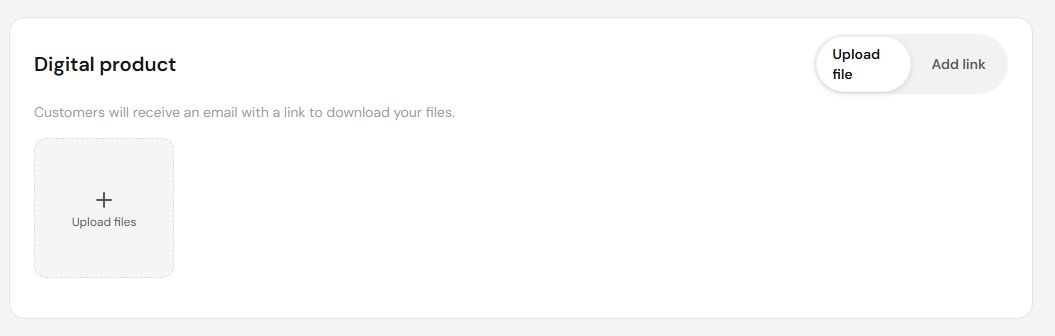
- Digital product file – click Upload file to upload your files directly, or Add link to link to a file hosted elsewhere. Customers receive an email with a link to download the files after purchase.

NOTE
- Add at least one payment method before customers can pay for this product. Do this after creating the product, or now from Payments.
Add multiple products at once with AI
Add products with AI generates full product listings from your product photos, without opening the manual product form.
- From the product type selection screen, click Add products with AI.

- In the Upload up to 10 product images dialog, click Upload product images and add up to 10 photos; each image becomes a separate product.

- Click Create products.

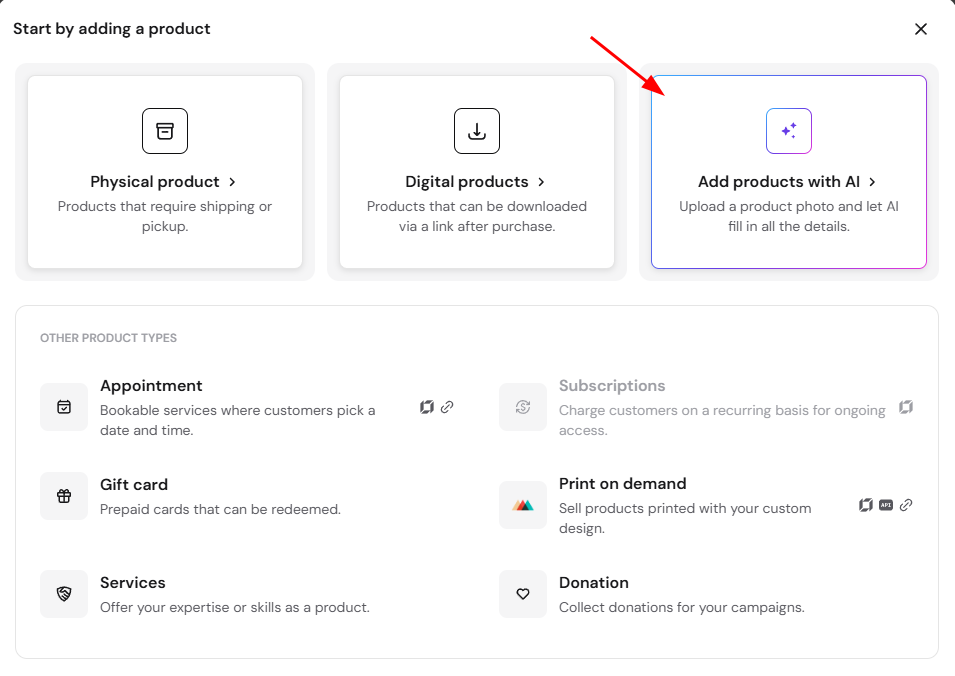
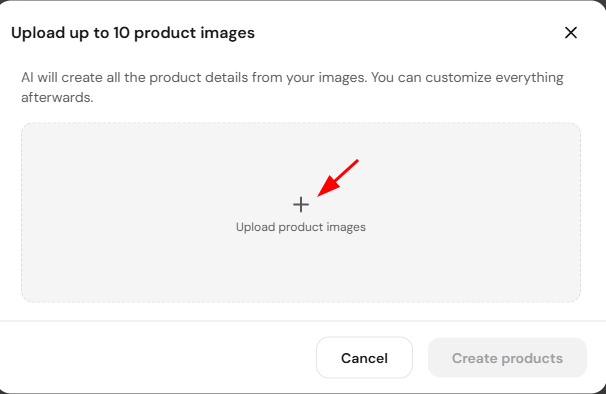
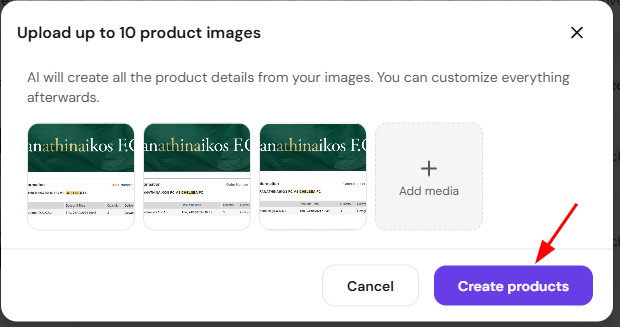
AI creates all the product details from your images, which you can customize afterward. Once creation finishes, a confirmation shows how many new products were created; click View product to review and edit it in the product list.
Create an appointment product
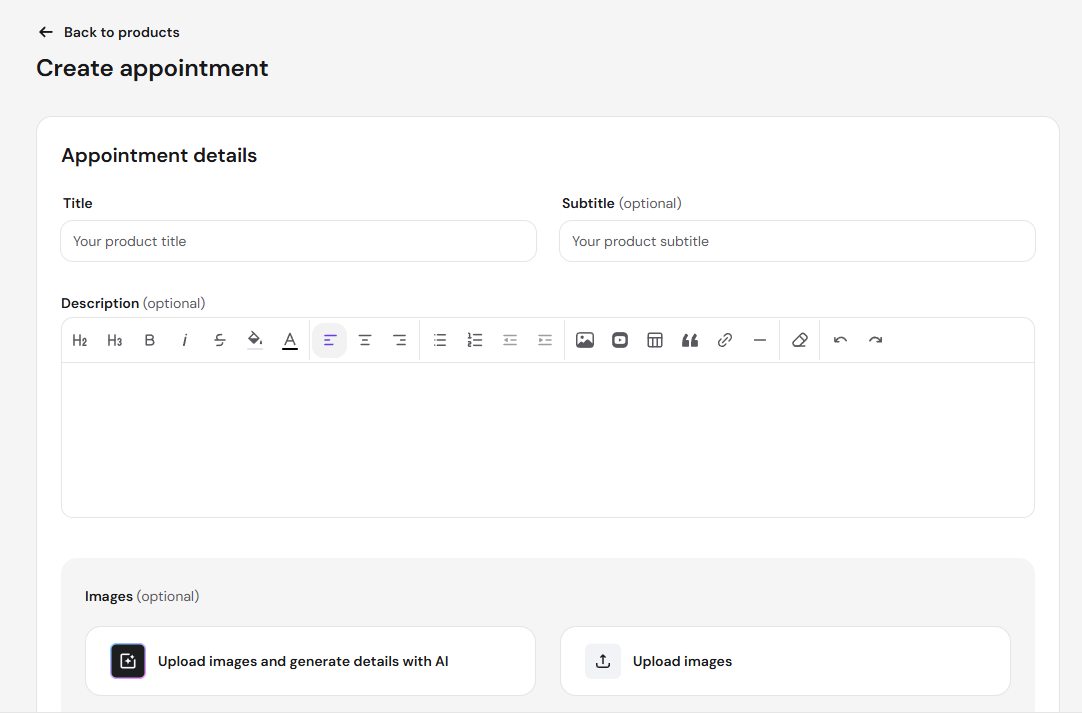
Appointment products are bookable services where customers pick a date and time. Selecting Appointment as the product type opens a dedicated Create appointment form.
- Appointment details – set a Title, an optional Subtitle, an optional Description, and optional Images.

- Sales channels – toggle each connected sales channel on or off, as with other product types.
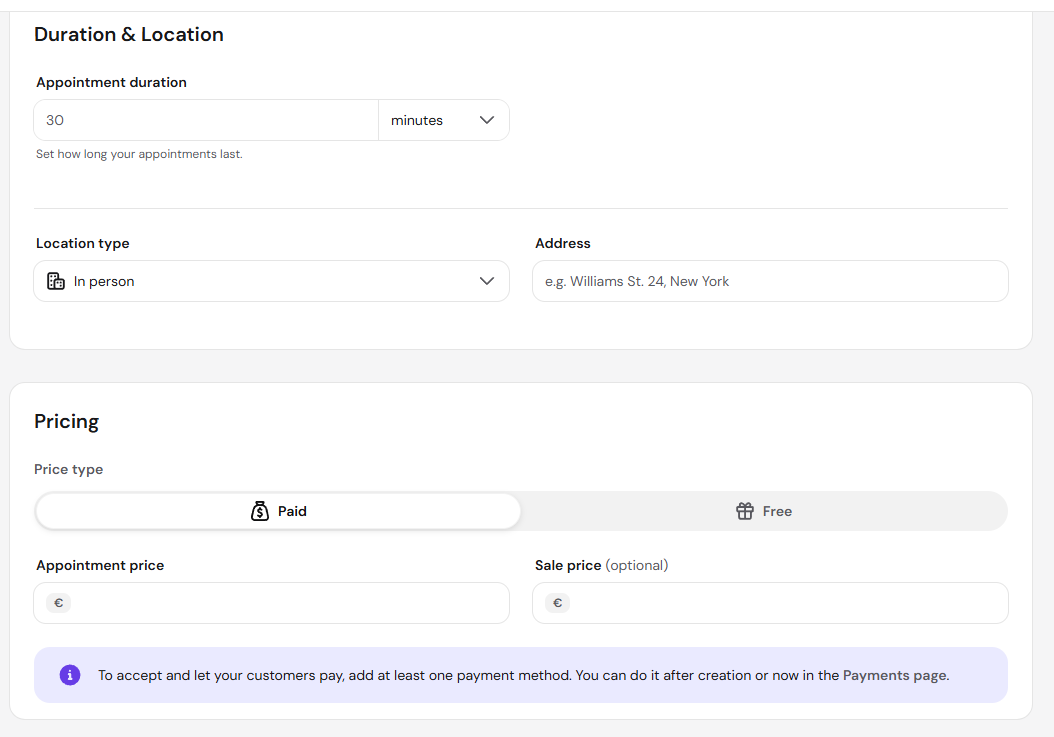
- Duration & Location – set the Appointment duration in minutes, and choose a Location type such as In person, with an Address field for in-person appointments.
- Pricing – choose a Price type of Paid or Free, then set an Appointment price and an optional Sale price for paid appointments.

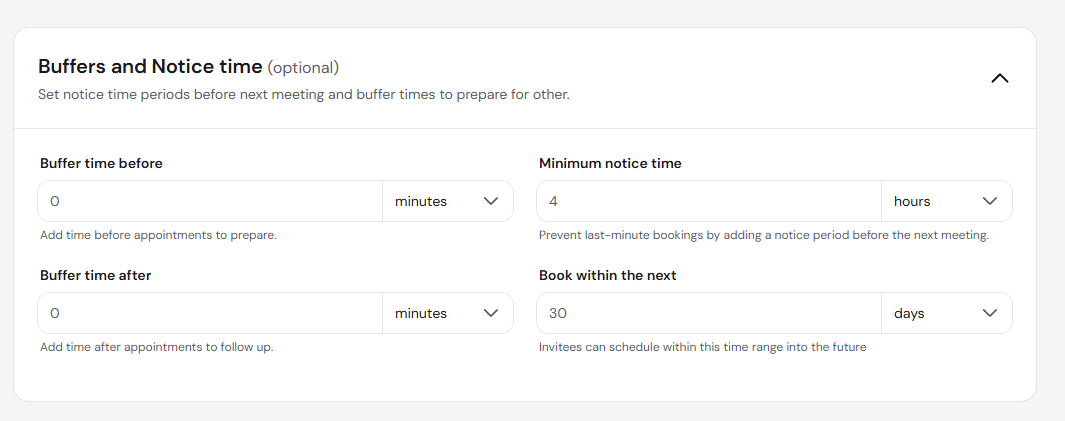
- Buffers and Notice time (optional) – set notice time periods before your next meeting and buffer times to prepare between appointments.

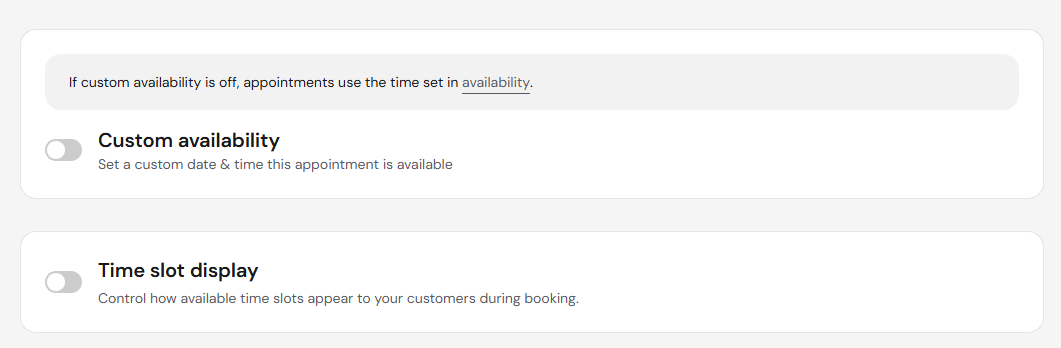
- Custom availability – toggle this on to set a custom date and time this specific appointment is available. When off, the appointment uses the time set in your overall Availability settings; see Hostinger Ecommerce: how to navigate the Store Manager for the full Appointments walkthrough.
- Time slot display – toggle this to control how available time slots appear to customers during booking.

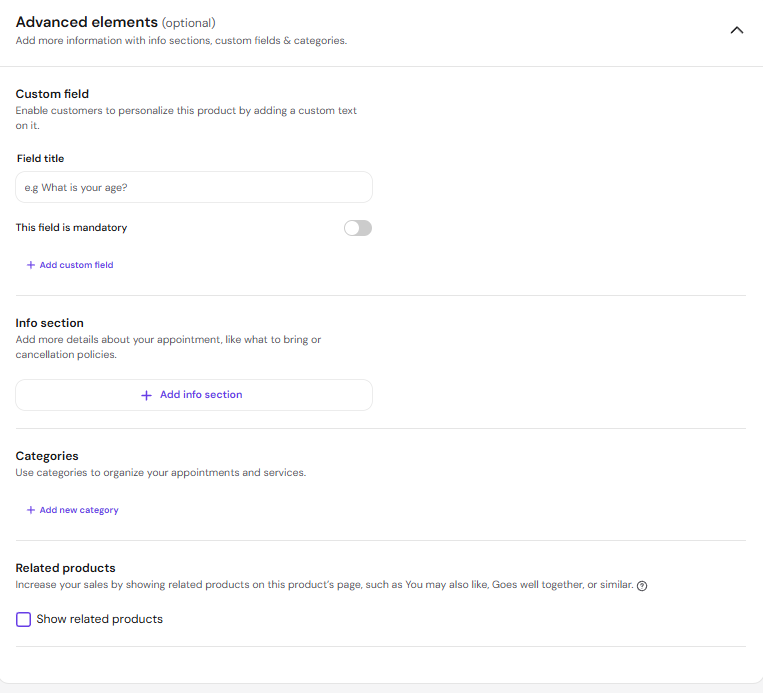
- Advanced elements (optional) – add info sections, custom fields, and categories, following the same pattern as the shared fields above.

Add a gift card
Gift cards are prepaid cards that customers can redeem. This form uses the shared Product details, Images, and Sales channels fields above, but replaces Pricing with:
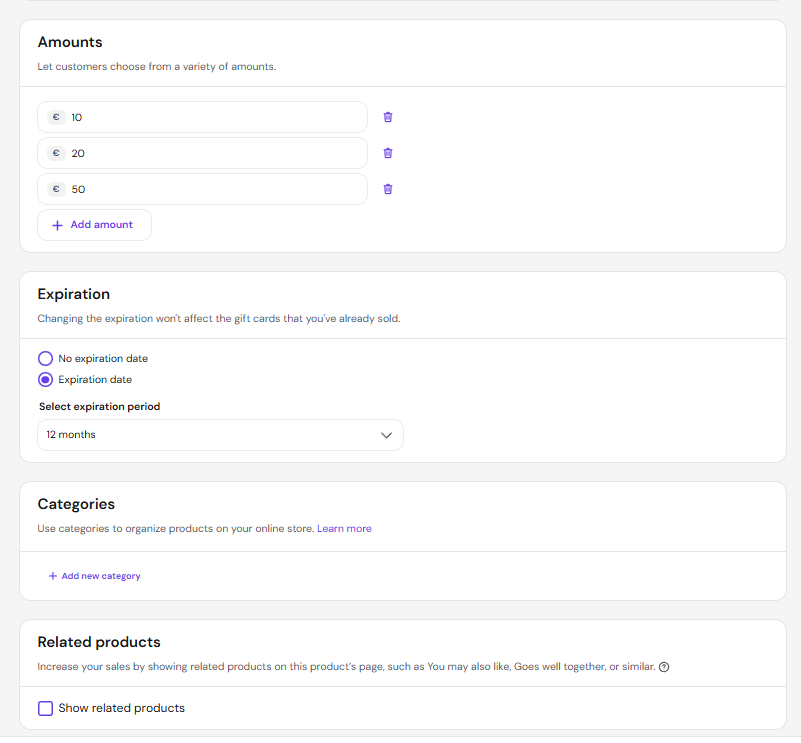
- Amounts – click Add amount to add each denomination customers can choose from (for example €10, €20, €50); click the trash icon to remove one.
- Expiration – choose No expiration date, or select Expiration date and set a Select expiration period (for example, 12 months). Changing the expiration doesn’t affect gift cards you’ve already sold.
- Categories (optional) – click Add new category to organize the gift card on your online store.
- Related products (optional) – toggle Show related products.

Add a service
Services let you offer your expertise or skills as a product. The form matches the physical product form, minus the Weight field:
- Price – the service’s price.
- Sale price (optional) – your final price with the discount applied.
- SKU (optional) – a stock keeping unit for the service.
- Track quantity – enable this checkbox to manage how many bookings or slots are available.

- Options – click Add option to manage variants.


NOTE
- Add at least one payment method before customers can pay for this service. Do this after creating the product, or now from Payments.
Add a donation product
Donation products let you collect donations for a campaign. This form uses the shared Product details, Images, and Sales channels fields above, plus a dedicated Donation amounts section:
- Suggested amounts – toggle this on to offer ready-made amounts customers can pick with one click. Click Add amount to add a value, and select the radio button next to one to make it the default shown on your online store.
- Custom amount – toggle this on to let customers enter their own donation amount, with a required Minimum and an optional Maximum (defaulting to no limit). Setting a minimum keeps donations above your payment processing fees.

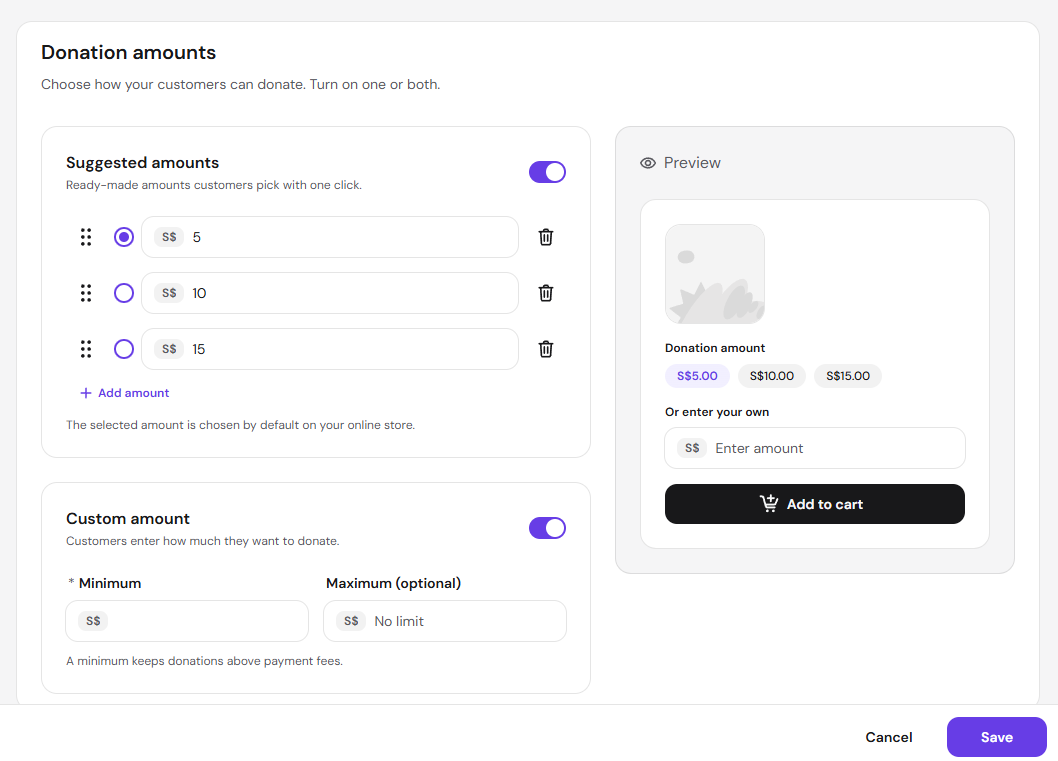
Turn on one or both amount types; a live preview on the form shows how the donation buttons and custom amount field will appear to shoppers.
Subscriptions
Subscription products charge customers on a recurring basis for ongoing access. Unlike the other product types on this page, subscriptions aren’t created from the standalone Hostinger Ecommerce Add product form — they’re only available through Hostinger AI Builder agentic mode, where you ask the AI to create the subscription product for you.
See Subscriptions in Hostinger Ecommerce and How to sell subscription products on Hostinger for the full setup process.
Print on demand
Print on demand products are sold with your custom design and fulfilled through the Printful integration rather than a Hostinger Ecommerce product form.
See How to connect your Hostinger AI Builder store to Printful to set up the integration, and How to create and edit print on demand products for the full product creation steps.
With a product type chosen and its details filled in, your product is ready to connect to a sales channel and start selling.