Hostinger Ecommerce is an AI-powered ecommerce platform, giving sellers a fast way to build businesses that can sell wherever customers discover, decide, and buy. Whether you’re a first-time store owner or an experienced developer, Hostinger Ecommerce offers multiple ways to launch and successfully run your online shops.
Power of Hostinger Ecommerce
With Hostinger Ecommerce:
- Launch store in seconds. One image upload is enough to generate a working store that is immediately LIVE and ready to take its first order with a quick Hostinger store.
- One business, multiple stores. With Hostinger Ecommerce, you will be able to create multiple shops for the same business in order to keep business management centralized, all in one place. The number of products and sales channels available depends on your plan; you can upgrade to unlock more features.
- Choose any way to create a website. Vibe code your website or build with Hostinger AI Builder, launch store in seconds with a quick Hostinger store or use all options all at once. No more tool lock-in, launch and run stores based on your businesses growth needs.
Hostinger Ecommerce plans
Hostinger Ecommerce is a standalone subscription — one plan covers one ecommerce store, with no feature locks. Purchase additional subscriptions to run more stores.
New Unlimited or Cloud hosting subscriptions no longer include Ecommerce. If you already had Ecommerce bundled with an existing hosting plan, it continues to work, with access to one sales channel.
How to launch my business with Hostinger Ecommerce?
Before getting started, make sure you have an eligible subscription.
To launch your business:
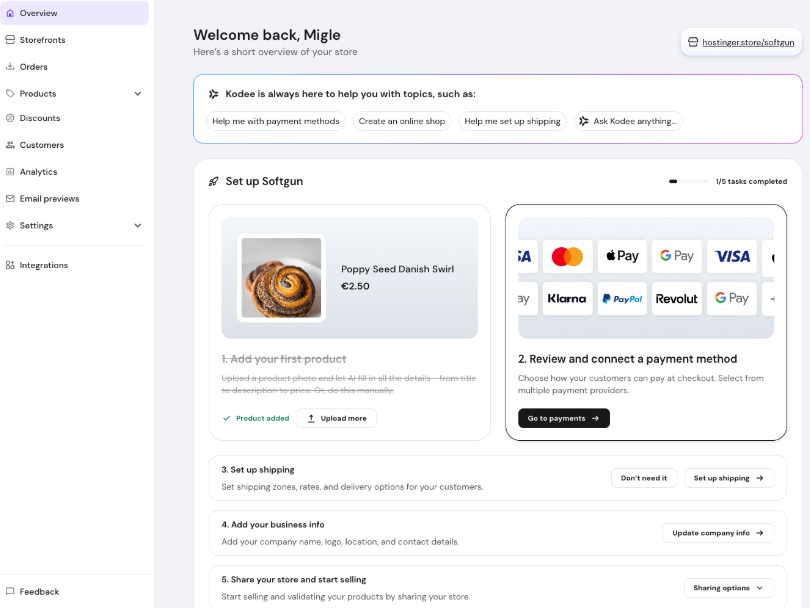
- Go to Ecommerce in hPanel.
- Click Get started to begin the onboarding flow.
- Answer 4 short questions about your business.
- Once you reach the Store Manager, follow the setup steps to prepare your business for selling online:
- Add products
- Set up payments
- Configure shipping rules (if needed)
- Add your business details
- Publish your first store
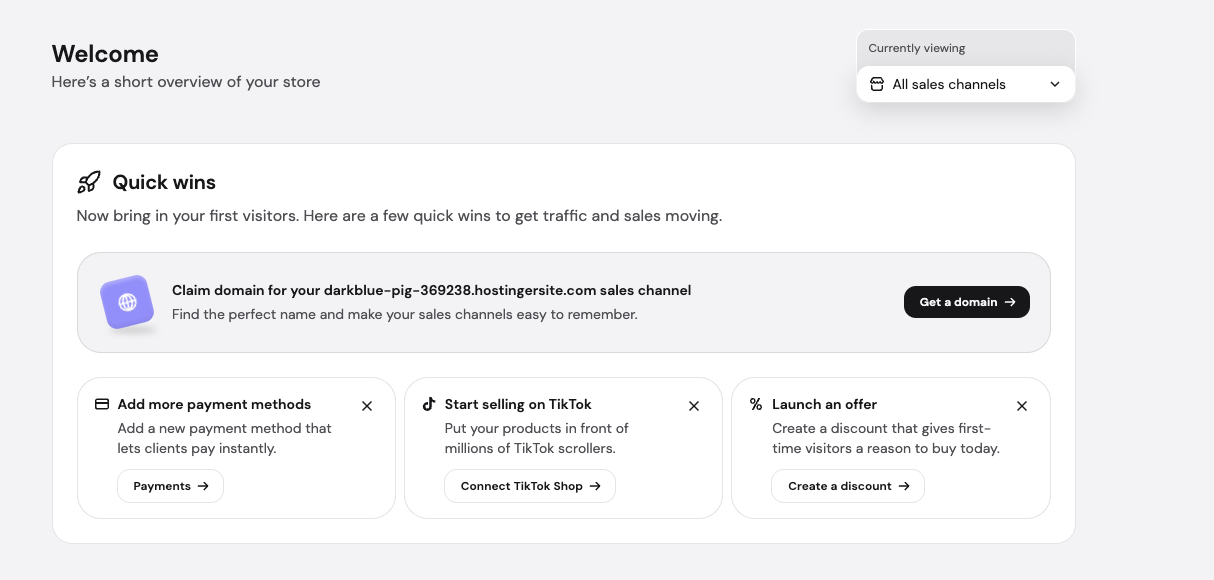
Quick wins after store setup
After you complete your initial store setup, a Quick wins section appears in Store Manager. It shows setup recommendations based on your store’s locale, such as region-specific payment methods or shipping options. Complete these steps to prepare your store for its first sale.
How to connect a store?
With Hostinger Ecommerce, you can connect multiple stores to the same business.
Choose the setup method that works best for you:
- Launch a store in under a minute with a Quick link store
- Build with Hostinger AI Builder manual mode using drag-and-drop tools.
- Connect a Hostinger AI Builder agentic mode project to your existing standalone Ecommerce store. Multiple storefronts of different types can be connected to the same business simultaneously.
- Add a Custom sales channel to build your own frontend and keep your catalog, orders, and checkout in sync through the Hostinger Ecommerce API. You can build against the public Sales Channel API directly, or use the Hostinger Connector to build, deploy, and manage your store with AI from tools like Cursor or Copilot.
- Power your website with WordPress (coming soon)
Store settings are managed from a single page that combines business identity (store name, logo), regional settings (currency, measurement system), and contact details (address, phone, email). Access it via Settings → Store settings.
What is a Quick link store?
A Quick link store allows you to launch a LIVE store within seconds.
To create one:
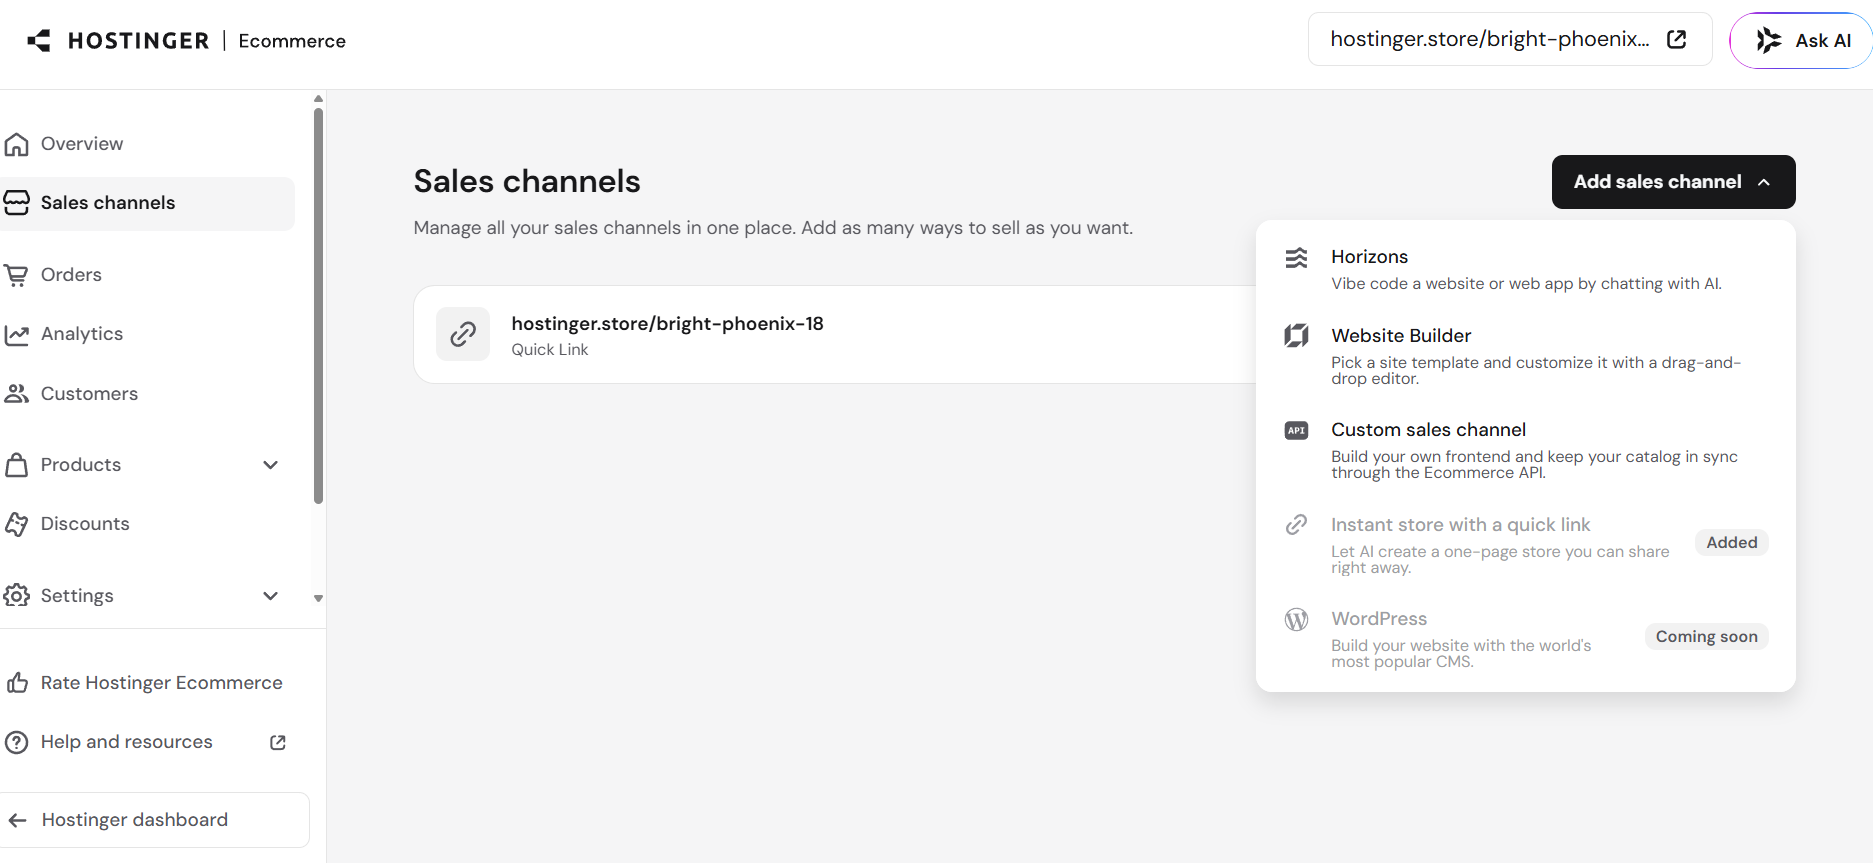
- Go to Sales channels on the side menu.
- Select Add sales channel.
- Choose Instant store with a Quick link.
- Your store will instantly appear and be ready to use.
You can customize your Quick link store handle at any time — you’re not limited to the one auto-generated from your business name during onboarding. To update it, navigate to your online stores and edit the handle directly.
Keep in mind:
- Handles are globally unique — no two stores can share the same one.
- Changes take effect instantly after saving.
- The old handle is freed up right away and becomes available for others to use.
Add products in store
To display products in your store:
- Go to Products.
- Select Add product.
- Choose the product type you want to create.
All added products will automatically appear in your Quick link store, or any other store you created via Hostinger Ecommerce. Product types not included in your plan will show a lock icon. Click Upgrade for you to upgrade the plan.
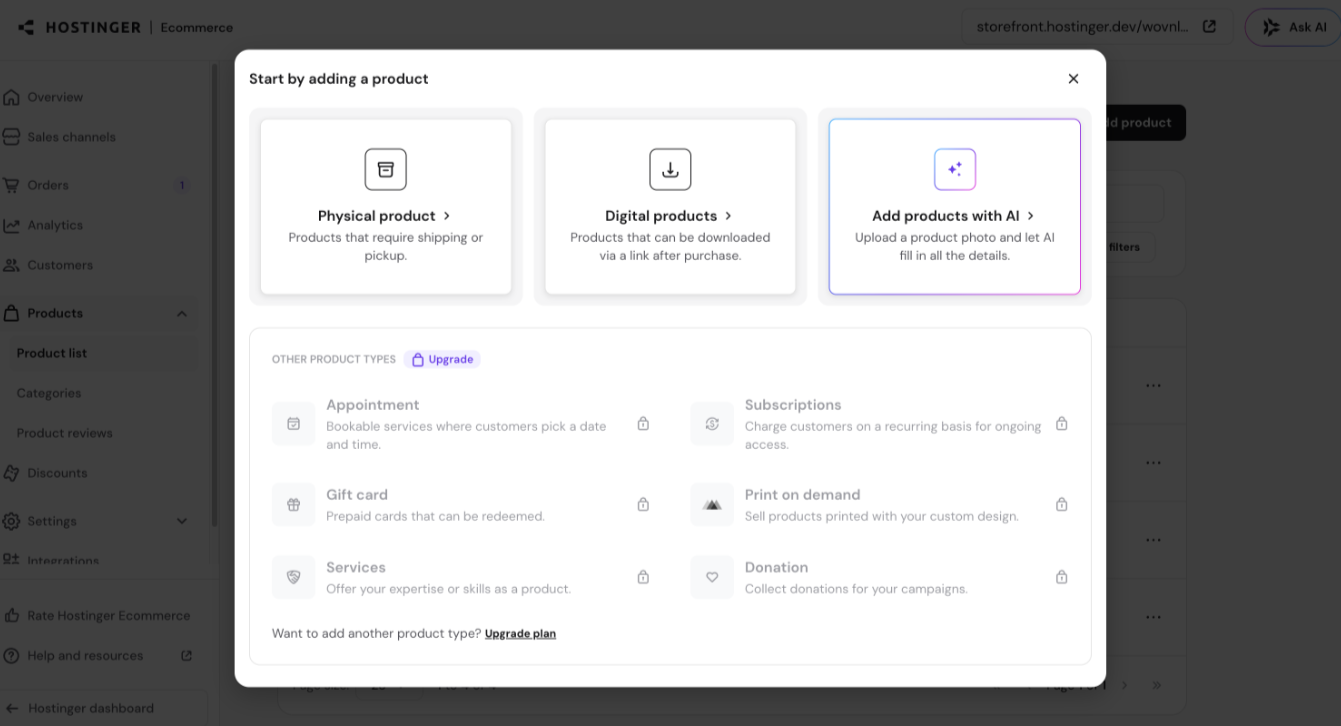
When adding a product, you can generate product images with AI instead of uploading your own, including using your existing product images as a reference to keep the same visual identity across generated images. See How to add products to your online store for the full steps.
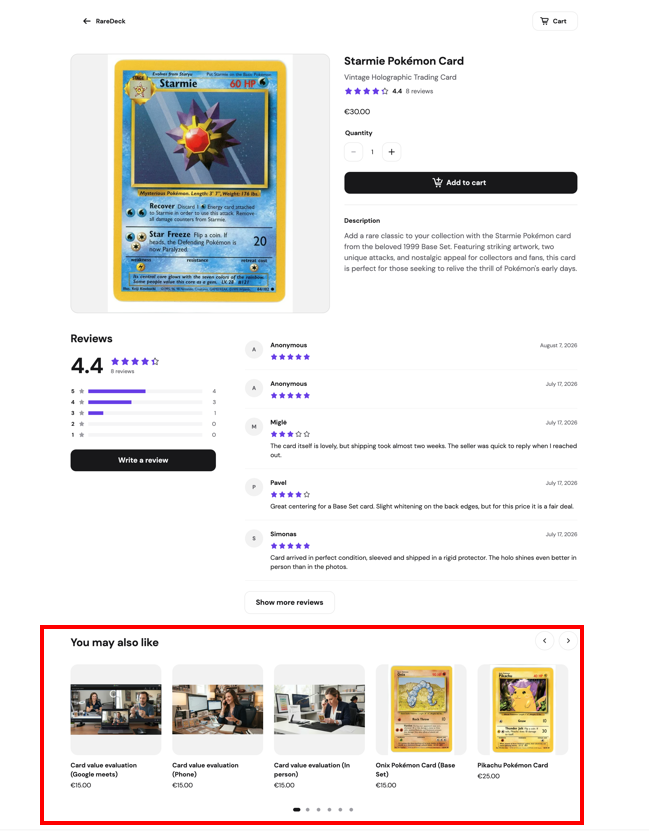
On the product page, Quick link stores show a You may also like carousel with other items from the same store, so shoppers have a way to keep browsing instead of hitting a dead end after landing on one product. Shoppers can navigate the carousel using the left/right arrows or the pagination dots.
Manage a product’s visibility across sales channels
Each product’s edit page includes a Sales channels card showing where the product is available. Channels are grouped into three statuses:
- Live on — the product is active on this channel and customers can buy it.
- Hidden from — the product exists on this channel but isn’t visible to customers.
- Needs attention — the channel has a setup issue, such as an unpublished site, a suspended website, or a missing payment plan.
Click a channel row to expand a detail pane showing the channel’s status, a shortcut to view or edit that channel (for example, Edit website), and a toggle to turn the product on or off for that channel. The card header shows how many channels are active out of the total, for example 3 of 6 channels.
Accept orders in store
To start accepting orders:
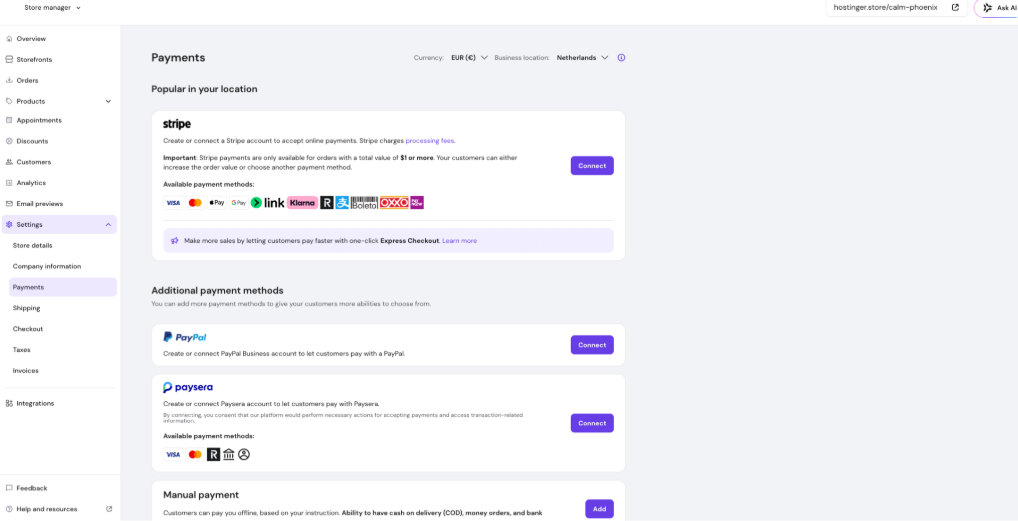
- Go to Settings → Payments.
- Select the region and currency your store will operate in.
NOTE
- Before going live, you can safely verify your checkout flow using the test payment method, without processing real transactions.
Store and checkout language
The Ecommerce store admin interface and checkout language are set based on the language saved in your hPanel account profile. This applies both to your existing store and when creating a new one.
The store’s default country/region is also derived from your account language setting (for example, lt_LT maps to Lithuania).
If no language is saved in your account, the interface defaults to the brand default language, and the store’s country/region instead falls back to detection based on your IP address.
You can change the language used for your store by updating your account language in hPanel.
Express Checkout in Quick link stores
Express Checkout lets customers complete a purchase directly from the product page, without visiting a separate checkout page. It’s powered by Stripe and appears automatically as a payment button (for example, Google Pay or a saved card) whenever the customer’s browser or device has a supported digital wallet configured.
To enable it:
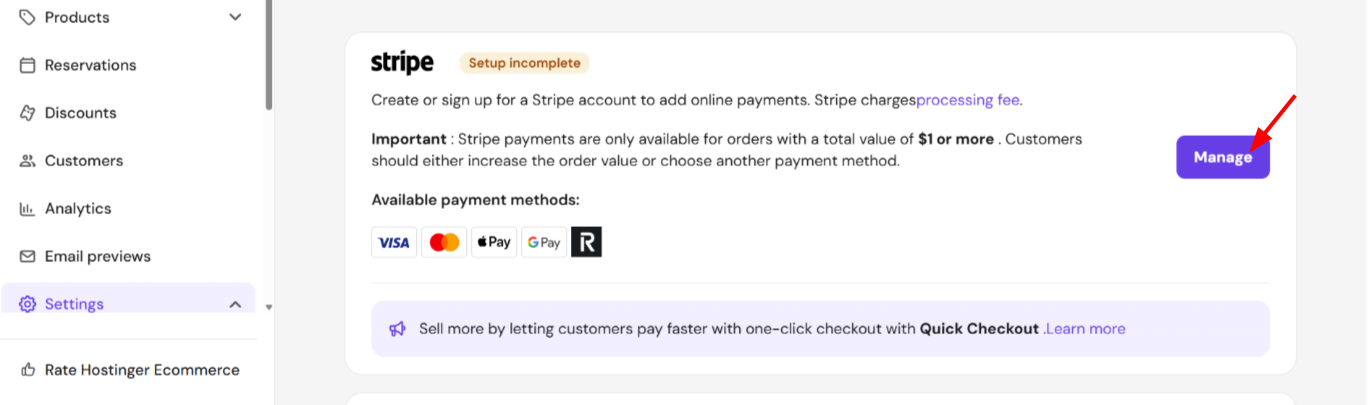
- Go to Settings → Payments.
- Connect Stripe as a payment method.
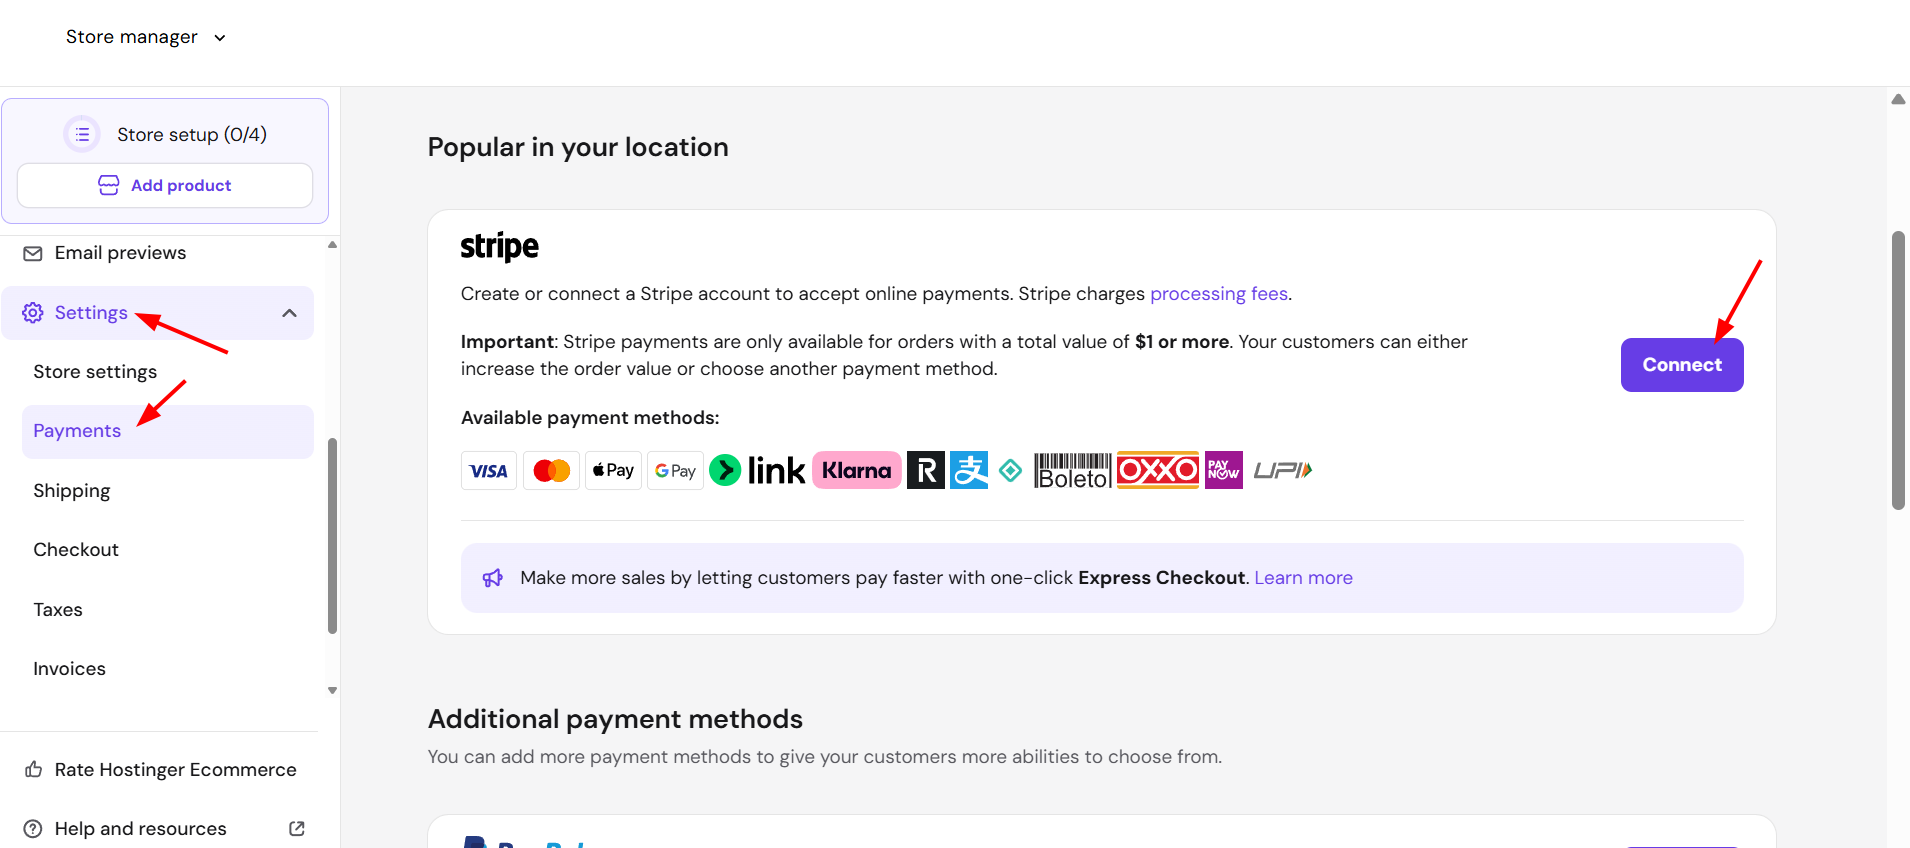
- Once it’s connected, click Manage.
- Then turn on Quick payment.
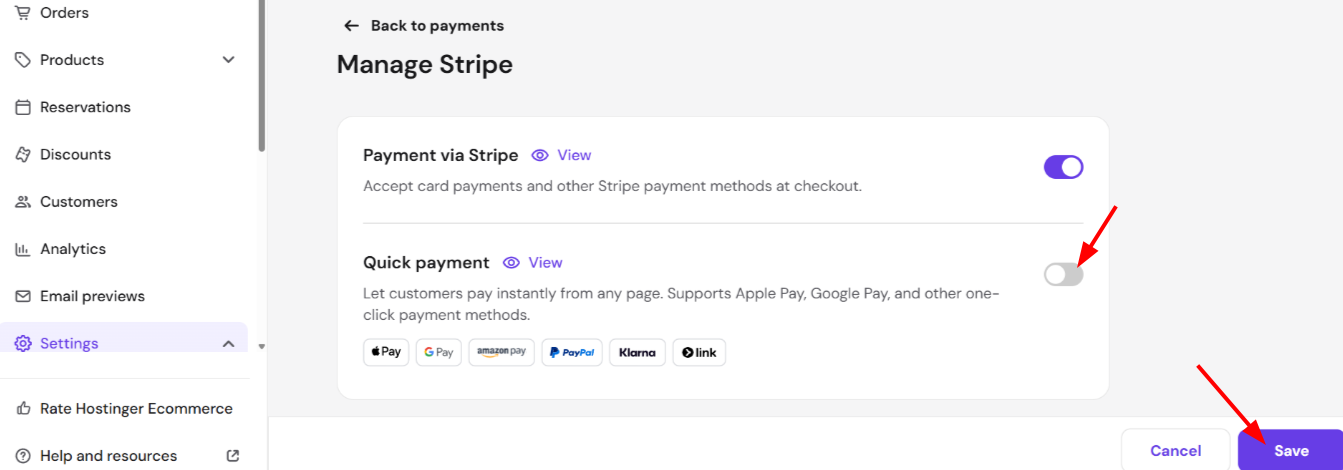
Once enabled, eligible customers will see the Express Checkout option beneath the regular Add to cart button on the product page. Customers without a supported wallet will not see this option and can still check out normally.
Cookie consent and footer in Quick link stores
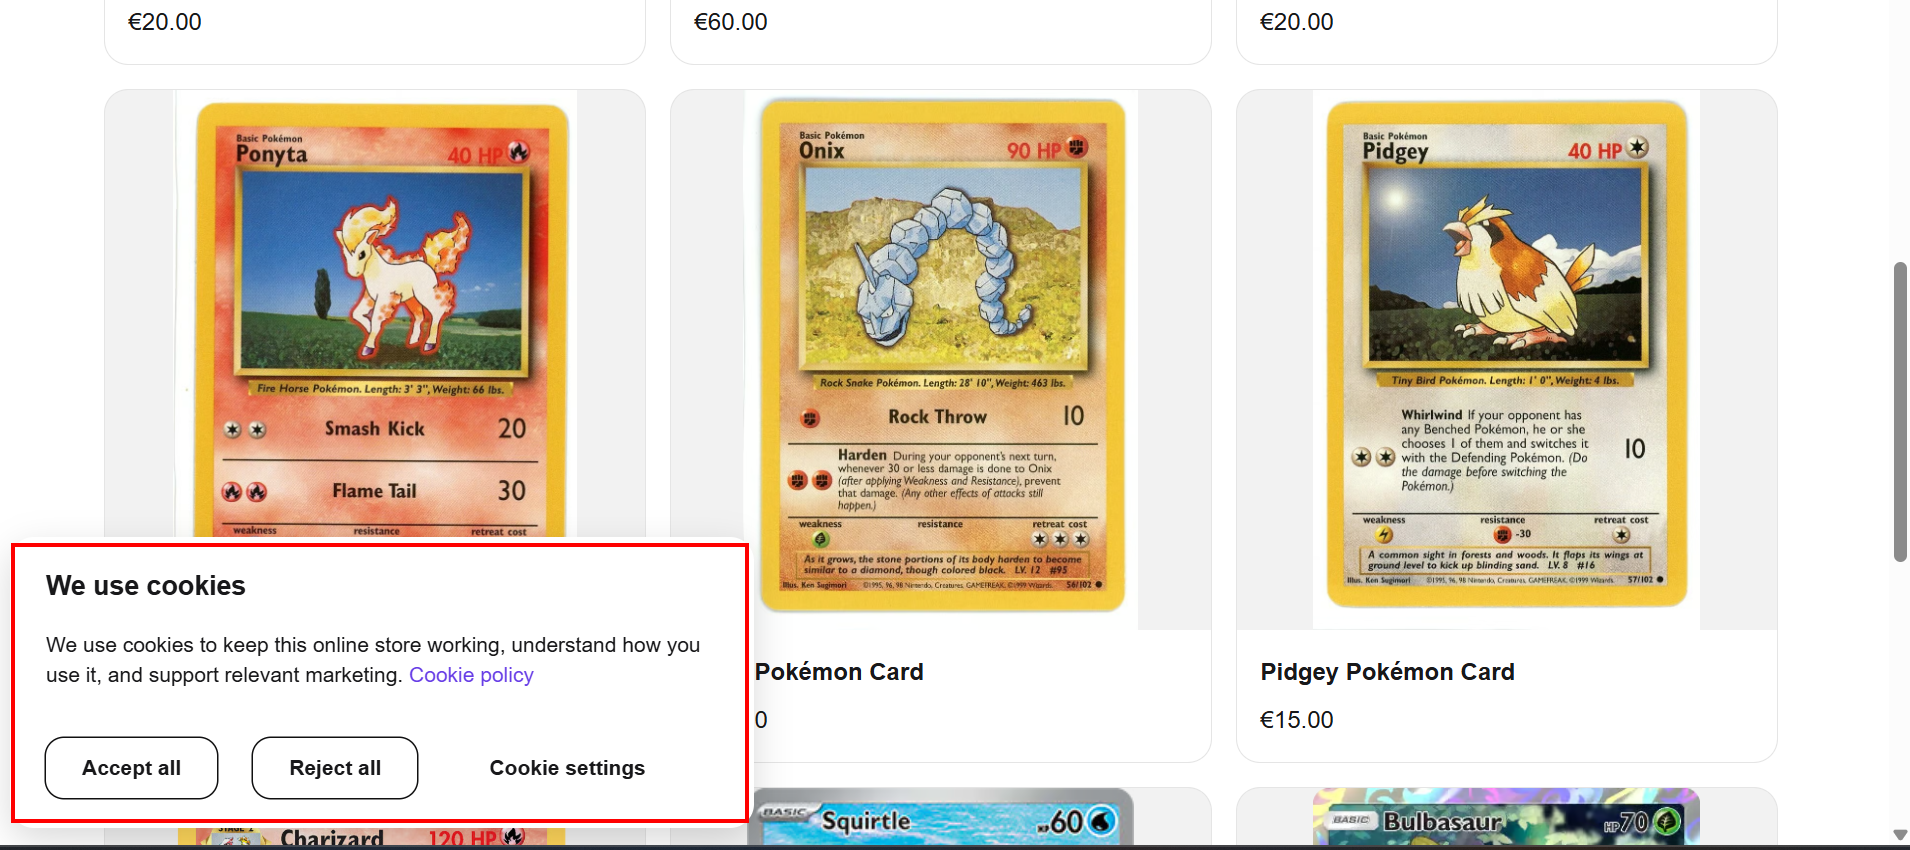
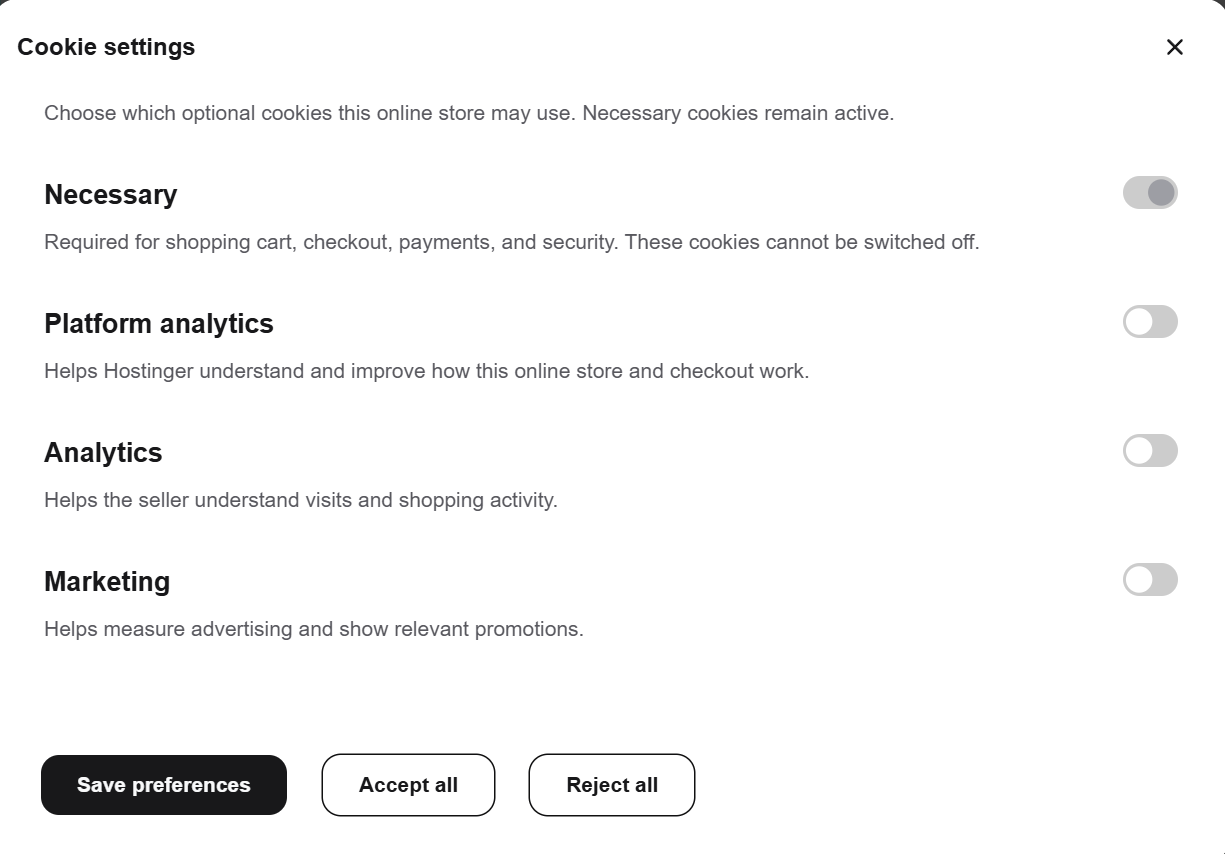
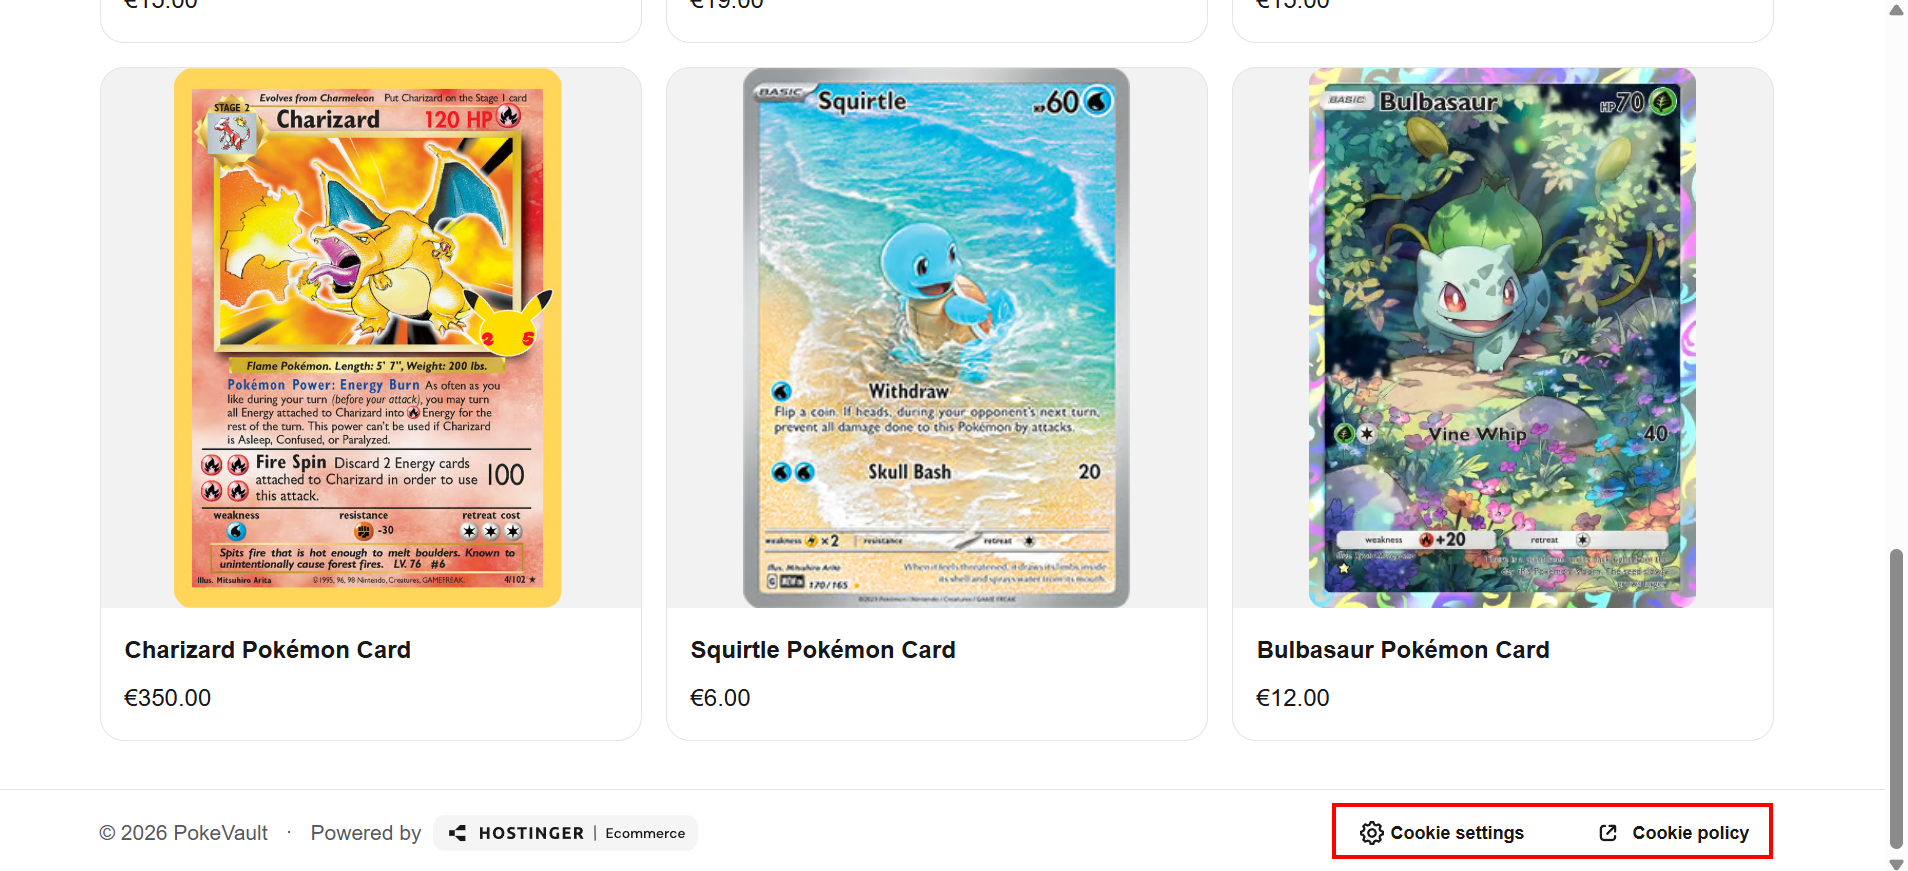
Quick link stores display a cookie consent banner on a shopper’s first visit. Shoppers can Accept all, Reject all, or click Cookie settings to choose which cookie categories to allow:
- Necessary — required for the shopping cart, checkout, payments, and security. These cannot be turned off.
- Platform analytics — helps Hostinger understand and improve how the store and checkout work.
- Analytics — helps you, the seller, understand visits and shopping activity.
- Marketing — helps measure advertising and show relevant promotions.
Every Quick link store also has a footer showing the store’s copyright, a Powered by Hostinger Ecommerce badge linking to the Ecommerce landing page, and Cookie settings and Cookie policy links so shoppers can revisit their preferences at any time.
Appointment booking in Quick link stores
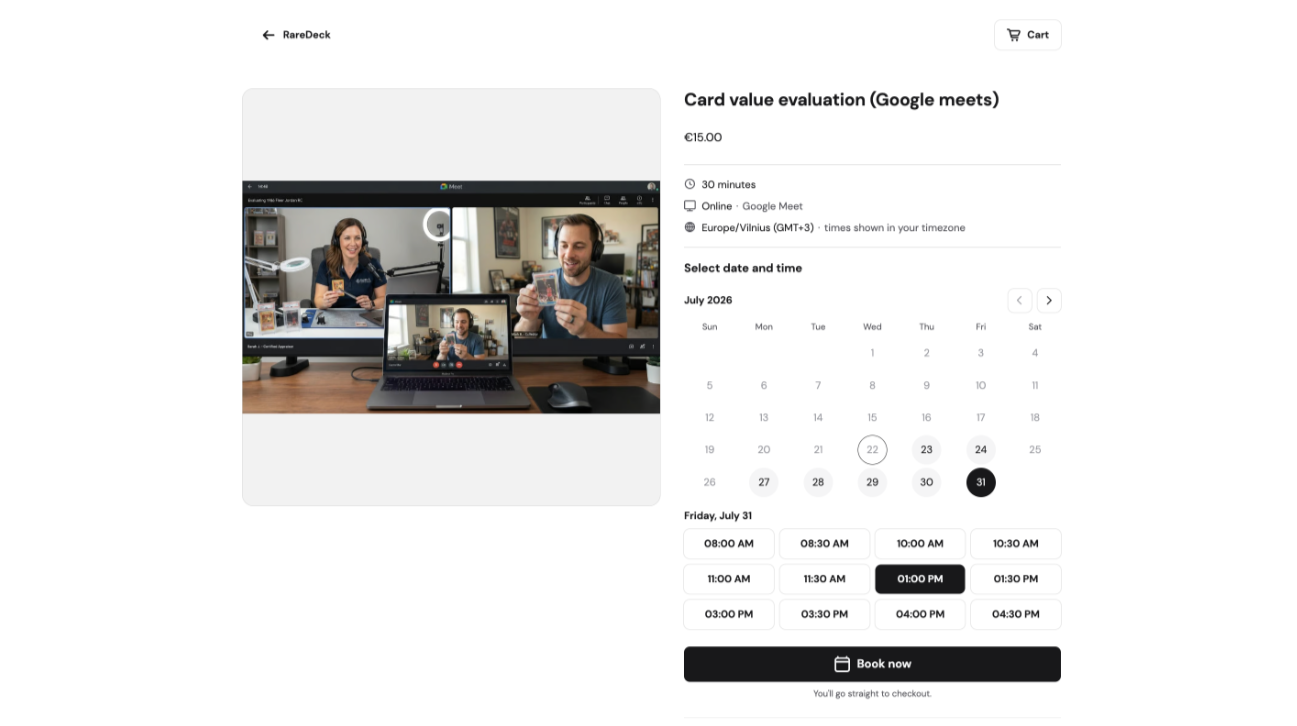
Quick link stores can now sell appointment-based products, the same as Hostinger AI Builder storefronts.
On the product page, shoppers pick a date and time from a calendar and time-slot picker, then click Book now to go straight to checkout with the selected slot pre-filled.
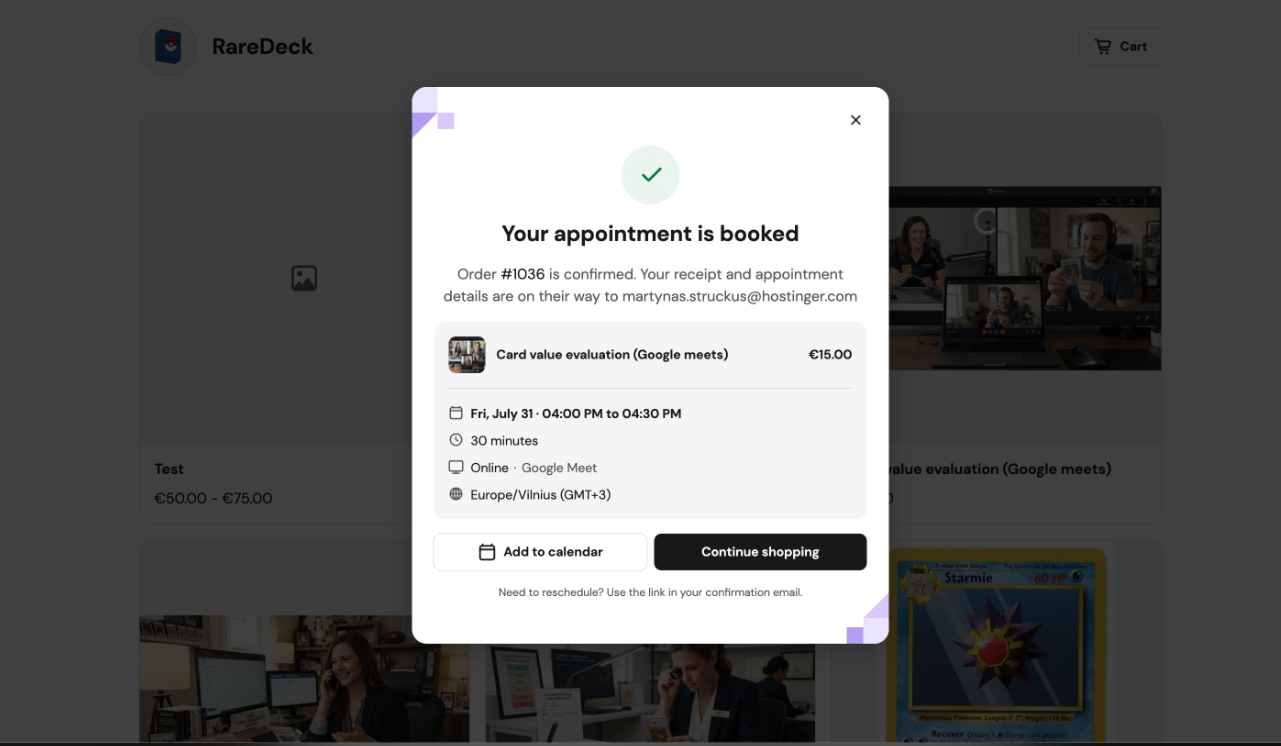
After checkout, shoppers see a confirmation with the service name, price, date/time, duration, location (Google Meet or in-person), and timezone, along with an Add to calendar (.ics) download.
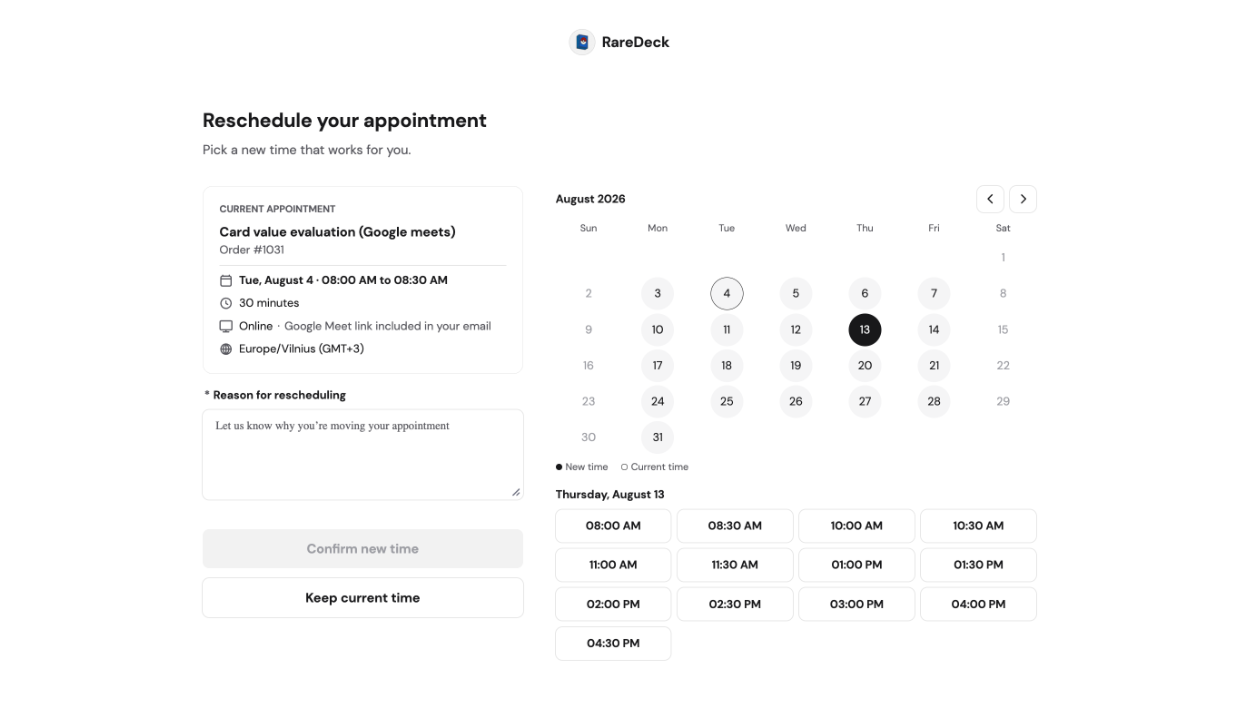
Shoppers can manage their appointment using the link in their confirmation email:
- Reschedule: pick a new time from the picker, with the current slot highlighted, and provide a reason.
- Cancel: provide a reason; refund guidance is shown if a payment was captured. Rescheduling is offered as an alternative to cancelling.
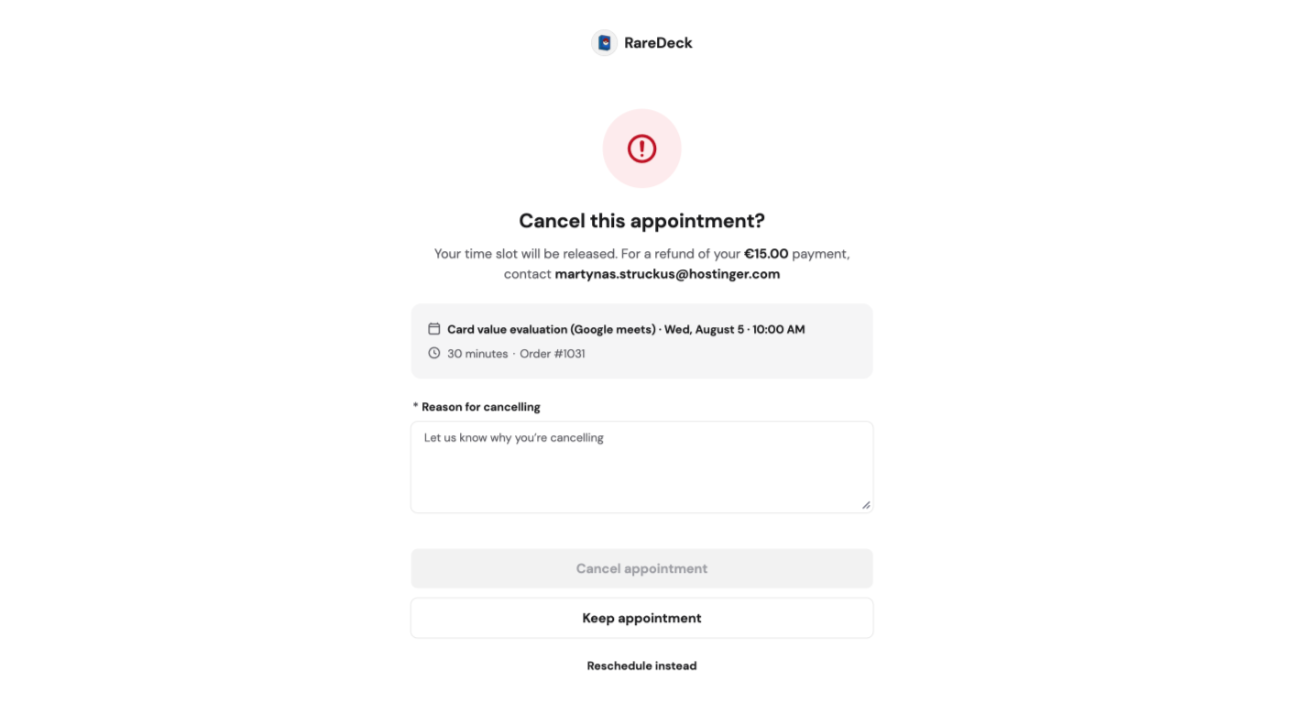
If an appointment has already started, was cancelled, or the store has disabled online changes, shoppers see an explanation page instead of a generic error. Expired or invalid links show their own dedicated state.
On mobile, booking and rescheduling actions stay accessible in a sticky footer while scrolling.
Custom product input fields
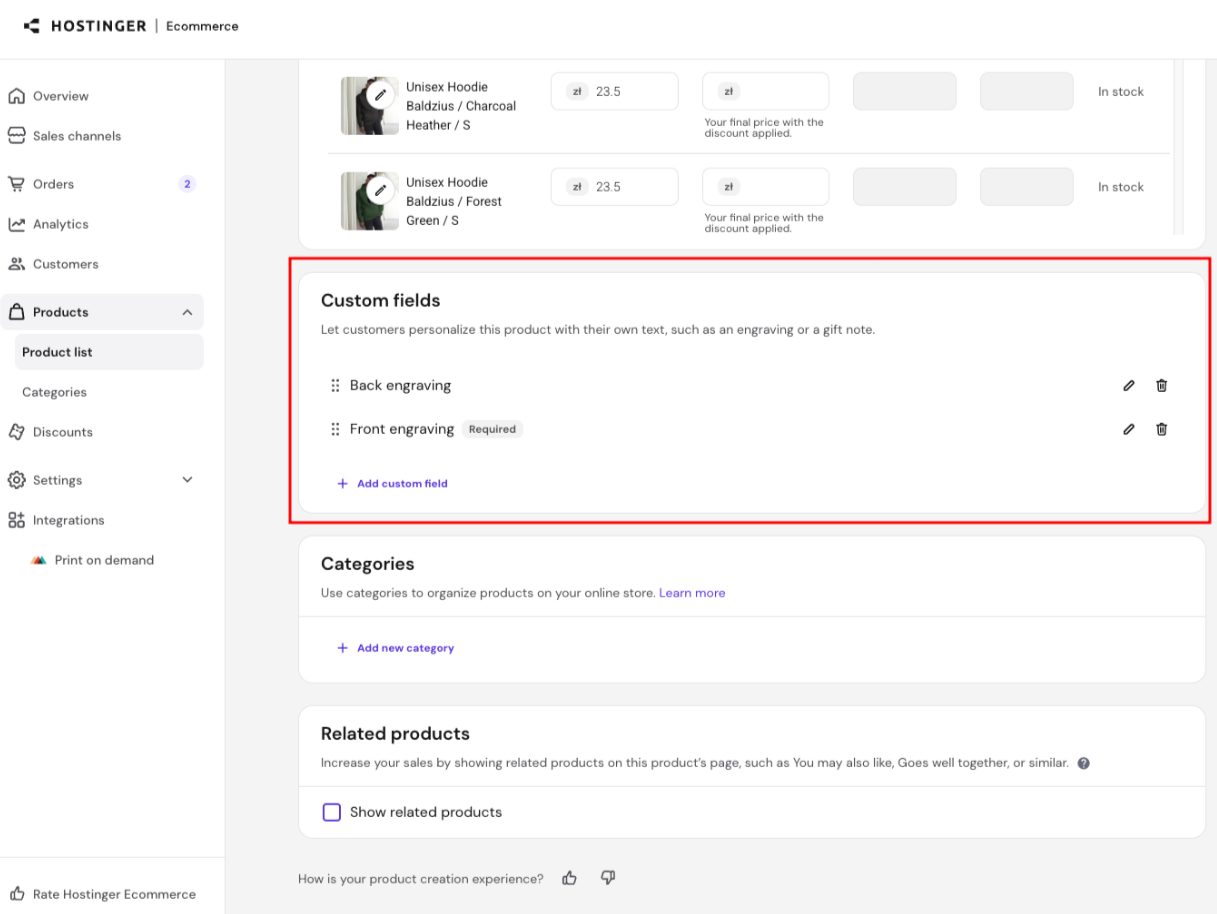
You can add custom input fields to any product to collect additional information from customers at the time of purchase (for example, personalization text, engraving details, or special instructions).
To manage custom fields:
- Go to Products → Product list.
- Open the product you want to edit.
- Scroll to the Custom fields section.
- Click Add custom field to create a new one, or use the pencil and trash icons to edit or delete existing fields. Drag the handle (⠿) next to a field to reorder it.
Product reviews
Product reviews are available for Quick link stores. When enabled, shoppers can read and submit reviews directly on the product page.
On the product page, shoppers see a star rating summary under the product title, showing the average rating and review count. Clicking it scrolls down to the full reviews section, which includes the overall rating, a star distribution breakdown, and a paginated list of individual reviews (5 per page, with a Show more reviews button). If a product has no reviews yet, shoppers see a prompt inviting them to leave the first one.
To leave a review, shoppers select a star rating, and optionally add their name, email, and a comment. If a shopper is reviewing after receiving a review-request email, their rating and email are pre-filled, though they can still change them. On mobile devices, the review form opens as a bottom sheet.
Managing product reviews
To check your product reviews, go to Products → Product reviews.
If reviews aren’t enabled yet, you’ll see a prompt to turn on reviews.
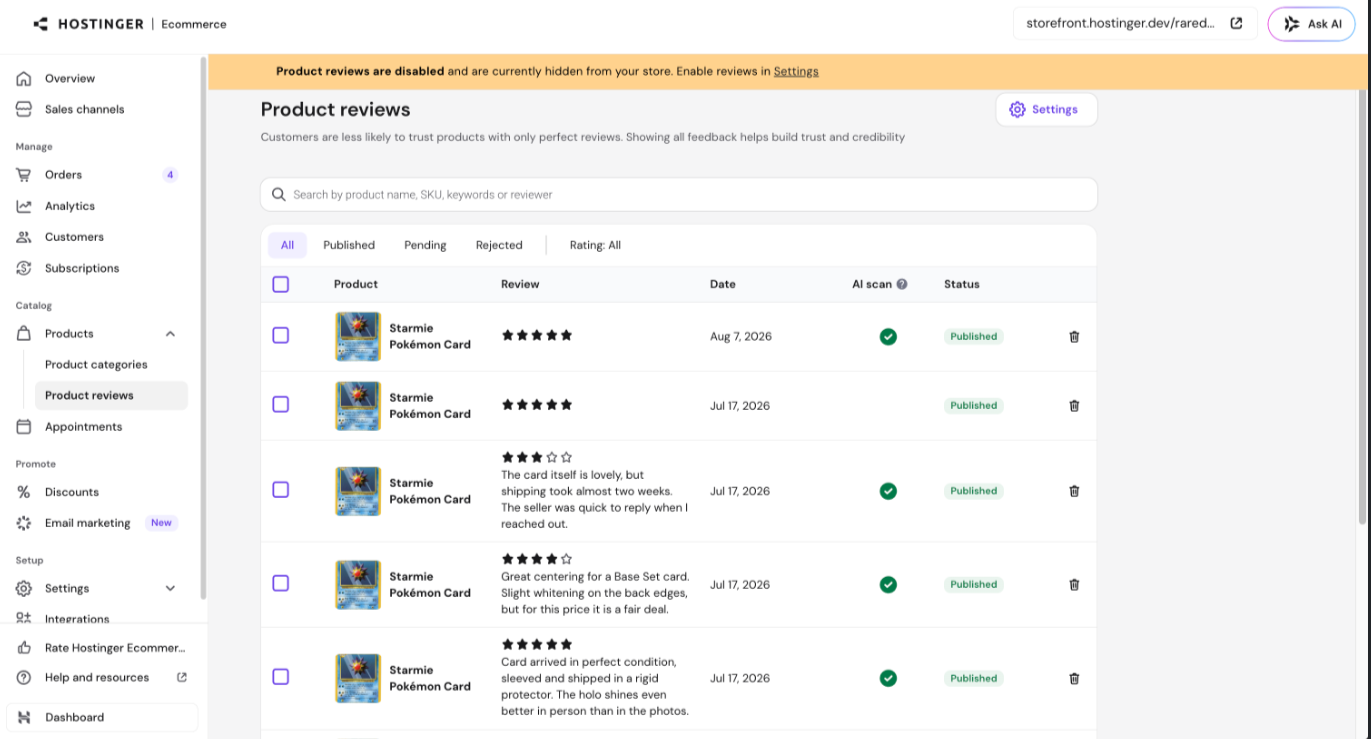
If they’re already on, you’ll see the full list of reviews, with the following tools:
- Search — search by product name, SKU, review text, or reviewer.
- Sort and filter — filter by status, rating, date, product name, and more. Each filter shows how many reviews match. Click Manage filters to choose which filters are visible and in what order. Your filter selections are saved in the URL, so you can bookmark or share a specific filtered view.
- Row and bulk actions — select one or more reviews using the checkboxes, then Publish, Mark pending, Reject, or Delete them.
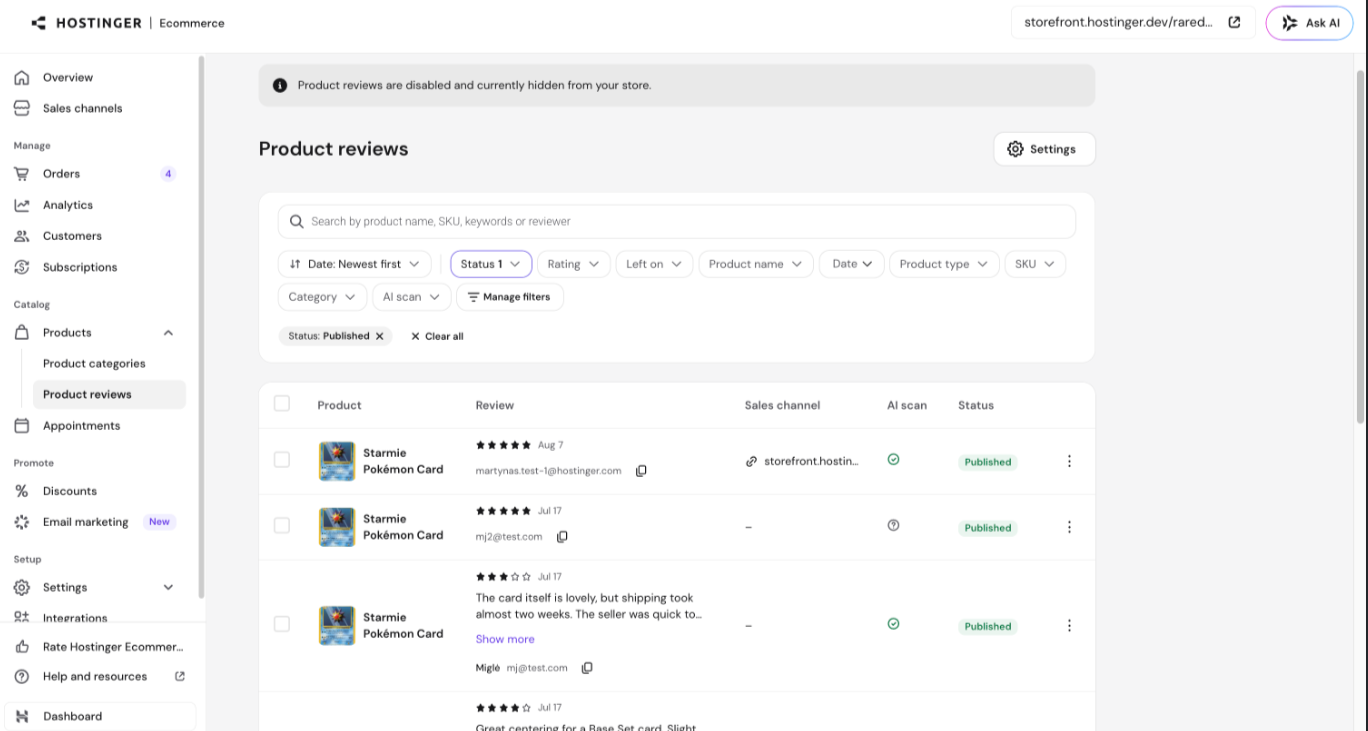
On mobile, reviews display as stacked cards instead of a table, with the same moderation actions available.
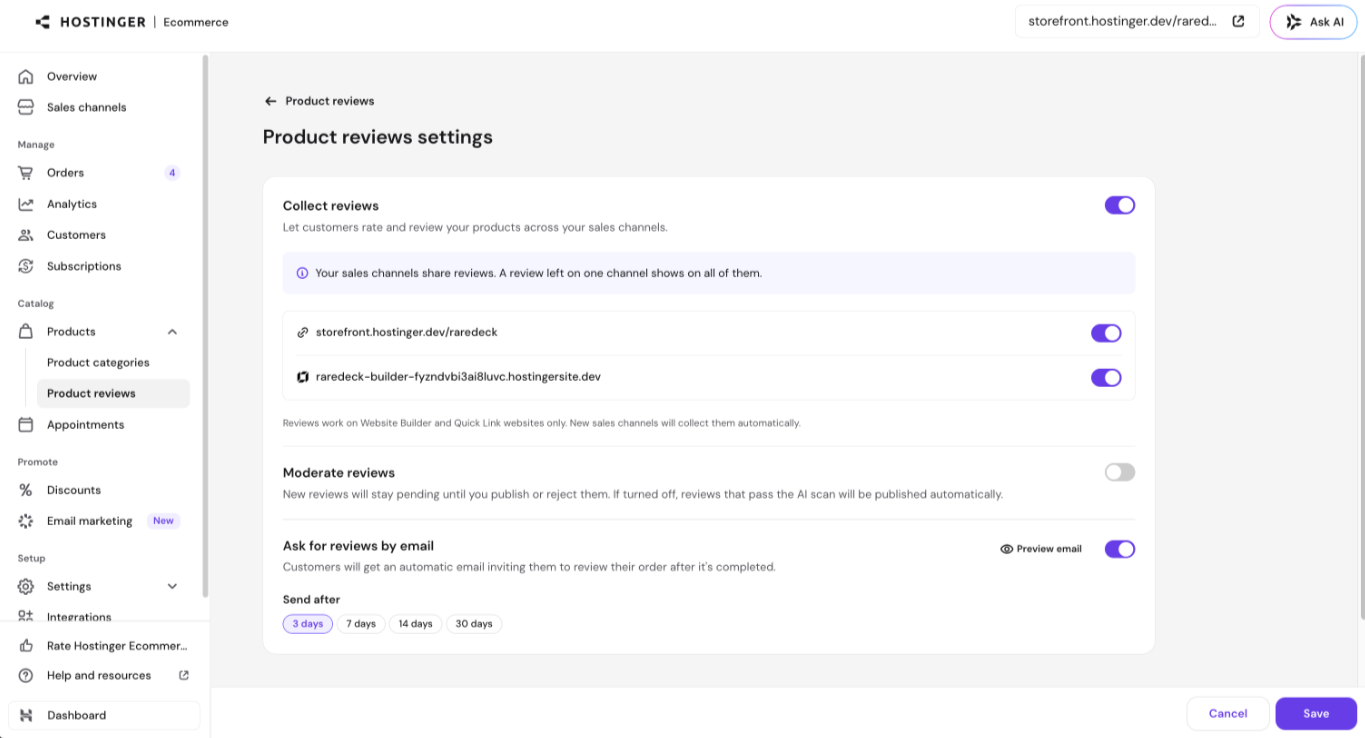
Product reviews settings
Go to Settings on the Product reviews page to manage:
- Collect reviews — the global on/off toggle for review collection across your store.
- Per-channel toggles — enable or disable review collection independently for each AI Builder or Quick Link sales channel connected to your store. Reviews are shared across channels that have collection enabled: a review left on one channel appears on all of them.
- Moderate reviews — when on, new reviews stay pending until you publish or reject them. When off, reviews that pass the AI scan are published automatically.
- Ask for reviews by email — automatically emails customers inviting them to review their order a set number of days after it’s completed. If you disable review collection for a channel, any queued review-request emails for that channel are canceled automatically.
Overview dashboard
The Overview tab in the Ecommerce store manager includes:
Analytics widget
Displays key store metrics directly on the Overview page without navigating to the full Analytics section.
- Each metric includes a sparkline chart showing daily performance for the selected period.
- Hover over any day on the chart to see the exact value for that date.
- A comparison badge (e.g. +165% vs previous week) shows how the current period compares to the previous one.
Sales channel filter
A “Currently viewing” dropdown lets you filter the analytics widget and recent orders list by a specific sales channel.
- Defaults to All sales channels — existing behavior is unchanged.
- Selecting a channel updates both the analytics widget and the recent orders list in real time.
Orders
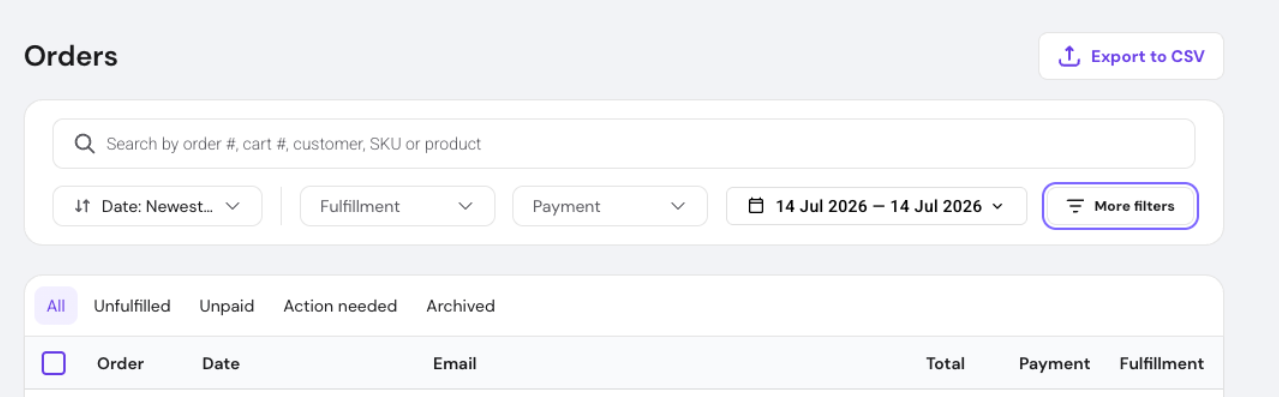
The Orders page lets you find orders using the following filters:
- Fulfillment status
- Payment status
- Date
- Product type
- Shipping method
- Country
- Order notes
- Order ID
- Cart ID
- Product title
- Product SKU
- Discount
Click More filters to customize which filters are visible and in what order they appear — select the filters you want, then click Apply selected. Use Reset to default view to revert to the standard filter set at any time. Orders are paginated, with a page size selector at the bottom of the table so you can control how many orders are shown per page.
Each order row also includes an actions menu (⋮). Use it to view order details, mark an order as paid, mark it as fulfilled, cancel it, or archive it, directly from the Orders table.
Order Details page layout
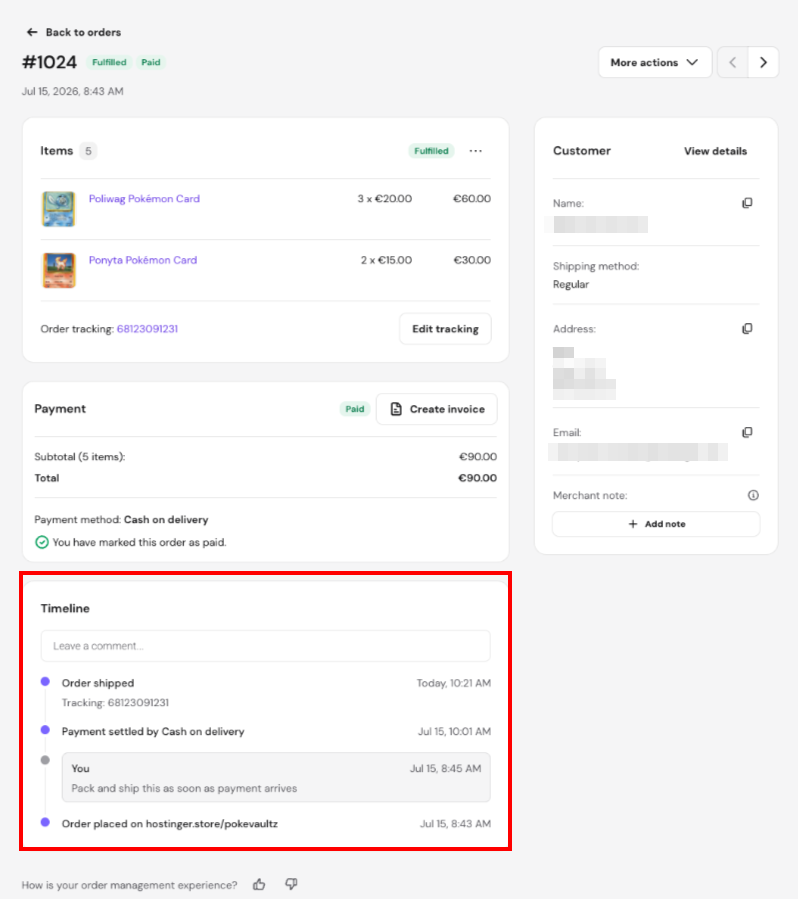
Opening an order shows a two-column Order Details page. Items and the order timeline appear on the left, and payment and customer information appear in the sidebar on the right.
Fulfillment and payment status chips appear next to the order number, so the order’s status is visible right away.
The customer card shows the name, address, and email, each with a copy icon for quick access. Shipping type appears alongside the ordered items instead of the customer card.
Order timeline
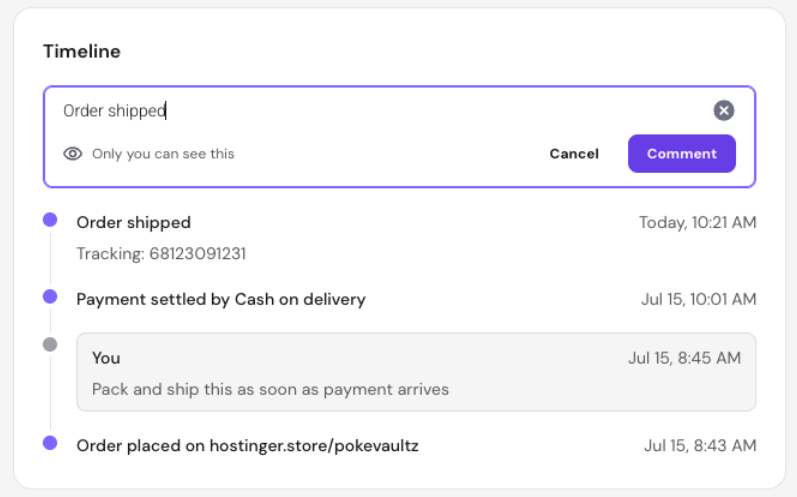
The Timeline card lists a chronological log of key events for the order, such as when it was placed, paid, shipped, refunded, or canceled, each with a timestamp.
You can also leave internal comments on the timeline, for example to note next steps for your team. These comments are private and are never visible to your customers. You can edit or delete a comment at any time using the pencil and trash icons next to it.
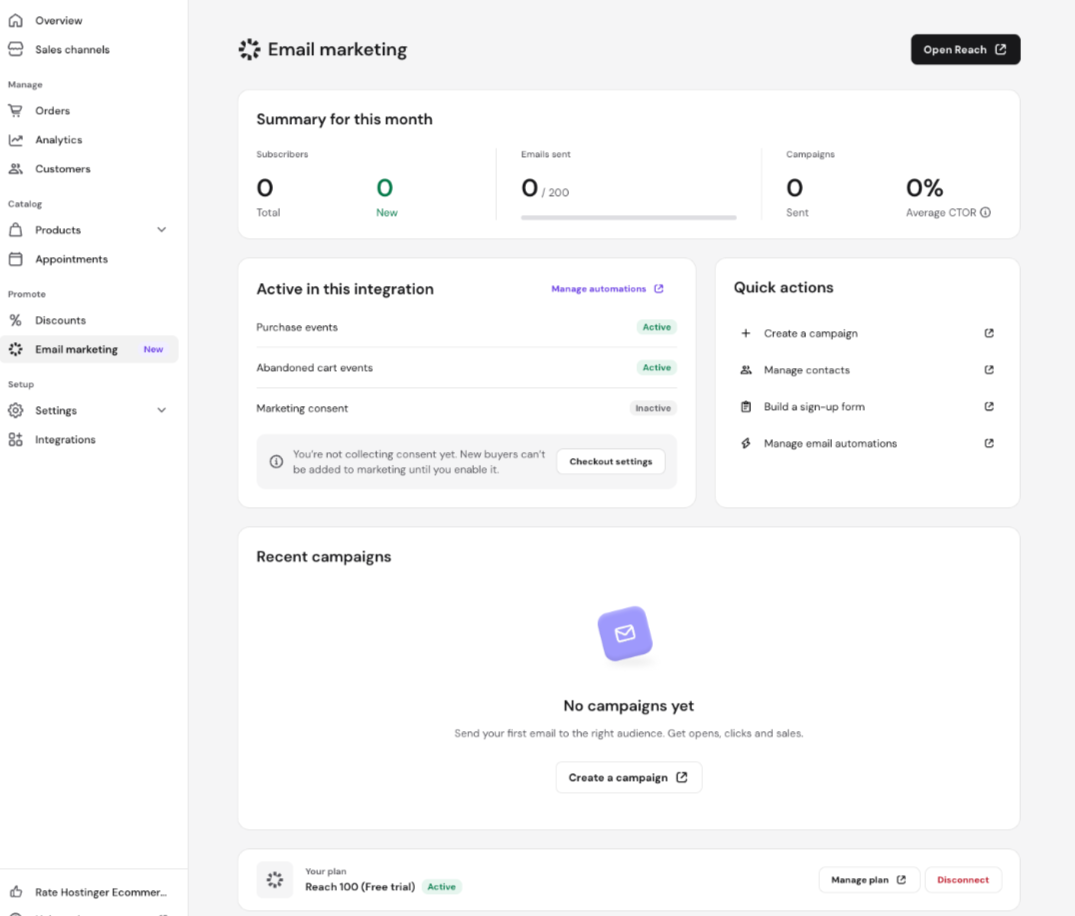
Email marketing dashboard
The Email marketing dashboard in Hostinger eCommerce gives you a single place to monitor and manage your store’s email marketing activity:
- Monthly summary — a real-time overview of subscribers, emails sent, and campaign performance, including average click-to-open rate (CTOR).
- Purchase and abandoned cart event tracking — automatically captures buyer behavior to trigger the right emails at the right time.
- Quick actions — create campaigns, manage contacts, build signup forms, and set up automations directly from the dashboard.
- Integration status panel — see which events are active and manage your automation settings without leaving the dashboard.
- Direct access to Reach — jump into the full Hostinger Reach dashboard with a single click.
To access it, go to your store dashboard, then Email marketing.