Hostinger Agent can build a new website for you on Hostinger AI Builder or WordPress. Describe what you want, and Agent asks a few questions before it recommends a platform and starts building. Agent also writes copy for individual pages, such as a homepage, landing page, or About page, and can apply it to your site. Hostinger dashboard also offers agent-led onboarding, a chat-based setup that guides you through setting up a hosting plan or adding a website.
Describe what you want to build
Tell Hostinger Agent about the website you want, including its purpose and any specific tools you need. For example: “I want to create a website for my photography portfolio, and I’ll need a booking/appointment plugin. Can you help me build it?”
Agent then lays out your setup options plainly, such as:
- Visual drag-and-drop editing with templates. This is AI Builder’s manual mode.
- Describing changes to AI and letting it generate the site. This is AI Builder’s agentic mode.
- WordPress, for managing the site yourself.
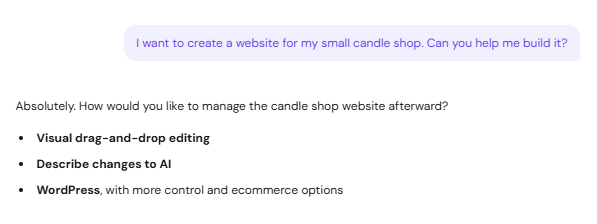
Agent recommends WordPress specifically when your request needs a plugin or tool that AI Builder does not support, such as an appointment or booking system. Otherwise, it typically points you toward one of AI Builder’s two modes for a faster, fully generated result.
Build your site with Hostinger AI Builder
Both AI Builder modes follow the same setup and build flow. They differ only in how you edit the site afterward.
- Answer any setup questions Agent asks, such as your business type and style preferences, or let Agent draft a brief for you to review instead.
- Review the confirmation card. It states the pages, sections, and design direction Agent plans to build. Select Show more to see the full brief.
- Select Confirm to start the build, or Deny to adjust the brief first.
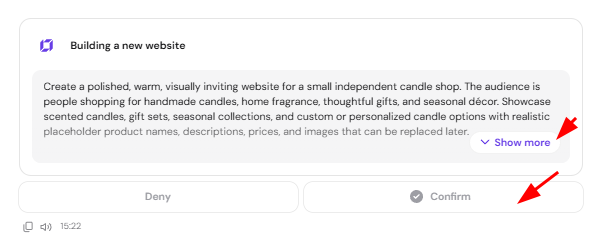
AI Builder generates full page content in one pass, in either mode, including a home page, the pages you specified, placeholder text and images, and working forms. The result is a complete site you can publish immediately, though placeholder content still needs your own details.
Agent verifies a build before confirming it is live. If it cannot confirm the build succeeded, it says so instead of claiming the site is ready.
Edit an AI Builder site afterward
How you edit the site afterward depends on which mode you chose:
- Manual mode opens in AI Builder’s visual editor, where you rearrange sections and edit elements directly using panels such as Elements, Pages, Styles, and Integrations.
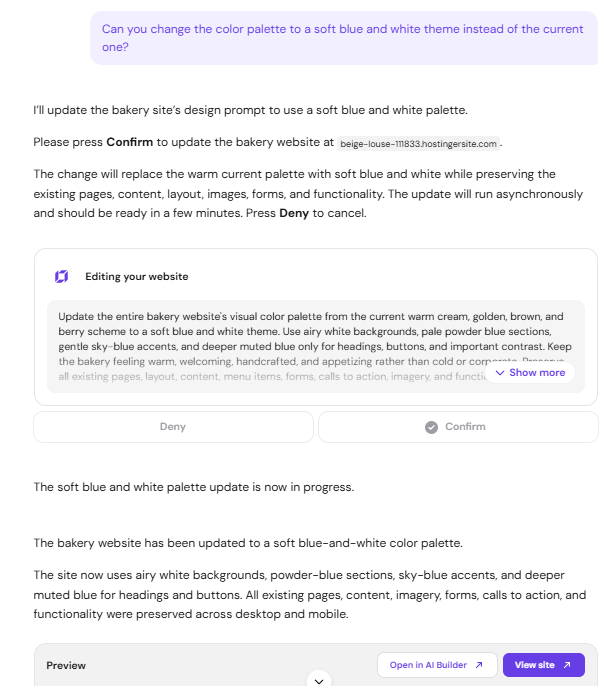
- Agentic mode opens in a AI prompt editor. You can also ask Hostinger Agent directly to change the site, such as its color palette or copy, and Agent applies the change and rebuilds the site. Review the confirmation card first, since each change re-runs the build.
Build your site with WordPress
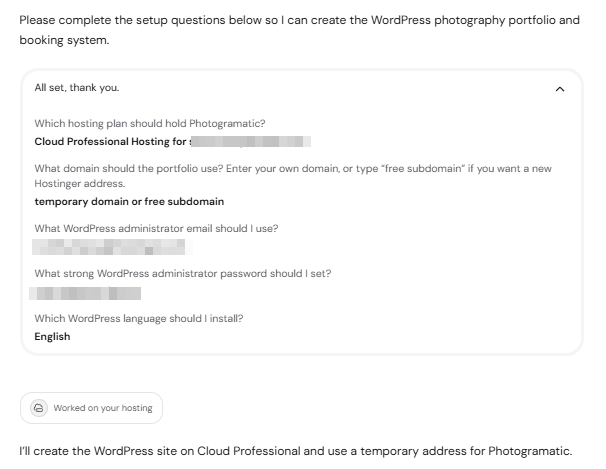
Agent sets up the technical foundation for a WordPress site rather than generating its design or content. A WordPress build typically includes:
- Choosing a hosting plan on your account to hold the new site.
- Setting a domain or a temporary Hostinger address, an administrator email, an administrator password, and a language.
- Installing WordPress itself.
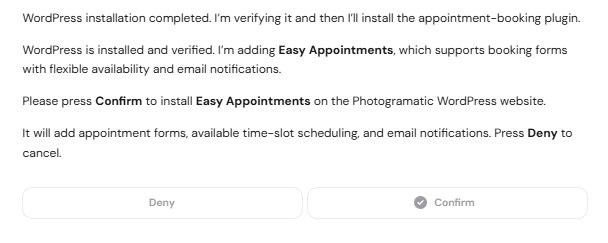
- Installing and activating any plugin your original request needs, such as a booking or appointment plugin.
Agent confirms each of these steps separately rather than all at once, and verifies one step before starting the next. For example, it confirms WordPress is installed before it installs a plugin.
A WordPress site set up this way does not include generated pages, a theme, or content. To generate a WordPress site’s design and content with AI, open wp-admin and use Hostinger’s AI Website Builder for WordPress. See How to Use Hostinger AI Website Builder for WordPress and How to Use the WordPress AI Assistant in Hostinger for that step.
Build a site from your own file
If you ask Hostinger Agent to build a site from a file you already have, such as an HTML file or a backup, Agent can create the empty site to hold it, but does not upload or place that file into the site itself. You place the file yourself. See How to upload a website from backups at Hostinger for uploading files to your website.
Write website copy for your pages with Hostinger Agent
Hostinger Agent writes the copy for individual website pages with its Creative Writer skills. Agent asks three questions, writes the copy in the chat, and then applies it to your website or gives you the steps to add it yourself, depending on your website platform.
To find these skills, open the Skills tab in Hostinger Agent and select Creative Writer → Website. There are six website writing skills:
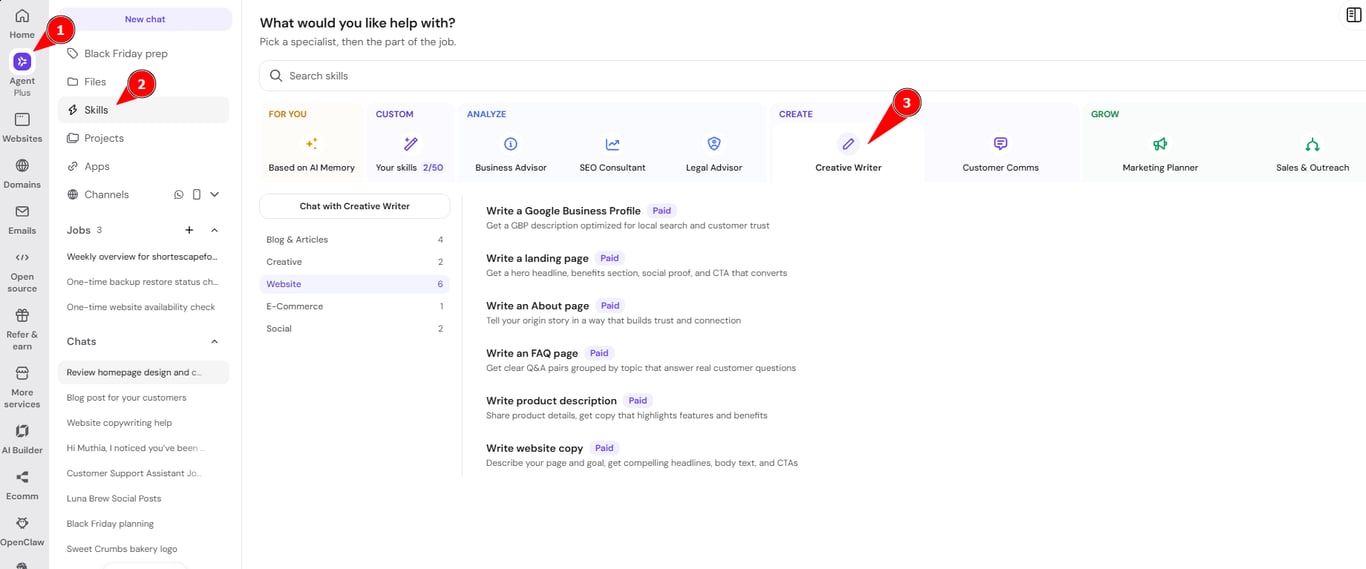
- Write website copy – headlines, body text, and calls to action for a homepage, services page, or other page.
- Write a landing page – a hero headline, benefits section, social proof, and call to action.
- Write an About page – your origin story, written to build trust with visitors.
- Write an FAQ page – questions and answers grouped by topic.
- Write product description – copy that highlights a product’s features and benefits.
- Write a Google Business Profile – a description for your Google Business Profile, written for local search.
You can also start a skill by describing what you need in the chat, for example help me write a landing page.
Answer the questions for your page
Each website writing skill asks three questions before it writes. For example, Write a landing page asks:
- What the landing page is for, such as selling products, promoting a special offer, or collecting customer emails.
- Which website should receive the landing page, or whether to use a new website.
- What visitors should do first, such as buy now, view products, or contact you.
Short answers are enough. To skip the questions, type your request in the message box instead.
Hostinger Agent writes the copy in the chat, organized by page section, with a headline, body text, and a call-to-action (CTA) button label for each section. Placeholders such as [Business Name] mark details to replace with your own. Under Quick actions, Agent suggests follow-ups, such as rewriting a section in a different tone or writing a shorter version.
Add the copy to your website
How Hostinger Agent adds the copy depends on your website platform:
- Hostinger AI Builder agentic mode – Agent applies the copy for you. Review the Editing your website card and select Confirm. A new page, such as a landing page, is added without replacing your homepage. The changes go live only after you open the site in AI Builder and select Publish.
- Hostinger AI Builder manual mode – Agent can’t change the text directly. It gives you ready-to-paste copy, which you add in the AI Builder editor by selecting each text element and choosing Edit text. See Hostinger AI Builder: How to update a website in manual mode to publish your changes.
- WordPress – Agent checks your existing pages and asks you to confirm before it replaces the page content. On pages built with Elementor, the new text is saved but the page keeps showing the Elementor layout, so replace the sections yourself with Edit with Elementor.
- A website on your hosting plan without a builder – ask Agent to write the page in HTML and publish it. Agent deploys the page after you confirm, and the deployment replaces all existing files on that website. See How to ask Hostinger Agent to deploy a website to your hosting for how deployments work.
Hostinger Agent changes the page copy only. Your business name, logo, and site header stay the same, so update them separately.
Start a website with agent-led onboarding during hosting plan setup
When you set up a hosting plan or add a website to an existing hosting plan, Hostinger dashboard opens agent-led onboarding, a chat-based setup that asks questions about your website. For the questions, website types, and setup actions in the chat, see How to set up a hosting plan in Hostinger.
Review the result before you consider it done
Check the finished site yourself against your original request before you treat it as complete, even after Agent confirms it is ready.
- Open the live site and compare its pages, content, and design to what you asked for.
- On a WordPress site, sign in to wp-admin and confirm any requested plugin is listed and active under Plugins.
- Change any administrator password that Agent generated and displayed in the chat.
Your website is now set up on the platform Agent recommended, and you can keep asking Agent to make further changes or ask it to guide you through the remaining setup yourself.