Hostinger AI Builder agentic mode is an AI-powered development tool that lets you create custom web applications and websites in minutes without writing code. Hostinger AI Builder agentic mode suits solopreneurs or beginners building functional browser-based apps, such as fitness trackers or management tools, as well as full websites using natural language prompts. It also serves web developers who want to build complex software with less effort through advanced prompting and manual debugging.
How Hostinger AI Builder agentic mode works
Hostinger AI Builder agentic mode functions as an AI collaborator. You provide instructions through chat or voice, and the AI generates the code, file structure, and backend for your website or application.
- Multilingual support: Enter your prompts in your preferred language; more than 80 languages are supported.
- Visual inputs: You can upload images or screenshots for the AI to interpret and recreate.
- eCommerce: Connect your project to Hostinger Ecommerce, a standalone subscription, to manage your online store directly within Hostinger.
- Technical flexibility: Hostinger AI Builder agentic mode automatically selects a tech stack for your app, typically Node.js for the backend and React and Vite for the front end. However, you can request specific technologies or tools.
Create websites and apps with Hostinger AI Builder agentic mode
Hostinger AI Builder agentic mode is designed for vibe coding, allowing you to build a wide variety of digital projects across several categories. Here are a few examples:
- Professional websites: Build landing pages, personal portfolios, business sites, online shops, and event websites.
- Productivity and task management: Create habit trackers, fitness platforms, interactive to-do lists, time-tracking tools, or brainstorming boards, personal budget calculators, savings goal monitors, and more.
- Dashboards: Visualize key metrics such as personal finance overviews or project status monitors.
- Learning and entertainment: Create gamified learning apps, interactive quizzes, or web-based versions of classic 2D games like Snake or Tetris.
How to access Hostinger AI Builder agentic mode
To create your first website with Hostinger AI Builder agentic mode, follow these steps.
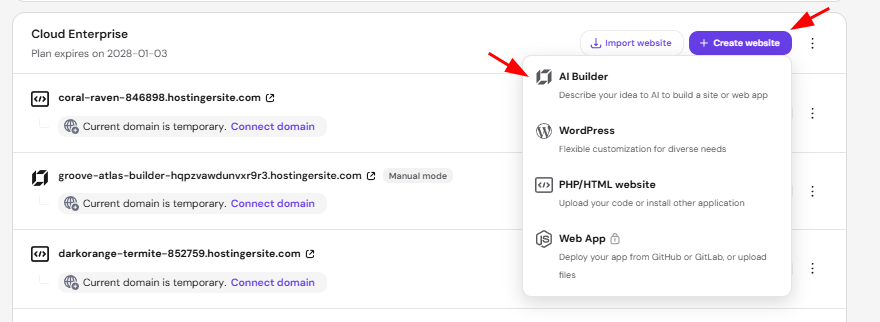
- Go to Hostinger dashboard → Websites.
- Click on Create website and select AI Builder

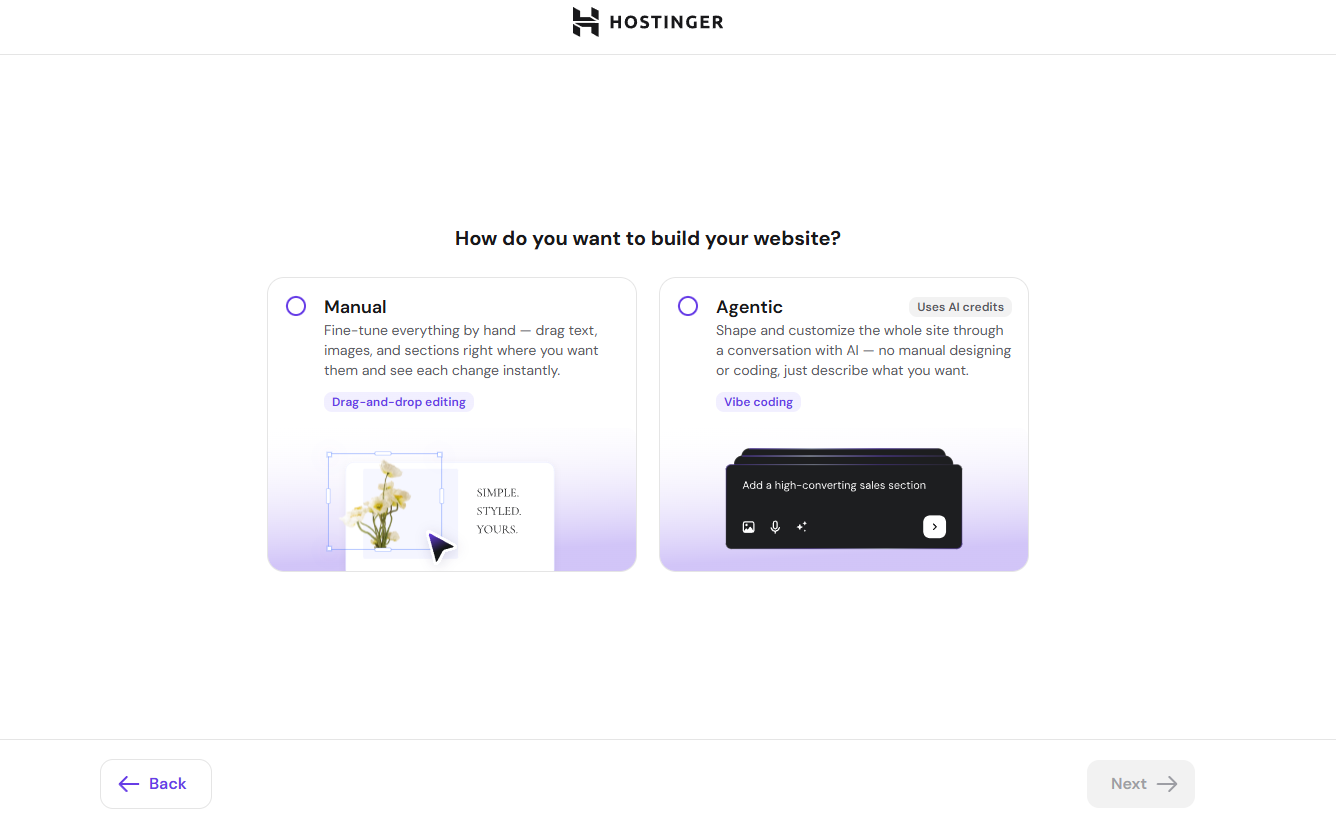
- Select agentic

- Enter your initial prompt, and optionally attach an image or PDF to guide the AI, then proceed to the next steps.
Choose a domain name for your website, or select Use temporary domain to set one up later, then continue. If you use a temporary domain, Hostinger AI Builder generates a project name based on your initial prompt, such as calendar-app-802980.hostingersite.com, making it easier to identify your project later if you have several.
To edit an existing website:
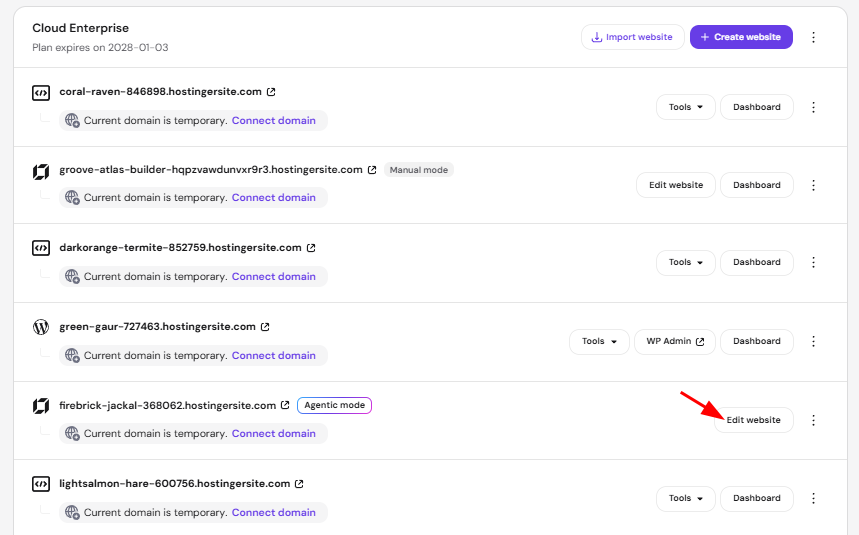
- Go to Hostinger dashboard → Websites.
- Locate your website and click on Edit website.

Hostinger AI Builder agentic mode interface features
The Hostinger AI Builder agentic mode editor is divided into a few functional areas to help you manage and refine your project.
Sidebar menu
Click on the ≡ icon to access your website management tools.
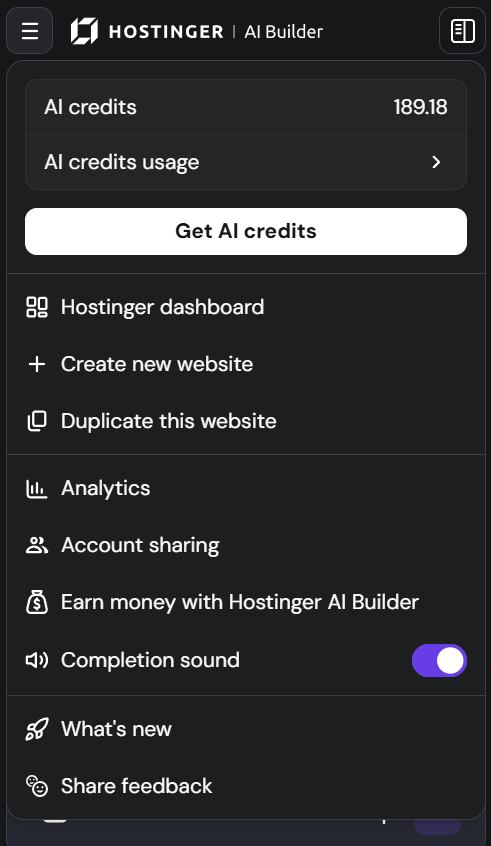
- AI credits: Displays your remaining and total credits for the current cycle.
- AI credits usage: Provides a detailed graph of credit consumption over the last 24 hours, 7 days, or 30 days.
- Get AI credits: Options to upgrade your plan or top up your current balance.
- Hostinger dashboard: Redirects you to the main Hostinger dashboard.
- Create new website: Start a fresh project from scratch.
- Duplicate this website: Create a copy of your current project.
- Account sharing: Securely grant access to your hosting plan to other users or collaborators.
- Earn money with Hostinger AI Builder: Access the referral program or allow others to use your website as a template for commissions.
- Completion sound: Toggle audio notifications for when the AI finishes a task.
Chat area
Review your previous prompts and responses. After each AI output, you can find the following options.
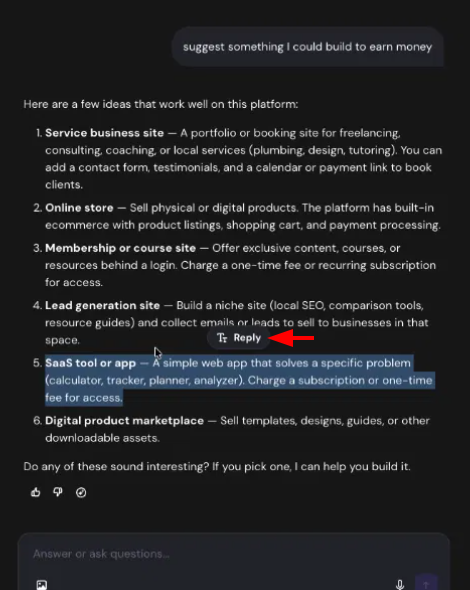
- Reply to specific text: Select any text within an AI response and click Reply to attach it to your next message. The AI then knows exactly which part you’re referring to, without needing to copy, paste, or describe it.

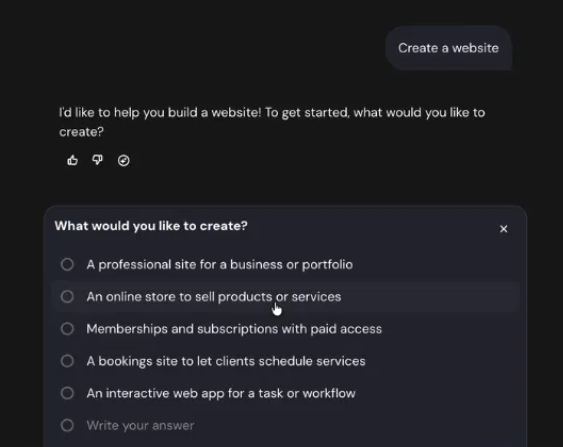
- Quick-select answers: When Hostinger AI Builder asks a clarifying question, you may see clickable answer options instead of typing a full response. Depending on the question, you can select a single option, select multiple options, or write your own answer.

- Provide feedback: Rate the message to improve future responses.
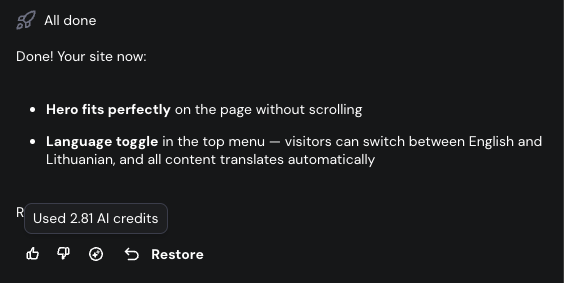
- Credit usage: This icon shows whether AI credits were used for a specific response. Hover on it for details.

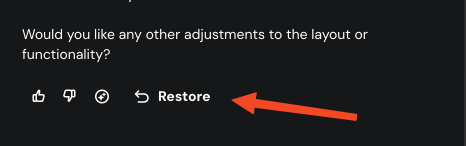
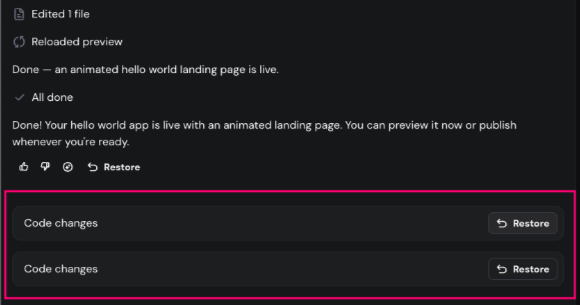
- Undo/Restore: Reverts the code changes from a specific message. If no actions were taken, the restore button will not be displayed.

- When a response modifies multiple files, each file appears as a separate Code changes entry with its own Restore button, so you can revert an individual file’s changes without reverting the entire message.

- On desktop, you can resize the chat panel by dragging its edge. Your preferred width is saved and stays the same after a reload. Drag the handle all the way to one side to hide the panel, or double-click it to reset to the default size.
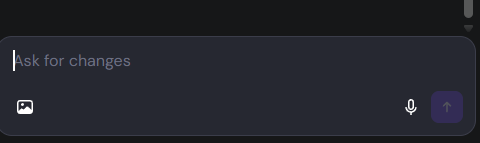
Prompt area
This is where you communicate with the AI. Enter text or use voice-to-text via the microphone icon. You can also upload a reference image using the image icon.
Top navigation bar
Manage the technical aspects of your site.

- Agent: Get instant assistance with product questions.
- Publish: Pushes your latest saved changes to the live version of your website.
On the preview area, you will find the following editor modes:
- Refresh preview: update the current view.
- Open main page (home icon): load your home page in preview mode.
- Editor modes: Switch between the following:
- Preview: Default mode, displays the latest updates on your website.
- Select and edit: Use this tool to click one or more elements on your website — drag or Shift+click to select multiple — then either edit them manually (text formatting, images) or type instructions for AI to apply changes only to the selected elements. You can also attach reference images to your annotation for AI to use, such as a photo you want applied as a background. Supported formats are JPEG, PNG, GIF, WebP, AVIF, and ICO, with a maximum of 10 images per session and 15 MB per image. This uses AI credits, the same as other Select and edit changes.
- Code: View the file structure and use the code editor.
- Data (optional): Access the integrated backend. Available if you have added backend functionality to your website.
- Device toggle: Switch to mobile view to check your app’s responsiveness.
- Button to open your website preview on a new tab.
- Fullscreen view (hide the chat and prompt areas)
NOTES
- Currently, Hostinger AI Builder agentic mode cannot create 3D games, browser extensions, trading or banking applications, as well as native mobile applications for the App Store (iOS) or Google Play (Android).
- Using the Undo/Restore function to revert your website to a previous state does not reinstate used credits.
Follow the Recommended steps guide in Hostinger AI Builder agentic mode
The Recommended steps guide in Hostinger AI Builder agentic mode is a card in the chat panel that lists eight setup steps for a newly built website. The card appears below the latest AI reply and above the Ask for changes box. It only appears for websites that are not yet published.
The eight Recommended steps
- Replace example content – Click Get prompt to add a ready-made prompt to the Ask for changes box. The prompt asks AI to find placeholder content, such as phone numbers, email addresses, opening hours, and social links, and to request your real details. Send the prompt to run it.
- Set up your store – Click Open Ecommerce to open the Ecommerce dashboard, where you add products, connect payments, and set up shipping.
- Place a test order – Go through your checkout from start to finish as a customer would. New orders appear in the Ecommerce dashboard.
- Try Select & edit for precise edits – Click Try it to turn on Select & edit. Then click text or images in the preview to edit them directly, or click any other element to leave a comment for AI to apply.
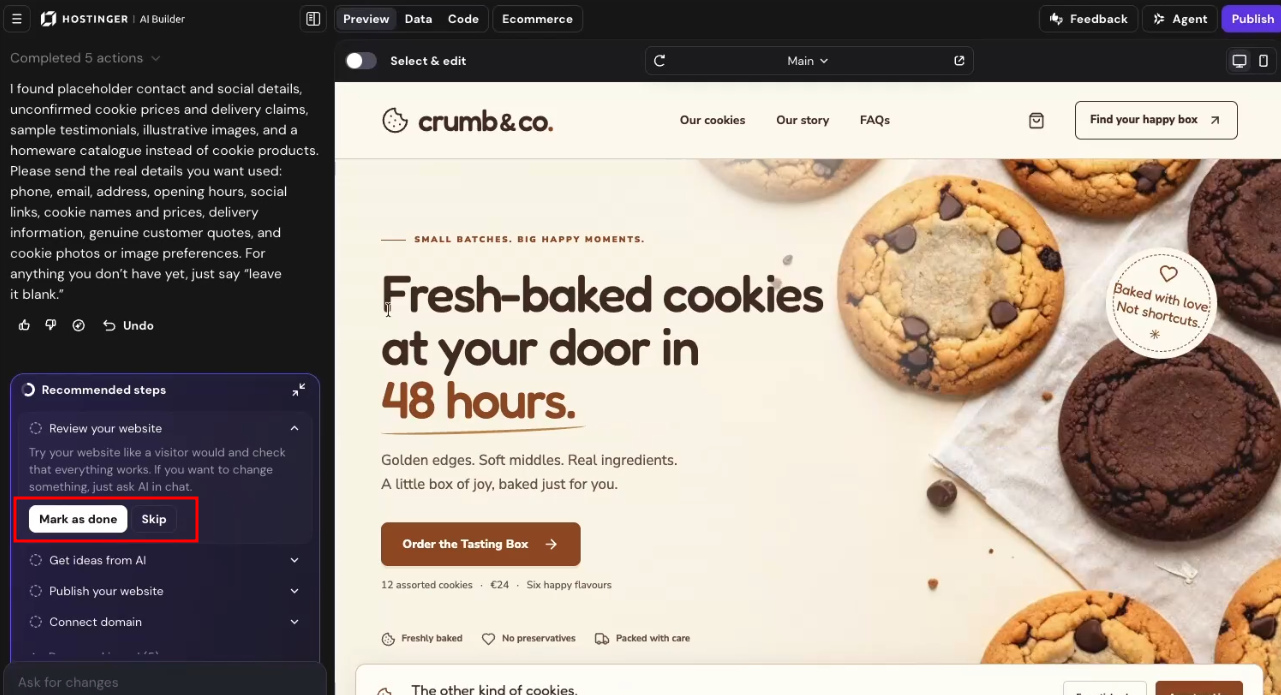
- Review your website – Check your website as a visitor would and confirm that everything works. Ask AI in the chat to change anything you want to adjust.
- Get ideas from AI – Click Get prompt to add a prompt that asks AI to suggest improvements or new sections. Send the prompt, then pick the ideas you like.
- Publish your website – Click Publish to publish your website and keep updating it afterward.
- Connect domain – Click Connect domain to connect a custom domain to your website.
Complete, skip, or finish the steps
Steps 1 to 6 include a Skip button. Steps 2, 3, and 5 also include a Mark as done button. The Publish your website and Connect domain steps show only their own action button.
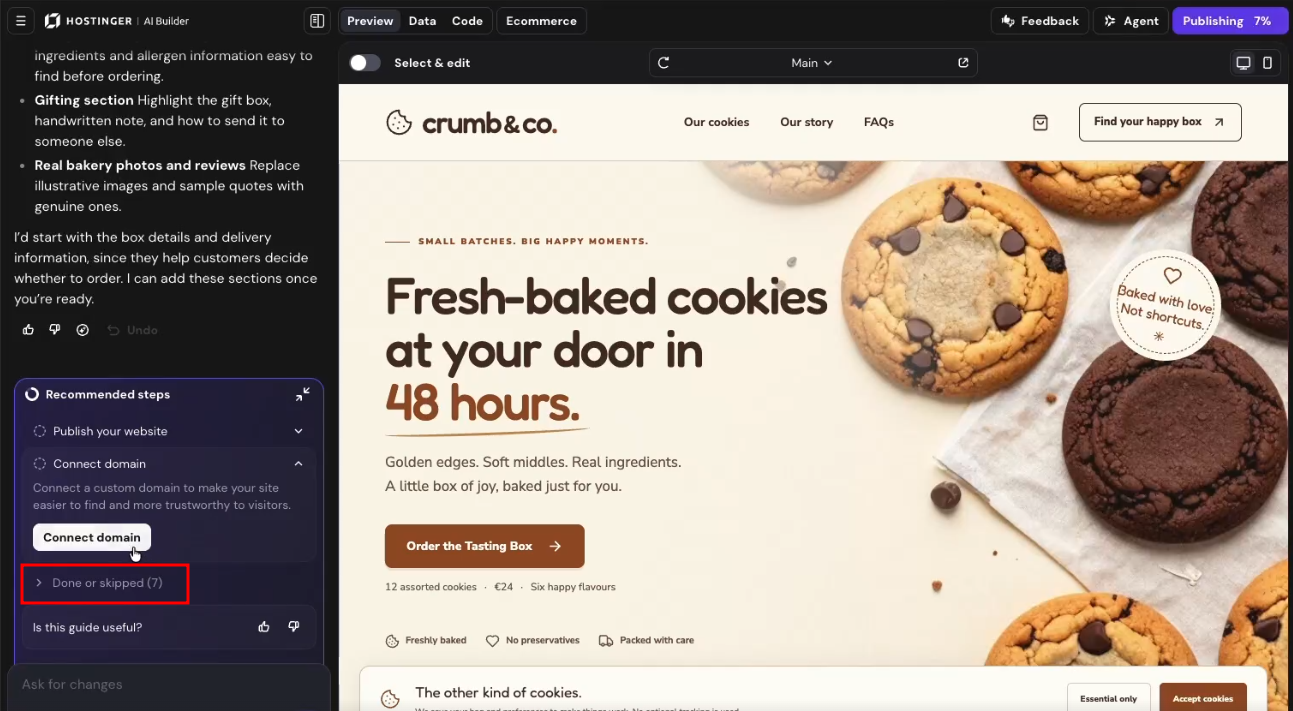
Completed or skipped steps move into a collapsed Done or skipped list that shows how many steps are in it. The expand and collapse icon in the top-right corner of the card opens and closes the card.
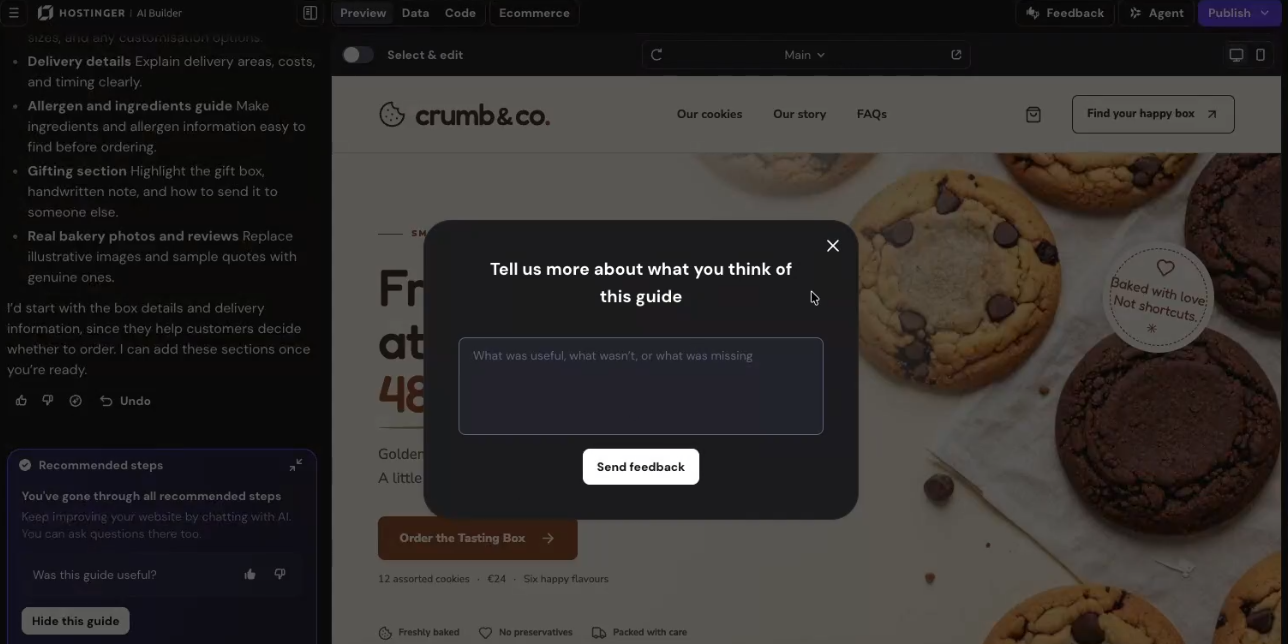
After you complete or skip all eight steps, the card shows You’ve gone through all recommended steps, along with a Was this guide useful? rating and a Hide this guide button. Rating the guide opens a Tell us more about what you think of this guide form with a Send feedback button.
NOTES
- The Recommended steps guide is available only in Hostinger AI Builder agentic mode, not in manual mode.
- The guide does not appear on websites that were already published it was introduced.
Frequently asked questions
Can Hostinger AI Builder agentic mode build a website in a language other than English?
Yes. You can enter prompts in your preferred language, and Hostinger AI Builder agentic mode supports more than 80 languages.
Can I choose a specific tech stack instead of the default one?
Yes. Hostinger AI Builder agentic mode automatically selects Node.js, React, and Vite by default, but you can request specific technologies or tools.
Can Hostinger AI Builder agentic mode build a mobile app?
No. It currently cannot build native mobile applications for the App Store (iOS) or Google Play (Android).