Cancel a Hostinger service, such as a hosting plan, VPS, or Hostinger Mail subscription, by requesting a refund if it’s still eligible, which terminates it immediately. Otherwise, disable auto-renewal so the service stays active until the end of its billing cycle and is then deleted automatically.
There is no delete button or menu option in Hostinger dashboard for Hostinger services.
Before you start
- Terminating any service, be it due to expiration or refund, will permanently delete all its associated data. Therefore, it is recommended to download a manual backup of your website files, databases and email to your local device.
- Canceling a hosting plan with a free email trial also cancels the email trial. To keep the email service, upgrade it to a Business Mail plan first.
- Canceling a service apply only to the selected subscription; other purchased services in the account remain unaffected.
NOTES
- If you are using Hostinger AI Builder manual mode downloading backups to a local device is not supported.
- For Hostinger AI Builder agentic mode, you can export the code.
- If you bought a new hosting plan instead of renewing an existing one, see What to do if you bought a new Hostinger plan instead of renewing.
If your service is refundable
If you are eligible for a refund according to the Hostinger refund policy, requesting a refund will result in the immediate termination of the service.
- Go to the Paid invoices page.
- Locate the service and click on Refund.
- If the service is not listed on the page, or the refund button is not displayed, the service is non-refundable.
- Follow the on-screen guidance to complete the request.
As soon as a refund is processed, the service is terminated, and all associated data is erased immediately.
If your service is not refundable
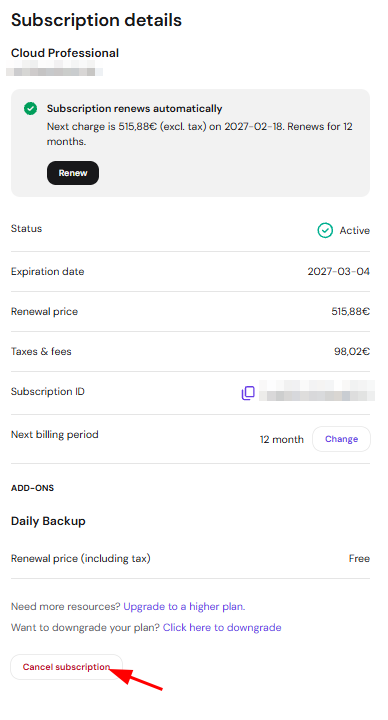
If your service is outside the refund period, not eligible for a refund, or you simply wish to stop using it after the current term, you must disable the auto-renewal feature.
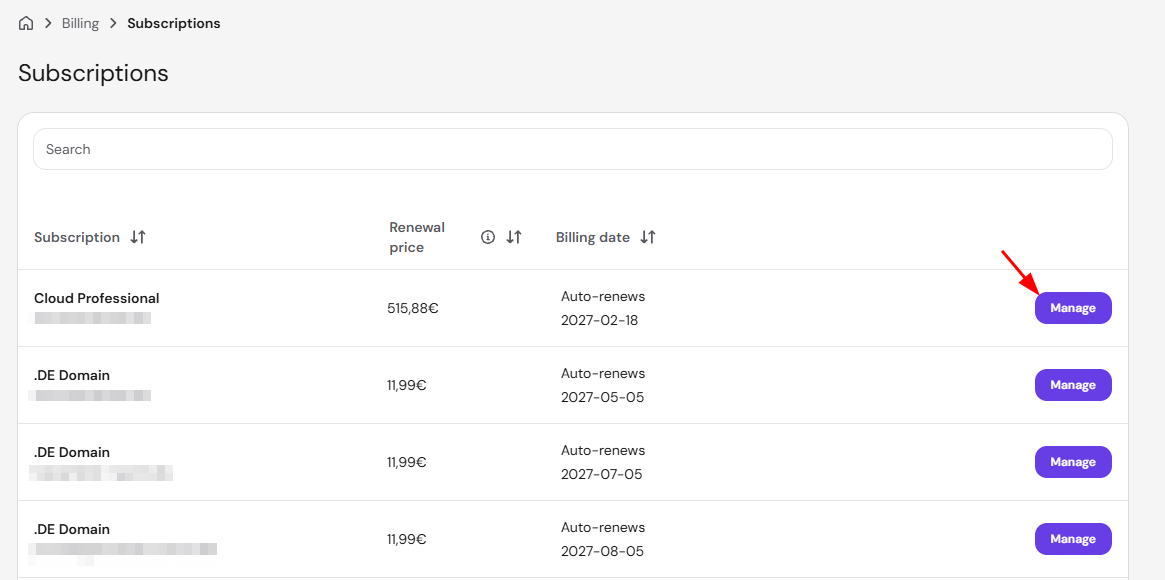
- Go to Hostinger dashboard → Billing → Subscriptions.
- Locate the service (hosting, VPS, email, domain, etc.) you wish to stop using.
- Click Manage next to it
- Then click Cancel subscription and confirm on the next page to disable auto-renewal.
- Optionally, manually delete any existing data.
Once auto-renewal is disabled, the service will remain active until its expiration date. After this date, the service will be automatically canceled and deleted from your account.
NOTE
- Hostinger accounts cannot be deleted if they have active services attached to them.
By following these steps, you can manage your services with confidence, ensuring your data remains secure while you get the most out of your active subscriptions.