The Hostinger VPS dashboard gives you full control over your Virtual Private Server (VPS), from checking status and resource usage to managing backups, security, and operating system settings. After purchasing a VPS, find it listed under VPS in Hostinger dashboard, then select your server to open its dashboard. The left sidebar organizes the dashboard into Overview, Docker Manager, Settings, OS & Panel, Backups & Monitoring, Security, API, DNS Manager, and Tutorials sections.
- Overview – the general information about your VPS, like its status, VPS IP, uptime, location, and so on.
- Docker Manager – deploy, manage, and monitor Docker containers on your VPS without using the command line.
- Settings – the main settings like root password, emergency mode, firewall, SSH, hostname.
- OS & Panel – main information about your current operating system, and the option to change it if needed.
- Backup & Monitoring – here you can find your server’s backups, usage and latest actions.
- Security – here you’ll find firewall settings and a malware scanner for your VPS.
- API – lets you interact with your Hostinger account programmatically to automate tasks and integrate VPS management into other tools.
- DNS Manager – The option to add a domain to your account and manage it from the Domains section of your Hostinger dashboard.
- Tutorials – a collection of useful articles to make the most of your VPS.
Overview
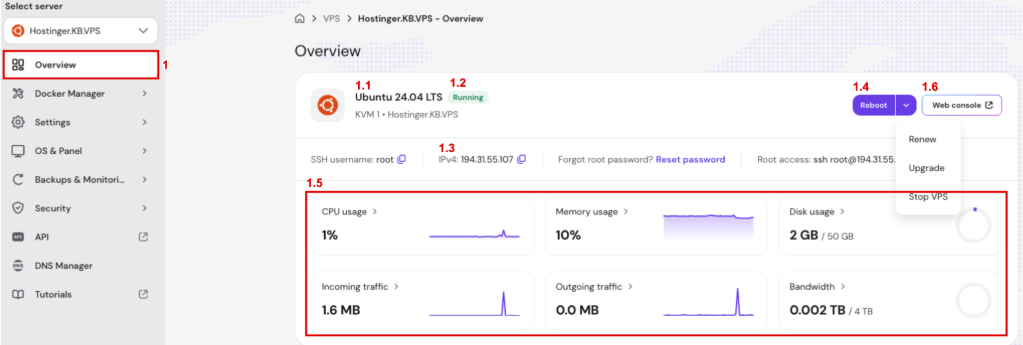
The Overview page (1) is the first page you see after selecting your VPS, summarizing your server’s status and key details at a glance.
Overview page consists of these information:
VPS information
Check your current operating system (1.1), your server’s status (1.2), and IPv4 address (1.3). Select Reboot (1.4) to restart your VPS, or open the management dropdown to Renew, Upgrade, or Stop your VPS. This section also shows a snapshot of your resource usage (1.5). Select Web console (1.6) to open the VPS Web console, where you can interact with Hostinger Agent VPS Web Console Edition. If you have a panel license connected to your VPS, this section also shows the panel’s login URL and management options.
Hostinger Agent VPS Web Console Edition is an AI sysadmin integrated into the VPS environment, accessible directly from the VPS Web console in Hostinger dashboard. Unlike an advisory AI assistant, it understands natural language requests and executes server management tasks directly. Use it for:
- Installing and configuring software, such as game servers or web servers.
- Troubleshooting server issues.
- Running system commands without manual CLI input.
SSH information
SSH information displays the connection details for your VPS:
- SSH username (2.1)
- IPv4 address (2.2)
- An option to reset your root password (2.3)
- Your root access command to copy and paste into a terminal (2.4)

Resource usage
Resource usage shows the current resources your server uses:
- CPU usage (3.1)
- Memory usage (3.2)
- Disk usage (3.3)
- Incoming traffic (3.4)
- Outgoing traffic (3.5)
- Bandwidth* (3.6)
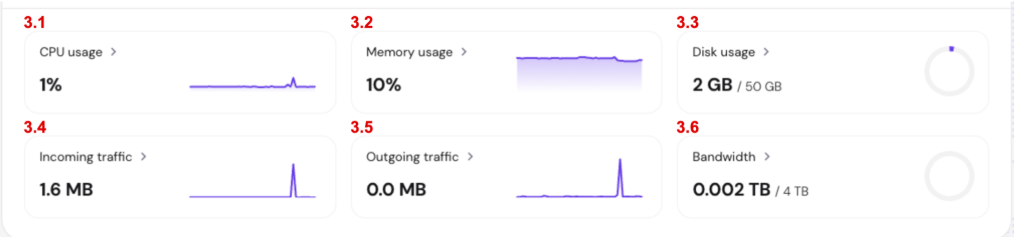
*The monthly VPS bandwidth limit resets on the first day of every month
Quick tiles
Quick tiles let you quickly manage:
- SSH key (4.1)
- Firewall rules (4.2)
- Snapshot & backups (4.3)
- Malware scanner* (4.4)

*You need to install the Monarx malware scanner to use the malware scanner tile.
VPS details
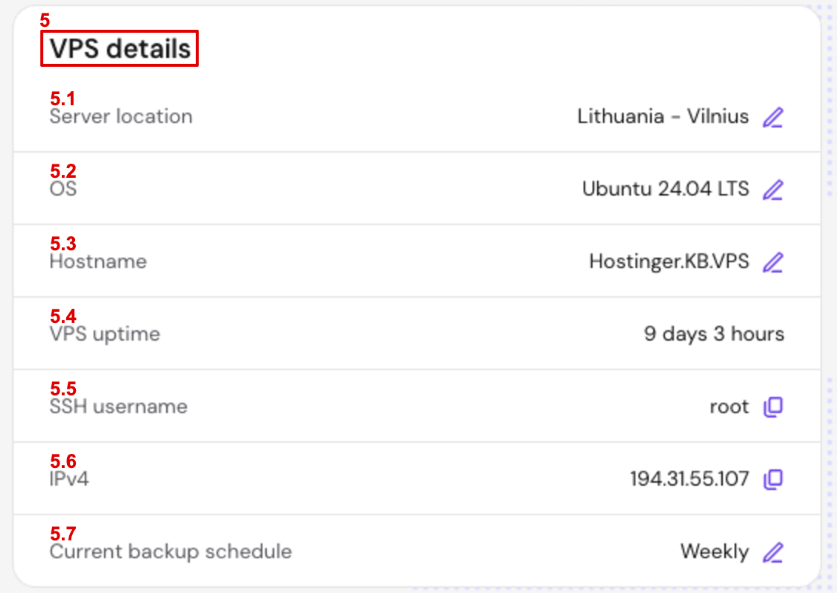
VPS details (5) shows:
- Server location (5.1)
- Operating system (5.2)
- Hostname (5.3)
- VPS uptime (5.4)
- SSH username (5.5)
- IPv4 address (5.6)
- Current backup schedule (5.7)
Plan details
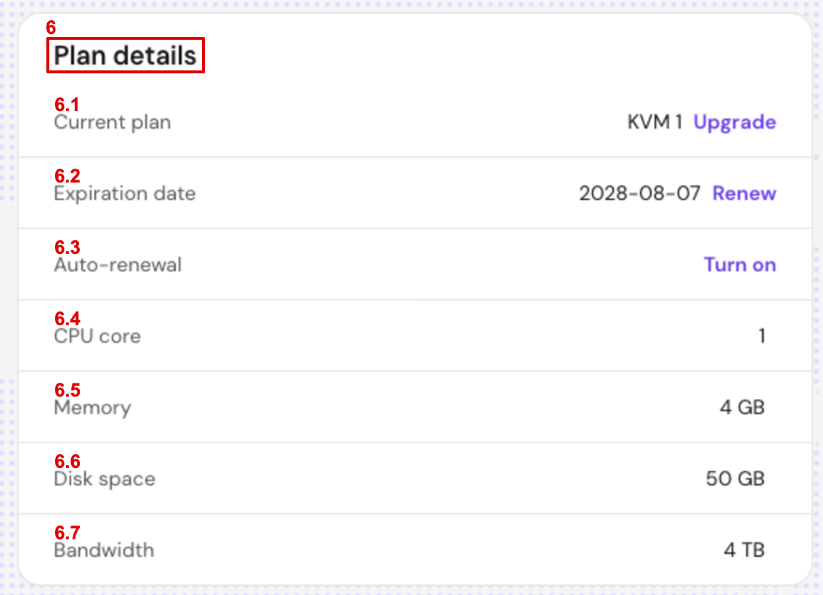
Plan details (6) highlights:
- Current plan (6.1), with an Upgrade link.
- Expiration date (6.2), with a Renew link.
- Auto-renewal status (6.3), with a Turn on link if it’s off.
- CPU core (6.4), memory (6.5), disk space (6.6), and bandwidth (6.7) included in the plan.
Docker Manager
Docker Manager is a built-in tool for VPS plans with a Docker template installed, letting you deploy, manage, and monitor Docker containers without using the command line. It lets you deploy, start, stop, or monitor containers with just a click, including launching images straight from Docker Hub. Select Docker Manager in the sidebar, then use the Projects sub-menu to view and manage your deployed containers, including updating configurations, checking logs for troubleshooting, or stopping services. See Hostinger Docker manager for VPS: simplify your container deployments for the full setup and deployment process.
Settings
The Settings page consists of four main sections:
Main settings
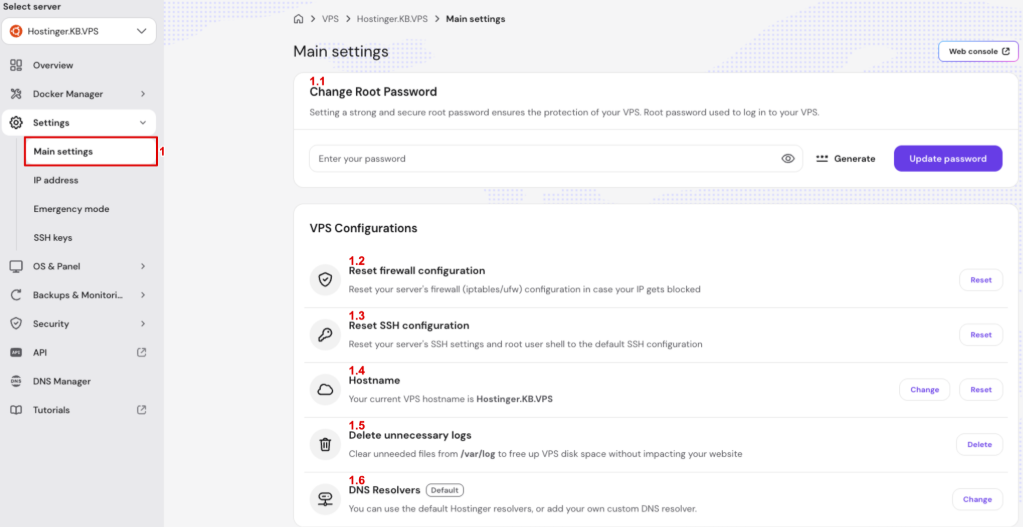
Here in Main settings (1), you can update your root password (1.1), reset your firewall (1.2) and reset SSH configuration (1.3) — these options help if you get locked out of your VPS — change your hostname (1.4), delete unnecessary logs (1.5), and change your VPS’s DNS resolvers (1.6).
IP address
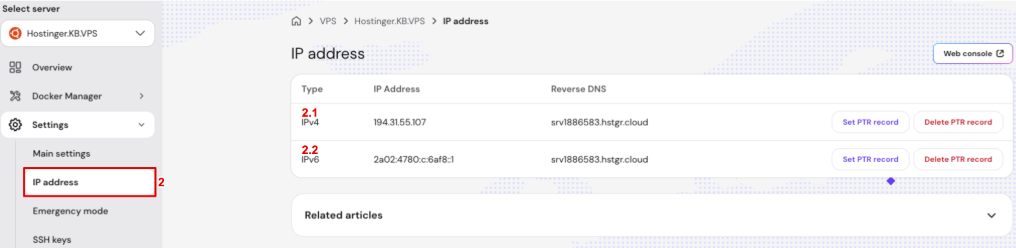
Here in IP address (2), you can set up a PTR record for your IPv4 (2.1) or IPv6 (2.2) address.
Emergency mode
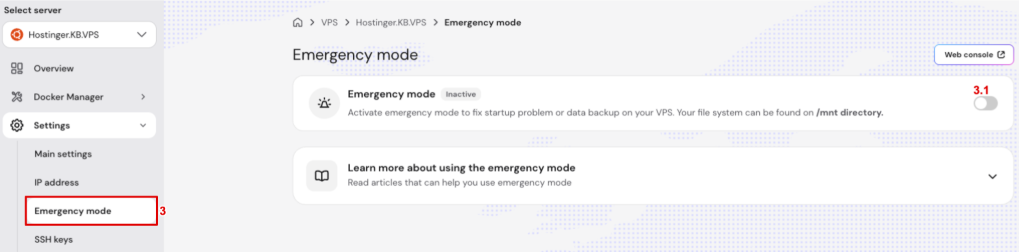
Emergency mode (3) provides the option to enable emergency mode (3.1). Activate emergency mode to fix a startup problem or back up data on your VPS. Your file system is available under the /mnt directory. Select Learn more about using the emergency mode to read related articles.
SSH keys
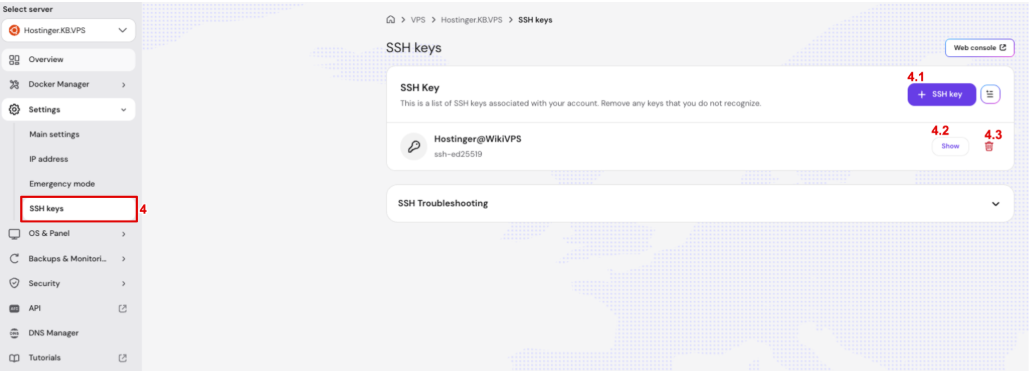
Here in SSH keys (4), you can easily add (4.1) an SSH key, show (4.2), or delete (4.3) existing SSH keys. Expand SSH Troubleshooting for related help articles. We’ve also done a video about this on the Hostinger Youtube channel.
OS & Panel
The OS & Panel page consists of two main sections:
Operating System
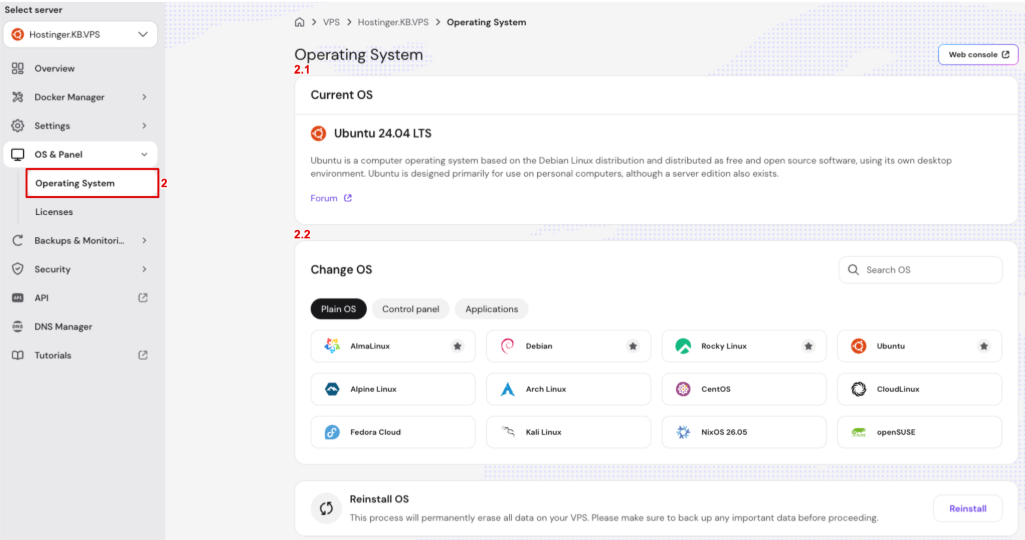
Operating System (2) shows information on your current OS (2.1) and how to change or reinstall OS (2.2).
Licenses
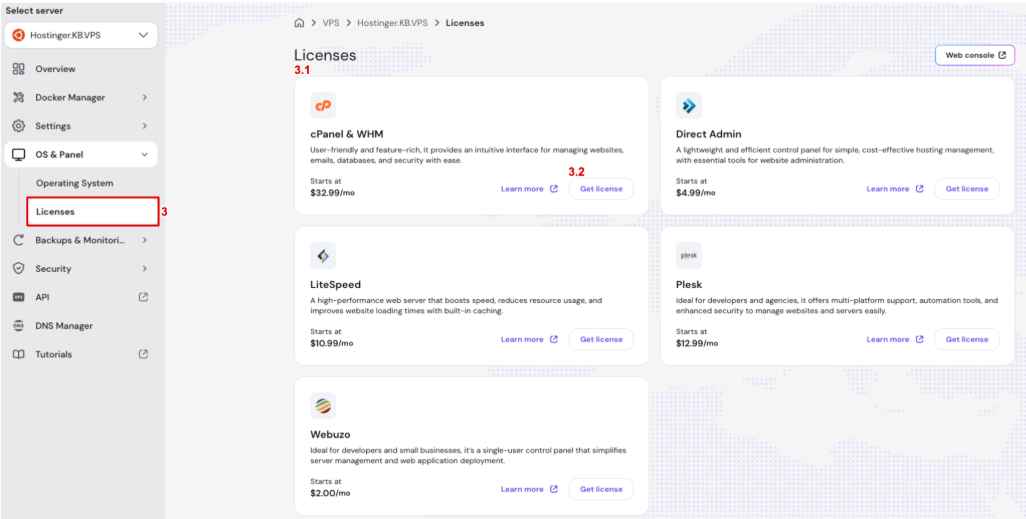
Licenses (3) shows information on the available VPS licenses (3.1) and purchasing license options (3.2), such as cPanel & WHM, Direct Admin, LiteSpeed, Plesk, and Webuzo, each with a Learn more link and a Get license button.
Backups & Monitoring
The Backups & Monitoring page consists of three main sections:
Snapshots & Backups
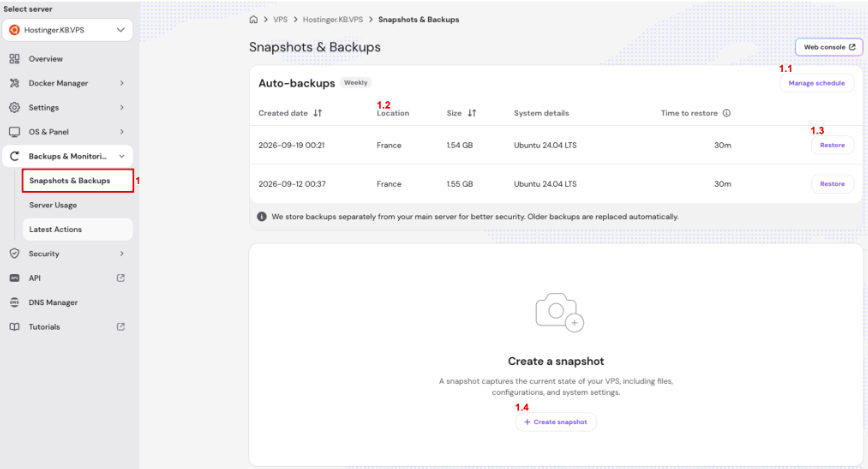
Snapshots & Backups (1) includes a snapshot, a copy of your VPS state at the exact moment it’s taken, while a backup covers your entire VPS. In this section, you can upgrade to daily backups (1.1), check in which physical your backup is stored (1.2), restore your VPS from a snapshot (1.3), and create a snapshot (1.4).
Server usage
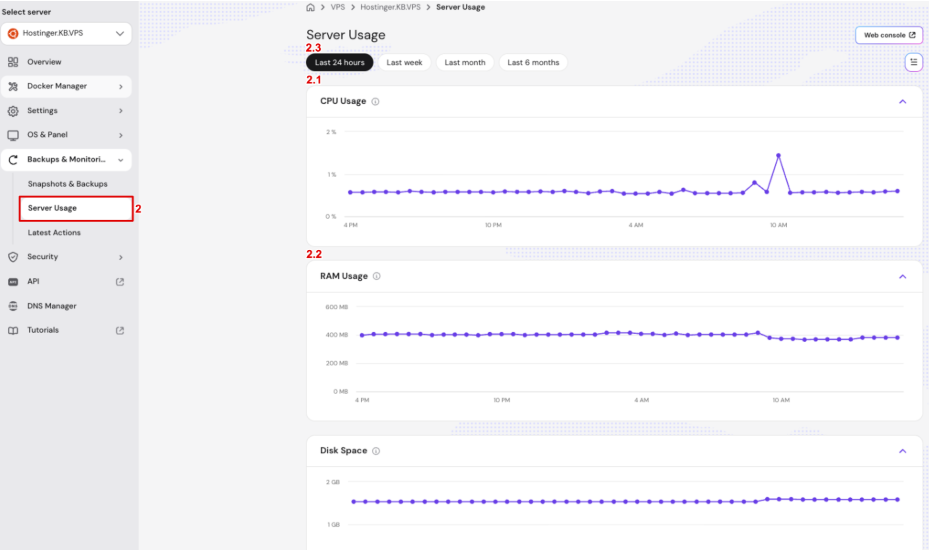
On Server usage (2), you can find the comprehensive resource usage of your VPS, including CPU usage (2.1) and RAM usage (2.2). Statistics can be displayed for different periods of time (2.3): the last 24 hours, last week, last month, or last 6 months.
Latest Actions
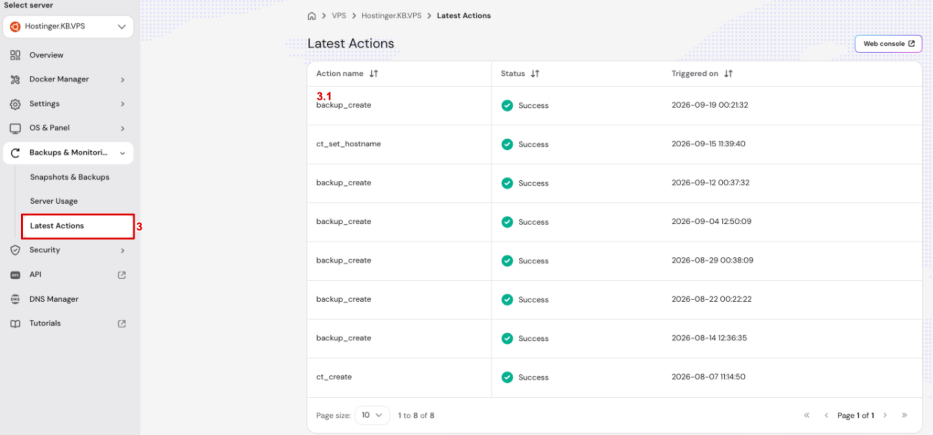
In Latest Actions (3), you can find a list of the latest actions of your server, such as backup creation, hostname changes, and container creation (3.1), along with each action’s status and the date it was triggered.
Security
This section lets you reinstall Monarx, a Linux malware scanner, or use a managed firewall on your Hostinger VPS. We’ve also done a video about this on the Hostinger Youtube channel.
API
The API section lets you interact with your Hostinger account programmatically, so you can automate tasks and integrate VPS management into other tools.
DNS Manager
DNS Manager allows you to add, edit, or manage DNS records for any domain in your Hostinger account. See How to point a domain to your VPS at Hostinger to learn how you can point a domain to your VPS specifically using the DNS zone editor.
Tutorials
The Tutorials section gives you a collection of articles to help you make the most of your VPS.
With this overview of each dashboard section, you can find any VPS setting or detail you need without digging through menus.
More Hostinger VPS management guides
Get to know your Hostinger VPS
Connect to and move your VPS
- How to connect to VPS using SFTP at Hostinger.
- How to transfer your VPS to a different location in Hostinger.
Network and troubleshooting