Codex hosting on Hostinger lets you deploy the apps you build with Codex on managed infrastructure, with automatic builds and no manual server setup. Hostinger supports Codex apps on Business and Cloud hosting plans, with frameworks like React, Vite, Express.js, and Next.js auto-detected from your project’s package.json.
Deploy your Codex project from a GitHub repository or by uploading a .zip file. Once your Codex app is live, manage logs, environment variables, restarts, database connections, and dependency vulnerabilities directly from hPanel.
Watch this end-to-end walkthrough to see how to build an app with Codex and deploy it live on Hostinger via GitHub:
Which Hostinger plans support Codex apps?
Codex hosting is available on the following Hostinger plans:
- Business web hosting
- Cloud Startup
- Cloud Professional
- Cloud Enterprise
If you’re on a different plan, upgrade your hosting plan through hPanel to access Codex hosting.
What you’ll need
- A Business hosting plan or Cloud hosting plan (Cloud Startup, Cloud Professional, or Cloud Enterprise)
- An app built with Codex using a supported framework
- Either a GitHub repository or a compressed project file (.zip)
Supported frameworks for Codex apps
Codex hosting supports the Node.js frameworks Codex commonly outputs, with Hostinger auto-detecting the framework from your project’s package.json and configuring the build for you. Your Codex app must use one of these frameworks:
Frontend frameworks:
- React
- Vue.js
- Angular
- Vite
- Parcel
- Preact
- Next.js
- Nuxt.js
- Astro
- Svelte
- SvelteKit
Backend frameworks:
- Next.js
- Express.js
- NestJS
- Nuxt.js
- Fastify
- Astro
- SvelteKit
Supported Node.js versions: 18.x, 20.x, 22.x, 24.x
If Hostinger can’t auto-detect your framework, it assigns the Other type. You can also select Other manually from the framework dropdown during setup.
Deploying a Codex app from a GitHub repository
Connecting a GitHub repository is the fastest way to deploy a Codex app on Hostinger. After the initial connection, pushes to the linked branch trigger automatic redeployments.
Step 1: Access the Node.js Apps section
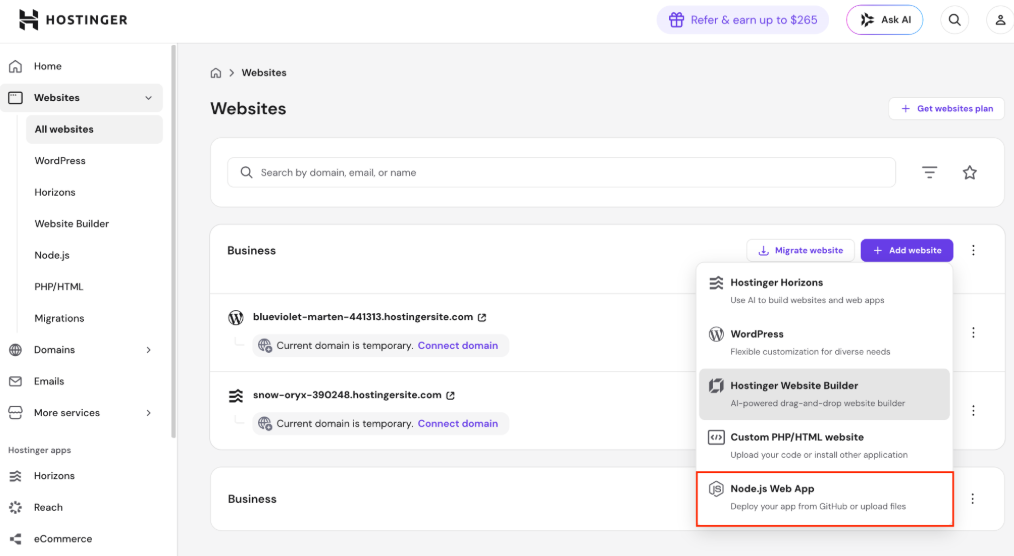
Log in to hPanel, navigate to Websites in the sidebar, and click Add Website.
Step 2: Select Node.js Apps
Choose Node.js Web App from the available options.
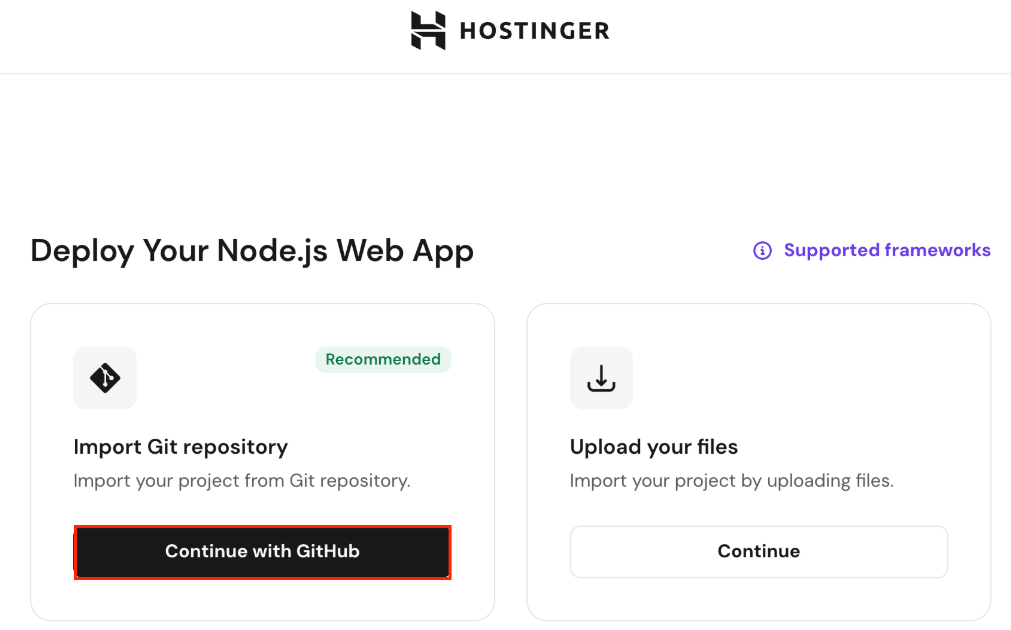
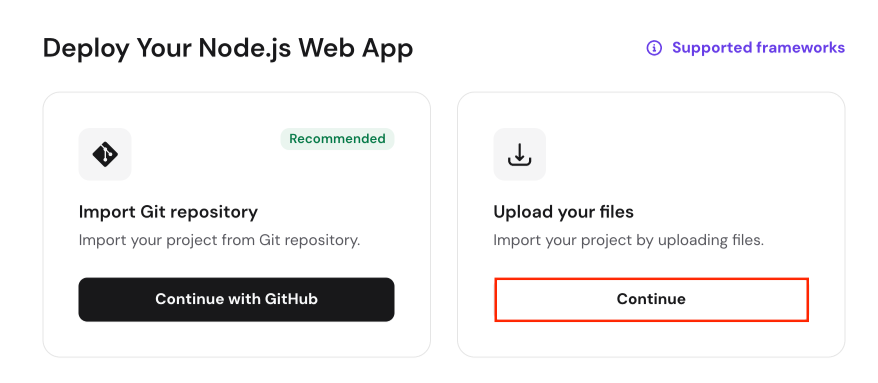
Step 3: Choose GitHub integration
Select Continue with Github under the Import Git repository section:
Step 4: Authorize GitHub access
You’ll be redirected to GitHub. Select All repositories then click Install & Authorize to allow Hostinger to access your repositories:

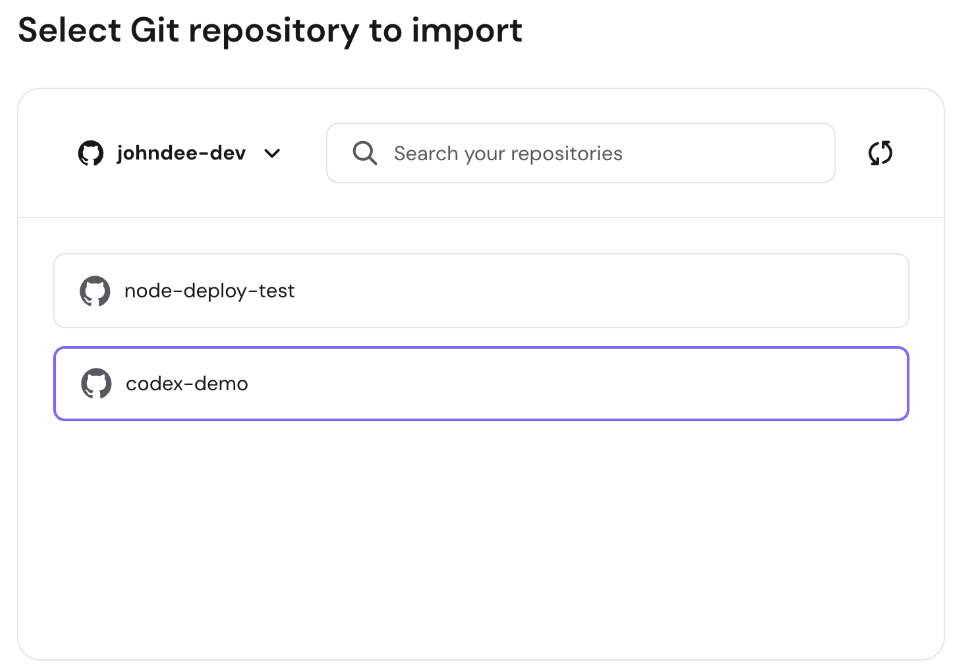
Step 5: Select your Codex repository
Choose the repository containing your Codex app:
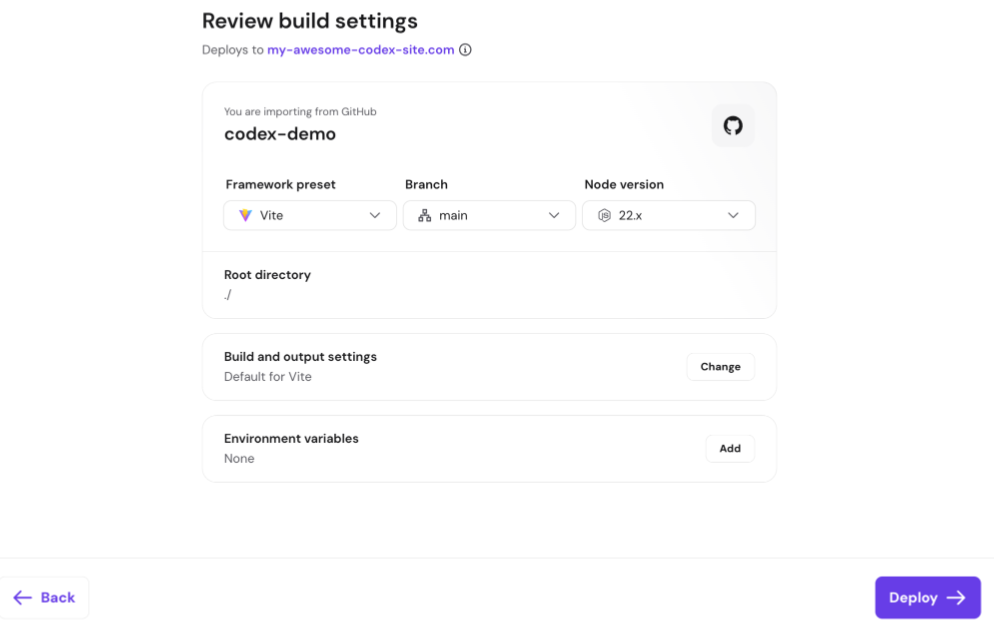
Step 6: Configure build settings
The system automatically detects your framework and suggests build settings, which you can modify if needed:
If your framework type is “Other”:
When Other is selected, Hostinger’s detection script gathers as much configuration information as possible. Some build and output settings may need to be filled in manually:
- Output directory. The folder where your app’s build files are generated. Common values: dist, build, out, or .next.
- Entry file. The main file that starts your application (e.g., index.js, server.js). Required only if your application needs it.
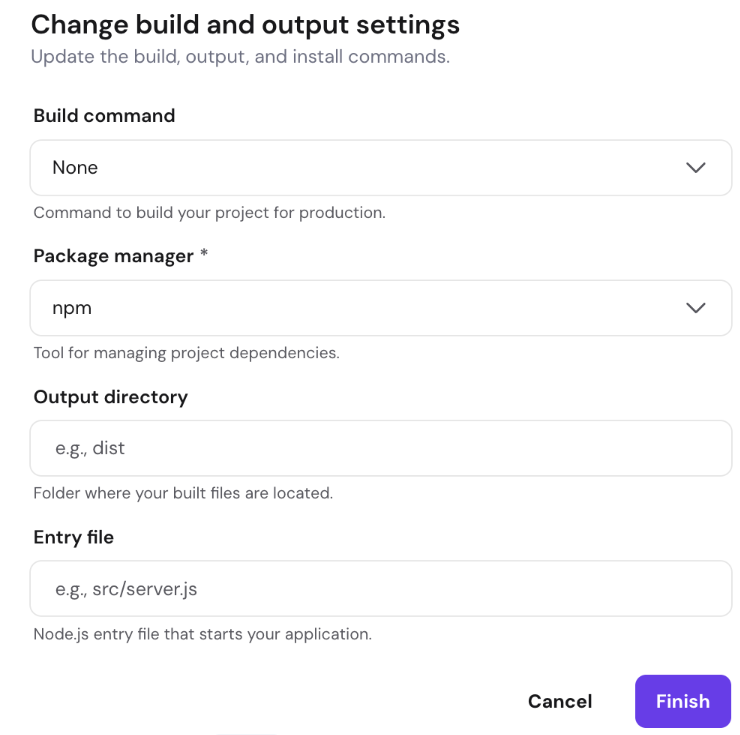
If you’re unsure of these values, check your project’s package.json or build configuration file.
Step 7: Deploy your Codex app
Click Deploy to start building your application:
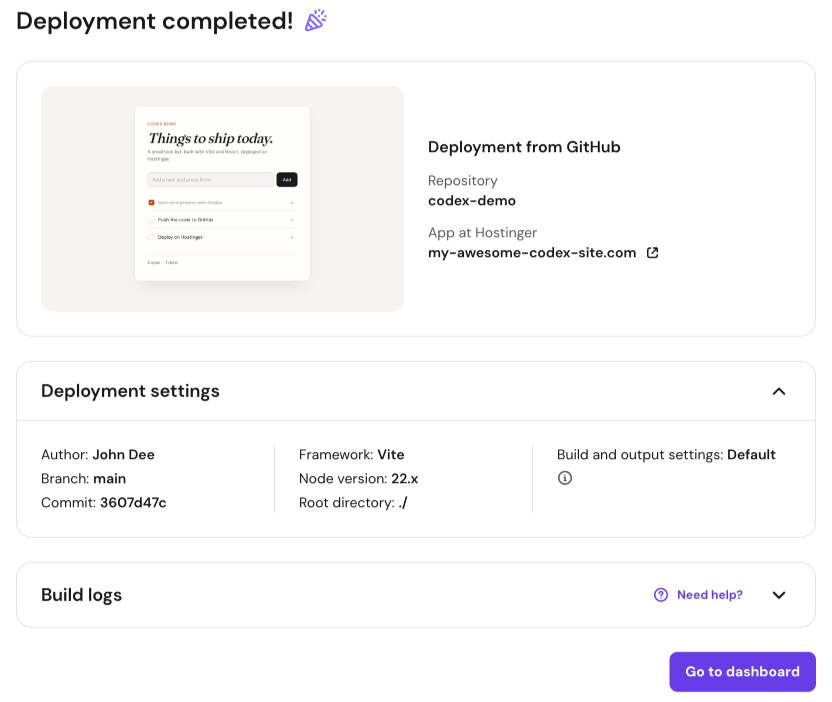
Your Codex app is now live. Once deployment completes, you’ll see a preview screenshot of your built site, giving you visual confirmation that the deployment was successful before navigating to your URL:
NOTE: One hosting plan can only be connected to one GitHub account at a time. All Codex apps within that hosting plan use the same GitHub account.
Deploying a Codex app by uploading files
If you’d rather not connect a GitHub repository, you can deploy your Codex app by uploading a compressed project file directly to Hostinger. The path works the same way as GitHub deployment, with Hostinger detecting your framework and handling the build.
Step 1: Access the Node.js Apps section
Log in to hPanel, navigate to Websites, and click Add Website.
Step 2: Select Node.js Apps
Choose Node.js Web App from the options.
Step 3: Choose file upload
Select Continue under the Upload your website files option:
Step 4: Upload your Codex project
Upload a compressed file (.zip) containing your Codex app.

Step 5: Configure build settings
Confirm or edit the auto-detected build settings.
If your framework type is “Other”:
When Other is selected, Hostinger’s detection script gathers as much configuration information as possible. Some settings may need to be filled in manually:
- Output directory. The folder where your app’s build files are generated. Common values: dist, build, out, or .next.
- Entry file. The main file that starts your application (e.g., index.js, server.js). Required only if your application needs it.
If you’re unsure of these values, check your project’s package.json or build configuration file.
Step 6: Deploy your Codex app
Click Deploy to build and launch your Codex app.
Your Codex app is now ready to use. Once deployment completes, you’ll see a preview screenshot of the built site, giving you visual confirmation that the deployment was successful.
Managing your deployed Codex app
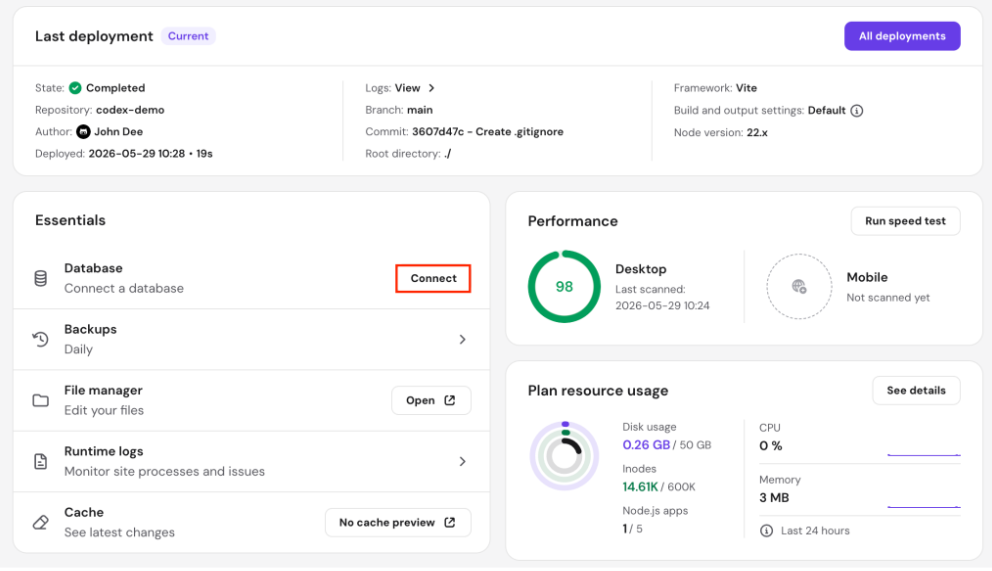
The Node.js Website Dashboard in hPanel gives you everything you need to manage your live Codex app. From a single screen, you can monitor deployment status, jump to environment variables, view resource graphs, and restart server-side apps:
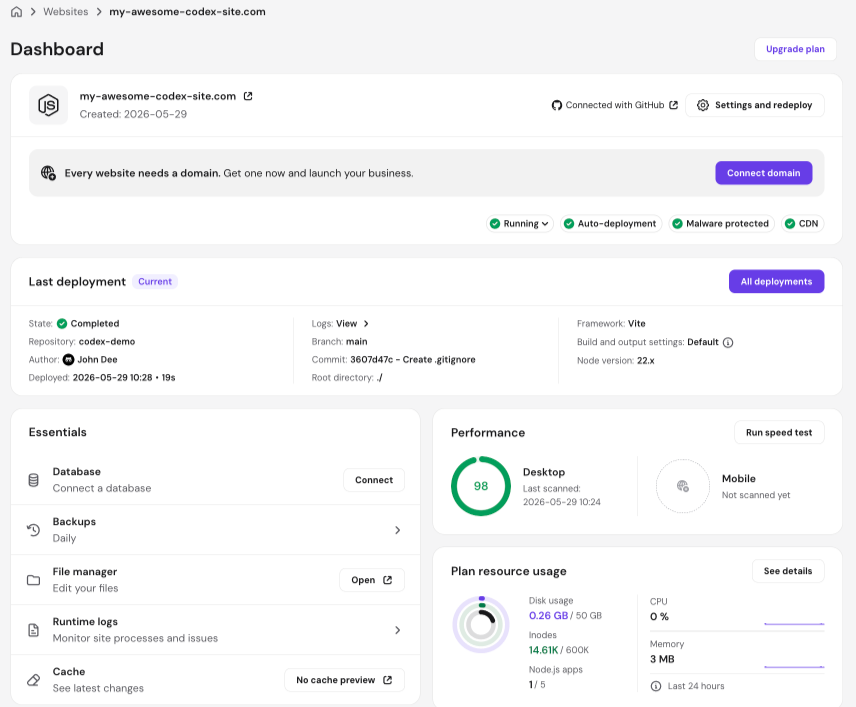
1. GitHub repository quick link
If your Codex app is deployed via GitHub, the dashboard shows a direct link to the connected repository. Click it to open the repo in a new tab to check code, branches, or recent commits without leaving hPanel.
2. Last deployment details
The dashboard displays detailed information about your most recent deployment, including:
- Deployment status (success or failed)
- Timestamp of the last deployment
- A quick link to view the full deployment log
This replaces the need to navigate to the Deployments section just to check the latest build status.
3. Quick links to key features
Quick navigation links let you jump directly to:
- Deployments
- Environment Variables
- Settings & Redeploy
- File Manager
4. Resource usage graphs
The dashboard includes average resource usage graphs for CPU, RAM, and I/O. The graphs give you a quick visual overview of how your Codex app consumes hosting resources without navigating to the full Resource Usage section.
If any metric approaches the red dotted line (your plan’s limit), optimize your app or upgrade your plan.
5. Restart
The dashboard includes a Restart button when you click Running for server-side Codex apps. Use this to restart the server process directly from hPanel, with no full rebuild or redeployment needed.
File structure after deployment
For Codex apps that generate backend build files (e.g., Express.js, Next.js, Nuxt.js, NestJS), build output is stored outside public_html:
- Build files location: /home/{username}/domains/{domain}/nodejs
- .htaccess location: /home/{username}/domains/{domain}/public_html/.htaccess. Automatically created to handle routing and serve content correctly.
If your Codex app was previously deployed with build files inside public_html, they’re moved automatically on the next build.
NOTE:
- This change applies to backend frameworks only. Frontend-only Codex apps (React, Vue, Angular) are not affected.
- If you encounter a 403 error after redeployment, check that the .htaccess file in public_html is correctly routing to the nodejs directory. Redeploying the application regenerates this file.
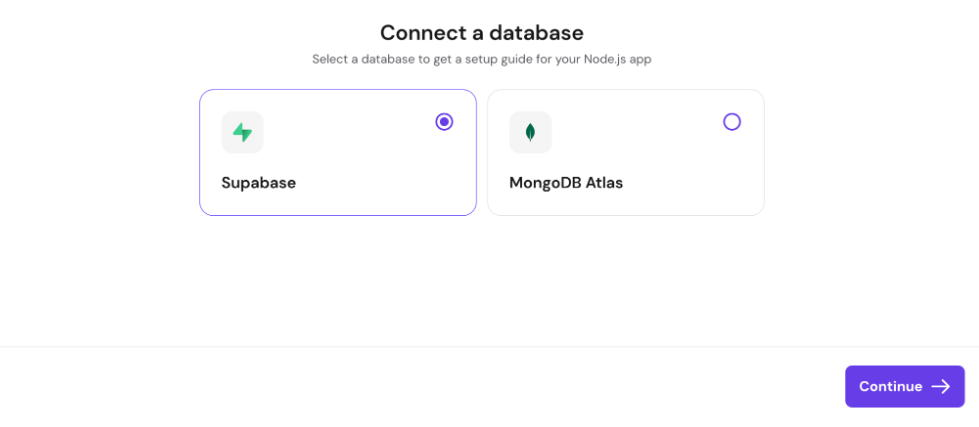
Database connect wizard
The Node.js dashboard includes a database connect wizard to help you connect your Codex app to an external database.
Supported providers:
- Supabase
- MongoDB Atlas
How it works:
- Locate the database connect wizard section in your Node.js dashboard and click Connect:

- Select your database provider (Supabase or MongoDB Atlas):

- Follow the on-screen instructions by entering the required database connection details. They’re saved automatically as environment variables in your deployment.

- The project rebuilds automatically after setup to apply the new configuration.

For manual database connection setup, see:
- Connecting a Supabase database to a Hostinger Node.js application
- Connecting a Hostinger MySQL database to a Node.js application
Vulnerability monitoring
Hostinger includes automatic vulnerability monitoring for your Codex app’s dependencies. To access it, go to Security → Vulnerabilities:
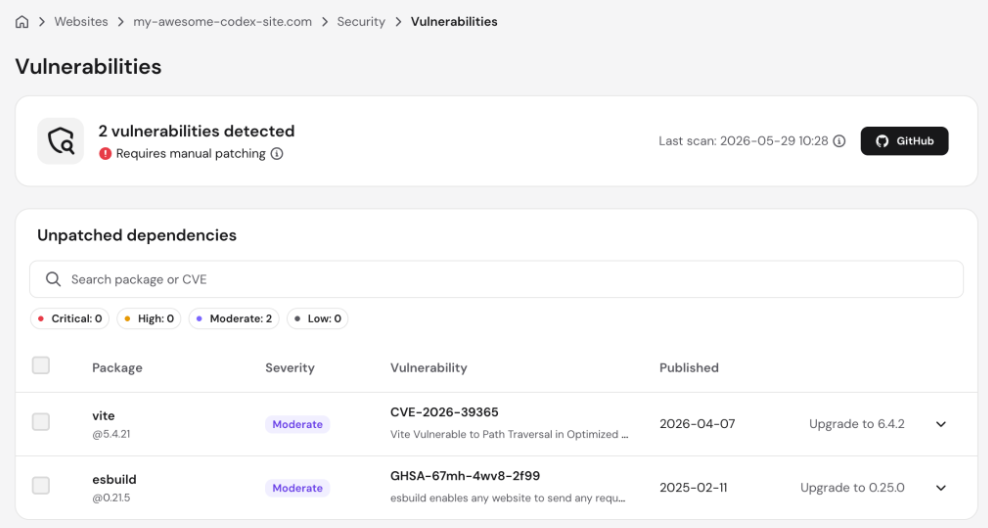
What it does:
- Scans deployed Codex apps for vulnerable npm packages
- Reports affected package names, available fixed (secure) versions, and severity levels
- Automatically scans all newly deployed applications
- Applications deployed before this feature launched are scanned on their next deployment
What to do when a vulnerability is detected: Update the affected package to the fixed version listed in the report, then redeploy your Codex app.
Hostinger supports automated vulnerability patching for Codex apps deployed via GitHub. When a vulnerability is detected, you can apply an auto-fix directly from the Vulnerabilities page without manual package hunting.
How auto-fix works:
- On the Vulnerabilities page, select one or more vulnerabilities and click Auto-fix (or Auto-fix all to fix in bulk).
- Hostinger opens a pull request on your connected GitHub repository with the recommended package update.
- Review and merge the PR on GitHub. Nothing is pushed to your branches without your action.
- Once merged, a new deployment triggers automatically and the vulnerability is marked as fixed.
Important notes:
- Auto-fix is only available for Codex apps deployed via GitHub. File upload deployments are not supported.
- Not all vulnerabilities have an auto-fix available. For those that don’t, update the affected package manually and redeploy.
- Auto-fix requires the Hostinger GitHub App to have write access to your repository. If write access hasn’t been granted, an error appears when you attempt to create a pull request. You’ll need to approve the permission update via the email sent by GitHub on Hostinger’s behalf.
- You still review and merge every PR. Hostinger doesn’t push changes directly to your branches or access your secrets or environment variables.
Frequently asked questions
1. I already have a domain added at Hostinger. How do I deploy my Codex app to it?
Currently, Codex apps must be deployed as a new website. The process:
- If the domain is already added to your hosting plan, remove the website first before adding a new one.
NOTE: Download a backup before removing the website.
- Click Add Website and select Node.js Apps.
- Choose your deployment method (GitHub or file upload).
- Once deployment completes, your Codex app is active on the domain you added.
2. How do I remove or undeploy my Codex app?
There’s currently no “Stop” or “Delete” button for Codex app deployments. To take your app offline, remove the entire website from hPanel. This deletes all associated deployments and takes your app offline.
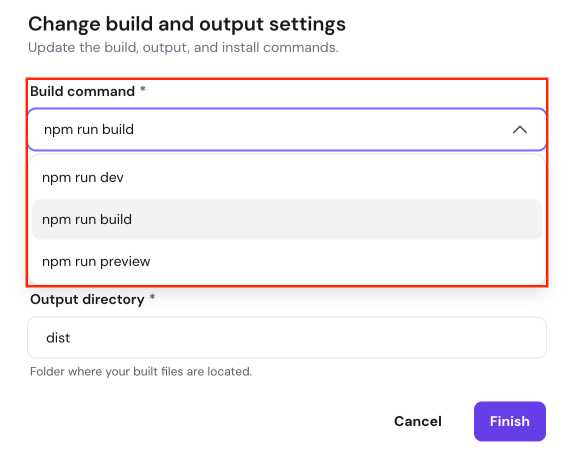
3. What npm commands can be run?
You don’t need to run npm commands manually via SSH or install npm separately. It’s already pre-installed by Hostinger.
The npm build commands available are visible in the Build settings dropdown during application setup:
4. Can I deploy a Codex app from a private GitHub repository?
Yes. Connect your GitHub account, grant access to the private repo, and deploy from the branch you want. Pushes to the connected branch trigger automatic redeployments.
5. How do I move a Codex app from local development or another host?
Push your Codex app to GitHub, connect the repository in Hostinger, and set the environment variables your app needs. If you’re migrating from another host, keep the same Node.js entry point and database settings where possible to reduce changes.
That’s it! You’ve successfully deployed a Codex app on Hostinger using GitHub integration or direct file upload. For questions or further help, reach out to our support team via live chat 24/7.