This guide explains how to connect a Node.js application to a MySQL database hosted on Hostinger.
Before proceeding:
-
You already have a built Node.js website or application
-
Your app requires a database connection to store data
-
You are ready to configure the database and environment variables for production
Step 1 – Create a MySQL database in Hostinger dashboard
-
Navigate to Websites → Dashboard→ Databases → Management
-
Fill in:
-
Database name
-
Database username
-
Password (save this securely)
-
-
Click Create
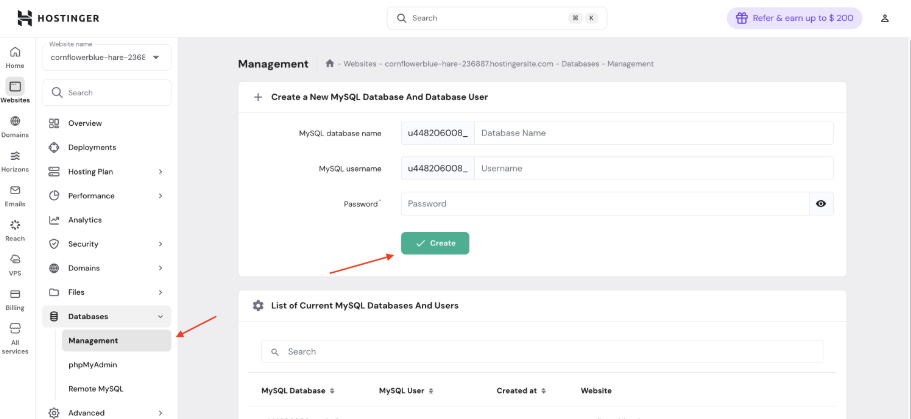
Once created, note down:
-
Database name
-
Database username
-
Database password
-
Database host (usually localhost on Hostinger)
Step 2 – Configure environment variables
Your Node.js app should never hardcode database credentials.
Instead, use environment variables.
Option A – Separate environment variables (recommended for clarity)
Create or update your .env file:
DB_HOST=localhost
DB_PORT=3306
DB_USER=databaseuser
DB_PASSWORD=databasepassword
DB_NAME=databasename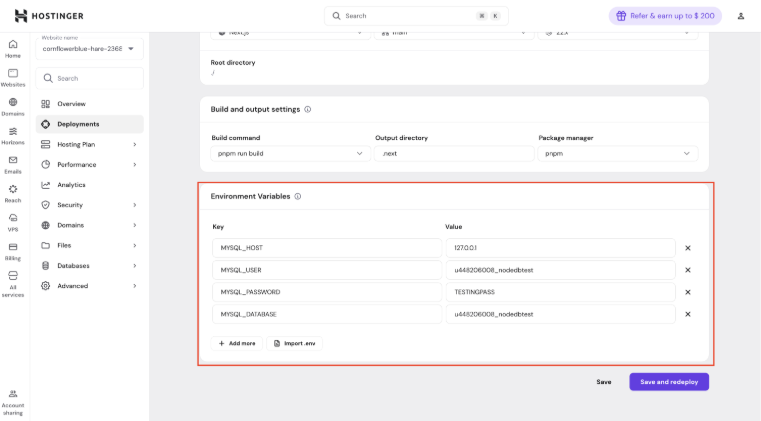
Option B – Single database connection string
You can also define one database connection variable, depending on your application setup:
DATABASE_URL=mysql://databaseuser:databasepassword@localhost:3306/databasenameIn this article, we’ll be using Option A.
Step 3 – Rebuild or restart the application
After updating environment variables, make sure to restart your application so it loads the new values.
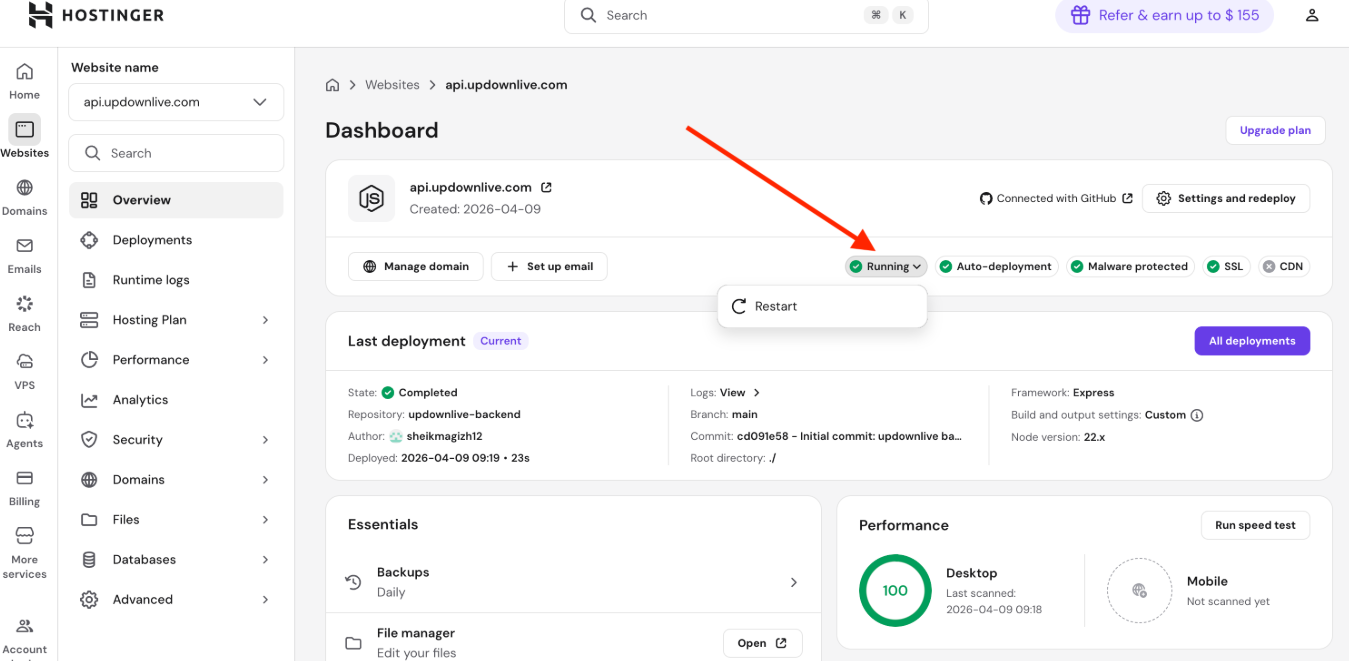
Restart from Hostinger dashboard (Recommended)
For server-side Node.js apps (e.g., Express.js, Next.js, NestJS), you can restart directly from the dashboard:
- Open your Website Dashboard in Hostinger dashboard
- Click Restart
Alternative: Restart via SSH
If you prefer to restart via the command line:
- Connect to SSH
- Run:
cd domains/xx/public_html(replace xx with your domain name) - Run:
touch tmp/restart.txt
Step 4 – Ensure your website contains database connection files
Before your application can store or retrieve data, it must include a dedicated database connection file.
This file is responsible for:
-
Reading database credentials from environment variables
-
Establishing a connection to the MySQL database
-
Exporting the connection so it can be reused across the application
Keeping database logic in a single file makes the application easier to maintain and debug.
Typical database connection file structure
In most Node.js projects, the database connection file is located in a folder such as:
-
config/database.js
-
db.js
-
database/connection.js
The exact name does not matter, as long as it is imported where needed.
Default MySQL connection file example (node.js)
Below is a simple and commonly used example using the mysql2 package.
import mysql from "mysql2/promise";
const db = mysql.createPool({
  host: process.env.DB_HOST,
  port: process.env.DB_PORT || 3306,
  user: process.env.DB_USER,
  password: process.env.DB_PASSWORD,
  database: process.env.DB_NAME,
});
export default db;
This file:
-
Reads credentials from environment variables
-
Creates a reusable connection pool
-
Prevents opening a new connection for every query
Example using a single connection string
If your application uses one database connection variable, the connection file may look like this:
import mysql from "mysql2/promise";

const db = mysql.createPool(process.env.DATABASE_URL);

export default db;
Example connection string:
DATABASE_URL=mysql://databaseuser:databasepassword@localhost:3306/databasenameUsing the database connection in your application
Once the connection file exists, it can be imported and used anywhere in your project.
Example:
import db from "./config/database.js";

const [rows] = await db.query("SELECT * FROM users");
This confirms that:
-
The database connection file is correctly set up
-
Your application can communicate with the MySQL database
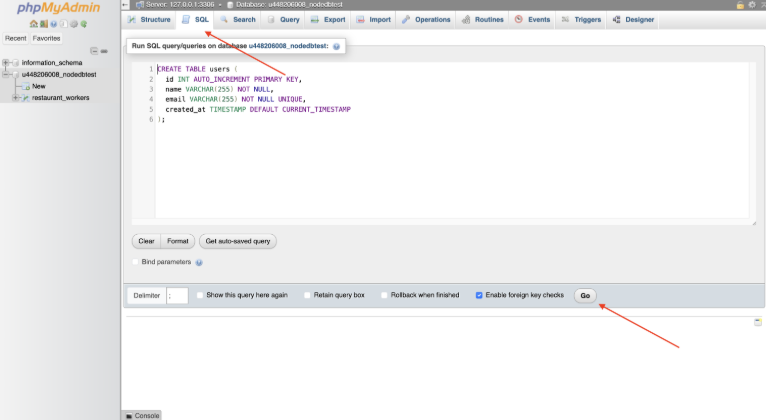
Step 5 – Create required database tables
Before storing data, your database must contain the required tables and columns.
Example SQL table
CREATE TABLE users (
id INT AUTO_INCREMENT PRIMARY KEY,
name VARCHAR(255) NOT NULL,
email VARCHAR(255) NOT NULL UNIQUE,
created_at TIMESTAMP DEFAULT CURRENT_TIMESTAMP
);
You can execute this SQL:
-
Via phpMyAdmin in Hostinger dashboard
-
Or programmatically from your application
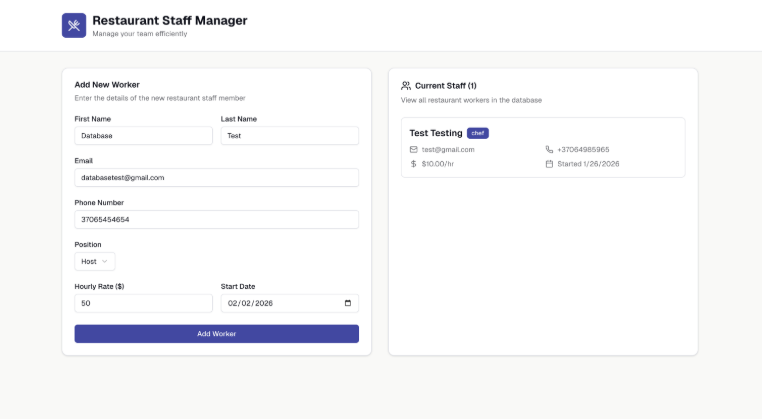
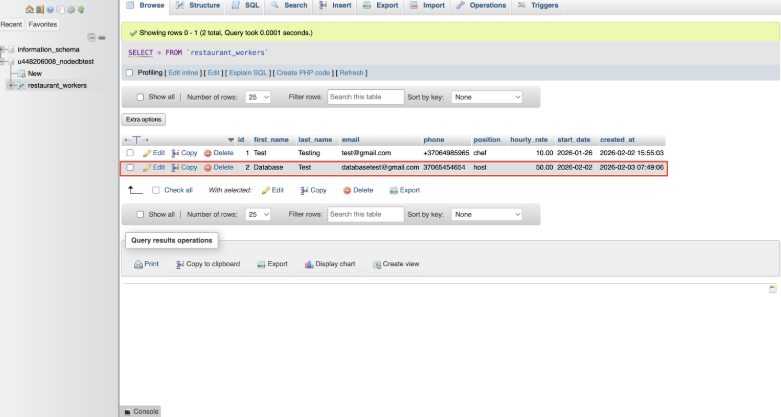
Step 6 – Test data insertion in production
-
Open your live Node.js application
-
Perform an action that stores data (e.g., submit a form)
-
Check the database using phpMyAdmin
-
Confirm:
-
A new row is created
-
Values are stored correctly
-
Common issues & troubleshooting
❌ Access denied for user
-
Verify database username and password
-
Ensure the user is assigned to the database
❌ Cannot connect to MySQL server
-
Confirm host is set to localhost
-
Ensure port 3306 is used
❌ Environment variables not loading
-
Restart the Node.js application
-
Confirm .env is included in the runtime environment