Feb 27, 2026
Larassatti D.
14min Read
WordPress automation means utilizing tools and workflows to automate repetitive website tasks. It can be anything from publishing new posts, sharing them on social media, backing up your site, or even translating your content.
To truly understand what WordPress automation can do, I spent a week experimenting with various workflows – from automating backups to syncing WooCommerce sales data to Google Sheets.
Along the way, I experimented with WordPress’ built-in features, plugins, and automation tools, such as Zapier and n8n, to assess their effectiveness in real-world scenarios.
What I found is that automation doesn’t have to be complicated or technical. Even simple workflows save you hours each week.
Here are seven WordPress automation ideas to implement on your site:
I documented the process of setting up these seven automation workflows on my WordPress site. Continue reading to learn how you can do the same on your own.
WordPress automation is the process of eliminating repetitive tasks on your site so that you don’t need constant manual input. Instead of spending time on routine work, you can let automation tools or software take care of it.
At its core, WordPress workflow automation relies on two key concepts: triggers and actions. A trigger is the event that starts an automation (for example, a new user registering on your site), while an action is the task that follows (such as sending a welcome email or publishing a post).
You can start creating automation workflows with WordPress’ built-in features, use plugins for quick setups, or take things further by connecting third-party tools like Zapier (great for beginners) or n8n (open-source, offers more customization for technical users) – depending on your needs and preferred level of control.
I researched and tested seven automations on my site, ranging from simple WordPress maintenance tasks to content translations that would work well for most types of websites.
Let’s dive deeper into how I set up each workflow and how you can do it too.
One tip I see in many WordPress tutorials and guides is to keep our websites up to date. And it’s for good reasons, since regular updates are essential for WordPress security, speed, and stability. Outdated plugins and themes are the most common entry points for security vulnerabilities.
Fortunately, these are among the easiest workflows to automate. WordPress comes with built-in features for enabling auto-updates.
First, you can enable WordPress auto-updates for both plugins and themes.
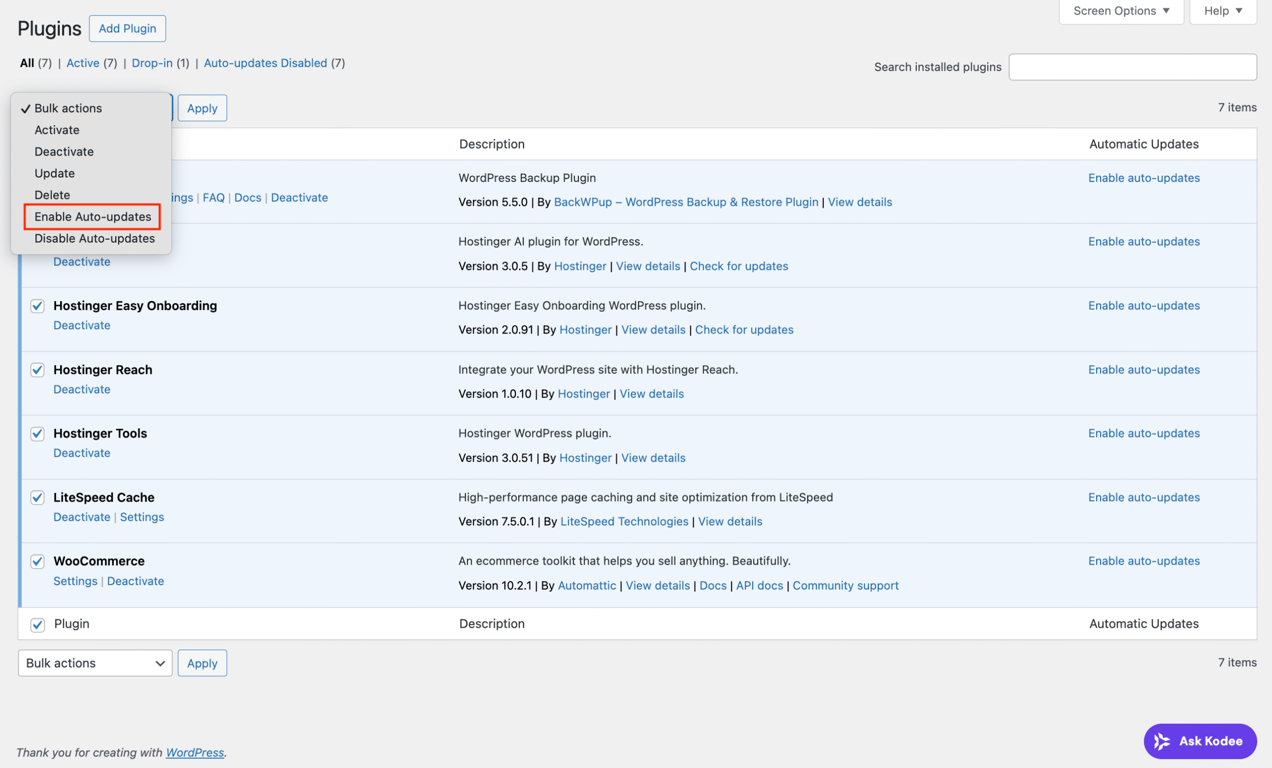
For plugins, go to the Installed Plugins menu on your WordPress dashboard. There’s an Automatic Updates column on the plugins list, where you can enable auto-updates for any plugin you want.
To save time, you can also enable automatic updates for all plugins at once using the Bulk actions menu – one click and it’s done.
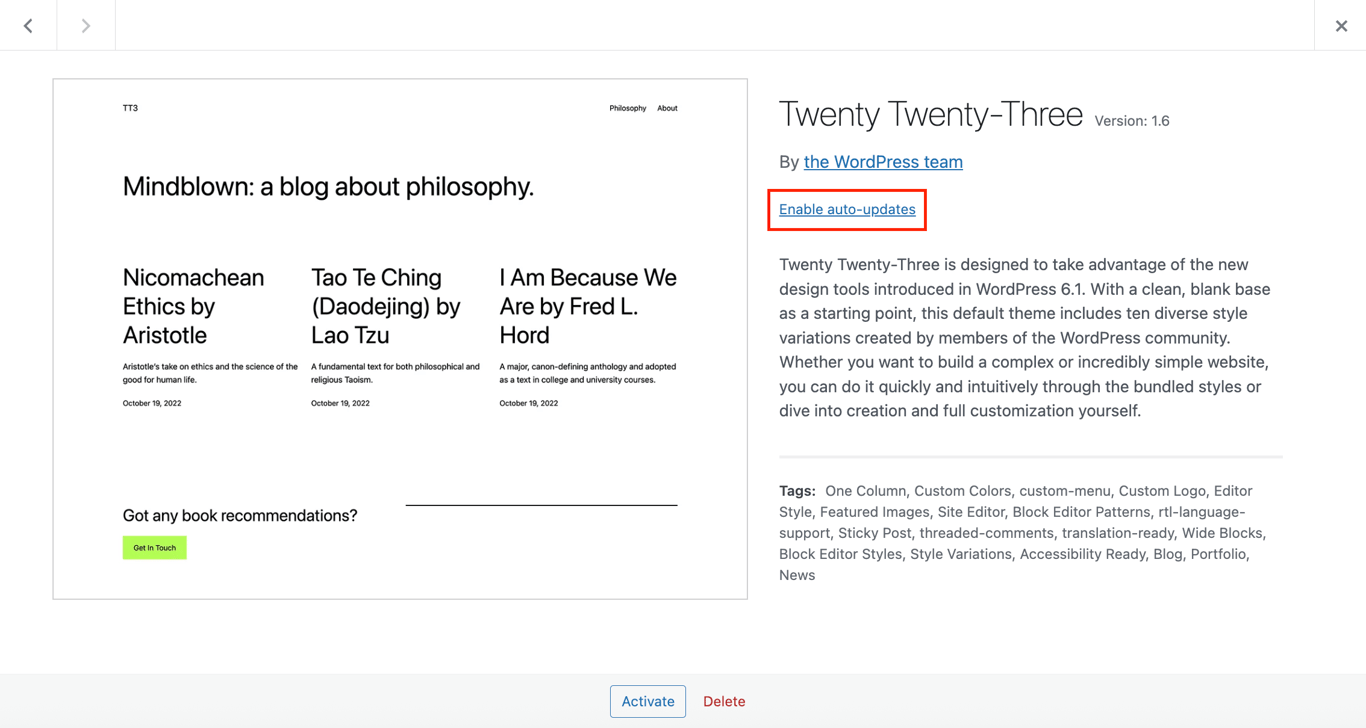
Setting up automation for updating WordPress themes is just as simple as going to Appearance → Themes. Then, hover over a theme until the Theme Details button appears.
There’s the Enable auto-updates button, which will directly activate the automation if you click on it.
Apart from themes and plugins, updating WordPress core software can also be automated by tweaking your site’s wp-config.php file. You can find the steps to do it in the article I linked.
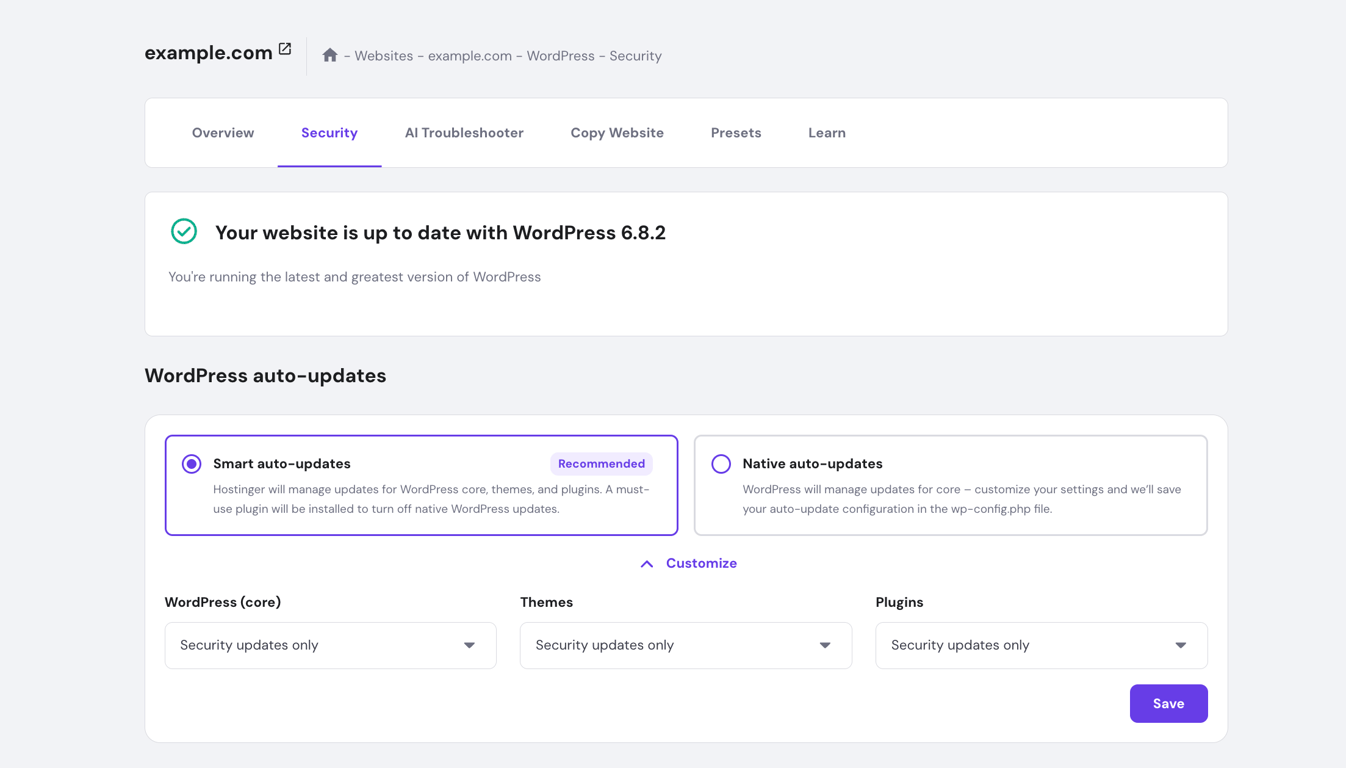
If you’re using Hostinger’s managed hosting for WordPress, don’t be confused if you can’t find any of the auto-update buttons. This is because website management is centralized in hPanel, where the WordPress smart auto-update feature is activated by default.
From the hPanel dashboard, go to WordPress → Security. There’s a section called WordPress auto-updates where you can choose how you want updates automation to be handled for your WordPress core, plugins, and themes.
By default, it’s set to Security updates only, and I recommend keeping it that way. It makes your site protected without the higher risk of compatibility issues that sometimes come with major updates.
From my experience, the risk with automating WordPress software updates is the possibility of a new patch conflicting with older plugins or themes, which will lead to unexpected errors. For example, a theme update might break your site’s layout, or a plugin update could disable certain features.
On the other hand, leaving updates completely manual comes with its own risk. If you miss a crucial update, your site may be vulnerable to security threats. That’s why I recommend keeping automated updates enabled at least for security patches.
If your hosting provider doesn’t offer this feature, it’s your call to decide whether to automate all updates or handle them manually. Either way, the safest approach is to always have regular backups in place so you can quickly roll back if something goes wrong.
Running regular WordPress database optimizations keeps your site fast and clutter-free. If you’re a beginner, the easiest way is to use a WordPress database plugin, which can automatically clean up post revisions and spam comments on a schedule. For those with more technical experience, setting up a cron job or running WP-CLI commands to automate the process will give greater control.
Automating my site’s backups gives me peace of mind, knowing that there’s always a recent copy of my site in the worst case.
Similarly to updates, automating backups is very straightforward. Most WordPress backup plugins, like UpdraftPlus and BackWPup, include this feature, often with additional options like database optimization.
You can also check if your hosting provider offers automatic WordPress backups. I’m hosting my WordPress site with Hostinger, and it comes with an automatic backup feature.
I’m on a Business plan, so automatic backups run daily. Premium plans include automatic weekly backups, with the option to upgrade to daily backups as an add-on.
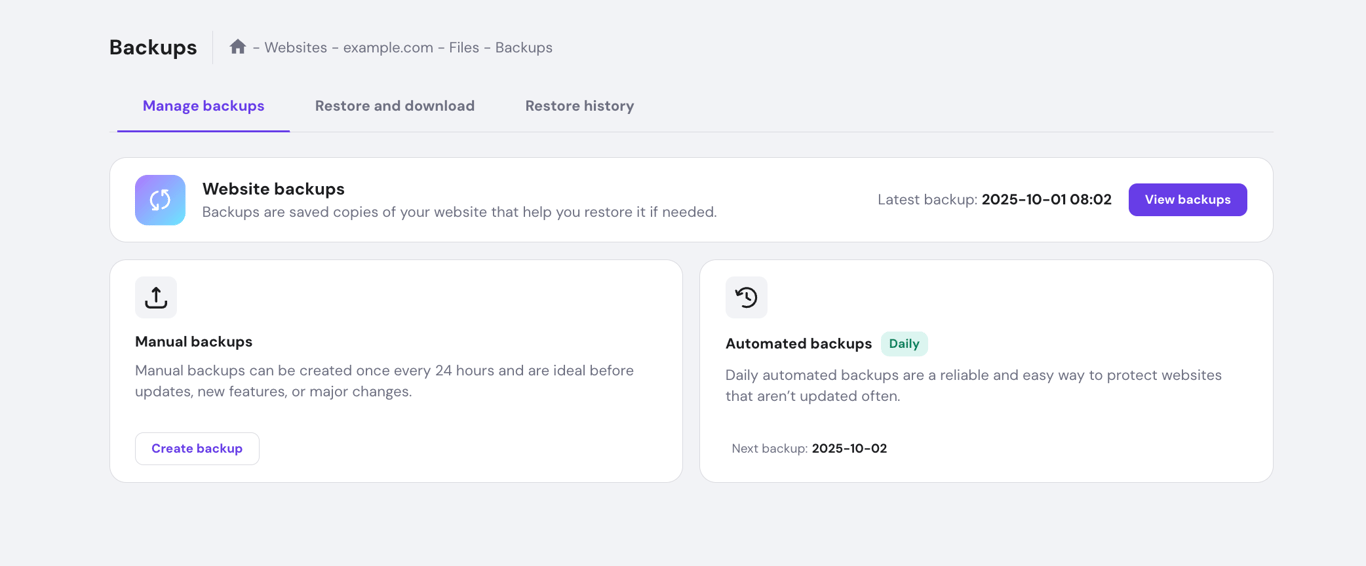
All the automatic backup data is stored securely on Hostinger’s servers. But I can also download my website files to my local computer by creating manual backups from hPanel.
If you’re also using Hostinger, simply go to Files → Backups from your hPanel dashboard to manage backups.
Whether using a plugin or your hosting provider’s tools, automated backups eliminate the need to remember backup schedules or manually export files, and there are no meaningful drawbacks to this practice – only protection.
However, a backup is only useful if you can restore your site from it when needed. So, to be extra safe, I like to test my backups after any major update on my site.
Scheduling posts in advance reduces the stress of last-minute writing and maintains your publishing consistency. This approach frees you to focus on time-sensitive content or trending topics without disrupting your regular posting schedule.
You can use content automation for SEO benefits, too, as an active blog signals freshness to search engines – without the stress of managing a tight publishing schedule.
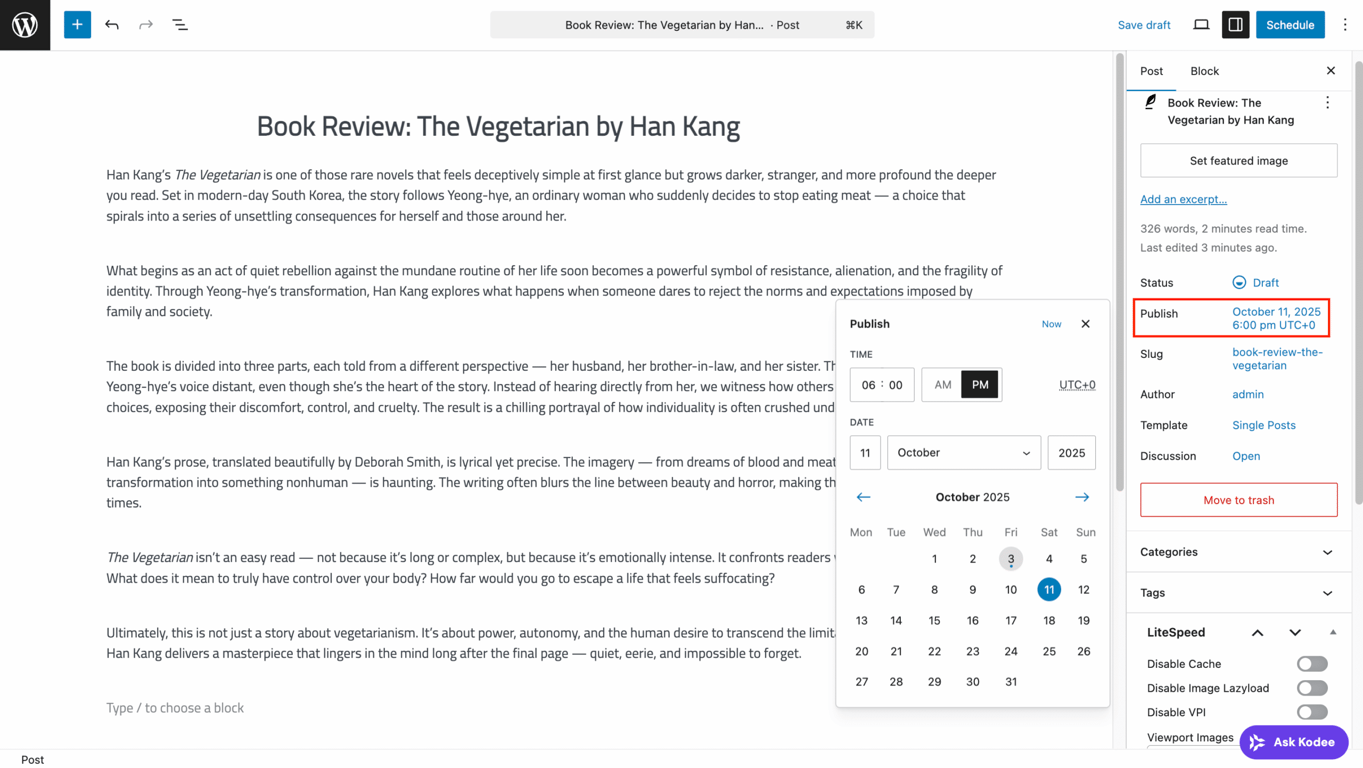
The easiest way to automate content publishing in WordPress is through its built-in scheduling feature. When editing a post on WordPress, you’ll see that the Publish option on the settings panel is set to Immediately by default.
Click on it until a scheduler popup appears. Set your desired publication date and time, and hit Schedule. Just like that, WordPress will automatically publish your post on the date and time you pick.
Apart from that, you can use AI automation tools like n8n or OpenClaw to create more advanced content automation workflows. These tools are handy when your publishing process involves other apps – for example, if you prefer writing in a different word processor, or if you’re collaborating with a team and want to simplify how posts move from draft to published.
We have a walkthrough guide to set up n8n to automatically create WordPress posts. The workflow starts with ChatGPT selecting the topics, writing the initial draft, and transferring the content to the WordPress post editor. Since AI-generated content isn’t always perfect, your manual work is mainly about editing and fact-checking.
Another option is to use the OpenClaw AI agent to automate content creation and publishing through prompting. Simply connect OpenClaw to WordPress using REST API, and you can do various WordPress tasks through the AI agent, including automating content publishing.
I’ve tried building workflows with both n8n and Zapier, and I can confirm that Zapier is much more beginner-friendly, thanks to its intuitive interface and simple setup. However, it offers less flexibility, and it can be pricey if you want to create complex workflows.
On the other hand, n8n offers greater customization and security for automation, as it provides more control over workflow logic. While it may appear to have fewer third-party app integrations than Zapier, it actually works with almost any service that provides an API key.
Read our in-depth comparison of n8n vs Zapier to find out which automation platform better suits your workflow needs.
Another WordPress automation tool you can try is the Uncanny Automator plugin. While it offers fewer third-party app integrations compared to Zapier or n8n, it’s great for automating workflows that involve multiple WordPress plugins. For instance, you want to automate content publishing using the data retrieved from WPForms.
If you prefer writing directly in the WordPress editor, the built-in post scheduling feature should be enough to automate content publishing. If you’re comfortable with data structures or have resources to keep up with the learning curve, n8n is worth exploring.
Automating social media sharing is one of the most time-saving WordPress workflows you can set up. With just one click of the Publish button, your new blog post can automatically go live on your social media channels.
You can automate social sharing using either WordPress plugins or external automation tools. Plugins offer the simplest setup.
So, I created this WordPress automation using Jetpack Social. The free version is enough for automating post shares across major social platforms. If you want to take it a step further with uploading custom images or videos, you’ll need to upgrade to the premium plan.
The first step is to install the plugin on your WordPress site. Then, you’ll see the Jetpack Social icon on the top toolbar of your WordPress post editor. Click on it for the Jetpack Social settings panel to appear, and you’ll see the Connect an account button.
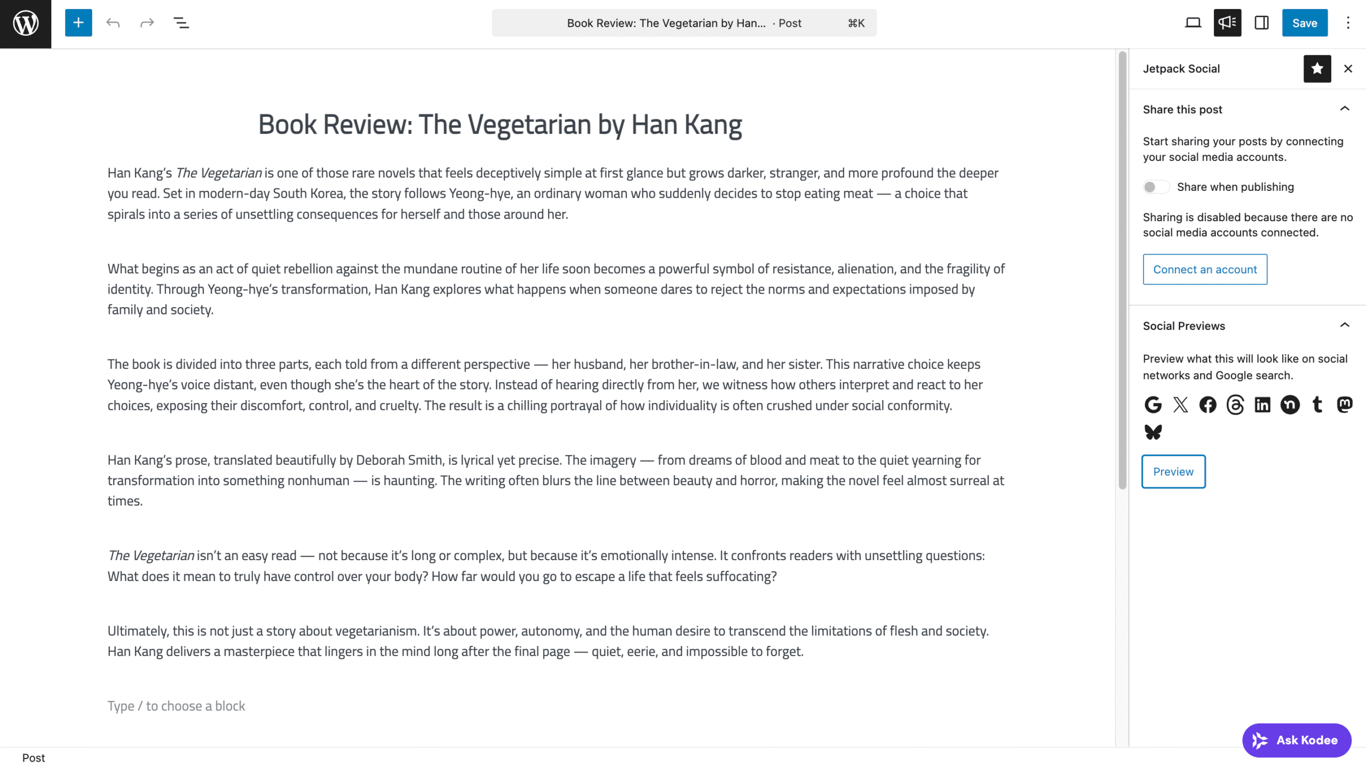
Jetpack Social currently integrates with Facebook, Instagram Business, Threads, Bluesky, LinkedIn, Nextdoor, Tumblr, and Mastodon. Note that you’ll need a business account or public page to connect with Facebook, LinkedIn, and Instagram. The setup process is simple, though – it’s just like the usual login to your accounts.
Once you’ve connected the platforms you want, turn on the Share when publishing toggle in the Jetpack Social settings panel. You can also add a short caption with up to 255 characters to accompany your post.
Make sure you set a featured image before publishing – Jetpack Social uses this as the visual preview in social media posts.
Besides plugins, you can also use automation tools. Most of them offer pre-built automation templates you can easily duplicate and customize based on your needs.
For example, I tried a Zapier workflow (called a Zap) template that uses a new WordPress post as the trigger and posting a photo to Instagram as the action.
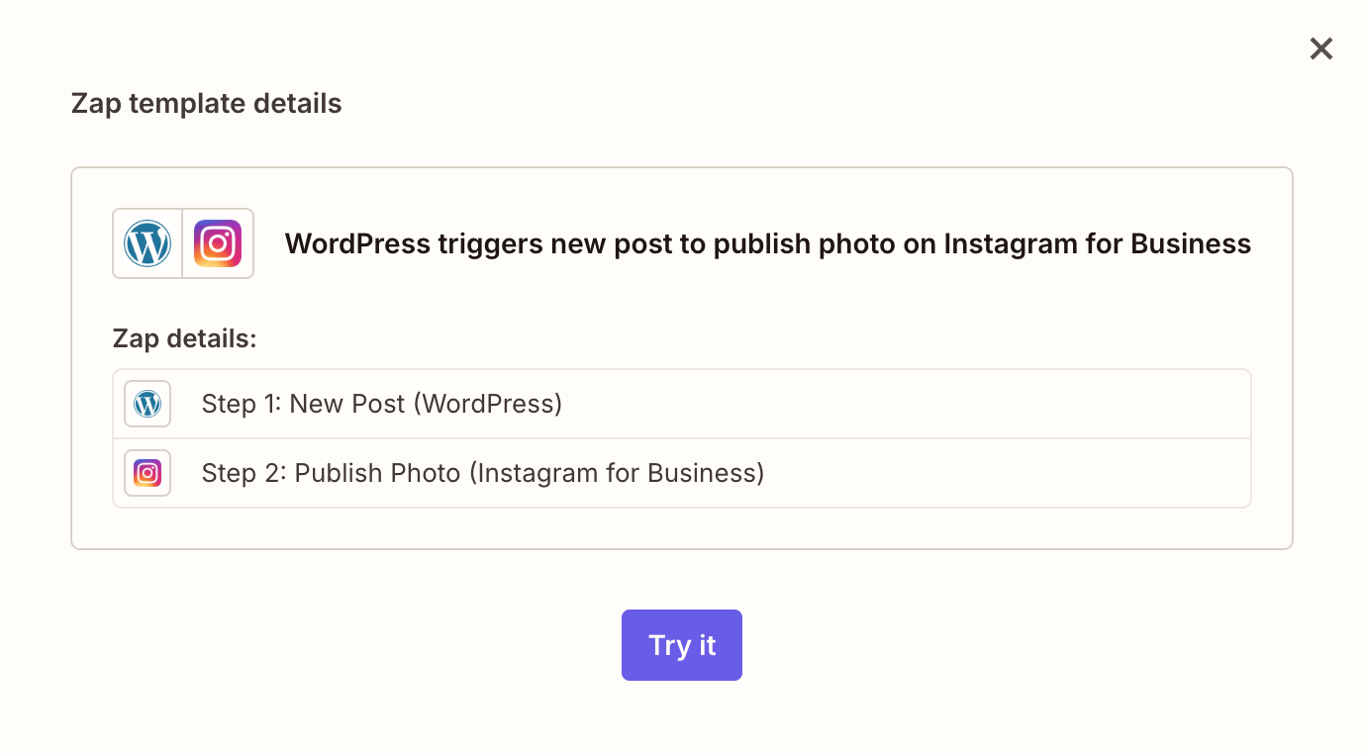
After selecting the template, Zapier redirects to the workflow editor, where you can connect your WordPress and Instagram Business accounts. Setting this up is straightforward, as connecting accounts only requires logging in and authorizing access.
Once connected, you can fine-tune the trigger and action fields through the dropdown menus in the workflow. This particular template allows you to post a photo from your new blog post automatically. If you’d like to generate custom captions or modify the post’s appearance, you’ll need to create a custom action.
If you’re interested in using n8n to create this automation workflow, I recommend checking out this Hostinger Academy video:

In the tutorial, Valentinas shows us how to create auto-generated posts on X according to a schedule trigger. You can tweak the workflow by replacing the trigger with a webhook node and connecting it to a WordPress node.
All in all, if your goal is simply to share new posts on social media automatically, a social media plugin like Jetpack Social is your best bet. It’s quick to set up, beginner-friendly, and keeps everything centralized right inside your WordPress dashboard.
However, if your workflow goes beyond just posting on social media – maybe you want to connect multiple apps, auto-generate content, or trigger custom actions (like sending a Slack message when a new post goes live or saving analytics data to Google Sheets) – then using an automation tool is the way to go.
With automatic translation, your content becomes instantly accessible in multiple languages. Creating a multilingual WordPress site helps improve user experience, since visitors can read your posts in the language they’re most comfortable with.
This is also beneficial for your site’s SEO as search engines like Google can index your translated pages, helping your site appear in searches across different regions and languages.
If you’re running your site solo like me, plugins once again come to the rescue. I automated my site translation using Weglot, and it was very easy to set up:
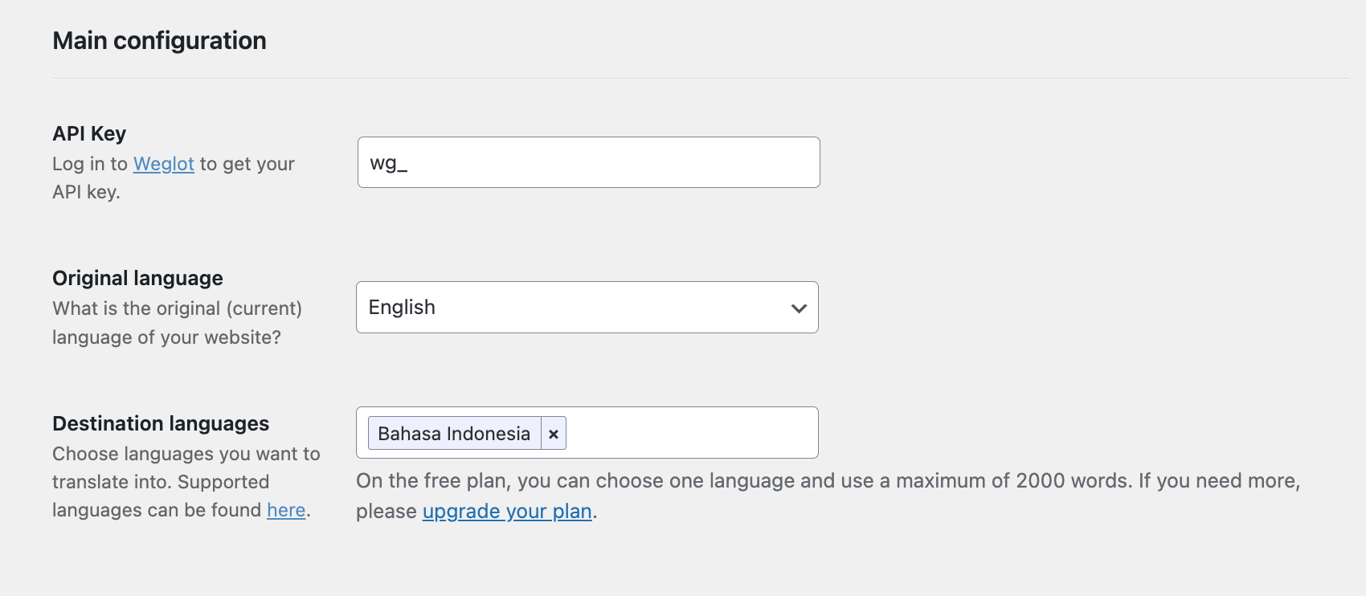
After hitting the Save button, the language switcher appeared, and all my content was automatically translated.
However, there’s a downside to using a plugin to auto-translate a WordPress site: the translations aren’t always perfect. Sometimes the tone or phrasing doesn’t fully match your desired writing style.
Fortunately, Weglot comes with a translation editor (most WordPress translation plugins include this feature as well), so you can easily tweak any words or sentences that don’t sound right. It even includes a glossary feature to help you maintain consistency across your translations.
One thing to note, though: Weglot doesn’t offer a free plan, only a 14-day free trial. After that, the paid plans start from €180/year, which is quite steep.
If you’re running a WordPress multisite or collaborating with a team of translators, a manual translation plugin like WPML or Polylang would be a better fit. These plugins provide greater control over translation accuracy and workflow management.
From there, you can set up automation workflows that align with your translation process, such as automating the movement of new posts from one language team to another for review.
Alternatively, if you’re already using a computer-assisted translation (CAT) tool to manage translations, it’s worth identifying which parts of the process can be automated.
For instance, you could set up an automation workflow like this:
New WordPress post → send content to your translation tool → save the translated text as a new post draft → notify the language reviewer on Slack to edit and publish.
This kind of setup helps maintain translation accuracy and consistency across languages while saving your team valuable time on manual coordination.
When building a mailing list, welcome emails make a strong first impression for your audience, and this process can be easily automated. The moment someone subscribes, they immediately receive an email that introduces your brand and builds a connection.
In addition to reducing manual work, automation ensures nothing slips through the cracks. Whether you’re gaining one subscriber a day or hundreds, the workflow runs in the background so that you can nurture relationships at scale.
The easiest way to set up this automation is to use an email marketing tool that integrates with WordPress.
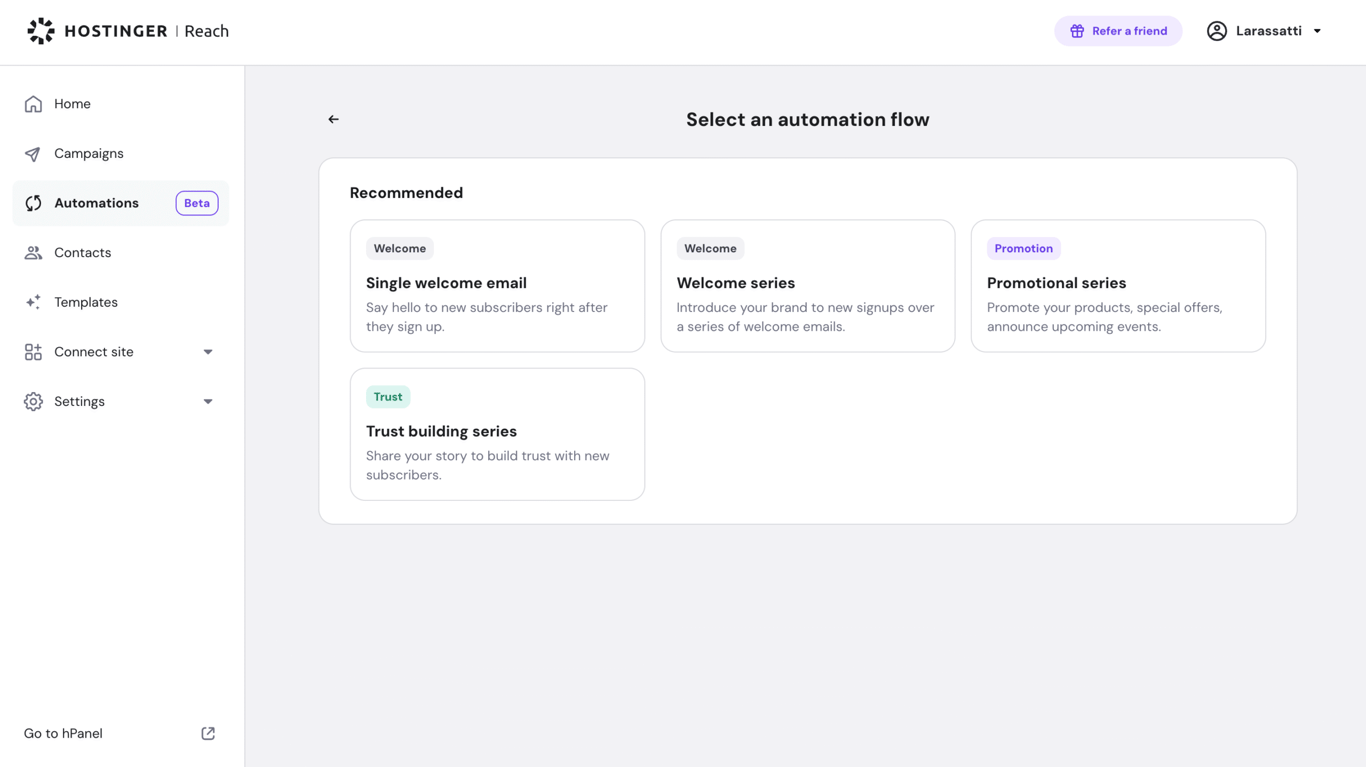
Here’s how to set up welcome email automation using Hostinger Reach as an example:
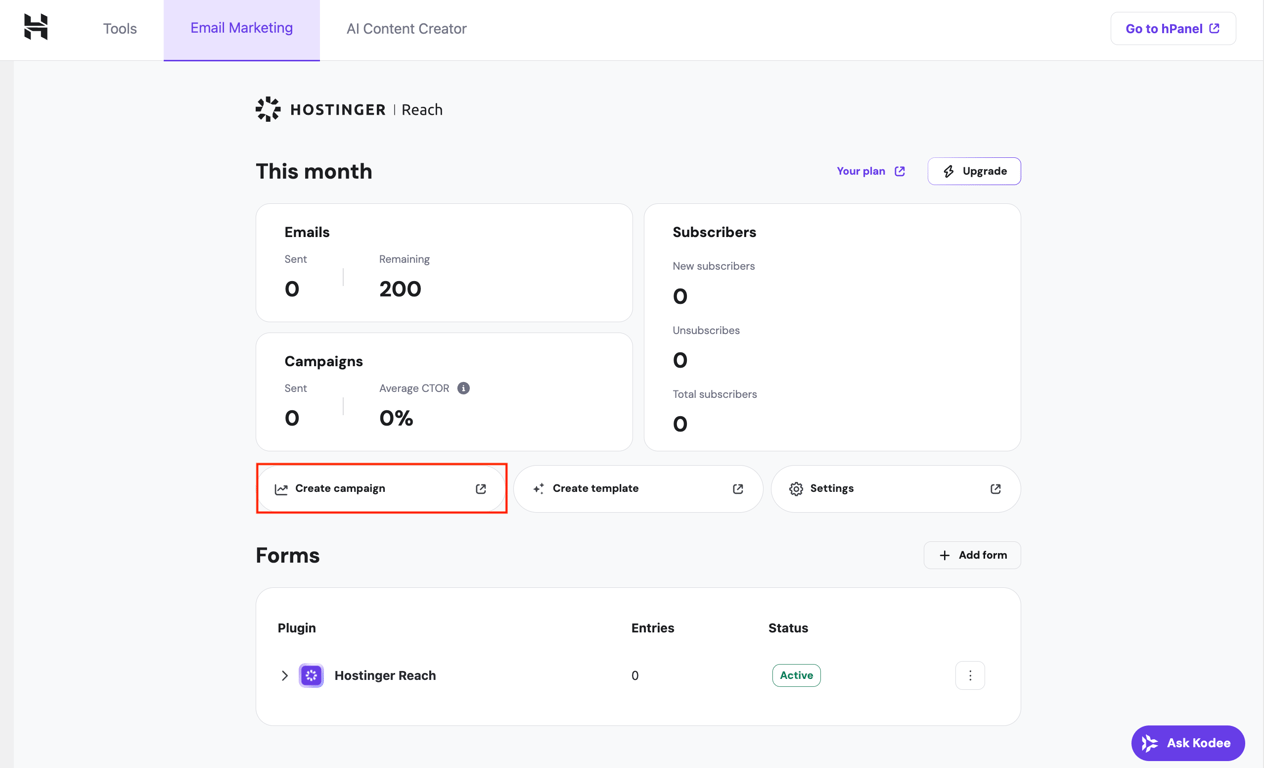
While you can use Hostinger Reach for free for one year, the option to activate this automation is only available on the paid version, starting at $1.99/month.
If you plan to create a newsletter in WordPress, this automation workflow is definitely worth setting up. Most email marketing platforms are designed to be beginner-friendly, so if, like me, you’ve never set up an automation workflow before, you’ll find it easy to create and schedule welcome or follow-up emails with just a few clicks.
Managing sales data directly from the WooCommerce dashboard can quickly become tedious, especially if you’re checking new orders, tracking daily revenue, or analyzing performance across multiple products.
While the built-in reports cover the basics, having your sales data in a spreadsheet provides more flexibility. For instance, you can calculate custom metrics, create charts, and collaborate with your team more efficiently.
Automating the flow of WooCommerce orders to Google Sheets takes this a step further, as you can process the data with other tools within the ecosystem.
Since this automation involves interaction between WordPress and Google Sheets, I used n8n to create the workflow. This way, it’s also easier to expand or tweak the automation later for more advanced tasks.
Before getting started, you’ll need to set up an n8n instance (I self-host it on a VPS), a Google account, and an active WooCommerce store. If you haven’t already, you can check our guide on how to set up an ecommerce store in WordPress.
So first, create a new Google Sheet document and add the column headers. I added Order ID, Date, Customer Name, Email, Total, and Status.
Next, I used a Webhook node as the trigger on n8n. I connected it to my WooCommerce site, then added a Google Sheets node next, set with the Append Row operation.
Here are the data fields I used for mapping:
Order ID: {{ $json.id }}

Date: {{ $json.date_created }}

Customer Name: {{ $json.billing.first_name }} {{ $json.billing.last_name }}

Email: {{ $json.billing.email }}

Total: {{ $json.total }}

Status: {{ $json.status }}
Once the workflow was ready, I activated it and connected the n8n webhook to WooCommerce by going to WooCommerce → Settings → Advanced → Webhooks. To make sure everything was working correctly, I placed a test order on the site and confirmed that the order data was automatically logged in my Google Sheet.
The main advantage of this automation approach is flexibility. Once your data is in Google Sheets, you can do anything with it – create pivot tables, build dashboards, share specific data with team members, or even connect it to other tools like Google Data Studio (Looker Studio) for advanced reporting.
However, there are some considerations. If you’re not experienced in setting up webhooks or working with automation tools, figuring out how to do this can take time. It took me hours to figure out how to make this workflow work, despite it only having two nodes.
Beyond that, make sure your webhook URLs are private, use strong and unique webhook secrets, and restrict Google Sheet permissions to authorized team members only. These precautions prevent unauthorized data access or accidental exposure of sensitive customer information.
For most online stores, this basic automation is more than enough. It captures key order details in a spreadsheet, allowing you to track your performance at a glance.
But once your store begins handling hundreds of orders a day, you can expand the workflow with additional nodes tailored to your business needs. For instance, you could add error-handling nodes to alert you if a sync fails, filter orders by value, or aggregate sales metrics by product category.
Learn how to integrate n8n with WordPress in our step-by-step tutorial, featuring more detailed automation examples.
That said, if your main goal is simply to view and edit WooCommerce data in a spreadsheet format without connecting external tools, the WP Sheet Editor plugin is a simpler alternative. It lets you manage hundreds of products directly within your WordPress dashboard, using a spreadsheet-like interface that’s easy to work with.
Finding the right tasks to automate begins with looking closely at your day-to-day workflow. The goal is to identify repetitive tasks that don’t require much creative thinking but still occupy space on your to-do list.
Here are some tips to identify which parts of your workflow you can automate:
Once you’ve identified the tasks you want to automate, try mapping out the flow. Decide which actions should happen first (the triggers) and what follows afterward (the actions).
When I first started, this part was challenging, as I wasn’t used to thinking about how different tools or apps “talk” to each other, so figuring out what goes where took some trial and error.
What really helped me was asking ChatGPT to sketch a possible workflow. You can do the same – just describe your goal in detail, mention the tools you’re using (like WordPress, Zapier, or n8n), and outline what should happen step by step.
To make sure you get accurate workflow suggestions, try writing your prompt in as much detail as possible – the more specific you are, the better the output will be.
With Hostinger’s managed hosting for WordPress, you’ll find many features to streamline your day-to-day maintenance tasks. Automatic backups and software updates are two examples of features carefully developed with our clients’ needs in mind.
You can also take advantage of Kodee, our AI Assistant, available with the Business plan and above. It simplifies website management by assisting with tasks such as generating ideas, organizing workflows, and troubleshooting issues.
After installing the Hostinger AI plugin, access Kodee via the button in your WordPress dashboard to request actions like creating posts, modifying settings, or troubleshooting errors.

If you grant permission, Kodee can integrate its Model Context Protocol (MCP) with your WordPress site. This allows the AI agent to complete actions on your site by being instructed on what you want, such as creating or deleting a post.
Hostinger bundles hosting, domains, email marketing, and automation features into a single platform. This centralized approach can simplify site management for anyone without the hassle of integrating services from multiple providers.
All of the tutorial content on this website is subject to Hostinger's rigorous editorial standards and values.

Larassatti Dharma is a content writer with 4+ years of experience in the web hosting industry. She has populated the internet with over 100 YouTube scripts and articles around web hosting, digital marketing, and email marketing. When she's not writing, Laras enjoys solo traveling around the globe or trying new recipes in her kitchen. Follow her on LinkedIn

/p> OpenClaw is an open-source, self-hosted AI agent that runs on your own server and can interact with the tools ...

Draft OpenClaw is an autonomous AI agent framework you can host on a virtual private server (VPS). It integrates with ...

To secure WordPress for AI automation, you need to protect the APIs, user accounts, plugins, and automated workflows that allow ...