How to automate WordPress with n8n
Jan 21, 2026
/
Aris S.
/
8 min Read
WordPress provides a graphical admin dashboard that lets you build, deploy, and manage websites easily without coding. While already efficient by itself, you can integrate WordPress with the low-code automation platform n8n to fully automate your website administration tasks.
If you already have both platforms set up, most WordPress-n8n integrations consist of only four easy steps:
- Generate WordPress REST API credentials using an admin account.
- Create the basic WordPress workflow in n8n.
- Add and configure the WordPress node.
- Test the workflow to verify functionality.
Integrating WordPress with n8n lets you automate various tasks. For example, you can automatically create posts with AI, share new content on social media, tag blog articles, and categorize posts without human intervention.
Explore how to automate WordPress with n8n in more detail below.
Prerequisites for connecting WordPress to n8n
Before setting up n8n integrations with the WordPress content management system (CMS), you must meet several prerequisites.
You must already have installed n8n and deployed your WordPress website. If you haven’t, we highly recommend self-hosting both of these on a provider like Hostinger to enjoy the following benefits:
- Cost-effectiveness. Self-hosting n8n is more affordable than the official cloud plan since you can set up as many workflows as you need without paying more.
- Greater control and flexibility. You get complete control over your hosting environment, allowing you to customize and modify it according to your preferences.
- Improved privacy. Since you have full access to the host server, you can ensure your data is protected and restricted to authorized parties.
- Additional features. Providers like Hostinger offer various features that help you set up and manage your self-hosted n8n and WordPress instances more easily, such as a control panel.

After deploying n8n and WordPress, create an account on each platform. Specifically, for WordPress, you need an admin user to obtain the credentials for the integration.
Next, check if your WordPress website’s REST API is reachable by opening the following address in your web browser. Replace yoursite.com with your website’s actual domain:
yoursite.com/wp-json
If you see an error like 403 forbidden, the API is inactive. You must update WordPress to the latest version and manually enable the WordPress REST API.
Now that you have all the prerequisites, let’s dive into the steps for integrating WordPress with n8n.
How to set up WordPress integration with n8n?
The steps to connect WordPress with n8n are as follows.
1. Generate WordPress REST API credentials
An application password authenticates external platforms, like n8n, to access and exchange data with your site via the WordPress REST API. It enables you to complete tasks on your website without directly interacting with the admin dashboard.
Here’s how to create an application password. Note that it’ll only be valid for the account that generated it:
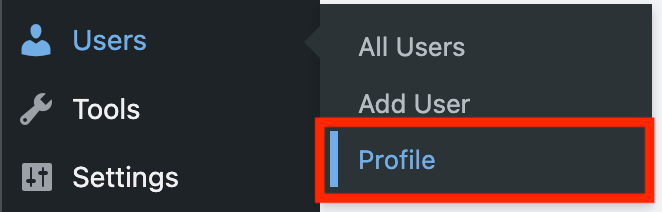
- Open your website’s WordPress admin dashboard and navigate to the Sidebar → Users → Profile.
- Scroll down to the Application Passwords section.
- Enter a name for your application password, preferably something descriptive like n8n-create-post.
- Hit Add Application Password.

- Copy the application password and store it in a safe location.
Important! For security reasons, you won’t be able to access your WordPress application password again after closing the profile page. Make sure you’ve made a note of it before proceeding.
We’ll use this application password later when configuring the WordPress node. First, let’s create our workflow.
2. Create your WordPress workflow in n8n
Before integrating WordPress into n8n, you need to create a workflow to define the data the CMS will process.
You can develop various WordPress workflows depending on your needs, and the integration steps will remain largely similar. For this tutorial, we’ll make a simple automation system that creates a new subscriber account when a user signs up using a form.
To start, follow these steps to configure the On form submission node to collect user data and start your workflow when users submit their contact details:
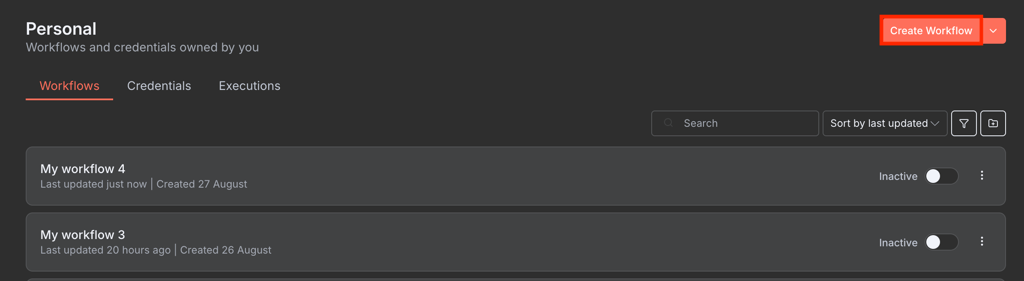
- Log in to n8n and click the Create Workflow button on the main screen.
- On your n8n canvas, click the + icon.
- Add the On form submission trigger node.
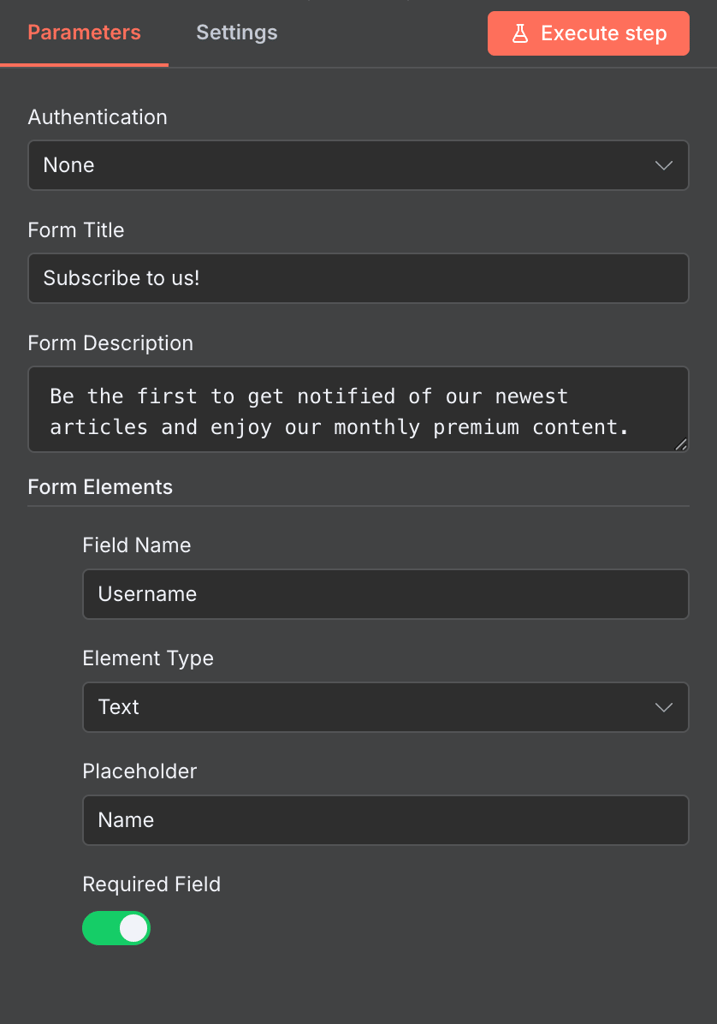
- The node configuration menu will open. Enter a name and description for your form.
- Click Add form element to add fields to your form. You’ll need four fields: username, first name, surname, and email address.
- Toggle the Required field setting for each field. These details are mandatory since creating a WordPress account requires them.
- Click the X button in the top right to close the configuration window.
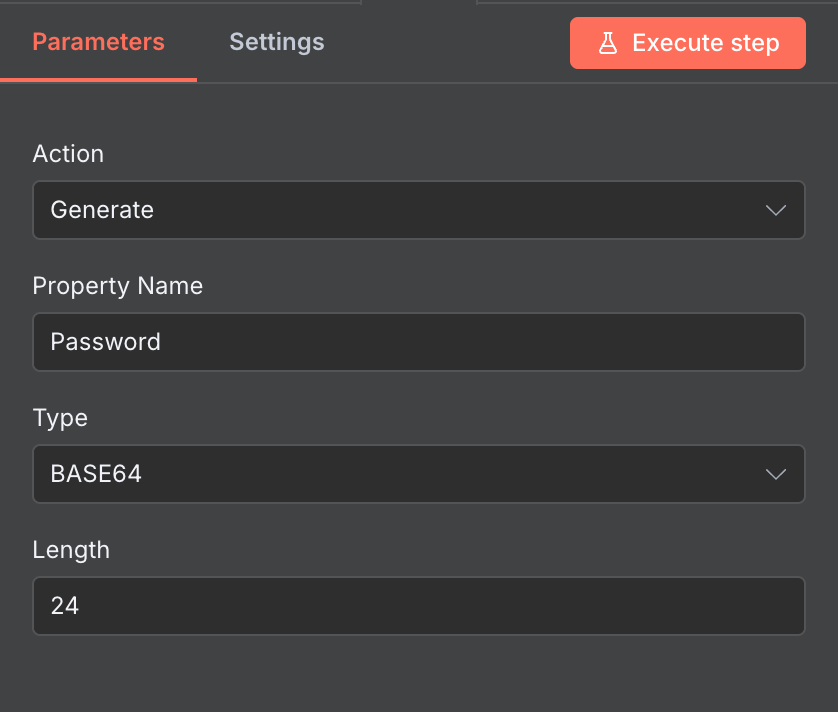
Next, you’ll need the Crypto node to generate a random password for the new WordPress user by following these steps:
- Add the Crypto node to your workflow, directly connected to the trigger.
- Set the Property Name to Password.
- Expand the Type menu and select the cryptographic algorithm to generate the password. In our case, we’ll choose Base64.
- Adjust the Length setting to determine the password length. We’ll use 24.
Then, set up the Gmail send a message node to send a welcome message to new subscribers after they submit the form. Before proceeding, ensure you have obtained the Google OAuth2 credentials, as you’ll need them to integrate the Gmail service.
Once you have the necessary details, follow these steps to configure the Gmail node:
- Click the + icon on your n8n canvas and add the Gmail send a message node after the Crypto node.
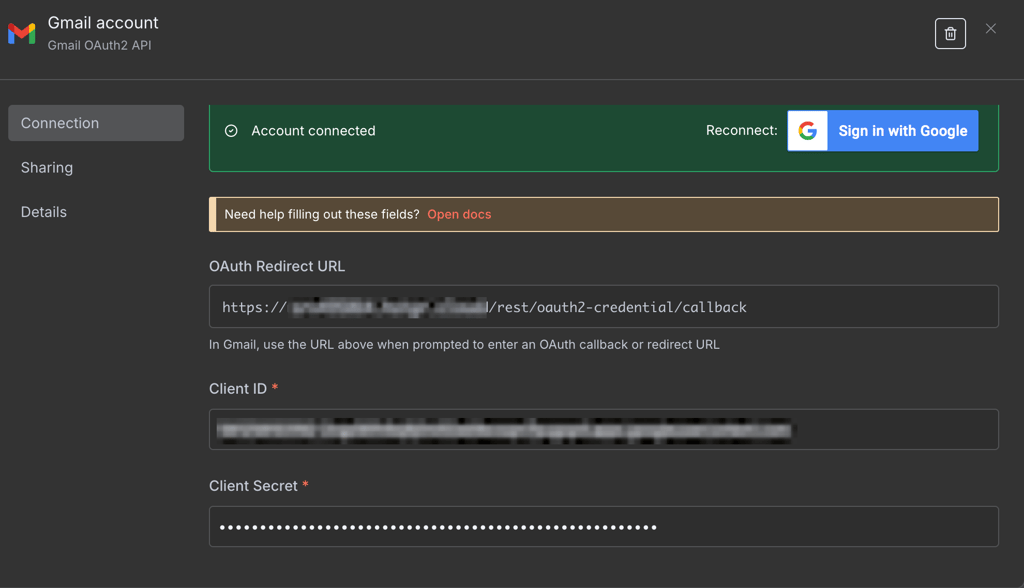
- Expand the Credential to connect with dropdown menu and select Create new credential.
- Fill out the fields using the OAuth2 credentials you obtained earlier.
- Click the Sign in with Google button and select the Gmail account from which you want to send the email. Once successful, you will see a confirmation message.
- Head back to the main node configuration menu.
- Enter the following expression into the To field. This enables your workflow to send the onboarding message to different email addresses according to the form submission.
{{ $json["Email address"] }}- Add a subject for your email. As you’ll want the subject to contain the subscriber name, you should include the {{ $json.Name }} expression like so:
Welcome to our blog, {{ $json.Name }}!- Write the message body for your email. Similarly, if you want to include the subscriber name or email address, use the previous expression.
3. Add and configure the WordPress node
After creating the workflow, you’ll need to integrate and configure the WordPress node.
In n8n, each node is reserved for a specific action or purpose. Some workflows might require multiple WordPress or non-WordPress nodes.
For this workflow, you’ll only need to set up the WordPress create a user node like so:
- Click the + icon on your n8n canvas and select the WordPress create a user node.
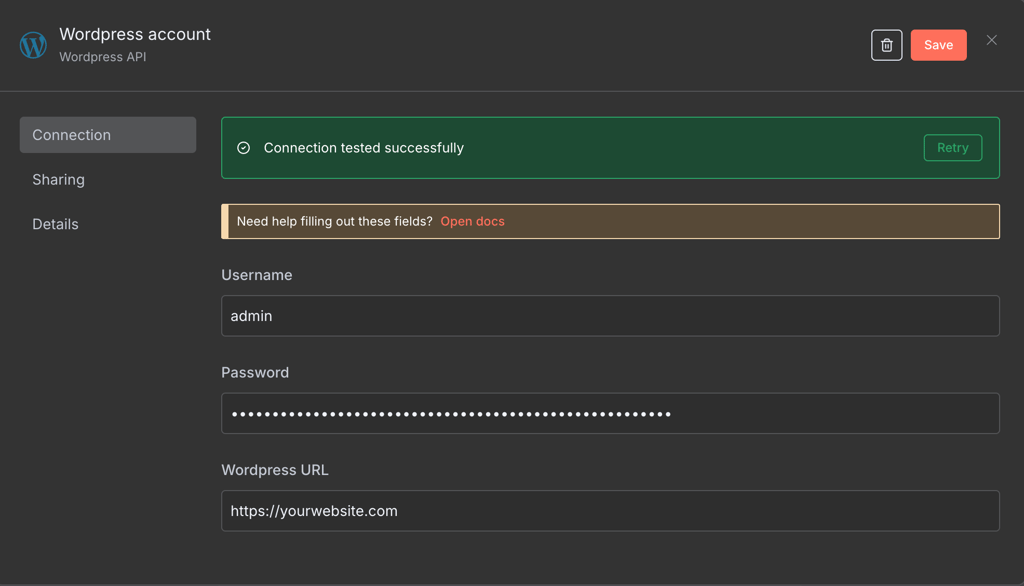
- From the Credential to connect with drop-down, click Create new credential.
- Enter your admin account’s username, the application password generated earlier, and the URL of your WordPress website.
- To enter the Username of the new account you want to create automatically, forward the data from the form using this expression:
{{ $('On form submission').item.json.Name }}- For the Name setting, we can use the same expression as above because our form doesn’t ask for this data.
- Hover over the First and Last Name fields, then select Expression to pass an empty value.
- In the Email field, enter the following expression to use the address submitted in the form:
{{ $('On form submission').item.json["Email address"] }}- Add the following expression to the Password field to forward the Crypto node’s randomly-generated password.
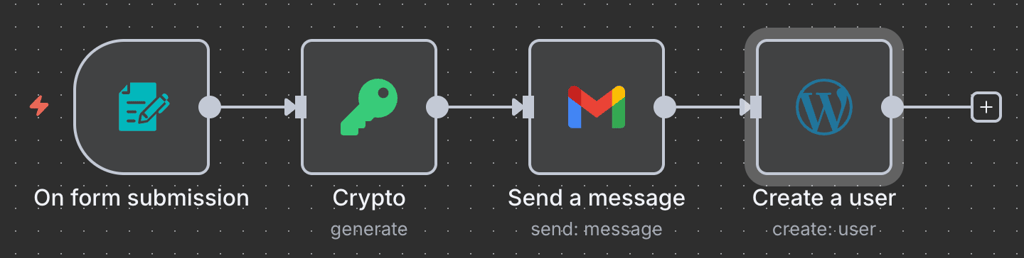
{{ $json.Password }}That’s it! Your workflow should look like the following image, and will be ready for testing.
4. Test the full workflow
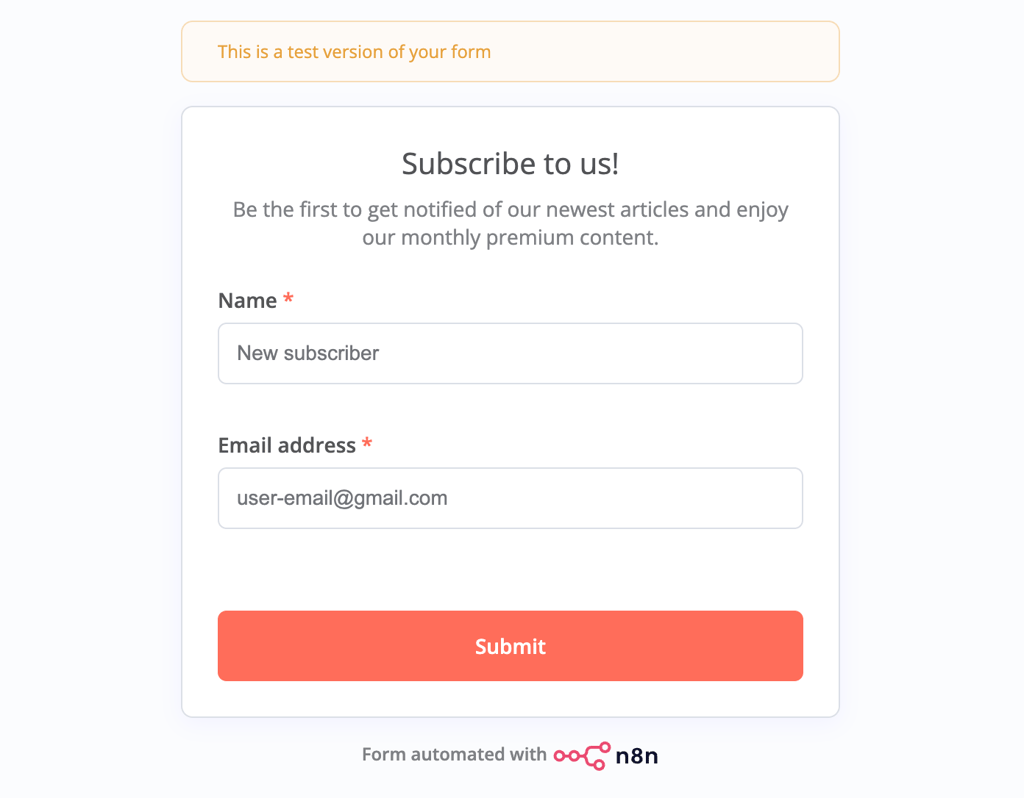
To test your workflow to verify that it works properly, hit the Execute Workflow button and enter your details into the pop-up form, as users would.
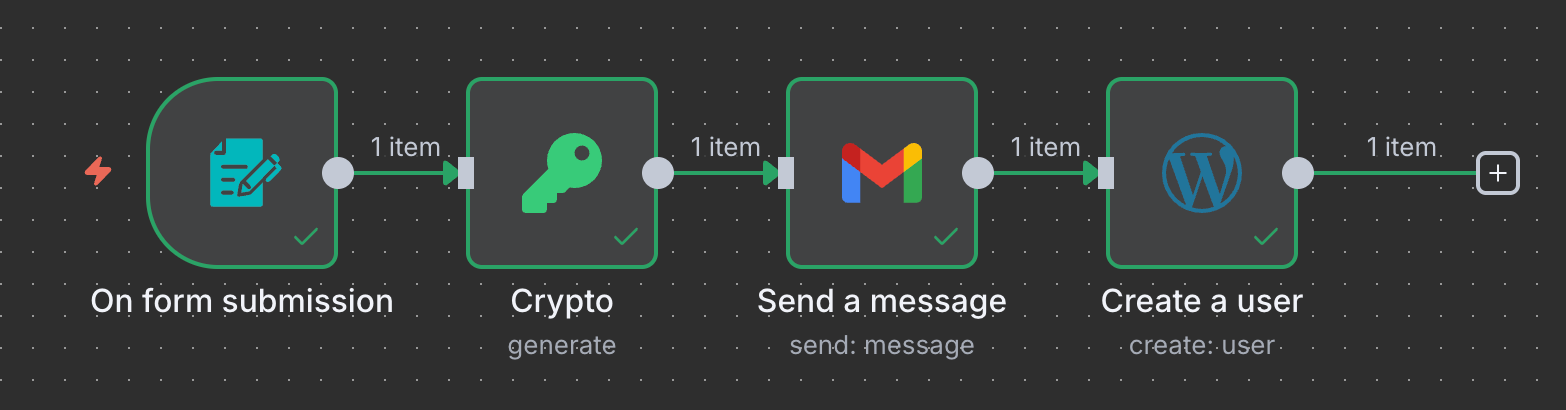
If everything works correctly, your workflow should turn green. The email address you entered in the form will receive the welcome message, and a new user account will appear in your WordPress instance.
If your workflow encounters an error, a red warning sign will appear. Here are some common issues and their solutions:
- Invalid credentials. Using invalid credentials prevents n8n from connecting to other applications and using their services. Check each node’s credentials to ensure you entered the correct details.
- Insufficient permission. Setting up the WordPress node using a non-admin account can cause an error because it doesn’t have the permission to create a new user. Check the credential configuration to ensure you’ve connected an administrator-level account.
- Wrong expression. Using incorrect expressions can cause the nodes to pass incorrect or empty values. Check each node’s input and output panes to verify that you’ve forwarded the correct data.
Using expressions in n8n
Instead of manually writing expressions, you can select specific data from previous nodes by dragging and dropping it from the input pane to a field.
After verifying your workflow’s functionality, hit Save and click the toggle at the top of your n8n canvas to activate it.

What can you automate with WordPress and n8n?
Integrating different nodes allows you to create WordPress workflows for various tasks. In addition to user creation, you can streamline post generation, publishing, tagging, and categorization.
Generating posts with AI
By combining WordPress and an AI agent, you can use n8n to generate content. This lets you automate time-consuming tasks like formatting articles and brainstorming topics, improving production efficiency.
To generate a WordPress post using n8n and AI, integrate the WordPress create a post node into your workflow by following these steps:
- Add the On schedule node that will start your workflow at a specified interval.
- Insert the OpenAI Message a model node to generate a topic for your post.
- Integrate the Google Sheets Get row node into n8n to fetch previously written topics.
- Set up the Aggregate and If nodes to determine whether the generated topic has already been written. Loop the true condition back to the OpenAI node to regenerate the topic if it already exists in the sheet.
- Add the Google Sheets append row node to update the topic list with the newly generated one.
- Connect another OpenAI Message a model node, but set it up to write content based on the given topic.
- Finish by adding the WordPress create a post node, which will take the AI-generated content and format it into a post draft.
Here’s how the completed workflow should look:

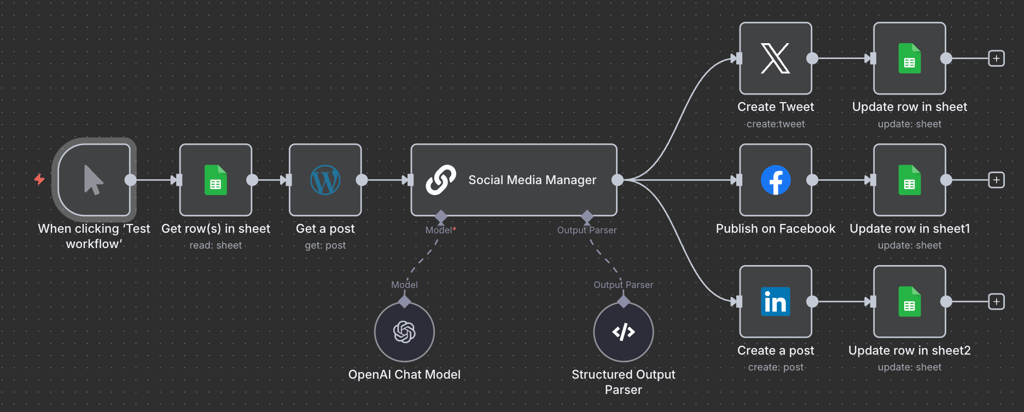
Publishing posts to social media
Integrating n8n with various social media applications can allow you to create a workflow that automatically shares WordPress posts after publication.
To create this workflow, combine the WordPress fetch a post and social media nodes. The steps look like this:
- Add the Manual trigger node, which initiates the workflow when the user clicks Test workflow on n8n.
- Insert the Google Sheets Get row node to retrieve the WordPress Post ID from a predetermined sheet.
- Connect the WordPress get posts node to fetch the corresponding post content using the ID retrieved from the sheet.
- Add the Social media manager node to implement an AI model for analyzing the WordPress content and generating captions for social media posts.
- Include the Publish on X node to share the WordPress post on this platform.
- Insert the LinkedIn node to upload the post to your timeline.
- Connect the Publish on Facebook node to share the post.
- Add the Google Sheets Update row node to mark the posts as published.
The finished workflow looks something similar to this:
Tagging blog posts with AI
n8n is especially helpful for time-intensive tasks like assigning WordPress tags and categories to posts. You can automate the process by fetching the metadata via the REST API and assigning it to existing content using n8n’s Update a post node.
We’ll explain how to categorize content automatically in the next section. Here, let’s explore how to configure a workflow for tagging WordPress posts automatically:
- Add the Manual trigger node to start the workflow with a press of a button.
- Connect the HTTP request node to fetch all the tags using the WordPress API endpoint.
- Insert the WordPress get post node to fetch all the posts.
- Set a filtering rule using the If node to check for posts without a tag.
- Use the Switch node to filter the untagged articles based on their topic or title.
- Add the WordPress update a post node for each post topic or title to assign the corresponding tag.
An example of a finished workflow looks like the following:

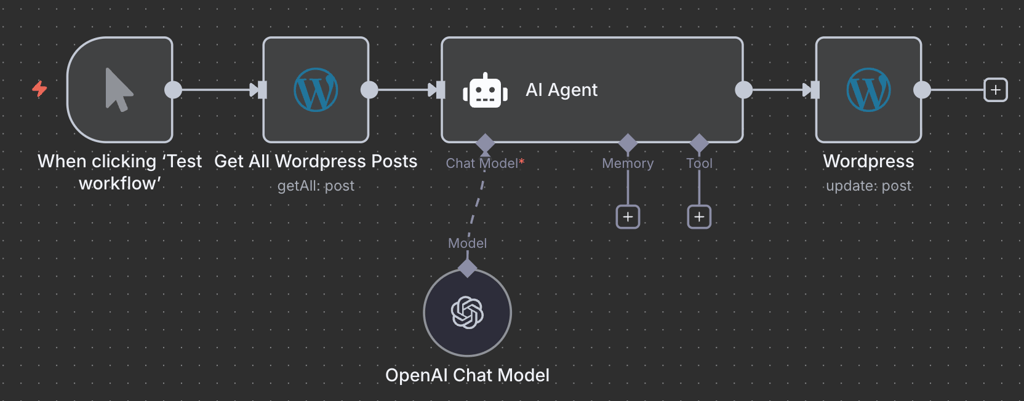
Categorizing blog posts with AI
The WordPress workflows for categorizing posts using n8n are subject to the same logic as adding a tag. The difference is that it involves an additional node for analyzing content using AI to determine the most fitting category.
Here’s how to set up the workflow:
- Add the Manual trigger node to start the workflow only when needed.
- Connect the WordPress get post node to fetch all existing content.
- Insert the AI agent node, which will read through the fetched posts to determine categories they may belong to.
- Add your preferred AI model to the AI agent node and select a large language model (LLM).
- Enter a prompt to ask the AI model to check the WordPress post content and categorize it.
- Connect the WordPress update post node at the end of your workflow to change the post category.
A completed workflow will look like this auto-categorize n8n template from Keith Rumjahn:
What else can I automate with n8n besides WordPress
After successfully integrating WordPress, we recommend connecting other nodes and applications to further explore the possibilities of what you can automate with n8n.
By understanding n8n more in depth, you can create other WordPress workflows for more complex tasks. For example, you can add a customer relationship management (CRM) application to your automation system to send a newsletter to new blog subscribers.
If you want to explore n8n and create more workflows, Hostinger is an excellent place to start. We have a comprehensive catalog of automation tutorials to help you kickstart your journey.
In addition to robust performance, our hosting plan offers various features to help streamline n8n setup and WordPress workflow management. For example, you can ask Kodee, our AI assistant, to help with server administration. You can also enable our free automatic backups to ensure data safety with minimal effort.
All of the tutorial content on this website is subject to Hostinger's rigorous editorial standards and values.

Aris is a Content Writer specializing in Linux and WordPress development. He has a passion for networking, front-end web development, and server administration. By combining his IT and writing experience, Aris creates content that helps people easily understand complex technical topics to start their online journey. Follow him on LinkedIn.