WordPress REST API guide: understand how to set it up and use it
Jan 13, 2026
/
Will M. & Aris S.
/
9 min Read
WordPress REST API is an interface that enables the content management system (CMS) to exchange data with third-party services. It lets you access content directly from the database, resulting in a seamless integration.
In this WordPress REST API tutorial, we will explain how this tool works and how to use it. You will also learn its common usage examples and best practices to ensure efficient development.
Download all-in-one WordPress cheat sheet
What Is WordPress REST API?
WordPress REST API is an interface that lets you integrate the CMS with other third-party applications. It allows you to develop software or websites that use WordPress’ data, functionality, and content without having to access them directly.
WordPress REST API works by providing endpoints for retrieving and manipulating content as JSON data to ensure compatibility regardless of the programming languages.
REST API’s use cases include developing a custom application that uses the CMS’ data or functionality. For instance, you can set up a headless WordPress to create a website based on a modern framework like React on top of the admin dashboard.
Another use case is to use REST API to manage a WooCommerce store. You can automate inventory management tasks, process orders programmatically, and update product information in bulk.
How WordPress REST API Works
An application programming interface (API) provides a set of rules allowing two web services to interact. Meanwhile, REST stands for Representational State Transfer, an architectural standard defining such communications.
A web app that adheres to the REST principles is considered RESTful. For example, it must use a uniform interface, providing a single access point to allow other applications to access its data.
To exchange data, the REST API sends the WordPress database a request, which is a set of instructions specifying information your application needs. In return, it sends a response containing the content and confirmation whether the process is successful.
Your application or client uses routes to determine which data to retrieve. These are URLs that locate specific content via the WP REST API, like WordPress posts or metadata. For instance, the following lets you access pages:
http://domain.tld/wp-json/wp/v2/pages
These routes will access the endpoint functions in WP REST API that manipulate requested data. You can retrieve, add, edit, or remove the information depending on the hypertext transfer protocol (HTTP) methods:
- GET – fetches data from the server.
- POST – inserts new data into the database.
- PUT – modifies existing data.
- DELETE – removes content from the database.
All the retrieved data will be shown in JSON format, meaning you must parse it before passing it to another code.
How to Set Up Your Environment for WordPress REST API
The REST API functionality is enabled by default in the WordPress installation. After purchasing a WordPress hosting plan and setting up the CMS, access the following link to verify if REST API is enabled:
http://domain.tld/wp-json/
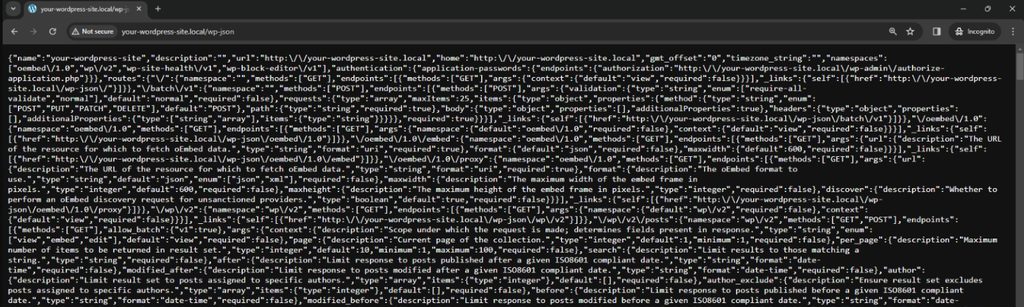
Remember to replace domain.tld with your own website address. If you see a list of endpoints, the WordPress REST API is active. Note that this feature is only available for WordPress 4.7 or later.
Pro Tip
We recommend setting up a local testing environment for your WordPress development activities to prevent potential misconfigurations or unwanted errors that could impact website availability or user experience.
Now, install the cURL utility in your local machine’s command-line interface (CLI), like Command Prompt or Terminal. It lets you send and receive requests from the WordPress server for testing.
Next, install the WordPress REST API Basic Auth handler to configure your verification method. It lets you access private data that requires administrative privileges.
After installing the plugin, we can start sending HTTP requests via WordPress REST API. To do so, open WP-CLI and connect to your site via SSH. Hostinger users can find the credentials by going to hPanel → Website Management → Advanced → SSH Access.

Let’s try accessing restricted data to verify if the WP REST API authentication works properly.
For example, we will run the following prompt in the local system’s command-line application to retrieve unpublished posts:
curl -X GET --user username:password -i http://domain.tld/wp-json/wp/v2/posts?status=draft

How to Use WordPress REST API
After setting up your hosting and testing environment, we can start using WordPress REST API. Here are some of its everyday use cases:
Important! Before proceeding, ensure you understand API call methods and JSON format to interpret the raw data much more quickly.
1. Fetching Data with GET Requests
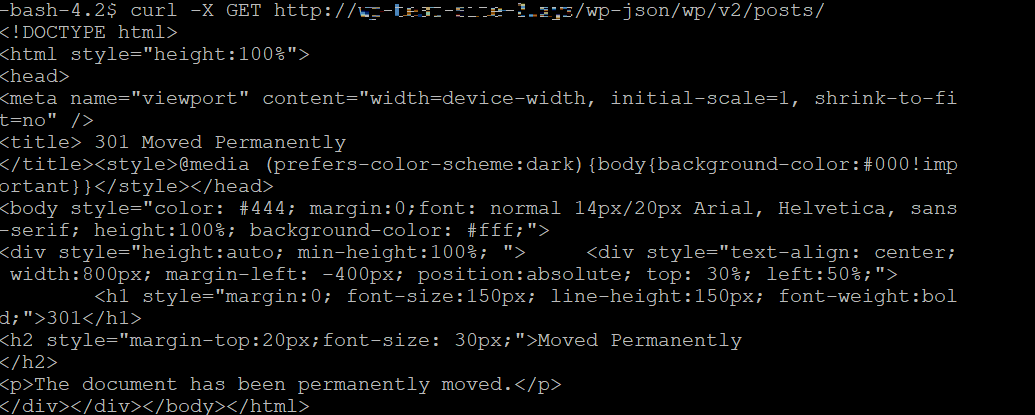
Use the GET method to retrieve data from your WordPress website via JSON REST API. For example, we’ll fetch content from the posts endpoint:
GET http://domain.tld/wp-json/wp/v2/posts/
This API request will print all posts from your WordPress site, including details like ID, content, and title. If you run it using cURL, the output should look as shown below.
You can also fetch pages using the corresponding endpoint:
GET http://domain.tld/wp-json/wp/v2/pages/
The output is similar, but the command will retrieve all pages instead of posts. You can also query custom post type by specifying their name in the endpoint:
GET http://domain.tld/wp-json/wp/v2/custom-post-type/
For example, use the following prompt to retrieve product-pages custom posts:
GET http://domain.tld/wp-json/wp/v2/product-page
Important! Remember to use cURL to test REST API requests via WP-CLI. For the actual application code, use functions or libraries like JavaScript’s Fetch instead.
You can use a query parameter to modify the output, like paginating or sorting the data. For example, use the following endpoint to reorder posts based on their creation date in ascending order:
/wp-json/wp/v2/posts?orderby=date&order=desc
Meanwhile, use page and per_page query parameters to retrieve a specific number of posts from a particular page. Here’s an example:
/wp-json/wp/v2/posts?page=2&per_page=10
Using the endpoint, the GET method will group posts into multiple pages, each containing 10 entries, and fetch the second one.
WordPress provides various other query parameters to filter data based on specific criteria. To learn more about them, read the documentation about posts REST API references.
2. Creating Content with POST Requests
The POST method lets you add new content to the WordPress database using a particular endpoint. For example, use the following prompt to create a blank post:
POST http://domain.tld/wp-json/wp/v2/posts/
You can also create new pages or custom post entries using their respective WordPress REST API endpoints like so:
POST http://domain.tld/wp-json/wp/v2/pages/
POST http://domain.tld/wp-json/wp/v2/custom-post-types/
To make a proper entry with a title, publishing status, and content, specify these details in your application’s code.
Furthermore, the WordPress REST API POST request commonly requires administrative privileges. If you are using authentication methods like open authentication (OAuth), ensure to add the verification token.
You should also add response validation, enabling your application to confirm whether the POST API request is successful.
3. Updating and Deleting Content
WordPress REST API PUT method lets you modify a specific post, page, or custom post entry using its ID. For example, you can insert new content or change the publishing status.
The syntax is similar to other API call methods but has the post ID at the end of the route:
PUT http://domain.tld/wp-json/wp/v2/posts/ID
Next, specify the data you want to modify. For instance, to insert new content, add the following line:
{
"content" = "publish"
}
Deleting posts, pages, or custom post entries also uses their ID, like in the example below:
DELETE http://domain.tld/wp-json/wp/v2/posts/ID
By default, the DELETE method moves data to the recycle bin, allowing you to recover it later if needed. For permanent deletion, add the force parameter like so:
DELETE http://domain.tld/wp-json/wp/v2/posts/567?force=true
Warning! We recommend avoiding the force argument if possible since it might cause accidental data loss.
4. Working with Custom Endpoints
WordPress REST API provides several default endpoints with pre-defined functionalities. However, these might be insufficient if your application needs specific data.
While you can customize outputs from default endpoints using filters or query parameters, the process is ineffective due to extra code. Moreover, it might be difficult to fetch extra content like form submissions.
To simplify data access for particular needs, create custom endpoints in WordPress. You can do so by modifying your theme’s functions.php via the theme file editor or by building a custom WordPress plugin.
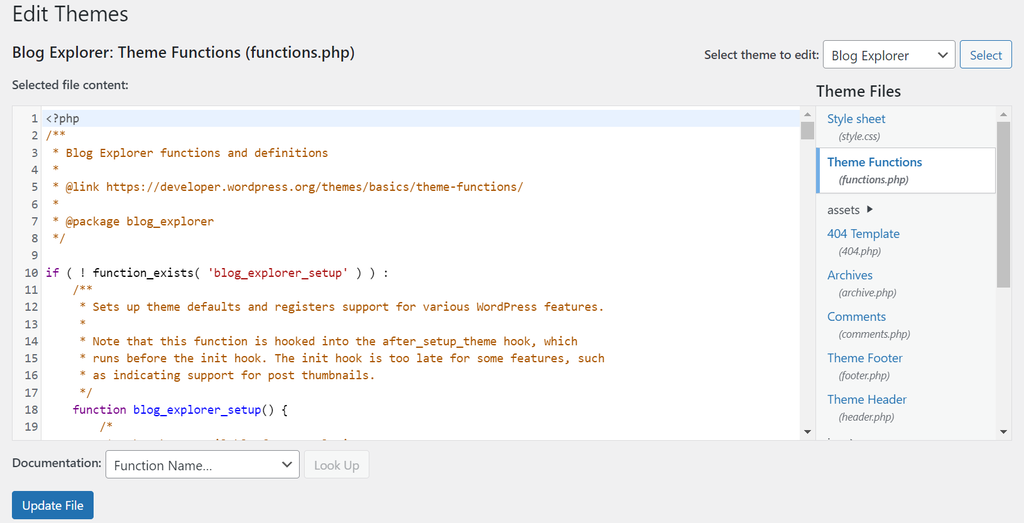
Add the following code snippet to register a custom endpoint, including its route, callback function, and query method:
add_action( 'rest_api_init', function () {
    register_rest_route( 'your_namespace/v1', '/your_endpoint/', array(
        'methods' => 'GET',
        'callback' => 'your_endpoint_callback',
    ) );
} );
Then, specify the callback function to be triggered when the endpoint is accessed. It will handle data manipulation and return the requested response.
function your_endpoint_callback( $data ) {
    // Your logic to handle the request like returning a JSON response
    return array( 'message' => 'Your custom endpoint works!' );
}
For example, your WordPress site has forms whose submissions are registered as custom posts. You can create a custom endpoint that lets you retrieve the entries by adding the following code snippet:
add_action( 'rest_api_init', function () {
    register_rest_route( 'custom/v1', '/form-submissions', array(
        'methods' => 'GET',
        'callback' => 'get_form_submissions',
    ) );
} );

function get_form_submissions() {
    $args = array(
        'post_type'      => 'form_submission',
        'posts_per_page' => -1,
    );

    $form_submissions = get_posts( $args );

    $response = array();
    foreach ( $form_submissions as $submission ) {
        $response[] = array(
            'id'         => $submission->ID,
            'title'      => $submission->post_title,
            'content'    => $submission->post_content,
            'author'     => $submission->post_author,
            'created_at' => $submission->post_date,
            // Add more fields as needed
        );
    }

    return $response;
}
The get_posts function iterates through the submissions, which you can then access using the GET method:
GET http://domain.tld/wp-json/custom/v1/form-submissions
5. Selecting Authentication
WordPress REST API authentication ensures secure data transmission with valid clients. Users can implement various mechanisms depending on their application requirements.
WordPress uses cookie authentication by default. It assigns logged-in users authentication cookies, which will be included in the request header for subsequent API calls. This method is simple but unsuitable for third-party web services that require authentication outside WordPress.
Another method is OAuth, which uses an authentication token to validate requests from your web service. Since it doesn’t use user credentials, it offers higher flexibility and reliability. However, the setup process can be complicated for some.
To configure OAuth, use the official plugin from the WordPress REST API GitHub repository. Also, we recommend OAuth 2.0 since it is simpler to implement, more scalable, and uses a newer architecture than version 1.0.
WordPress REST API Examples
WordPress REST API is helpful for various web development tasks and applications. For example, you can retrieve posts from the CMS and display them to other websites for content distribution.
Another use case is enabling data submission from an existing static site to the WordPress backend. It simplifies the development process since you can leverage the CMS’ capabilities to store the data instead of configuring a database manually.
WordPress API integration also lets you automatically update your site’s content. For example, you can push posts from Apple News to your website using the PUT method without logging in.
A more advanced use case for REST API is creating a headless CMS. For example, you can create news-centric mobile apps that use the WordPress dashboard for content management.
API’s real-world applications include fetching specific post data from the database for the block editor. Another example is displaying Google Maps on WordPress sites using plugins.
Best Practices for Using the WordPress REST API
To efficiently use the WordPress REST API feature for web development and integration, consider the following best practices.
Set Up Proper Authentication
Setting up proper authentication improves WordPress REST API security, ensuring only authorized users or applications can access sensitive data.
It helps minimize security vulnerabilities, preventing unauthorized access and data breaches. To choose the best method, consider the scalability, ease of implementation, and your requirements.
Sanitize Inputs
Sanitizing input in WordPress REST API matters, especially when working with public data that all users can access. It involves validating and cleaning input from external sources to prevent malicious code from infiltrating the CMS.
It also helps safeguard your WordPress from security vulnerabilities like SQL injection and cross-site scripting (XSS).
WordPress provides built-in functions for sanitizing input data, like sanitize_text_field(), sanitize_email(), and sanitize_url(). Add them to your application’s code for those that will receive and parse the retrieved content.
Leverage Caching
Caching helps optimize your WordPress website performance and scalability. It reduces server load and improves response times by storing frequently accessed data in memory, allowing clients and the API to retrieve the data faster.
Minimizing server load also helps maintain WordPress API uptime during traffic spikes. If too many clients send requests simultaneously, the database might be unable to handle them, causing downtime.
There are various WordPress caching solutions and plugins, including LiteSpeed Caching and W3 Total Cache.
Minimize Requests and Code
To improve your application and WordPress performance, use as few API calls as possible. You can also bundle related requests for a specific task and send them simultaneously, minimizing back-and-forth communication.
Also, avoid redundant operations to keep your code efficient and short. In addition to minimizing resource usage, it helps improve maintainability and scalability.
Keep All Software Updated
Make sure to regularly update your WordPress core files, plugins, themes, and any other software you use on your website to keep everything working smoothly. This will guarantee you get the latest features, allowing both web services to integrate seamlessly.
Also, using the latest versions applies the latest security patches and bug fixes to maintain usability. We also recommend subscribing to WordPress newsletters and blogs to catch up with the latest updates.
Conclusion
WordPress REST API is a feature that lets your CMS seamlessly interact with third-party web services. It is commonly used to develop applications with WordPress content or create a headless CMS.
The REST API is enabled by default in WordPress core, which you can test by sending a request using cURL via WP-CLI. To do so, specify the HTTP method and the route to access an endpoint that acts as a function that will modify data.
Use the GET method to fetch data like a WordPress post to your application. Meanwhile, use the POST command to push content, PUT to modify an existing entry, and DELETE to remove a resource.
When using this feature, ensure you apply proper authentication like OAuth or Basic Auth. Also, keep your code concise and leverage caching to maintain the WordPress REST API performance under high load.
WordPress REST API FAQ
This section will cover some frequently asked questions about WordPress REST API to help you get a better understanding of the topic.
What Are the Benefits of Using the WordPress REST API?
JSON REST API lets you integrate WordPress with other web services. It allows direct access to the CMS’ data and features without having the users interact with the dashboard directly.
How Do I Get Data From WordPress REST API?
To retrieve data from WordPress REST API, write a code that sends an HTTP request to an endpoint using the GET method. You can use tools that support HTTP, like JavaScript’s Fetch or cURL in WP-CLI. Then, parse the JSON data according to your application’s programming language.
Are There Any Limitations When Working With the WordPress REST API?
Yes. The maximum number of posts per page you can retrieve via REST API is 100. Moreover, fetching content via API requires more computing power than a direct database query, potentially leading to performance issues.
Who Should Learn How to Use the WordPress REST API?
Aspiring WordPress developers who want to build an application or web service leveraging the CMS functionality should learn REST API. It is also essential for users wishing to develop a WordPress headless CMS or migrate their content to another platform.
All of the tutorial content on this website is subject to Hostinger's rigorous editorial standards and values.

Will Morris is a staff writer at WordCandy. When he's not writing about WordPress, he likes to gig his stand-up comedy routine on the local circuit.

Aris is a Content Writer specializing in Linux and WordPress development. He has a passion for networking, front-end web development, and server administration. By combining his IT and writing experience, Aris creates content that helps people easily understand complex technical topics to start their online journey. Follow him on LinkedIn.


