What is WP-CLI and how to use it for managing a WordPress site
Dec 22, 2025
/
Leonardus N. & Ariffud M.
/
11 min Read
WordPress is one of the most user-friendly content management systems (CMS) due to its intuitive admin dashboard. However, managing a WordPress site can become more complex, especially as your website grows. Whether you are a regular user or a developer, you need to manage themes, plugins, and updates.
Mastering tools such as the WordPress Command-Line Interface (WP-CLI) can be a game-changer. This WP-CLI WordPress tutorial offers a comprehensive guide, covering everything from its installation to using it effectively for WordPress website management.
By the end, you’ll have a solid grasp of WP-CLI’s capabilities, equipping you to manage WordPress websites more efficiently.
Download all-in-one WordPress cheat sheet
What Is WP-CLI?
WP-CLI is the command-line interface for WordPress, enabling users to manage their WordPress sites without a web browser. It’s a set of command-line tools for handling WordPress tasks, including managing themes, plugins, and databases.
While the WordPress admin dashboard offers a user-friendly experience, WP-CLI elevates website management. Using the command-line interface, you can perform tasks more swiftly and even automate various site maintenance aspects.
WP-CLI is particularly useful for WordPress developers who handle multiple sites, facilitating streamlined management directly from the command line.
What Are the Benefits of WP-CLI?
WP-CLI offers various advantages for both regular users and freelancers. Here’s why you should consider using the WordPress command-line interface:
- Efficiency – WP-CLI lets you perform tasks in seconds that could take minutes or even hours via the traditional WordPress admin dashboard.
- Bulk actions – this tool helps you manage multiple plugins, themes, or websites with a single command. It is particularly beneficial for freelancers who manage clients’ sites and want to perform bulk actions quickly.
- Remote management – with WP-CLI, you can remotely maintain WordPress websites, meaning there’s no need to log in to each admin dashboard individually.
- Automated backups – WP-CLI enables you to create automated backup routines for your WordPress site. This is handy for those with WP-CLI support in their WordPress backup solutions.
- Advanced customizations – while WordPress’ graphical interface is user-friendly, it can be limiting for more complex tasks. WP-CLI allows for advanced customization that isn’t possible through the dashboard.
WP-CLI v2
WP-CLI has come a long way, and its latest stable version is WP-CLI v2, with the newest release being 2.8.1. This release brings updated features and improved stability to help you manage your WordPress site efficiently.
Here are the minimum requirements for running WP-CLI v2:
- PHP 5.6 or later
- WordPress 3.7 or later
- UNIX-like environment (OS X, Linux, FreeBSD, Cygwin) – limited support in Windows.
Updating to the latest version is recommended for several reasons:
- Newer versions often come with security patches.
- Access to new commands and functionalities that older versions may not support.
- Improved speed and efficiency in executing commands.
Important! Although WP-CLI can be installed in older PHP and WordPress versions, we recommend updating to the latest releases for enhanced security.
How to Install WP-CLI?
Installing WP-CLI is straightforward whether you’re on a hosting plan or a local Linux environment.
Fortunately, WP-CLI is already installed if you’re using Hostinger’s Premium plan or above for web hosting and managed WordPress hosting.

To use it, activate SSH access on your hPanel. Here’s how:
- Log in to your hPanel.
- Navigate to Advanced → SSH Access through the left sidebar.
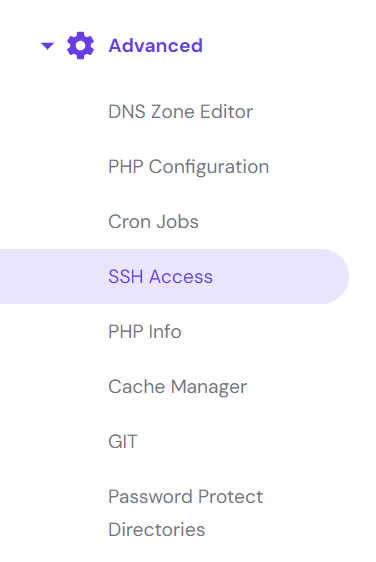
- Click Enable in the SSH status section, and you’re all set.

For those on VPS hosting or any Linux environment, you can manually install WP-CLI using the steps below:
- Access your server using an SSH client like PuTTy.
- Once logged in, download the WP-CLI PHAR file:
curl -O https://raw.githubusercontent.com/wp-cli/builds/gh-pages/phar/wp-cli.phar
- Verify that the PHAR file is working:
php wp-cli.phar --info
- Make the file executable:
chmod +x wp-cli.phar
- Move the PHAR file to a location in your path, for example:
sudo mv wp-cli.phar /usr/local/bin/wp
- Complete the WP-CLI installation by executing the following command:
wp core install
Common WP-CLI Commands
After installing WP-CLI, familiarize yourself with its primary features. This command-line tool lets you accomplish many tasks efficiently. Mastering these WP-CLI commands will help you manage your WordPress site directly from the command line.
How to Check WP-CLI Version
To ensure you’re running the current version of WP-CLI, you can check this tool’s installed version routinely. Open your command-line tool and enter:
wp cli version
You’ll see an output similar to:
WP-CLI 2.8.1
For more detailed information, including the PHP and MySQL version, you can use this command:
wp --info
The output will look like the following:
PHP binary:     /usr/bin/php8.2
PHP version:    8.2.0
php.ini used:   /etc/php/8.1/cli/php.ini
MySQL binary:   /usr/bin/mysql
MySQL version:  mysql  Ver 8.0.27-0ubuntu0.22.04.1 for Linux on x86_64 ((Ubuntu))
SQL modes:
WP-CLI root dir:        /home/wp-cli/
WP-CLI vendor dir:      /home/wp-cli/vendor
WP_CLI phar path:
WP-CLI packages dir:    /home/wp-cli/.wp-cli/packages/
WP-CLI global config:
WP-CLI project config:  /home/wp-cli/wp-cli.yml
WP-CLI version: 2.8.1
If you’re on an outdated version, you can easily update WP-CLI by running the wp cli update command below:
wp cli update
The output will confirm the updated version, such as:
Success: WP-CLI updated to 2.8.1
How to Access the List of WP-CLI Commands and Help Documentation
WP-CLI offers built-in documentation that contains essential command information. To view a complete list of available commands, type the following:
wp
You should see the output as follows:
NAME
  wp
DESCRIPTION
  Manage WordPress through the command-line.
SYNOPSIS
  wp <command>
SUBCOMMANDS
  cache                 Adds, removes, fetches, and flushes the WP Object Cache object.
  cap                   Adds, removes, and lists capabilities of a user role.
  cli                   Reviews current WP-CLI info, checks for updates, or views defined aliases.
.....
To exit the help page, press Q.
How to Learn More About a Specific Command
If you need details about a particular WP-CLI command, this tool offers comprehensive help documentation. This includes syntax, options, and examples.
For instance, to learn more about the wp user command, you can type:
wp help user
You’ll see the output detailing usage, available arguments, and other essential information:
NAME
  wp user
DESCRIPTION
  Manages users, along with their roles, capabilities, and meta.
SYNOPSIS
  wp user <command>
SUBCOMMANDS
  add-cap          Adds a capability to a user.
  add-role         Adds a role to a user.
  create           Creates a new user.
  ...
You can also use the help command for subcommands. For example, to access the help page for the wp user update command, type:
wp help user update
How to Install WordPress via WP-CLI
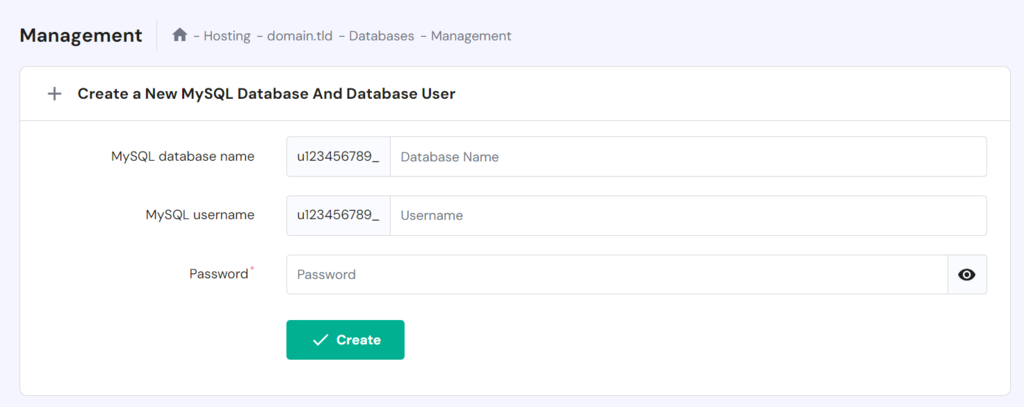
Installing WordPress through WP-CLI is quick and efficient. Before starting, ensure you’ve created a MySQL database, as it’s a prerequisite for WordPress installation.
With Hostinger, you can create a MySQL database in hPanel by navigating to Databases → Management via the sidebar.
Fill in the database’s name, username, and password to create a new database.
Alternatively, follow these steps to create a new MySQL database using the command line:
- Enter the MySQL shell by typing:
mysql -u root -p
- Add a user and database name by typing the commands below. Replace username and databasename with your chosen values:
CREATE USER 'username';
CREATE DATABASE 'databasename';
- Grant all permissions for the user to modify the database:
GRANT ALL PRIVILEGES ON databasename.* TO 'username' IDENTIFIED BY 'yourpassword';
- Quit the MySQL shell by executing:
quit
After setting up the MySQL database, you can install WordPress from the command line. First, navigate to the public_html directory, where your website files should reside. To check the current directory, run the following:
pwd
If you’re not in public_html, navigate accordingly:
cd /home/username/public_html
Once you’re in the public_html directory, proceed as follows:
- Download the latest WordPress core version using the following:
wp core download
- Create a new wp-config.php with your database credentials:
wp config create --dbname=databasename --dbuser=username --dbpass=password --dbhost=localhost --dbprefix=wp_
- Complete the WordPress installation using the wp core install command. Replace the placeholders with your details:
wp core install --url="your_domain.com" --title="Your Site Title" --admin_user="username" --admin_password="password" --admin_email="you@domain.com"
The output will confirm the WordPress installation:
Success: WordPress installed successfully.
How to Install and Manage WordPress Themes via WP-CLI
From listing all installed themes to installing a new one, WP-CLI streamlines these tasks effortlessly.
First, if you want to view all the currently installed themes, use:
wp theme list
This command will display an output like:
+----------------+----------+--------+---------+
| name           | status   | update | version |
+----------------+----------+--------+---------+
| astra          | inactive | none   | 4.3.1   |
| twentytwentytwo| active   | none   | 1.4     |
+----------------+----------+--------+---------+
If you want to switch your active theme from Twenty Twenty-Two to Astra, for instance, use the following command:
wp theme activate astra
You will see an output similar to:
Success: Switched to 'Astra' theme.
You can also utilize WP-CLI to find themes from the WordPress repository. Here’s an example to search for themes with Bootstrap support:
wp theme search bootstrap
You should see an output similar to the following:
Success: Showing 10 of 630 themes.
+-----------------------+-----------------------+--------+
| name                  | slug                  | rating |
+-----------------------+-----------------------+--------+
| Bootstrap Fitness     | bootstrap-fitness     | 0      |
| Bootstrap Coach       | bootstrap-coach       | 0      |
| The Bootstrap Blog    | the-bootstrap-blog    | 100    |
...
For example, to install and activate The Bootstrap Blog theme, utilize the command below:
wp theme install the-bootstrap-blog --activate
If you want to see more wp theme subcommands, run the command as is. Here’s the output you will see:
usage: wp theme activate <theme>
   or: wp theme auto-updates <command>
   or: wp theme delete [<theme>...] [--all] [--force]
...
How to Install and Manage WordPress Plugins via WP-CLI
WP-CLI simplifies WordPress plugin management from installation to deactivation. Let’s go over how you can do this effortlessly.
To list currently installed plugins, use the following command:
wp plugin list
The output will look like this:
+----------------+----------+--------+---------+
| name           | status   | update | version |
+----------------+----------+--------+---------+
| akismet        | inactive | none   | 5.3     |
| hello-dolly    | active   | none   | 1.7.2   |
+----------------+----------+--------+---------+
To install a new plugin like WooCommerce, use the following wp plugin install command:
wp plugin install woocommerce
The output will confirm the installation:
Success: Installed 1 of 1 plugins.
To activate this newly installed WordPress plugin, use:
wp plugin activate woocommerce
You will then see:
Success: Plugin 'woocommerce' activated.
To install multiple plugins in one go, list the plugin slugs separated by a space:
wp plugin install woocommerce gutenberg
You can search for plugins in the WordPress repository using the command below. For example, to find WordPress cache plugins, type:
wp plugin search cache
This will generate an output similar to:
Success: Showing 10 of 1010 plugins.
+--------------------------------+--------------------------+--------+
| name                           | slug                     | rating |
+--------------------------------+--------------------------+--------+
| LiteSpeed Cache                | litespeed-cache          | 96     |
| W3 Total Cache                 | w3-total-cache           | 88     |
| WP Fastest Cache               | wp-fastest-cache         | 98     |
…
For more wp plugin commands, run:
wp plugin
Here’s a glimpse of the output you can expect:
usage: wp plugin activate <plugin>
   or: wp plugin deactivate <plugin>
   or: wp plugin install <plugin> [--activate]
...
How to Update WordPress via WP-CLI
Updating your WordPress site, themes, and plugins is essential for performance and security. WP-CLI streamlines this process so your site can run the latest WordPress updates.
To update WordPress to the latest version, run:
wp core update
You should see this output:
Success: WordPress updated successfully.
Next, check if a database update is needed by running:
wp core update-db
After the update, the output will confirm like this:
Success: WordPress database updated.
To verify your current WordPress version, use:
wp core version
Keeping your installed plugins up-to-date is also crucial. To update plugins, use:
wp plugin update --all
The output will read:
Success: Updated x of x plugins.
Make sure to update your themes, as well. To update all of them, run:
wp theme update --all
You’ll see the following output:
Success: Updated x of x themes.
For targeted updates, replace the –all parameter with the specific theme or plugin slug.
How to Change WordPress URL via WP-CLI
If you need to change your WordPress URL, WP-CLI simplifies this process.
To modify the home address, run the wp option update command, replacing http://example.com with your domain name.
wp option update home "http://example.com"
The output will confirm as follows:
Success: Updated 'home' option.
To adjust the site URL, use the same command but swap home with siteurl:
wp option update siteurl "http://example.com"
You’ll see this output:
Success: Updated 'siteurl' option.
How to Reinstall WordPress Core via WP-CLI
In some cases, WordPress core files may get corrupted due to faulty updates or hacking attempts. WP-CLI provides a quick way to reinstall these core files without affecting your site’s content and settings.
To reinstall the WordPress core, run the following command:
wp core download --skip-content --force
This command will skip downloading the wp-content directory and forcibly overwrite all other existing WordPress core files. The output should be:
Success: WordPress downloaded.
After downloading the core files, verify their integrity with this command:
wp core verify-checksums
If everything is clear, you should see:
Success: WordPress installation verifies against checksums.
How to Manage Content via WP-CLI
Managing content on WordPress can be time-consuming if you’re doing it manually. WP-CLI streamlines this process, enabling you to create, edit, and delete posts and media directly from the command line.
Managing Posts
To view a list of all posts, run the following command:
wp post list
You’ll see an output similar to this:
+----+--------------+-------------+---------------------+-------------+
| ID | post_title   | post_name   | post_date           | post_status |
+----+--------------+-------------+---------------------+-------------+
| 1  | Hello world! | hello-world | 2023-06-06 03:39:33 | publish     |
+----+--------------+-------------+---------------------+-------------+
In this example, the post with the title Hello world! has an ID of 1. To move this post to the trash, use:
wp post delete 1
The output will read:
Success: Trashed post 1.
To create a new post, run:
wp post create --post_status=publish --post_title="This Post Was Created With WP-CLI" --edit
This command will open your system’s default text editor. Once you’ve added the content, save and exit the editor to see the output:
Success: Created post 10.
If you have a draft saved as a TXT file in the directory, you can import it directly with:
wp post create ./post.txt --post_title='Sample Post' --post_status=publish
To generate multiple posts for testing, use:
wp post generate --count=10
Managing Comments
To approve a pending comment with a specific comment ID, use:
wp comment approve 45
The output will confirm with:
Success: Approved comment 45.
To list all the comments on a post, you can run:
wp comment list --post_id=1234
The output will display a list of comments associated with the post:
+------------+---------------------+--------------+
| comment_ID | comment_date        | comment_content |
+------------+---------------------+--------------+
| 34         | 2023-10-18 12:34:56 | Great post!    |
+------------+---------------------+--------------+
Managing Media
You can automate image imports using WP-CLI. For instance, to import all images from a folder named images_for_site, run:
wp media import images-for-site/*
You should see an output like this:
Imported file 'images-for-site/image-1.jpg' as attachment ID 25.
Imported file 'images-for-site/image-2.jpg' as attachment ID 26.
Success: Imported 2 of 2 items.
How to Export/Import WordPress via WP-CLI
WP-CLI offers simple yet powerful commands for exporting and importing WordPress data. Whether moving to a new host or backing up content, these commands make the process more efficient.
To export all your WordPress posts into an XML file, use the following command:
wp export --dir=/path/to/folder
This will save the XML file to the specified directory, after which you’ll see this output:
Success: Wrote 'filename.xml' to '/path/to/folder'.
You can also export specific types of content, like pages or custom post types. For instance, to export all pages, use:
wp export --post_type=page
To import an XML file into WordPress, use:
wp import /path/to/file.xml --authors=create
The –authors=create flag ensures that new authors mentioned in the XML file are created if they don’t already exist. You’ll see an output like:
Success: Imported from 'file.xml'.
You can also skip specific content or attachments during import. For example, to skip attachments, run:
wp import /path/to/file.xml --skip=attachment
How to Manage Database Using WP-CLI
Managing your WordPress database is crucial for optimal website performance. WP-CLI simplifies database tasks, offering a set of commands you can run directly from the command line.
To display all registered WordPress users, use this command:
wp db query "SELECT user_login, ID FROM wp_users;"
You’ll get an output similar to this:
+------------+----+
| user_login | ID |
+------------+----+
| user       | 1  |
+------------+----+
To export your WordPress database, run:
wp db export
This saves an SQL file in your current directory. You’ll see this output:
Success: Exported to 'wordpress_db.sql'.
To import an SQL file into your WordPress database, run the following:
wp db import filename.sql
After a successful import, you’ll see:
Success: Imported from 'filename.sql'.
Periodically, it’s beneficial to check your database for errors. Use this command for a quick repair:
wp db repair
You’ll get this confirmation message:
Success: Database repaired.
Finally, keep your database optimized for smooth site performance. Execute the following:
wp db optimize
You’ll see this output:
Success: Database optimized.
How to Search and Replace Using WP-CLI
Bulk changes to your WordPress content, URLs, or database fields usually require manual effort or specialized database plugins. However, WP-CLI offers a helpful search and replace command that automates this process.
To replace a string throughout your database, run:
wp search-replace 'old-string' 'new-string'
The output will confirm the action:
Success: Replaced 'old-string' with 'new-string'.
Before making permanent changes, you can perform a dry run to preview the results:
wp search-replace 'old-string' 'new-string' --dry-run
To run a case-insensitive search, include the –regex and –regex-flags options:
wp search-replace 'old-string' 'new-string' --regex --regex-flags='i'
You can specify which databases to search and replace in with this:
wp search-replace 'old-string' 'new-string' --all-tables-with-prefix
To change your website’s domain, execute a dry run first to check what will be replaced:
wp search-replace --dry-run 'website.net' 'website.com'
If it all checks out, go ahead with the actual replacement command:
wp search-replace 'website.net' 'website.com'
The output should read:
Success: Replaced 'website.net' with 'website.com'.
Conclusion
Mastering WP-CLI is invaluable for efficient WordPress management. In this WP-CLI tutorial, we’ve shared several examples of how to use the WordPress command-line interface.
Knowing these commands enables you to update your WordPress version, install plugins and themes, manage content, and optimize your database directly from WP-CLI.
As such, using WP-CLI can simplify your workflow and reduce the risk of human error when using a graphical user interface, particularly during critical tasks. That way, you can manage your WordPress sites confidently.
All of the tutorial content on this website is subject to Hostinger's rigorous editorial standards and values.

Leo is a Content SEO Specialist and WordPress contributor. Armed with his experience as a WordPress Release Co-Lead and Documentation Team Representative, he loves sharing his knowledge to help people build successful websites. Follow him on LinkedIn.

Ariffud is a Technical Content Writer with an educational background in Informatics. He has extensive expertise in Linux and VPS, authoring over 200 articles on server management and web development. Follow him on LinkedIn.


