Drupal tutorial explained for beginners
Dec 22, 2025
/
Domantas G.
/
15 min Read
Drupal is a robust content management system (CMS) used to build all kinds of websites. Many well-established companies trust Drupal to run their high-traffic sites due to its versatile features and extensive modules.
That said, Drupal has a steeper learning curve than its competitors. Beginners may find building a website with this content management system challenging. In fact, without proper guidance, users may end up not utilizing all of Drupal’s capabilities.
However, there’s no need to worry ‒ our Drupal tutorial will cover everything you need to know in order to start. We’ll introduce you to the proper Drupal installation procedure and how to build a site using this CMS. We’ll also show you how to install modules, themes, and updates.

Why Should You Use Drupal?
Drupal is a CMS that currently powers 2.2% of all websites whose CMS we know. Over the years, the PHP-based software keeps evolving due to a growing community of developers that have turned it into an open-source project. Today, Drupal is free to download under the GNU Public License.
Despite being mainly known for powering government and organization websites, Drupal can accommodate a wide variety of sites. That’s because it employs a vast collection of modules and themes to expand a website’s functionality and look.
Here is what you can expect when using this platform:
- Great functionality – modules expand the functionality of your site. For example, you can add statistics features to your website by installing the Google Analytics module.
- Flexible customization – the CMS boasts over 2,965 themes for different purposes. You can also modify Drupal core modules to better suit your needs.
- Reliable security – Drupal regularly generates detailed security reports, keeping users updated on their site’s safety. Furthermore, Drupal’s security team is always ready to respond to any security issues.
This tutorial will go over all the available features and attributes to help you decide whether to use Drupal. First, we’ll discuss the installation of the platform.
Before Installing Drupal
Before installing Drupal, there are a few things you have to take care of. We’ll go over them in the following sections.
1. Acquire Web Hosting
Web hosting is a service that makes a website accessible on the Internet. By purchasing a hosting plan, you rent server resources to host the content of your website. Hosting prices vary depending on the service provider and the type of plans.
It’s essential to pick the right Drupal hosting provider, as it will significantly affect your site’s performance. A web host should provide you with enough resources and features to meet your site’s needs. Other important factors include security measures, guaranteed uptime, and customer support.
After finding the right hosting provider, choose the type of hosting. A hosting plan optimized for your site will save you money in the long run. Once your website has grown, upgrade to a plan with more resources and better scalability.
Most hosting providers offer hosting services that differ in the amount of allocated resources and customization flexibility. Here are some of Hostinger’s hosting plans:
- Regular web hosting ‒ best for blogs and sites with low to medium volumes of traffic.
- Cloud hosting ‒ ideal for sites that cannot afford any downtime.
- Drupal hosting ‒ these plans cater specifically to hosting Drupal sites.
- VPS hosting ‒ excellent for users who want dedicated server resources and flexible hosting management.
Our Drupal hosting plans include everything necessary to build and maintain a Drupal site. With prices in the range of $1.39-$3.99/month, Hostinger’s Drupal hosting comes with servers optimized for Drupal, a one-click installer, and a dedicated support team.
Alternatively, opt for shared hosting if you’re planning to use a different platform. Hostinger’s shared hosting plans cost the same as Drupal hosting and include a WordPress installer.
2. Purchase a Domain Name
Internet users use domain names to access websites on browsers without having to memorize the site’s IP address. If you want to know more, check our beginner-friendly guide about what domain name is.
The right domain name will help you build online credibility and boost the recognition of your brand. Therefore, make sure your domain is unique and memorable. Avoid symbols and hyphens as they can harm its readability.
Domain Name Checker
Instantly check domain name availability.
You can check the chosen domain’s availability on Hostinger’s Domain Checker. If it is no longer available, view top-level domain or name alternatives using a domain name generator.
Once you’ve found the right domain, register it with a domain registrar and point it to your hosting server. If you purchase the domain name and hosting from the same web host as a bundle, you won’t need to do that.
Keep in mind that Domain Name System (DNS) records may take up to 24 hours to propagate globally. During this time, your site will be unavailable.

How to Install Drupal?
There are two ways to install Drupal – manually or by using an auto-installer. In this section, we’ll discuss both methods. Note that the steps listed in this tutorial are for the 9.x.x version of Drupal. However, they should apply to older core versions too.
Using Auto Installer
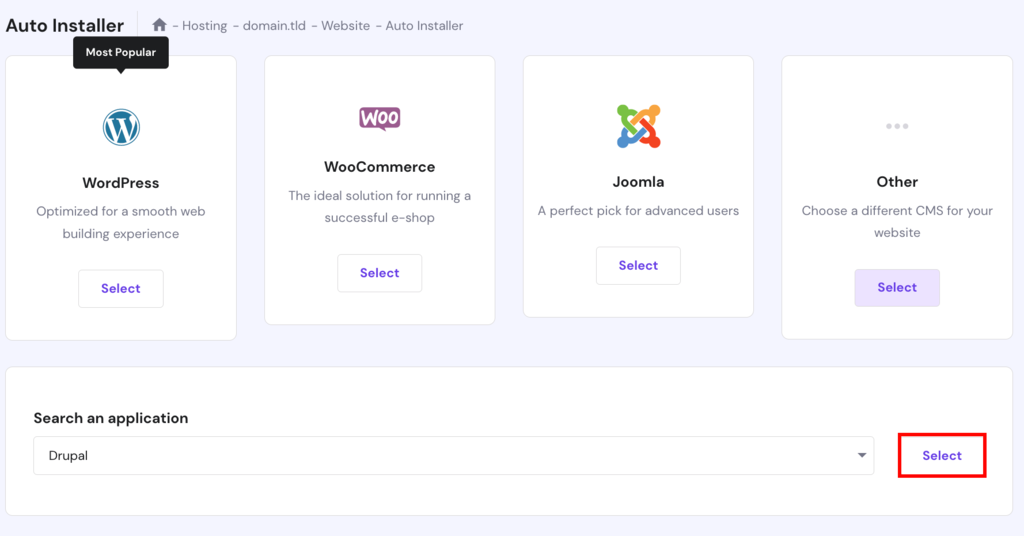
The easiest way to install Drupal on your hosting server is by using the auto-installer feature. You can find it on your hosting control panel. For this example, we’ll install Drupal via Hostinger’s hPanel.
- Go to Auto Installer in the Website section of hPanel.
- Select the Other option and pick Drupal from the drop-down menu. Click Select.
- Enter your admin login details and database information into the pop-up form. While you’re free to change the core version, we recommend opting for the latest version for the best performance.
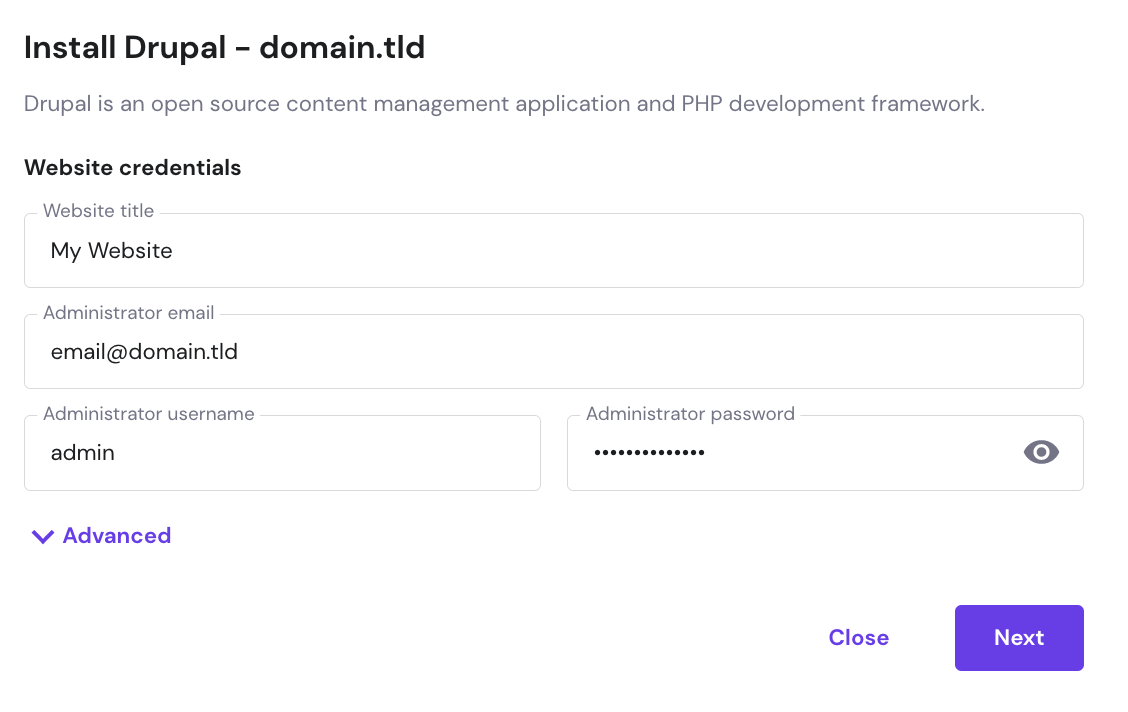
- Click Install to start the installation.
Installing Drupal Manually
If your web hosting doesn’t include an auto-installer, you can install Drupal manually.
Developers generally prefer this method as it gives them more control over the installation, which is beneficial when installing Drupal on localhost or a VPS.
The following tutorial will show you how to install Drupal manually via hPanel.
- Download the Drupal ZIP file from the official website.
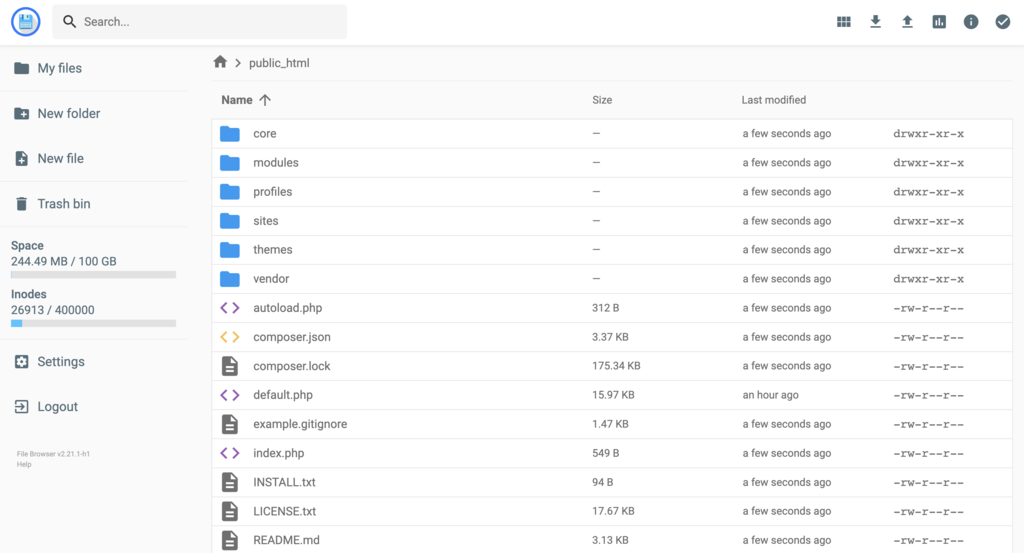
- Access the File Manager from the Files section of hPanel. Upload and extract all the files from the ZIP file directly to the public_html directory. You can also do this step via an FTP client such as FileZilla.
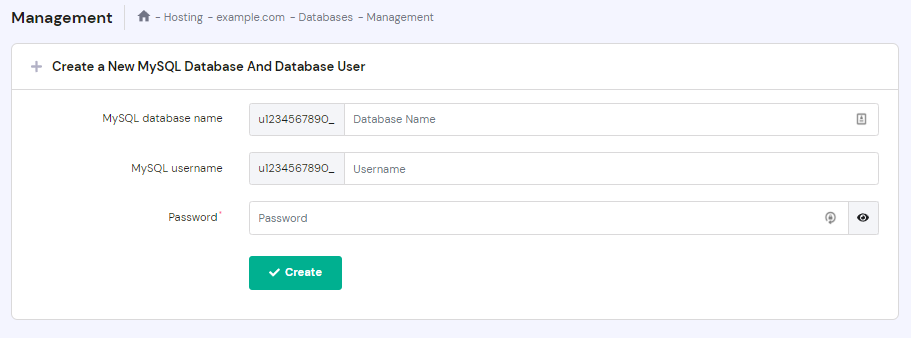
- Navigate back to the hPanel dashboard, then go to MySQL Databases under the Databases section. Create a new database for your Drupal site. Take note of the database name and username as you’ll need them later.
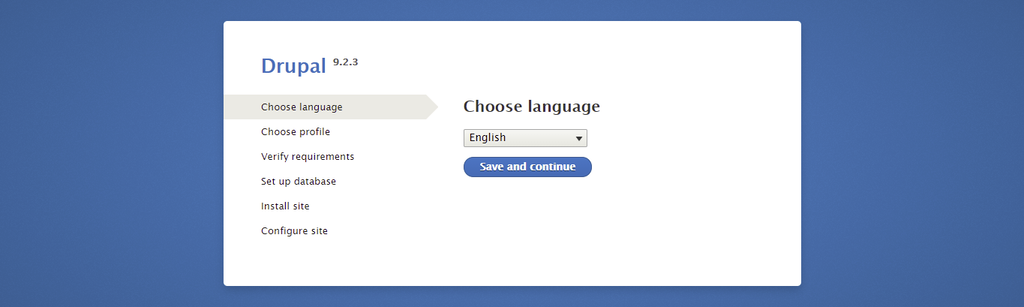
- Access the URL http://yourwebsite.com/core/install.php on your web browser to run the Drupal installer. Choose your language and click on the Save and continue button.
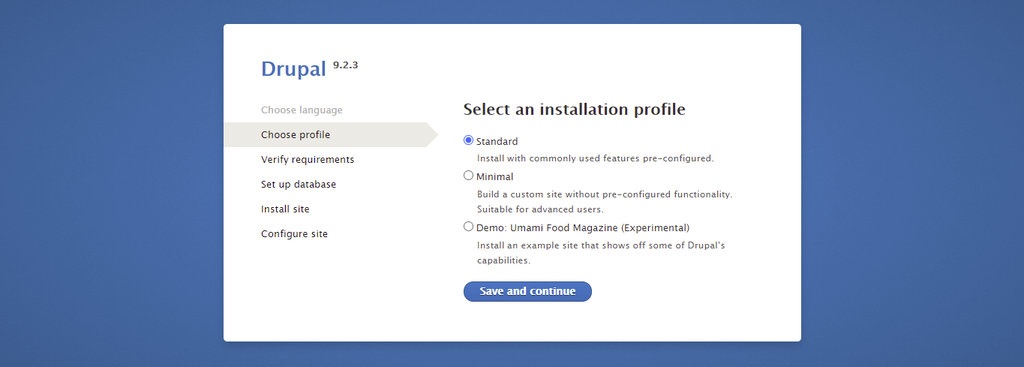
- Pick an installation profile and click Save and continue. If you’re new to Drupal, we recommend continuing with Standard. The Minimal installation profile is best for advanced users as it offers more freedom in terms of customization.
- Enter the database name and other information you set up earlier. Then, click Save and continue to configure the website.
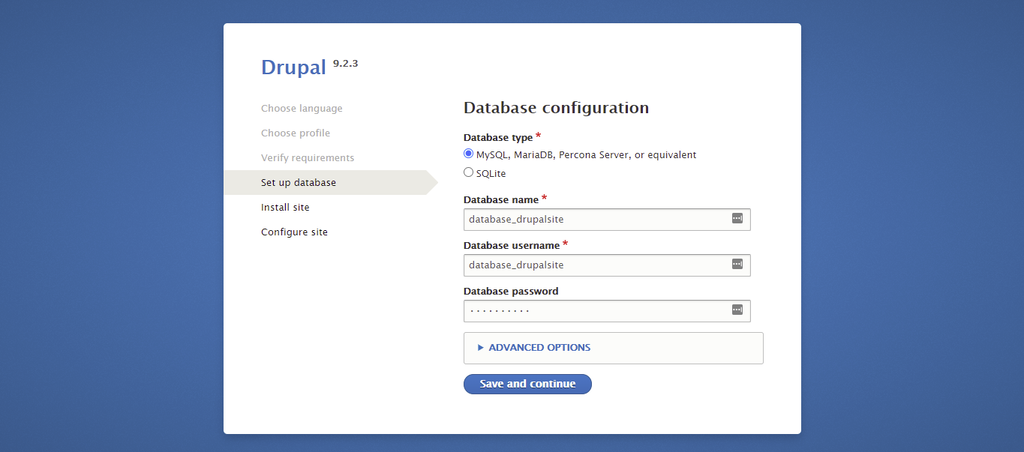
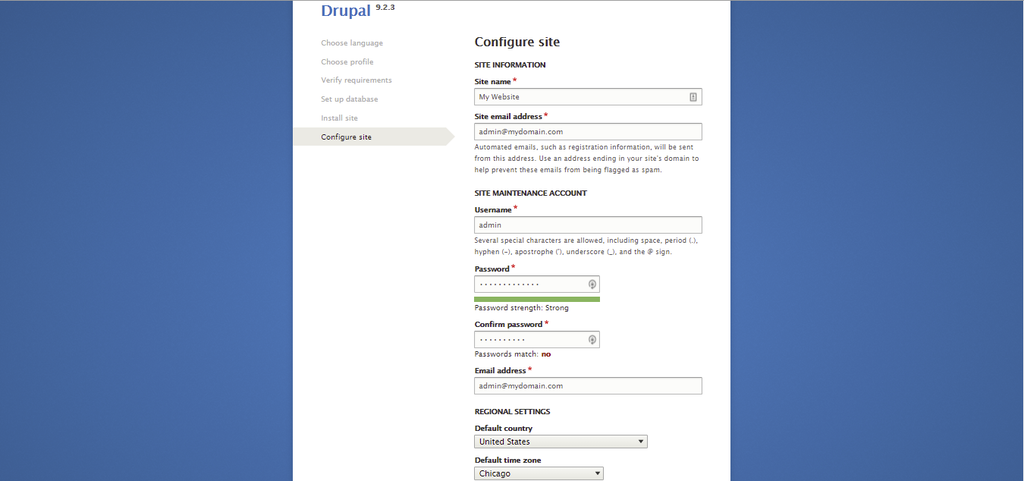
- Fill in the site information, site maintenance account, and regional settings sections. Take note of the username and password since they will be used as your site’s login credentials. Click Save and continue to finish the Drupal installation.
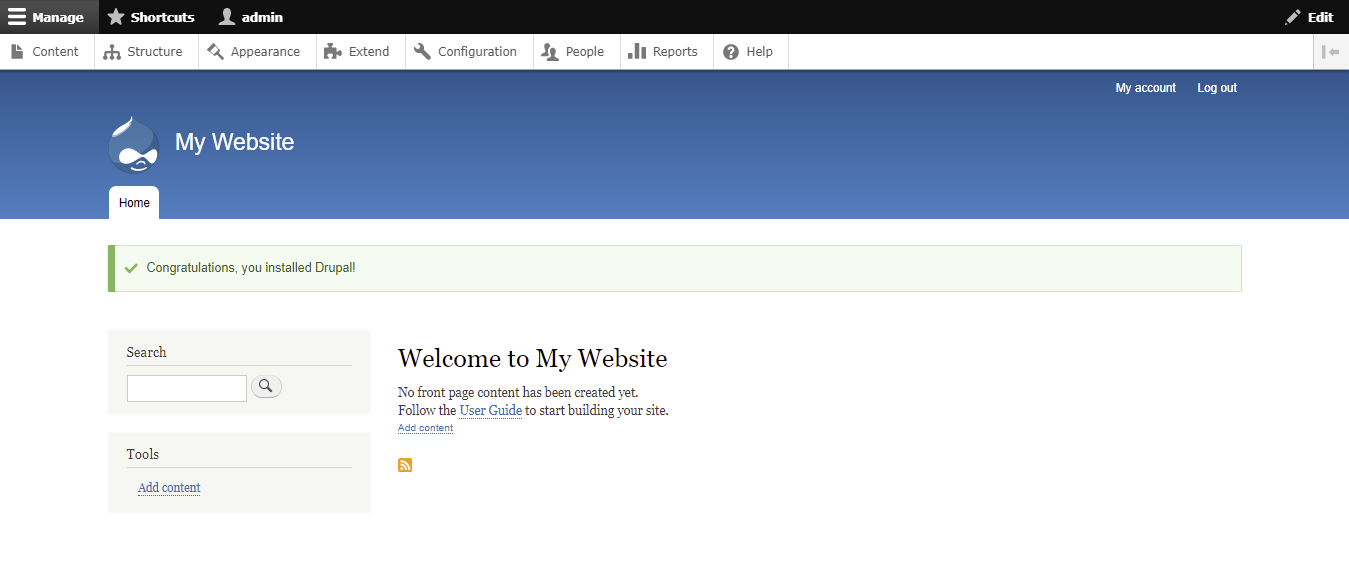
- If you’ve successfully installed Drupal, a confirmation message will appear on your admin dashboard.
Pro Tip
If you need to configure your Drupal database details, access the settings.php file. You can find it here: public_html/sites/default/.
Review your database credentials and information in the MySQL Databases section of the hPanel.
Installing Drupal Using Template
Hostinger VPS users can benefit from installing Drupal using our OS template. The OpenLiteSpeed Drupal One-Click automatically installs OpenLiteSpeed, Drupal and LSCache.
It also automates initial setup for components like PHP OPCache to reduce the time it takes to optimize a web server, making it a more convenient solution.
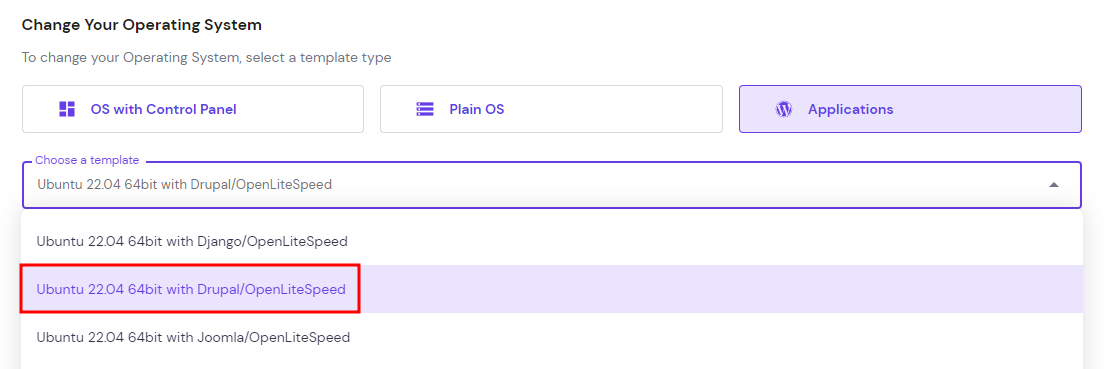
To do this, open your hPanel and click Manage on your server. After that, navigate to Operating System → Change Your Operating System → Applications. Choose the Drupal template from the drop-down menu.
After that, click Change OS and wait for the process to finish. Remember to back up your data before changing your VPS operating system.
How to Build a Website With Drupal?
After successfully installing Drupal, we can proceed with the steps of building a site on the platform. The following section will discuss the navigation of the Drupal admin dashboard and how to create website elements, such as pages and menus.
Understanding Drupal Administrator Dashboard
The Drupal admin dashboard is accessed by logging in. You can access the login page via https://your-site-address/user/login.
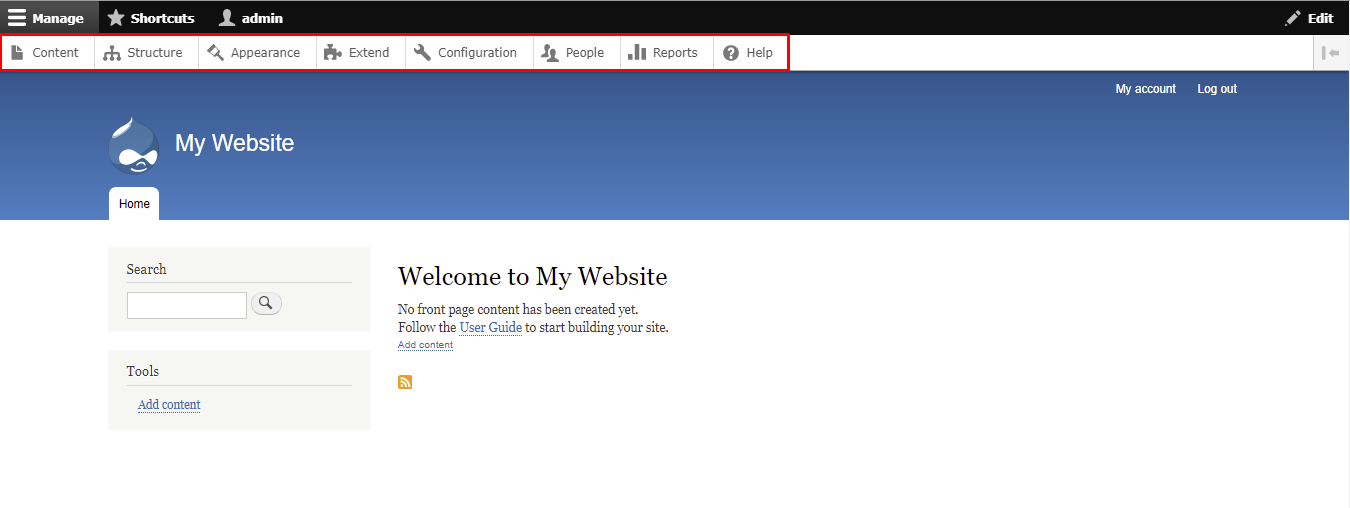
Once logged in, click Manage at the top left corner of the page to view the following menu items:
- Content – access this section to create content like articles and basic pages.
- Structure – controls your site’s structure components, such as block layouts and content types.
- Appearance – manages the installation and settings of themes.
- Extend – manages module installation to expand your website’s functionality.
- Configuration – provides access to various options, including basic site settings.
- People – regulates user accounts, permissions, and roles.
- Reports – takes you to the system logs and site’s status reports.
- Help – contains a simple knowledge base of modules and basic steps to start your Drupal site.
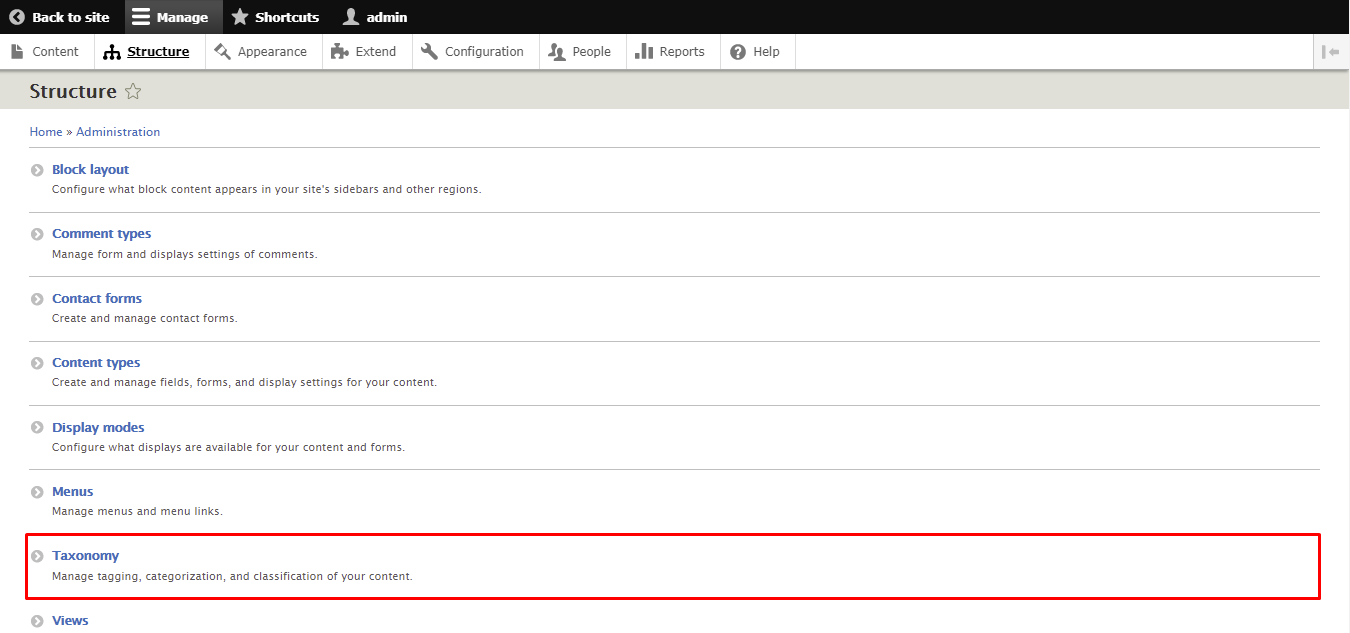
Creating Taxonomies
A taxonomy is used to classify website content. In Drupal, taxonomies comprise entities called terms, which are words that describe specific content within vocabularies. A vocabulary may have a flat or hierarchical structure depending on the type of content.
The first step of creating a taxonomy is to add the required vocabularies and each of their terms. You can then attach taxonomy terms to content entities, setting up listing pages to classify them.
Here are the steps to create a new taxonomy in Drupal:
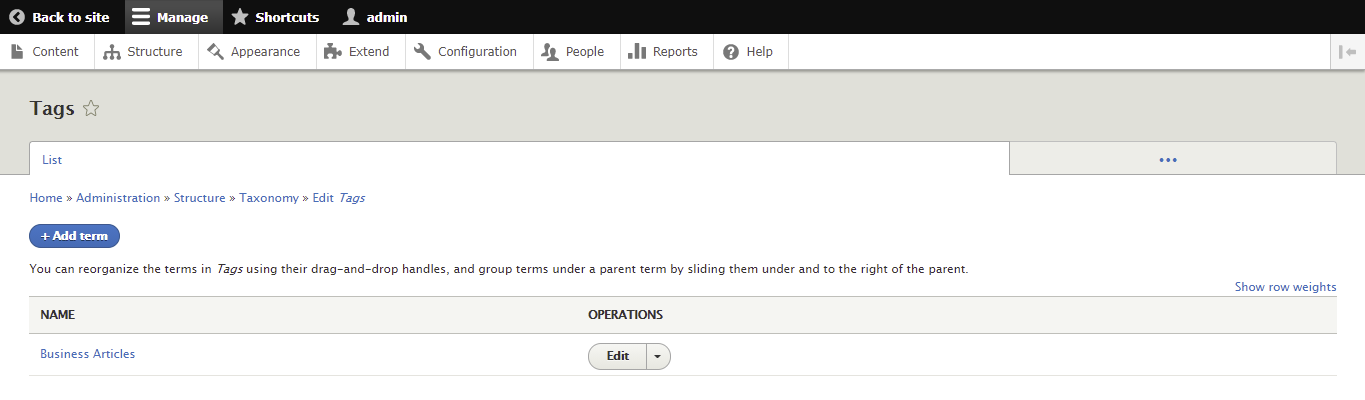
- Navigate to Structure -> Taxonomy from the admin dashboard.
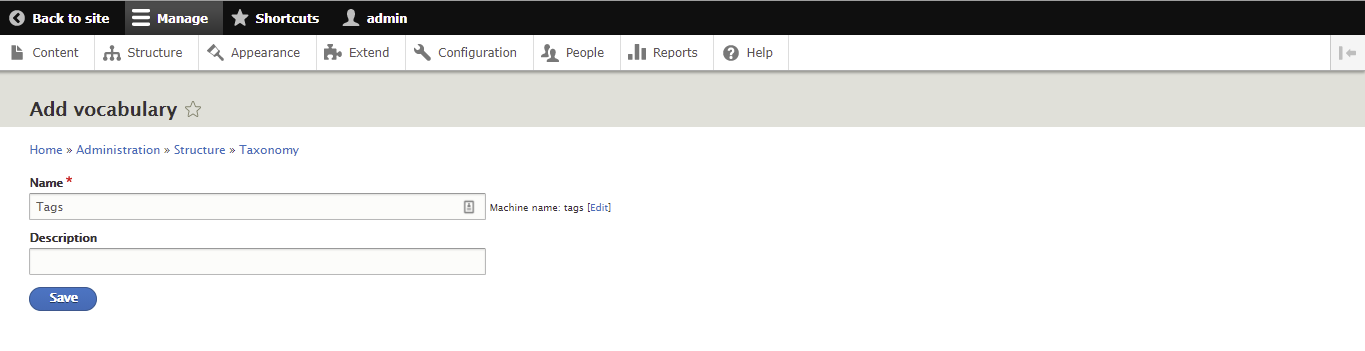
- Click Add Vocabulary and fill in its name (compulsory) and description (optional). In this example, we’ll create a Tags vocabulary for article classification. Select Save when you’re done.
- You’ll be directed to the Tags page. Click Add term to start building the list of terms.

- Enter the term’s name (compulsory), description, text format, URL alias, and relations. Then, click Save. For this example, we’ll call the new term Business Articles.
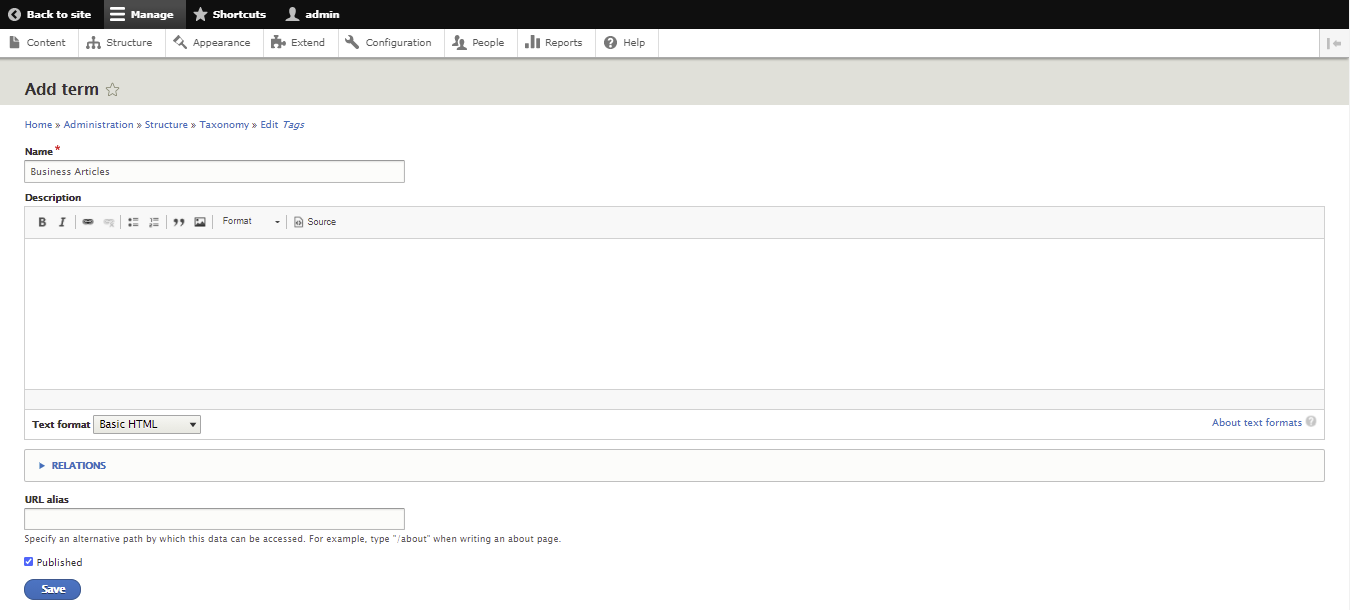
- You’ll now have Tags as the parent category and Business Articles as the subcategory. Feel free to add more terms if you want more subcategories.
Creating Articles and Basic Pages
Drupal has two core content types – article and basic page.
The article content type, formerly known as story, is used to create content like press releases and blog posts. Entries of this content type feature on the site’s homepage and allow comments.
Meanwhile, the basic page type is employed for static content that requires minimal to no updates, like an About Us page. A basic page isn’t featured on the site’s homepage and doesn’t allow comments by default.
Additionally, Drupal has four optional content types, which you can activate by enabling the Book, Blog, Forum, and Poll modules:
- Book page – content that is part of a collection of related entries, known as a book. The Book module links individual pages of a book, thus creating an outline for site navigation and content management.
- Forum topic – lets you create a discussion thread on a forum. Visitors can join it by writing comments. Use it with the Advanced Forum module for better performance and to access more features.
- Poll – collects votes and answers to multiple-choice questions. The type is multilingual and works well with the Entity Embed module for easier customization.
- Blog entry – starting with Drupal’s core version 8, this content type was discontinued. It is now a contributed module that allows users to create an online diary or journal.
In this tutorial, you’ll learn how to create both articles and basic pages.
Let’s start by creating an article:
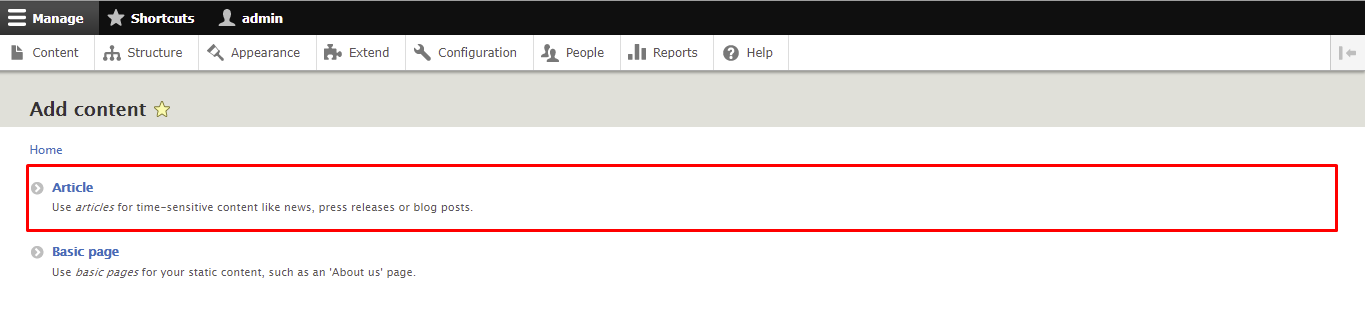
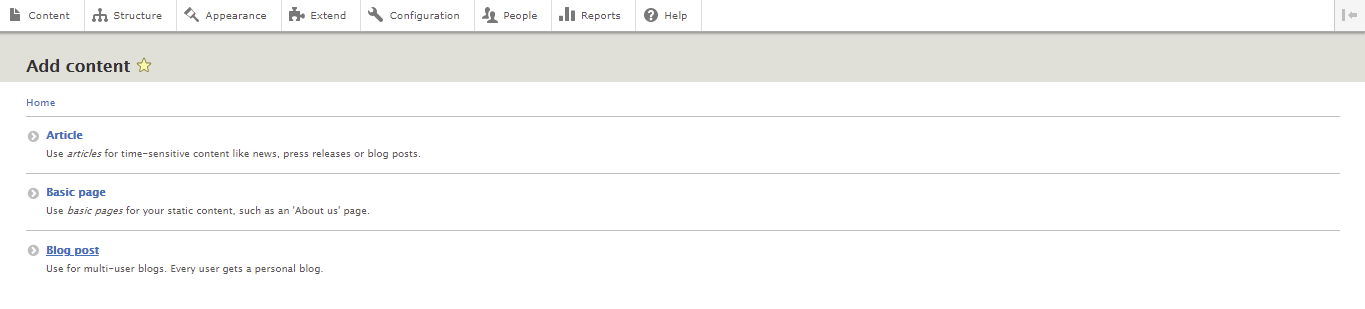
- Select Content on the admin dashboard.
- Click on the Add Content button and choose Article.
- Add the title, body, and tags for the article. Set the text format to Restricted HTML or Full HTML if the content contains HTML code. Remember that individual articles only allow one image in the PNG, GIF, or JPEG format.
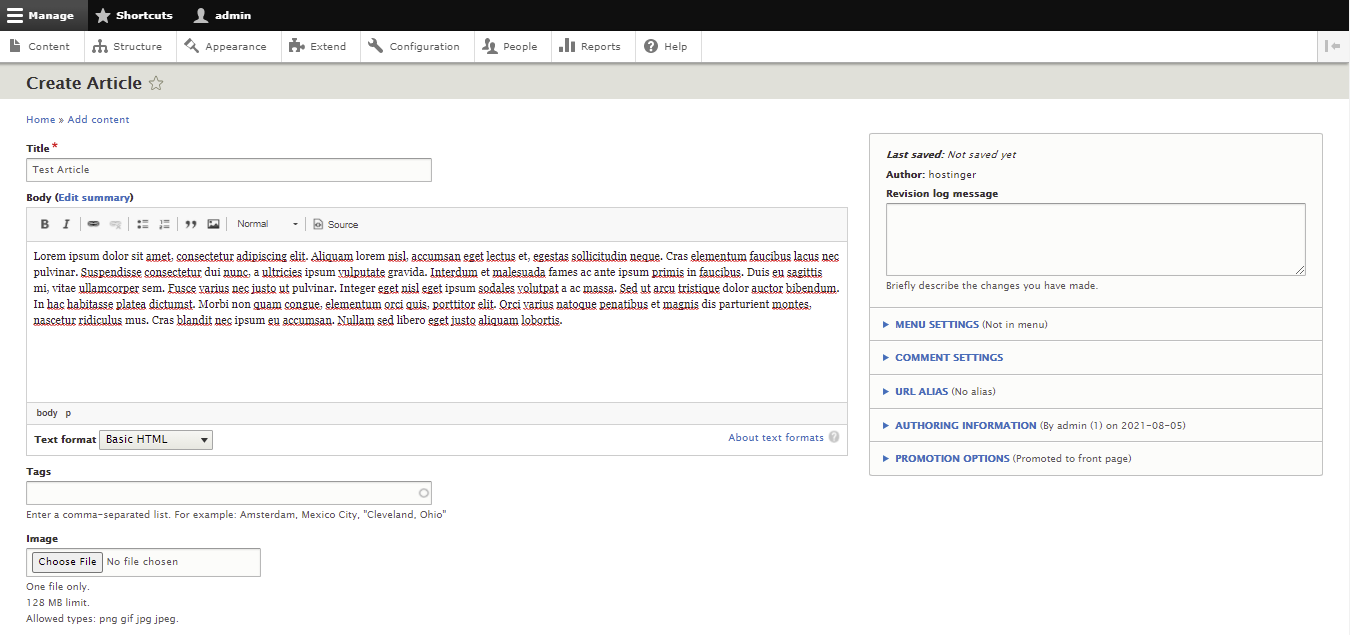
- Additional article settings you can modify are available on the right side of the content editor:
- Menu settings ‒ check the box if you want to add the article as a menu item.
- Comment settings ‒ enable or disable comments on the article.
- URL alias ‒ create an alternative path to categorize the article better. Otherwise, Drupal will automatically publish it under http://yourdomain.com/article-title.
- Authoring information ‒ add the article’s author and the date and time of publishing. Leave the latter blank to use the actual submission time.
- Promotion options ‒ you can place the article on the homepage or move it to the top of the article list.
- Click Preview to check what the finished article will look like. If you’re happy with it, check the Published box and click Save.

Now, let’s try to create a basic page. Here are the steps to make an About Us page:
- Navigate to Content on the admin dashboard.
- Click on the Add Content button and choose Basic Page.

- Type in the title and the body of the page. Don’t forget to set the text format to Restricted HTML or Full HTML.

- Just like during article creation, you can customize the additional settings on the side panel on the right.
- Click Preview to see the final result, check the Published box, and select Save to publish the page.
Creating Menus
Menus are useful for categorizing and structuring the site. While Drupal already has several of them by default, you can also add custom menus.
The following steps will show you how to create one:
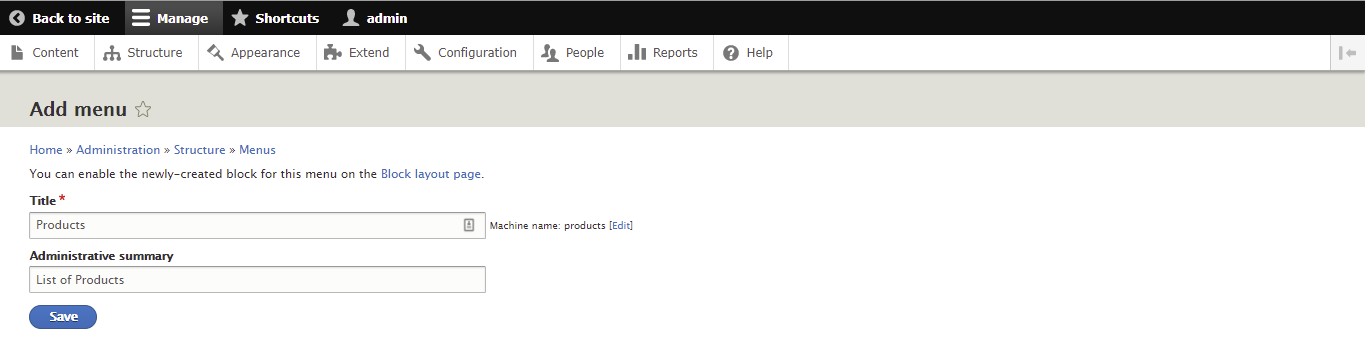
- Navigate to Structure -> Menus from the admin dashboard.
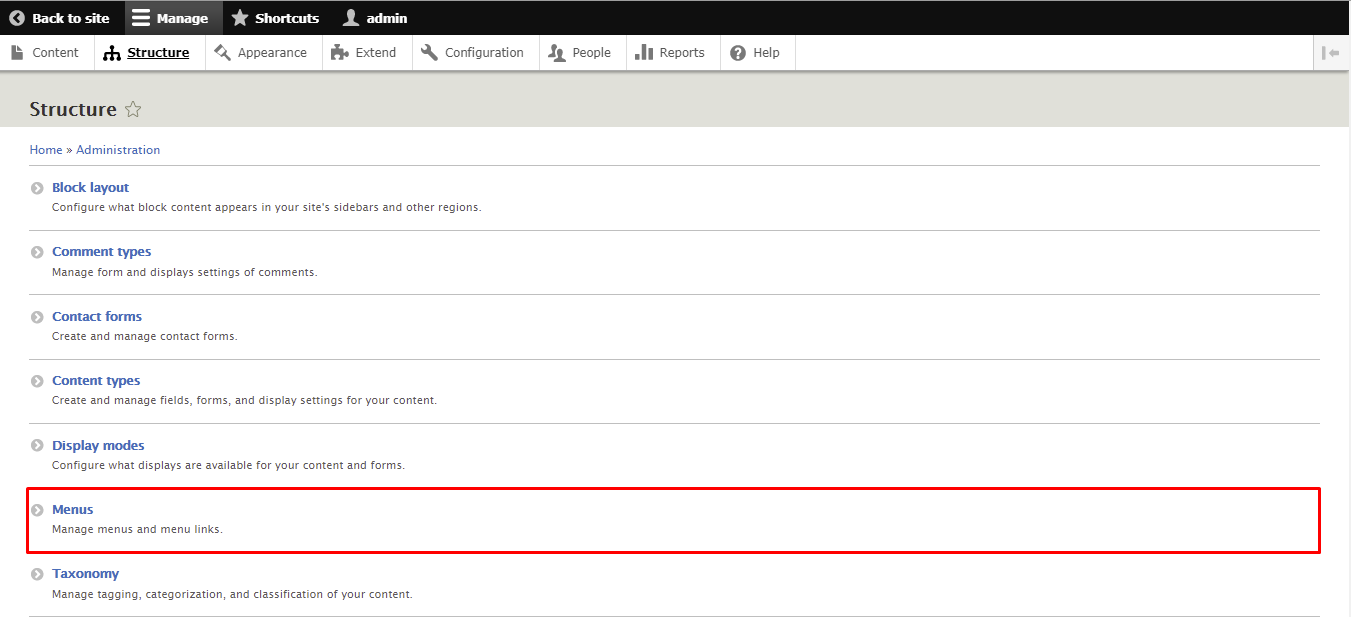
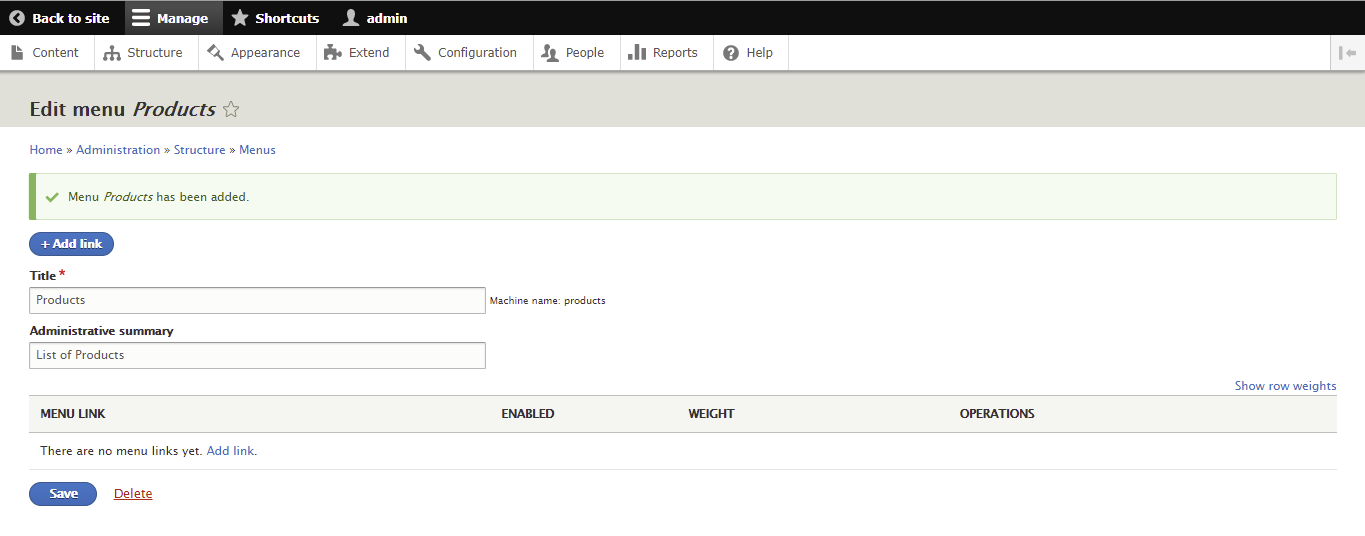
- The Menus page will display all the default menus. You can edit them by clicking on the Edit menu button. Click Add menu to create a new one.
- Add the title and summary of the menu and click Save.
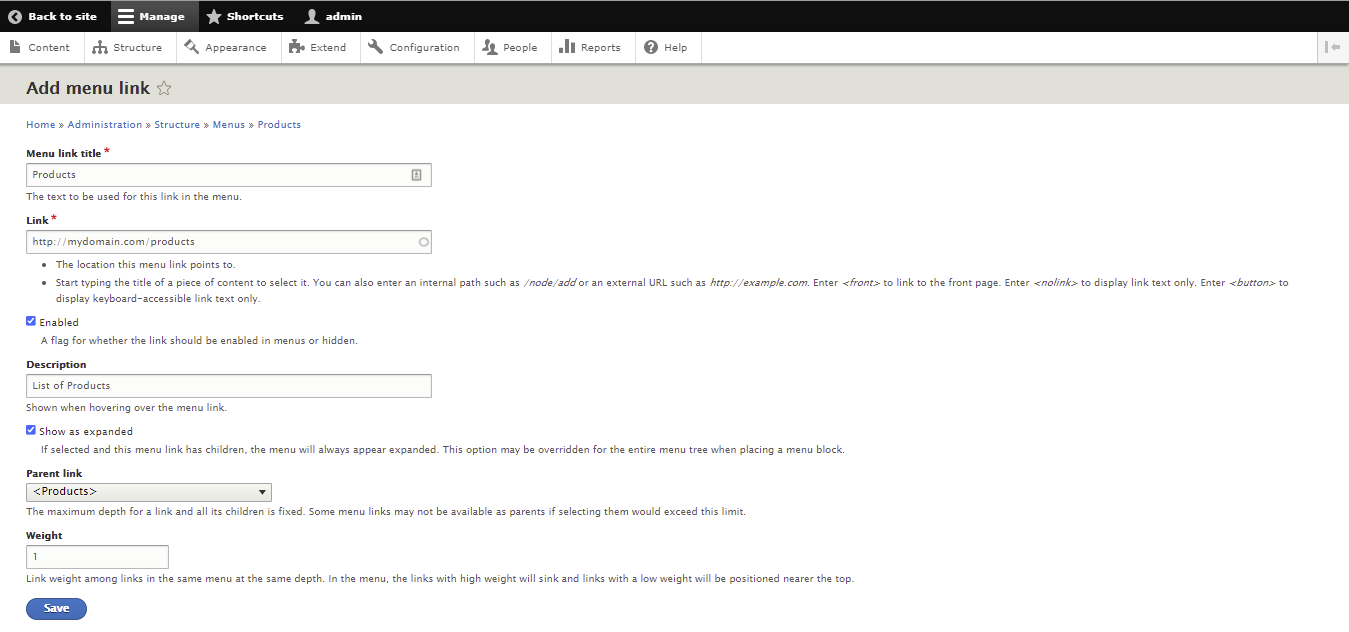
- Now, let’s add a menu link to the menu. Click Add link.
- Fill in the required information, then click Save.
- Menu link title ‒ the name of the menu.
- Link ‒ the path for the menu link. Its value can be an internal Drupal path, an external URL, or <front> to redirect users to the front page. Uncheck the Enabled box if you don’t want to display the link.
- Description ‒ the tooltip shown when the cursor hovers over the link. Check the Show as expanded box to have the menu always expanded.
- Parent link ‒ choose one from the drop-down menu.
- Weight ‒ add a numeric value to determine the link’s order on the menu. Drupal will display them in ascending order.
Placing Drupal Blocks
Blocks are boxes of content that are rendered in a region. For example, you can add a user login form (block) to the website footer (region).
This functionality, provided by the Block core module, is part of the core of Drupal 8. Use it with the Custom Block and Place Block modules to incorporate blocks on any page.
Here are the steps to place a block in Drupal:
- Navigate to Structure -> Block Layout from the admin dashboard.
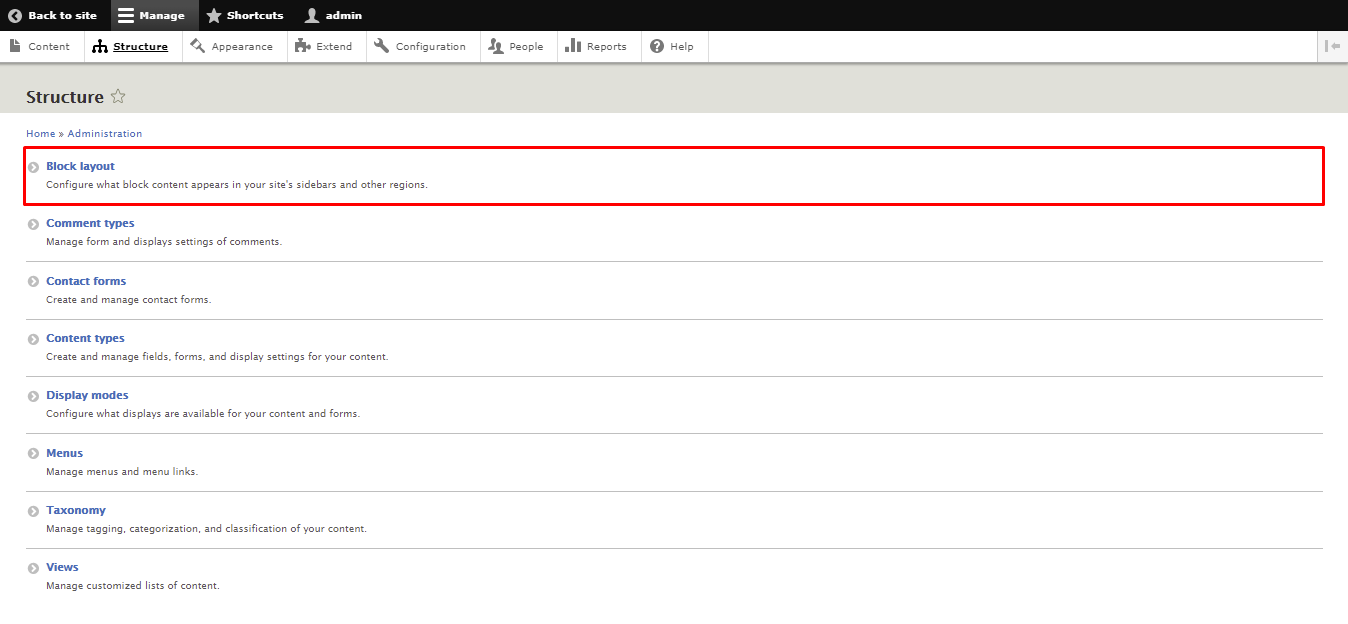
- The Block layout page will display all the regions that allow blocks. Let’s say we want to place a page title block in the header region. Click on the Place block button next to the Header region.
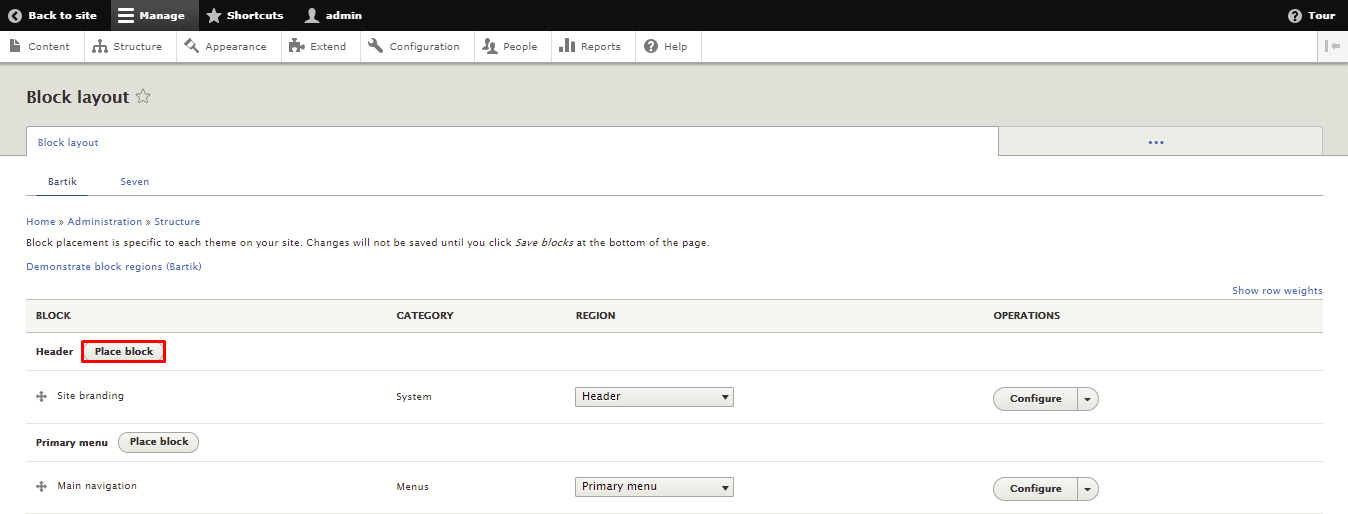
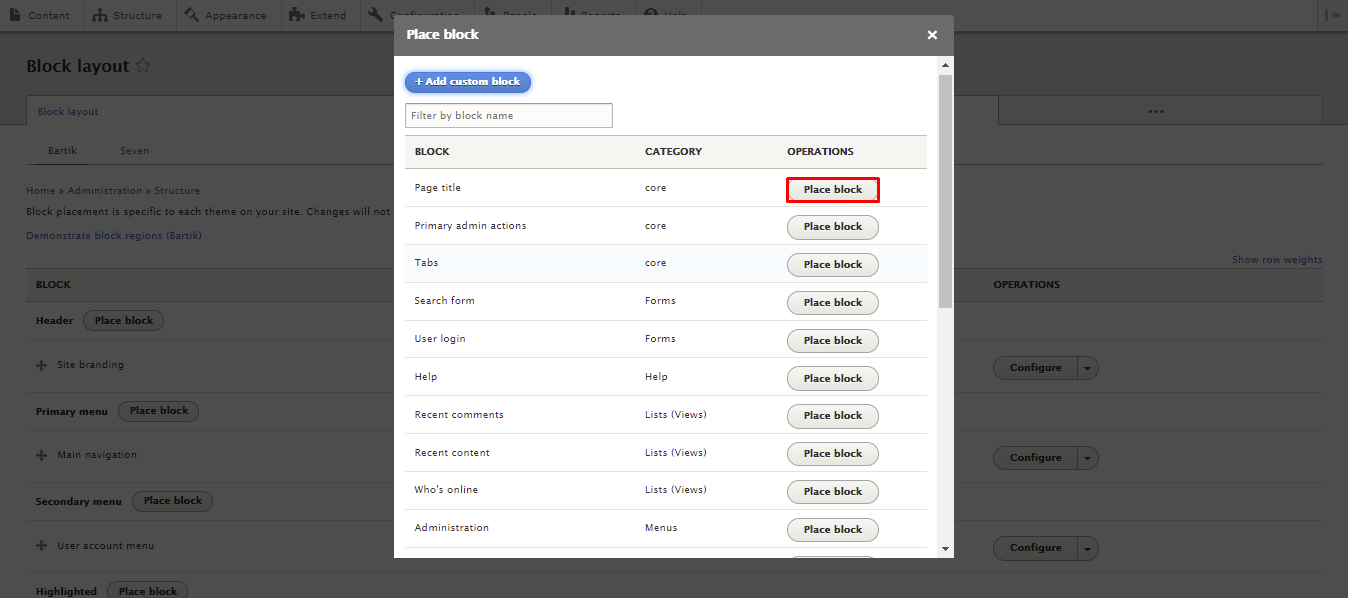
- A pop-up window will appear, displaying the available blocks. Find the Page title block and click the Place block button next to it.
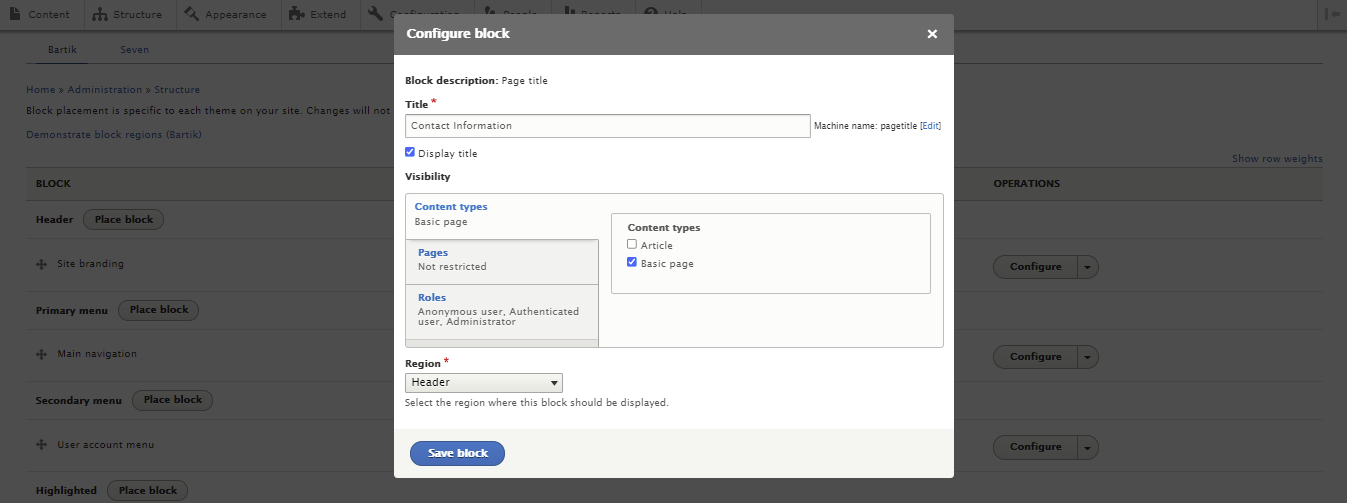
- Fill in the required information:
- Title ‒ the name of the block. Uncheck the Display title box to hide it.
- Visibility ‒ manages the block’s visibility settings:
- Content types ‒ displays the block when the user views selected content types.
- Pages ‒ shows the block based on the page’s URL.
- Roles ‒ displays the block to users with specific roles.
- Region ‒ determines the region where the block will be displayed.
- Once you’re done, click Save block.
How to Install Modules in Drupal?
A Drupal module is a collection of files that extends a site’s functionality. Drupal has two types of modules ‒ core and contributed modules.
Drupal includes core modules with essential functions by default. For additional tools, install contributed modules from the module downloads page or create your own modules.
In this section, you will learn how to install a module via the administrative interface and Drush.
Using the Administrative Interface
While this method is the easiest way to install Drupal modules, it only works for contributed modules. Refer to the Drush tutorial in the next section to install custom modules.
Follow these instructions to install a module using the administrative interface:
- Navigate to the Drupal Module Downloads page and look for your desired module. In this example, we’re going to install the Admin Toolbar module, which improves the accessibility of the built-in toolbar.
- Click on the chosen module’s page and scroll down to the Downloads section. Right-click on the tar.gz download link and select Copy link location. Make sure your Drupal version meets the module’s requirements.

- Return to your Drupal homepage. Click Manage -> Extend.

- Click on the Add new module button and paste the tar.gz download link to the Add from a URL text box. Select Continue.

- Once the installation is successful, you’ll see a confirmation message. Click Enable newly added modules to return to the Extend page.

- Locate the new module and check the box next to it. Scroll down and hit Install.
Important! If the Add new module button is missing, enable the Update Manager core module from the Extend menu. Changing the default theme to Seven via Appearance also works in some cases.
Here are some of the most popular contributed Drupal modules:
- Chaos Tool Suite – contains an API and a set of tools, such as AJAX responder, form wizard, and CSS tools. The module is intended to facilitate the web development process.
- Display Suite – provides a drag and drop interface for more accessible page building.
- Metatag – lets you automatically add meta tags and structured metadata to your site. It also supports meta tags to control how your content looks when shared on social media.
- Google Analytics – adds Google’s web statistics tracking system to your website.
- Webform – helps build various types of forms for data collection purposes.
- Paragraphs ‒ offers various paragraph types for a better content creation experience. The module makes it possible to embed YouTube videos, slideshows, and quotes between other content blocks.
Using Drush
Drush is a command-line shell for managing Drupal. It provides a way to perform admin tasks without using Drupal’s backend. That said, operating Drush requires technical knowledge, so it may be unsuitable for beginners.
The first thing you need to do is install Drush on your Drupal project. Run the line below from your root directory to install Drush via the Composer dependency manager tool.
composer require --dev drush/drush
Keep in mind that this will only work for users with root access, meaning that you have to be on a virtual private server to install modules using Drush.
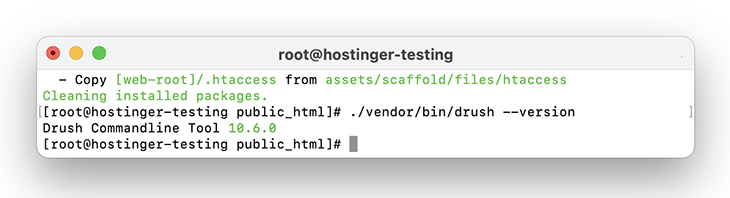
Execute the following command to check whether the installation process was successful:
./vendor/bin/drush --version
Now that you have Drush set up, use it to install a Drupal module by following this tutorial:
- Navigate to the Drupal Module Downloads page and look for your desired module. For this tutorial, we’ll again use the Admin Toolbar module.
- Access the module’s page and find the project name in its URL. For example, if the page’s URL is https://www.drupal.org/project/admin_toolbar, admin_toolbar will be the project name.
- Download the tar.gz module file, then upload and extract it to your site’s Module directory. Alternatively, run this command from your site’s root directory to download the module using Composer:
composer require drupal/admin_toolbar
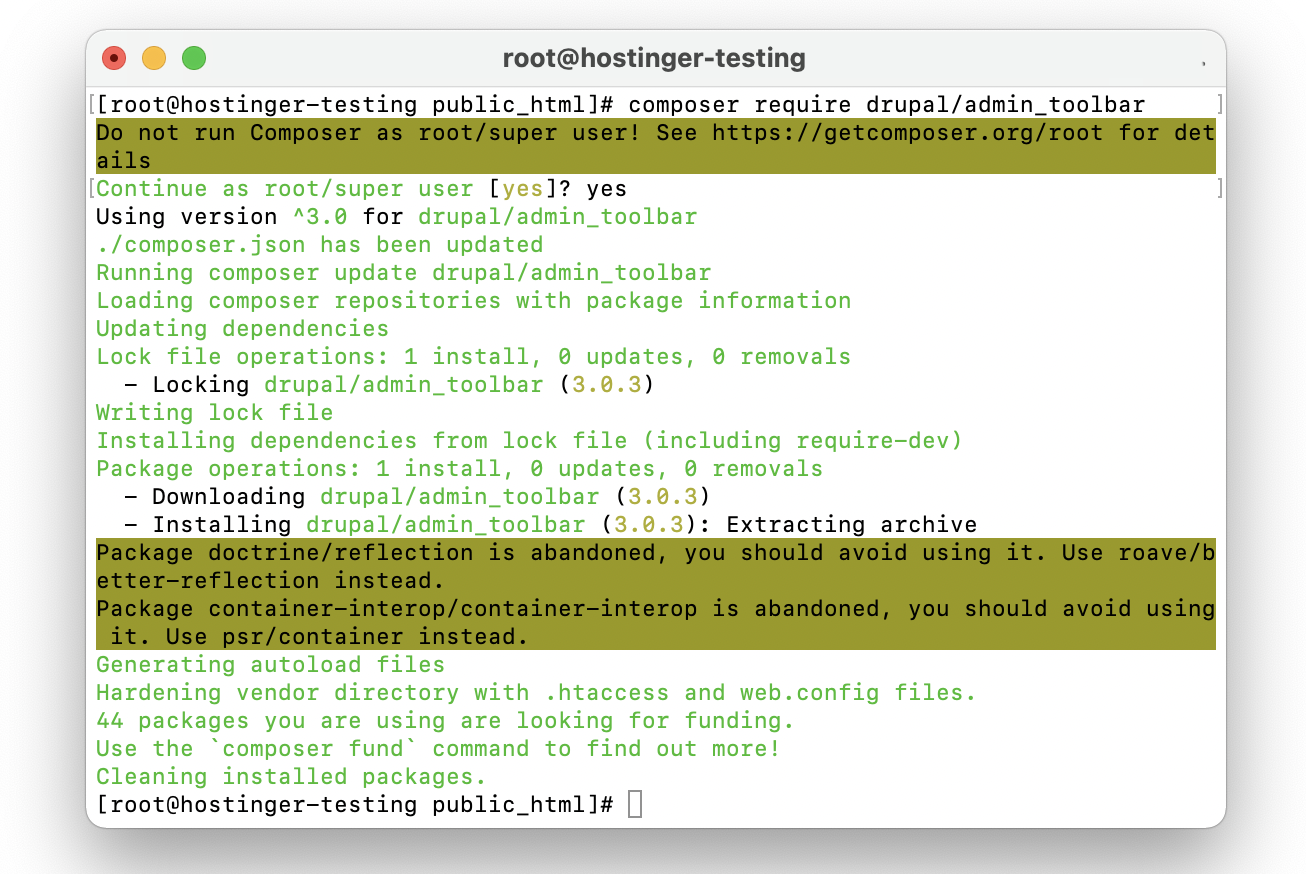
- Run the Drush command below. Then, follow the instructions to complete the installation process.
drush pm:enable admin_toolbar

How to Install Themes in Drupal?
Setting up an appealing look for your site is essential, as it will leave a good impression on visitors. Using an aesthetically pleasant theme is one way to do it.
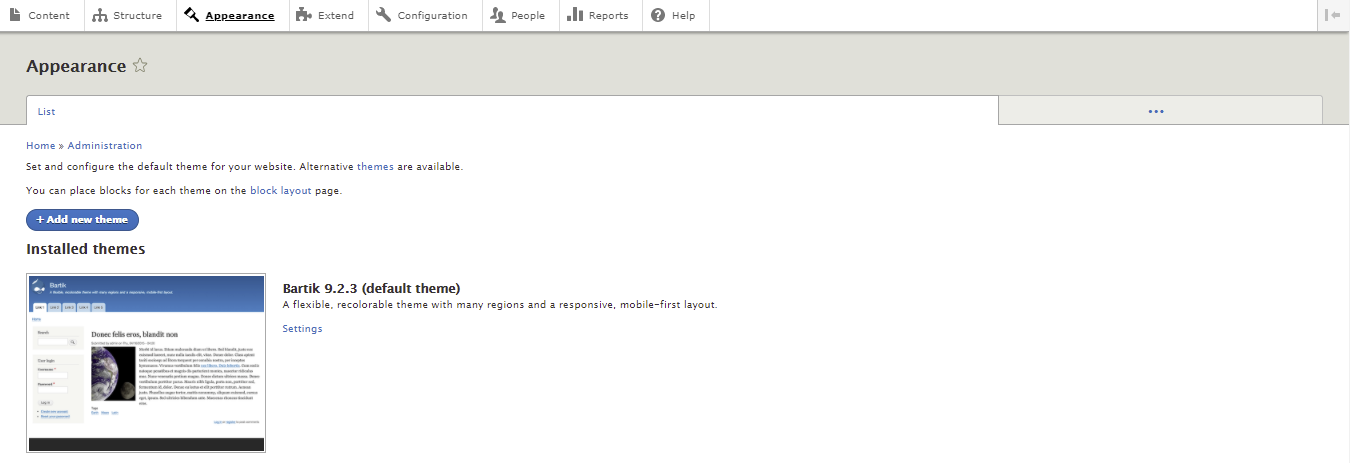
You can view installed Drupal themes via the Appearance tab.
Many online sources offer third-party themes to choose from. However, the official Drupal Theme downloads page is the most reliable source, containing over 2,900 themes.
The theme directory has useful filters to narrow down a search based on compatibility as well as development and maintenance status.
Here’s how to install a Drupal theme:
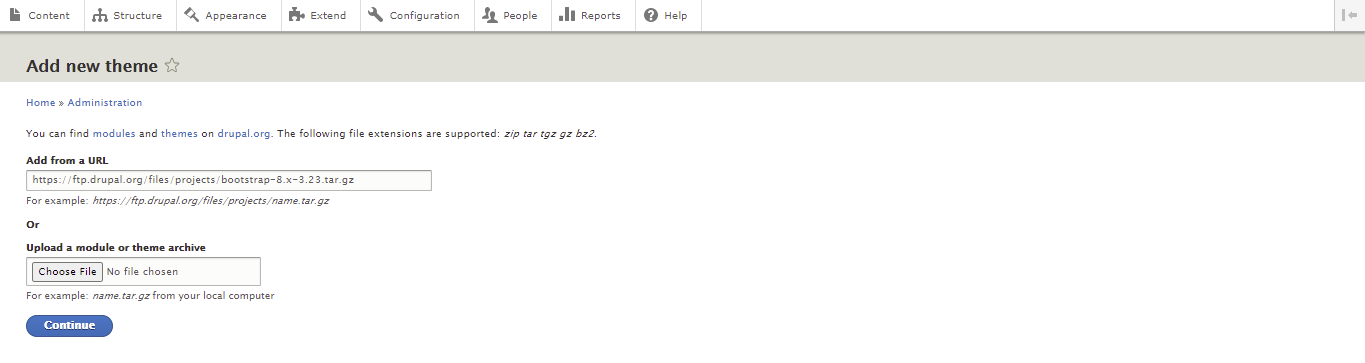
- Navigate to the Drupal Theme Downloads page and choose a theme. Right-click on the tar.gz download link and select Copy link location. Make sure your Drupal version meets the theme’s requirements.
- Return to your Drupal homepage and click on Appearance.
- Click on the Add new theme button and paste the tar.gz download link to the Add from a URL text box. Select Continue.
- If the installation is successful, you’ll see a confirmation message. Hit Install newly added themes to return to the Appearance page.

- Scroll down to the Uninstalled themes section and click Install and set as default under the new theme.

How to Create a Blog on Drupal?
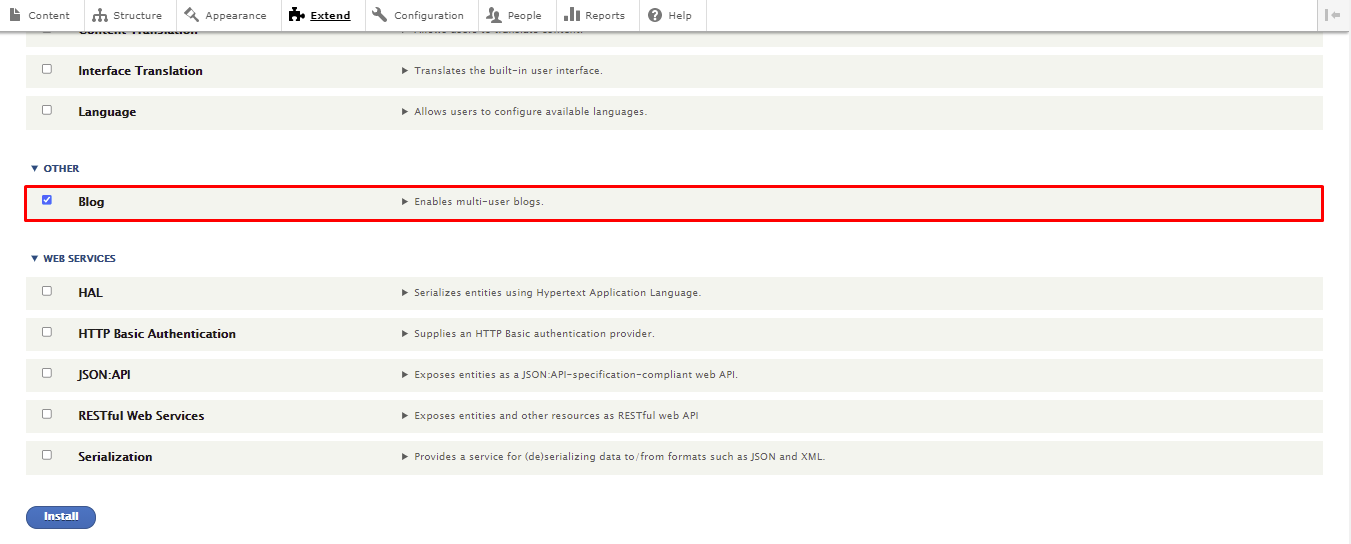
With Drupal, you can set up a fully functional blog site. However, the Blog module is no longer included with the core software, starting with Drupal 8. Therefore, you’ll have to download and install the contributed module manually.
Once installed, the blog module will appear on the Extend menu. Check the box next to Blog and click Install to enable the module.
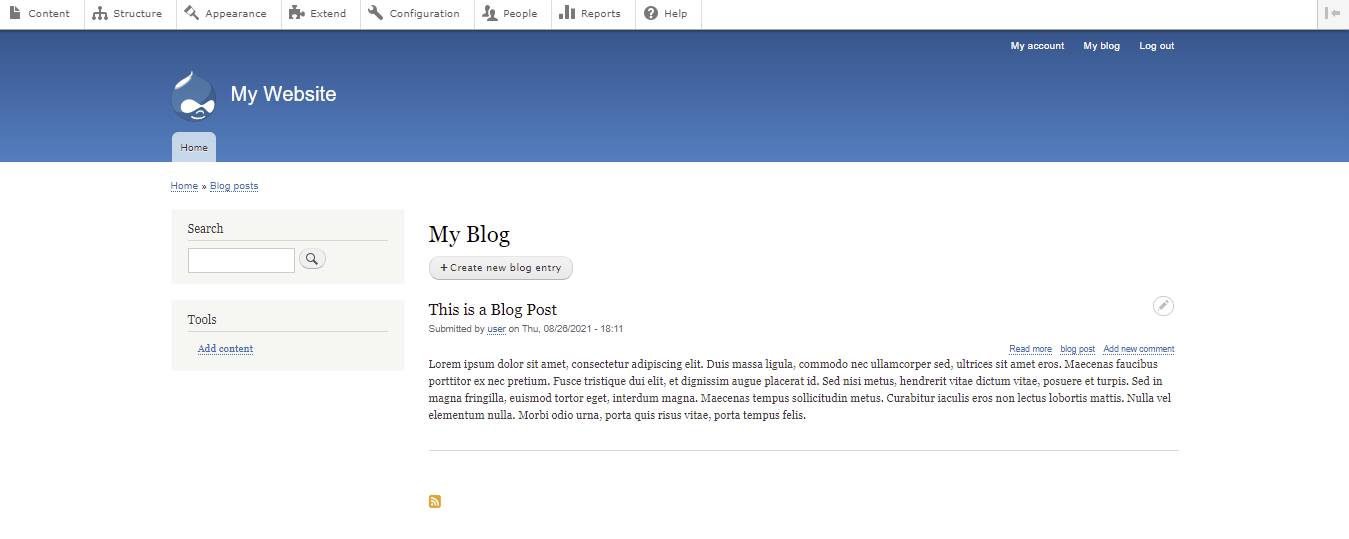
When you navigate to Content -> Add content, you should see a new content type called Blog post. Select it to create a blog entry.
Add the title, body, and tags for the post. Click on the Comment Settings menu on the right side and choose Open to allow comments. If another user wrote the blog post, add their account name to the Authoring Information settings.
Once you’re done, check the Publish box and hit Save to create a new blog post. Your blog post should now be visible under the Blog section of your homepage.
How to Back Up Drupal?
Regularly backing up your Drupal site helps keep data safe in case of a software or hardware malfunction. If something goes wrong, a backup will let you restore the site without losing important data.
The following tutorial will show you how to back up your Drupal files using Hostinger’s hPanel:
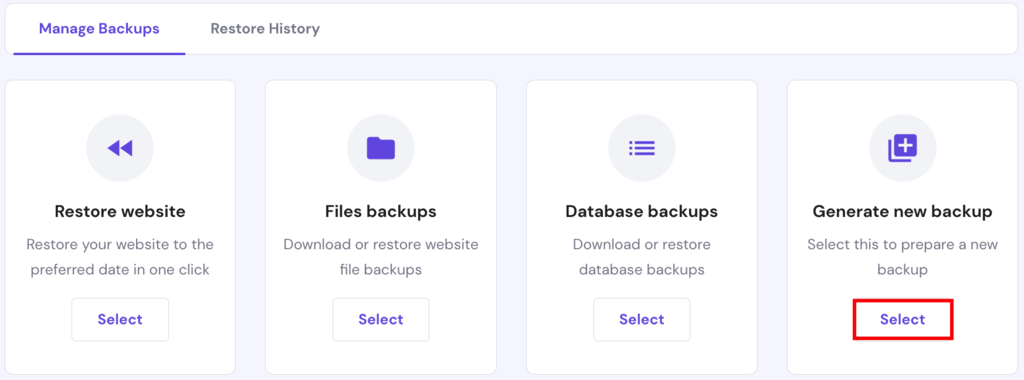
- Login to hPanel, then navigate to Backups under the Files section.
- Hit Select under the Generate new backup option.
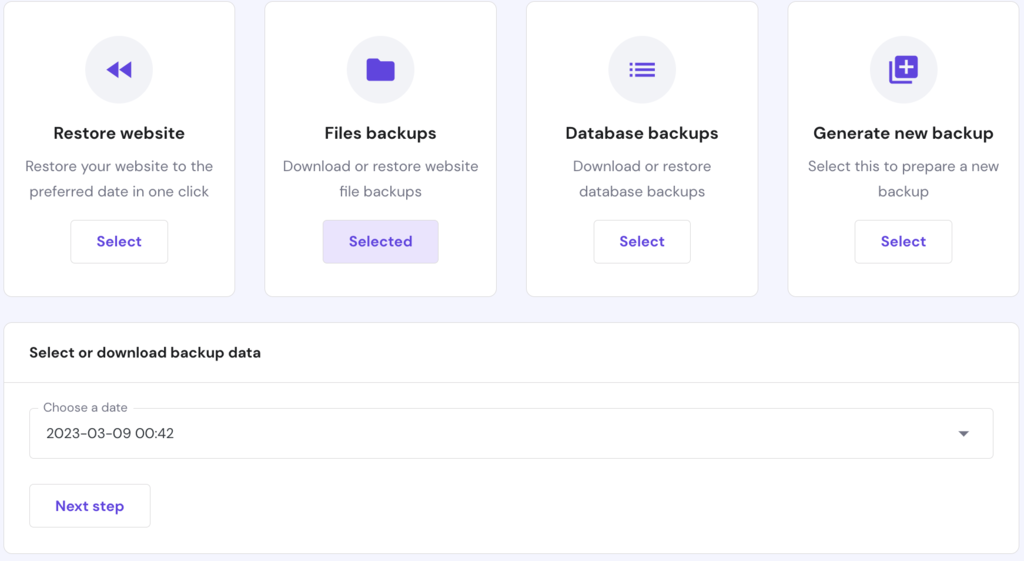
- A dialog box will appear asking you for confirmation. Click Proceed to start the backup process. Keep in mind that you can only generate one backup every 24 hours.
- When the backup is ready, click File backups, pick the backup file from the drop-down list, and hit Prepare to Download.
How to Update Drupal?
In Drupal, updates and upgrades are two different things. An update means installing a newer minor version of Drupal, such as updating the core to 9.2 from 9.1. Meanwhile, upgrading refers to major changes, like replacing Drupal 8 with version 9.
In this section, we will go over the steps of updating Drupal. Before starting, we strongly recommend switching your site to Maintenance mode. Doing so will prevent visitors from accessing the site during the update process.
- Navigate to the Configuration tab and select Maintenance mode.
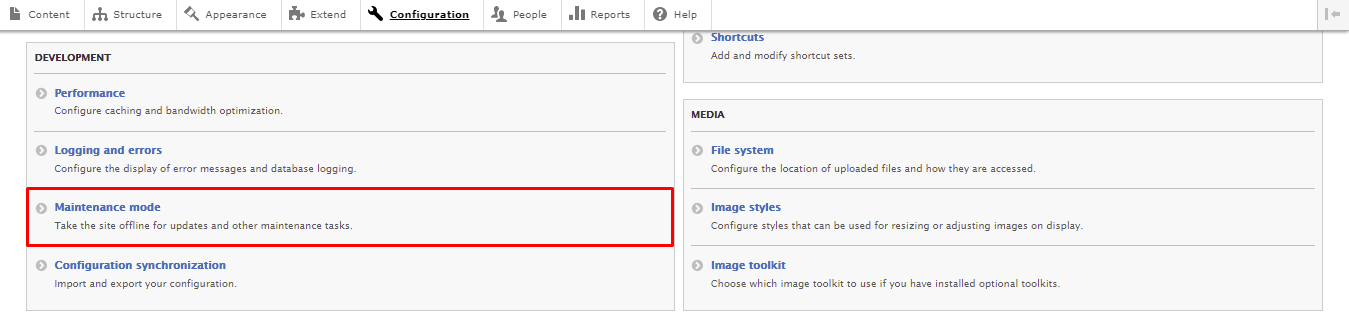
- Check the Put site into maintenance mode option. Here, you can create a custom message to greet visitors who access your site during the update process.
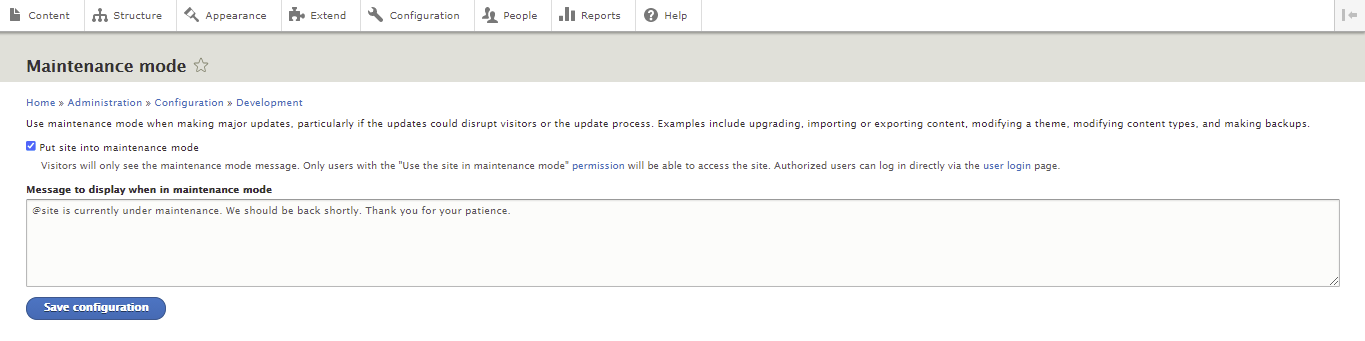
- Hit the Save configuration button.
With this out of the way, navigate to Reports -> Available updates to see if a Drupal core update is available.
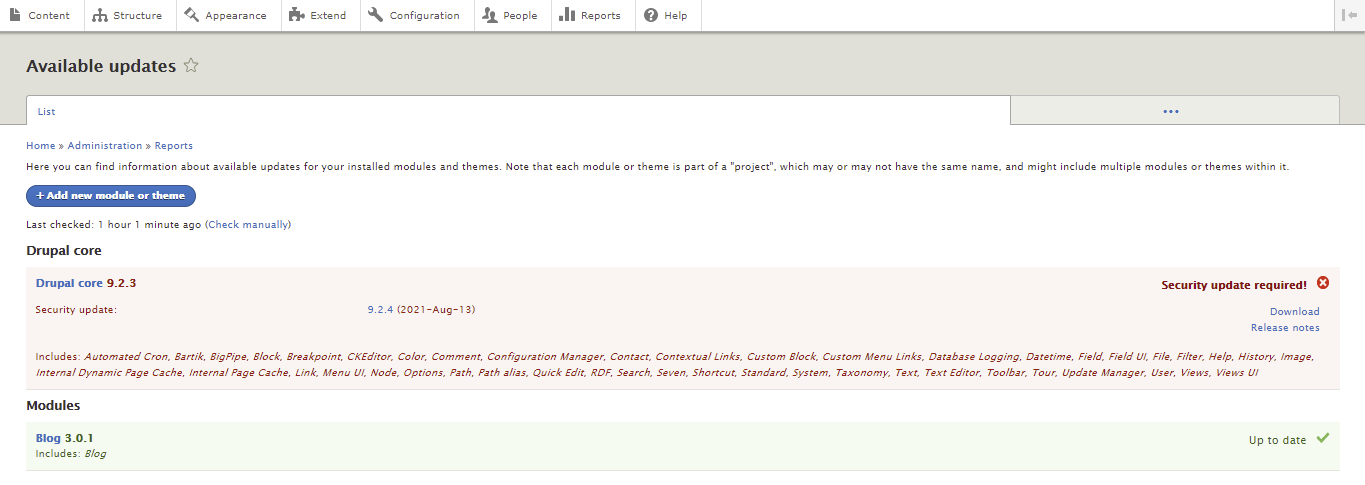
There are a few ways to update Drupal. You can use SSH or FTP to update the platform manually or employ Composer to automate the process. If you’re a beginner, we recommend using an FTP client like FileZilla.
Here are the steps to update Drupal using FTP:
- Download the latest Drupal version and extract the file.
- Connect to your FTP account and access your Drupal installation folder. In most cases, it’s public_html.
- Select core and vendor folders as well as all the files in the Drupal root directory and delete them. Keep the modules, profiles, sites, and themes folders.
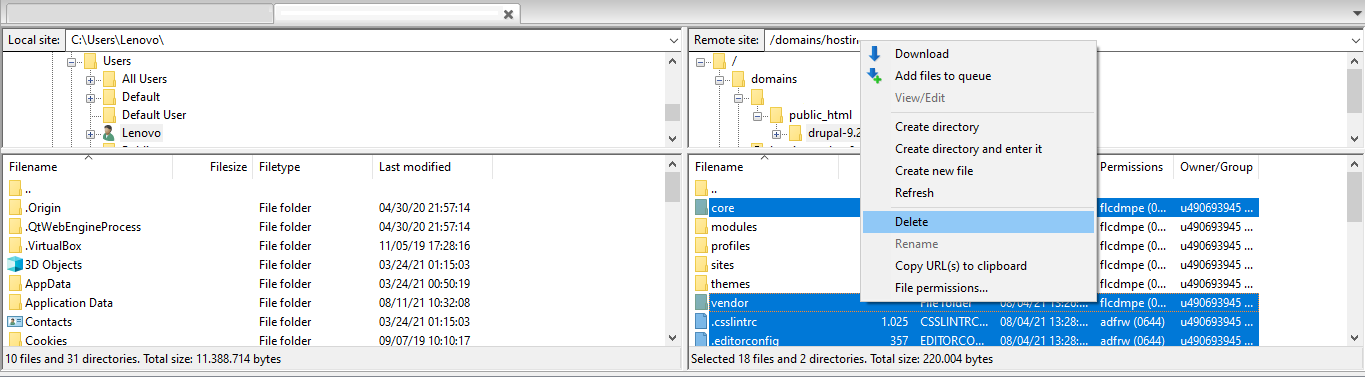
- Open the folder with the update files and upload everything except modules, profiles, sites, and themes to your Drupal root directory.
- Then, revisit the Available updates page to check whether the core version has been successfully updated.
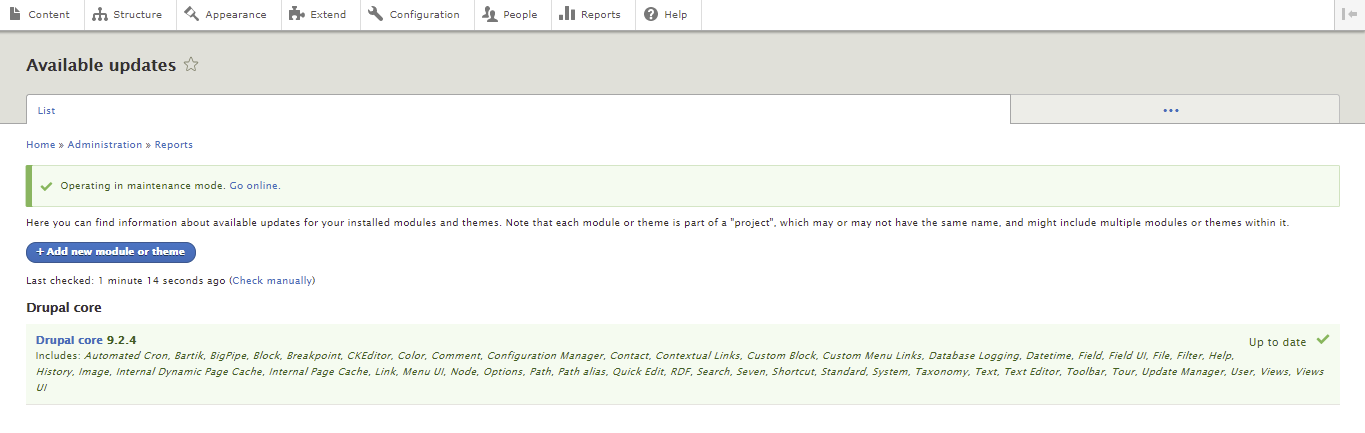
- Lastly, turn off the maintenance mode by clicking Go online next to the Operating in maintenance mode message.
Conclusion
Drupal is a highly customizable CMS that can power all kinds of websites. It supports a wide array of modules and themes to streamline the web development process and extend its functionality.
This article discussed the steps to build a new site on Drupal, from installing the platform to setting up themes and modules. We also covered other essentials, such as creating a blog, backing up a site, and updating Drupal.
Consult the official Drupal documentation to learn more about the CMS. It will take some time and effort before you can fully utilize it.
Don’t hesitate to ask questions in the comment section below should you require additional information. Good luck.
Suggested Reading
Joomla Tutorial for Beginners
15 Best CMS Platforms to Start a Website
12 Best Forum Software to Build an Online Community
16 Best WordPress Alternatives
All of the tutorial content on this website is subject to Hostinger's rigorous editorial standards and values.

Domantas leads the content and SEO teams forward with fresh ideas and out of the box approaches. Armed with extensive SEO and marketing knowledge, he aims to spread the word of Hostinger to every corner of the world. During his free time, Domantas likes to hone his web development skills and travel to exotic places.