How to deploy an LLM with vLLM on a GPU server
Sep 16, 2026
/
By Ariffud M.
/
10 min Read

To deploy an LLM with vLLM, prepare your GPU server and install vLLM there, then load your preferred vLLM-compatible model and serve it through an OpenAI-compatible API.
vLLM itself is a tool for running and serving LLMs on GPUs. It’s designed for efficient model serving, especially when several requests need to share the same GPU.
Here’s how to deploy an LLM with vLLM on your GPU server:
- Choose a GPU with enough VRAM for your model and expected workload.
- Connect to the GPU server over SSH and verify the NVIDIA hardware.
- Set up an isolated Python environment and install vLLM.
- Load the model and start its OpenAI-compatible API.
- Keep the vLLM server running with a systemd service.
- Protect remote API access with a private port and SSH tunnel.
- Send test requests and confirm the API key and network restrictions work.
- Compare inference throughput with single and concurrent requests.
This tutorial uses Qwen2.5-Coder-7B-Instruct as the vLLM model and Hostinger GPU as the provider. The overall process applies to other vLLM-compatible models and GPU providers, with slight differences in GPU sizing, server setup, and control-panel menus.
1. Choose a Hostinger GPU for the model
Choose the L40S GPU with 48 GB of VRAM for the Qwen2.5-Coder-7B-Instruct model when you rent a GPU from Hostinger.
Your GPU for vLLM needs enough VRAM for the model weights, which depend on the parameter count and precision, plus the KV cache, runtime overhead, context length, and concurrent requests.
Start with the model weights because they set the baseline VRAM requirement. Use this simple estimate for a model with BF16 weights, such as Qwen2.5-Coder-7B-Instruct:
VRAM for model weights ≈ parameter count × 2 bytes
The model has 7.61 billion parameters, so the calculation is:
7.61 billion × 2 bytes ≈ 15.2 GB
Don’t treat 15.2 GB as the model’s total VRAM requirement, though.
You also need GPU memory for the CUDA runtime, activations that temporarily hold data while the model processes tokens, which stores previously processed token data for reuse during generation.
Hostinger offers the RTX 4090 with 24 GB of VRAM, starting at $0.38/hour. That capacity exceeds the model’s estimated 15.2 GB weight footprint.
However, we recommend the L40S, starting at $0.92/hour, because its 48 GB of VRAM provides substantially more room for the KV cache, runtime overhead, longer context windows, and concurrent requests.
Use this comparison table to choose the right Hostinger GPU for your workload:
| GPU | VRAM | When to choose it |
| RTX 4090 | 24 GB | Development, experimentation, and small- to medium-model inference |
| L40S | 48 GB | AI inference and generative AI workloads (recommended for this deployment) |
| A100 80GB PCIe | 80 GB | LLM inference with larger memory requirements, model training, and research workloads |
| RTX PRO 6000 (Server) | 96 GB | Large-model inference and fine-tuning that require more VRAM than the L40S provides |
| B200 | 192 GB | Large-model fine-tuning, inference at scale, and other highly memory-intensive AI workloads |
| B200 (Dedicated) | 192 GB | The same workloads as the B200 when you specifically need dedicated, non-shared GPU resources |
After choosing your GPU, set up your instance in Hostinger dashboard to choose your operating system, top up your account credits, and deploy it.
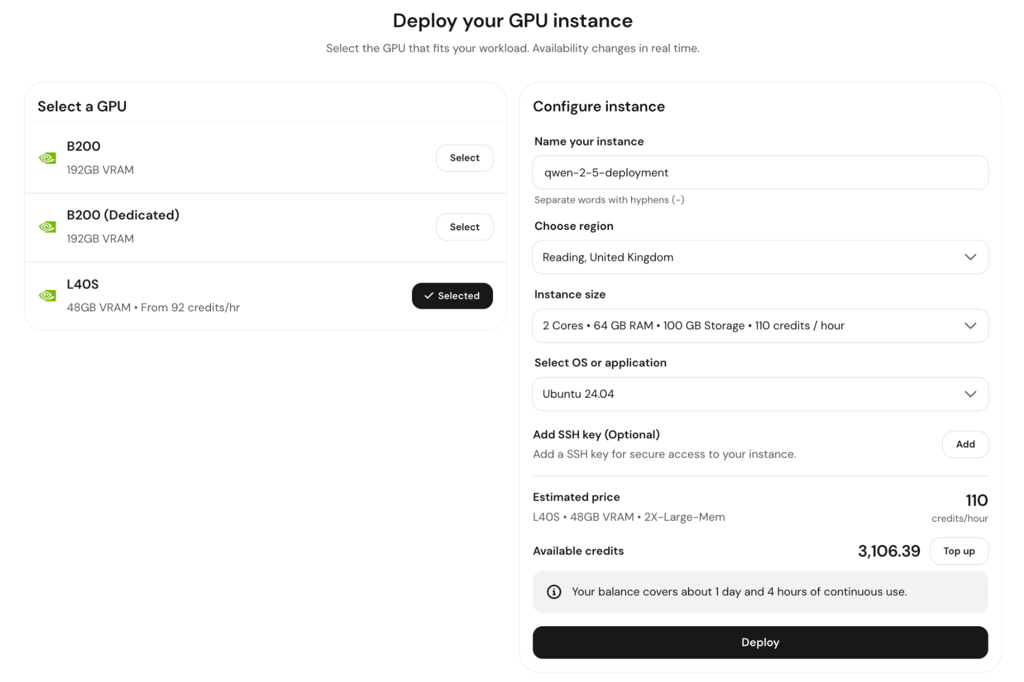
Important! Hostinger GPU instances are billed hourly using your account credits. Hostinger destroys the instance and its data if your credits run out. Keep enough credits available while you use the server.
2. Connect to the GPU server and verify the hardware
Connect to your Hostinger GPU server over SSH and verify the L40S with nvidia-smi before installing vLLM.
In Hostinger dashboard, go to Dev Tools → GPU → Manage and copy the SSH command from the Overview page:
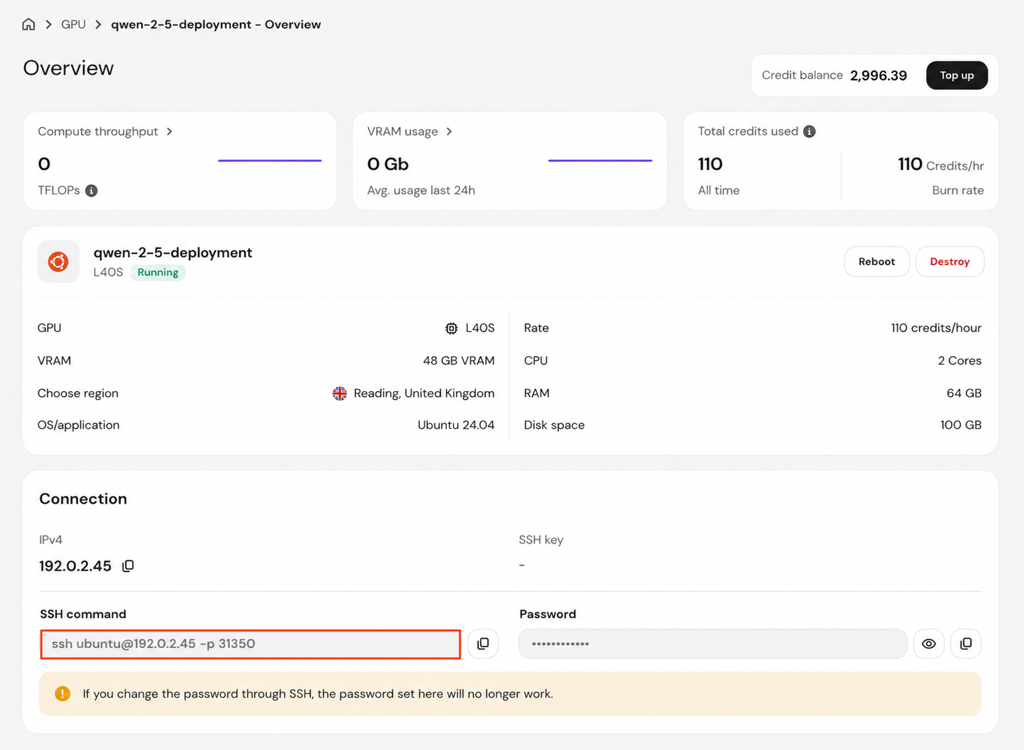
Then open a terminal on your computer, paste the command, and enter the root password to connect. Note the username and port in the SSH command – you’ll need both later to open an SSH tunnel.
You can also set up passwordless SSH for more secure key-based access without entering the SSH password each time you log in.
Once connected, update the package list:
sudo apt update
Next, verify the GPU:
nvidia-smi
The output should list the NVIDIA L40S, its driver version, the CUDA version supported by the driver, and about 48 GB of GPU VRAM.
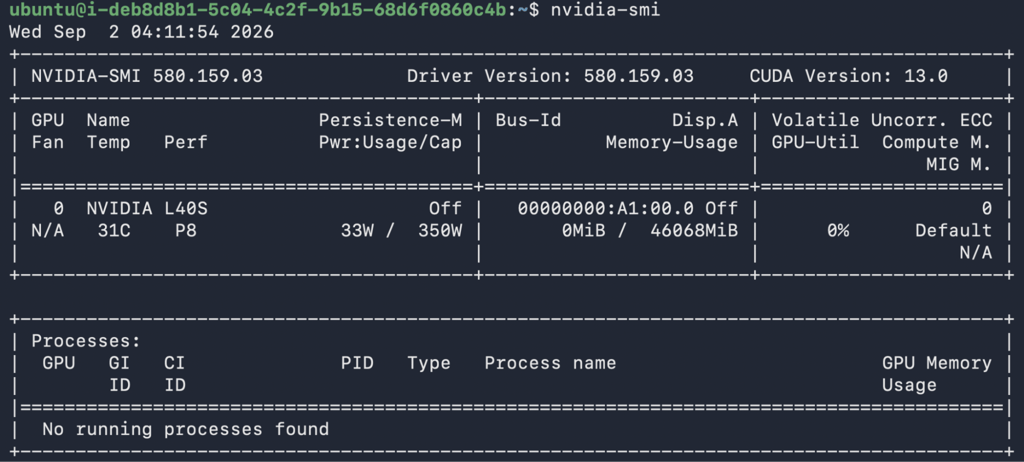
Record the current VRAM usage so you can compare it with the usage after vLLM loads the Qwen2.5-Coder-7B-Instruct model.
3. Install vLLM in a Python environment
To install vLLM in a Python environment, first set up the required tools, then use uv to create the environment and install the package.
uv downloads and manages the required Python version, so you don’t need to install Python separately.
First, install curl and ninja-build, then use the former to install uv:
sudo apt install -y curl ninja-build
curl -LsSf https://astral.sh/uv/install.sh | sh
source "$HOME/.local/bin/env"
Next, create a directory for vLLM and move into it:
sudo mkdir -p /opt/vllm
sudo chown "$USER":"$USER" /opt/vllm
cd /opt/vllm
Create and activate the Python virtual environment:
uv venv --python 3.12 --seed --managed-python
source .venv/bin/activate
Now install the pinned vLLM version. Pinning the version keeps your setup reproducible and matches the commands in this tutorial.
uv pip install "vllm==0.28.0" --torch-backend=auto
The –torch-backend=auto option selects a PyTorch build that matches your NVIDIA driver, so you don’t need to choose a CUDA-specific package yourself.

Finally, verify the installation and confirm that PyTorch detects the L40S:
python --version
vllm --version
python -c "import torch; print('CUDA available:', torch.cuda.is_available()); print('GPU:', torch.cuda.get_device_name(0) if torch.cuda.is_available() else 'none')"
The output should show Python 3.12, vLLM 0.28.0, CUDA available: True, and NVIDIA L40S.
4. Serve the model with the vLLM OpenAI-compatible API
Serve Qwen2.5-Coder-7B-Instruct with vllm serve to start an OpenAI-compatible API on the GPU server.
First, generate an API key:
export VLLM_API_KEY="$(python -c 'import secrets; print(secrets.token_hex(32))')"
echo "$VLLM_API_KEY"
The first command generates the key and stores it as VLLM_API_KEY. The second prints the generated key, which looks similar to this:
6f1c82e0b9d64cda829f5d707f5571590e98c42dd75a5204349fd9029e498865
Save the printed key somewhere secure because you’ll use the same value to connect to the API later.
Start the model and pass the API key to vLLM:
vllm serve Qwen/Qwen2.5-Coder-7B-Instruct
   --host 127.0.0.1
   --port 8000
   --api-key "$VLLM_API_KEY"
The –host 127.0.0.1 option keeps vLLM accessible only from the GPU server, while –port 8000 sets the local API port. The –api-key option requires clients to provide the key when sending requests to the OpenAI-compatible API endpoints.
The first launch takes a few minutes to an hour because vLLM needs to download and cache roughly 15 GB of model files. The exact time depends on your internet speed.
Wait until the terminal shows that the server has started successfully, then leave vLLM running in the current terminal.
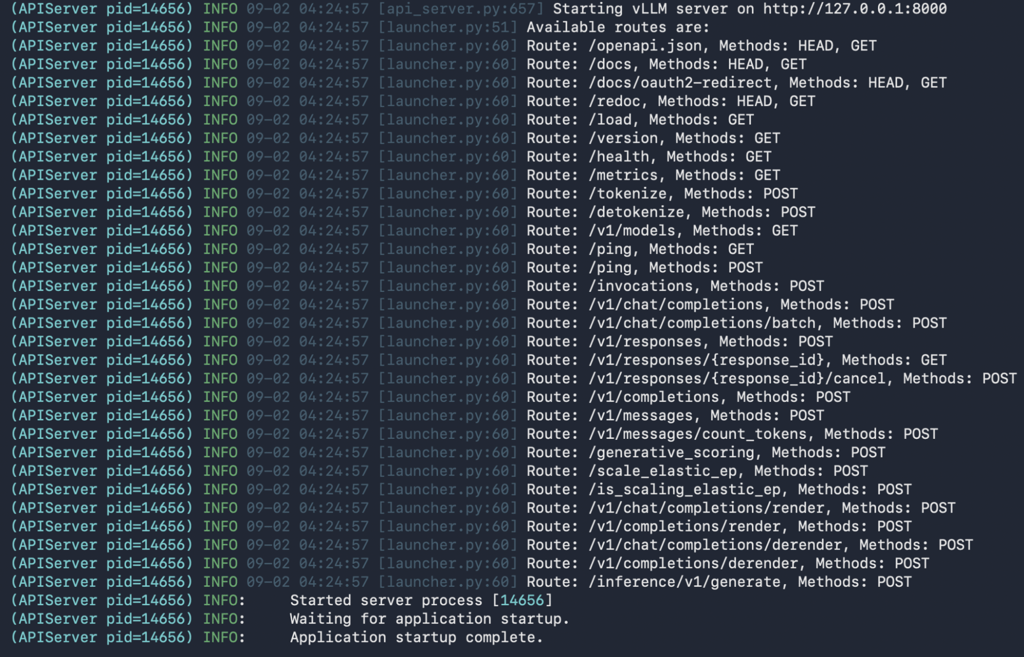
Next, open a new terminal window, connect to the server the same way as before, and check the GPU again:
nvidia-smi
Compare the current VRAM usage with the value you noted before starting vLLM. The increase is expected because the loaded model, KV cache, and vLLM runtime all use GPU memory.
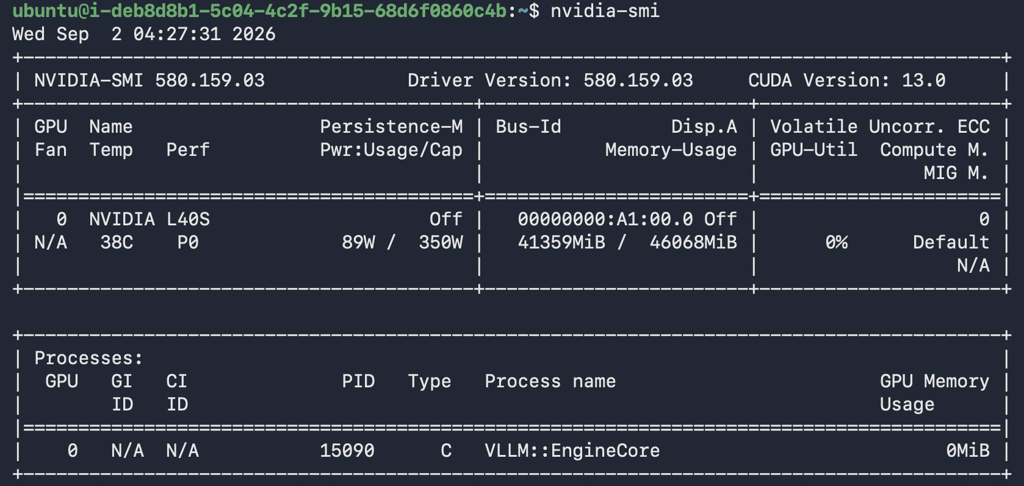
You can now safely close this terminal.
5. Keep the vLLM server running with systemd
Create a systemd service for vLLM so the server keeps running after you disconnect from your SSH session and restarts automatically after a failure.
Go to the terminal where you started vLLM and press Ctrl+C to stop it.
Save the API key in a file so systemd can use it after you close the terminal:
printf 'VLLM_API_KEY=%sn' "$VLLM_API_KEY" | sudo tee /etc/vllm.env > /dev/null
sudo chmod 600 /etc/vllm.env
You don’t need to replace $VLLM_API_KEY with the actual key. The command takes the API key already saved in your terminal session and writes its value to /etc/vllm.env.
Next, create the systemd service:
sudo tee /etc/systemd/system/vllm.service > /dev/null <<'EOF'
[Unit]
Description=vLLM inference server
After=network-online.target
Wants=network-online.target

[Service]
Type=simple
EnvironmentFile=/etc/vllm.env
WorkingDirectory=/opt/vllm
ExecStart=/opt/vllm/.venv/bin/vllm serve Qwen/Qwen2.5-Coder-7B-Instruct --host 127.0.0.1 --port 8000
Restart=on-failure
RestartSec=5

[Install]
WantedBy=multi-user.target
EOF
Restart=on-failure starts vLLM again five seconds after the process exits with an error.
Reload systemd, start the service, and enable it to start automatically after a reboot:
sudo systemctl daemon-reload
sudo systemctl enable --now vllm
sudo systemctl status vllm --no-pager
The status should show active (running).

vLLM still needs time to load the model and initialize its GPU components. Wait for a few minutes before checking anything.
Next, confirm that vLLM is serving requests after it finishes loading the cached model:
source <(sudo cat /etc/vllm.env)

curl -sS
   -H "Authorization: Bearer $VLLM_API_KEY"
   http://127.0.0.1:8000/v1/models
The response should include Qwen/Qwen2.5-Coder-7B-Instruct. You can now safely disconnect from SSH without stopping vLLM.

Check the service logs with this journalctl command if systemctl status shows failed or vLLM doesn’t respond after loading the model:
journalctl -u vllm -n 100 --no-pager
6. Secure access to the vLLM API
Secure access to the vLLM API by keeping port 8000 private and connecting through an SSH tunnel.
Open a new terminal on your computer and run:
ssh -N -L 8000:127.0.0.1:8000 -p SSH_PORT ubuntu@GPU_IP_ADDRESS
Replace SSH_PORT and GPU_IP_ADDRESS with the values shown for your GPU instance in Hostinger dashboard.
After you authenticate, the terminal stays open without showing a shell prompt. This is expected because -N creates the SSH connection only for port forwarding.
Leave this terminal open while you use the vLLM API. The tunnel forwards http://127.0.0.1:8000 on your computer to 127.0.0.1:8000 on the GPU server.
Note that Hostinger doesn’t make non-SSH services publicly accessible by default, although you can expose services on your GPU instance through Hostinger dashboard.
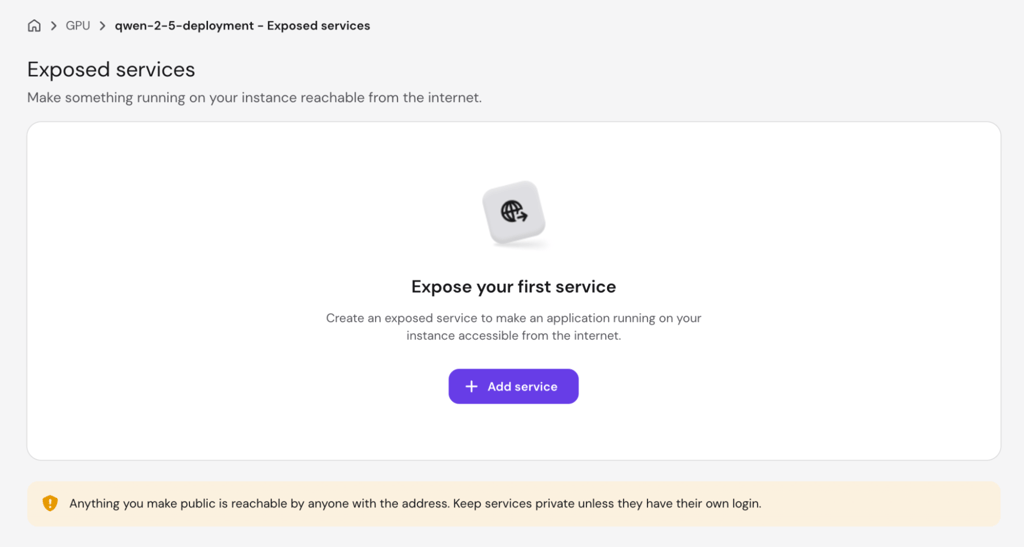
However, avoid exposing any service using port 8000 because doing so makes the vLLM API reachable from the internet.
Also, secure exposed services with app authentication, firewall rules, and HTTPS certificates when you intentionally make a service public.
7. Test the vLLM API connection
To test the vLLM API connection, send a chat request to your deployed model through the SSH tunnel, then verify that the API key is required and port 8000 isn’t publicly accessible.
Open a new terminal on your computer. Then, load the API key you saved earlier:
printf "Paste the vLLM API key: "
read -s VLLM_API_KEY
echo
export VLLM_API_KEY
Paste the key at the prompt. The terminal won’t display it.
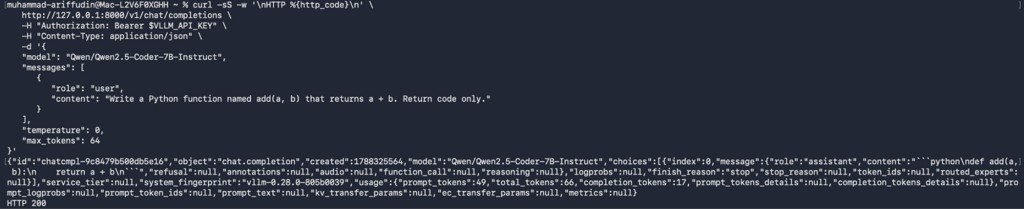
Next, send a request to the /v1/chat/completions endpoint:
curl -sS -w 'nHTTP %{http_code}n'
   http://127.0.0.1:8000/v1/chat/completions
   -H "Authorization: Bearer $VLLM_API_KEY"
   -H "Content-Type: application/json"
   -d '{
   "model": "Qwen/Qwen2.5-Coder-7B-Instruct",
   "messages": [
      {
         "role": "user",
         "content": "Write a Python function named add(a, b) that returns a + b. Return code only."
      }
   ],
   "temperature": 0,
   "max_tokens": 64
}'
A successful request returns HTTP 200. The JSON response should show Qwen/Qwen2.5-Coder-7B-Instruct in the model field, generated code in the response, and token counts under usage.
After that, send a request without the Authorization header:
curl -sS -o /dev/null -w 'HTTP %{http_code}n'
   http://127.0.0.1:8000/v1/models
vLLM should return HTTP 401, confirming that it rejects requests without the API key.

Finally, try connecting directly to port 8000 on the GPU instance instead of using the SSH tunnel:
curl --connect-timeout 5 http://GPU_IP_ADDRESS:8000/v1/models
The connection should time out or fail because vLLM listens on 127.0.0.1 and you haven’t exposed port 8000.
Also check your exposed services in Hostinger dashboard and make sure none use internal port 8000.
8. Benchmark inference throughput
Benchmark your vLLM throughput by comparing one request at a time with up to eight simultaneous requests.
Close the terminal you used for the API tests and stop the SSH tunnel with Ctrl+C.
Then start a new terminal, connect to your GPU server over SSH, activate the vLLM environment, and load the API key::
cd /opt/vllm
source .venv/bin/activate
export VLLM_API_KEY="$(sudo sed -n 's/^VLLM_API_KEY=//p' /etc/vllm.env)"
Next, run the benchmark with one request at a time:
vllm bench serve
   --backend openai-chat
   --base-url http://127.0.0.1:8000
   --endpoint /v1/chat/completions
   --model Qwen/Qwen2.5-Coder-7B-Instruct
   --dataset-name random
   --num-prompts 32
   --input-len 512
   --output-len 128
   --max-concurrency 1
   --header "Authorization=Bearer ${VLLM_API_KEY}"
   --ignore-eos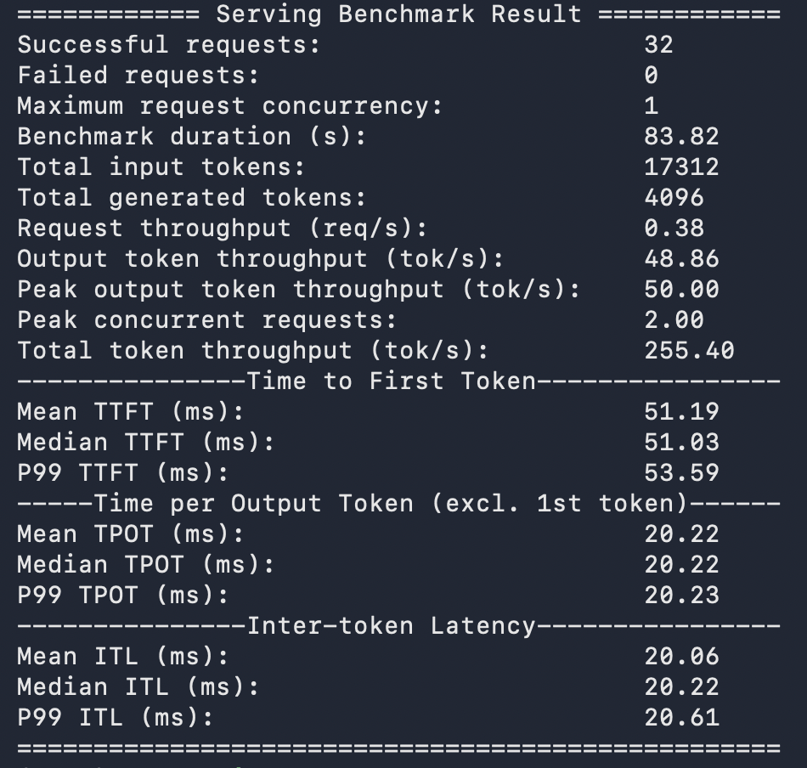
Run the same command again after the first benchmark finishes, but change –max-concurrency 1 to –max-concurrency 8.
Keep the other settings unchanged. Both runs use 32 requests, 512 input tokens, and 128 output tokens, so concurrency is the only variable.
The –ignore-eos option makes each request generate the full 128 output tokens, which keeps the two runs comparable.
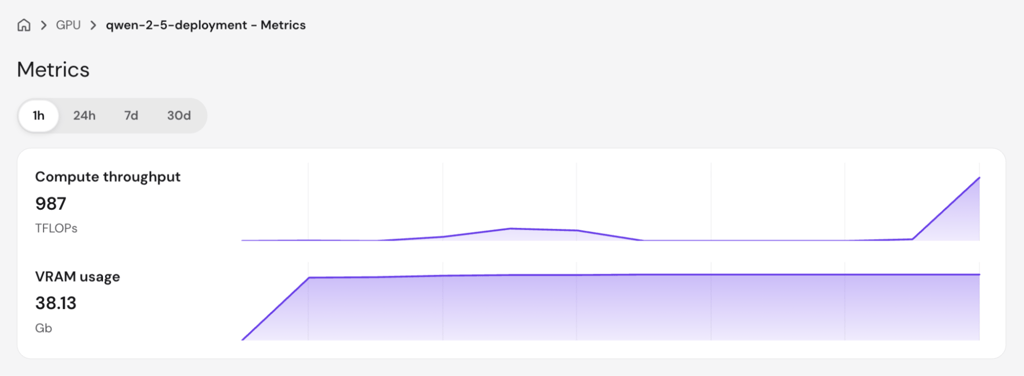
While running the benchmarks, check the Metrics section for your GPU instance in Hostinger dashboard. Use the 1h view to see the GPU compute throughput and VRAM usage during the tests.
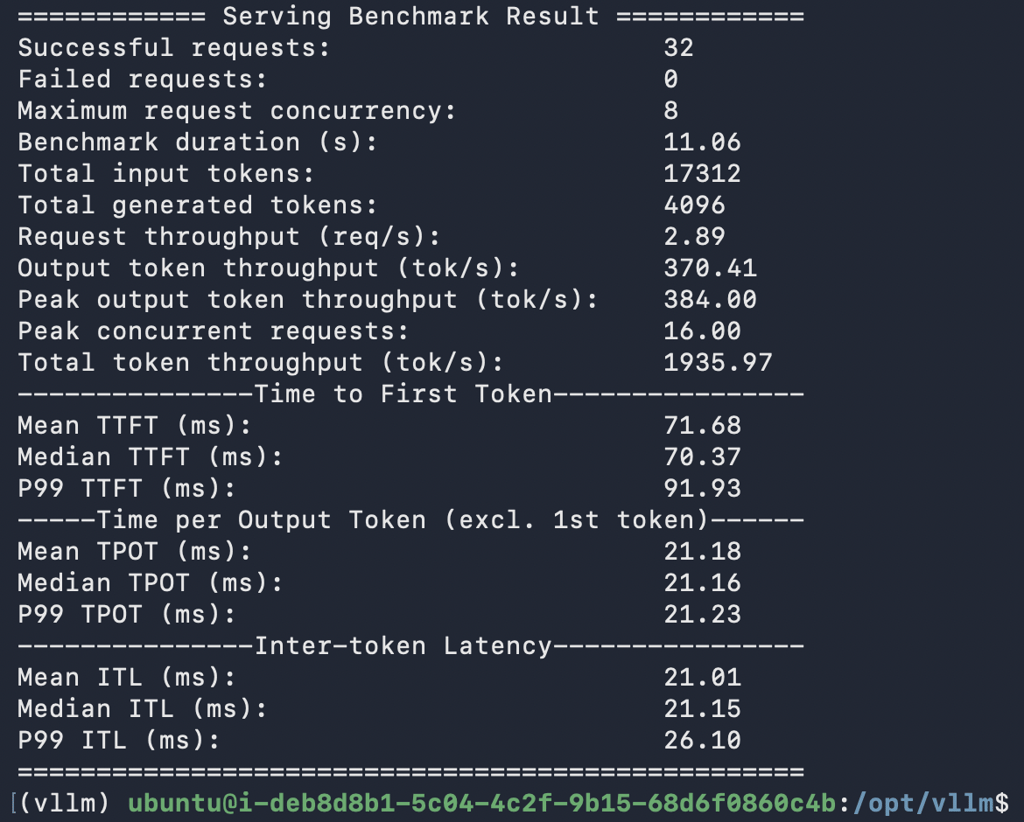
Record the Request throughput (req/s) and Output token throughput (tok/s) values shown at the end of each benchmark. A completed comparison could look like this:
| Max concurrency | Request throughput (req/s) | Output throughput (tok/s) |
| 1 | 0.38 | 48.86 |
| 8 | 2.89 | 370.41 |
Request throughput shows how many requests vLLM completes per second, while output throughput shows how many output tokens it generates per second.
Increasing maximum concurrency from 1 to 8 raised request throughput from 0.38 to 2.89 req/s and output-token throughput from 48.86 to 370.41 tok/s.
How vLLM handles concurrent inference efficiently
vLLM handles concurrent inference efficiently with continuous batching, which keeps adding waiting requests as processing capacity becomes available, and PagedAttention, which reduces wasted KV-cache memory.
Unlike a fixed batch that waits for the whole group to finish, continuous batching lets vLLM start waiting requests while other requests are still generating tokens.
PagedAttention stores each request’s KV cache, the attention data vLLM saves for previously processed tokens, in small blocks wherever VRAM is available. This reduces wasted gaps in GPU memory and leaves more room for concurrent requests.
When to use vLLM instead of Ollama
Use vLLM instead of Ollama when you expect several users or apps to share the same GPU and serving more requests efficiently matters more than simplifying model setup.
The main difference is what each tool prioritizes. vLLM focuses on inference serving, with features such as continuous batching and PagedAttention, while Ollama simplifies downloading, running, and switching between models.
In practice, vLLM lets the GPU process concurrent requests more efficiently, but you configure more of the serving setup yourself. Ollama handles more of that setup for you, making it easier to get a model running quickly.
Choose vLLM for team coding assistants, application backends, shared internal tools, and other workloads that receive requests from several clients.
Set up Ollama for local development, trying different models, or personal tools where ease of use matters more than maximizing throughput.
For a simple AI-powered app sending only a few API requests at a time, either option works well.
How to connect vLLM to Continue in VS Code
To connect vLLM to Continue in Visual Studio (VS) Code, configure Continue to send requests to http://127.0.0.1:8000/v1 through your SSH tunnel.
Continue is an open-source AI coding assistant available as a VS Code extension. It supports OpenAI-compatible APIs, so you can use the Qwen model and API key you already configured.
Set up Continue with the vLLM endpoint
Set up Continue by installing the VS Code extension, adding your vLLM API key as a local secret, and using http://127.0.0.1:8000/v1 as the API base URL.
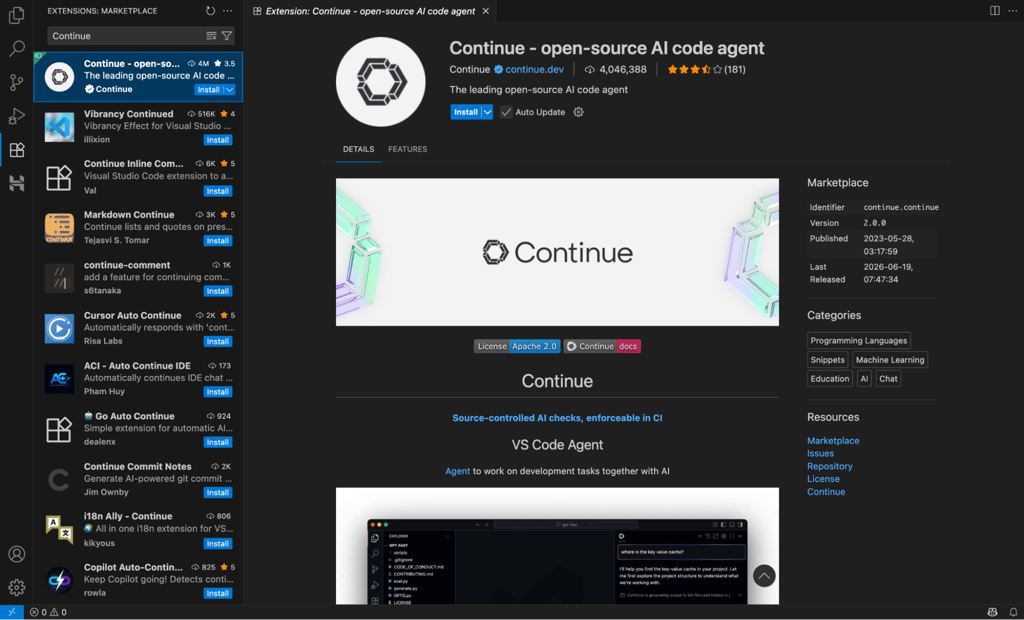
- Open the extension marketplace in VS Code, search for Continue, and select Install.
- Start the SSH tunnel and leave its terminal open:
ssh -N -L 8000:127.0.0.1:8000 -p SSH_PORT ubuntu@GPU_IP_ADDRESS
Replace SSH_PORT and GPU_IP_ADDRESS accordingly.
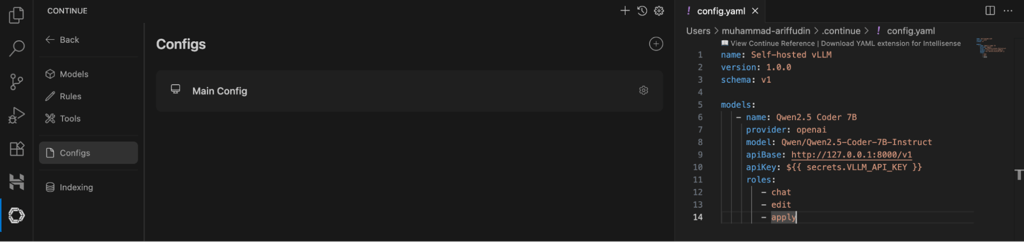
- Open the Continue sidebar and go to Settings → Configs → Main Config. Click the gear icon to open config.yaml, which Continue creates automatically.
- Add the Qwen2.5-Coder-7B-Instruct model to config.yaml:
name: Self-hosted vLLM
version: 1.0.0
schema: v1

models:
   - name: Qwen2.5 Coder 7B
     provider: openai
     model: Qwen/Qwen2.5-Coder-7B-Instruct
     apiBase: http://127.0.0.1:8000/v1
     apiKey: ${{ secrets.VLLM_API_KEY }}
     roles:
        - chat
        - edit
        - apply
The provider: openai setting tells Continue to use the OpenAI-compatible API format. apiBase sends those requests to vLLM through the SSH tunnel.
Save config.yaml when you’re done.
- In the same .continue folder as config.yaml, create a file named .env and add the vLLM API key you saved earlier:
VLLM_API_KEY=your-vllm-api-key
Replace your-vllm-api-key with the actual key, then save .env.
- Restart VS Code so Continue loads the API key from .env. Open Continue and select Qwen2.5 Coder 7B as the model.
Test the deployed model with a coding request
To test the vLLM Continue integration, send a coding request from Continue while the SSH tunnel remains open.
For example, ask:
Write a Python function that checks whether a string is a palindrome and add three pytest tests.
The exact response will vary, but a successful result should contain code similar to this:
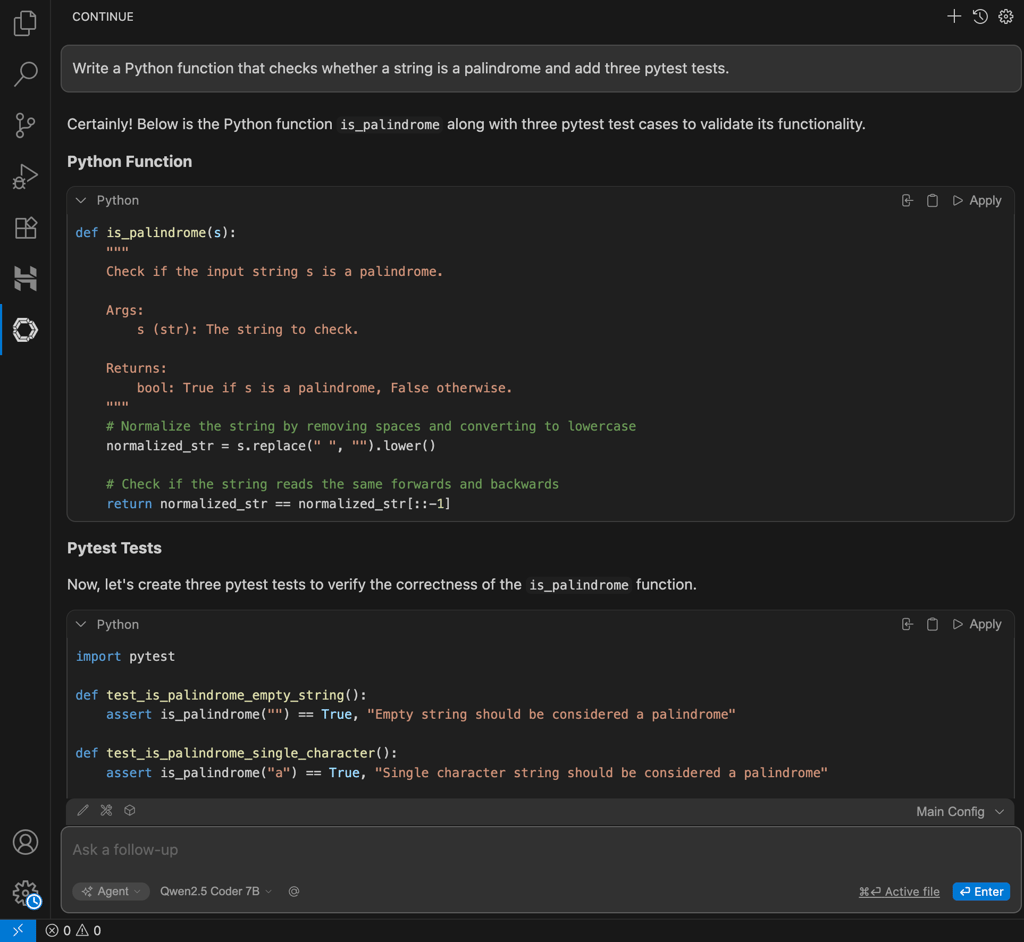
This confirms that Continue reached your vLLM API through the SSH tunnel and received output from the configured model.
Repeat the curl API test you ran previously if Continue doesn’t respond. Double-check the model, apiBase, and API key in your Continue configuration if curl works but Continue still can’t connect.
Next steps for your LLM deployment with vLLM
Extend your LLM deployment with quantization to reduce VRAM usage, LoRA adapters to serve fine-tuned variants, or tensor parallelism to use multiple GPUs.
- Quantization. It stores model weights at lower precision to reduce VRAM usage. Use it next when you want to fit a larger model on the same GPU or leave more memory available for inference. Serve a supported quantized model, such as an AWQ or GPTQ checkpoint.
- LoRA adapters. They add small sets of fine-tuned weights to a base model without loading a separate copy of the full model. Use them next when you want to serve different specialized versions of the same base model. In vLLM, enable LoRA support with –enable-lora and load adapters with –lora-modules adapter-name=adapter-path.
- Tensor parallelism. It splits a model across multiple GPUs. Use it next when the model no longer fits on one GPU or you want to spread its memory requirements across several GPUs. Set –tensor-parallel-size to the number of GPUs you want vLLM to use, for example, –tensor-parallel-size 2 for two GPUs.

All of the tutorial content on this website is subject to Hostinger's rigorous editorial standards and values.

Ariffud is a Technical Content Writer with an educational background in Informatics. He has extensive expertise in Linux and VPS, authoring over 200 articles on server management and web development. Follow him on LinkedIn.