Fake Cloudflare verification (ClickFix) malware shows your website’s visitors a fake “Verify you are human” page that tricks them into running a command on their own computer. That command installs malware on the visitor’s device, not on your website. The fake page comes from malicious code on your website, most often an unknown plugin, a must-use plugin, a modified theme, or injected database content.
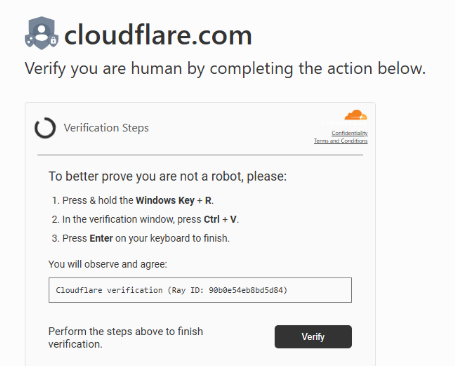
Do not complete the steps on the fake page, and ask anyone testing your website not to complete them. If you or a visitor already ran the command, disconnect that computer from the internet, run a full antivirus scan, and change important passwords from a different, clean device.
To fix it, confirm the symptom, find and disable the code that injects the page, clean your files and database, then secure your website so the attacker cannot return. The Hostinger Malware Scanner checks website files only, so a clean scan result does not rule out this infection.
Before you start
- Make sure you can log in to the Hostinger dashboard, your WordPress Admin area, and File Manager.
- Do not click the verification checkbox or follow any instructions on the fake page, even to test it.
- Test your website in a private browser window while logged out of WordPress, because the fake page is usually hidden from logged-in administrators.
- Use the WordPress steps if your website runs on WordPress. For other content management systems (CMS), follow the same order of checks and your CMS’s own security documentation.
Identify a fake Cloudflare verification (ClickFix) attack
A ClickFix attack shows a page that looks like a Cloudflare security check and asks visitors to run keyboard commands. A genuine Cloudflare challenge never asks you to open a terminal or a Run dialog, or to paste anything. There are six common signs of a ClickFix attack:
- Your page loads for a moment, then a “Verify you are human” screen covers it.
- After the checkbox is clicked, the page shows steps such as Windows key + R or Windows key + X, then Ctrl + V and Enter.
- The address bar still shows your own domain while the fake page is displayed.
- The page appears for logged-out visitors and in private windows, but not when you are logged in to WordPress.
- The page appears on some visits, devices, or pages, but not on others.
- Your website does not use Cloudflare, or you have not set up any Cloudflare challenge for it.
The Hostinger CDN browser verification page, shown as “Checking your browser”, is a legitimate security check and not a ClickFix attack. The Hostinger CDN check runs automatically, and visitors pass it without any action.
When a visitor follows the steps on a fake page, the page has already copied a malicious command to their clipboard. Pasting and running the command installs malware on the visitor’s computer, which can steal passwords and other data.
Confirm the fake verification page comes from your website
Confirm the attack by opening your website as a regular visitor and checking where the fake page loads from. The result tells you whether to look inside your website or at a redirect.
- Log out of WordPress, or open a new private window in your browser.
- Open your homepage and two or three other pages of your website.
- When the fake page appears, check the address bar:
- It still shows your domain: code on your website injects the page. Continue with the investigation below.
- It changes to another domain: your website redirects visitors. Check redirects and the
.htaccessfile first.
- Open the same page in a different browser, on another device, or over mobile data. This rules out a problem limited to your own computer or network.
- If your domain uses Cloudflare, log in to your Cloudflare account and confirm you have not set up a challenge page. A real Cloudflare challenge never shows keyboard instructions.
NOTES
- Clearing your own browser cache does not remove the fake page, because the code runs on your website and not on your device.
- Write down which pages showed the fake page and when, so you can test each change during the cleanup.
Investigate where the fake Cloudflare verification page is injected
The fake page is usually injected by a plugin or must-use plugin you did not install. It can also come from a theme file, the .htaccess file, or the database. Check each place below before you remove anything, and note what you find.
|
Check |
What indicates an infection |
Where to check |
|
Malware Scanner |
Malicious or compromised files, when they were found, and the actions the scanner took on them. |
Hostinger dashboard → Websites → Manage site → Security → Malware Scanner in the sidebar. |
|
Plugins |
A plugin you do not remember installing, cannot find in the official WordPress plugin directory or on a known vendor’s website, or that has an unusual name or version number in its folder name. |
Hostinger dashboard → WordPress → Updates, which lists installed plugins even when you cannot log in to the WordPress Admin area. Also check |
|
Must-use plugins |
Any file you did not add. Must-use plugins run automatically and cannot be deactivated from the WordPress Admin area. |
File Manager, in |
|
Themes |
Unexpected code at the top or bottom of |
Hostinger dashboard → WordPress → Updates, and |
|
|
Redirect rules you did not add, or lines that load a PHP file automatically, including lines left behind by a security plugin you already removed. |
File Manager, starting with the |
|
Root folder |
PHP files you do not recognize next to |
File Manager, in your website’s root folder. |
|
WordPress users |
Administrator accounts you do not recognize. |
WordPress Admin area → Users → All Users. |
|
Database |
|
phpMyAdmin, in the options and posts tables. Your table prefix is set in |
|
Other websites on the plan |
The same signs on any other website or subfolder installation in the same hosting plan. |
The same checks for each website. |
NOTES
- A clean Malware Scanner result does not mean your website is clean. The Malware Scanner checks files, not the database, and a malicious plugin can look like a normal plugin to a file scan.
- To read scan results and the actions taken on each file, see How to use the Malware Scanner at Hostinger.
- A plugin that shows a fatal error when you activate it, or a critical error when you delete it, is worth investigating, but it is not always the source of the fake page.
Remove the ClickFix malware from your website
Remove the infection with one of three options: find and remove the injecting code yourself, restore a backup from before the infection, or request the Hostinger site cleanup service for WordPress websites. Whichever option you choose, also complete the steps to secure your website after the cleanup, or the infection can return.
Option 1 – Find and remove the injecting code manually
Manual removal keeps your current content. You disable suspicious items one at a time and test after each change, so you know exactly which item showed the fake page.
- Create a backup of your website files and database before you change anything, following How to create backups at Hostinger. This backup preserves your content but may still contain the malware, so do not treat it as a clean restore point.
- Change your WordPress administrator passwords and remove administrator accounts you do not recognize, so the attacker cannot undo your cleanup while you work.
- Remove leftover lines from the
.htaccessfile that load PHP files you do not recognize, and delete those unknown PHP files from the root folder. Keep the standard WordPress rules and the rules of security or cache plugins you still use. - In the WordPress Admin area → Plugins, deactivate the most suspicious plugin first: one you do not recognize or cannot find from an official source. If you cannot access the WordPress Admin area, rename the plugin’s folder in File Manager instead, as described in the notes below.
- Clear your website cache, and also clear the Hostinger CDN cache or Cloudflare cache if you use one. Wait 5 minutes.
- Open the pages you noted earlier in a new private window while logged out:
- The fake page is gone: you found the source. Continue with step 8.
- The fake page still appears: deactivate the next suspicious plugin, then repeat steps 5 and 6.
- If no plugin is the source, check must-use plugins and remove files you do not recognize from
wp-content/mu-plugins. Then switch temporarily to a default WordPress theme, such as Twenty Twenty-Five, to test whether your theme is the source. - Delete the malicious plugin or file completely. Deactivating a plugin stops it from running, but its files stay on the server.
- If the infected item is a plugin or theme you need, reinstall a fresh copy from the official source. Do not reactivate the infected copy.
- If the fake page remains after all the checks above, export your database with phpMyAdmin. Then use the Search tab to look for
<scriptand unfamiliar domains in the options and posts tables, and remove only entries you confirm are malicious.
NOTES
- If the WordPress Admin area shows an error when you deactivate or delete a plugin, open
wp-content/pluginsin File Manager and rename the plugin’s folder, for example by adding-disabledto the end. WordPress deactivates a plugin whose folder it cannot find. See How to disable WordPress plugins without access to the admin page at Hostinger for the full steps. - Change one thing at a time and test after each change. Disabling several items at once hides which one was responsible.
- Manual backups are available on Business or higher hosting plans, and you can create one once every 24 hours. If you made one recently, wait for it to finish before you start the cleanup.
Option 2 – Restore a backup from before the infection
Restoring a backup replaces your website files and database with the version from the backup date. Use this option when you cannot find the source manually, or when the infection keeps coming back.
- Open the Malware Scanner and note the Malware first found date shown below the chart. The Infected files found per day chart in the Malware Scanner shows detections from the past 30 days.
- Choose a backup created before that date. A backup from after the first detection may already contain the malware.
- Restore the files and the database to the same date, following How to restore backups at Hostinger.
- If other websites on your hosting plan are also infected, restore or clean them in the same session, so one website cannot reinfect the others.
Restoring a backup reverts every change made after the backup date, including new posts, pages, orders, and form entries. Restoring one website does not clean the other websites on the same hosting plan.
NOTE
- A restored website still has the same weakness that let the attacker in, and it brings back the plugin and theme versions from the backup date. Secure your website right after the restoration finishes.
Option 3 – Request the Hostinger site cleanup service
The Hostinger site cleanup service is a paid service for WordPress websites with domains pointed to Hostinger, offered separately from the Malware Scanner. The site cleanup service cleans both files and the database without rolling your website back to an older date. If the service is available for your website, a Request site cleanup button appears in the Malware Scanner section of the Hostinger dashboard.
A WordPress developer or professional malware-removal service can also clean your files and database if you prefer not to edit them yourself. After any cleanup service, you still need to secure your access and keep your software updated.
Secure your website after the ClickFix cleanup
Securing your website is required after every cleanup option, including deleting a plugin, restoring a backup, or using a cleanup service. Removing the malicious code removes the symptom, but not the way the attacker got in. Attackers often leave extra administrator accounts, hidden files, or saved login sessions so they can return. Complete all eight steps below on every website in your hosting plan.
- Change every password. Change the passwords for your Hostinger account, every WordPress administrator, every FTP or SFTP account, and your database. If you change the database password, update it in
wp-config.phpas well, or your website will stop loading. - Enable two-factor authentication for your Hostinger account and for every WordPress administrator.
- Remove unknown accounts. Delete WordPress users you do not recognize, and check that remaining users have only the role they need. Remove FTP accounts and SSH keys you did not create.
- Change the WordPress security keys. Replace the security keys (salts) in
wp-config.phpwith new ones from the WordPress secret-key generator. New keys log out everyone, including an attacker who stole a login session, which changing passwords alone does not do. - Update everything. Update WordPress, all themes, and all plugins to their latest versions, and consider enabling automatic WordPress updates. Update again right after a backup restoration, because a restore brings back older versions.
- Delete what you do not need. Delete inactive plugins and themes, and any plugin or theme from an unofficial, nulled, or cracked source. Remove file manager plugins that give file access from the WordPress Admin area unless you actively use them.
- Check scheduled tasks. In the Hostinger dashboard, open Advanced → Cron Jobs and delete any cron job you did not create.
- Secure the other websites on your plan. Repeat these steps for every website and subfolder installation in the same hosting plan. One unsecured website can reinfect all the others.
To secure your Hostinger account itself, also follow What to do if your account or site has been hacked at Hostinger.
NOTES
- Deactivating or deleting the malicious plugin does not close the weakness that let it be installed. Without these steps, the same or a different malicious plugin can appear again.
- Restoring a clean backup does not change your Hostinger, FTP, or database passwords, and it brings back the security keys from the backup date. Secure your website right after the restoration finishes, before you add new content.
Verify the ClickFix cleanup
Verify the cleanup by testing your website as a visitor over several days and checking new Malware Scanner results. Malicious code can show the fake page only at certain times or to certain visitors, so a single test is not enough.
- Clear your website cache, and the CDN or Cloudflare cache if you use one, then wait 5 minutes.
- Open your homepage, the pages that showed the fake page, and a contact or form page in a private window while logged out. Test in at least two browsers.
- Test from another device or over mobile data.
- Repeat these tests later the same day and again over the next two days.
- Run a full scan with a trusted security plugin, such as Wordfence or MalCare, including its database and file-change checks.
- After the Malware Scanner runs its next automatic scan, open Hostinger dashboard → Websites → Manage site → Security → Malware Scanner and confirm that no new detections appear after the cleanup date. The Malware Scanner shows the time since its last scan and cannot be started manually.
- Keep caching and CDN features turned off while you test, and turn them back on only after your website stays clean for at least a day. Then clear the cache once and test again.
NOTE
- If the fake page appears again, even once, stop testing that page and note which page showed it and when. Then follow the steps for a fake verification page that keeps coming back.
Fix a fake Cloudflare verification page that keeps coming back
A ClickFix infection that returns after cleanup means the way in is still open. There are four usual causes: another infected website on the same hosting plan, an outdated or vulnerable plugin, a stolen password, or a hidden file the cleanup missed.
- List every website in your hosting plan, including WordPress installations in subfolders such as
domain.tld/blog. Older or forgotten installations are a common source. - Check the Malware Scanner results for each website. The same file name appearing on several websites shows that the infection is spreading across your plan.
- Update or delete outdated plugins and themes on every website, not only the one showing the fake page.
- Clean or restore all infected websites in the same session, then secure each of them before you test again.
- If the infection still returns, restore each infected website’s files and database from a backup created before its first detection, or request the Hostinger site cleanup service.
Once the fake verification page stops appearing over several days of testing and your accounts are secured, your website and its visitors are protected from this ClickFix infection.
Frequently asked questions about fake Cloudflare verification pages
Is the verification page from Cloudflare?
No. The page copies Cloudflare’s design to look trustworthy, but malicious code on your website generates it. A real Cloudflare challenge never asks visitors to press keyboard shortcuts or paste commands.
Why don’t I see the fake page when I’m logged in?
Many ClickFix scripts hide the fake page from logged-in administrators, so the website owner does not notice it. Always test in a private window while logged out of WordPress.
Why does the Malware Scanner show my website as clean?
The Hostinger Malware Scanner checks website files, not the database, and a malicious plugin can look like normal plugin code. A clean scan alongside the fake page means you still need to check your plugins, must-use plugins, theme, .htaccess file, and database manually.
Does deactivating the malicious plugin remove the infection?
Deactivating the plugin stops it from showing the fake page, but its files stay on your server. Delete the plugin completely, then secure your website so it cannot be installed again.
Does restoring a backup remove a ClickFix infection?
Restoring files and the database from before the first detection removes the malicious code added after that date. The restored website can still be reinfected, so update your software, change your passwords and security keys, and check the Malware Scanner results after its next scan.
What should my visitors do if they followed the instructions?
Visitors who ran the command should disconnect the affected computer from the internet, run a full antivirus scan, and change their important passwords from a different device. They should also contact their bank or IT team if the computer holds work or financial accounts.
Additional resources