Hostinger cPanel hosting plans allow you to edit Mail Exchanger (MX) records via the local cPanel interface. However, these local records only control your live mail routing if your domain name points directly to Hostinger cPanel nameservers. If your domain points to hPanel nameservers or an external provider, you must manage your live MX records at that specific DNS zone provider instead.
Before you start
- This configuration only affects your live email routing if your domain uses Hostinger cPanel nameservers.
- If your domain points elsewhere, you can still map the email service to use your cPanel email by creating an A record at your current DNS provider pointing to your cPanel server IP address.
- If your domain is pointing to Hostinger cPanel nameservers and you are using a different email service such as Google Workspace, gather the priority and destination values from your email provider.
Add an MX record in Hostinger cPanel
- Log in to your Hostinger cPanel account.
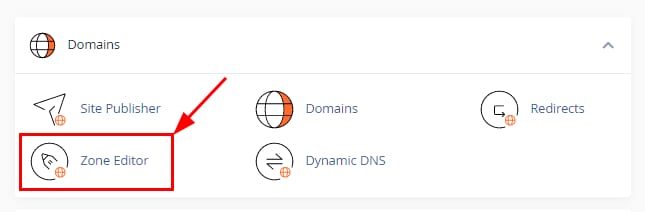
- Navigate to the Domains section and select Zone Editor.

- Locate your domain name from the list and click the + MX Record button.

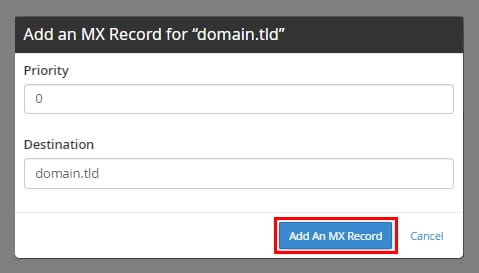
- In the overlay window, enter the Priority value (for example,
0). - In the Destination field, enter your mail server address or your domain name.
- Click the Add an MX Record button to save the changes.


If you’re using Hostinger cPanel email, make sure that your domain has only the following record:
- Type: MX
- Priority: 0
- Destination: your domain name
- TTL: Default
Edit or delete Hostinger cPanel MX records
- Navigate to the Domains section in cPanel and select Zone Editor.
- Locate your domain and click the Manage button.
- Filter the records list by clicking MX to view only mail records.
- To modify a record, click the Edit button next to the row, update the values, and click Save Record.
- To remove a record, click the Delete button next to the row and confirm the action when prompted.


Your cPanel MX record updates are now complete and will take effect once propagation is completed.