This guide explains how to create email addresses for your domain using Hostinger Mail and manage them directly from hPanel. A mailbox or email account provides an individual email address for your domain, such as name@yourdomain.tld, with its own unique password, storage allotment, and settings. Creating these accounts allows you to send and receive messages through webmail or your preferred external email client.
Before you start
Before creating your Hostinger Email mailboxes, make sure that you have an active hosting plan eligible for a free email trial, or a standalone Hostinger Mail plan.
Activate the free Hostinger Mail trial
If your hosting plan includes a free email trial and you are setting up email accounts for the first time, follow these steps.
- Go to hPanel → Emails.
- Click on Start Free – you will also get the option to purchase Business Email.
- Select the domain from the dropdown list and click Confirm.
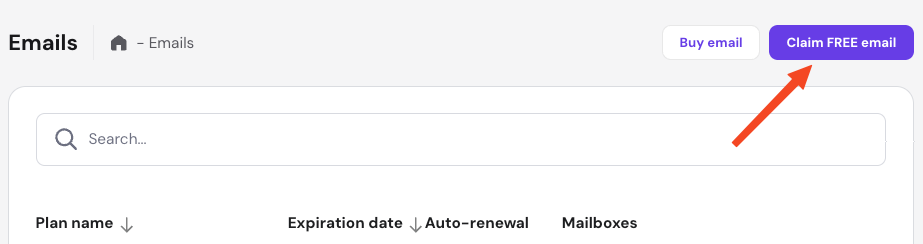
To claim the free email trial for additional domains:
- Go to hPanel → Emails.
- Click on Claim free email.

- Enter the domain name or select it from the dropdown list and click Confirm.
Activate a Hostinger Business Mail plan
You should set up your Business Email order if:
- You don’t have a hosting plan and have Starter, Standard or Premium Business Email plan order pending set up, or
- You have a both a hosting plan and a Business Email order, and the domain you want to use is not added to the hosting plan.
To set up your Business Email plan:
- Go to hPanel → Emails.
- Locate the purchased email plan.
- Click Setup.
Once the email service is activated, you can start creating mailboxes.
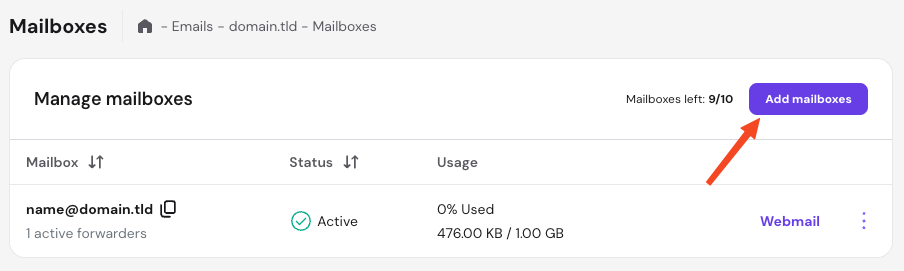
Create a Hostinger Mail mailbox
- Go to hPanel → Emails.
- Locate the email plan connected to your domain and click Mailboxes.
- Click Add mailboxes.
If you have a Business Email plan and are out of slots, the button will show as Buy more mailboxes.

- Enter the email name and password.

-
Click Create.
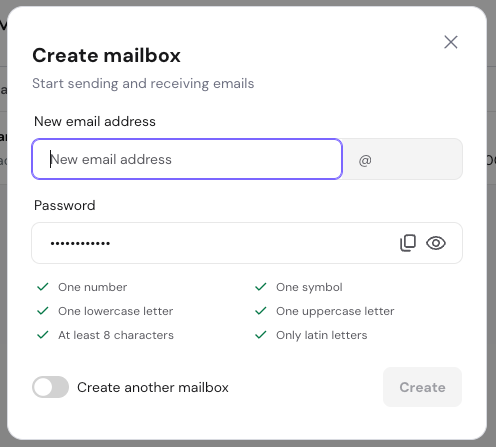
The new mailbox will appear on the Mailboxes list.
Mailbox name requirements
The mailbox name must follow these rules:
- Length: 1–50 characters
- Allowed characters: letters (a–z), numbers (0–9), and periods (.)
- Cannot contain special characters such as:
& = _ ' - + , < > - Cannot contain multiple consecutive periods (..)
- Names can begin or end with non-alphanumeric characters except periods (.)
Manage Hostinger Mail mailboxes
The Mailboxes section displays all existing email accounts for your domain along with current storage usage, status, and quick access to webmail. Click the Options (⋮) menu next to a mailbox to perform management actions:
- Change password
- Mailbox settings
- Create forwarders
- Create alias
- Create an automatic reply
- Create catch-All
- Connect apps and devices
- Delete account
NOTE
- Deleted mailboxes can be restored within 30 days before permanent deletion. For detailed steps, refer to our guide on how to restore a deleted Hostinger Mail mailbox.
You can now access your new mailbox using Hostinger Webmail or link it to an external email client application.
Additional resources
- Hostinger Video Tutorial: Get started with Hostinger Mail.
- Interactive demo: