How to make an ecommerce website in 7 steps
Sep 22, 2026
/
By Ksenija & Auksė Ž.
/
16 min Read
To make an ecommerce website, use a website builder, an ecommerce platform, or a content management system (CMS) with ecommerce tools. All three can get a store up and running without any coding.
Website builders are the quickest way to launch a small catalog, ecommerce platforms handle larger inventories and multiple sales channels, and a CMS gives you the most control over how the store works. The best option depends on what you want to sell, the features you need, your budget, and how much control you want over building and managing your store.
Whichever approach you choose, you’ll need to set up the essentials that allow customers to discover your products and complete a purchase. This usually includes your domain and hosting, payment and shipping methods, product listings, and the pages that make up your storefront.
However, not every sale needs to go through a storefront. If customers already know what they want to buy, some ecommerce platforms let you send them directly to checkout through a shareable link instead.
Here are the seven steps to take to make an ecommerce website:
- Find the right platform. Compare options based on product management, payments, shipping, customization, and the other features you need to run your business.
- Get your domain and hosting. Register your store’s domain and arrange reliable hosting if your platform doesn’t include it.
- Configure checkout and delivery. Add your preferred payment methods and decide how you’ll ship orders to customers.
- Build your storefront. Create a mobile-friendly layout that makes products easy to find and buy.
- Add your products. Upload images, descriptions, prices, variants, and other essential product details.
- Complete your store pages. Create the main pages customers need to navigate your store and make purchases confidently.
- Prepare for launch. Test orders, payments, shipping, links, and the mobile experience before going live.
1. Choose an ecommerce platform
Choose an ecommerce platform by comparing how well each one handles the products you sell, the payment and shipping methods your customers expect, and the level of design control you want.
Your choice will determine which payment methods, shipping options, design tools, and other ecommerce features you can use as your business grows.
When comparing ecommerce platforms, look at:
- Product management. Check how easy it is to add and update products, process orders, and manage variants, inventory, subscriptions, or digital downloads.
- Payment options and fees. Check which payment methods and currencies are supported, as well as any transaction or payment processing fees.
- Shipping and fulfillment. Look for the shipping rates, carrier integrations, delivery options, and fulfillment tools your business requires.
- Design and customization. Consider the available templates and the level of control you have over your storefront, product pages, and checkout.
- Marketing and SEO. Check for built-in SEO, analytics, discounts, email marketing, and other tools you plan to use to attract and retain customers.
- Scalability. Make sure the platform can accommodate more products, orders, traffic, and sales channels as your store grows.
- Overall cost. Compare subscription fees with the costs of hosting, themes, apps, transaction fees, and other paid features you’ll need.
As a no-code option, Hostinger Ecommerce Website Builder combines website creation, hosting, and ecommerce management on a single platform.
You can generate your store with AI or choose a customizable ecommerce template, then adjust the design to fit your business.
You can also sell without sending every customer through your storefront. Hostinger Ecommerce Checkout Links let you create a shareable link for one or more products with the variants and quantities already selected.
Customers who open it go directly to a pre-filled checkout, so you can use the link in email campaigns, social media, DMs, printed materials, or a QR code.
This works particularly well when the customer has already discovered the product elsewhere and doesn’t need to browse your catalog first. For example, you could promote a specific bundle in an Instagram post and link directly to checkout, or add a QR code for a product to packaging or an event flyer.
The platform supports physical and digital products, services, gift cards, and print-on-demand products.
Customers can choose from 100+ payment methods, while you track inventory in real time, set up shipping zones and delivery options, and manage orders from one dashboard.
Built-in tools also cover product reviews, discounts, related product recommendations, analytics, and SEO.
AI tools can handle some of the setup work as well. The AI Product Generator creates editable product descriptions from uploaded images, while the AI SEO Assistant suggests focus keywords and helps complete your site’s SEO details.
Pro tip
Start by shortlisting two or three platforms that meet your must-haves, then sign up for any free trials on offer to test the interface before you pay. Hands-on experience will reveal usability issues that feature lists won't.
2. Secure your domain and hosting
Depending on the ecommerce platform you choose, hosting may already be included, or you may need to purchase it separately.
Pick a name that’s easy to remember, easy to spell, and easy to connect to your business, then check that it doesn’t closely resemble an existing brand before you buy a domain name.
You have more options than .com. Consider .shop for online stores, or a country-code extension if you’re targeting a specific market. Whichever registrar you use, make sure the domain is registered in your name so you can move it freely later.
Your domain points visitors to your store, but hosting is what they arrive at – it’s where your product images, pages, and store files live.
Check whether your platform already includes hosting. Buying separately means choosing a plan with enough storage for your product catalog and images, and enough bandwidth for the traffic you expect.
When comparing ecommerce hosting providers, prioritize performance, reliability, and security.
Look for features such as NVMe storage, caching, CDN support, and sufficient bandwidth to keep product pages loading quickly.
Choose a provider with at least a 99.9% uptime guarantee and essential security features such as SSL, automated backups, malware scanning, firewall protection, and DDoS protection.
Consider whether the hosting can grow with your store. You should be able to upgrade resources as traffic increases or during seasonal spikes without disrupting your site. 24/7 technical support is also useful, particularly if you don’t plan to handle server-related issues yourself.
Avoid registering your domain through your ecommerce platform or a third-party builder if they retain ownership. Always ensure the domain is registered in your name so you can transfer it freely if you switch providers.
3. Set up payment and shipping methods
To set up payment and shipping methods, connect a payment gateway that supports your customers’ preferred payment methods, then decide which regions you’ll deliver to and what you’ll charge for shipping.
A payment gateway is the service that processes card and wallet payments for you. These can include credit and debit cards, digital wallets such as Apple Pay and Google Pay, bank transfers, and market-specific payment methods.
Compare providers based on their transaction fees, currency conversion charges, payout schedules, supported countries, and integration with your ecommerce platform.
Check for additional costs associated with refunds, chargebacks, or international payments as well.
If you sell primarily to customers in India, for example, you might choose Razorpay so customers can pay directly from their bank accounts using UPI (Unified Payments Interface ), alongside cards and other locally popular payment methods.
For shipping, first decide which countries or regions you’ll serve and how you’ll fulfill orders. You can pack and ship products yourself, use a third-party fulfillment service, or have a supplier send orders directly to customers through dropshipping.
Then, create shipping zones and choose how customers in each one will be charged for delivery:
- Free shipping. Cover delivery costs yourself, include them in product prices, or offer free delivery above a minimum order value.
- Flat-rate shipping. Set predefined delivery fees, such as $5 for standard shipping and $10 for express delivery.
- Calculated shipping. Base the delivery fee on factors such as destination, package weight, dimensions, and your carrier’s rates.
- Local pickup or delivery. Give nearby customers the option to collect orders or receive delivery within a defined area.
Once configured, place test orders for different locations and order values. Confirm that the correct payment methods appear, shipping charges are calculated accurately, and customers receive the expected order confirmation.
Confirm that any payment gateway you choose is PCI DSS compliant. Processing card payments through a non-compliant provider can expose your customers’ data and make your business liable for security breaches.
4. Design your ecommerce store
Desing you ecommerce store by starting with a template that fits your catalog and brand, or using an AI website builder to generate the initial layout, then customizing the pages and navigation around how customers browse, compare, and buy your products.
You can look at successful ecommerce website examples to see how different stores organize their product categories, navigation, imagery, and calls to action.
As you create your own design, focus on:
- Clear navigation. Keep your main menu simple, group products into categories customers would think to look under, and add search and filters when your catalog is large enough to need them.
- Clear next steps. Use headings, spacing, product imagery, and prominent buttons to guide customers toward your best-selling products and key actions such as Add to cart and Checkout.
- Consistent branding. Use the same fonts, colors, image style, and visual elements throughout your store so the site feels like one coherent business rather than a set of unrelated pages.
- Mobile-friendly layouts. Make buttons easy to tap, keep text readable without zooming, and check that menus, filters, product galleries, forms, and checkout work comfortably on smaller screens. This is where most of your orders will come from, as smartphones accounted for 71% of global online retail orders in Q2 2026.
- Accessible design. Make sure customers can browse products and complete checkout using a keyboard or assistive technology. Use readable text, descriptive alt text, clear form labels, and easy-to-identify buttons. Check text and background color combinations with a free tool such as the WebAIM Contrast Checker, aiming for a contrast ratio of at least 4.5:1 for normal text and 3:1 for large text under WCAG AA guidelines.
In some countries and regions, including the US, EU, and UK, ecommerce websites may be subject to accessibility laws such as the ADA or EAA. Non-compliance can result in legal complaints or fines. Review the regulations that apply to the markets where you sell before launching.
Keep the route from a product page to checkout as straightforward as possible. Avoid unnecessary pop-ups, competing calls to action, or navigation elements that distract customers when they’re ready to buy.
Before moving on, preview your key pages on both desktop and mobile and check that customers can easily find a product, view its details, add it to their cart, and reach checkout.
5. Create product listings
Create a listing for each product by including a clear product name, price, images, description, available options, and stock status. Add reviews or ratings too, if your platform supports them.
Start with photos that let customers inspect the product from different angles. Show important details such as materials, texture, and finishes up close, and add a photo of the product in use so customers can see its size clearly.
Keep the lighting, backgrounds, and image style consistent across your catalog so products are easier to compare.
Your product description should answer the questions the images can’t. Explain what the product does, its main benefits, and the details customers need before buying.
Depending on what you sell, that could include dimensions, materials, compatibility, ingredients, care instructions, or what’s included in the package.
Follow the same approach when you write product descriptions across your catalog so customers know where to look for the details they care about.
Make options such as size, color, or material easy to select, and show whether each variant is in stock. Keep inventory information accurate so customers know when an item or specific option is out of stock.
Pro tip
For out-of-stock variants, add a back-in-stock notification option instead of greying out the button. Letting customers enter their email to be notified recovers potential lost sales and gives you a list of people who already want the product when it returns.
Finally, make the next action obvious. Place a clear Add to cart button near the price and product options, and check that switching variants updates the image, price, and stock status.
6. Add the main ecommerce website pages
Add a homepage, category and product pages, About and Contact pages, policy pages, cart, and checkout to complete your ecommerce website.
Each page should help customers complete a specific part of the shopping journey, from discovering products to placing an order.
Homepage
Place your main product categories near the top of the homepage so customers can quickly choose where to start browsing.
Follow them with a small selection of featured, best-selling, or new products, along with any offers you currently want to promote.
Use clear calls to action, such as “Shop now” or “View collection,” to guide customers to the relevant part of your catalog.
If you sell a large number of products, make the search bar easy to find rather than relying entirely on menu navigation.
Keep large banners, product images, and other visual elements optimized so they don’t slow down the page. Measure Core Web Vitals to identify issues with loading speed, responsiveness, and visual stability, then optimize any page elements causing poor performance
Pro tip
Use lazy loading for images below the fold so only the assets visible on screen load initially. This reduces initial page load time without requiring you to remove visual content from the page.
Category pages
Organize products according to how customers are likely to browse them, such as by product type, use, audience, or collection.
Keep category names specific enough that customers can predict what they’ll find before opening them.
Pro tip
Use descriptive, keyword-rich URLs for category pages (e.g., /womens-running-shoes instead of /category-12). Clear URLs help search engines understand your catalog structure and can improve organic rankings for category-level searches.
For larger categories, add filters for attributes that influence the purchase: size, color, price, material, brand, or availability. Sorting by price, newest arrivals, or popularity helps too.
Product pages
Lay out the page so the price, product options, and Add to cart button sit together near the top, where customers look first.
Below that, arrange supporting information – specifications, sizing, materials, delivery details, and reviews – in the order that matters most for your product. Sizing comes first for clothing; compatibility comes first for electronics.
Browse product page design examples for ideas on presenting product information clearly and making the path from browsing to adding an item to the cart easier.
About page
Explain who runs the business, what you sell, and what makes your products different. Include details customers can’t get from a product page: where your products are made, how you source materials, who designs them, or why you started.
You don’t need a long company history. Prioritize details that give customers useful context about the products and the business they’re buying from.
Contact page
Give customers clear ways to contact you about products, orders, delivery, or returns. Include the channels you actively monitor, such as email, phone, live chat, or a contact form, and state when customers can expect a response.
Add your address and opening hours if you have a physical store or pickup location. Keep the Contact page linked from your main navigation or footer so customers don’t have to search for support information.
Policy pages
Create separate policies for shipping, returns, refunds, and customer data. Spell out the conditions customers need to know before ordering, including delivery time frames, return windows, excluded items, refund methods, and who pays return shipping.
Avoid copying policy templates directly from other websites without legal review. Policies that don't reflect your actual business practices or comply with local consumer protection laws can expose you to disputes and regulatory penalties.
Make these policies easy to reach from your footer and link to them from the checkout page, where customers are most likely to look. Check which policies and disclosures you’re legally required to provide in every market where you sell.
Cart and checkout pages
Let customers review their products, quantities, prices, discounts, shipping costs, and final order total before paying. Allow them to change quantities or remove products without leaving the cart.
Around 70% of online shopping carts are abandoned, with unexpected costs and forced account creation among the most common reasons. To reduce friction at this stage, ask only for the information needed to process and deliver the order, clearly show payment and delivery options, and offer guest checkout if your platform supports it.
7. Test and launch your ecommerce website
Test your ecommerce website by placing a practice order yourself, then launch it by publishing the site and connecting your domain.
Start from the homepage and work through product selection, cart, checkout, and payment the way a customer would, on both desktop and mobile. Test each of the following:
- Navigation and product discovery. Open menu links, use search and filters, and make sure category and product pages lead customers where expected.
- Product options and cart. Select different variants, change quantities, remove items, and confirm that prices and availability update correctly.
- Checkout. Complete a purchase using the payment and delivery options you’ve enabled. Check that shipping fees, taxes, discounts, and the final order total are calculated correctly.
- Forms and customer information. Submit the contact, checkout, and account forms, and confirm that required fields are enforced and error messages appear when something’s missing.
- Order confirmation. Check that successful orders appear in your store dashboard and that customers receive the correct confirmation page and email.
- Links and page content. Open important internal and external links and review product information, contact details, shipping information, and store policies for errors.
Once everything works correctly, publish your ecommerce website and connect your domain if it isn’t already connected. Check that the live site loads correctly, displays a padlock icon in the browser address bar (indicating HTTPS is active), and is accessible via your main domain.
Then, place one final order on the live store to confirm that checkout, payment processing, shipping calculations, and order notifications still work after publishing. This one should be a real order with test mode off, so use your own card and refund it afterward. If everything goes through correctly, your ecommerce website is ready for customers.
Why you need an ecommerce website
You need an ecommerce website because it allows you to sell products 24/7 with global reach, and reduces your costs compared to a physical store.
It also shows you what customers browse and buy, so you can adjust your products and marketing based on what’s actually working.
Increased preference for online shopping
An ecommerce website lets you meet the growing demand for online shopping by giving customers a convenient way to browse and buy your products from wherever they are.
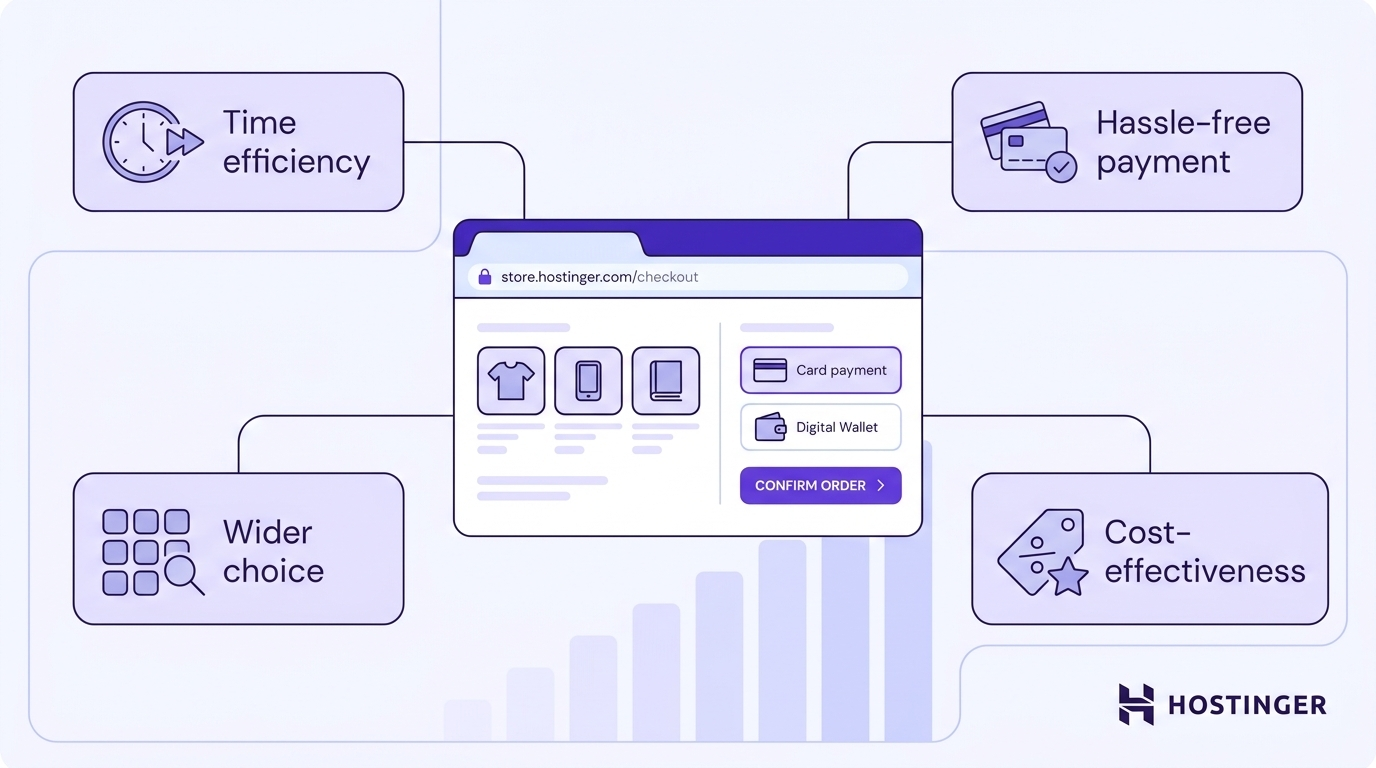
Customers choose online shopping because it offers:
- Convenience. Customers can shop at any time without traveling to a physical store or waiting for it to open.
- More choice. Shoppers can browse a wider selection of products, brands, sizes, and variants than a local store can stock
- Flexible payments. Online stores can support cards, digital wallets, bank transfers, and other payment methods that customers already use.
- Easy price comparison. Customers can compare products, prices, and offers before deciding what to buy.
Reduced operational expenses with 24/7 availability
Selling products online is significantly less expensive than running a physical store because you avoid the fixed costs that come with a storefront:
- Always-open storefront. Your store takes orders overnight, on weekends, and on holidays without extra staffing. Online shopping peaks in the afternoon and evening, often outside standard store hours.
- Staff expenses. You don’t need floor staff or cashiers, and chatbots can handle common customer support questions. You can also explore how to use AI in ecommerce to get more done with less effort across your entire operation.
- Monthly rent and utilities. While you still need hosting and a domain name, this cost is far lower than paying for commercial rent, electricity, and air conditioning.
Data collection opportunities for personalization purposes
An ecommerce website lets you collect data about how customers interact with your store and act on what it tells you.
You can track which products customers view, what they purchase, how often they return, and which items they leave in their carts. You can then use this data to recommend related products, create offers based on previous purchases, or send more relevant email campaigns.
You can also collect zero-party data, which customers intentionally share with your business. For example, a clothing store could ask customers about their preferred styles or sizes through a quiz or account preferences, then use those answers to recommend suitable products.
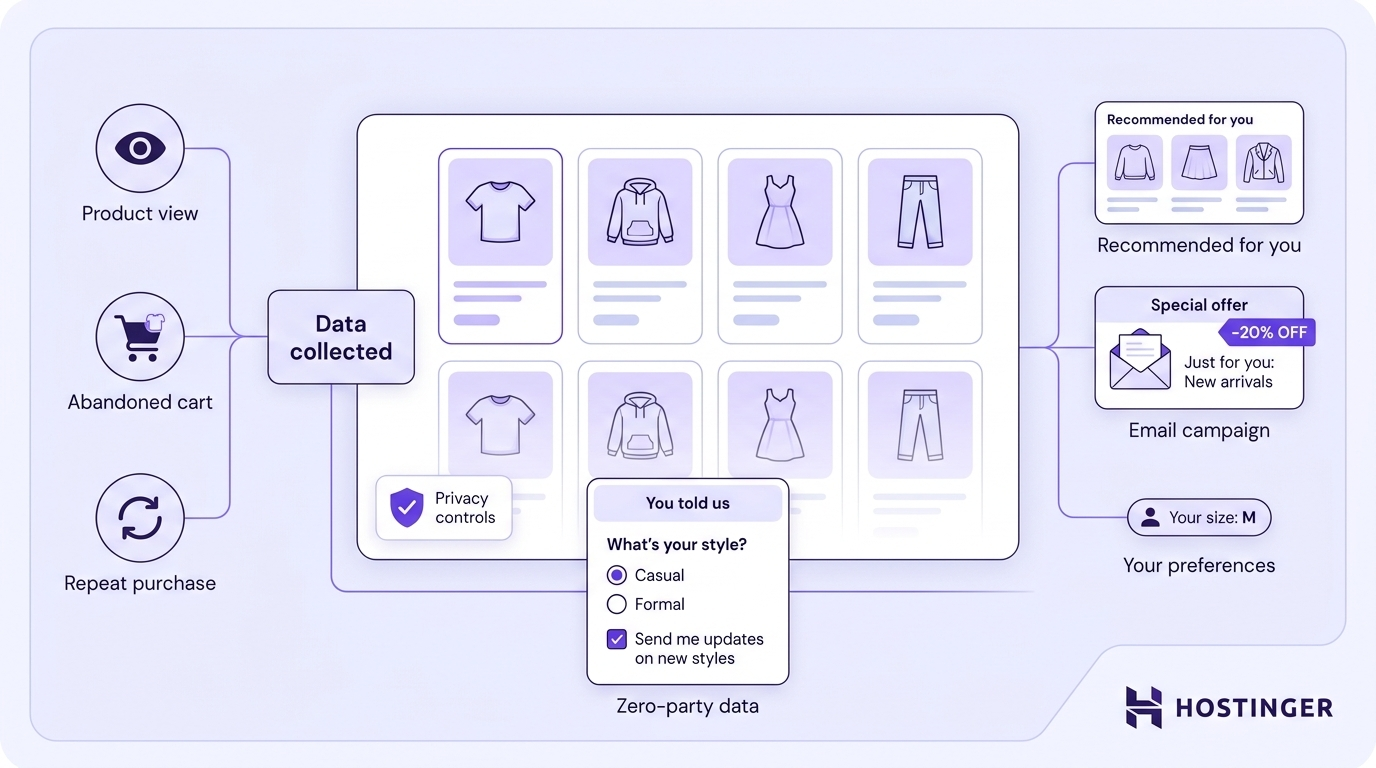
Be transparent about what customer data you collect, why you collect it, and how you use it, and provide any consent or privacy controls required by the markets where you operate.
Adaptability to the ever-changing business landscape
An ecommerce website lets you see which marketing works and shift your budget accordingly. You can use channels such as SEO, email, and paid advertising to attract customers, then track what happens after they reach your store.
Website analytics show which campaigns bring in traffic and which lead to purchases. With this information, you can focus your budget on the channels that deliver results and adjust those that don’t.
For example, if an advertising campaign attracts visitors but few of them make a purchase, you can change the offer, messaging, or targeting and measure whether performance improves.
Tips to promote your ecommerce store
To promote your ecommerce store, use content marketing, social media, affiliate partnerships, and email marketing to attract potential customers and encourage previous buyers to return.
Implement content marketing
Create content around the questions, problems, and interests of your target audience. This can include blog posts, buying guides, tutorials, comparisons, videos, and newsletters.
Start by writing blog posts that answer questions your potential customers are already searching for, then link to the products that solve them.
For example, a store selling hiking equipment could publish guides on choosing hiking boots, packing for different types of hikes, or comparing tent materials, then direct readers to relevant products when they’re ready to buy.
Boost social presence
Use social media to introduce your products to new audiences, interact with customers, and bring interested shoppers back to your ecommerce website.
Here are several ways to use social media to grow your brand and business:
- Repurpose existing content. Turn blog posts, product guides, customer reviews, and product photos into shorter posts, videos, or other content suited to each platform.
- Use social listening. Follow conversations, questions, and trends related to your niche to identify topics your audience is interested in.
- Share social proof. Repost customer reviews, testimonials, photos, and other user-generated content that shows people using and recommending your products.
- Provide customer support. Respond to questions in comments and DMs, then direct customers to the appropriate product, policy, or support page when needed.
- Use shopping features. Where available, connect your product catalog to the platform’s shopping tools so customers can discover products while using social media.
- Run targeted ads. Create campaigns for specific audiences based on factors such as interests, demographics, or previous interactions with your business.
Run affiliate marketing
Build an affiliate program that rewards partners for sending customers to your store. Start by choosing affiliates whose audiences are relevant to your products and deciding how much commission you’ll pay for each successful referral.
Affiliate marketing currently drives 16% of ecommerce sales, making it a valuable sales channel for online stores.
Use a platform such as CJ or Awin to generate tracking links, track sales, calculate commissions, and manage payouts.
Give affiliates useful promotional materials, such as product images, key selling points, unique discount codes, or dedicated landing pages. Track which affiliates generate sales so you can focus your partnerships and budget on those that perform well.
Build a mailing list
Build your mailing list by adding signup forms where customers are likely to see them, such as on your homepage, in your footer, in blog posts, and at checkout.
Give people a clear reason to subscribe by offering a first-order discount, early access to sales, product updates, or exclusive content.
As your list grows, create an email marketing strategy for ecommerce that defines what you’ll send, who should receive each message, and when you’ll contact them.
Then focus on four things:
- Use a professional email address. Send campaigns from an address using your business domain, such as offers@yourstore.com, so recipients can easily recognize your business.
- Segment your email list. Group people based on factors such as previous purchases, browsing behavior, or where they are in the buying process. For example, send different messages to new subscribers, cart abandoners, and previous buyers.
- Automate key emails. Set up automated sequences for events such as new signups, abandoned carts, completed purchases, or customer birthdays. That way, the email arrives while the customer is still thinking about it.
- Keep growing your list. Try different methods for building an email list, such as signup forms, discounts, exclusive content, and social media promotion. Compare which placements and incentives generate the most signups, then focus on those that work best for your store.
Calculate the real cost of launching your ecommerce website
A small store using an all-in-one website builder typically costs $50–$150 to launch and $30–$300 per month to run. A larger store with custom development and serious marketing spend runs from $1,000 to $10,000+ per month.
Before launching your store, calculate both the upfront and recurring costs so you know how much you’ll need to get started and keep the website running.
Focus on three main areas:
- Initial setup. Account for your domain, hosting, or ecommerce platform, theme, and any paid add-ons. Domains typically cost $10 to $30 per year, while hosting can range from $2.99 to $29.99 per month. Ecommerce platforms can cost anywhere from $3.99 to $2,300 per month. Ready-made themes can be free or cost up to $300, while custom ecommerce development can range from $1,000 to over $50,000.
- Ongoing costs. Include platform renewals, paid apps, maintenance, integrations, and payment processing. Payment providers commonly charge 2.4% to 3.49% plus a fixed fee per transaction. Professional website maintenance can cost up to $2,000 per month, depending on how much work you handle yourself.
- Marketing. Budget for the channels you plan to use, such as SEO, paid advertising, social media, and content creation. New ecommerce businesses may spend around $500 to $1,000 per month on marketing, although you can start with a smaller budget and increase spending on channels that generate sales.
Your total will depend on the platform, features, and marketing channels you choose, so calculate each ecommerce website cost based on what your store actually needs. Remember to include renewal prices and recurring fees, not only what you pay at launch.
All of the tutorial content on this website is subject to Hostinger's rigorous editorial standards and values.

Ksenija is a digital marketing enthusiast with extensive expertise in content creation and website optimization. Specializing in WordPress, she enjoys writing about the platform’s nuances, from design to functionality, and sharing her insights with others. When she’s not perfecting her trade, you’ll find her on the local basketball court or at home enjoying a crime story. Follow her on LinkedIn.

Auksė Žirgulė is Vice President of Product at Hostinger, where she focuses on innovating products that help people build and grow their online presence. She currently leads Hostinger AI Builder and Hostinger Ecommerce. Passionate about solving real customer problems, Auksė enjoys turning customer insights into products that drive both user value and business growth. Follow her on LinkedIn.