How to Customize the WooCommerce Checkout Page: A Step-By-Step Guide
Dec 23, 2025
/
Brian
/
12min read

Customizing the checkout experience on your WooCommerce store can help reduce cart abandonment rates, encourage customers to complete their purchases, and even prompt them to spend more.
In this tutorial, we’ll provide a step-by-step guide on how to customize your eCommerce store’s checkout page, whether you’re a first-time WordPress user or a seasoned WooCommerce store owner.
Download checklist: How to start an online business
Why You Should Customize Your WooCommerce Checkout Page
WooCommerce is one of the most popular eCommerce WordPress plugins in the market. It offers many built-in features to set up an eCommerce site without coding.
However, the default checkout page might not align perfectly with the unique needs and brand identity of your eCommerce business. By customizing the standard WooCommerce checkout page, you can:
Enhance User Experience
A lengthy and complicated buying journey can confuse visitors and discourage them from purchasing. By removing unnecessary WooCommerce checkout fields and providing clear guidance, customers can navigate the checkout process more smoothly and quickly.
Tailoring the buying process to meet the specific needs and preferences of your target audience can make them feel more valued. For instance, let buyers choose their preferred language, currency, payment processing platform, and shipping method for a more positive experience.
Boost Conversion Rates
According to recent eCommerce statistics, almost 70% of buyers abandon their cart before completing the checkout process. Reasons for this include a complex checkout journey, unexpectedly high shipping costs, mandatory account creation, poor website performance, and a lack of diverse payment gateways.
By addressing issues users have with your checkout page through customization, you will be able to improve your conversion rates.
Increase Average Order Value (AOV)
Checkout page customization lets you implement strategies for cross-selling and upselling.
Personalized product recommendations, special offers, and bundle deals presented at checkout can entice customers to add more items to their cart and increase the average order value.
How to Customize WooCommerce Checkout Pages Using Plugins
Before you customize the checkout page, consider creating a staging site first. This way, you can test the changes in a safe environment without affecting your live site.
Luckily, Hostinger’s WooCommerce hosting comes with a built-in WordPress staging tool you can set up via hPanel:
- Head to Websites at the top bar and select Manage next to your domain name.
- On the left menu, navigate to WordPress → Staging.
- Click Create Staging to set up your staging site.

If you’re new to WooCommerce or WordPress in general, using a plugin makes the checkout page customization process much easier.
Here are several sales funnel plugins and checkout page builders compatible with WooCommerce:
- FunnelKit Builder. Get ready-made checkout templates and forms you can edit using the Gutenberg block editor or third-party page builders. You can add blocks, images, texts, and custom fields specific to your needs.
- CartFlows. One of the best WooCommerce plugins for optimizing the checkout flow, CartFlows simplifies the process of adding upsell offers and personalizing the WooCommerce Thank You page.
- Flexible Checkout Fields for WooCommerce. Its user-friendly interface enables you to edit WooCommerce checkout fields with ease. The pro version also offers additional features like checkboxes, radio buttons, and file uploads.
- Checkout Field Editor for WooCommerce. Easily create a custom field to collect customers’ shipping and billing addresses and any additional information you may need.
Creating a Custom Checkout Page With FunnelKit Builder
In this tutorial, we will show you how to customize checkout pages using FunnelKit Builder. Follow these steps to set up the plugin:
- Open your WordPress dashboard, go to Plugins → Add New Plugin, and search for FunnelKit Builder.
- Once you’ve installed and activated the plugin, head to the FunnelKit dashboard on the left sidebar.
- Go to the Quick Setup menu and choose Create Store Checkout.
FunnelKit Builder allows you to create a sales funnel from scratch or use a pre-made WooCommerce checkout page template. If you prefer the second option, click Create Store Checkout and choose from a wide range of funnel templates.

For a more targeted search, change the filters based on the checkout page types and page builder compatibility – Elementor, Divi, Block Editor, Oxygen, or Other.
Note that the free version only allows a one-page checkout process. To create a multi-step checkout page, you need to register as a pro user.
Hover over each template and click the Preview button to take a closer look at your favorite design. By doing so, you can see how your checkout page will look on desktops, smartphones, and tablets.
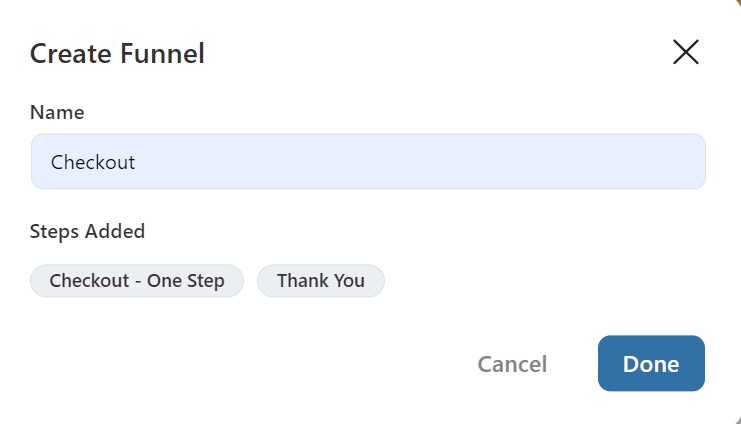
After finding the right design, select Import This Funnel at the top right of your screen. Enter your funnel name, and click Done.
To adjust your checkout page’s layout and content, click the Preview button inside the Checkout box.
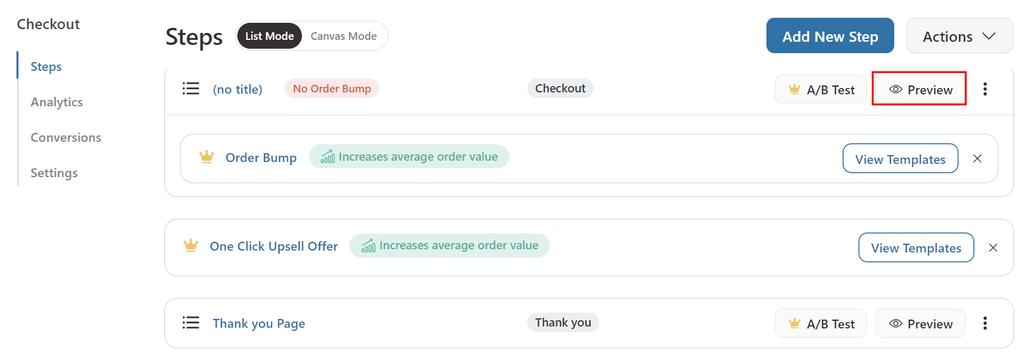
From there, select Edit Checkout at the top menu bar, and the Gutenberg interface will open.
Perform changes like you would on any WordPress page. Simply select any element like text, icon, checkout button, or block container to customize its content, typography, color, spacing, and size.
For instance, you can upload your own WooCommerce store logo by clicking the default logo and selecting Replace. Then, choose an image from the WordPress media library or upload a new one from your computer.

Arrange your logo further via the Block tab on the right menu bar. Set your logo as Default or Rounded, enter a suitable image alt text, select an aspect ratio, and adjust its width and height.
To customize your page’s design, select the Checkout Form container and head to Style on the right menu. Here, you can play around with various editing options:
- Font family. Choose a font that represents your brand identity best, whether it’s professional or casual.
- Font size and weight. Adjust how big or small the text should appear and set the thickness of the characters. Increasing the font size improves readability while adjusting the weight helps you emphasize certain text elements.
- Alignment. Move your content’s position within the container or page to the left, center, or right.
- Color. Change the background, text, and link colors to match your brand’s visual identity or highlight important information on the checkout page.
- Border style. Modify the border’s style, color, width, and radius to enhance the form’s visual appeal.
Once everything looks good, don’t forget to click Publish or Update to save your changes.
Customizing the Shipping Form on the Checkout Page
You can also customize the shipping form layout by selecting the Checkout Form block and navigating to General → Shipping Information on the right sidebar.
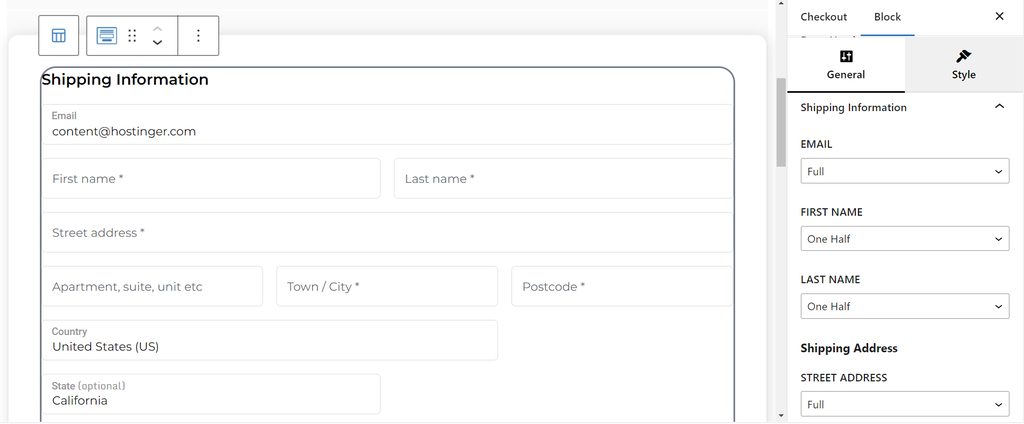
From there, adjust the size of each field box containing the customer’s personal information, shipping address, and billing address. There are four options you can choose from the drop-down menu:
- Full. The box will span the entire width of its parent container. As you can see in the screenshot above, the default Email and Street address fields are examples of a full column.
- One Half. Choosing this option means splitting content into two equal columns, just like how the First name and Last name fields are positioned.
- One Third. This is useful for dividing content into three equal parts. Take note of how we fit the Apartments, Town/City, and Postcode fields in one row.
- Two Thirds. Select this layout if you want to make one column wider than one-half fields while not taking up the full width of the parent container. The Country box is an excellent example of a two-thirds column.
To edit the content of your shipping form, save your changes, and click Back to Checkout Page at the top of the WordPress editor. Under the Design tab, customize checkout fields for shipping address, shipping method, and order summary.
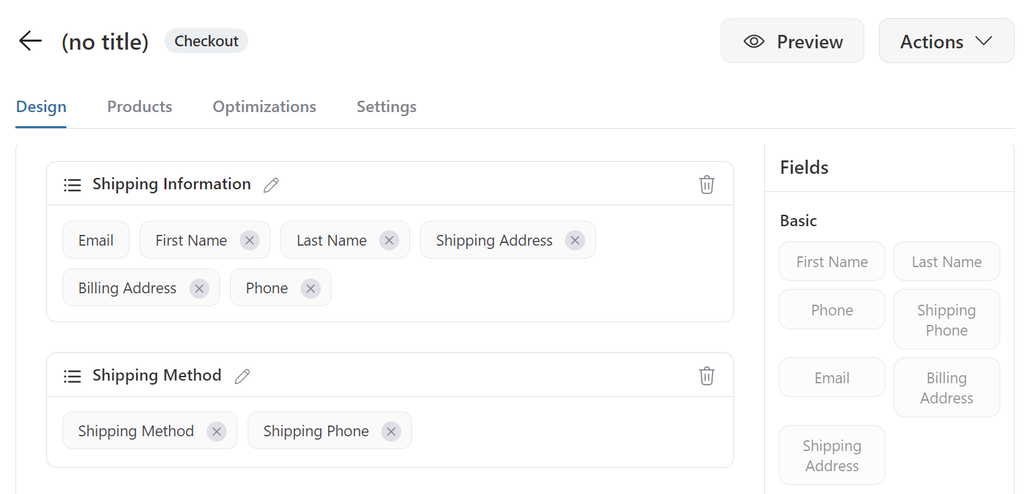
To add new checkout page form fields, simply drag them from the Fields menu on the right sidebar to your preferred section.
Unfortunately, you have to purchase FunnelKit Builder’s pro plan to add premium fields like Products and Order Total.
If you want to arrange how columns appear on each section, click and hold any field and drop it anywhere you like. You can also delete a field by hovering over it and clicking the X icon.
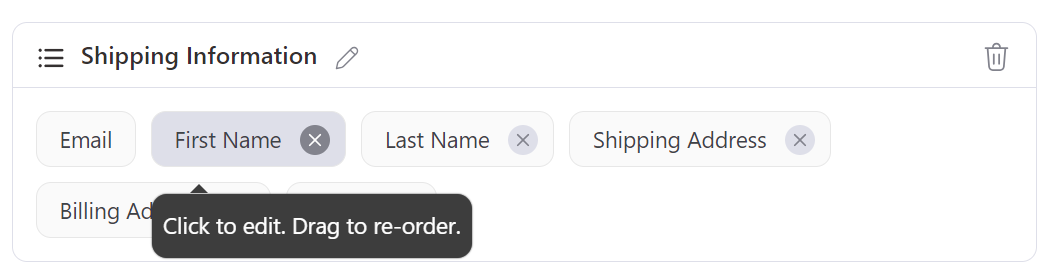
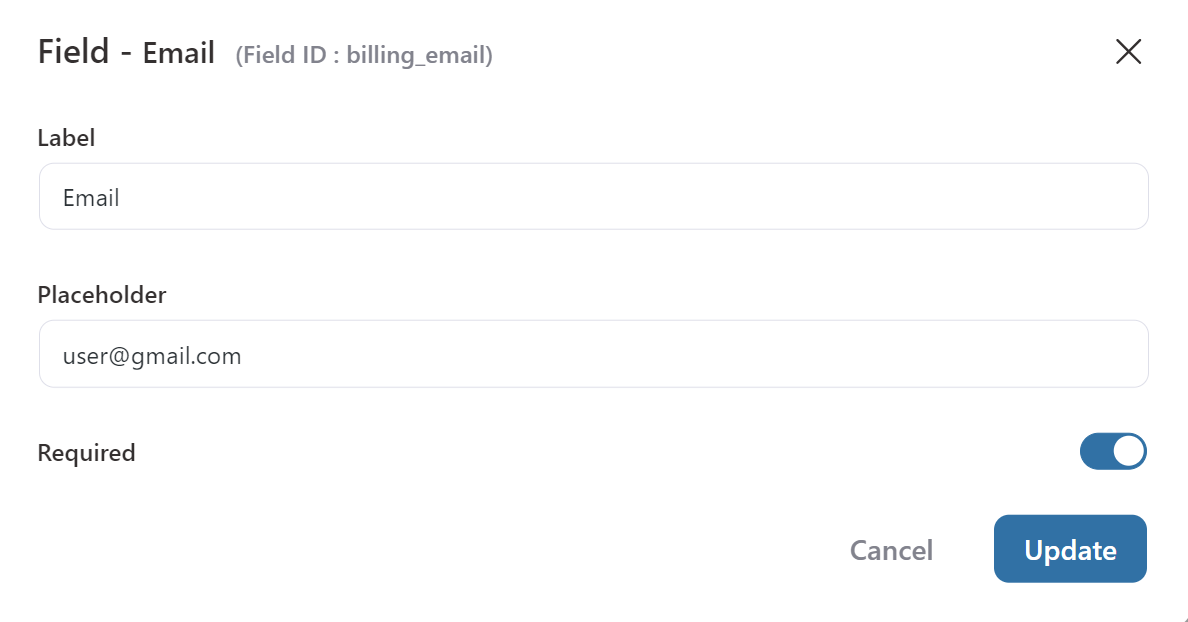
There’s also an option to customize the label of each field so that customers can fill in the form correctly and complete their checkout process without any confusion.
To do so, click any field just once, and the Edit Field pop-up will appear. Then, enter the label name and placeholder value. Hit Update to save the changes.
Once everything is configured, make sure to click Save so that you won’t lose your progress.
Customizing the WooCommerce Coupon Field During Checkout
Integrating a coupon field on your checkout page can give customers discounts and encourage conversion.
To add a coupon field, head to the Gutenberg editor and select the Checkout Form block. On the right sidebar, navigate to General → Collapsible Order Summary, and then toggle on the Enable button.
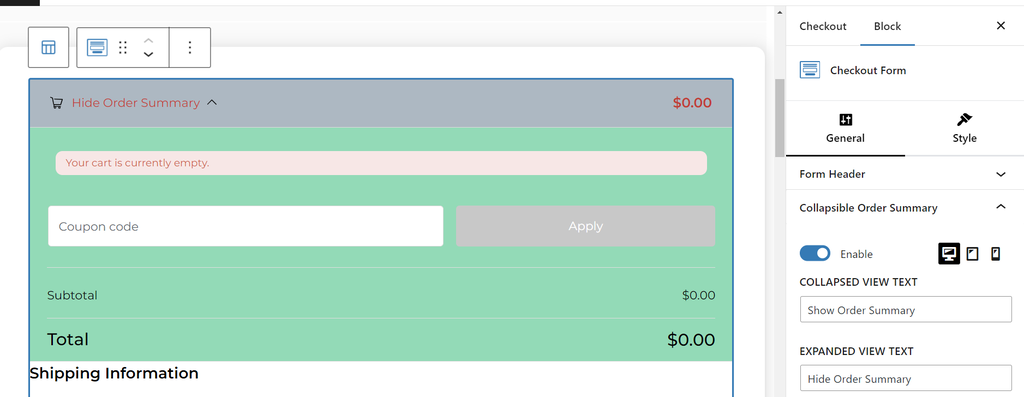
Scroll down to Coupon Button Text, and enter a short call-to-action – the default value is Apply. Make sure the Enable Coupon button is toggled on.
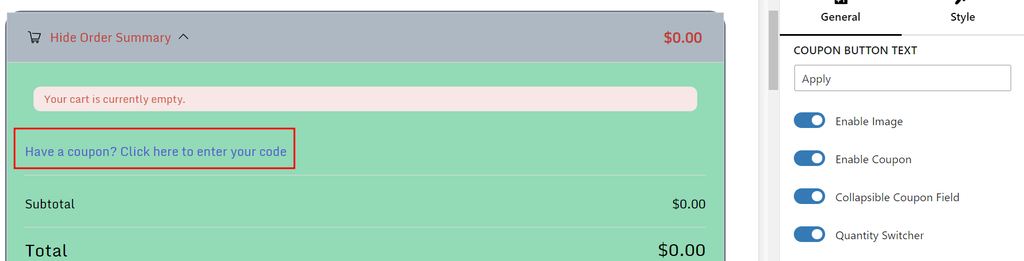
You can also hide the coupon code field and only make it visible once users click it by activating the Collapsible Coupon Field option.
Pro Tip
Before displaying products on the checkout page, make sure you’ve already added products to your WooCommerce shop. Not sure how? Follow the steps in our comprehensive WooCommerce tutorial.
Adding Products to Your Checkout Page
Click Back to Checkout Page, open the Products tab, and click Add Product. Search for the products you’ve added before, and select Add.

After that, configure the discount settings if you have any, and set the stock quantity for each product. Don’t forget to save your changes once done.
If you upgrade to the pro version, FunnelKit also offers the ability to create one-click upsell offers to boost your sales. To do so, click the Back (←) icon. Under Steps, select One Click Upsell and choose a suitable template.
To improve the user experience, display your products and checkout form on the same page using plugins like One Page Checkout and Layouts for WooCommerce.
Customizing Payment Options on the Checkout Page
By default, FunnelKit is compatible with every payment method that WooCommerce supports, including cash on delivery, bank transfers, and cheques.
But if you want to offer more payment options, installing plugins like WooCommerce Stripe Payment Gateway can do the trick. On top of major credit and debit card providers like Visa, MasterCard, UnionPay, and American Express, this plugin also supports Google Pay and Apple Pay.
Unfortunately, if you mainly receive payments via PayPal, you need to install a separate WooCommerce PayPal Payments plugin.
To set up Stripe for WordPress, head to Plugins → Add New Plugin and enter WooCommerce Stripe Payment Gateway in the search field. Once found, click Install Now, wait a few seconds, and activate the plugin.
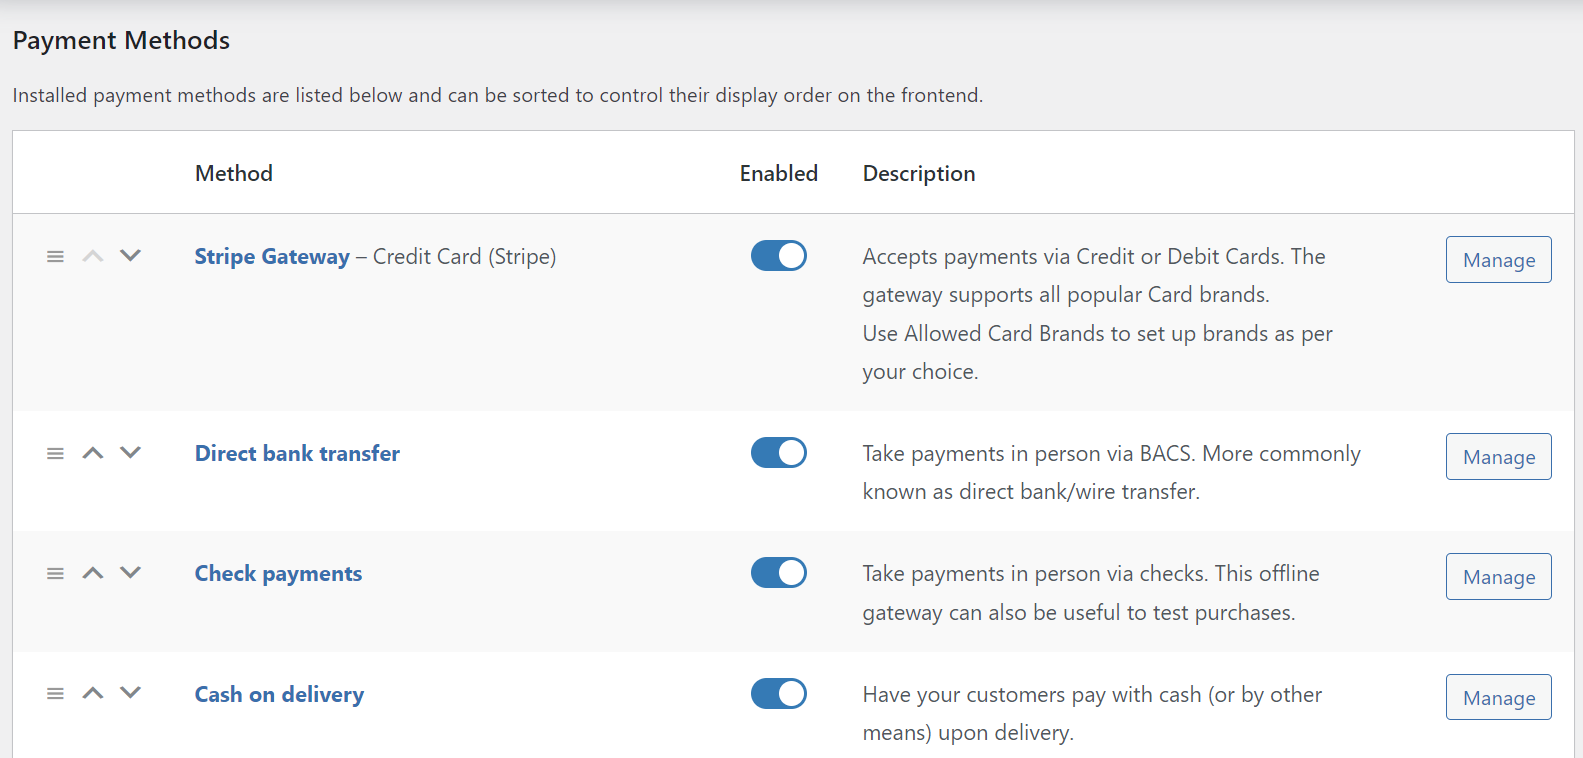
Next, go to WooCommerce → Settings on the left menu and open the Payments tab. From there, enable all the payment methods you prefer.
Publishing Your Custom Checkout Page
To launch your newly created checkout page, head back to FunnelKit → Store Checkout, click the three-dot icon inside the Checkout box, and select Publish.

That’s it; you’ve successfully created and published a custom checkout page. It should automatically appear when users click their cart.
To double-check, open your browser and visit your WordPress website to see whether the custom WooCommerce checkout page is displayed properly.
If your eCommerce site still shows the default WooCommerce design, follow these steps:
- Open your WordPress dashboard and head to WooCommerce → Settings.
- Choose the Advanced tab and scroll down to Checkout Page.
- Open the drop-down menu, enter your custom checkout page URL, and assign the correct page.
- Click Save Changes.
WooCommerce Checkout Page Customization for Advanced Users
Using custom code allows you to customize the WooCommerce checkout page even further. That said, we don’t recommend this method for those unfamiliar with code editing because the smallest mistakes can lead to website errors.
Customizing a Checkout Page Using Custom Code
You can add custom fields to your custom WooCommerce checkout page by editing your theme’s functions.php file.
Haven’t Selected a WordPress Theme Yet?
Enhance your eCommerce site’s look and feel with these stunning and feature-rich WooCommerce themes.
But first, make sure to create a WordPress child theme so that your customization won’t be affected by any theme updates.
Access your WordPress site files. You can use an FTP client like FileZilla or your hosting account’s file manager. If you’re a Hostinger user, simply follow these steps:
- Log in to your hPanel account, head to Websites, and click Manage next to your domain name.
- On the left menu, scroll down to Files → File Manager and choose Access files of (your domain).
- Open public_html → wp-content → themes, and open the theme’s folder you’re currently using.
- Locate and right-click on the functions.php file, then select Edit.
- Write a PHP function that contains the code you want to execute at the bottom of the file. Use add_action() to hook your custom function.
For example, to add a new field, use:
add_action('woocommerce_after_order_notes', 'your_custom_function');Inside the custom function, use woocommerce_form_field to add the field. Afterward, specify the type, such as text, checkbox, class, label, placeholder, and required status:
function your_custom_function($checkout) {
    echo '<div id="your_custom_div">';
    woocommerce_form_field('your_custom_field', array(
        'type'          => 'text',
        'class'         => array('your-custom-class form-row-wide'),
        'label'         => __('Your Custom Field'),
        'placeholder'   => __('Enter something'),
        'required'      => true,
    ), $checkout->get_value('your_custom_field'));
    echo '</div>';
}
To remove a field, use the woocommerce_checkout_fields filter. For instance, if you want to remove the billing phone field, enter this code snippet:
add_filter('woocommerce_checkout_fields', 'custom_remove_fields');
function custom_remove_fields($fields) {
    unset($fields['billing']['billing_phone']);
    return $fields;
}
Modifying existing fields is also possible with the woocommerce_checkout_fields filter. You can change properties like label, class, or type of existing fields.
Here’s an example:
add_filter('woocommerce_checkout_fields', 'custom_modify_fields');
function custom_modify_fields($fields) {
    $fields['billing']['billing_first_name']['label'] = 'New Label';
    $fields['billing']['billing_first_name']['required'] = false;
    return $fields;
}
To save the data of your custom fields when an order is placed, use the woocommerce_checkout_update_order_meta action hook:
add_action('woocommerce_checkout_update_order_meta', 'save_custom_field_data');
function save_custom_field_data($order_id) {
    if (!empty($_POST['your_custom_field'])) {
        update_post_meta($order_id, 'Your Custom Field', sanitize_text_field($_POST['your_custom_field']));
    }
}
Apply Custom Checkout Page Styling With CSS
Cascading Style Sheets (CSS) is one of the most popular languages for fine-tuning the appearance of your WooCommerce site. With it, you can adjust visual elements, including changing the background color of fields and making their corners more rounded.
Simply access the CSS customizer in WordPress by going to Appearance → Customize. In the Theme Customizer, find the Additional CSS section on the left menu. This is where you can write or paste your custom CSS code.
To customize specific elements on the checkout page, you need to know their CSS selectors by inspecting the page elements. If you’re using Google Chrome, right-click on any element on the checkout page and select Inspect. This will open the developer tools and highlight the selected HTML structure.
Hover over different parts of the HTML to find the corresponding part of the checkout page. The developer tools will show you the CSS selectors for these elements.

From the Additional CSS section, start writing CSS rules targeting the selectors you identified. For example, to change the background color of the checkout button, you might write something like this:
.woocommerce-checkout #place_order {
    background-color: #000; /* Change #000 to your desired color */
    color: #fff; /* Change the text color if needed */
}
You can make similar changes for other elements like form fields, labels, headers, and more.
Once you’re satisfied with the changes, click Publish. After that, visit your checkout page to ensure that the changes appear as expected.
Using WooCommerce Action Hooks
Action hooks in WooCommerce and WordPress are points where you can insert custom PHP code. These hooks run at specific points during the execution of a page, allowing you to modify or enhance its functionality.
For example, you can use action hooks to add credit card logos on the checkout or cart page, which is beneficial for improving user trust and reducing cart abandonment.
The names of these hooks are usually self-explanatory, indicating where the hook allows code insertion. Common examples of WooCommerce action hooks are:
woocommerce_before_cart
woocommerce_checkout_before_customer_details
woocommerce_after_main_content
Each hook corresponds to a different part of the WooCommerce pages, such as Cart, Checkout, and Single Product Page.
To add an element, you can use the add_action function in your theme’s functions.php file. For example, to add a message before the shipping form, insert the following snippet:
add_action( 'woocommerce_before_checkout_shipping_form', function() {
    echo 'Your custom message or HTML here';
});
This code will insert whatever content you include in the echo statement during which the woocommerce_before_checkout_shipping_form hook is executed.
While action hooks are primarily for adding content, you can use them to remove elements by unhooking or overriding functions that add the default content. For instance, if a specific action hook calls a function that adds a certain field or section you want to remove, enter remove_action to unhook that function.
After adding your custom code, test your WooCommerce store to ensure that the changes work as expected. Make sure to test thoroughly because small errors can significantly impact your store’s functionality.
Alternatively, install a code snippet management plugin like Code Snippets. With this method, each snippet of code can be managed separately.
Note that some WooCommerce themes also have their own hooks for further customization. For instance, the Shoptimizer theme includes hooks for modifying the header, footer, and sidebar.
To learn more about the topic, including what a WordPress hook is and how it works, we highly recommend you to read our WordPress hooks tutorial.
Common WooCommerce Checkout Page Issues
To maintain a smooth customer experience, understanding common WooCommerce checkout page errors and how to solve them is crucial.
In this section, we’ll briefly talk about the main checkout page errors that frequently occur:
Payment Methods Not Showing
In most cases, this issue happens due to incorrect settings or payment gateway compatibility problems.
To resolve it, double-check your payment gateway configuration and make sure it’s correctly set up. Also, verify whether your current WooCommerce version supports the preferred payment processors.
Plugin Conflict Issues
Despite providing an easy way to enhance your site’s functionality, plugins aren’t always compatible with each other.
Conflicts between plugins can result in checkout page errors, disrupting the user browsing experience. To troubleshoot them, deactivate plugins one by one to identify the culprit. Then, update the conflicting plugin or seek an alternative if the issue persists.
Theme Functionality Problems
Sometimes, the active theme might not be fully compatible with WooCommerce, leading to checkout issues. To address this, contact the theme developer for support. You can also switch to another theme temporarily to see if the problem disappears.
Slow Loading Times
Unresponsive and slow-loading checkout pages make the overall shopping experience unpleasant for customers, so even minor tweaks that speed up WooCommerce can lead to noticeable improvements.
To avoid this, make sure to choose a reliable WooCommerce hosting provider. Hostinger’s WooCommerce hosting uses a fast-performing LiteSpeed server and speed-optimization features, including object caching for WordPress. Our object caching tool eliminates repetitive database queries, making your eCommerce store perform up to three times faster.

Conclusion
eCommerce stores come in all shapes and sizes, but they have one goal in common: selling products or services online. With eCommerce plugins like WooCommerce, you can set up an online store easily without any coding knowledge or design skills.
That being said, the default WooCommerce checkout page design may not offer the best design and user experience. By customizing the default WooCommerce checkout page, you can create a seamless and pleasant shopping experience and boost your conversion rate.
In this tutorial, we’ve explained how to create a custom WooCommerce checkout page using plugins like FunnelKit Builder or by editing code.
We hope this tutorial has provided you with the necessary guidance on how to customize WooCommerce checkout page designs. Good luck with your online business!
How to Customize the WooCommerce Checkout Page FAQ
Find answers to commonly asked questions about WooCommerce checkout page customization.
How to Customize the Checkout Page in WooCommerce Without a Plugin?
To customize the WooCommerce checkout page without a plugin, you’ll need to edit the checkout template files. This involves accessing your WordPress theme, copying the WooCommerce template file (checkout/form-checkout.php) to your theme folder, and making modifications there. Make sure to use a child theme to prevent errors when making changes.
How Do I Enable Shipping Addresses in WooCommerce?
In WooCommerce, you can enable shipping addresses by navigating to your WordPress dashboard and going to WooCommerce → Settings → Shipping. From there, ensure the Shipping Location(s) option is set so you can ship worldwide or to specific regions. Then, check the Enable shipping box in the Shipping Options to allow customers to enter separate shipping addresses.
Where Can I find the WooCommerce Checkout Template?
The WooCommerce checkout template can be found within the WooCommerce plugin directory in your WordPress installation. To locate and edit it, access your site’s files through a File Manager or an FTP client. Then, head to \wp-content\plugins\woocommerce\templates\checkout.
All of the tutorial content on this website is subject to Hostinger's rigorous editorial standards and values.

Brian is a Content Writer who loves telling complex stories in a simple way. He has written all types of content, including tutorials, blog posts, landing pages, social media posts, white papers, infographics, and YouTube scripts. Follow him on LinkedIn.


