To fix loopback requests on your Hostinger website, find the requests your hosting IP address sends to your own website on the Traffic page of the Hostinger dashboard, then stop the process behind them. Loopback requests are HTTP requests a website sends to itself through its own domain, hosting IP address, or localhost.
WordPress uses loopback requests for WP-Cron, the Heartbeat API, Site Health tests, and XML-RPC. Too many loopback requests raise CPU usage and cause slow pages or 503 errors. The most common fixes are replacing WP-Cron with a Hostinger cron job, limiting the Heartbeat API, blocking xmlrpc.php, and rescheduling plugin scans. Excessive loopback traffic is a different issue from the WordPress Site Health warning that your site could not complete a loopback request.
Before you start
- Use a web, cloud, or Agency Hosting plan with access to the Traffic page in the Hostinger dashboard.
- Find your hosting IP address by following How to find your Hostinger hosting IP address.
How loopback requests affect your website and resource usage
Each loopback request runs your website’s code on your hosting plan, so a high volume of loopback requests consumes CPU and entry processes. When loopback requests reach your hosting plan’s limits, your website loads slowly or returns 503 errors.
Loopback requests usually come from a WordPress process that runs too often, such as a stuck WP-Cron job or a backup plugin that scans constantly. Check your CPU and entry process graphs on the Resources Usage page to confirm whether your website is close to its limits. On Agency Hosting plans, follow How to check resource usage in Agency plan instead.
Identify loopback requests on the Hostinger dashboard Traffic page
Loopback requests appear on the Traffic page of the Hostinger dashboard as repeated requests from your own hosting IP address. Follow these steps to find them and the process that sends them:
- In the Hostinger dashboard, go to Websites and open the hosting dashboard of your website.
- Select Analytics → Traffic on the left sidebar.
- Choose a date range under Filter by, such as Last 24 hours or Last 7 days.
- In the Top list, select IP Addresses and check whether your hosting IP address, or an IPv6 address, is among the IP addresses with the most requests.
- Open the Access logs tab and enter your hosting IP address, for example
185.185.185.185, in the search bar. - Check the Request column for the path that receives repeated requests, such as
/wp-cron.php?doing_wp_cron.
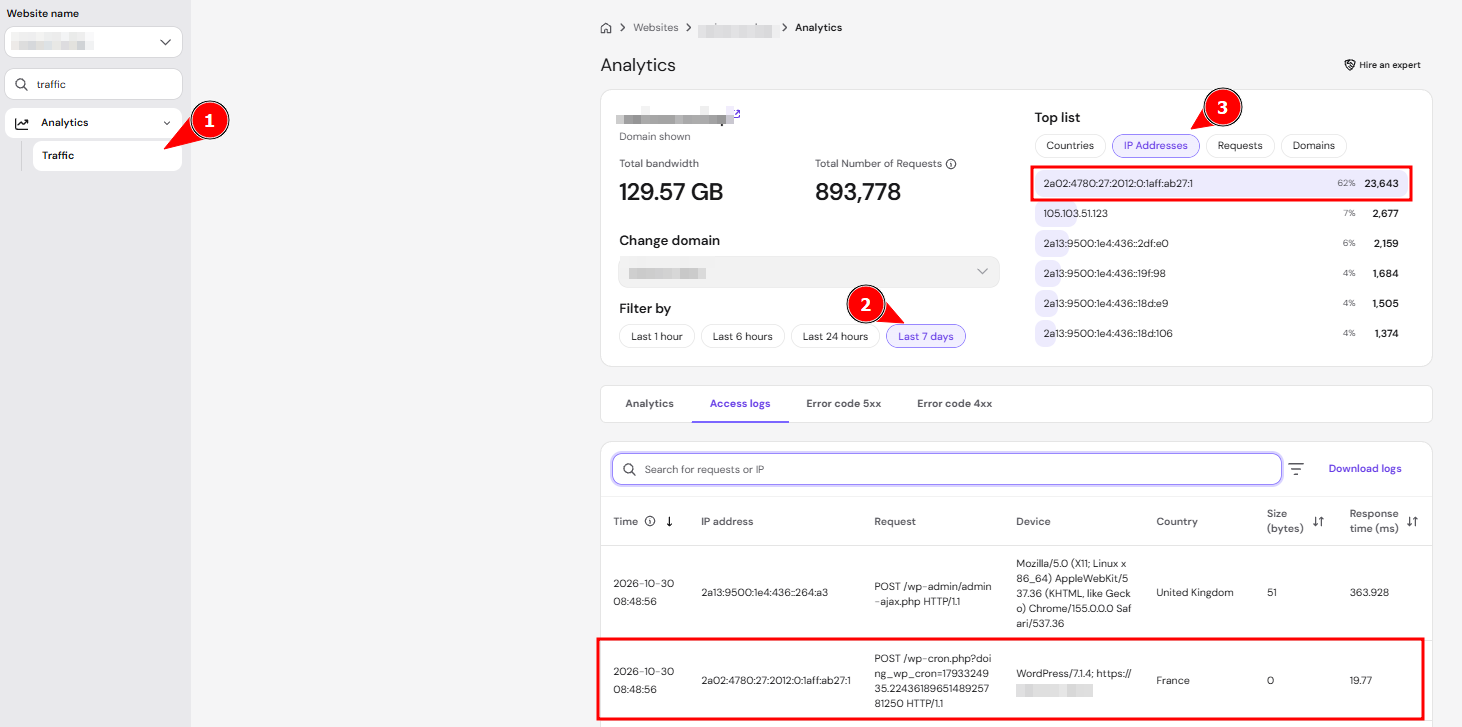
WordPress loopback requests show a Device value in the format WordPress/[version]; https://domain.tld. Match the path in the Request column to the causes in the next section to find the right fix.
NOTES
- When Hostinger CDN is active, the IP Address column can show CDN IP addresses instead of the real source. Read Hostinger CDN: Visitor IP addresses in logs and analytics for details.
Identify loopback requests from a Hostinger IPv6 address
Loopback requests sometimes come from an IPv6 address, such as 2345:b1b0:6789:20::12a, instead of your hosting IPv4 address. A Hostinger IPv6 address doesn’t match the IPv4 address in your hosting plan details, so it can look like an unknown visitor. Confirm that an IPv6 address belongs to Hostinger:
- Copy the IPv6 address from the Top list or the IP address column of the Access logs tab.
- Enter the IPv6 address in an IP lookup tool.
- Check that the ISP is Hostinger International Limited.
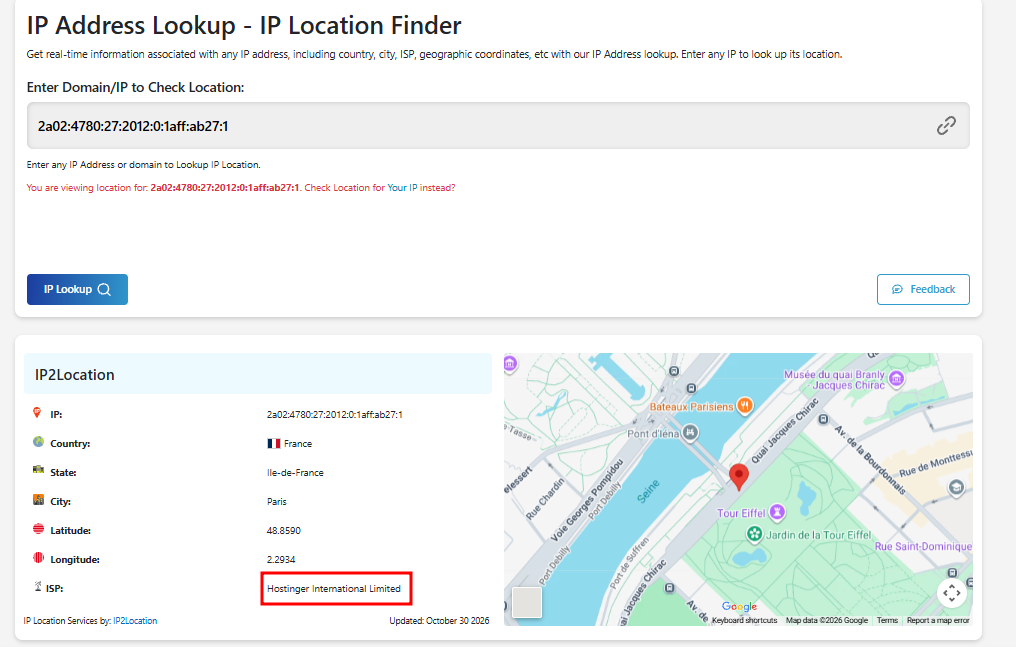
- Search the IPv6 address in the Access logs search bar to review the paths it requests.
WordPress loopback requests from a Hostinger IPv6 address show the same Device value, WordPress/[version]; https://domain.tld.
Fix common causes of loopback requests on a Hostinger website
The path in the Request column of the access logs shows which process sends the loopback requests. There are five common causes: WP-Cron, the WordPress Heartbeat API, XML-RPC, Site Health REST API checks, and backup or security plugin scans.
|
Request path |
Cause |
Fix |
|
|
A stuck or overly frequent WP-Cron job. |
Disable WP-Cron and replace it with a Hostinger cron job. |
|
|
Too many WordPress Heartbeat API requests. |
Limit or disable the Heartbeat API with a Heartbeat control plugin. |
|
|
Pingbacks and trackbacks. |
Block |
|
|
A Site Health check loop caused by a plugin blocking REST API requests. |
Find the security or caching plugin that blocks the REST API. |
|
|
A backup or security plugin that scans constantly. |
Pause the scan or backup and reschedule it to off-peak hours. |
Back up wp-config.php and .htaccess before you edit them. A syntax error in either file can take your website offline.
Replace WP-Cron with a Hostinger cron job
Repeated requests to /wp-cron.php?doing_wp_cron mean WP-Cron, the WordPress internal scheduler, runs too often. Disable WP-Cron and run it from a Hostinger cron job on a fixed schedule instead:
- Open the website’s configuration file,
wp-config.php, in File Manager. - Add the following line above the
/* That's all, stop editing! */line, then click Deploy in the top-right corner to make the changes live:define('DISABLE_WP_CRON', true); - In the Hostinger dashboard, open Cron Jobs on your website’s sidebar.
- Select Custom as the Type.
- Enter the following command in Command to Run, replacing
domain.tldwith your domain:wget -O /dev/null -o /dev/null "https://domain.tld/wp-cron.php?doing_wp_cron" - Set the Schedule to run every 15 minutes, then click Save.
- Review plugins that register frequent or overlapping cron jobs, and deactivate the ones you don’t need.
Read How to set up a cron job at Hostinger for more details about the cron job fields.
Limit the WordPress Heartbeat API
Repeated requests to /wp-admin/admin-ajax.php?action=heartbeat come from the WordPress Heartbeat API, which keeps the WordPress Admin area in sync with the server. Reduce how often the Heartbeat API runs:
- Install a Heartbeat control plugin in your WordPress Admin area.
- Set the Heartbeat interval to 60 seconds, or disable the Heartbeat API on the WordPress Admin area dashboard.
- Close the WordPress editor when you aren’t using it, because an open editor keeps sending Heartbeat API requests.
Block XML-RPC loopback requests to xmlrpc.php
Repeated requests to /xmlrpc.php usually come from WordPress pingbacks and trackbacks. Excessive XML-RPC requests overload the CPU and expose your website to spam.
- Block
xmlrpc.phpif you don’t use pingbacks, Jetpack, or remote publishing apps. Add the following code to the.htaccessfile in your website’s root folder:<Files xmlrpc.php> Order Deny,Allow Deny from all </Files> - Keep XML-RPC enabled if you use Jetpack or remote publishing apps, and disable pingbacks and trackbacks in Settings → Discussion in the WordPress Admin area instead.
Read How to create a .htaccess file at Hostinger if your website doesn’t have this file yet.
NOTES
- Agency Hosting plans have
.htaccesssupport disabled by default. Turn on the .htaccess support toggle for your WordPress website by following How to enable .htaccess on Agency plans before you add the XML-RPC rule. - Non-WordPress websites on Agency Hosting plans can’t use
.htaccess. Read .htaccess files in Agency Hosting for Hostinger dashboard alternatives.
Fix WordPress Site Health REST API loopback loops
Repeated requests to /wp-json/wp/v2/ mean WordPress Site Health calls the REST API, fails, and keeps retrying. This loop usually happens when a security or caching plugin blocks WordPress REST API requests. Find and adjust the plugin:
- Deactivate your security and caching plugins one at a time until the loopback requests stop.
- Reactivate the plugin that caused the loop.
- Allowlist the WordPress REST API in that plugin’s settings, or reduce its scan frequency.
- Check Tools → Site Health in the WordPress Admin area for any remaining warnings.
Read Hostinger WordPress Site Health troubleshooting to resolve other Site Health warnings.
Reschedule backup and security plugin scans
Heavy loopback traffic to /wp-admin/admin-ajax.php without the Heartbeat action usually comes from a backup or security plugin that runs constantly. Reduce the load from the plugin:
- Schedule scans and backups during off-peak hours, such as overnight.
- Lower the scan frequency, or use incremental backups instead of full hourly backups.
Fix loopback requests from other scripts or non-WordPress websites
Loopback requests to paths not listed in the table come from your website’s own scripts, services, or integrations. These loopback requests also apply to non-WordPress websites. Reduce them with these steps:
- Review the scripts or services in the Request column of the access logs that make repeated internal calls.
- Disable recently added code, plugins, or integrations one at a time to check whether the loopback requests stop.
- Set scheduled tasks and uptime monitors to run no more than once every 10–15 minutes.
Identify loopback requests caused by malware
Malware and other malicious scripts can also generate loopback requests from your hosting IP address. There are four common signs that loopback requests come from malware rather than a normal WordPress process:
|
Sign |
How it differs from normal WordPress loopback requests |
|
Repeated requests to unusual file names, such as |
Normal WordPress loopback requests go to |
|
Request spikes continue after you disable WP-Cron. |
A process outside WordPress sends the loopback requests. |
|
Request parameters such as |
These parameters point to injected code that runs commands or pulls remote code. |
|
Thousands of small POST requests to |
Normal pingbacks don’t reach this volume, so a compromised pingback or brute-force script is the likely source. |
Scan your website with the Hostinger Malware Scanner if your loopback requests match any of these signs. Follow How to fix a malware-infected WordPress website at Hostinger to clean the infected files.
Confirm loopback requests have stopped on your Hostinger website
Monitor your website’s resource usage for 24 hours after applying a fix to confirm the loopback requests have stopped. Check these two places:
- Open the Resources Usage page, or the resource usage page of your Agency Hosting plan, and check that CPU and entry process usage no longer spike.
- Search your hosting IP address, or the Hostinger IPv6 address, in the Access logs tab again and check that repeated requests to the same path no longer appear.
Read What to do if your hosting plan limits are reached in Hostinger if your resource usage stays high after the loopback requests stop.
Once the process behind the loopback requests is fixed, your website stops sending repeated requests to itself, CPU usage drops, and pages load without self-request overloads.
Loopback requests FAQ
Are loopback requests always a problem?
No, WordPress needs loopback requests to run WP-Cron, the Heartbeat API, and Site Health tests. Loopback requests become a problem only when their volume raises CPU usage or causes slow pages and 503 errors.
Will disabling WP-Cron stop scheduled posts and plugin tasks?
No, scheduled posts and plugin tasks keep running when you replace WP-Cron with a Hostinger cron job. The Hostinger cron job runs wp-cron.php on a fixed schedule, such as every 15 minutes.
Why does my hosting IP address appear in my website’s access logs?
Your hosting IP address appears in the access logs when your website sends requests to itself. Loopback requests can also appear from a Hostinger IPv6 address, which an IP lookup tool shows with the ISP Hostinger International Limited. WordPress loopback requests show a Device value in the format WordPress/[version]; https://domain.tld.
Additional resources