To make a Hostinger Horizons project accessible using a custom domain or subdomain, the domain must be pointed to Hostinger.
There are two supported methods to point a domain to a Hostinger Horizons project. The right option depends on where you want to manage your domain’s DNS settings.
Choose a pointing method
Option 1 – Using nameservers (recommended)
Use this method if you want Hostinger to manage your domain’s DNS zone, including records for the website, email, and subdomains.
When you change the nameservers to Hostinger, the entire DNS zone is managed from Hostinger.
If the domain is registered at Hostinger, it already uses Hostinger nameservers and no action is required.
Option 2 – Using DNS records
Use this method if you want to keep DNS management at your current domain provider and only point the domain to your Horizons project.
This method associates the domain or subdomain with your Horizons project without transferring DNS management to Hostinger.
Follow the steps below based on the method you prefer.
Option 1 – Point the domain using Hostinger nameservers
For domains registered elsewhere, follow the steps below to change the nameservers to Hostinger.
If the domain is registered outside Hostinger, follow these steps to change its nameservers.
-
Open hPanel → Websites
-
Locate the Horizons website and select Check guide
-
Copy the nameserver values shown in hPanel.
They look similar to:-
example1.dns-parking.com -
example2.dns-parking.com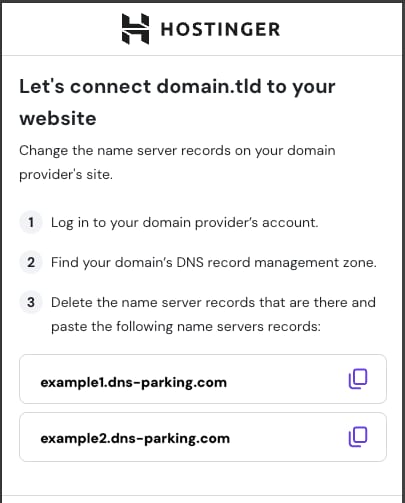
The exact values may differ. Always use the ones shown in hPanel.
-
- Log in to your domain registrar’s account
- Open the domain’s nameserver settings
- Remove all existing nameserver entries
- Add the Hostinger nameservers you copied
- Save the changes
After the nameserver update, allow up to 24 hours for DNS propagation.
Option 2 – Point the domain using DNS records
Use this method to point the domain or subdomain while keeping DNS management at your current provider.
Before you start
-
If you are pointing the root domain, records for
@and www must be removed. -
If you are pointing a subdomain, remove any records that are only for that subdomain.
Add the required DNS records
-
Log in to your domain providers account
-
Open the DNS management zone for the domain
-
Remove existing A, AAAA, and CNAME records for
-
@and www (root domain), or -
the subdomain you are pointing
-
-
Add the following records:
For a root domain
-
ALIAS
-
Name:
@ -
Points to:
yourdomain.tld.cdn.hstgr.net -
TTL: default or
300
-
-
CNAME
-
Name:
www -
Points to:
www.yourdomain.tld.cdn.hstgr.net -
TTL: default or
300
-
⚠️Important: make sure there are no A records for www or @, as this will prevent the domain from working and/or SSL certificate from being displayed.
For a subdomain
-
CNAME
-
Name:
subdomain -
Points to:
yourdomain.tld.cdn.hstgr.net -
TTL: default or
300
-
Replace yourdomain.tld with your full domain name, including the extension.
For subdomains, adding a www record is not recommended.
After pointing the domain
Once the domain is pointed to Hostinger:
The website becomes accessible using the custom domain after propagation is completed.