Set only one header background color by default in Hostinger AI Builder manual mode. Keep the header transparent to make it match the color of each page’s first section, or use custom code to set different header colors on different pages.
Enable a transparent header
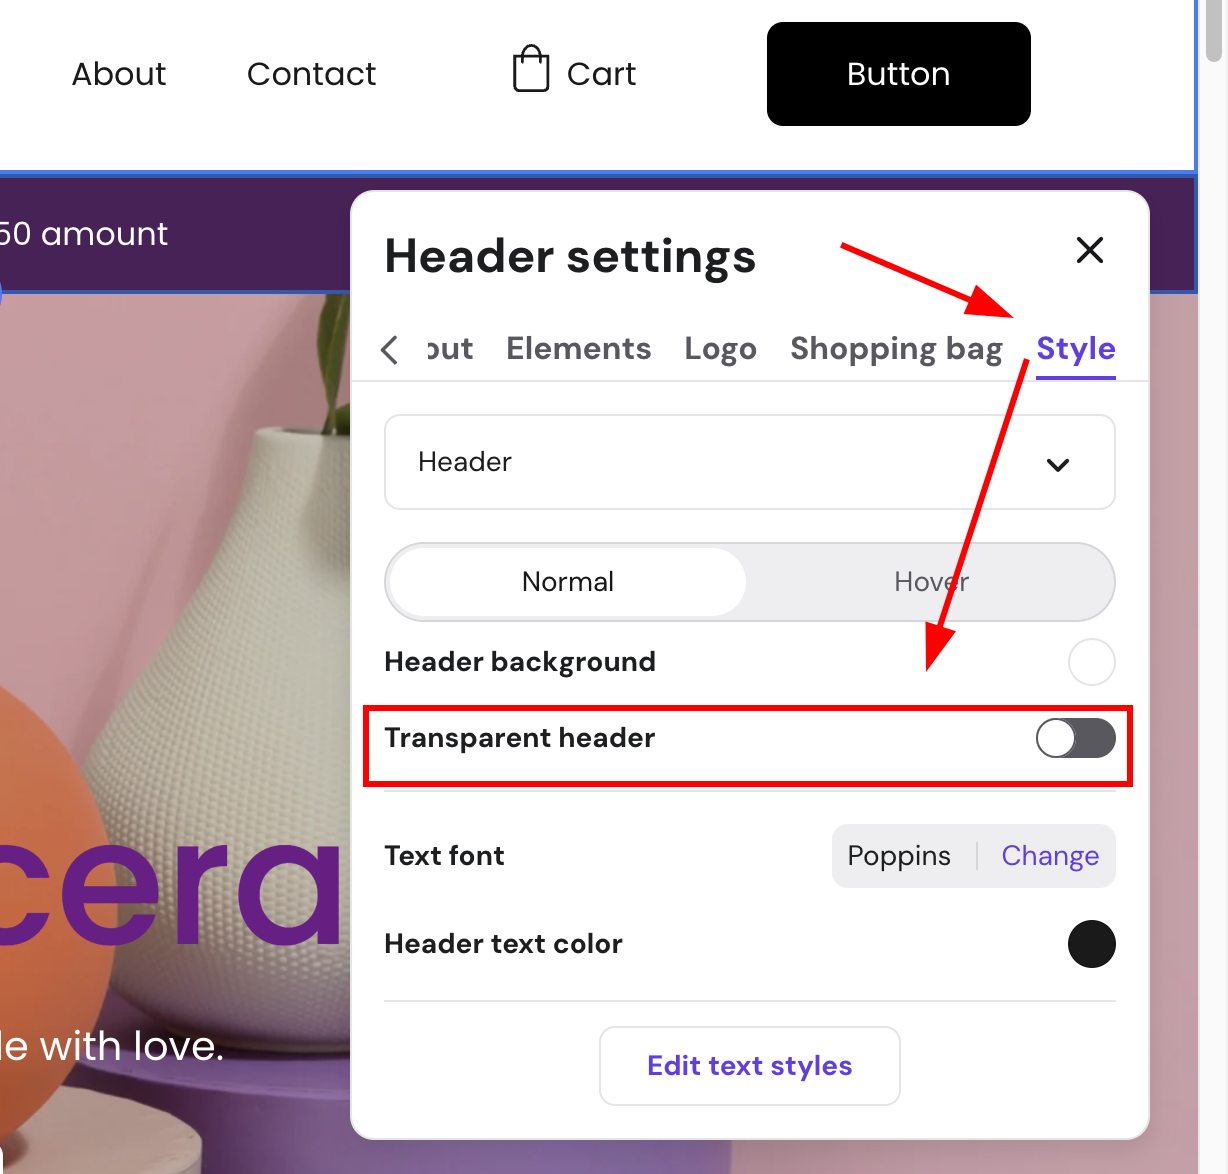
- Click Edit header:

- Open the tab Style, and toggle on Transparent header. In this specific case, this would make the header purple, taking the color of the narrow section about free shipping:


Alternatively, if you want to use different header background colors on different pages, you can do so using custom code.
Changes made via custom code will be visible in preview mode and online, but not within the editor.
Set different header colors per page using custom code
- Copy the code below for your desired setup into a plain text editor: one specific page, multiple pages, or all pages except one.
- Customize the code:
- Replace
'#f00'with your preferred color name (e.g.,'green') or HEX code (e.g.,'#008000'). - Replace the page path (e.g.,
'/contact') with the slug of the page you want to target.
- Replace
- In the AI Builder, go to Ellipsis more → Integrations.
- Paste the code into the Custom code field and save your changes.
- Update your website to apply the changes.
What is a slug?
A slug is the part of a URL that identifies a specific page on your website. For example:
-
https://domain.tld/contact→/contact -
https://domain.tld/about-us→/about-us
To target the homepage, use/only.
Change the header background color on one specific page
Copy the code below and customize it:
<script>
let newHeaderColor = ‘#f00’;
setInterval(() => {
if (document.querySelector(‘.background’)) {
if (window.location.pathname === ‘/contact’) {
document.querySelector(‘.background’).style.backgroundColor = newHeaderColor;
document.querySelectorAll(‘.block-header-item__dropdown’).forEach(dropdown => {
dropdown.style.backgroundColor = newHeaderColor;
})
}
else {
document.querySelector(‘.background’).style.backgroundColor = ”;
document.querySelectorAll(‘.block-header-item__dropdown’).forEach(dropdown => {
dropdown.style.backgroundColor = ”;
})
}
}
});
</script>
Change the header background color on multiple pages
Copy the code below and customize it:
<script>
    let newHeaderColor = '#f00';
    setInterval(() => {
        if (document.querySelector('.background')) {
            if (window.location.pathname === '/' || window.location.pathname === '/contact') {                document.querySelector('.background').style.backgroundColor = newHeaderColor;
                document.querySelectorAll('.block-header-item__dropdown').forEach(dropdown => {
                    dropdown.style.backgroundColor = newHeaderColor;
                })
            }
            else {                document.querySelector('.background').style.backgroundColor = '';
                document.querySelectorAll('.block-header-item__dropdown').forEach(dropdown => {
                    dropdown.style.backgroundColor = '';
                })
            }
        }
    });
</script>- To change the header color on more pages, copy this part:
|| window.location.pathname === '/contact'- Change the slug (
/contact) and add it to the end of the statement, for instance:
if (window.location.pathname === '/contact' || window.location.pathname === '/about-us' || window.location.pathname === '/blog')
Change the header background color on all pages except one
Copy the code below and customize it:
<script>
    let newHeaderColor = '#f00';
    setInterval(() => {
        if (document.querySelector('.background')) {
            if (window.location.pathname !== '/') {                document.querySelector('.background').style.backgroundColor = newHeaderColor;
                document.querySelectorAll('.block-header-item__dropdown').forEach(dropdown => {
                    dropdown.style.backgroundColor = newHeaderColor;
                })
            }
            else {                document.querySelector('.background').style.backgroundColor = '';
                document.querySelectorAll('.block-header-item__dropdown').forEach(dropdown => {
                    dropdown.style.backgroundColor = '';
                })
            }
        }
    });
</script>
Your header now displays your chosen colors across the pages you’ve configured.