How to install Ubuntu: 3 methods for beginners
Oct 14, 2026
/
By Ignas R.
/
7 min Read
To install Ubuntu on a laptop or desktop computer, download the Ubuntu Desktop ISO file, create a bootable USB drive, and follow the installation wizard. You can replace your existing operating system, install Ubuntu alongside Windows, or run it in a virtual machine using VirtualBox.
The best installation method depends on your needs:
- Replace Windows with Ubuntu: Install Ubuntu directly on your computer for full hardware access, removing the existing operating system from the selected drive.
- Install Ubuntu alongside Windows: Set up a dual-boot system that lets you choose between Windows and Ubuntu when starting your computer.
- Use VirtualBox: Run Ubuntu inside Windows or another supported operating system without replacing your existing installation.
Before installing Ubuntu on a physical drive, back up your important files and check your disk configuration. Selecting the wrong installation option can permanently erase existing data.
What do you need to install Ubuntu?
Before installing Ubuntu Desktop, make sure your computer meets the minimum hardware requirements and that you’ve prepared the necessary installation files.
For Ubuntu 26.04 LTS, the recommended requirements are:
- Processor: 2 GHz dual-core processor or better.
- RAM: At least 6 GB.
- Storage: At least 25 GB of free disk space.
- USB drive: At least 8 GB of capacity for creating installation media.
- Internet connection: Recommended for downloading updates and drivers, but not required for installation.
Back up your important files before installing Ubuntu. Creating a bootable USB drive erases its contents, while choosing to replace your existing operating system can permanently delete data from the selected disk.
If you’re installing Ubuntu alongside Windows, check whether BitLocker encryption is enabled before modifying disk partitions. We’ll cover this in the dual-boot installation steps.
If you’re using VirtualBox instead, you don’t need a USB drive, but your computer must have enough available RAM and storage to run both operating systems.

How to install Ubuntu by replacing your existing operating system
Installing Ubuntu directly on your computer gives it access to your hardware without running a virtual machine. This method is suitable if you want Ubuntu to replace Windows or another existing operating system.
Replacing your operating system erases the data on the selected installation drive. Back up important files and confirm which drive you intend to use before proceeding.
1. Download the Ubuntu Desktop ISO
Download the latest Ubuntu Desktop LTS ISO file from the official Ubuntu website.
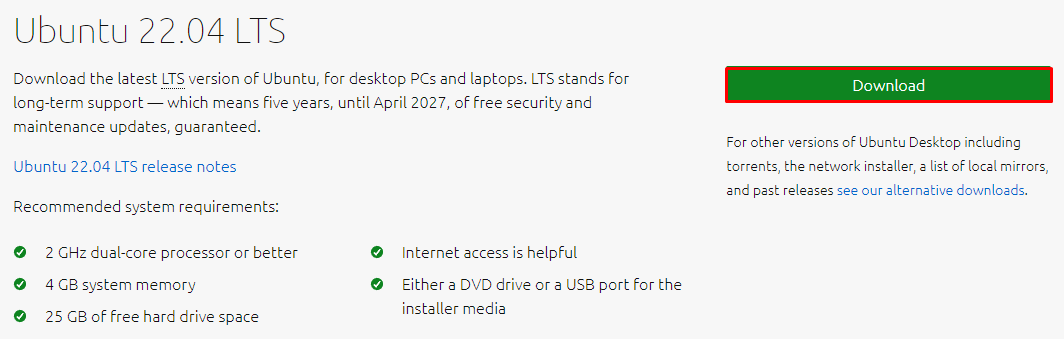
Choose the Desktop version for a graphical interface and save the ISO file to your computer. You’ll use it to create a bootable USB drive.
2. Create a bootable USB drive
A bootable USB drive lets you start the Ubuntu installer without launching your existing operating system.
On Windows, you can create one using Rufus:
- Download and open Rufus.
- Connect a USB drive with at least 8 GB of storage.
- Under Device, select the correct USB drive.
- Click SELECT under Boot selection and choose your downloaded Ubuntu ISO file.
- Leave the default partition scheme and file system settings unless your computer requires a specific configuration. Modern UEFI-only systems typically use GPT.
- Click START and confirm the prompts to create the installation media.
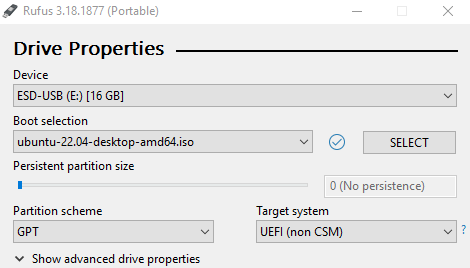
Rufus erases all existing data on the selected USB drive. Make sure you’ve selected the correct device before starting.
Wait until Rufus displays READY, then safely eject the USB drive.
3. Boot your computer from the USB drive
With the Ubuntu bootable drive ready, proceed with the installation. For that, restart your computer and Once your bootable USB drive is ready, restart your computer and select it as the startup device.
- Insert the USB drive into the computer where you want to install Ubuntu.
- Restart the computer and open the boot menu. The required key depends on your manufacturer, but common options include F12, F10, Esc, or F2.
- Select your USB drive from the available boot devices. On UEFI systems, it may appear with a UEFI label.
- Wait for the Ubuntu startup screen, then select the option to try or install Ubuntu.
If your computer doesn’t recognize the USB drive, check its UEFI boot settings and confirm that the installation media was created correctly. You usually don’t need to change the permanent boot order.

When the installer reaches Disk setup, choose Erase disk and install Ubuntu only if you intend to replace the operating system on the selected physical drive. Double-check the drive before confirming.
The remaining installer settings, including language, keyboard, user account, and restart, are covered in the installation completion section.
How to install Ubuntu alongside Windows
You can install Ubuntu alongside Windows using a dual-boot configuration, which lets you choose which operating system to run when starting your computer. Unlike a virtual machine, both operating systems run directly on your hardware.
Before installing Ubuntu alongside Windows:
- Back up your files. Changing disk partitions carries a risk of data loss, even when you intend to keep Windows.
- Check BitLocker encryption. If your Windows drive uses BitLocker or Device Encryption, save your recovery key and check whether encryption must be disabled before installation. Ubuntu can’t safely install alongside an encrypted Windows partition using the guided installer.
- Check available storage. Make sure your drive has enough free space for Ubuntu and your existing Windows files.
If BitLocker is enabled on the Windows installation drive, follow Canonical’s instructions to turn off BitLocker in Windows and wait for decryption to finish before proceeding. Disabling encryption may have security implications, so check whether you can re-enable it afterward.
To install Ubuntu alongside Windows:
- Boot from the Ubuntu USB drive. Restart your computer, open the boot menu, and select the USB installation media.
- Launch the Ubuntu installer. Choose the installation language, keyboard layout, and other initial preferences.
- Choose the dual-boot option. Under Disk setup, select Install Ubuntu alongside Windows or the equivalent option if Windows is detected.
- Allocate disk space. Select the installation drive and adjust how much space Ubuntu will use. Make sure Windows retains enough space for your existing files and applications.
- Review the disk changes. Confirm that Ubuntu will be installed alongside Windows rather than replacing it. Carefully review the installation summary before proceeding.
- Complete the installation. Configure your user account, password, and time zone, then finish the installation and restart your computer.
- Choose your operating system. Remove the USB drive when prompted. After restarting, use the operating system selection menu to boot into Ubuntu or Windows. If the menu doesn’t appear, check your UEFI boot options.
Do not select Erase disk and install Ubuntu when installing alongside Windows on the same drive. This option removes the existing partitions on the selected drive.
If the installer doesn’t display an option to install Ubuntu alongside Windows, stop and check your disk configuration and encryption settings before continuing. Manual partitioning is intended for advanced users.
How to install Ubuntu on Windows using VirtualBox
You can install Ubuntu on Windows using Oracle VirtualBox, which runs Ubuntu inside a virtual machine without replacing your existing operating system.
This method is useful for testing Ubuntu, learning Linux, or running applications in an isolated environment. Unlike dual-booting, you can use Ubuntu and Windows simultaneously without restarting your computer.
1. Download and install VirtualBox
Start by downloading the latest version of Oracle VirtualBox for Windows.
Open the installation file and follow the setup wizard. You can keep the default settings for most installations.
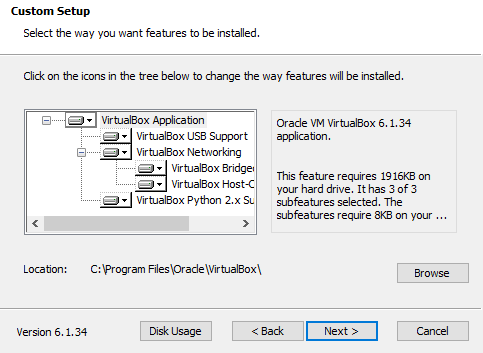
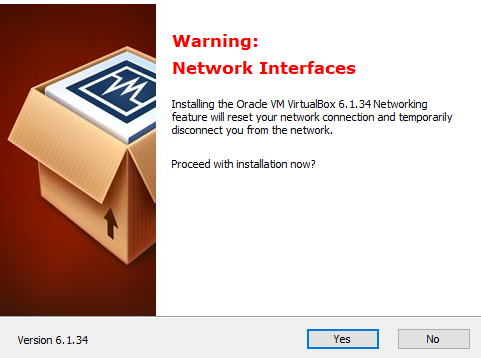
During setup, VirtualBox may temporarily interrupt your internet connection while configuring its network components.
Once the installation finishes, open VirtualBox to create your Ubuntu virtual machine.
2. Create an Ubuntu virtual machine
Before creating the virtual machine, download the Ubuntu Desktop ISO from the official Ubuntu website if you haven’t already.
Follow these steps:
- Open VirtualBox and click New to create a virtual machine.
- Enter a name, such as Ubuntu, and select the downloaded ISO file under ISO Image.
- Disable Install OS Using Unattended Installation to complete the installation manually using Ubuntu’s installer.
- Allocate memory and processor resources. Aim for at least 4 GB of RAM if your computer has sufficient resources, leaving enough memory and CPU capacity for Windows.
- Create a virtual hard disk with at least 25 GB of storage. You can use dynamically allocated storage so the disk file grows as needed, up to its configured limit.
- Review the virtual machine settings and click Finish.
- Select your new Ubuntu virtual machine and click Start to launch the installer.
When Ubuntu starts, follow the installation wizard to configure the operating system.
If you select Erase disk and install Ubuntu inside a correctly configured VirtualBox virtual machine, the installer erases the selected virtual disk, not your Windows installation. Always verify the target disk before confirming.
The next section explains how to complete the Ubuntu installation wizard.
How to complete the Ubuntu installation
Once Ubuntu starts from your bootable USB drive or VirtualBox virtual machine, follow the installation wizard to configure your operating system.
Most steps are the same regardless of your installation method. However, the disk setup option depends on whether you’re replacing Windows, dual-booting, or using VirtualBox.
- Select your language and keyboard layout. Choose your preferred language, configure accessibility settings if needed, and select your keyboard layout.
- Choose Install Ubuntu. You can select Try Ubuntu to test the operating system without installing it. Otherwise, proceed with the installation and connect to the internet if available.
- Configure installation preferences. Choose Interactive installation, then select Default selection for essential applications or Extended selection for additional software. You can also enable third-party drivers and media support.
- Choose the correct disk setup option. To replace Windows, select Erase disk and install Ubuntu, which deletes the data on the selected drive. For a dual-boot setup, select “Install Ubuntu alongside Windows” if available, and allocate disk space for Ubuntu. In VirtualBox, select Erase disk and install Ubuntu only after confirming that the selected disk is the virtual hard drive created for the virtual machine.Important: Review the selected disk carefully before proceeding. If the expected installation option isn’t available, stop and check your disk configuration.
- Create your user account. Enter your name, computer name, username, and password. Choose whether Ubuntu should require your password when logging in.
- Set your time zone. Select your location and preferred time zone.
- Review and confirm the installation. Check the installation summary, especially the changes to the selected drive and partition. Click Install only when the settings match your intended setup.
- Complete the installation. Wait for Ubuntu to finish installing, then select Restart Now when prompted. For USB installations, remove the USB drive when instructed. In VirtualBox, make sure the virtual machine boots from its installed virtual hard drive instead of restarting the installer.
Once Ubuntu restarts, sign in with your new credentials. Your Ubuntu desktop is ready to use.
Next steps: Set up Ubuntu after installation
After installing Ubuntu, check that your system boots correctly and that essential features, such as your internet connection, audio, and display, work as expected. If you installed Ubuntu alongside Windows, restart your computer to confirm that both operating systems remain accessible.
Before you start using Ubuntu regularly:
- Install system updates. Open Software Updater and install available security updates and bug fixes. Restart your computer if prompted.
- Verify your installation. Check your Ubuntu version to confirm that the correct operating system release was installed.
- Learn basic Linux commands. Get familiar with the terminal and practice essential Linux commands such as
ls,cd, andpwdto navigate your system.
If you’re running Ubuntu in VirtualBox, consider creating a virtual machine snapshot after completing your setup. This lets you restore a working configuration if something goes wrong while testing software.
This article is a localized version of How to install Ubuntu: 3 methods for beginners, originally published in English.
All of the tutorial content on this website is subject to Hostinger's rigorous editorial standards and values.

Ignas takes great satisfaction in helping people tackle even the most complex technical issues. His current goal is to write easy-to-follow articles so that these issues will not happen at all. During his free time, Ignas likes to play video games and fix up things around his house.


