How to optimize images for WordPress
Sep 11, 2025
/
Hasna A.
/
6 min Read
A WordPress site with well-optimized images can reap benefits such as fast loading times, enhanced user experience, and better SEO.
This article will explore four easy ways to optimize images for WordPress. We will also list the best plugins to optimize images and answer some of the most frequently asked questions about WordPress images.
Why It’s Important to Optimize Images for WordPress
Optimizing images on your WordPress website is very important. Here are four reasons why:
- Increase web page speed – unoptimized images make your web pages bloated and slower to load. By optimizing your large images without sacrificing quality, you can speed up WordPress.
- Enhance the user experience – waiting around longer than usual for a page to load is frustrating for website visitors. The bounce rate – the percentage of visitors who land on a web page and leave without exploring the rest of the site – is very high for websites that take longer than three seconds to load.
- Better search engine optimization (SEO) – search engines like Google favor fast-loading websites and penalize slow websites. If your images are optimized and your website is fast, you’re more likely to rank well on search engine results pages (SERPs).
- Save disk space – optimizing your WordPress images will let you use your hosting resources more efficiently. If your image files occupy less space, you will have more room to add other types of content and features to your website.
Suggested Reading
4 Easy Methods to Optimize Images for WordPress
Read on to learn four quick ways to optimize WordPress images.
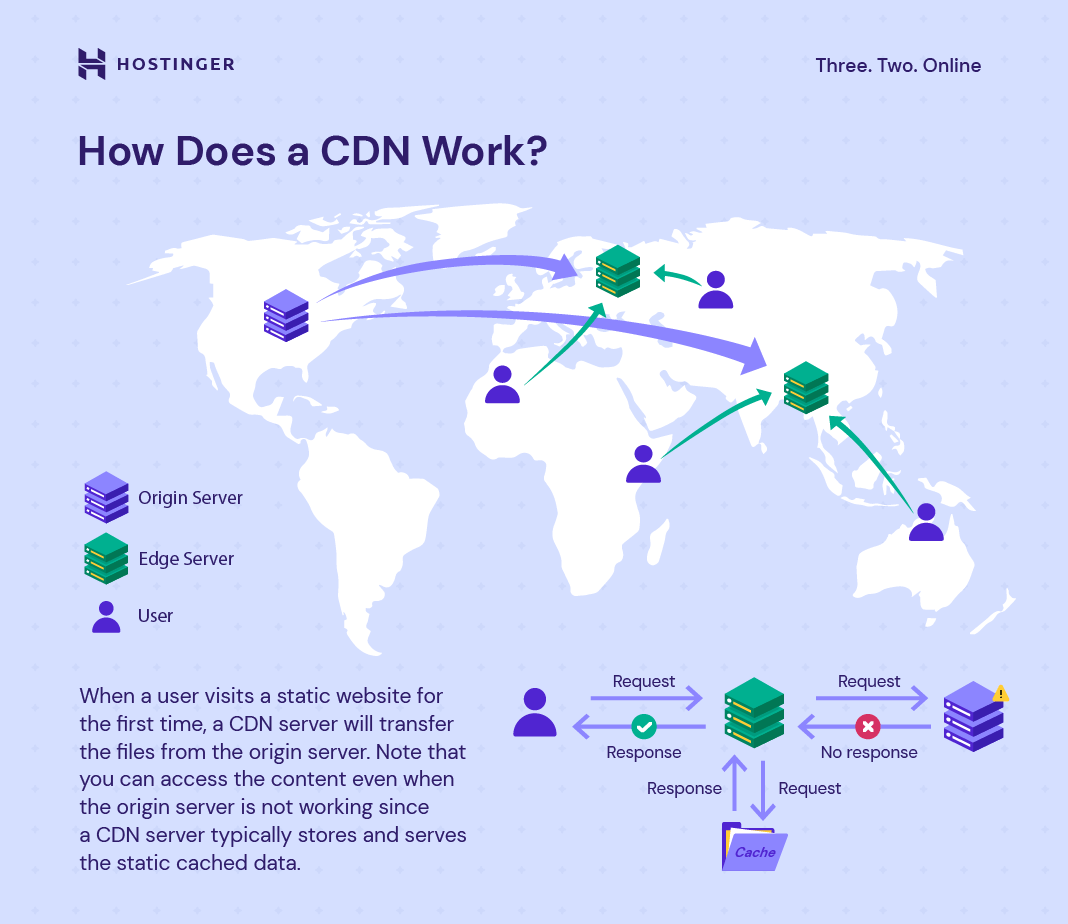
1. Serve Images Through a CDN
A content delivery network (CDN) is a global system of servers that speeds up the delivery of your website’s content, including images, videos, and style sheets. Using a CDN on your WordPress site ensures visitors receive data from a server close to them.
For example, if your visitor is in Indonesia, they will receive content from a nearby server, which reduces loading times.
You can set up a CDN separately, like integrating Cloudflare with your WordPress site. Fortunately, some managed WordPress hosting providers like Hostinger offer a CDN as part of their services. If you’re on a Business plan or higher, activate Hostinger’s CDN with these steps:
- Log in to hPanel, head to Websites, and click Manage next to your domain.
- From the sidebar menu, navigate to Performance → CDN.
- Select Enable to activate the CDN.
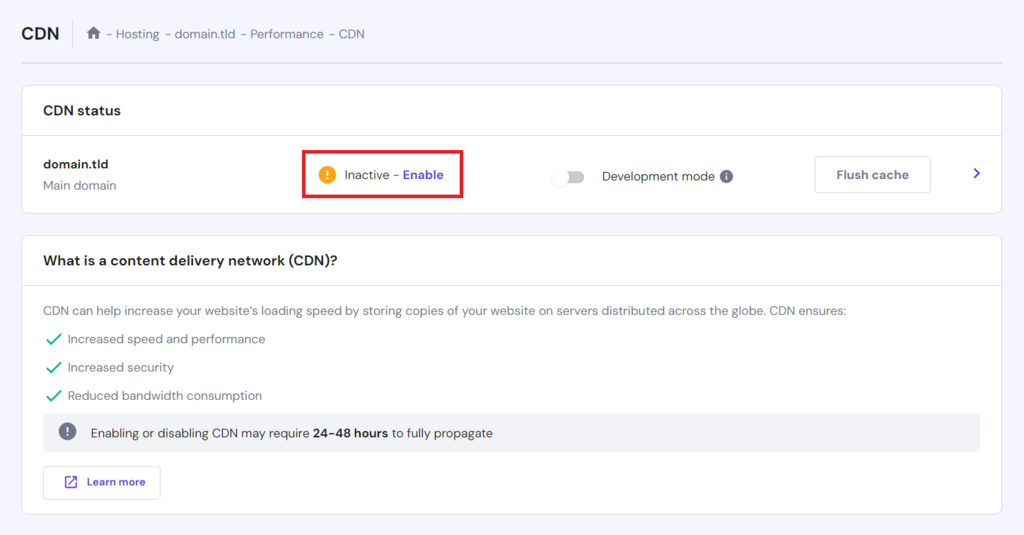
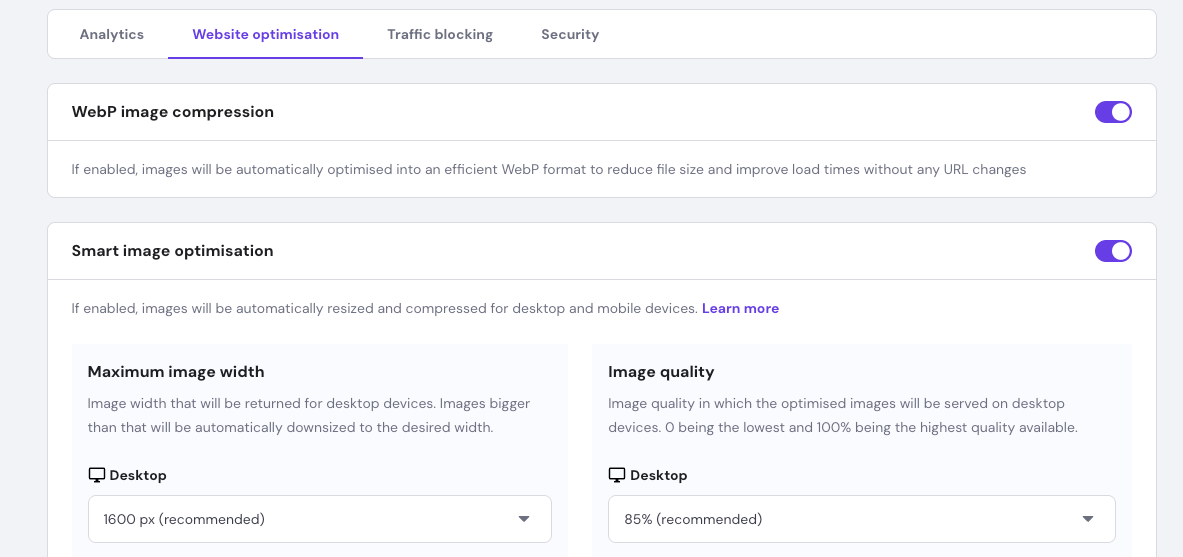
- Click the arrow sign next to Flush cache and select the Website optimisation tab. You will see options to activate WebP image compression and Smart image optimization.
CDN propagation – or the process of updating and distributing your content across all servers within the network – may take 24-48 hours.
2. Compress Your WordPress Images
By compressing images, you will reduce their file size. A compressed image file will load faster on your WordPress webpage, improving its speed.
The quickest way to compress images in WordPress is to use an image compression plugin. Such plugins often do more than just utilize compression to optimize images. We will break down two plugins that optimize images in one of the following sections.
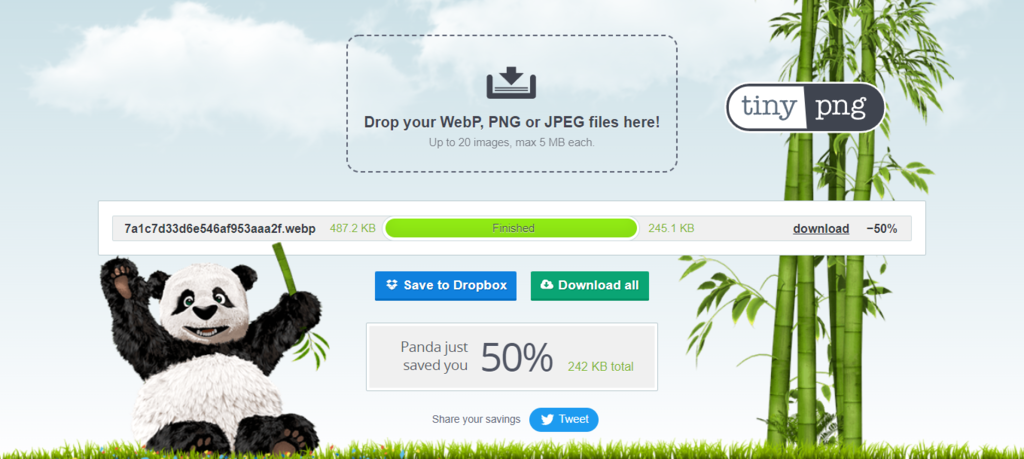
Alternatively, you can also manually compress your large images before uploading them to WordPress by using image editing software or a free tool like TinyPNG.
TinyPNG doesn’t only accept PNG images. It works with other image file formats, including WebP and JPEG. All you have to do is upload the image you want to compress, and the tool will reduce its size for you. The tool can also compress multiple files at once.
3. Resize Images
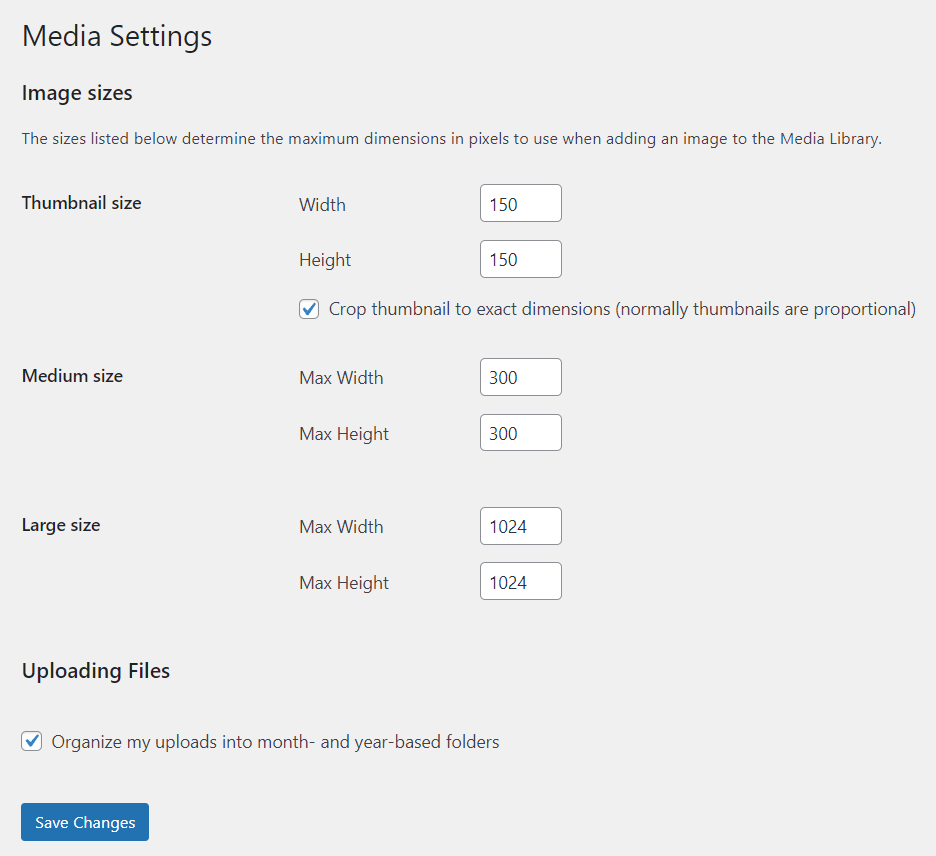
Another way to optimize images for WordPress is to resize their pixel dimensions. Fortunately, this feature is built into the WordPress core.
By default, WordPress uses four different sizes of the same image:
- Thumbnail (150 x 150 pixels)
- Medium (up to 300 x 300 pixels)
- Large (up to 1024 x 1024 pixels)
- Full Size (the original image size)
That being said, you can change them to fit your preferences. Here’s how to change the default WordPress image sizes via the media library:
- Open the WordPress dashboard and go to Settings → Media.
- Enter your preferred maximum width and height for each size.
- Click Save Changes.
4. Clean Up Your WordPress Media Library
As your WordPress site grows, its media library will accumulate a lot of uploaded images. While many of these uploaded images will be featured on your website, many of them might end up unused. For instance, images from deleted blog posts will stay in your media library.
Having many unused images in your library can slow your website down, take up a lot of space on your WordPress hosting server, and make media management difficult. Creating and restoring site backups will take longer since more files will be included in them.
Before cleaning your WordPress media library, it’s highly recommended to create a complete backup of your WordPress website first. This way, you’ll be able to restore your website to its normal state if anything goes wrong with the cleanup.
There are two main methods to clean your WordPress media library – manually or automatically with a WordPress plugin.
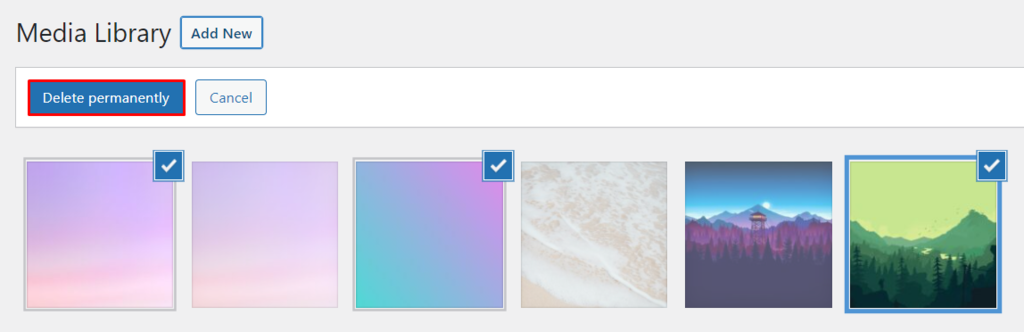
Here’s how to do it manually by permanently deleting unused images:
- Open the WordPress admin dashboard.
- Go to Media → Library.
- You can either delete the unused images individually or in bulk.
- To delete an image individually, click on it and select Delete permanently.
- To delete images in bulk, click Bulk select, select the unused images, and click Delete permanently.
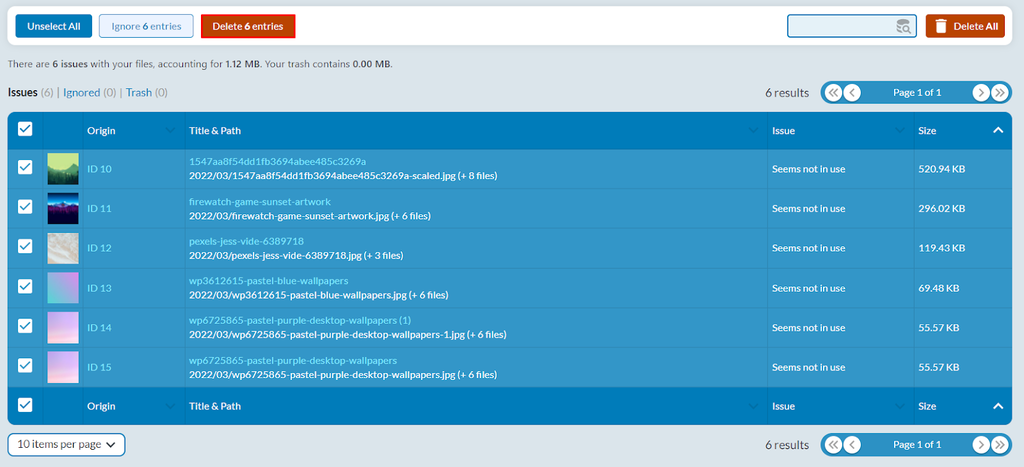
And here’s how to clean up your WordPress media library by using the Media Cleaner plugin:
- Open the WordPress admin dashboard.
- Install and activate the Media Cleaner plugin.
- Navigate to Media → Cleaner.
- Click Scan. The unused images will appear as “Seems not in use” under the Issue column.
- Select the images you want to delete, and click Delete (number of selected images) entries.
Best WordPress Plugins for Optimizing Images
A WordPress optimization plugin optimizes existing images as well as new ones. Take a look at two of the best WordPress image optimization plugins you can install on your website.
1. Image Optimization and Lazy Load by Optimole

Plugin Stats:
- Downloads: 200,000+
- Rating: 4.8/5
- Notable features: all images type CDN, machine learning-powered compression, lazy load without jQuery
- Pricing: freemium (paid plans start at $20.61/month)
Optimole is an optimization plugin that optimizes your site’s images via a global CDN (content delivery network). Combined with a cloud-based solution, Optimole reduces the load on your server and speeds up your loading times.
The plugin comes with a one-click setup and automated tools. Simply create an account and insert your API key to activate it. The tools will then automatically run in the background to optimize your images.
Optimole’s free version supports 5,000 monthly visits. You can purchase one out of the two premium plans to get more visits. The Optimole Starter plan costs $19.08/month for 50,000 visits, while the Optimole Business plan supports 100,000 monthly visits for $39.08/month.
2. Imagify Image Optimizer
Plugin Stats:
- Downloads: 800,000+
- Rating: 4.3/5
- Notable features: asynchronous bulk optimization, automatic resizing, WebP conversion
- Pricing: freemium (paid plans start at $4.99/month)
Imagify increases your website speed by automatically resizing and compressing different image formats. Aside from still images, Imagify can also optimize animated graphics.
Imagify has three compression settings – normal, aggressive, and ultra. Normal means lossless compression, while aggressive and ultra are lossy compression types. Compared to lossless compression, lossy reduces the file size more significantly at the expense of some image quality.
Imagify’s free Starter plan limits users to 20 MB images per month – approximately 200 images – with a maximum upload size of 2 MB per image.
Meanwhile, the Growth plan allows for optimizing up to 500 MB of images per month – equivalent to 5,000 images – at a cost of $4.99/month, while the Infinite plan offers unlimited image optimization for $9.99/month.
Conclusion
Performing optimization for images on your WordPress website is very important to increase its loading speed, enhance user experience, implement better SEO, and save storage space on your hosting server.
In this article, we have explored four ways to optimize images on WordPress:
- Serve images through a CDN – get a hosting plan with a built-in CDN like Hostinger’s to quickly deliver images through globally distributed edge servers.
- Compress your WordPress images – use an image editing program or an online tool like TinyPNG to quickly reduce image file sizes without compromising on quality.
- Resize image files – change the default image resize settings on WordPress.
- Clean up your WordPress media library – delete unused or duplicated images on your WordPress media library manually or using a plugin.
We hope you have found this article helpful for speeding up your WordPress website. Good luck.
Other WordPress Must-Knows
Change Font Size in WordPress
Fix or Increase Your WordPress Memory Limit
Remove WordPress Sidebar
Create a WordPress Staging Site
Add Custom Fields to Your WordPress Posts
How to Optimize Images for WordPress FAQ
This section will answer some frequently asked questions about WordPress optimization for images.
Does WordPress Automatically Optimize Images?
Yes – since WordPress 4.5, WordPress compresses all uploaded images to 82% of their original quality. However, this percentage of compression doesn’t offer a significant improvement to site speeds. We still recommend using the methods listed in this article.
What Is the Best Image Size for WordPress?
The recommended sizes for different types of images in WordPress are:
Blog post images: 1200 x 630 px
Headers: 1048 x 250 px
Thumbnails: 150 x 150 px
Logos: 200 x 100 px
Featured images: 1200 x 900 px (landscape) or 900 x 1200 px (portrait)
Background images: 1920 x 1080 px
What Is the Best Image Optimizer for WordPress?
The best image optimizer for WordPress depends on your specific needs. Look for an image optimizer that offers image compression and optimization features to improve website speed and performance.
Can I Optimize My WordPress Images Without a Plugin?
Yes, you can optimize your WordPress images without a plugin by resizing them to the appropriate dimensions, compressing them using an online tool, and optimizing their file names and alt tags. You can also use lazy loading to improve page load times.
All of the tutorial content on this website is subject to Hostinger's rigorous editorial standards and values.

Hasna is passionate about tech, culture, and the written word. She hopes to create content that helps people succeed on the web. When not writing, rearranging, or polishing sentences, she enjoys live music and overanalyzing movies.


