Dec 22, 2025
Irfan F.
6min Read

Search engine optimization (SEO) is an inseparable part of digital content creation. After all, the ranking of websites or web pages on search engine results pages directly impacts visibility and traffic.
One of the deciding factors of SEO ranking is website speed. Thus, it is crucial to ensure your site loads quickly. Otherwise, people might get frustrated and hit the back button before the page even finishes loading.
This is where Gzip compression comes in handy – it is one of the tricks for improving page speed.
By the end of this article, you will know what Gzip compression is and how to check and enable Gzip compression on a website.

The larger the file, the longer it takes to complete the file transfer, increasing your site’s load time. Luckily, data compression lets users download reduced-size files. Thus, your website will load faster.
There are two main types of compression:
Gzip falls into the category of lossless compression. It’s a popular method to reduce the size of HTML, PHP, JavaScript, CSS, and other files.
Before enabling Gzip compression, first check whether the site has it enabled already.
The following section will show you how to do so using site speed or Gzip compression tests and browser developer tools.
A website speed test is a tool for measuring sites’ load time. It grades the site or page load time and often provides a detailed report of elements affecting the performance. Some tools will even display the website’s rate of file size reduction.
It also suggests numerous tips and tricks to improve website speed, including recommendations of compression algorithms to produce smaller files.
This free tool is available on many websites, including Pingdom, Google’s PageSpeed Insights, and GTmetrix.
You can use one of the many free tools to check if a site has Gzip compression enabled, such as Small SEO Tools’ Check Gzip Compression and WhatsMyIP’s HTTP Compression Test.
Simply open the tool, paste the site URL in the provided field, and click Check Compression or a similar button.
This method is best for those who don’t want to use an external tool to check a website’s Gzip compression.
Follow the steps below to check if Gzip is enabled on a site using a browser:
If Gzip has not been enabled, there are two ways to do it. You can either modify the .htaccess file or go for a WordPress plugin.
The easiest way to enable Gzip on a WordPress website is to install a plugin. It will be a lot easier and safer than modifying the .htaccess file.
There are many plugins for this purpose available, but we have chosen these four plugins based on their features and ease of use:
Since these plugins have more features than just compression, we suggest trying all of them to see which one fits your needs best.
This method of enabling Gzip compression is quite technical, so it’s more suitable for advanced users. However, anyone can do it as long as they’re careful.
Important! Before we continue, back up the .htaccess file first in case something goes wrong.
This tutorial will show you how to modify the .htaccess file using the File Manager of your web hosting provider’s control panel. We’ll be using Hostinger’s hPanel. However, you can also use an FTP such as FileZilla client.
To enable compression via the .htaccess file, follow the steps below:

<IfModule mod_deflate.c>
AddOutputFilterByType DEFLATE text/plain
AddOutputFilterByType DEFLATE text/html
AddOutputFilterByType DEFLATE text/xml
AddOutputFilterByType DEFLATE text/css
AddOutputFilterByType DEFLATE application/xml
AddOutputFilterByType DEFLATE application/xhtml+xml
AddOutputFilterByType DEFLATE application/rss+xml
AddOutputFilterByType DEFLATE application/javascript
AddOutputFilterByType DEFLATE application/x-javascript
</IfModule>

To understand Gzip, you first need to know how a website works.
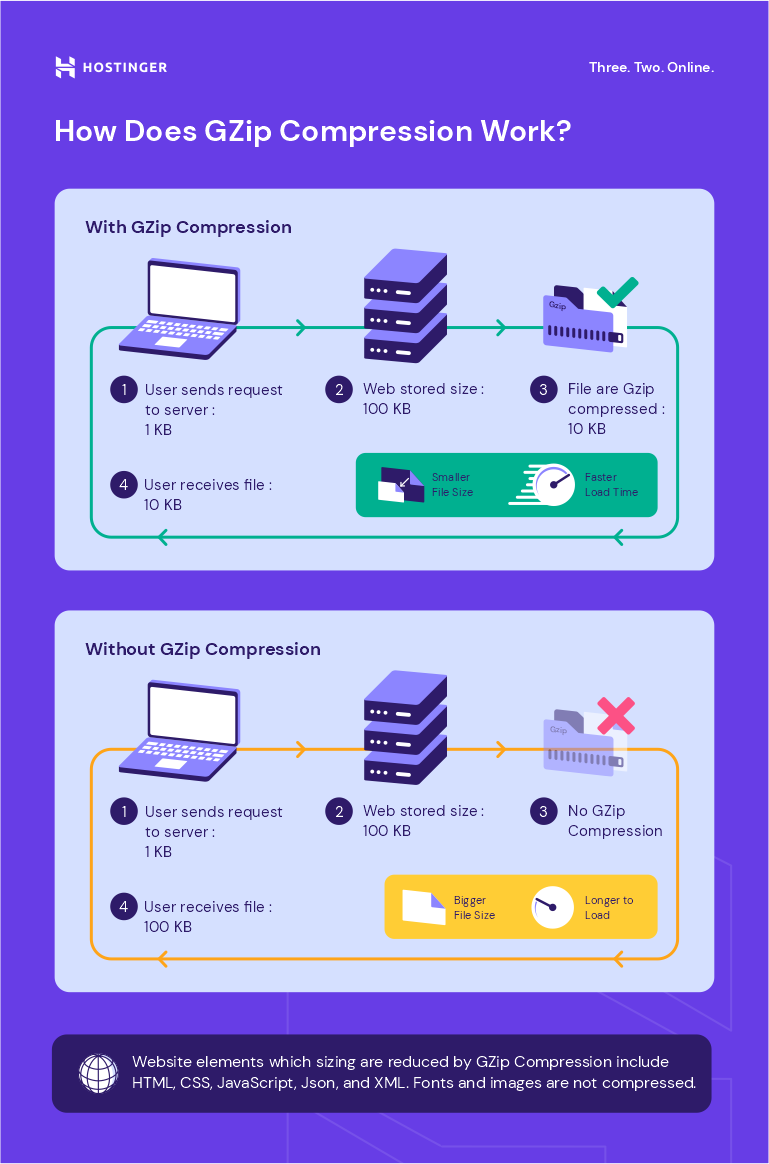
A website is made up of web files stored on a web server. When a person types the website’s URL into a browser, the browser sends a request to the web server hosting the desired content.
The web server processes the request by retrieving the requested files from a database. It sends the files to the browser in the form of an HTTP response. Naturally, the bigger the size, the longer the data transfer will take.
Once the browser receives the files, it will render the web page in question.
However, there will typically be repeated data within text files, such as duplicate characters or words appearing several times throughout a document.
Within HTML files, for instance, there will be a similar closing tag for every opening tag. For example, the opening tag <table> will be paired with </table> , while the <div> tag will be paired with </div>.
Gzip employs the lossless DEFLATE algorithm, which finds and replaces these duplicate strings with unique identifiers.
This process is called character encoding. It produces zipped or compressed files whose names will end with the .gz file extension. The file in the compressed size is smaller compared to the original or uncompressed version. This saves bandwidth and results in faster data transfer times.
Once the end user’s browser receives the compressed file, it will unzip or uncompress the file. The unique identifiers in the compressed file will be decoded back to the original data.
Important! While Gzip can be used to process files of any type, there will be no significant amount of file size reduction for already compressed file types, like images or videos. Such files may even increase in size.
In addition, note that Gzip is not the same as ZIP. The latter is also a lossless compression method, but it is used for storing files rather than transferring them. It produces a .zip file instead of a .gz file.
Gzip is only one of many data compression methods and algorithms. Examples of other methods include ZIP, TAR, and 7Z.
You may wonder why you should enable Gzip compression instead of other methods, especially when they supposedly have better performance. For example, research conducted by Expedited Security shows that Google’s compression algorithm Brotli can compress HTML, CSS, and JavaScript files into smaller sizes than Gzip.
That being said, there are many reasons to choose Gzip over other methods or algorithms, including:
With its quick and efficient compression time and ratio, Gzip helps reduce page load time, increasing SEO ranking.
Fast load time positively impacts web pages’ rankings on search engine results pages. The faster the site loads, the higher it ranks. The higher it ranks, the more visibility it gets, driving traffic to the website and increasing its revenue.
Gzip is a file format and a type of lossless compression technology used to reduce the size of files and speed up sites. Gzip works using the DEFLATE algorithm, which finds duplicate strings within a text file and replaces them with unique identifiers. They are decoded back to the original data during the decompression process.
After enabling Gzip compression, your site’s visitors will have a great user experience, and it will possibly rank higher on search engine results pages.
You can check whether a website has already enabled Gzip by using a website or online Gzip speed test or your browser’s developer tools.
Gzip compression on a website can be enabled using two methods – installing a WordPress plugin or editing the .htaccess file. We recommend installing a plugin rather than editing the .htaccess file for beginners – it is easier and less risky.
Although various compression methods and algorithms are available, there are many reasons to choose Gzip compression over others. Not only is it free and open-source, but it also boasts one of the most effective compression ratios and is very fast.
We hope this article has helped you understand Gzip compression better. We wish you good luck with improving your website.
All of the tutorial content on this website is subject to Hostinger's rigorous editorial standards and values.

Irfan believes that technology and the internet can help improve our lives significantly. That's why he shares his experience as a WordPress blogger to educate others. In his free time, Irfan enjoys good films and books.

Ecommerce website features determine whether visitors trust your store, find what they need, and complete a purchase without friction. If ...

Ecommerce fulfillment services are the operational processes that move an online order from checkout to delivery and handle returns. They ...

Ecommerce inventory management is the system and processes you use to track, control, and optimize your stock levels across your ...
Comments
April 10 2023
At hostinger we use Cloudflare CDN right? and on cloudflare they use Brotli compression that is better than gzip compression! so your website is already as default working with this if cloudflare is activated. You should update this article and really make that clear even though some reading this article dont use hostinger, most of us do when we look at solutions from hostinger.
April 14 2023
Hello there! Thank you for your feedback. Regarding Cloudflare, we are deprecating it from our panel (you can still use it directly). The reason is that we offer our own CDN solution - Hostinger CDN now, it does offer all the necessary tools for image compression. Keep an eye on it, and be sure to test it out once it is available in your region. As for the GZIP article, you are right, this tutorial is more general and focuses less on our product.