How to complete ZOHO mail setup: creating an account, configuring MX, spf and dkim
May 22, 2026
/
Hasna A.
/
4 min Read
If you’re looking for an email and productivity suite solution for your business or organization, Zoho Mail is a great option.
It’s reliable, ad-free, and has a free plan that’s feature-packed. It also has an option to create a custom email address by connecting Zoho Mail to your existing domain name.
In this guide, we’ll walk you through every step of signing up for a free Zoho Mail account and setting it up properly.

Creating a Free Zoho Mail Account
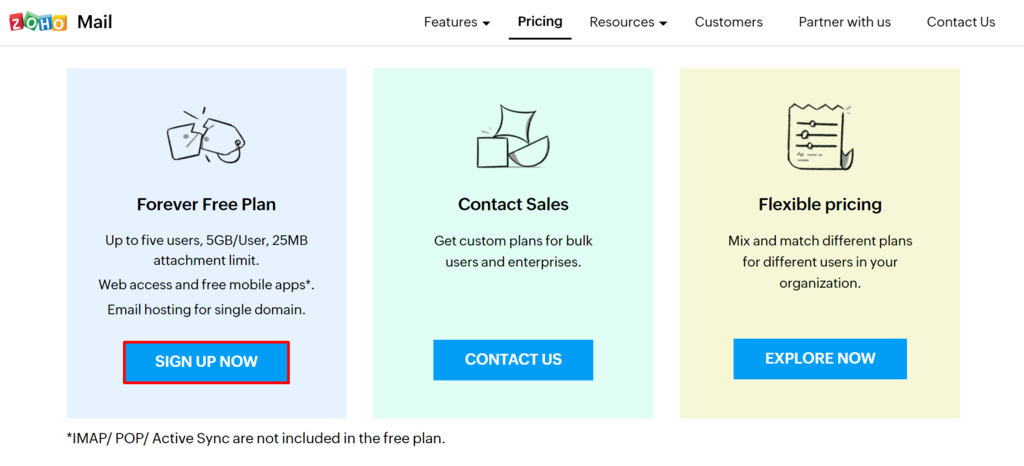
The Forever Free Plan supports up to five users and comes with a 5GB storage space limit for each of them. However, you are only allowed to use a single domain name with this version of Zoho Mail.
This is a great option for smaller projects with a tight budget, as it also comes with productivity suite features such as Calendars, Docs, and Sheets – all the necessary tools for collaborative work.
To start using Zoho Mail’s services, you need to sign up first. It is a reasonably straightforward process since all you need is a valid phone number and a domain name you’ve purchased in advance.
- Visit the Zoho Mail Pricing page, scroll down, and sign up for the Forever Free Plan using your domain name.
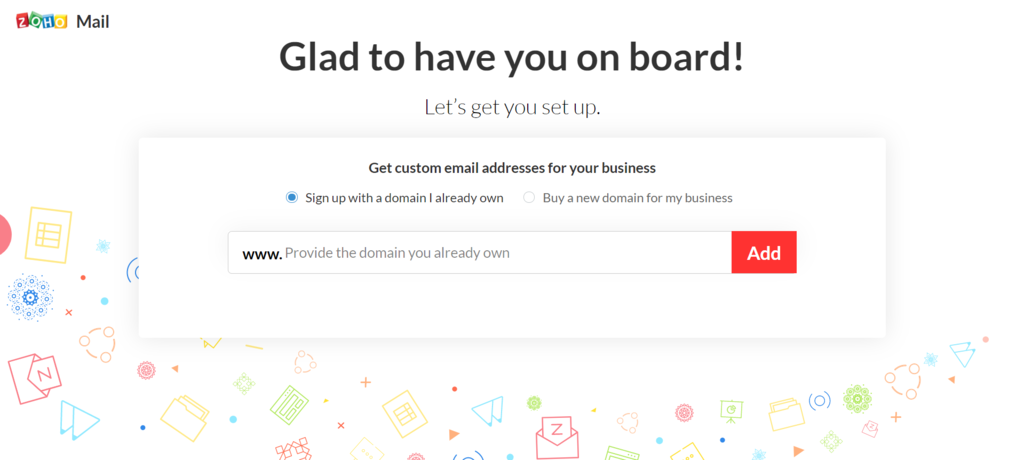
- Fill in the sign-up form. You will be asked to create an administrator email with your username and domain. Keep in mind that you can’t use the same email you’ve entered for your contact details.
- After signing up, you will receive a message on your phone with a verification number. Enter the Verification Code and click Verify My Mobile.
Once you’ve gone through the steps above, you will have successfully created a free account on Zoho Mail.

Configuring a Zoho Mail Account
Now that you’ve registered your Zoho Mail account, let’s configure it.
Verify Domain Name
Before you start using Zoho Mail, you’ll have to verify the domain name you entered during signup.
Choose one out of three verification methods – by TXT, CNAME, or HTML. In the following example, we will be using the CNAME method.
- Find your hosting provider’s DNS Manager from the list. Since we’re using a domain hosted on Hostinger as an example, we will choose Others.
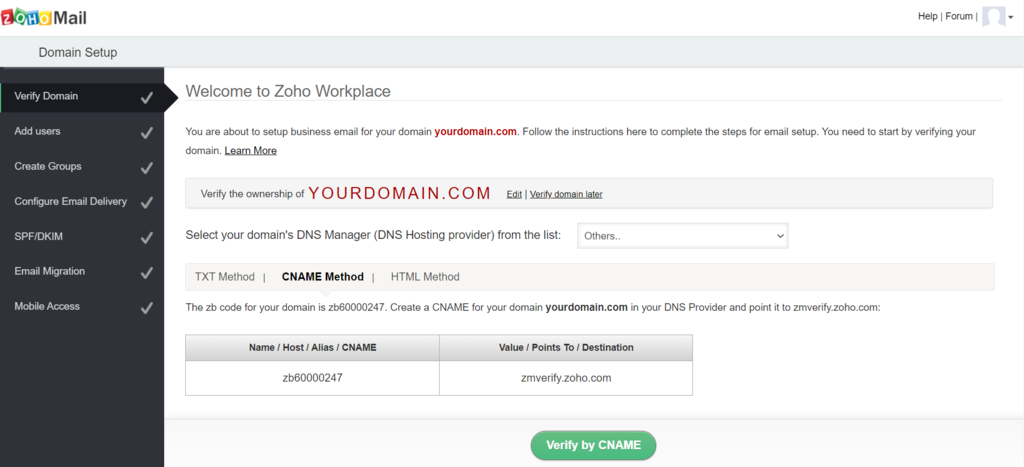
- Next, select the CNAME Method.
- Take note of the values in both columns of the table.
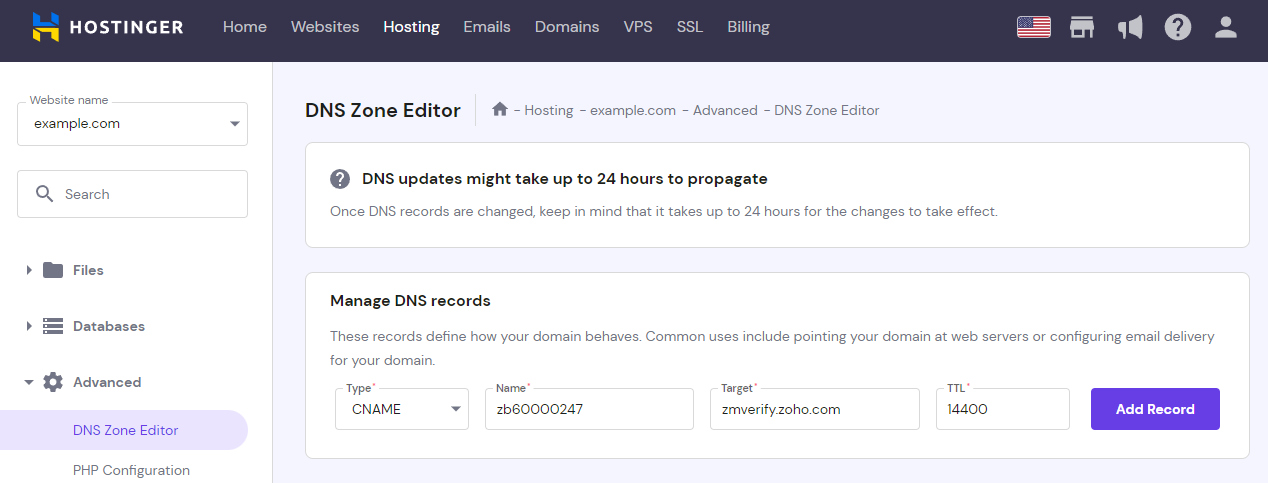
- Open Hostinger’s hPanel in another tab and go to Advanced -> DNS Zone Editor.
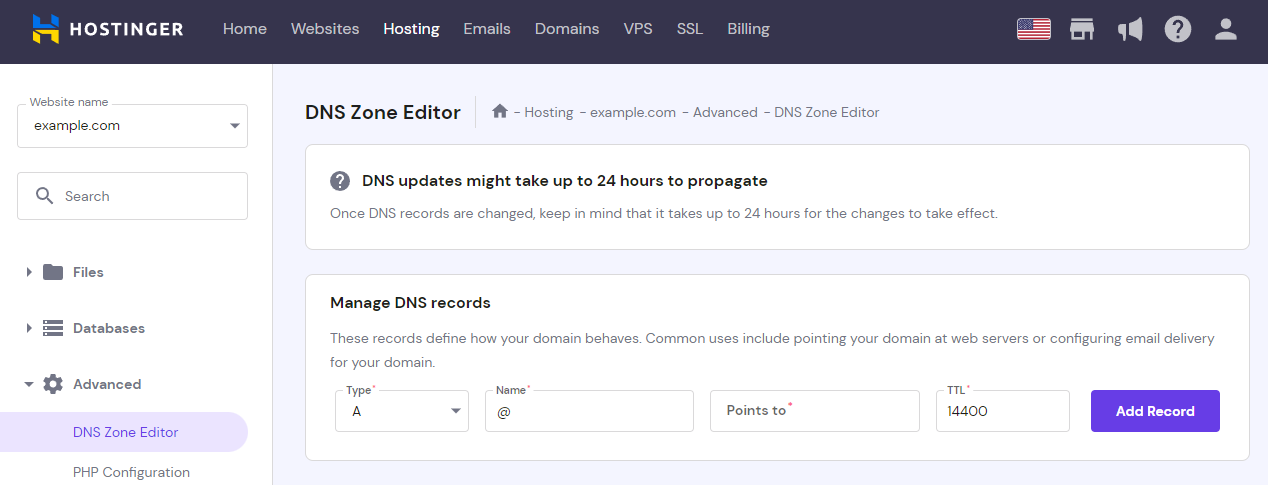
- Under Manage DNS Records select CNAME from the drop-down menu and paste the values you’ve copied earlier. For the TTL field, type in 14400. Click Add Record.
- Return to the Zoho Mail admin area and select Verify by CNAME.
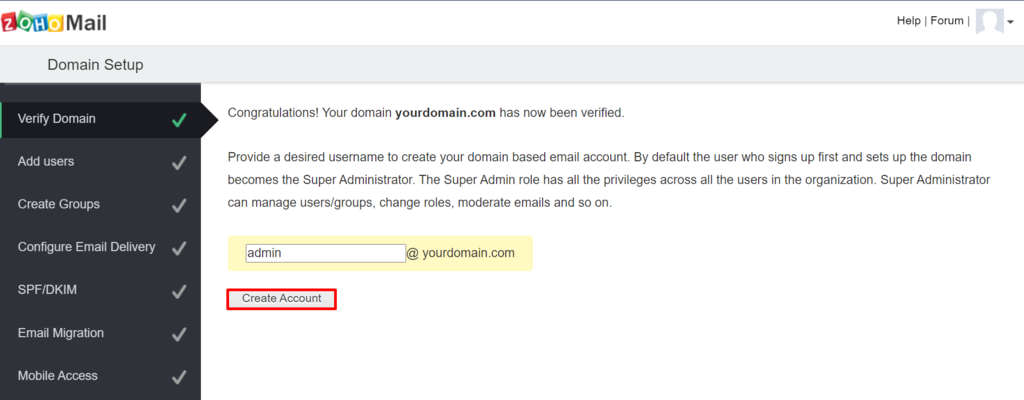
- You’ll get a success message and the opportunity to change the name of the Super Administrator email account.
- Select Create Account to finalize the verification.
Now your domain name has been successfully verified. You can now Add Users and Create Groups.
Creating MX Records in DNS Manager
The next step is to add new MX Records so that your new Zoho Mail account can start receiving emails through your custom domain name.
Configuring SMTP
Simple Mail Transfer Protocol (SMTP) allows you to send emails through a specific server or email client of your choice. Keep in mind that this configuration is limited to outgoing emails only.
Here’s how to configure Zoho Mail SMTP to send emails from a WordPress website:
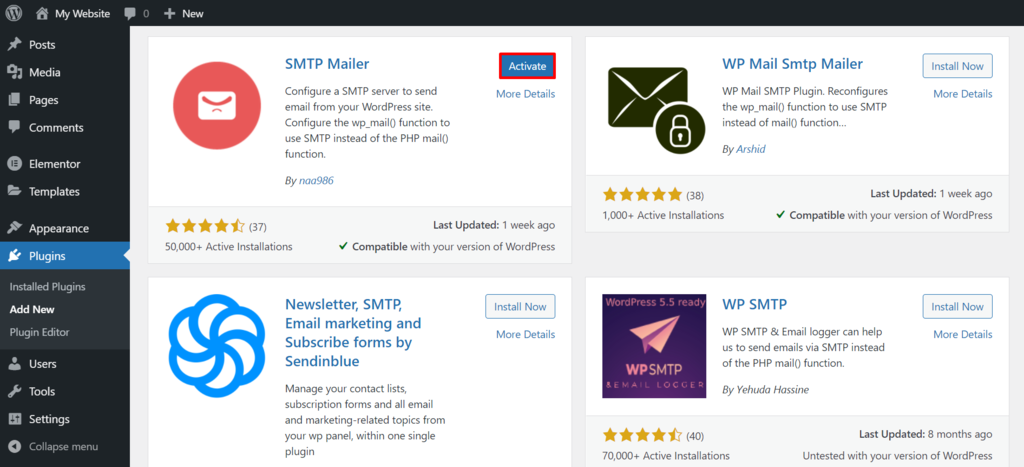
- Log in to your WordPress dashboard and navigate to Plugins -> Add New.
- Search for the SMTP Mailer plugin and click Install Now. Once installed, Activate it.
- Go to Settings -> SMTP Mailer.
- Enter the following values into the fields:
- SMTP Host: smtppro.zoho.com
- SMTP Username: Your Zoho Mail email address – for example, admin@yourdomain.com.
- SMTP Password: Create a new strong password and keep it somewhere safe.
- Type of Encryption: SSL or TLS – depends on which one you use.
- SMTP Port: Use 465 for SSL or 587 for TLS.
- From Email Address: Your Zoho Mail email address.
- From Name: The name of the sender you want to display in your emails.
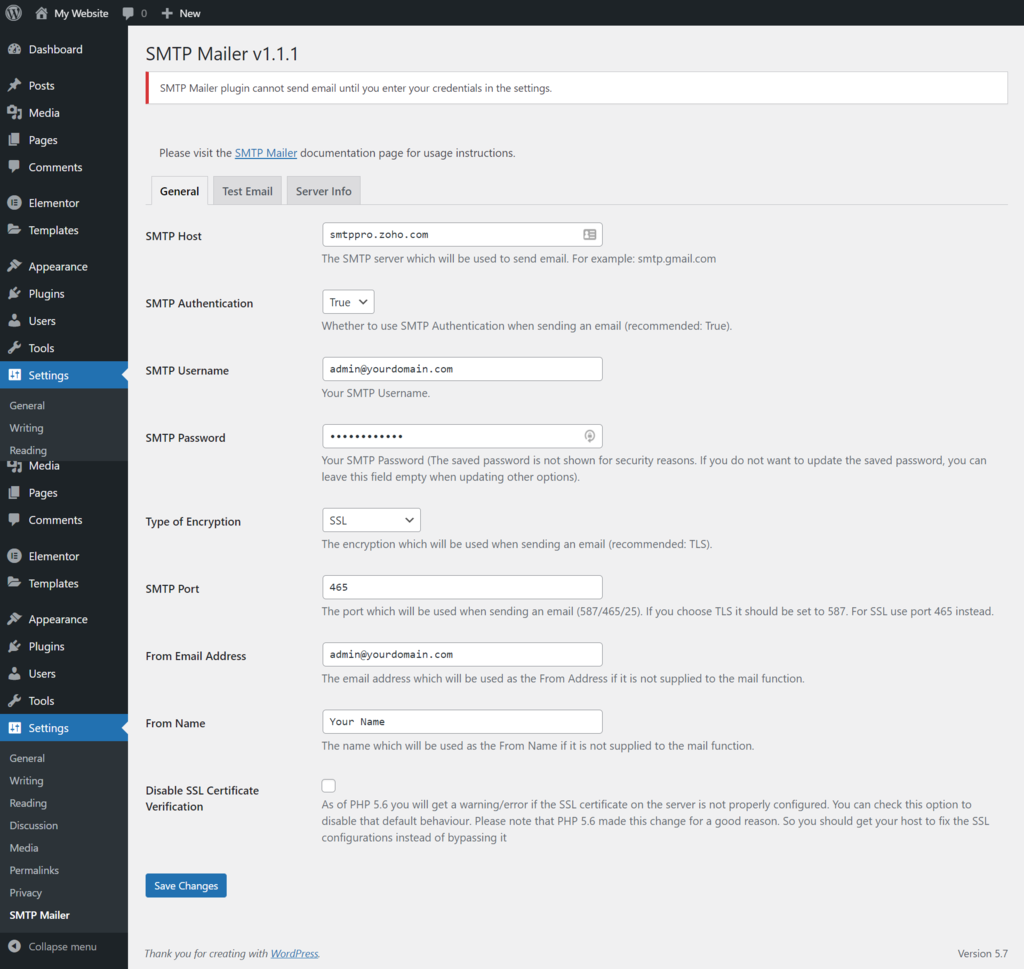
- Select Save Changes.
Having done this, you’ll be able to send emails from your WordPress site.
Pro Tip
Read our article on How to Check if Port 587 Is Open and establish more secure connections between your mail client and server.
Configuring SPF and DKIM
Zoho Mail gives you an option to configure these two settings from the get-go.
How to Set Up SPF?
SPF prevents attempts of impersonation by specifying which hostnames or IP addresses are authorized to send emails from the domain at hand. Here’s how to set up the SPF records for your Zoho Mail account:
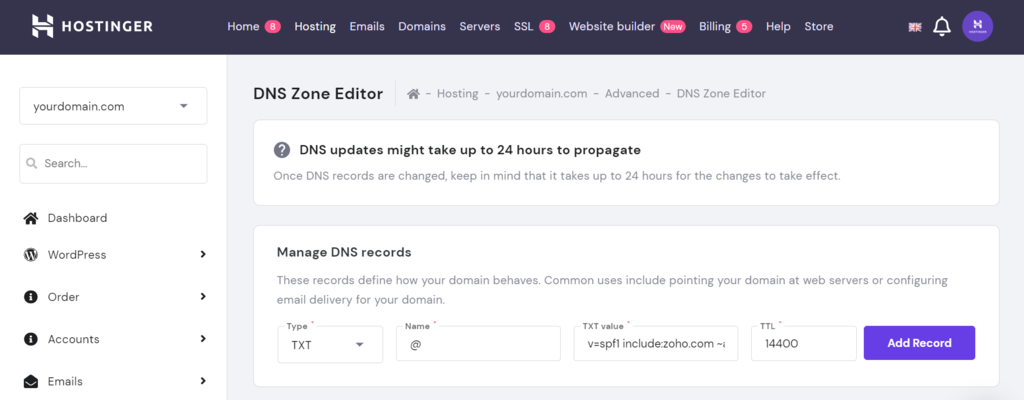
- Copy and save the values from the Zoho Mail SPF table.
- Navigate to hPanel in a new tab and go to the DNS Zone Editor.
- Using the search bar, look up “SPF” and delete the existing SPF record.
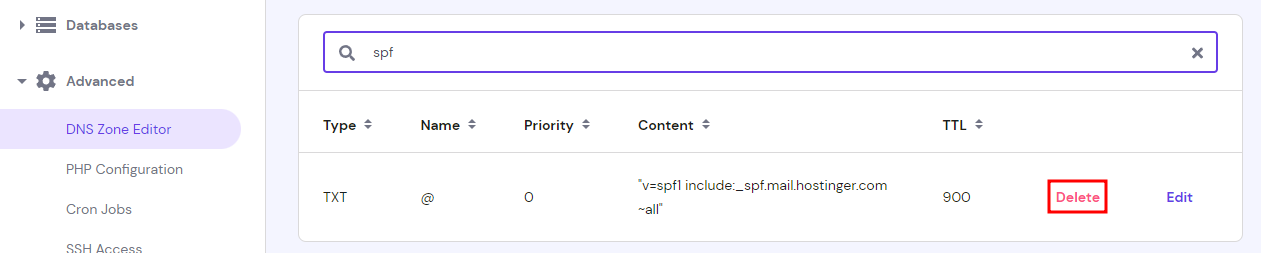
- Fill in the fields with SPF values from Zoho Mail that you’ve copied. Choose TXT from the drop-down menu, and leave the TTL values as 14400. Click Add Record.

How to Set Up DKIM?
DKIM is a form of email authentication that adds signatures to each email you send. To configure DKIM in Zoho Mail, follow these steps:
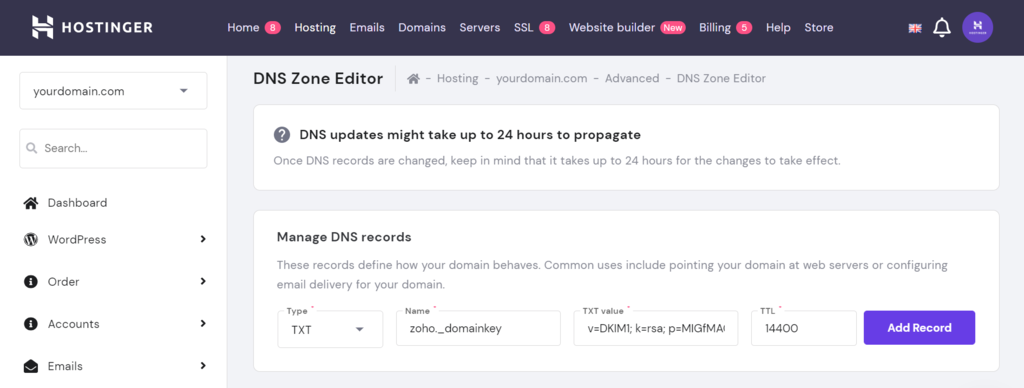
- Select Proceed to Configure DKIM.
- From the Domain List, click the pencil icon near your domain name to Edit.
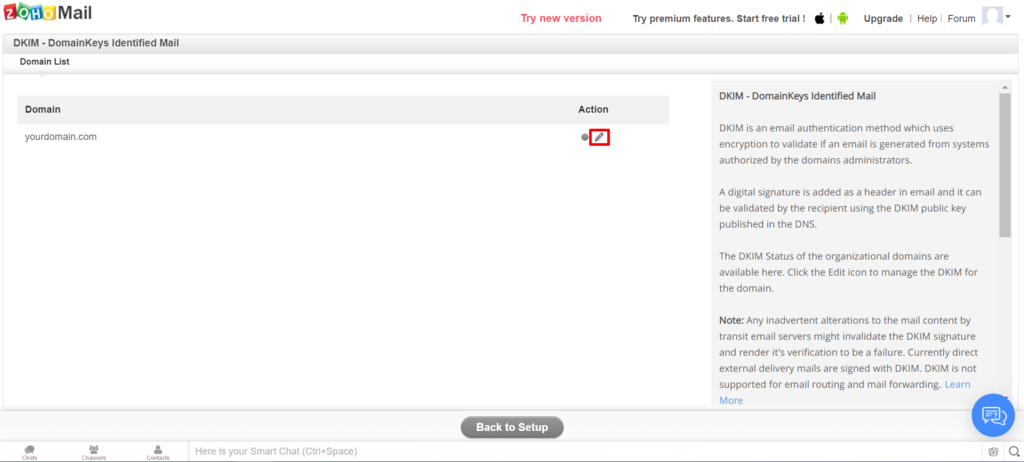
- Click Add Selector.
- Input Zoho as the Selector Name and Save.

- The following table will be displayed – copy and save its values.
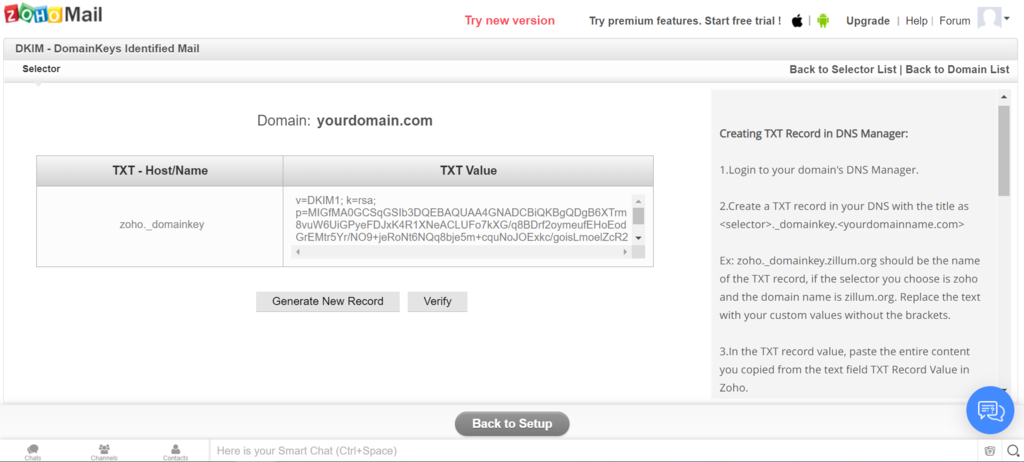
- On hPanel, go to DNS Zone Editor and add a new TXT record with the previously copied values.

With this step done, you will have finished configuring your Zoho account to receive and send emails through your domain name. You can also configure email migration and activate mobile access, but these settings are optional.
Suggested Reading
Read our guide to block unwanted emails on Zoho Mail for effective communication.
Conclusion
Zoho Mail is a feature-packed email solution that you can use for free. In this guide, we’ve walked you through the steps to sign up for a free Zoho Mail account and set it up properly by verifying your domain name, configuring SMTP, and creating MX, SPF, and DKIM records.
If you find yourself looking for a more premium email service, check out the paid Zoho plans, Google Workspace suite, or business email service by Hostinger.
We hope that this guide has helped you, and we wish you the best of luck.
All of the tutorial content on this website is subject to Hostinger's rigorous editorial standards and values.

Hasna is passionate about tech, culture, and the written word. She hopes to create content that helps people succeed on the web. When not writing, rearranging, or polishing sentences, she enjoys live music and overanalyzing movies.

