How to set up Outlook for email
Jun 29, 2026
/
Aris S.
/
7 min Read
To set up Outlook, open the app on your computer or mobile device, add your email account, enter your password, and follow the sign-in prompts. Outlook automatically configures most Microsoft 365, Outlook.com, Gmail, Yahoo, iCloud, and Exchange accounts.
Manual IMAP, POP, and SMTP settings are primarily needed for custom-domain emails or when automatic setup fails. The table below shows which setup method fits your situation.
| Situation | Use this setup method | What you need |
| Microsoft 365, Outlook.com, Gmail, Yahoo, iCloud | Automatic setup | Email address and password |
| Custom domain email | Manual IMAP/POP/SMTP setup | Server settings from your email provider |
| Hostinger email | Hostinger manual or automatic setup | hPanel IMAP/SMTP details or CNAME records |
| Work or school account | Automatic setup or IT instructions | Email address, password, possibly Microsoft Authenticator |
| Outlook does not connect | Troubleshooting section | App password, correct server settings, DNS records |
Before you set up Outlook
Before you start, make sure you have:
- Your email address and password;
- A stable internet connection;
- The Outlook app installed on your device;
- An app password if your account uses two-factor authentication (some providers require this instead of your regular password);
- For custom domain email: IMAP, POP, SMTP, port numbers, encryption type, and MX record details from your email hosting provider.
If you do not have a custom domain address yet, you can get a business email through a hosting provider. Your provider will give you the server details you need to complete manual setup.
Important! The steps and screenshots in this guide may look different depending on whether you use new Outlook, classic Outlook, Outlook for Mac, iOS, or Android.
How to set up Outlook automatically
Most Microsoft 365, Outlook.com, Gmail, Yahoo, iCloud, and Exchange accounts connect automatically when you add them to Outlook.
- Open Outlook.
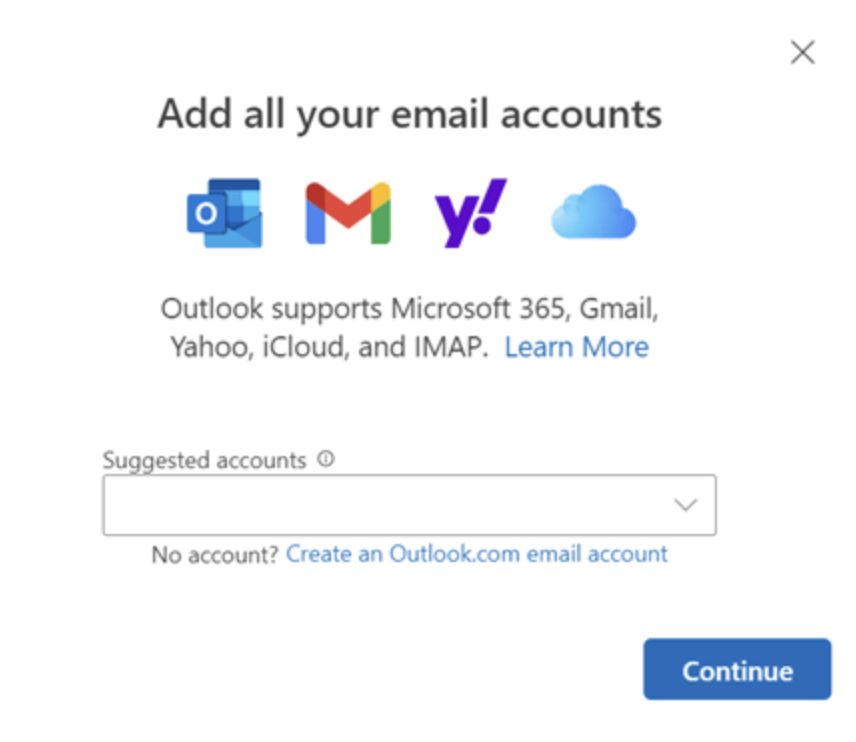
- Select Add Account. If Outlook is already set up on your device, go to File → Add Account.
- Enter your email address and select Connect or Continue.
- Enter your password when prompted.
- Complete two-factor authentication if your account requires it.
- Select Done.
Outlook will detect and configure your mailbox settings automatically. If it cannot find the settings, you will be prompted to enter them manually. In that case, follow the manual setup steps in the section that matches your device or email provider.
If your custom domain email is not connecting, check that your DNS records for email are configured correctly before trying again.
How to set up Outlook in the new Outlook for Windows
New Outlook is Microsoft’s updated Windows client for Windows 10 and 11.
- Open new Outlook.
- Go to View settings (gear icon) or File → Account info.
- Open Accounts → Your accounts.
- Select Add Account.
- Enter your email address and follow the sign-in prompts.
Most accounts connect automatically after you authenticate. If you use a non-Microsoft provider or a custom domain email, you may need to generate an app password or enable IMAP access on the provider side before Outlook can connect.
How to set up Outlook in classic Outlook for Windows
Classic Outlook includes Outlook 2021, Outlook 2024, and Microsoft 365 desktop versions that use the traditional ribbon interface.
Automatic setup in classic Outlook
- Open classic Outlook.
- Go to File → Add Account.
- Enter your email address and select Connect.
- Enter your password and complete authentication if prompted.
- Select OK, Done, or Finish.
Manual IMAP or POP setup in classic Outlook
Use this method when classic Outlook cannot automatically find your account settings, or when you need to enter specific IMAP, POP, or SMTP server details.
- Go to File → Add Account.
- Enter your email address and expand Advanced options.
- Check Let me set up my account manually and select Connect.
- Choose IMAP or POP. IMAP is recommended for most users because it syncs email across multiple devices.
- Enter your incoming and outgoing server addresses, port numbers, and encryption method.
- Enter your full email address as your username, then enter your password.
- Select Connect.
Get the exact server settings from your email provider or from hPanel if you use Hostinger.
What to know about Outlook 2016 and Outlook 2019
Microsoft ended support for Office 2016 and Office 2019 on October 14, 2025. Outlook 2016 and Outlook 2019 may still open and work, but they no longer receive security updates, bug fixes, or technical support.
If you are still using either version, upgrade to Microsoft 365, Outlook 2024, or another supported version to avoid security risks.
How to set up Outlook for Mac
The setup process on Mac is similar to Windows, but the account settings are accessed through the menu bar instead of the File menu.
- Open Outlook for Mac.
- Go to Outlook → Settings → Accounts or Tools → Accounts, depending on your version.
- Select Add Email Account.
- Enter your email address and select Continue.
- Enter your password and complete authentication if prompted.
- Select Done.
Most Microsoft 365, Outlook.com, Gmail, Yahoo, and Exchange accounts connect automatically after authentication. If you use a custom domain email and automatic setup fails, enter your IMAP and SMTP details from your email provider or from hPanel.
How to set up Outlook for iOS
The Outlook app for iOS supports automatic setup for most account types.
- Open the Outlook app on your iPhone or iPad.
- Tap Add Account.
- Enter your email address and tap Add Account or Continue.
- Enter your password and complete two-factor authentication if prompted.
- Tap Sign In.
Outlook automatically configures most account types after you enter your credentials. If your Hostinger email does not connect automatically, tap Advanced or choose IMAP when prompted, then enter the IMAP and SMTP details from hPanel.
How to set up Outlook for Android
The Outlook app for Android also supports automatic setup for most account types.
- Open the Outlook app on your Android device.
- Tap Add Account.
- Enter your email address and tap Continue.
- Enter your password and complete authentication if prompted.
- Tap the checkmark or Done.
Like in iOS, most accounts connect automatically after you enter your credentials. If your Hostinger email does not connect automatically, choose IMAP for multi-device syncing or POP to download messages to a single device, then enter the server details from hPanel when prompted.
How to set up Hostinger email in Outlook manually
Use this section if your Hostinger email does not connect to Outlook automatically. First, find your IMAP, POP, and SMTP settings in hPanel:
- Log in to hPanel and click Emails on the top menu.
- Click in Mailboxes next to your desired domain.
- Click Connect Apps & Devices from the sidebar.
- Select your desired service.
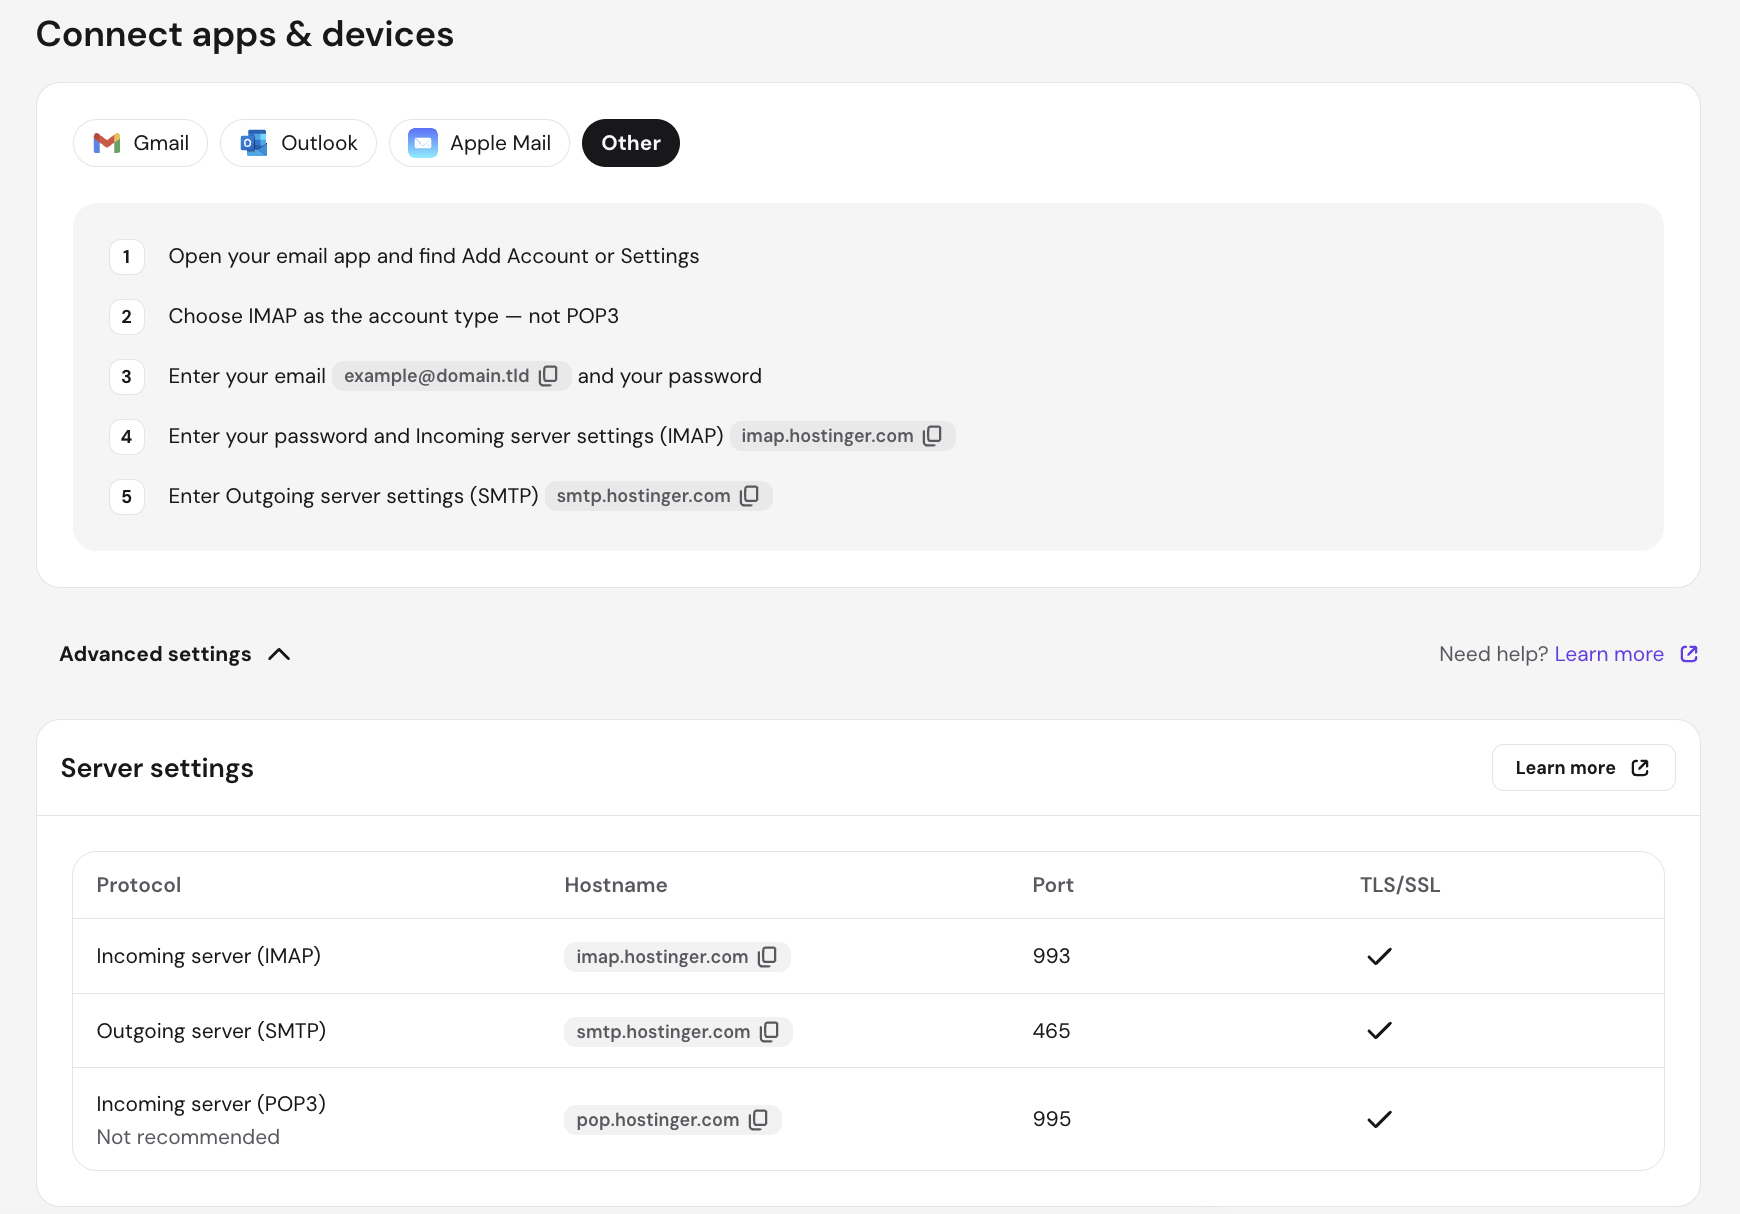
Use those details to fill in the Outlook fields below:
| Outlook field | What to enter |
| Incoming server (IMAP) | imap.hostinger.com |
| Incoming server (POP) | pop.hostinger.com |
| Outgoing server (SMTP) | smtp.hostinger.com |
| IMAP port | 993 |
| POP port | 995 |
| SMTP port | 465 |
| Incoming encryption | SSL/TLS |
| Outgoing encryption | SSL/TLS |
| Username | Your full email address |
| Password | Your email account password |
Use SSL/TLS for both incoming and outgoing encryption. The IMAP port is 993 and the SMTP port is 465.
After saving, send a test email to confirm outgoing mail works and check that incoming messages arrive correctly. If you see an error, reopen your account settings and verify that every value matches exactly what hPanel shows.
How to set up Hostinger email in Outlook automatically
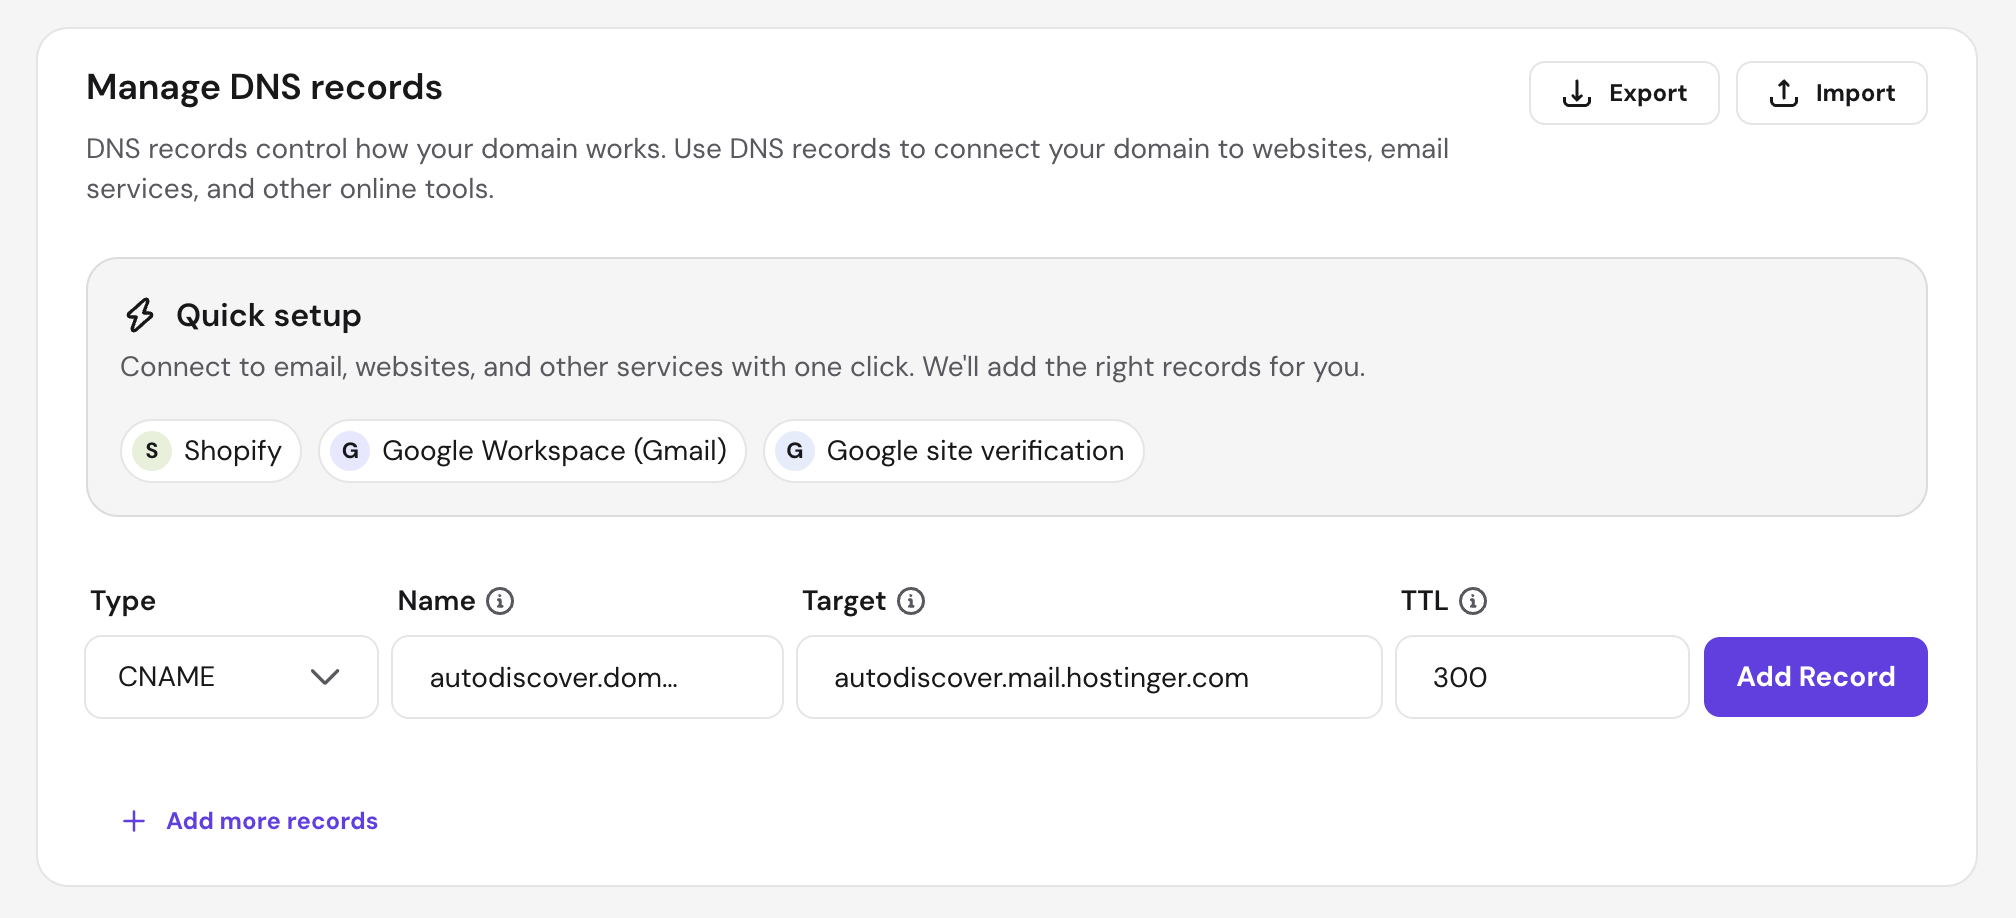
Hostinger email can connect to Outlook automatically when your MX records and autodiscover/autoconfigure CNAME records are set correctly. To add those records:
- Log in to hPanel and click Domain on the top menu.
- Click Manage next to your domain.
- Click DNS/Nameservers from the sidebar.
- Under Manage DNS Records, add two CNAME records with the following settings:
| Field | Record 1 | Record 2 |
| Type | CNAME | CNAME |
| Name | autodiscover.yourdomain.com | autoconfigure.yourdomain.com |
| Target | autodiscover.mail.hostinger.com | autoconfigure.mail.hostinger.com |
| TTL | 300 | 300 |
Replace yourdomain.com with your actual domain name.
DNS propagation can take up to 24 hours. Use a DNS checker tool to confirm that the CNAME records point to the correct addresses. Once propagation is complete, open any Outlook app, add a new account, and enter your Hostinger email address and password.
If Outlook still cannot detect your mailbox after propagation, use the manual IMAP/SMTP setup steps in the previous section instead.

Should you use IMAP or POP for Outlook?
Use IMAP for most Outlook setups because it syncs email across devices. Use POP only if you want Outlook to download messages to one device for offline access.
IMAP
IMAP stores your messages on the mail server and keeps them in sync across every device where Outlook is installed. Changes you make on one device, like deleting or moving a message, are reflected everywhere. IMAP requires an internet connection to fetch new messages, but it is the better option for most users.
POP
POP downloads messages from the server to your device and typically removes them from the server after they are downloaded. This enables offline access, but limits you to reading those emails on a single device. POP is a good fit if you work mostly offline and use one computer.
Keep in mind that both IMAP and POP sync email only. Calendar events, contacts, and tasks may not sync depending on your email provider.
Outlook and Outlook.com detect mailbox settings automatically for most account types, but you may need to enter IMAP vs POP3 or SMTP settings manually for custom domain email or non-Microsoft providers.
Why won’t Outlook connect to my email account?
If Outlook is not connecting, the issue is usually a wrong password, incorrect server settings, or a DNS configuration problem. Here are the most common causes and how to fix them.
- Incorrect password. Check that you are entering the correct password for your email account. If you recently changed your password, update it in Outlook under your account settings.
- App password required. If two-factor authentication is enabled on your account, some providers require an app password instead of your regular login password. Generate an app password from your provider’s security settings and use it when Outlook asks for a password.
- Wrong server settings. Check that your IMAP, POP, SMTP, port numbers, and encryption settings match exactly what your provider specifies. For Hostinger, verify the values in hPanel under the Connect Apps & Devices section.
- MX records not configured. If your mailbox is not receiving messages, your MX records may be missing or incorrect. Review your DNS settings and confirm the MX records point to your email provider’s servers. Incorrect SPF, DKIM, and DMARC records can also cause delivery issues, so they are worth checking as well.
- DNS propagation in progress. If you recently updated your MX, autodiscover, or autoconfigure records, wait up to 24 hours for the changes to propagate fully before retrying.
- Unsupported Outlook version. Outlook 2016 and Outlook 2019 no longer receive security updates or support from Microsoft. If you are using either version, upgrade to Outlook 2024 or Microsoft 365.
- Work or school account restrictions. Accounts managed by an organization may require admin approval, Microsoft Authenticator, or device management enrollment before Outlook can connect. Contact your IT administrator if you cannot add a work or school account.
Next steps after setting up Outlook
Once your account is connected, send a test email to confirm outgoing mail is working and check that incoming messages arrive in your inbox.
If you set up IMAP, verify that folder sync is working as expected across your devices.
From there, you can set up an email signature, create folders and rules, back up important emails, or enable two-factor authentication. Good email management habits make a difference once your inbox starts filling up.
All of the tutorial content on this website is subject to Hostinger's rigorous editorial standards and values.

Aris is a Content Writer specializing in Linux and WordPress development. He has a passion for networking, front-end web development, and server administration. By combining his IT and writing experience, Aris creates content that helps people easily understand complex technical topics to start their online journey. Follow him on LinkedIn.