How to install Django locally and on a VPS
Sep 15, 2026
/
By Andzelika D. & Valentinas C.
/
6 min Read
Django is installed using Python’s package manager, pip, after preparing Python and a virtual environment for the project. Developers usually install Django locally when building and testing applications, while VPS installations provide a dedicated environment for running Django projects online.
The installation process depends on the environment where Django will run, but the core steps remain the same: preparing the required dependencies, creating an isolated Python environment, installing Django, and verifying that the framework is ready to use. Once installed, Django provides the tools needed to create, test, and deploy Python-based web applications.
How to install Django locally
Installing Django locally involves preparing Python, creating a virtual environment, and using pip to install the Django framework package. A local installation is the most common setup for developers who want to build and test Django applications before deploying them to a server.
1. Check your Python installation
Django is a Python framework, so Python must be installed on your computer before setting up Django. Check whether Python is already available by running:
python --version
If Python is installed correctly, the command returns the installed version. If it is missing, install the latest version from the official Python website before continuing.
2. Verify that pip is available
pip is Python’s package manager and is used to install Django and other Python dependencies. Check that pip is installed by running:
pip --version
A successful response shows the installed pip version and confirms that it is ready to use.
3. Create a virtual environment
A virtual environment keeps Django and other project dependencies isolated from your system-wide Python installation. This makes it easier to manage multiple Django projects with different requirements.
Create a virtual environment in Python by running:
python -m venv myenv
Replace myenv with any name you want to use for your environment.
4. Activate the virtual environment
Before installing Django, activate the virtual environment you created.
On Windows, run:
myenvScriptsactivate
On macOS or Linux, run:
source myenv/bin/activate
Once activated, any Python packages you install will be added to this isolated environment.
5. Install Django using pip
With the virtual environment active, install Django using pip:
pip install django
pip downloads and installs the latest Django version along with any required dependencies.
6. Verify the Django installation
After installation, confirm that Django is available by checking its version:
django-admin --version
If the command returns a version number, Django has been installed successfully and is ready for use.
How to install Django on a VPS
A VPS provides a remote server environment where you can host Django applications online. Installing Django on a VPS follows the same core process as a local setup, but requires additional server configuration, such as connecting through SSH and preparing the server environment.
If you use a Hostinger VPS, you can either deploy Django using a preconfigured template or install it manually on a Linux server.
Install Django using a Hostinger VPS template
Hostinger makes it easy to set up Django on your VPS using a dedicated template. This method simplifies the installation process, letting you avoid command-line setup while providing a stable and optimized environment for your Django application.
To start, consider your project’s needs:
- CPU and RAM – a faster CPU and more RAM improve performance, particularly for complex applications or high traffic.
- Storage – Django applications handle databases and static files. Ensure your VPS has sufficient SSD storage for these requirements.
- Bandwidth – choose a plan with enough bandwidth to handle expected traffic without slowdowns.
For a basic Django project, our Django VPS lower-tier plans, like KVM 1 or KVM 2, will suffice. As your project grows, you can easily scale up to a higher-tier plan.
After selecting your desired plan, set up the framework by choosing the OpenLiteSpeed and Django (built on Ubuntu 24.04) template during the onboarding process.
If you use our regular VPS plan or have previously installed a different template, follow these steps instead:
- Log in to Hostinger dashboard and navigate to VPS → Manage.
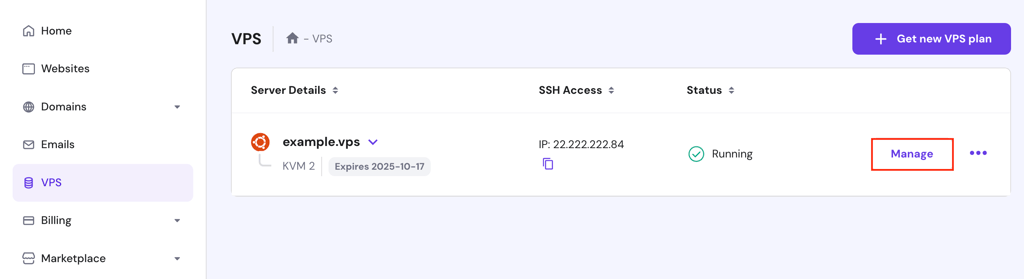
- On your VPS dashboard’s left sidebar, select OS & Panel → Operating System.
- In the Change OS section, go to the Application tab.
- Select OpenLiteSpeed with Django. You can also find it easily using the search menu.
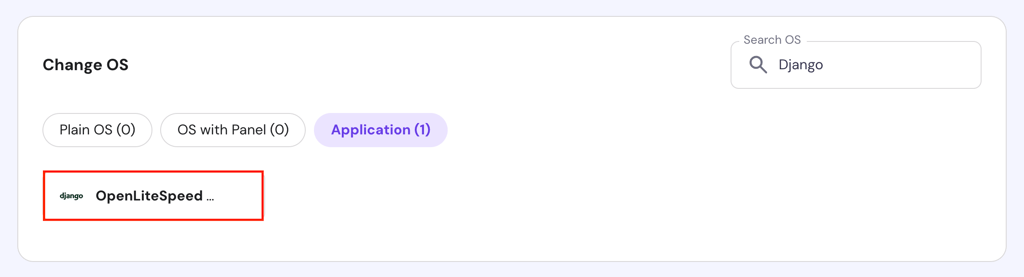
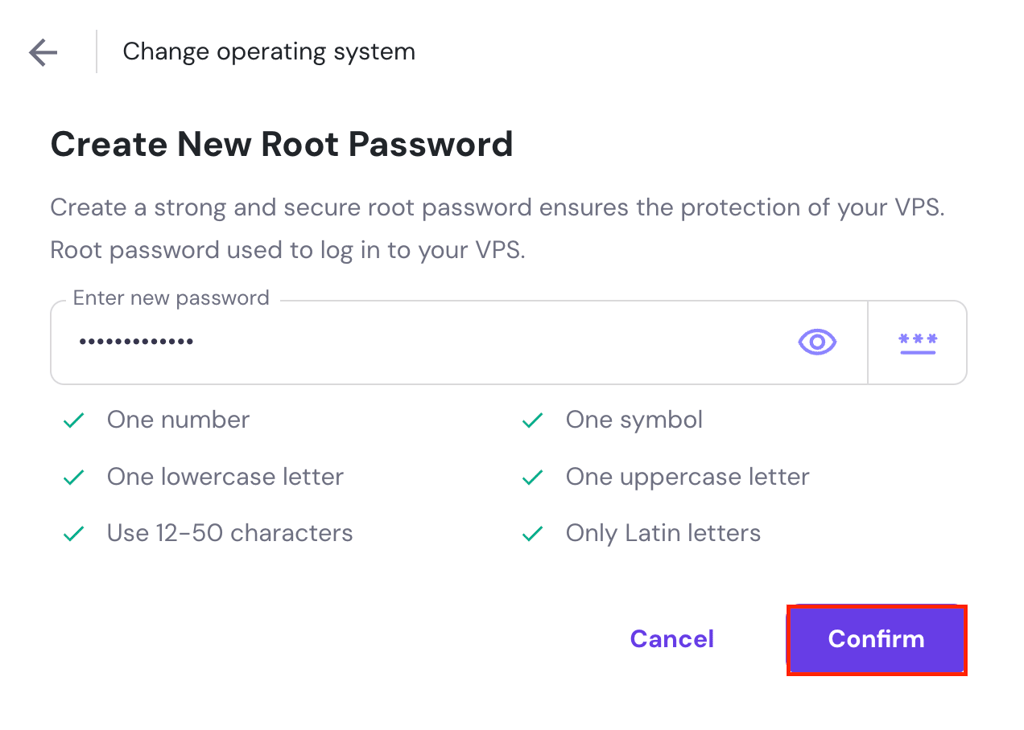
- When the popup appears, click Change OS, acknowledge the data deletion warning, and enter a new password for your server.
- Hit Confirm and wait for the process to complete within 10 minutes.
Once done, you’ll have a fully-configured server running Ubuntu 24.04 with Django and the OpenLiteSpeed web server.
💡 Pro tip
You can change your server's password later if needed, either via the Settings menu or by using Hostinger Agent, our AI assistant. Using Hostinger Agent is simpler – just type a prompt asking it to change your password and include the new one. For example: "Please change my server password to MyNewSecurePassword123."
Install Django manually on a VPS
If you prefer using a different operating system, web server, or need more flexibility in setting up Django, you can manually install it using commands. Follow these steps:
1. Access your VPS
To manually install Django, you first need to connect to your VPS using a terminal or an SSH client like PuTTY. Here are the instructions:
- Open your terminal and run the following command, replacing your_vps_ip with your VPS’ actual IP address:
ssh root@your_vps_ip
- When prompted, enter your root password to gain server access.
For Hostinger VPS customers, you can find your server’s IP and root login credentials by navigating to the VPS details section in your VPS dashboard.
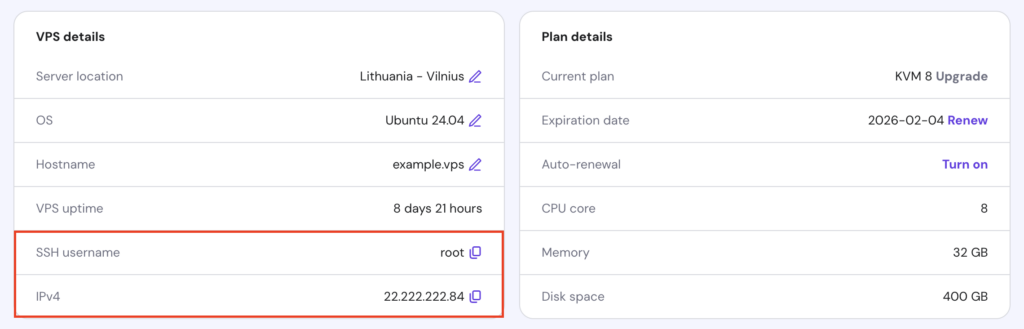
If you don’t want to use external software, Hostinger users can also access their server via the Browser terminal feature. Simply hit the button in the top right corner of your VPS dashboard to log in automatically.
- Once logged in, it’s a good practice to update and upgrade your server with:
apt update && apt upgrade -y
After updating, your VPS will be ready to install Python and other required dependencies for Django development.
2. Install Python and pip
To run Django, you’ll need to install Python and pip on your VPS. Most modern Linux distributions, like Ubuntu, come with Python pre-installed.
Here’s how to verify if Python is installed and to install or update it if necessary:
- Run the following command to check the current version of Python:
python3 --version
- If the command returns the Python version number, Python is already installed, and you just need to install pip, the package installer for Python.

- If it returns an error, you’ll need to install Python.
- Here are the commands to install Python 3 and pip:
sudo apt update
sudo apt install python3 python3-pip -y
After that, you’re ready to set up a virtual environment for your Django project.
3. Set up a virtual environment
A virtual environment is an isolated space where you can install Python packages and dependencies for a specific project. This method doesn’t affect the system-wide Python environment or other projects.
Using a virtual environment is especially important when working with Django, as different projects may require different versions of packages. It ensures that each project’s dependencies are neatly contained and don’t conflict with others.
Follow these steps to set up a virtual environment on your VPS:
- Install the venv package, if it’s not already installed:
sudo apt install python3-venv -y
- Create and navigate to your project directory. Here, we name it myproject:
mkdir myproject
cd myproject
- Create a virtual environment, replacing env_name with your preferred name:
python3 -m venv env_name
- Activate the virtual environment:
source env_name/bin/activate
Once activated, your shell prompt will change to reflect the virtual environment name, indicating you’re working within it.
4. Install Django
The last step is to install Django itself. You can do it by following these steps:
- Use pip to install the latest Django version:
pip install django
This will download and install Django and all its dependencies within the virtual environment.
- Execute this command to check if Django is installed and to see the version:
django-admin --version
You should see an output showing the current Django version, indicating that installation was successful.

That’s it! Now you can start building your Django application.
What to do after installing Django
Installing Django is the first step toward building and running Python web applications. After setting up your environment, the next stage is creating your project structure, adding features, configuring your database, and preparing your application for deployment.
To continue developing your Django project, explore these next steps:
- Create your first Django project and understand the framework’s structure.
- Configure your application settings, database, and static files.
- Deploy your Django application to a production server when it is ready for users.
A reliable hosting environment can help keep your Django application available and scalable as it grows. If you are moving from local development to production, consider setting up Django on a VPS with the resources and control needed for your application.

All of the tutorial content on this website is subject to Hostinger's rigorous editorial standards and values.

Andzelika is a Content Writer and Editor with over 5 years of experience in the digital marketing industry. With passion for technology and the art of the written word, she loves to combine the two worlds and produce actionable content.

Valentinas Čirba, Hostinger's Head of VPS, is a seasoned product leader specializing in VPS products with over ten years of experience. He's an expert at setting product strategy, leading cross-functional teams, and making smart decisions to deliver innovative solutions. Valentinas is committed to creating products that not only meet business objectives but also truly serve the customer. Follow him on LinkedIn.