The Hostinger CLI deploys a Node.js app or a static HTML website to your Hostinger hosting plan with one command, hostinger up. The command asks which website and hosting plan to use, detects your app type and build settings, and links your project folder to the website so later deployments need no extra details. To save or remove a project’s details yourself, use hostinger link and hostinger unlink.
Before you start
- Install the Hostinger CLI and sign in, as described in How to use Hostinger API CLI.
- To deploy a Node.js app, use a hosting plan that supports Node.js web apps. See How to add a Node.js web app in Hostinger for the supported plans and frameworks.
Deploy a website with hostinger up
Run hostinger up in your project folder to deploy a Node.js app or a static HTML website. The CLI asks a series of questions and runs the required commands in order, so you don’t need to know which commands to run.
- Open your project folder in the terminal and run
hostinger up. - Select the website to deploy to, or select Create a new website.
- For a new website, select the hosting plan to host it, then enter a domain. Leave the domain empty to use a free temporary subdomain on
hostingersite.com. - Confirm the detected app type. For a Node.js app, the CLI asks This looks like a Node.js app. Deploy it as nodejs? Type
Yto continue. - Review the build settings the CLI reads from your project, then type
Yto use them. The settings include the framework, Node.js version, root directory, build script, output directory, entry file, and package manager.
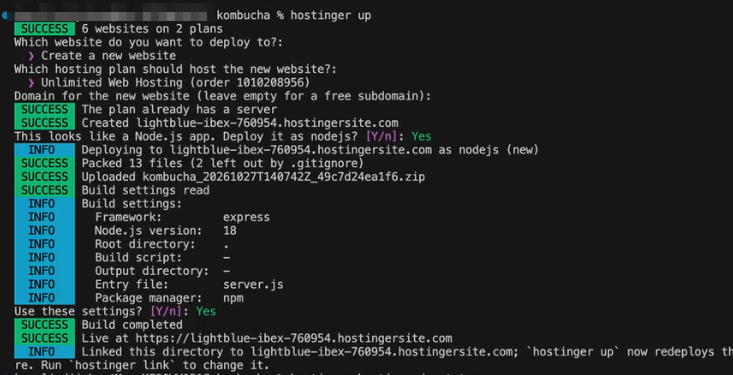
The CLI packs your project files, skipping files listed in .gitignore, then uploads and builds the website. When the build completes, the CLI shows the live URL of your website.
Redeploy a project with hostinger up
After the first deployment, hostinger up links your project folder to the website. Run hostinger up again in the same folder to redeploy the website after you change your code. To deploy the folder to a different website instead, run hostinger link.
Save project details with hostinger link and hostinger unlink
hostinger link saves your project’s details locally, so later commands for that website need no account or domain details.
- Open your project folder in the terminal.
- Run
hostinger linkto save the project details. - Run
hostinger unlinkto remove the saved details.
After you link a project, website commands run without the hosting username and domain. For example, purging the CDN cache changes from this:
hostinger hosting cdn purge-cache u123456789 domain.tld
To this:
hostinger hosting cdn purge-cache
Your website is now deployed from your terminal, and later deployments and website commands need only the command name while you work in the linked project folder.