Aug 22, 2025
Ariffud M. & Jordana A.
8min Read
A 403 Forbidden error is an HTTP status code that blocks access due to permission or configuration issues. This error indicates that the server understands the request but refuses to authorize it, typically because of restricted permissions.
Keep reading as we walk you through actionable solutions to fix the 403 Forbidden error, from simple troubleshooting steps to more advanced server-side configurations:
Additionally, potential causes that can trigger this error include:
Download comprehensive HTTP status codes cheat sheet
Browser cache stores outdated files, which can conflict with updated site permissions and trigger a 403 error. Cookies save login and preference data, and when they become corrupted or outdated, they may block access to some pages.
First, clear your browser cache and cookies to remove any conflicting or outdated data. This forces the browser to fetch fresh files from the server, which can resolve access issues – though you’ll need to log in again to most sites afterward.
Here’s how to do it in Google Chrome (similar steps apply to Firefox and Safari):
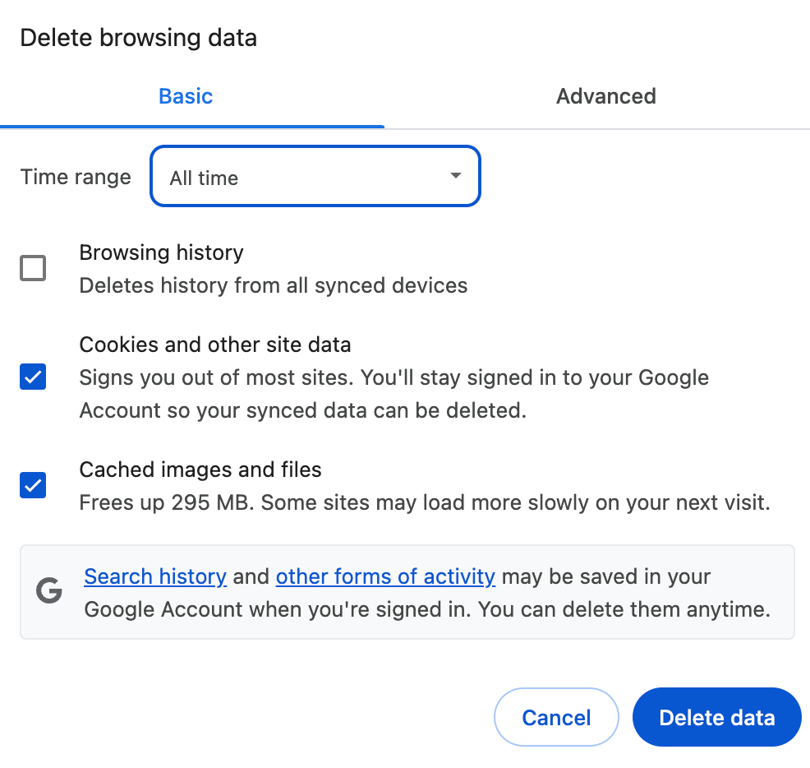
After clearing cache and cookies, revisit the website and try logging in to see if the 403 Forbidden error is resolved.
A virtual private network (VPN) routes your connection through remote servers. However, some websites block these servers for security or regional compliance, often resulting in a 403 error.
Temporarily disable your VPN and try accessing the website again. If this resolves the issue, switch to a different VPN server or contact your VPN provider for guidance.
If these simple checks don’t solve the problem, move on to the next steps, which involve checking your website’s security.
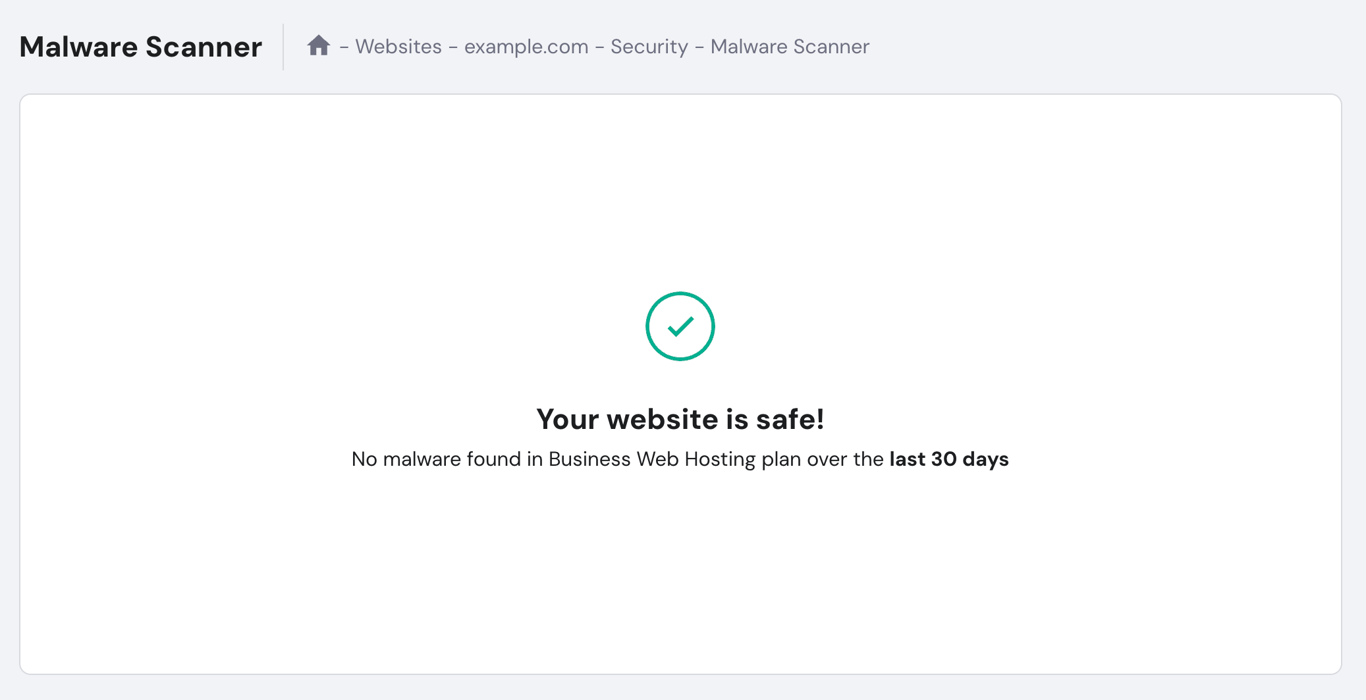
Malware can insert harmful code into your website’s files. This can change permissions or configuration rules, leading to restricted access and a 403 Forbidden response.
Scan your website for malware to identify and remove any harmful code. On Hostinger web hosting plans, you can use the built-in Malware Scanner in hPanel without third-party tools:
For additional protection, use reputable WordPress malware scanner plugins like Wordfence or Solid Security. These tools detect threats in real time and block suspicious activity before it can cause further issues.
If the scan reveals infections, clean or replace the affected files, then recheck your site to confirm the 403 error is gone.

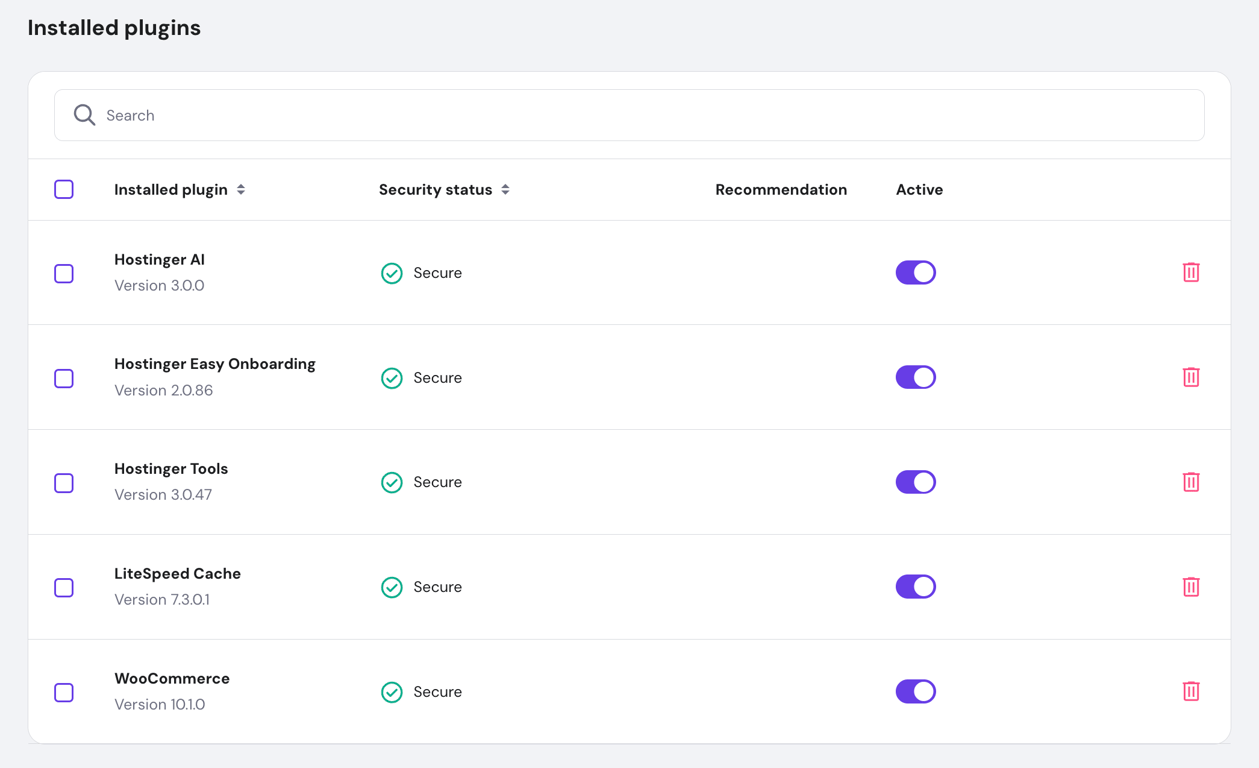
Faulty or incompatible WordPress plugins may override permission settings. When this happens, affected pages can become inaccessible and return a 403 Forbidden error.
Disable your WordPress plugins to determine if one is causing the issue. You can do this from your WordPress dashboard or directly in hPanel if you’re a Hostinger customer:
If you prefer a manual method, you can disable all plugins at once via the file manager or an FTP client:
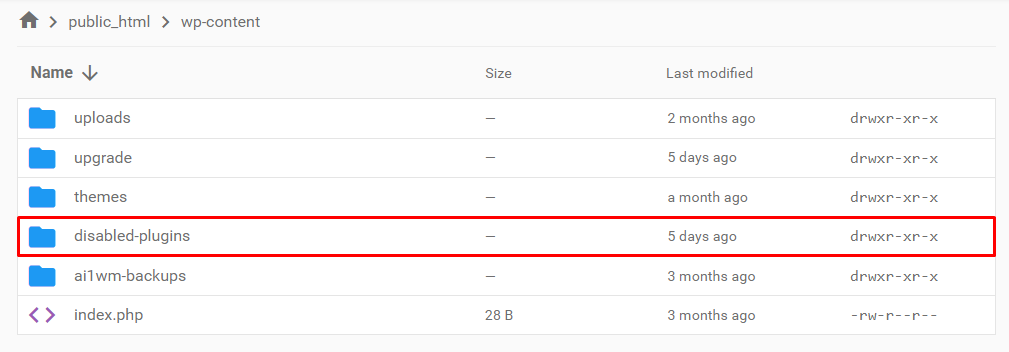
Once you’ve found the plugin causing the error, update it or remove it entirely.
If security-related fixes don’t work, the next steps address server configurations and file settings.
A content delivery network (CDN) stores cached copies of your site across multiple servers, and outdated or misconfigured cache can lead to a 403 status code.
If your website uses a CDN, temporarily turn it off to check if it’s serving the error instead of your origin server. Hostinger automatically enables the in-house CDN for the Business web hosting plan and above. To disable it in hPanel:

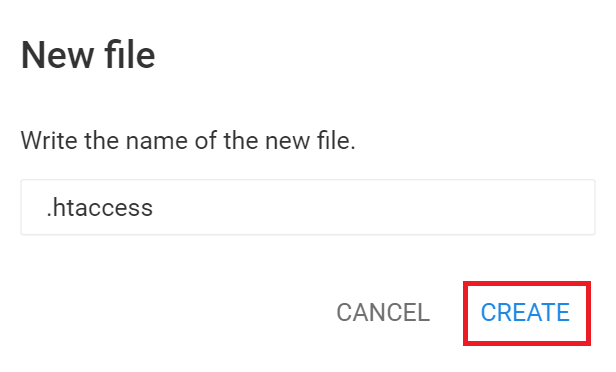
A corrupted or misconfigured .htaccess file can apply incorrect server rewrite or access rules, blocking visitors and returning a 403 Forbidden error.
If recent changes or malware have altered your .htaccess file, replace it with a clean version. If you’re using Hostinger, you can create a new .htaccess file through hPanel’s File Manager:
# Enable URL Rewriting
RewriteEngine On
# Rewrite rule to redirect requests to index.php
RewriteCond %{REQUEST_FILENAME} !-f
RewriteCond %{REQUEST_FILENAME} !-d
RewriteRule ^(.*)$ index.php?/$1 [L]
For WordPress websites, you can also regenerate the file without using File Manager:
After restoring .htaccess, try accessing your site again. If the error disappears, the file was likely the cause.
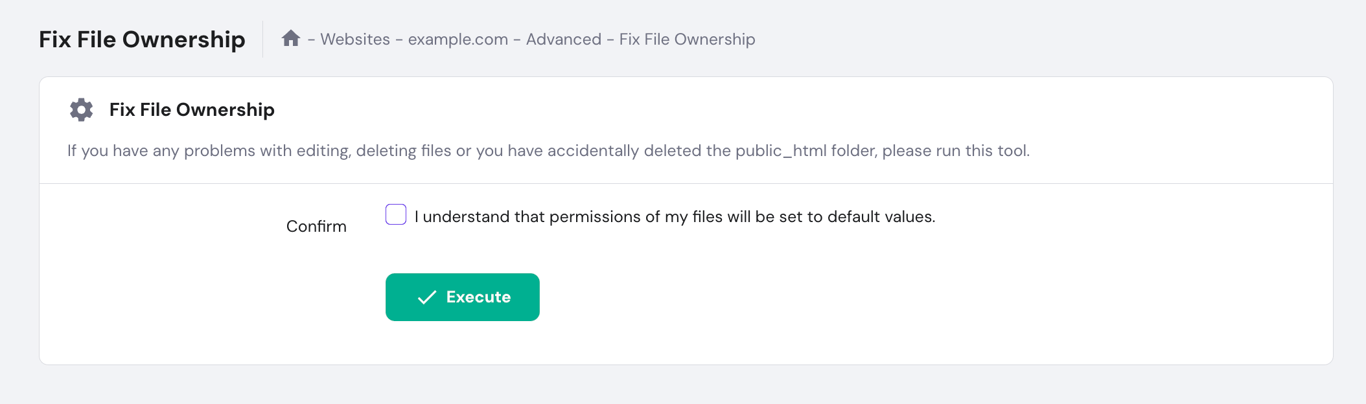
File permissions control access to your website’s data. When a file is too restrictive, the server blocks access for security reasons, resulting in a 403 Forbidden error.
If your file permissions are incorrect, you can easily reset them in just one click using Hostinger’s built-in Fix File Ownership tool:
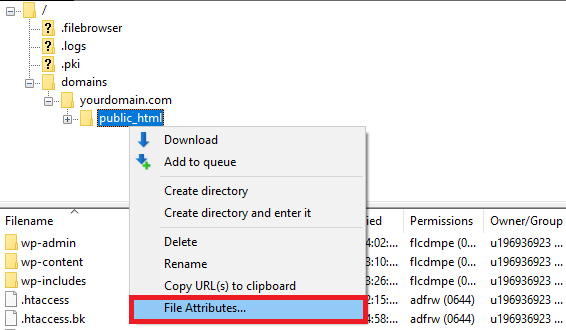
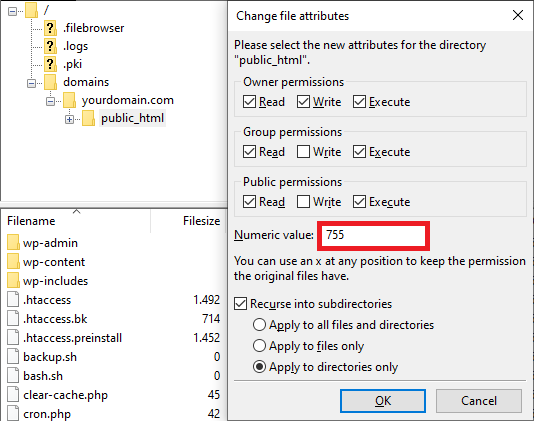
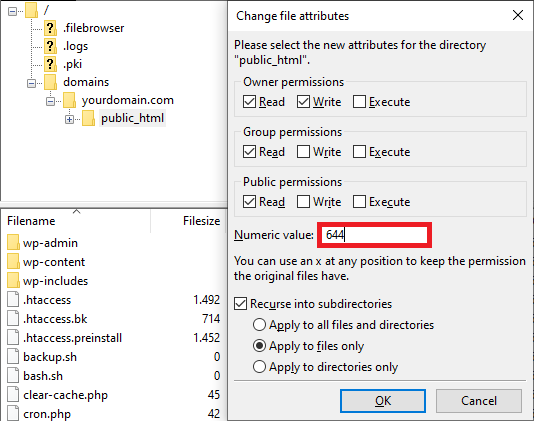
Alternatively, you can reset file permissions manually using an FTP client like FileZilla:
Once you’ve applied the correct permissions, revisit your site to confirm if the 403 error disappears.
In Linux and VPS hosting environments, the ownership settings decide which users can modify or execute files. If ownership is incorrectly assigned, you may be denied access to certain resources, causing a 403 error.
This fix is more technical, as it requires using SSH to connect to your server and running Linux commands. Follow these steps to check and adjust file ownership in Linux:
ls -l [file name]
The output will look like this:
-rwxrw-rw- 1 [owner][group] 22 Sep 22 10:00 filename.txt
chown [owner][:group] [file name]
For example, if your username is John, use:
chown John filename.txt
If your website lacks an index page, such as index.html or index.php, users may receive a 403 Forbidden error when trying to access it.
This occurs because the web server expects an index page to load by default, and without one, the server blocks access.
First, check if your homepage is named index.html or index.php. If not, rename it through your FTP client or file manager.
If the index page is missing, create one. Here’s how:
If you’re still facing issues, we have two more troubleshooting steps involving domain-related configurations that you can try.
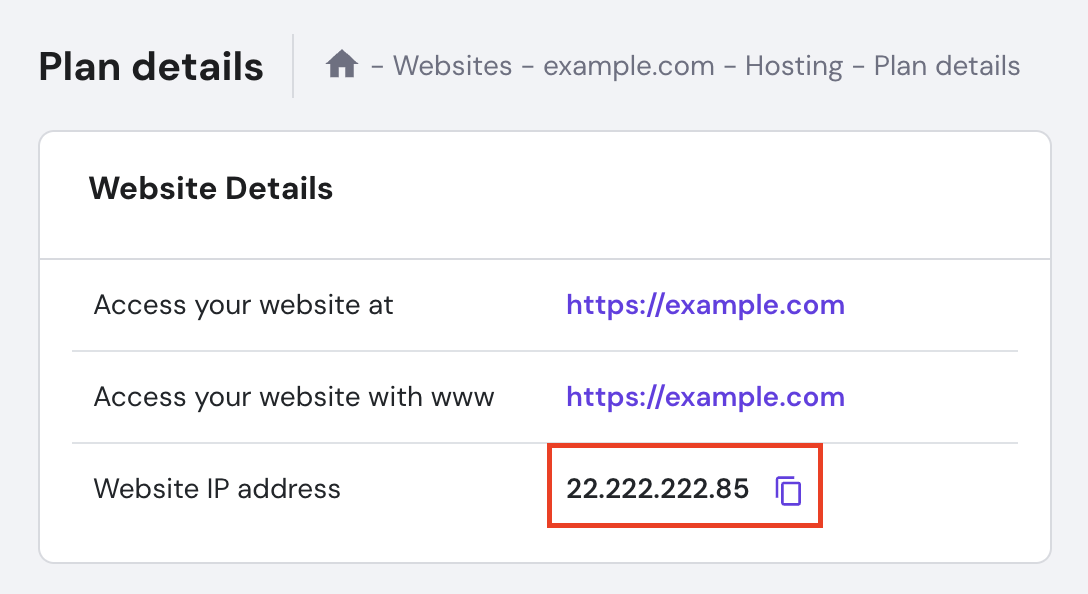
The A record is a type of Domain Name System (DNS) record that maps your domain to the correct IP address. If your domain’s A record points to the wrong IP, users may be denied access to your website. This leads to a 403 Forbidden response.
If you host your website with Hostinger, first find your site’s IP address by going to hPanel → Hosting Plan → Plan Details.
Then, check if your domain’s A record is pointed correctly by following these steps:
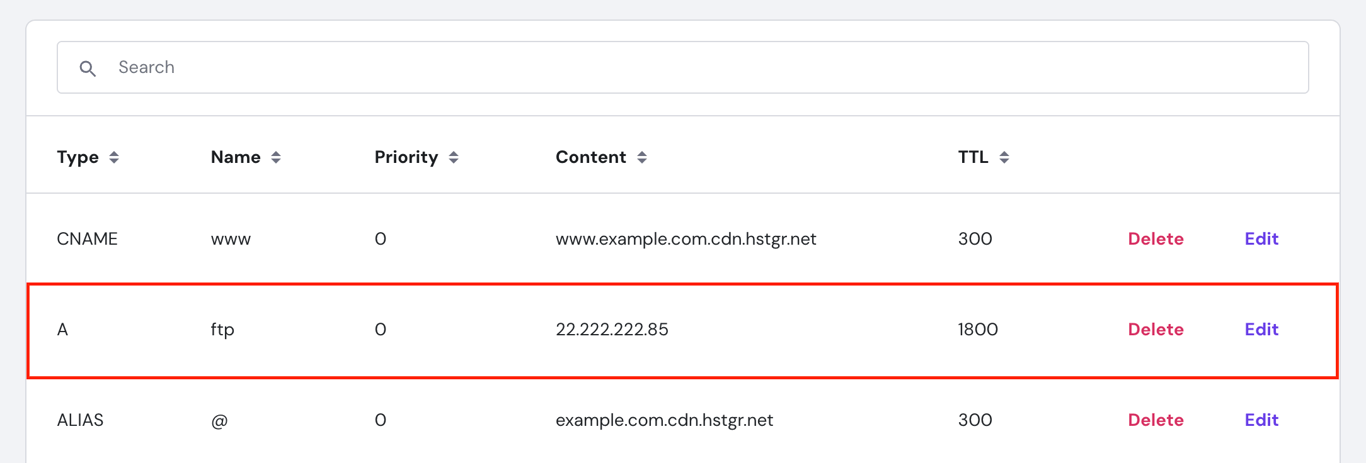
Please note that editing the A record may affect the services or subdomains using it.
If this doesn’t resolve the error or causes disruptions, consider creating a new A record instead:

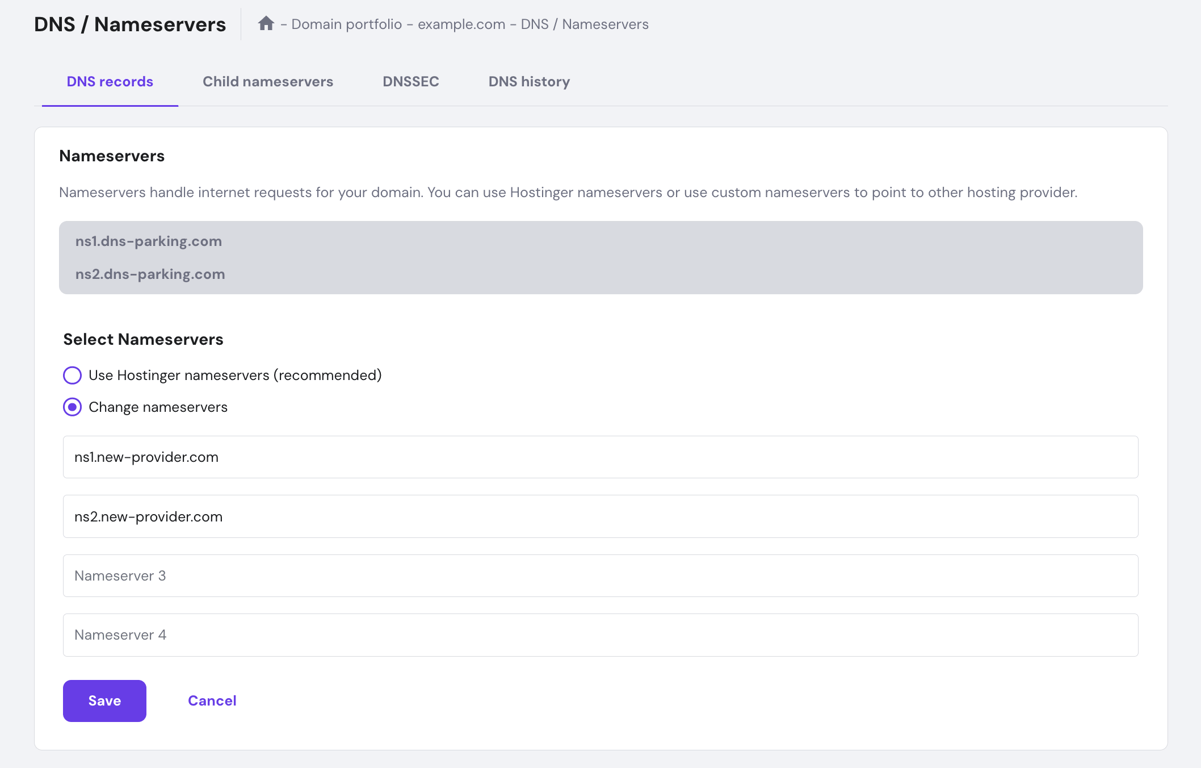
When you change hosting providers, your domain’s DNS records need to be updated to point to the correct nameservers. If you skip this step, users will still be directed to your old host, which leads to access issues like the 403 Forbidden error.
If you register your domain at Hostinger, here’s how to update your domain’s nameservers:
If you prefer a visual guide, watch our video to discover easy-to-follow solutions for fixing the 403 Forbidden error. We’ll show you step-by-step instructions on how to apply key troubleshooting methods, like adjusting file permissions and resolving issues with the .htaccess file.

Troubleshooting the 403 Forbidden error requires a systematic approach. Start with the simplest fixes and gradually progress to more complex solutions.
If the 403 problem persists, there are still some other methods worth trying:
All of the tutorial content on this website is subject to Hostinger's rigorous editorial standards and values.

Ariffud is a Technical Content Writer with an educational background in Informatics. He has extensive expertise in Linux and VPS, authoring over 200 articles on server management and web development. Follow him on LinkedIn.

Jordana is a Senior Content Writer with a background in Information Systems. She has over five years of experience in WordPress and is casually dabbling with PHP and MySQL. Her passion for writing and technology drives her to create tutorials for anyone wanting to build their online presence. Follow her on LinkedIn.
Ecommerce hosting providers supply the infrastructure that keeps an online store fast, secure, and always available to customers. Unlike basic ...

Podcast hosting is a specialized service that stores your audio files and distributes them to directories like Spotify, Apple Podcasts, ...
Joomla hosting refers to web hosting services specifically optimized for websites built with the Joomla content management system (CMS). Known ...