How to remove WordPress malware: manual and automatic malware removal
Apr 14, 2026
/
Aris S.
/
11 min Read
Being the most popular content management system (CMS), WordPress is a common target of cyber attacks. While the platform is safe, website owners must apply robust security practices to minimize the risks.
If you see signs of hacked WordPress, like unauthorized redirection or modified content, malware might be infecting your site. If not handled properly, this can lead to serious issues, including data loss and downtime.
In this tutorial, we will explain different methods of WordPress malware removal. You will learn how to do so manually, automatically, or using a third-party service so you can choose the one most suitable for your needs.
Download WordPress security checklist
Learn more about malware with Hostinger Academy
Want to learn more about malware? Check our video tutorial to learn more about different types of malicious software and how to protect your website against them.

What to do before removing malware on WordPress
Before eliminating WordPress malware, make sure to complete the following tasks to prevent the attack from getting worse.
Restrict WordPress access
If you suspect your WordPress site is compromised, immediately restrict its access to prevent users from visiting it. Otherwise, the malware might spread to visitors’ devices or redirect them to phishing sites.
This step also ensures that only administrators resolve the issue, allowing you to track changes more easily in case of errors.
To restrict WordPress access, block all IP addresses except your computer’s via the .htaccess file. Here’s how to do so on the Hostinger hosting plan:
- Log in to hPanel and click Websites from the top menu.
- Click Dashboard on the website you want to fix.
- Select File manager.

- Open the public_html directory and double-click the .htaccess file. If you can’t find it, check out our guide on what to do if .htaccess is missing.
- Add the following lines at the bottom of the file. Replace your_ip_address with the actual value:
order allow,deny

deny from all

allow from [your_IP_address]
- Click the disk icon on the top right to save the changes.
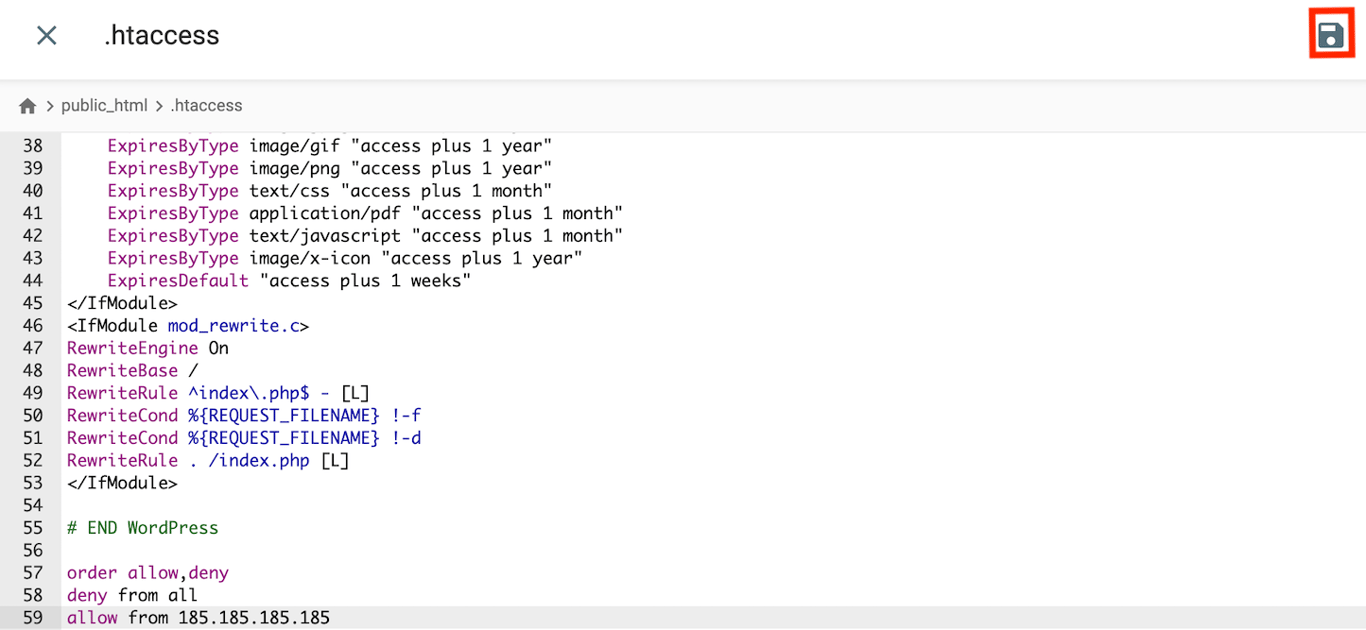
Before doing so, remember to set up a static IP address on your computer. Otherwise, you must update the .htaccess file periodically since the value will change.
Back up WordPress files
Backing up your website files helps you pinpoint the malware infection more quickly. It lets you compare the data before and after the attack to distinguish the malicious code.
The steps of creating a WordPress backup differ depending on the web hosting company. For Hostinger users, follow these:
- On the website management menu, go to the sidebar → Files → Backups.
- Select the Files Backups option, choose your preferred backup date, and click Next Step.
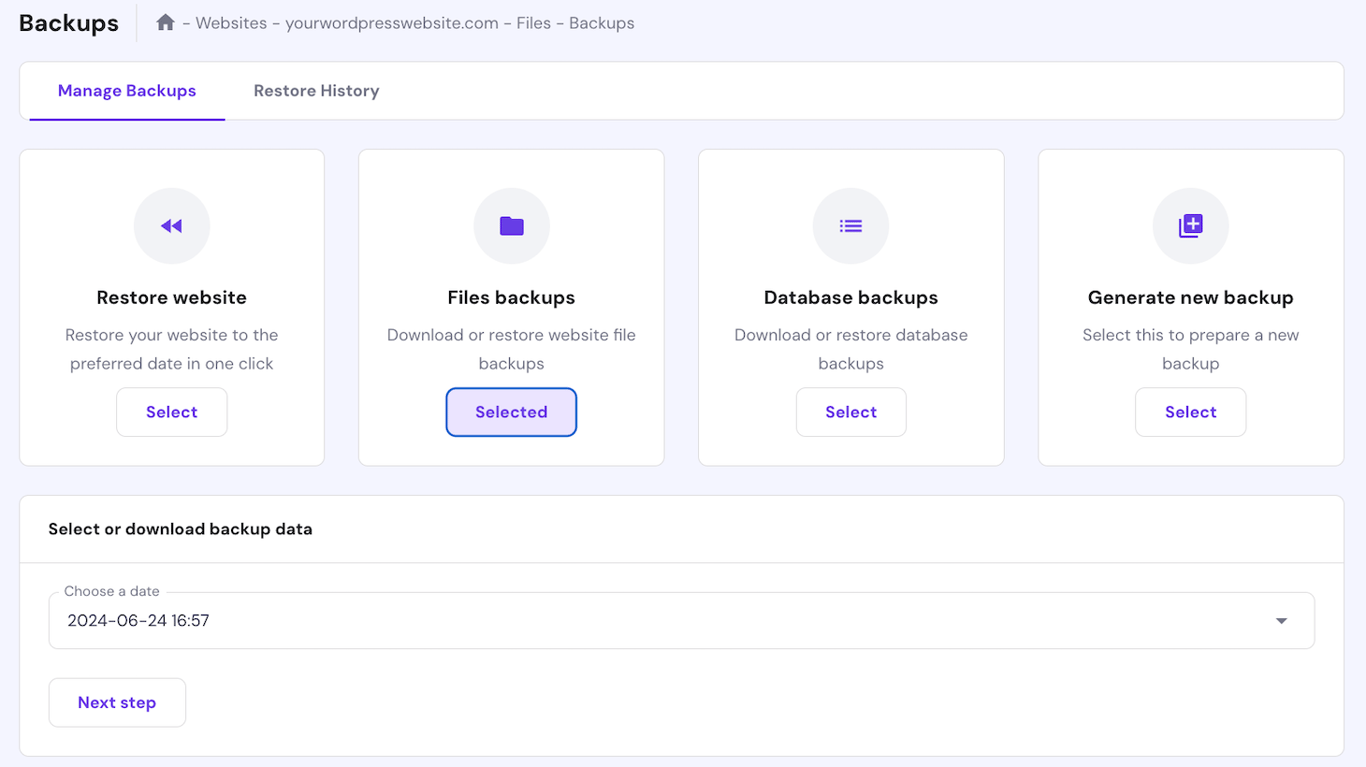
- Click Download all files.
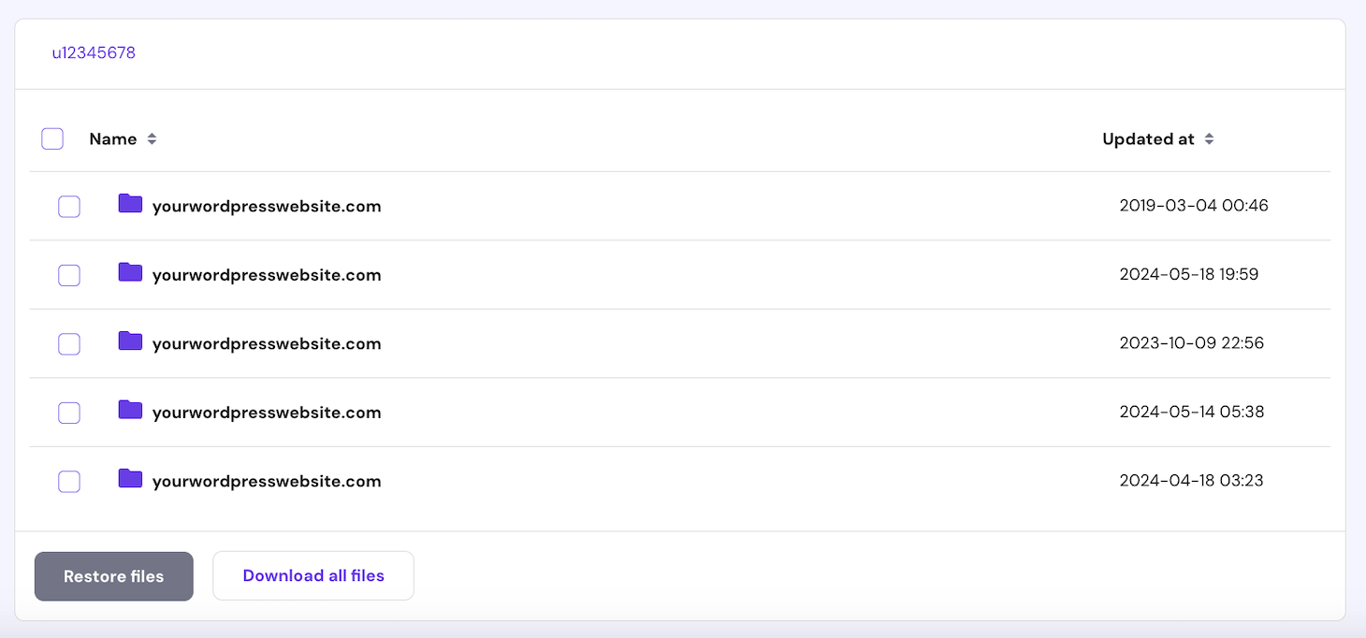
- Wait until hPanel finishes preparing the files. Once ready, click Download Backup.
- Repeat the step for the Database Backup option.
All Hostinger web hosting plans have automatic weekly backups to ensure you have an up-to-date recovery point.
However, not all web hosts offer the same feature, meaning you can’t download a backup if you haven’t created one manually. In this case, we recommend contacting your hosting provider to check if they have a copy of your website files.
Check recent changes
Tracking recent modifications on your website helps you identify which file is infected with malware.
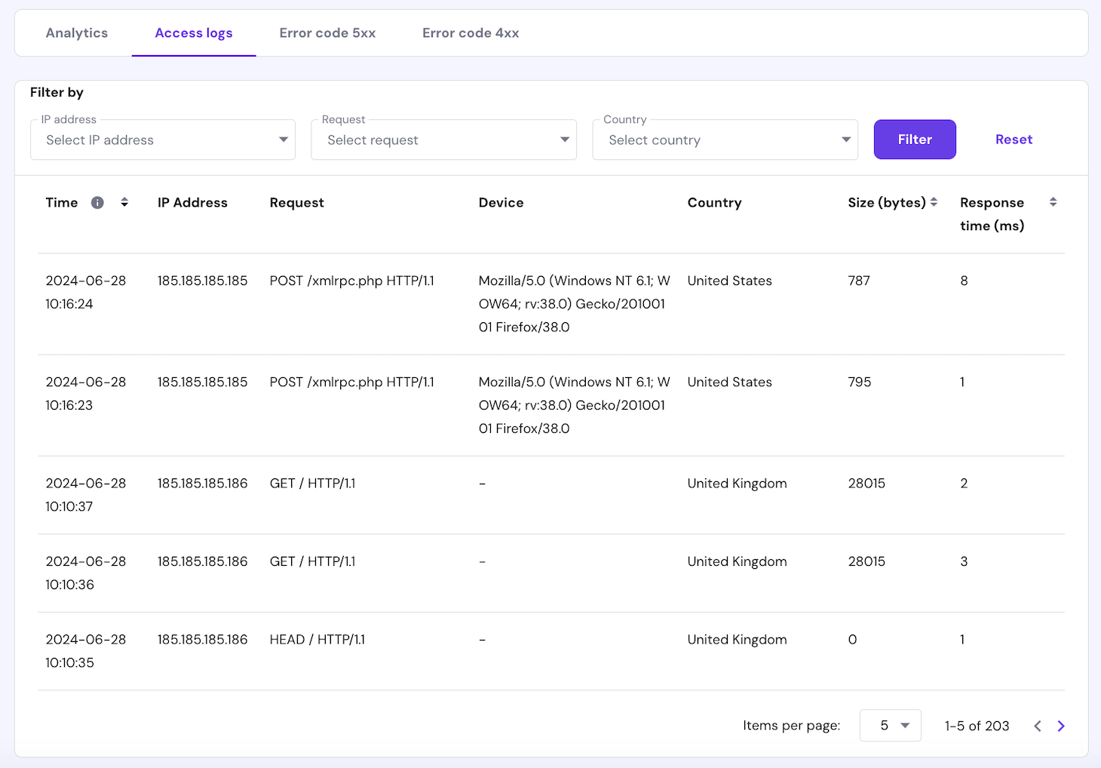
A simple way to do this is by checking the activity log. At Hostinger, you can do so via hPanel by going to Website Management → Performance → Analytics → Access Logs.
For a more detailed analysis, you can also list recently modified files using a command. To do so, connect to your WordPress server via SSH using Terminal or a client like PuTTY. Then, run the following:
find . -type f -name '*.file_extension' -ctime n
Replace file_extension with the actual file format you want to check, such as PHP or JS, which are common targets for malware attacks. n specifies the time span you wish to check as days. In this example, we will search for JavaScript files modified three days ago:
find . -type f -name '*.js' -ctime -3
Update all passwords and access keys
Cybercriminals might use malware to steal WordPress administrators’ credentials. If your website is compromised, immediately change all passwords to slow down the attack.
We also recommend updating credentials on other platforms, including the WordPress database, hosting panel, and File Transfer Protocol (FTP) client. To minimize security threats, use a robust and unique password for each account.
To simplify the process, use a password generator tool like 1Password Strong Password Generator. In addition, store all your credentials in applications like NordPass or 1Password, which provides an encrypted vault to safeguard your login information.
In addition, change the WordPress salts to keep your new login details secure. You can reset salts and all admin passwords to a random string of characters by running the following command via SSH:
wp config shuffle-salts && wp user reset-password $(wp user list --role=administrator --field=ID)
Remove symlinks
Symlinks lets you create shortcuts that point to files or directories, providing multiple access points for a simpler management process.
However, cyber attackers can exploit compromised shortcuts to access important files or the root folder. To avoid this issue, unlock the symlink by running this command via SSH:
find . -type l -exec unlink {} \;After completing the WordPress malware removal steps, remember to recreate the symlink; otherwise, your website might not work correctly.
Update WordPress
Outdated WordPress might have security vulnerabilities. Updating it ensures you apply the latest patch, minimizing the known attack surface for cybercriminals.
In addition to WordPress, make sure to update plugins and themes, as hackers can exploit them to gain access to your website. At Hostinger, hPanel has vulnerability detection that alerts you about compromised extensions.
Moreover, update your PHP version since this scripting language is susceptible to attacks like SQL injection and cross-scripting. You can also do so via hPanel by going to the website management menu → sidebar → Advanced → PHP configuration.

We also recommend enabling hPanel’s automatic update feature to ensure your WordPress installation, plugins, and themes use the latest security patches as soon as possible. Do so by going to the sidebar → WordPress → Security.
Expert Tip
Unsupported plugins and themes are significant security risks as they don’t receive patches to remove any vulnerabilities. Always check when your extensions were last updated. If there have been no updates and activities in the development log in the past six months, it’s safer to uninstall the plugin or theme and look for an alternative.

Reset file and folder permissions
Changing file permissions might expose sensitive data to the public, which cyber attackers can exploit to infect your website. Resetting access privileges prevents unauthorized parties from modifying essential data.
You can do so using an FTP client like FileZilla or hPanel’s File Manager. Ideally, set permissions for files to 644 and folders to 755. To learn what these values mean, check our chmod command tutorial.
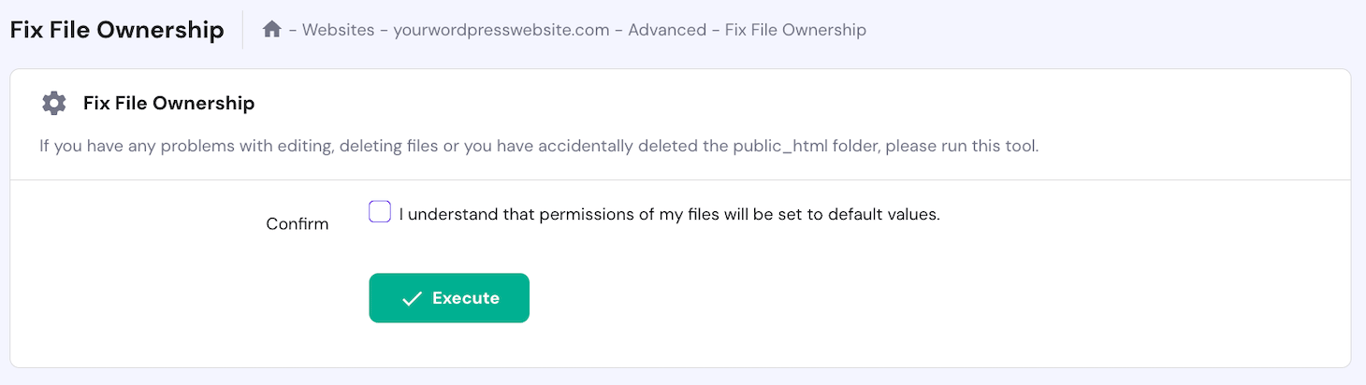
Alternatively, Hostinger users can reset all file permissions in a single click via hPanel. To do so, navigate to the website management menu → sidebar → Other → Fix File Ownership. Check the box and click Execute.
Scan your computer for malware
Malware in WordPress can also infect your personal computer when you access the infected website or download its files. Before cleaning it up, it is essential to check if your system is also compromised.
This step prevents the malware from spreading back into your website. You can clean up your computer using various antivirus software like Bitdefender and Norton.
How to remove malware manually from WordPress site
Users with technical knowledge can manually remove malware from their WordPress sites. While this method can be complicated for beginners, it works across different hosts.
1. Reinstall WordPress core files
The first step to remove malware from WordPress is reinstalling the CMS’ core files. If you still have access to the admin dashboard, you can do so by navigating to the sidebar → Updates and clicking the Re-install Now button.
Otherwise, you reinstall WordPress using an FTP client or File Manager in hPanel. Here’s how to do so at Hostinger:
- On the website management menu, click File manager.
- Open public_html and locate the wp-content folder. Right-click the item and click Download.
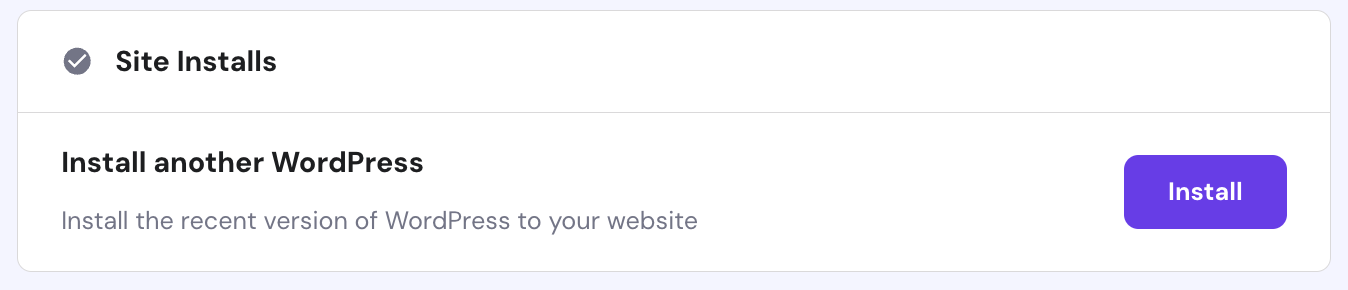
- Return to the website management menu and click WordPress on the sidebar.
- Scroll down to the Site Installs section and click Install.
- Return to File Manager and navigate to the public_html folder.
- Drag and drop the wp-content folder you downloaded earlier to File Manager.
Alternatively, reinstall the core files using the WordPress command-line interface (WP-CLI). Before doing so, open File Manager and navigate to the public_html root directory.
Rename wp-admin and wp-include folders by right-clicking them and selecting Rename. Doing so will force WP-CLI to download new files, which is preferred since those folders might be compromised.
Once finished, connect to your website via SSH and run the following command. Replace 6.6 with your preferred WordPress version:
wp core download --version=6.6 --skip-content --force
2. Compare infected vs clean WordPress installation
Now, we have clean and infected WordPress files. Let’s compare them to check which item has the malicious code so we can remove them from the installation.
You can identify malware manually using the split window feature of your FTP client. However, it can be tedious since WordPress has a lot of files, especially if your website is complex.
Use commands to highlight disparities between your website code quickly. To do so, put the clean and infected WordPress files into two folders on your server. Then, run the following via SSH:
diff -r wordpress-clean/ wordpress-infected/ -x wp-content
You can also run a checksum via WP-CLI to verify the integrity of your website files. This process compares your WordPress core’s data block with the original one to identify unauthorized changes. Here’s the command:
wp core verify-checksums
You can also run a checksum on plugins. However, this often yields an error since the command only works for official WordPress extensions:
wp plugin verify-checksum
Remember that slight adjustments on your files can cause a checksum error. So, before running the command, ensure you have a fresh copy of the core WordPress files.
3. Clear out PHP files from uploads
Cybercriminals often exploit PHP files to inject your WordPress with malicious code. Removing them from the Uploads folder can help close the hackers’ entry points, minimizing the risk of further attacks.
To do so, open your WordPress installation folder using an FTP client or Hostinger File Manager. Then, navigate to public_html → Uploads, and remove all the files.
In File Manager, you can delete files in bulk by clicking the checkmark icon at the top right, selecting the files to remove, and choosing the action.
You can also delete all PHP files within the Uploads folder using commands via SSH:
cd public_html/uploads/ && rm *.php
However, we recommend checking the Upload folder’s content first since the command will wipe all the files, potentially removing a critical item. You can quickly list PHP items by running the following:
find . -name ".php"
4. Look for hidden backdoors within your files
In order to create a backdoor, cybercriminals often inject harmful code into PHP files in your WordPress installation, themes, and plugins. You can’t simply remove these items since they are essential for website functionality.
The target scripts for hidden backdoors vary, but the most common ones include wp-config.php and functions.php. To create an entry point, hackers typically insert PHP functions like base64, exec, move_uploaded_file, and str_rot13.
To quickly identify potentially compromised PHP files, check if those PHP functions exist on your website. Here’s the command:
find . -type f -name '*.php' | xargs egrep -i "(mail|fsockopen|pfsockopen|stream\_socket\_client|exec|system|passthru|eval|base64_decode) *)"
Remove any additional scripts in the compromised files. For reference, you can set up a new staging WordPress site to see the original code.
We also recommend checking image and iframe files since hackers might include a backdoor when uploading them to your website. Here are the commands:
find wp-content/uploads -type f -iname '*.jpg' | xargs grep -i php

find . -type f -name '*.php'| grep -i '<iframe'
Important! Some themes and plugins use these PHP functions to work correctly. Check the extensions after cleaning them to ensure you don’t remove any essential functions.
5. Inspect the SQL database file
In addition to the core files, clean malware in your WordPress database by removing suspicious scripts. There are two methods to do so – using WP-CLI commands or manually inspecting the backup.
To search for malicious scripts in your SQL database, connect to the website’s server via SSH and run the following:
wp db search "<script"
This command will output all entries with the <script tag from your SQL database. Don’t remove suspicious entries yet since we will use them to help check potentially compromised posts in the next step.
To make the process more efficient, you can also search for scripts containing JavaScript functions that cybercriminals often exploit. In this example, we are checking for eval(), atob(), and fromCharCode():
wp db search '(<script|eval\(|atob|fromCharCode)' --regex
To do so manually, open the SQL database backup we created earlier and search for suspicious scripts. To simplify the task, we recommend using a code editor with a highlighter and a search feature like Sublime or Visual Studio Code.
6. Review the code for each page and post
Cybercriminals might exploit input functionality on your WordPress posts, pages, and comment section to insert malicious content. Check recent changes on them to catch suspicious modifications.
To review post or page revisions, open your WordPress dashboard and edit the content you want to check. Open the Settings sidebar, click the three-dot icon, and select Revisions. If you can’t find the option, there hasn’t been any change since publishing.
Such malicious content might only be visible using the code editor. To check for these, click the three-dot icon and select Code Editor.
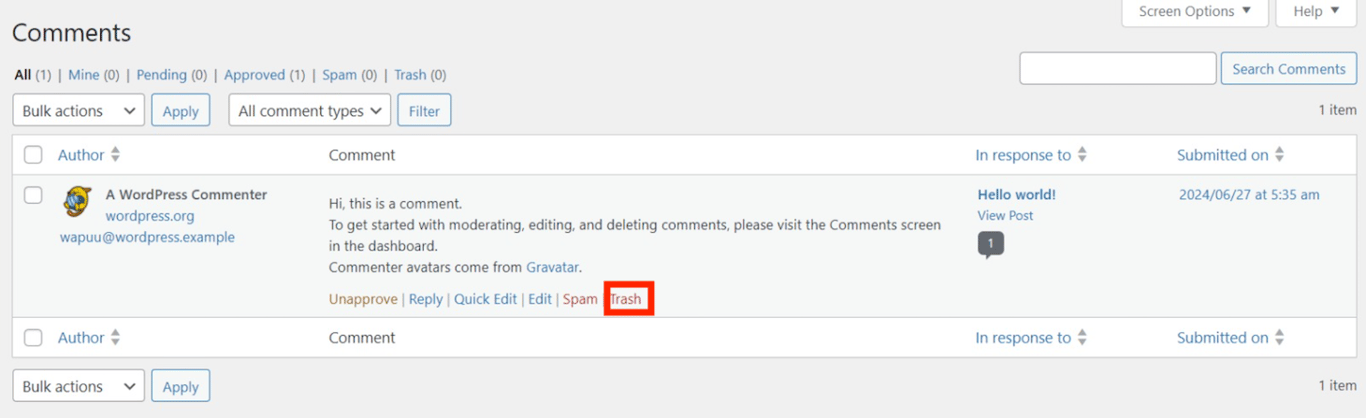
For comments, check the history by going to the WordPress dashboard → sidebar → Comments. Remove unwanted entries by hovering over the comment and clicking Trash.
Now, check the scripts obtained from the previous step to identify which area of your website is compromised. This step is crucial since changes in posts, pages, or comments will write new entries in your database tables.
To do so, open the database backup using a text editor and manually delete unwanted scripts from the entry.
7. Review the user list and privileges
After you delete malware and suspicious code from WordPress, let’s check if unauthorized accounts exist on your website. Cybercriminals often create new admin users to modify your website or access important data from the inside.
To do so, open your WordPress dashboard and go to sidebar → Users → All Users. From the list, check if there are new, suspicious admin accounts. If you found one, delete it by checking the box next to the name and selecting Delete from the Bulk actions menu.
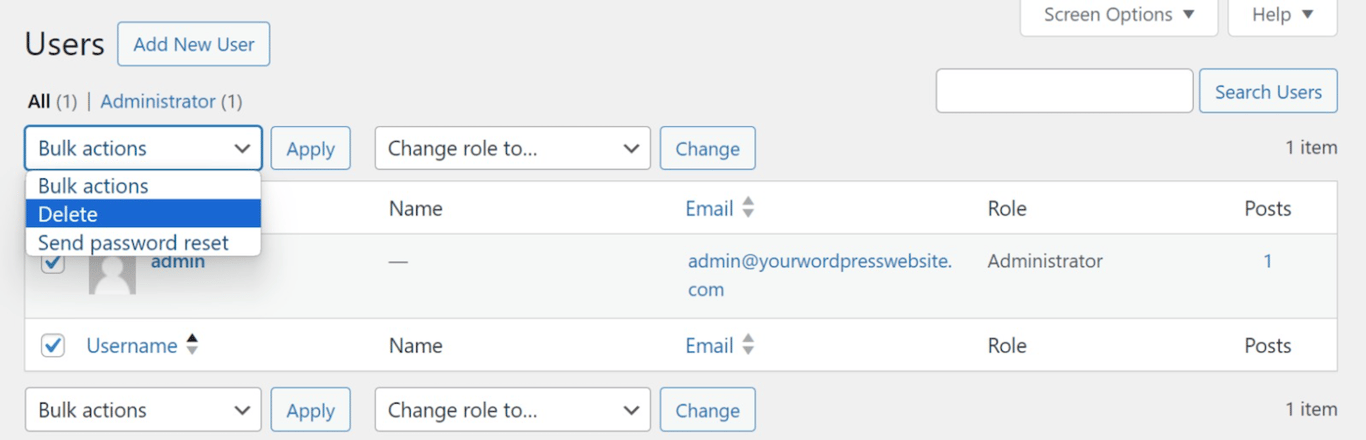
Also, review other accounts’ roles to ensure only authorized users can access critical files. Change their roles by checking the box next to their name and selecting a new title from the Change the role to… menu.
You can also use WP-CLI to check users in more detail. For example, run the following to list all accounts sorted by their creation date:
wp user list --fields=ID,user_login,user_registered --orderby=user_registered --order=ASC --format=table --debug
8. Remove your website from URL blocklists
To protect visitors, Google will automatically flag your site if it gets hacked or infected with malware. After cleaning malicious software, remember to remove your website URL from Google’s blocklist.
You can do so via your Google Search Console admin dashboard. Open the Security & Manual Actions and click the Security issues tab. Select I have fixed these issues → Request a review to ask Google to re-index your WordPress site.
Note that the process can take a few days. We recommend doing it immediately since the longer Google blocks your website, the more it harms search engine optimization (SEO) and your website reputation.
How to remove WordPress malware automatically
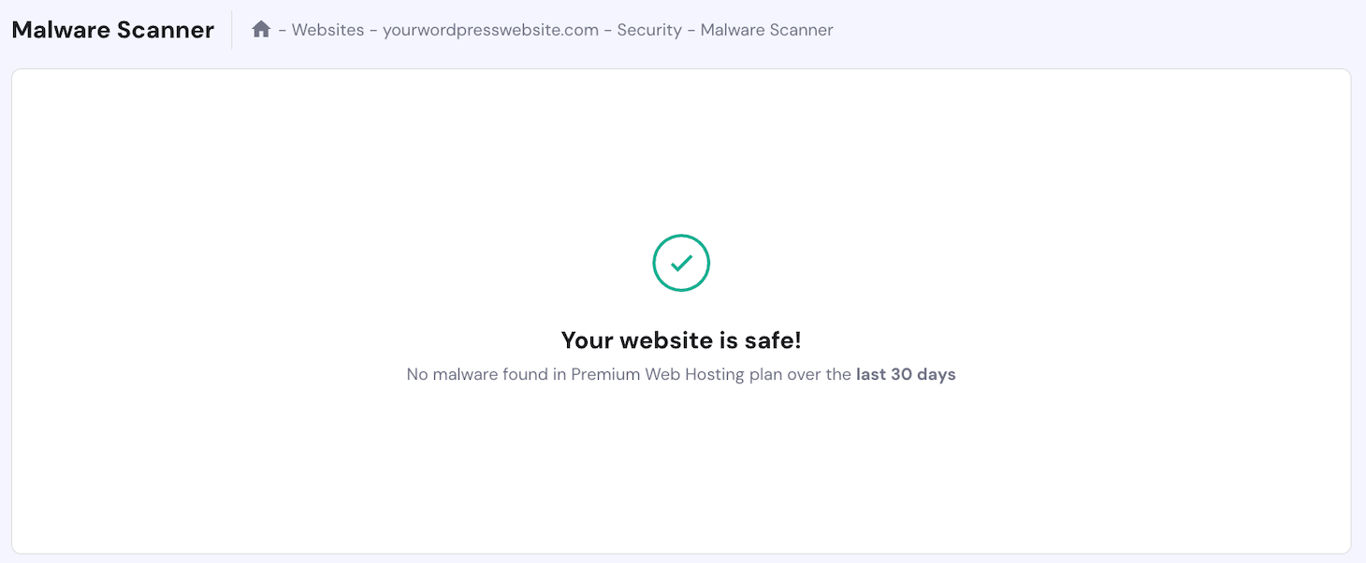
If you use managed WordPress hosting from Hostinger, you already have a built-in malware scanner that runs at the server level. It automatically detects and removes malware without adding overhead to your site.
To run a scan, go to hPanel → Security → Malware Scanner. You’ll see a summary of the latest scan results, including any malware that was discovered, removed, or cleaned. If everything looks good, you’ll see a message confirming your website is safe.
Since the scanner works at the server level, you can still use it even if a cyber attack has locked you out of your WordPress admin dashboard. That’s a big advantage over plugin-based tools, which need the dashboard to function.
If you’re not on Hostinger or want an extra layer of protection, there are plenty of WordPress malware scanner plugins worth considering.
Wordfence is one of the most popular options. It scans your site at the application level and gives you more granular control, including login monitoring, detailed security logs, and advanced configuration options.
The trade-off is that it requires more setup, runs inside WordPress itself (which can affect performance), and won’t help you if you’ve lost access to your dashboard.

Hiring a WordPress malware removal service
If you encounter difficulties when removing malware from your WordPress website, consider using a professional service. We also recommend doing so when dealing with complex issues.
A professional can properly clean malware on your website, ensuring no malicious scripts or backdoors remain. Hiring experts also prevents you from deleting important files during the removal process to maintain functionality.
Several development agencies offer WordPress malware removal services. However, if you are on a tight budget, look for freelancers on websites like Upwork and Fiverr.
When looking for freelance services, write a clear job description to find a suitable candidate more quickly. After getting applicants, review their portfolios to determine if their expertise is suitable for your recovery task.
Checking reviews is also essential to determine if the freelancer can work quickly since malware infection requires immediate fixes. If needed, you can also ask other developers or friends for recommendations for similar services.
Conclusion
Malware infection is a common cyber attack on WordPress that can cause serious damage. However, you can quickly clean your site from this malicious software using the right tools and methods.
Before cleaning up the malware, restrict your WordPress access and download all the available backups to avoid further damage. Then, reinstall the WordPress core via hPanel or download the components using WP-CLI through SSH.
Then, delete malicious scripts on your PHP files, SQL databases, and posts. After you remove malware from WordPress, remove suspicious admin users and request Google to unflag your website via the search console.
You can also remove malicious software from WordPress using plugins like Wordfence or Hostinger’s built-in malware scanner in hPanel. If you find the issue too complex, consider hiring professionals from agencies or freelance websites.
All of the tutorial content on this website is subject to Hostinger's rigorous editorial standards and values.

Aris is a Content Writer specializing in Linux and WordPress development. He has a passion for networking, front-end web development, and server administration. By combining his IT and writing experience, Aris creates content that helps people easily understand complex technical topics to start their online journey. Follow him on LinkedIn.


