How to migrate your website from shared hosting to VPS
Dec 22, 2025
/
Jordana A. & Valentinas C.
/
11 min Read
For their first website, people usually go with shared website hosting. It’s affordable and easy to manage, making it more than suitable for beginners and users with minimal technical knowledge.
However, as the website and its traffic volume grow, the required server resources, such as storage space and bandwidth, will also increase.
One of the most effective ways to scale up is to migrate your website from shared hosting to VPS for better performance, compatibility, and security.
This tutorial will explain the steps to migrate from shared hosting to VPS. But first, let’s explore what VPS hosting is and why it can be an ideal upgrade from your shared account.
A brief overview of migrating a website from shared hosting to VPS:
| Required Knowledge | Basic website management, familiarity with hosting environments |
| Privileges Required | Root or administrative access for VPS |
| Difficulty | Intermediate |
| Main Goal | Steps to migrate a website to VPS, including data and database transfer |
| OS Compatibility | Any Linux-based system |
Why you need VPS hosting
A virtual private server (VPS) is one of the most popular hosting services for large websites and projects.
Comparing VPS and shared hosting services, both divide a physical server for multiple users. However, a VPS platform uses virtualization technology like a hypervisor to divide the server into partitions, providing each user with isolated, dedicated resources.
What does this mean for the regular user? Essentially, as a VPS client, you’ll be able to freely configure individual systems and effortlessly scale your website as you grow.
A VPS also has some key differences from dedicated server hosting, which provides users with an isolated system instead of a virtual one. While dedicated servers commonly offer higher performance, they are usually more expensive. In this case, VPS may better suit your needs and budget.
Suggested Reading
Read our tutorial on what is a VPS to learn everything there is to know about virtual private servers.
Here are the advantages of switching from a shared plan to a VPS hosting environment:
- Server resources ‒ a VPS hosting plan offers higher CPU, RAM, and storage space resources than shared hosting, increasing speed and scaling your site for higher traffic volumes.
- Dedicated server space ‒ unlike shared web hosting, VPS gives users their own dedicated server space for their website or project. This improves privacy for better data security.
- System management ‒ VPS hosting services give users root access and a dedicated IP address, giving them complete control of the server technology. For instance, they can install software and operating systems (OS) freely.
- Self-healing environment – VPS can deploy an automatic failover during misconfiguration or system failure. It also uses a cloud platform that constantly customizes and reconfigures resources, which dedicated servers lack.
- Privacy and security ‒ with shared hosting services, security issues on one server may affect all the hosted sites. VPS partitions prevent this risk.
If you need hosting scalability and full control over the server, upgrade from a shared to a VPS plan. It’s more affordable than a dedicated server and offers additional features.
Web hosting providers offer VPS plans at different prices depending on the features and allocated resources. They also commonly offer self-managed and managed VPS.
Suggested Reading
Check out our other tutorial to learn more about the 10 best VPS hosting providers and their different services, features, and prices.
With self-managed VPS, users configure, manage, and maintain the server themselves. If you go with a managed VPS, the web hosting company will handle the server configuration and security patching for you.
Hosting providers usually offer both shared and VPS plans, making the upgrade process easier. If you need a new hosting provider, pick one with robust VPS security, features, and support.
For example, Hostinger has four VPS hosting plans costing between $6.99–$25.99/month, with full root access, 24/7 assistance, weekly backups, and a 30-day money-back guarantee.
Hostinger VPS hosting plans come with control panel templates for CentOS, Ubuntu, Fedora, and Debian. If you wish, you could even install plain Rocky Linux and AlmaLinux operating systems without a control panel.
Hostinger’s VPS also includes Kodee, our smart AI assistant. You can use it to ask anything related to your VPS, guide you through tasks, and perform actions by simply typing a prompt. For example, type “How do I install NGINX on my VPS?” or “Please change my VPS password to [yournewpassword].”

After purchasing a new VPS hosting plan from Hostinger, follow the steps below to easily migrate your custom or WordPress sites. Do note that if you’re using a website builder platform, the steps may differ.
How to migrate your website from shared hosting to VPS
Now, let’s go over the process of migrating your website from shared hosting to VPS, ensuring a smooth transition to increased performance and control.
1. Create a site backup
Before modifying a site, make sure to create a WordPress backup to avoid data loss in case of errors or misconfigurations. Doing so also lets you transfer your site files and databases to another hosting type and provider easily.
This tutorial will show you how to back up your site data through Hostinger’s custom control panel, hPanel. The steps may differ for other hosting providers, but the general procedure is similar:
- Open hPanel, log in to your hosting account, and head to your website dashboard. Then, navigate to Files → Backups from the left-side menu.
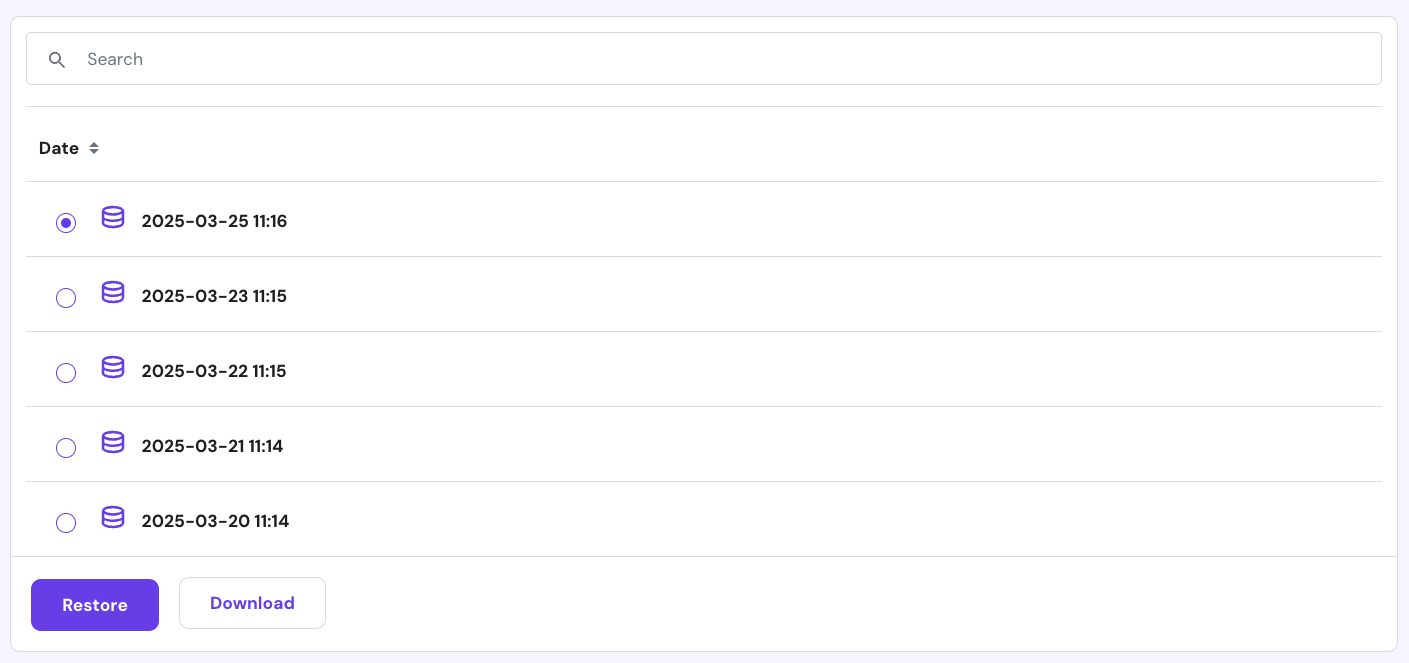
- Select Files backups. Check the time and date of the latest backup from the drop-down menu. Click Next step.
- Press Download all files. Wait until the process is finished.
- Once the Download Backup button appears, right-click and select Copy Link Address.
- Paste the link into a text editor like Notepad. We will use this download link to migrate your website files.

Repeat the steps for your database by clicking Database backups. If there are no backups available, select Generate new backup → Proceed. Copy the backup download link and database name to a text editor.
2. Set up a virtual private server
Before migrating your site, set up the VPS first. We recommend choosing a server template with the Linux, Apache, MySQL, and PHP (LAMP) stack and Webmin/Virtualmin pre-installed. Servers with a pre-installed control panel, like Hostinger’s Cyberpanel VPS hosting, make management easier.
To change your VPS OS and pre-installed software, Go to the hPanel → VPS tab. Select the VPS in question, and click Operating System on the sidebar. Pick OS with Control Panel, select your desired template, and click Change OS.
For this tutorial, we will use the AlmaLinux 8 64bit with Virtualmin. Remember that the new server might take a few minutes to start, and the process will wipe all the existing data in your VPS. If you’re migrating – you don’t have to worry about that, since you’ll want an empty VPS to begin with.
Accessing Webmin/Virtualmin
Webmin is web-based frontend software for UNIX system administration. It allows the admin to manage the system remotely through any web browser.
Virtualmin is a Webmin plugin that helps simplify multiple domain management tasks, which works similarly to cPanel or other website management tools. This web hosting control panel supports UNIX-based systems like Linux.
Here’s how to access Webmin or Virtualmin with root access permissions:
- Once the new OS is installed, go to hPanel → Operating system to obtain the management panel’s username and Login URL.
- Get your root password. If you forget it, reset it and create a new one from the Settings section.
- To access Webmin or Virtualmin, enter the Login URL link in your web browser’s address bar.
- Once you see the login page, enter the credentials.
- In the post-installation wizard, click Next to set up Virtualmin.
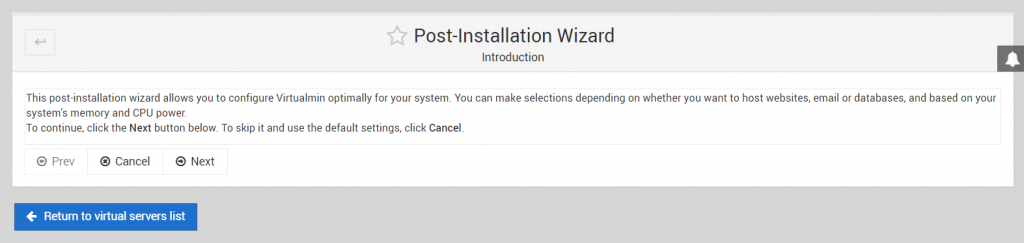
Setting up Virtualmin
Follow these steps to configure Virtualmin. Depending on the version, the steps may slightly differ:
- Memory
- Preload Virtualmin libraries? ‒ we recommend choosing No since we will use a secure SSH connection for most of the process.
- Run email domain lookup server? ‒ if you want to run an Email Server on your VPS, choose Yes. Keep in mind that this feature uses more RAM.
- Virus Scanning ‒ enable the ClamAV virus scanner.
- Spam filtering ‒ enable SpamAssassin to run an email server on your VPS.
- Database servers – select enable on the MariaDB database server and disable on PostgreSQL. This is the database selection you want to use.
- MariaDB password ‒ enter the password for the database.
- MariaDB database size ‒ determine the website’s database size based on the system’s usage. Leave the default settings if you’re unsure what to choose.
- DNS configuration ‒ select Skip check for resolvability. Later, you can point the domain name to the VPS via hPanel’s DNS Zone Editor.
Important! Don’t enable ClamAV if your VPS has less than 2 GB of spare RAM. Doing so may consume all the remaining memory, crashing your server.
Once the configuration process is complete, click Re-check and refresh the configuration to test whether the virtual server setup is successful.
Creating a virtual private server
Next, create a new user, database, and directory for your website. Here are the steps to do it using Virtualmin:
- Navigate to List Virtual Server and select your server from the list.
- If it suggests that “Virtualmin’s configuration has not been checked since it was last updated,” select Re-check and refresh configurations.
- Wait until the checking process is complete. At the bottom of the page, press Return to the servers list.
- If the list doesn’t show a new server, create one. Otherwise, skip this step.
- From the server configuration page, click the new server → Virtual server details tab. Obtain your Home directory for the file transfer.
- Check the MariaDB database enable box to create the database. Click Save virtual server. The server is ready to host a website.
Virtualmin will create a MariaDB account with its administrative login username for the domain. If you use the default template settings, it will also create a MariaDB database for the virtual server.
The database name will be the first part of the domain name – so if the domain is foo.com, the database will be called foo.
Depending on the hosting provider, your website’s database may not be MariaDB. For example, Hostinger uses MySQL. While different, you can migrate a MySQL database to MariaDB without extra steps.
3. Transfer website files to the VPS
Once the new server is set, transfer your site files from shared hosting to VPS. We’ll use the wget command to download the backup archives we created in the first step. Here’s how to do it:
- Connect to your new VPS account via an SSH client or use Browser terminal from the Overview section in hPanel.
- Access the directory where you will store all your files. Use the Home directory copied from the last step. The command should look like this:
cd /home/hostinger-dev/public_html/
Remember to replace hostinger-dev with the appropriate domain name.
- Copy your website file backup’s download link.
- Use the wget command to download the backup from your shared server to the VPS. If you can’t paste the link into the SSH client, transfer it to a text editor first. Here’s an example of what the command will look like:
wget http://srv167.main-hosting.eu:8080/download-backup/fe26ee2e4159db037c3106c37fa3ffb5b2072662/backup-file-name.tar.gz
- Then, extract the archive using the tar command:
tar -xvf backup-file-name.tar.gz
For the last two commands, replace backup-file-name.tar.gz with the appropriate file name.
- We’ve just created a new public_html folder. Now, move its contents to the original public_html directory. Access the extracted public_html folder using the cd command:
cd domains/hostinger-dev/public_html/
Remember to replace hostinger-dev.
- Then, move all the contents to the public_html folder created with Virtualmin using the mv command:
mv -v ./* /home/hostinger-dev/public_html/
- Navigate back to the public_html directory that Virtualmin created using the cd command:
cd /home/hostinger-dev/public_html/
- Use the ls command to verify that the folder contains all the moved files. You should see a list like this:
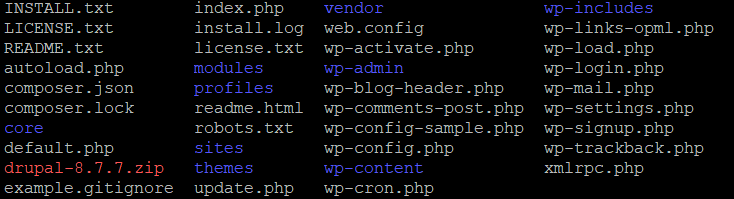
- Virtualmin automatically creates a user and group based on the domain name. Change the files and folders’ ownership to match the credentials from Virtualmin using the chown command:
chown hostinger-dev:hostinger-dev -R *
Completing this step will not only move your website content to the new VPS environment but also your WordPress assets like themes, plugins, and custom code.
Pro Tip
Instead of SSH, you can also use an FTP client like FileZilla to transfer files from your local computer to the personal server. However, FTP only supports file transfer to VPS. It does not support shell commands for website configuration.
4. Transfer database files to the virtual private server
We’ll use the wget command to transfer the database backup from your shared hosting account to the VPS. The steps are similar to migrating site data in the previous section.
Since the server already created a new database during the VPS configuration, you don’t need to add one.
Checking MySQL database name and password
To transfer the MySQL database backup, obtain the newly created database’s name, username, and password. Go to the Virtualmin control panel → Edit Databases section to retrieve them. The username and password will show up in separate tabs.
In this example, our MySQL database Name and username are both hostinger-dev.
Downloading and importing the MySQL backup
Once you have the MySQL database name, follow these steps to import the backup:
- Navigate to the Backups section of your shared hosting account and copy the download link.
- Go back to the VPS control panel. Create a new directory called sql_backup and enter it using the following command:
mkdir sql_backup && cd sql_backup
- After switching directories, use the wget command to download the file from the shared web hosting backup and save it on the new virtual server:
wget http://srv167.main-hosting.eu:8080/download-backup/60a7e64afb1a769b1de4f2139aa0a27c2c2ecb01/backup-file-name.sql.gz
- Extract the compressed file using the gunzip command:
gunzip backup-file-name.sql.gz
- You will get a file with the same name in the SQL format. Move it to the new database using the command below. Replace the MySQL-database-name with your own and hostinger_dev with your VPS name.
mysql -u root -p hostinger_dev < MySQL-database-name.sql
- Enter the database password from the post-installation wizard.
5. Make some final changes
After completing the website and MySQL database import process, you may need to do additional VPS configurations to ensure it works properly.
If the Error establishing a database connection message appears, edit the wp-config.php file and update it with the new MySQL database details. Here’s how to do it:
- Enter the directory where all your site data are stored using the cd command:
cd /home/hostinger-dev/public_html/
- You will see all the files present in the current folder. Check if the wp-config.php file is in the directory using the ls command.

- After confirming that the file is present, run the following command to edit it with the Nano text editor:
nano wp-config.php
Scroll down until you find these lines:
// ** MySQL settings – You can get this info from your web host ** //
// ** MySQL settings - You can get this info from your web host ** //
/** The name of the database for WordPress */
define('DB_NAME', 'database-name');
/** MySQL database username */
define('DB_USER', 'username');
/** MySQL database password */
define('DB_PASSWORD', 'password');
/** MySQL hostname */
define('DB_HOST', 'mysql');- Enter your database details in these fields:
- DB_NAME – database name.
- DB_USER – username.
- DB_PASSWORD – password.
- DB_HOST – localhost since the MySQL database is on the same server.
- Press CTRL + X to close the window and Y to confirm the changes.
Lastly, update the DNS record to point the domain name to VPS from the shared hosting server. The easiest way is to change the A record via the domain name registrar or VPS account settings.
Since domains registered with Hostinger resolve to our nameservers, set the A record via hPanel. Go to DNS Zone Editor, fill in your VPS IP address as the A record, and click Save Changes. A similar procedure should apply to other domain name registrars.
Alternatively, contact your registrar to point the domain name to your new VPS.
Important! It can take up to 24 hours for DNS changes to fully propagate worldwide.
Conclusion
Most users solve their scaling issues by migrating from shared hosting to virtual private server (VPS) services.
And it’s no wonder why – a VPS hosting plan guarantees better security, offers stable performance, and lets users manage resources flexibly, which makes it more than suitable for higher-traffic websites.
Commonly, many web hosting providers offer both shared and VPS plans. For example, Hostinger offers four VPS hosting plans starting at $6.49/month.
In this article, you have learned how to migrate from shared hosting to your new VPS. The migration process takes five steps but may differ depending on the VPS provider. Here’s how to do it with Hostinger:
- Back up your site files and database via hPanel.
- Set up and access your new VPS using Virtualmin.
- Download and transfer your site files from the shared server to the VPS hosting account.
- Download and transfer your database backup to your VPS account.
- Make final database changes and point your domain name to the VPS.
We hope this article has helped you understand the shared hosting to VPS migration process! If you have any questions, leave us a comment below.
Continue Learning About VPS
How to Change the SSH Port
How to Change Hostname on Linux
How to Install FFmpeg on Linux for Video Management
Migrate your website from shared hosting to VPS FAQ
In this section, we will answer several commonly asked questions about migrating from shared hosting to VPS to help you understand it more.
What is the difference between shared hosting and VPS hosting?
In a shared hosting environment, multiple users share the same server resources, meaning your website may slow down when others experience high traffic. It is also preconfigured and has limited customizability. Meanwhile, VPS hosting provides users with isolated resources from a virtual server partition, providing better performance and customization.
Can I migrate a non-WordPress website from shared hosting to VPS?
Yes, you can migrate custom-coded websites or ones built on any content management system (CMS) to VPS hosting plans. However, you may not be able to migrate websites built using a website builder since they are tied to a specific hosting provider. In this case, upgrade your builder-based website to cloud hosting, which performs better than a shared account.
Is VPS hosting faster than shared hosting?
Yes, VPS hosting provides isolated server resources to ensure your website performs well, even during high traffic. You can also tailor the server environment and resource allocations according to your needs to ensure optimal website performance.
All of the tutorial content on this website is subject to Hostinger's rigorous editorial standards and values.

Jordana is a Senior Content Writer with a background in Information Systems. She has over five years of experience in WordPress and is casually dabbling with PHP and MySQL. Her passion for writing and technology drives her to create tutorials for anyone wanting to build their online presence. Follow her on LinkedIn.

Valentinas Čirba, Hostinger's Head of VPS, is a seasoned product leader specializing in VPS products with over ten years of experience. He's an expert at setting product strategy, leading cross-functional teams, and making smart decisions to deliver innovative solutions. Valentinas is committed to creating products that not only meet business objectives but also truly serve the customer. Follow him on LinkedIn.