How to fix the 403 Forbidden error: 13 methods for website owners and developers
Jun 11, 2026
/
Ariffud M. & Jordana A.
/
14 min Read
A 403 Forbidden error means the server understands your request but refuses access because of permission, configuration, security, or authorization issues. Visitors should start with quick checks such as clearing browser cache and cookies, disabling VPN, and testing whether their IP address is blocked.
Website owners should then review site-level causes, including malware, WordPress plugin conflicts, CDN settings, .htaccess rules, file and directory permissions, file ownership, missing index files, DNS records, nameservers, hotlink protection, and blocked IP addresses.
Developers and API users should troubleshoot 403 errors by inspecting how the request is authenticated and authorized. Check authorization headers, bearer tokens, OAuth scopes, expired tokens, IAM roles, API rate limits, CORS policies, IP or network restrictions, and full request-response headers to identify why the server rejects an otherwise valid request.
How to fix 403 Forbidden as a website owner
Website owners can fix a 403 Forbidden error by checking whether browser data, IP restrictions, website files, server configuration, DNS settings, or security rules are blocking access to the site. Start with quick access checks, such as clearing browser cache and cookies, disabling VPN, and checking whether the IP address is blocked. Then review site-level causes, including malware, WordPress plugin conflicts, CDN settings, .htaccess rules, file permissions, file ownership, missing index files, A records, nameservers, and hotlink protection.
1. Clear your browser cache and cookies
Browser cache stores outdated files, which can conflict with updated site permissions and trigger a 403 error. Cookies save login and preference data, and when they become corrupted or outdated, they may block access to some pages.
First, clear your browser cache and cookies to remove any conflicting or outdated data. This forces the browser to fetch fresh files from the server, which can resolve access issues – though you’ll need to log in again to most sites afterward.
Here’s how to do it in Google Chrome (similar steps apply to Firefox and Safari):
- Click the three-dot icon in the top-right corner and select Settings.
- Go to Privacy and security → Delete browsing data.
- In the time range menu, choose All time.
- Check Cookies and other site data and Cached images and files.
- Click Delete data to remove them.
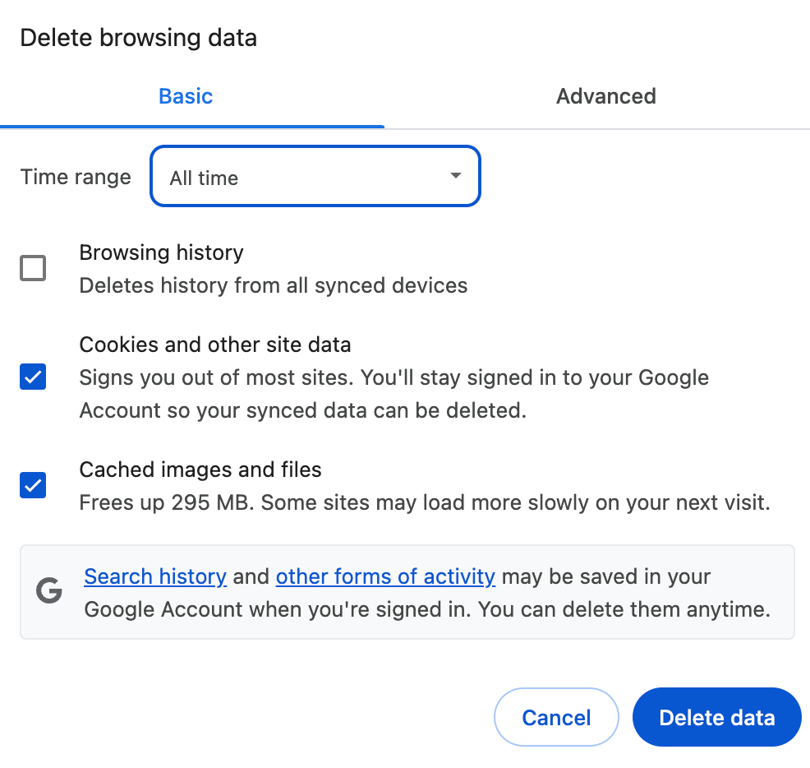
After clearing cache and cookies, revisit the website and try logging in to see if the 403 Forbidden error is resolved.
2. Temporarily disable VPN
A virtual private network (VPN) routes your connection through remote servers. However, some websites block these servers for security or regional compliance, often resulting in a 403 error.
Temporarily disable your VPN and try accessing the website again. If this resolves the issue, switch to a different VPN server or contact your VPN provider for guidance.
If these simple checks don’t solve the problem, move on to the next steps, which involve checking your website’s security.
3. Scan for malware
Malware can insert harmful code into your website’s files. This can change permissions or configuration rules, leading to restricted access and a 403 Forbidden response.
Scan your website for malware to identify and remove any harmful code. On Hostinger web hosting plans, you can use the built-in Malware Scanner in hPanel without third-party tools:
- Go to your website’s dashboard, then select Security → Malware Scanner from the left sidebar.
- If no malware is found, you’ll see your hosting plan’s name and the time since the last scan.
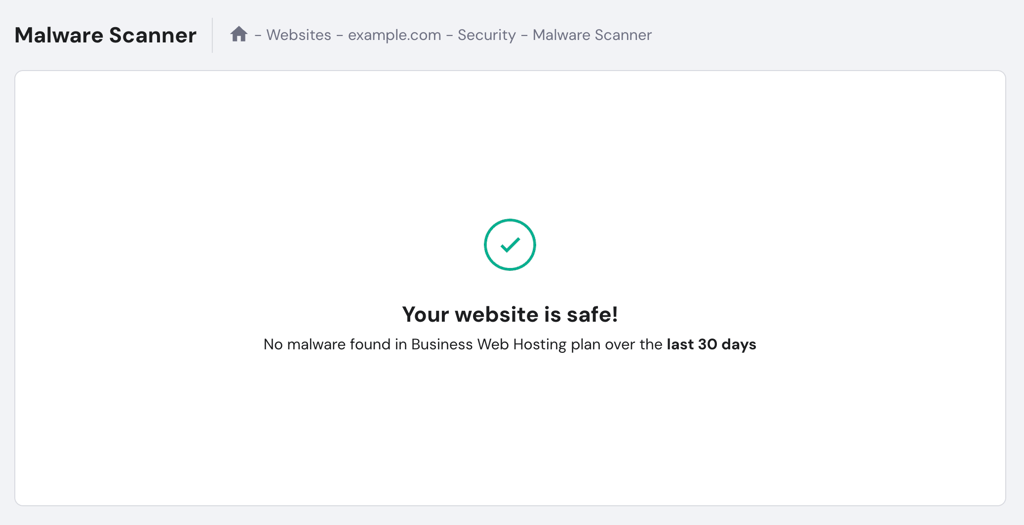
- Otherwise, the tool will list the infected files and the actions taken to clean them.
For additional protection, use reputable WordPress malware scanner plugins like Wordfence or Solid Security. These tools detect threats in real time and block suspicious activity before it can cause further issues.
If the scan reveals infections, clean or replace the affected files, then recheck your site to confirm the 403 error is gone.

4. Disable WordPress plugins
Faulty or incompatible WordPress plugins may override permission settings. When this happens, affected pages can become inaccessible and return a 403 Forbidden error.
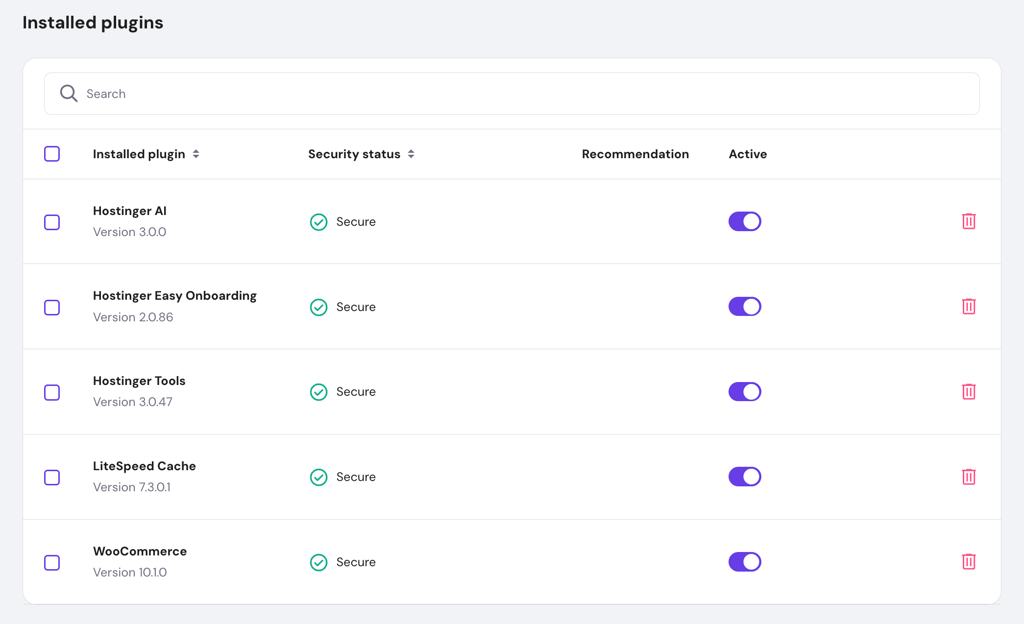
Disable your WordPress plugins to determine if one is causing the issue. You can do this from your WordPress dashboard or directly in hPanel if you’re a Hostinger customer:
- From your website’s dashboard, go to WordPress → Security.
- Scroll down to the Installed plugins section.
- Toggle each plugin off individually and check your site after each change.
If you prefer a manual method, you can disable all plugins at once via the file manager or an FTP client:
- Navigate to the wp-content folder in public_html.
- Rename the plugins folder to disabled-plugins. This will deactivate all plugins simultaneously.
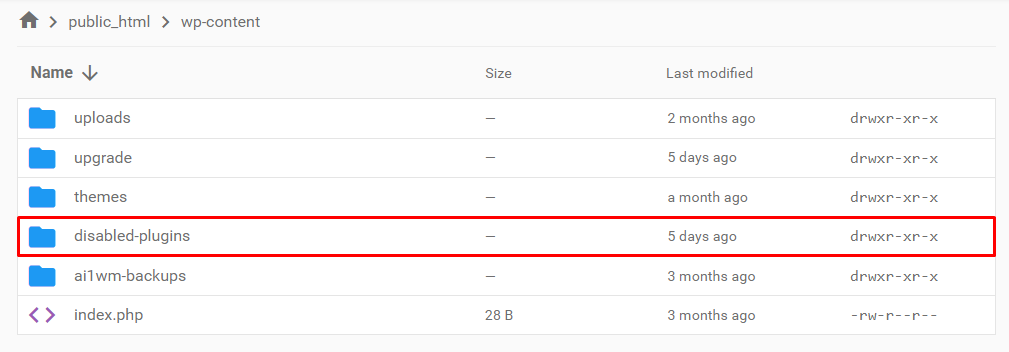
- Check your website. If the error is gone, one of the plugins is the culprit.
- Rename the folder back to plugins to reactivate them.
- From your WordPress dashboard, deactivate plugins one by one to identify the problematic one.
Once you’ve found the plugin causing the error, update it or remove it entirely.
If security-related fixes don’t work, the next steps address server configurations and file settings.
5. Temporarily disable CDN
A content delivery network (CDN) stores cached copies of your site across multiple servers, and outdated or misconfigured cache can lead to a 403 status code.
If your website uses a CDN, temporarily turn it off to check if it’s serving the error instead of your origin server. Hostinger automatically enables the in-house CDN for the Business web hosting plan and above. To disable it in hPanel:
- Go to Performance → CDN.
- In the CDN status section, hit Disable.

- If this resolves the problem, keep the CDN disabled temporarily and contact our support for further troubleshooting.
6. Restore the .htaccess file
A corrupted or misconfigured .htaccess file can apply incorrect server rewrite or access rules, blocking visitors and returning a 403 Forbidden error.
If recent changes or malware have altered your .htaccess file, replace it with a clean version. If you’re using Hostinger, you can create a new .htaccess file through hPanel’s File Manager:
- Go to Files → File Manager in your website dashboard.
- Open the public_html directory and locate the .htaccess file.
- Right-click the file and select Download to create a backup.
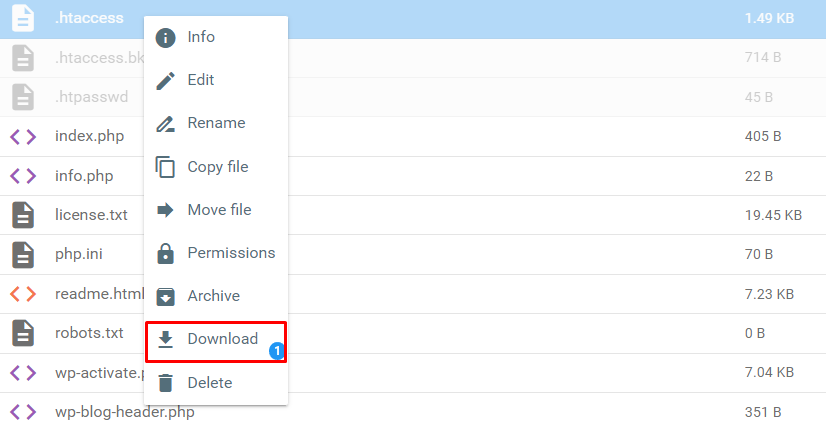
- Delete the current .htaccess file.
- Click New file and name it .htaccess without any extensions.
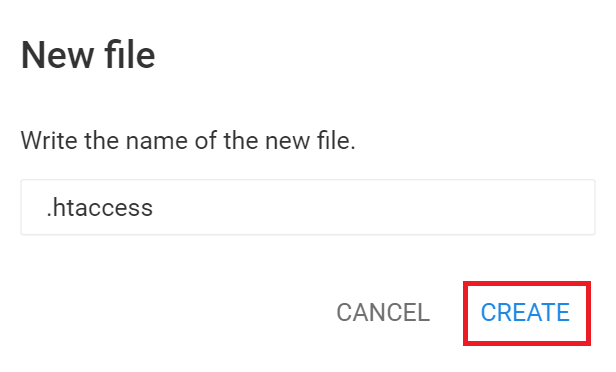
- Paste the following default code and save the file:
# Enable URL Rewriting
RewriteEngine On
# Rewrite rule to redirect requests to index.php
RewriteCond %{REQUEST_FILENAME} !-f
RewriteCond %{REQUEST_FILENAME} !-d
RewriteRule ^(.*)$ index.php?/$1 [L]
For WordPress websites, you can also regenerate the file without using File Manager:
- Log in to your WordPress dashboard.
- Go to Settings → Permalinks.
- Hit Save Changes without modifying any settings.
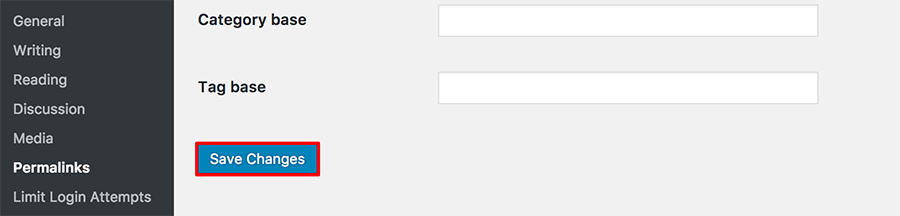
After restoring .htaccess, try accessing your site again. If the error disappears, the file was likely the cause.
7. Reset file and directory permissions
File permissions control access to your website’s data. When a file is too restrictive, the server blocks access for security reasons, resulting in a 403 Forbidden error.
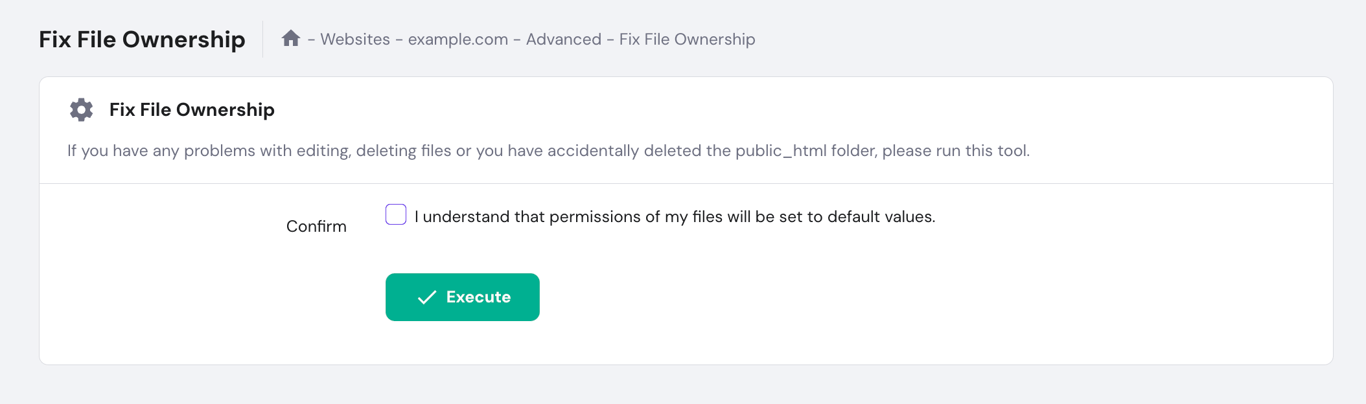
If your file permissions are incorrect, you can easily reset them in just one click using Hostinger’s built-in Fix File Ownership tool:
- In hPanel, search for Fix File Ownership.
- Select the checkbox to confirm and hit Execute. The tool will automatically set default permissions for all website files and folders.
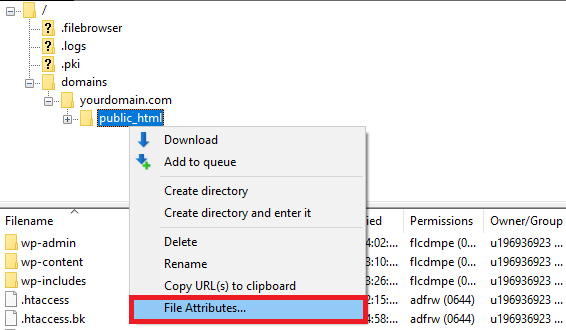
Alternatively, you can reset file permissions manually using an FTP client like FileZilla:
- Connect FileZilla to your website.
- Right-click the public_html directory and select File Attributes.
- In the Numeric value field, enter 755 for directories. This lets the owner read, write, and execute the file but prevents others from modifying it.
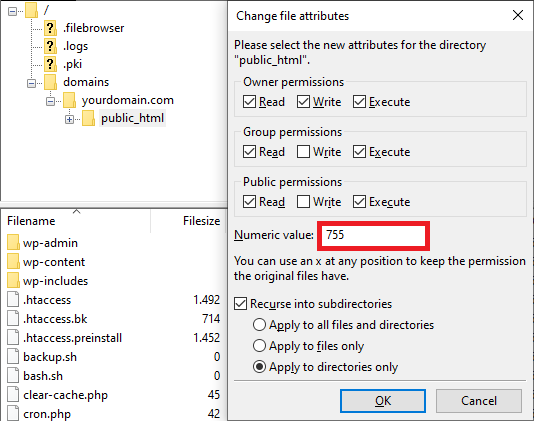
- Select Apply to directories only, then hit OK.
- For files, repeat the process, entering 644 for the Numeric value and selecting Apply to files only. This gives the owner read and write access, while others can only read.
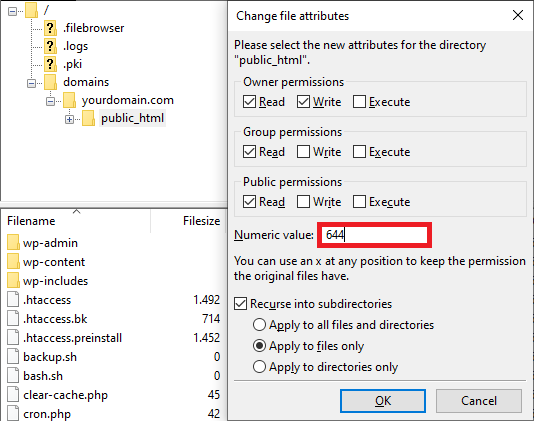
Once you’ve applied the correct permissions, revisit your site to confirm if the 403 error disappears.
8. Edit File Ownership
In Linux and VPS hosting environments, the ownership settings decide which users can modify or execute files. If ownership is incorrectly assigned, you may be denied access to certain resources, causing a 403 error.
This fix is more technical, as it requires using SSH to connect to your server and running Linux commands. Follow these steps to check and adjust file ownership in Linux:
- Connect to your server using an SSH client like PuTTY.
- To check the ownership of a file, run:
ls -l [file name]
The output will look like this:
-rwxrw-rw- 1 [owner][group] 22 Sep 22 10:00 filename.txt
- Owner and group should match your hosting account’s username. If not, use the chown command to fix it:
chown [owner][:group] [file name]
For example, if your username is John, use:
chown John filename.txt
9. Upload an index page
If your website lacks an index page (e.g., index.html or index.php), users may receive a 403 Forbidden error when trying to access it.
This occurs because the web server expects an index page to load by default, and without one, the server blocks access.
First, check if your homepage is named index.html or index.php. If not, rename it through your FTP client or file manager.
If the index page is missing, create one. Here’s how:
- Access your website’s directory.
- Upload or create an index.html or index.php file inside the public_html directory.
- After uploading, try visiting your website again to verify that it now loads the homepage correctly.
If you’re still facing issues, we have two more troubleshooting steps involving domain-related configurations that you can try.
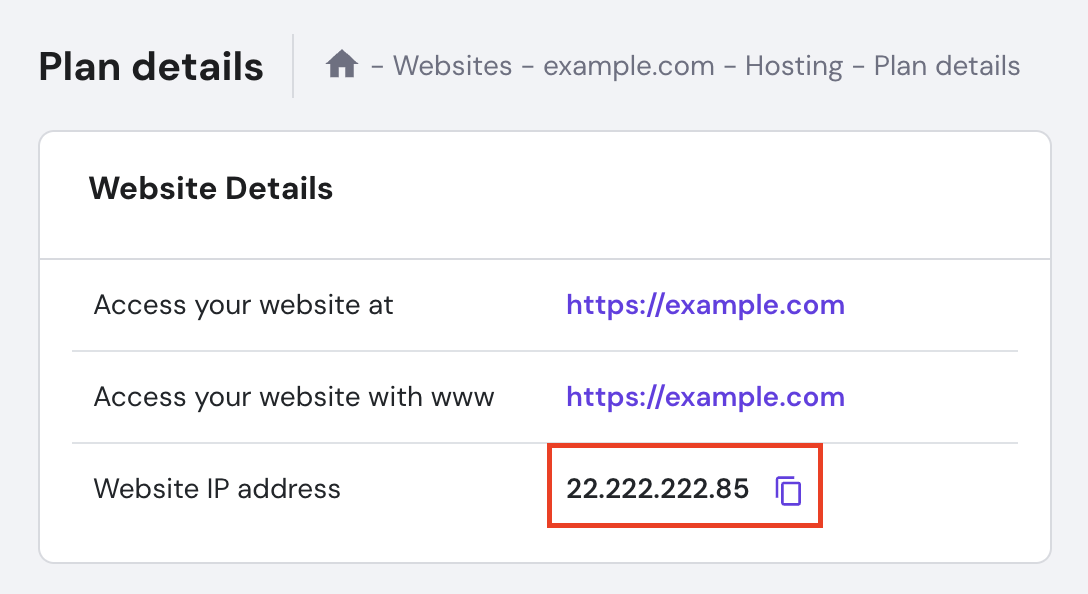
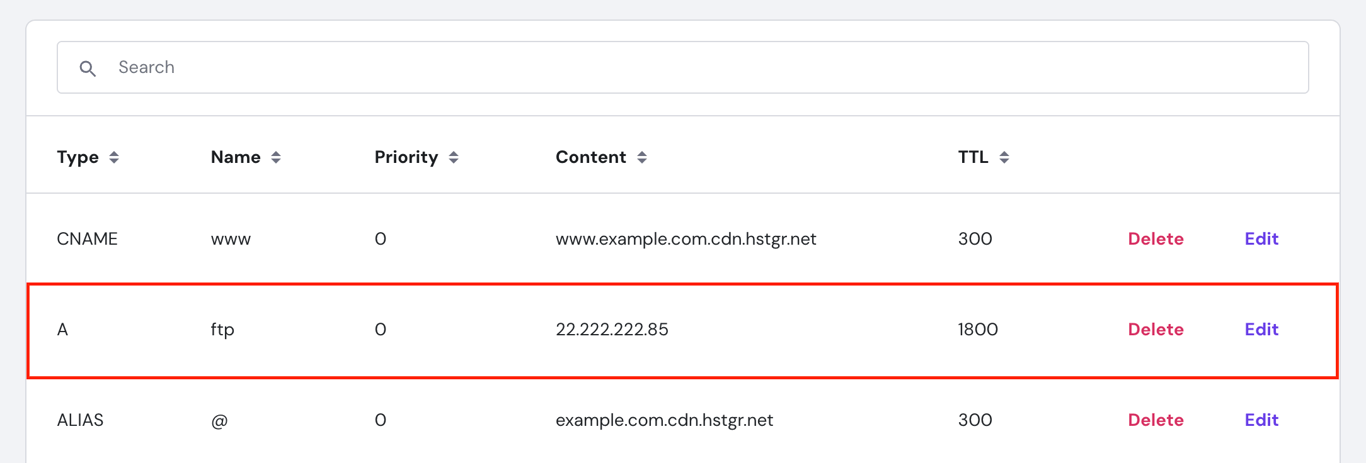
10. Verify the A record
The A record is a type of Domain Name System (DNS) record that maps your domain to the correct IP address. If your domain’s A record points to the wrong IP, users may be denied access to your website. This leads to a 403 Forbidden response.
If you host your website with Hostinger, first find your site’s IP address by going to hPanel → Hosting Plan → Plan Details.
Then, check if your domain’s A record is pointed correctly by following these steps:
- Navigate to Advanced → DNS Zone Editor.
- Locate the A records by scanning the Type column.
- Examine the IP addresses listed in the Content column.
- If the A record doesn’t point to the correct IP address, click Edit to modify it, then click Update.
Please note that editing the A record may affect the services or subdomains using it.
If this doesn’t resolve the error or causes disruptions, consider creating a new A record instead:
- In the same DNS / Nameserver page, scroll up to the Manage DNS records section.
- Select A for the Type, then enter the correct IP address in the Points to field.
- Click Add Record to create the new A record.

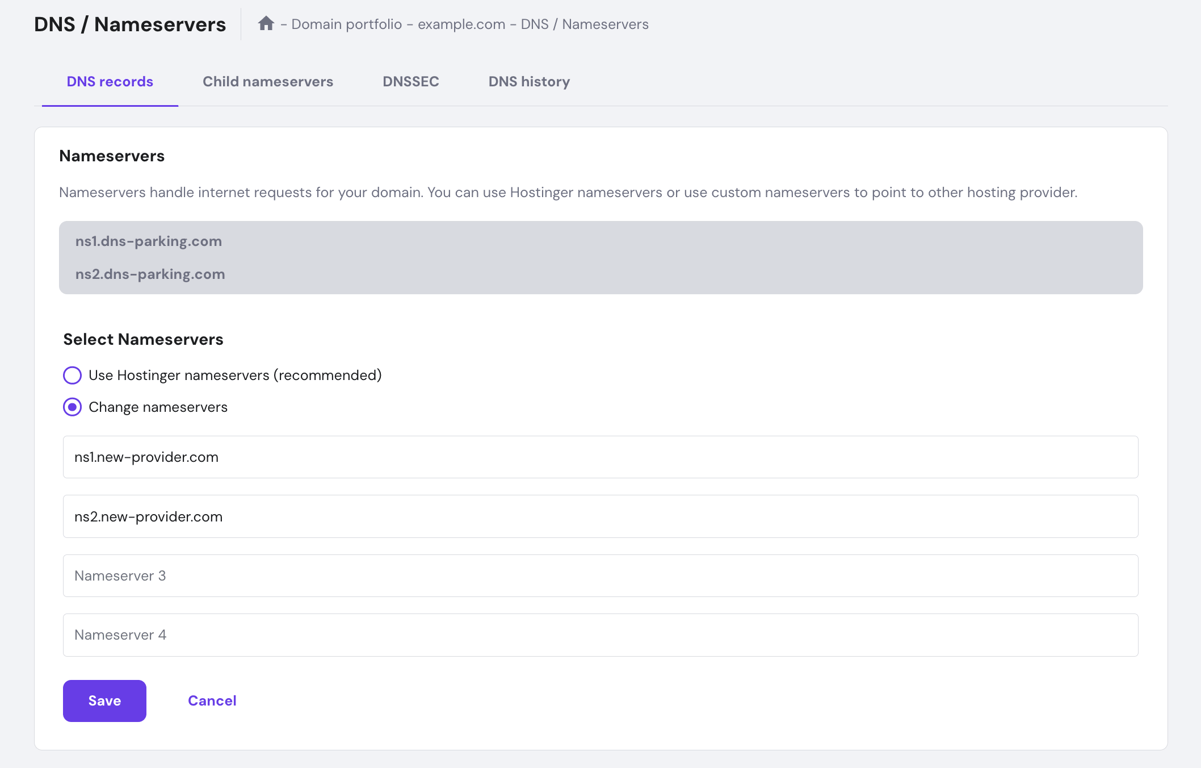
11. Update nameservers
When you change hosting providers, your domain’s DNS records need to be updated to point to the correct nameservers. If you skip this step, users will still be directed to your old host, which leads to access issues like the 403 Forbidden error.
If you register your domain at Hostinger, here’s how to update your domain’s nameservers:
- Go to Domains → Domain portfolio → Manage next to your domain.
- Select DNS / Nameservers → DNS records.
- Choose Use Hostinger nameservers (recommended) if your website is with Hostinger, or Change nameservers if you host your site elsewhere.
- Fill in the correct nameserver details, then hit Save.
12. Disable or check hotlink protection
Hotlink protection prevents other websites from embedding your files, but a misconfigured rule can block your own domain and trigger 403 errors.
This issue usually appears when images (JPG, PNG, WebP) return a 403 error while the rest of the website loads normally. That’s a strong signal that hotlink protection is incorrectly configured.
First, check your hotlink protection settings in your hosting control panel. On Hostinger, go to Files → Hotlink Protection and verify that your domain is properly allowlisted. Add all common variations:
yourdomain.comwww.yourdomain.com- both http and https versions
If any version is missing, your own site requests may be blocked.
If you’re using .htaccess, look for rules like:
RewriteEngine on
RewriteCond %{HTTP_REFERER} !^$
RewriteCond %{HTTP_REFERER} !^https?://(www\.)?yourdomain.com [NC]
RewriteRule \.(jpg|jpeg|png|gif|webp)$ - [F]
Make sure your domain is included in the allowlist condition. Otherwise, remove or update the rule.
If you use Cloudflare, check Scrape Shield → Hotlink Protection and temporarily disable it to confirm whether it’s causing the issue.
After making changes, clear your browser cache and test image URLs directly. If they load correctly, the 403 error was caused by hotlink protection.
13. Check whether your IP address is blocked
If you see a 403 error while others can access the site normally, your IP address is likely blocked by a firewall, security plugin, or server rule.
This type of 403 error is user-specific and often caused by too many requests, failed login attempts, or security filters that flagged your IP as suspicious.
Start by confirming whether your IP is the issue. Connect to the site using a different network — for example, switch from WiFi to your phone’s mobile data. If the website loads normally on another network, your current IP address is blocked.
Next, find your current IP address using a tool like “what is my IP” and check whether it appears in your hosting control panel. On Hostinger, go to Security → IP Manager and review the blocked IP list. If your IP is listed, remove it and save the changes.
If you’re using a WordPress security plugin such as Wordfence or Solid Security, the block may come from there. If you’re locked out of the dashboard, access your site via FTP or File Manager and temporarily disable the plugin by renaming its folder. Then log back in and remove the IP block from the plugin settings.
You should also check firewall rules at the CDN or server level. For example, Cloudflare’s WAF (Web Application Firewall) may block specific IPs or regions based on custom rules or bot protection settings.
If the 403 error persists only on your IP, but not globally, the issue is almost always related to IP blocking rather than file permissions or server configuration.
If you prefer a visual guide, watch our video to discover easy-to-follow solutions for fixing the 403 Forbidden error. We’ll show you step-by-step instructions for applying key troubleshooting methods, such as adjusting file permissions and resolving issues with the .htaccess file.

How to fix 403 Forbidden as a developer or API user
A 403 Forbidden error in APIs and backend systems usually means your request is valid but lacks the required authorization, permissions, or configuration.
Unlike website-level 403 errors caused by file permissions or plugins, developer-facing 403 responses are typically tied to authentication headers, access tokens, IAM policies, or API restrictions. The fix depends on how your request is structured and how the server validates access.
The sections below walk through the most common causes of 403 errors in APIs and backend systems, along with practical ways to diagnose and resolve them.
1. Check authorization headers and bearer tokens
A missing or incorrectly formatted Authorization header is one of the most common causes of 403 errors in APIs.
Most APIs require a valid authentication token sent in the Authorization header. If the header is missing, malformed, or uses the wrong scheme, the server will reject the request even if the endpoint exists.
For example, a correct request typically looks like:
curl -H "Authorization: Bearer YOUR_ACCESS_TOKEN" https://api.example.com/user
Make sure:
- The header name is exactly
Authorization - The token uses the correct format (usually
Bearer <token>) - There are no extra spaces or missing prefixes
If you’re using a frontend app or SDK, inspect the request in your browser’s Network tab to confirm the header is being sent correctly.
2. Verify OAuth scope
A valid access token can still return a 403 error if it doesn’t include the required OAuth scopes for the requested resource.
APIs often restrict access based on scope (permissions attached to the token), such as read:user, write:repo, or email. If your token lacks the necessary scope, the server recognizes your identity but denies access to that specific action.
For example, a GitHub API request may fail if the token doesn’t include the correct scope:
curl -H "Authorization: Bearer YOUR_TOKEN" https://api.github.com/user/repos
Check the API documentation to confirm which scopes are required for the endpoint. Then:
- Regenerate the token with the correct scopes, or
- Update your OAuth flow to request the necessary permissions
If the API returns a response body, look for keywords like “insufficient_scope” or “forbidden” — these are strong indicators that scope is the issue.
3. Rotate or refresh expired tokens
An expired or invalid access token can trigger a 403 error even if the request is otherwise correct.
Many APIs use short-lived access tokens (typically 15–60 minutes) for security. Once the token expires, the server may return a 403 instead of a 401, especially if the token is still present but no longer valid.
To fix this, generate a new access token or use a refresh token flow. A typical OAuth flow looks like:
curl -X POST https://api.example.com/oauth/token \
  -d "grant_type=refresh_token" \
  -d "refresh_token=YOUR_REFRESH_TOKEN"
Make sure your application:
- Stores refresh tokens securely
- Automatically refreshes access tokens before they expire
- Handles token renewal errors gracefully
If you’re unsure whether expiration is the issue, decode the token (for JWTs) and check the exp field — it shows the exact expiration timestamp.
4. Audit IAM policies and access roles
A 403 error often occurs when your authenticated identity lacks the required permissions defined in IAM policies or access roles.
In cloud environments like AWS, Google Cloud, or Azure, access is controlled by role-based policies. Even with valid credentials, your request will be denied if the assigned role doesn’t թույլ the specific action.
For example, in AWS, a Lambda function may return a 403 if its execution role lacks permission:
{
  "Effect": "Allow",
  "Action": "s3:GetObject",
  "Resource": "arn:aws:s3:::your-bucket/*"
}
If this policy is missing, any request to read from the S3 bucket will fail with a 403.
To fix IAM-related 403 errors:
- Check which identity (user, role, or service account) is making the request
- Review attached policies for missing actions (e.g.,
s3:GetObject,lambda:InvokeFunction) - Ensure the resource ARN matches exactly (bucket, function, API endpoint)
On Google Cloud, verify IAM roles assigned to your service account. On Azure, review RBAC (Role-Based Access Control) permissions in the resource group or service level.
If the API response includes messages like “AccessDenied” or “not authorized to perform this action”, the issue is almost always permission-related.
5. Distinguish 403 from 429 rate limiting
Some APIs return a 403 error instead of a 429 (Too Many Requests) when you exceed rate limits.
While 429 is the standard status code for rate limiting, many APIs (including older or custom implementations) use 403 to block further requests once a quota is exceeded. This can make it seem like a permission issue when it’s actually a usage limit.
If you’re sending multiple requests in a short time, inspect the response headers and body. A rate-limited response often includes:
- A
Retry-Afterheader indicating when you can try again - Keywords like “rate limit”, “quota exceeded”, or “too many requests”
For example:
HTTP/1.1 403 Forbidden
Retry-After: 60
To resolve this:
- Reduce request frequency (implement throttling)
- Use exponential backoff between retries
- Check API quotas and upgrade your plan if needed
If the error disappears after waiting or reducing request volume, the issue is rate limiting — not authentication or permissions.
6. Check for CORS-related 403 errors
A 403 error in browser-based requests can occur when the server blocks cross-origin requests due to missing or misconfigured CORS headers.
CORS (Cross-Origin Resource Sharing) controls whether a browser allows requests from a different domain. If the server doesn’t include the correct Access-Control-Allow-Origin header, the browser may block the request — sometimes surfacing as a 403 error.
This often happens during preflight requests (OPTIONS). If the server rejects the preflight check, the actual request never proceeds.
To diagnose:
- Open DevTools → Network tab
- Look for an
OPTIONSrequest before your main request - Check if the response includes headers like:
Access-Control-Allow-OriginAccess-Control-Allow-MethodsAccess-Control-Allow-Headers
Example of a failing request:
Origin: https://yourapp.com
If the server doesn’t explicitly allow this origin, the request will be blocked.
To fix this:
- Configure the server to allow your origin (or use
*for public APIs) - Ensure preflight requests return a 200 status with proper headers
- Verify that authentication headers (like
Authorization) are included inAccess-Control-Allow-Headers
If the same request works in curl but fails in the browser, the issue is almost always CORS-related.
7. Test from a different IP or network
A 403 error can happen when an API blocks your IP address, region, VPN, or data center network instead of your credentials.
This is common with APIs protected by firewalls, fraud detection systems, or Web Application Firewalls (WAFs). Your token may be valid, but the request is rejected because it comes from a blocked IP range or an unsupported location.
Test the same request from a different network:
curl -H "Authorization: Bearer YOUR_TOKEN" https://api.example.com/resource
Then repeat it from:
- a local machine instead of a server
- mobile hotspot instead of office WiFi
- a different cloud region
- a non-VPN connection
If the request works from one network but fails from another, check IP allowlists, firewall rules, geo-restrictions, and WAF logs.
For APIs hosted behind Cloudflare or similar CDNs, review security events to see whether the request was blocked before reaching the origin server. If your app runs on AWS, Google Cloud, or Azure, confirm that the API provider allows requests from cloud data center IP ranges.
This test helps separate authorization problems from network-based blocking.
8. Inspect the full request and response
The fastest way to diagnose an API-related 403 error is to inspect the entire request and response, including headers, status codes, and the response body.
A 403 response often includes clues that indicate whether the issue is due to authentication, permissions, rate limits, CORS, IP blocking, or a WAF rule. Don’t rely on the status code alone; check the exact error message returned by the server.
Use curl -i to show the response headers:
curl -i -H "Authorization: Bearer YOUR_TOKEN" https://api.example.com/resource
Look for signals like:
WWW-Authenticate→ authentication or token issueRetry-After→ rate limitingAccess-Control-Allow-Origin→ CORS configurationX-RateLimit-Remaining→ quota statusServer: cloudflare→ CDN or WAF-level block
Also review the response body. Messages like “insufficient_scope,” “AccessDenied,” “quota exceeded,” “origin not allowed,” or “blocked by security policy” usually point to the exact cause.
If the request works in one tool but fails in another, compare both requests line by line. Differences in headers, methods, origin, IP address, or token format often explain why one request succeeds and the other returns 403.
Key takeaways
Troubleshooting the 403 Forbidden error requires checking where access is being blocked: the browser, website files, server configuration, DNS settings, security rules, or API authorization layer.
Start with quick access checks. Clear your browser cache and cookies, disable your VPN, and check whether your IP address is blocked to rule out browser, connection, or network-level issues.
Website owners should then review site-level causes. Scan for malware, disable conflicting WordPress plugins, restore the .htaccess file, reset file permissions, check file ownership, upload a valid index page, verify the domain’s A record, update nameservers, and review CDN or hotlink protection settings.
Developers and API users should inspect the request’s authentication and authorization details. Check authorization headers, bearer tokens, OAuth scopes, expired tokens, IAM policies, rate limits, CORS restrictions, IP or network blocks, and full request-response headers.
If the 403 Forbidden error persists, inspect hidden files or directories, review server error logs, and contact your hosting provider with the affected URL, timestamp, IP address, and error message.
All of the tutorial content on this website is subject to Hostinger's rigorous editorial standards and values.

Ariffud is a Technical Content Writer with an educational background in Informatics. He has extensive expertise in Linux and VPS, authoring over 200 articles on server management and web development. Follow him on LinkedIn.

Jordana is a Senior Content Writer with a background in Information Systems. She has over five years of experience in WordPress and is casually dabbling with PHP and MySQL. Her passion for writing and technology drives her to create tutorials for anyone wanting to build their online presence. Follow her on LinkedIn.