How to Set Up a Video Streaming Server
Aug 26, 2025
/
Aris S. & Valentinas C.
/
13 min Read
A video streaming service like YouTube lets users broadcast content to online audiences. While such a platform is easy to set up, it has limited customization options and policy restrictions.
If you want complete control, set up your own streaming solutions. The easiest way to do so is using a virtual private server (VPS) hosting plan from a provider like Hostinger, which comes with features that help simplify the configuration process, like a control panel.
To help you get started, this tutorial will explain how to set up a video streaming server on a Ubuntu VPS. You will also learn how to enable other streaming protocols and make the broadcast accessible via web browsers.

What Is a Video Streaming Server?
A video streaming server is an intermediary system that lets you broadcast content live from your local system to online audiences.
The live streaming process works by encoding video content in real-time, breaking it into smaller data packets, and sending it to the client. The media transfer is continuous, meaning the server doesn’t store the media locally.
Prerequisites for Setting up a Streaming Server
To set up your own video streaming server, you need a VPS running a Linux operating system, like Ubuntu 24.04. Read the tutorial explaining what a VPS is if you need more information on how virtual private servers work. It must also be compatible with the NGINX web server since we will utilize its data transmission module.
In addition, your server must support the SSH connection to execute commands remotely. Your local system must also have an SSH client like PuTTY installed to access the VPS. For Linux and MacOS, use the built-in Terminal.
Setting up your own media streaming server also requires basic Linux server administration knowledge. If you are unfamiliar with it, we recommend reading our Linux commands tutorial to learn more about the essential utilities.
How to Build a Video Streaming Server
Once you familiarize yourself with Linux commands, read on to learn how to set up your own server for streaming video in eight steps.
1. Purchase a Virtual Private Server
Since setting up a streaming server requires a VPS, purchase a plan from a reputable provider if you haven’t already done so. To choose the best VPS hosting for broadcasting video content, consider the prerequisites we explained previously.
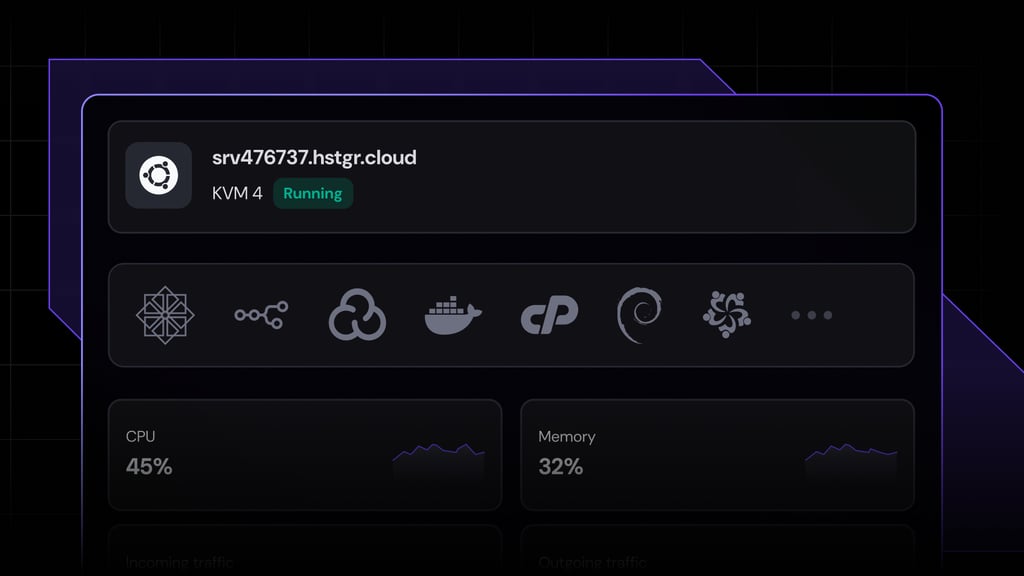
Based on them, Hostinger is an ideal choice. All our VPS solutions have a Browser terminal that lets you connect to the system without an SSH client. It helps simplify the live streaming server setup process since you can do so directly from your web browser.
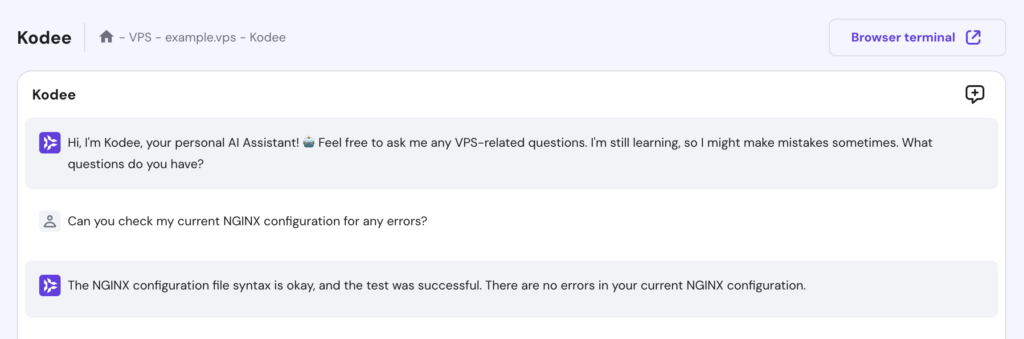
In addition, Kodee, our AI assistant for VPS, enables you to quickly generate commands for installing and configuring media streaming server software. This makes Hostinger’s VPS plan especially suitable for new VPS users unfamiliar with Linux system administration.
Using Kodee to manage your server
In addition to assisting you with various system administration tasks, you can ask Kodee to directly manage various aspects of your server, including rebooting your VPS, resetting services to their default state, and adjusting firewall rules. Simply enter a message and Kodee will handle the rest.
When choosing a VPS hosting plan, ensure it also offers a high-speed connection and sufficient bandwidth. It is important since video streaming needs consistent and continuous data transfer.
Hostinger’s VPS provides a 1 Gb/s connection and up to 32 TB of bandwidth. Our high-performance network ensures your live streaming platform broadcasts videos reliably without buffering.

2. Set Up Your VPS
After purchasing and setting up your VPS plan, let’s prepare the hosting environment by updating its repository and installing the video server software.
Start by connecting to your server via SSH using PuTTY or Browser terminal. You can find the login credentials under the VPS details section in hPanel’s VPS overview menu. By default, you will connect as root.
However, we will create another superuser since running commands as root might cause severe issues if not careful. To do so, run the following:
adduser your-username
Enter the required information, like the password, name, and other details. Press Y and hit Enter to confirm.
Next, grant the new user the superuser privilege to enable administrative command executions using sudo. You can do so by entering the following:
usermod -aG sudo your-username
Switch to the new user using this command:
su your-username
Enter the user’s password, and you should see the command-line shell changes. Now, let’s prepare the server by updating the system packages to ensure you get the latest software versions from the local repository:
sudo apt update

sudo apt upgrade
Note that the commands only work for Debian-based operating systems like Ubuntu. For other distributions, replace apt with the corresponding package manager, such as dnf or yum in CentOS:
sudo yum update

sudo yum upgrade
3. Install NGINX and the RTMP Module
On a media streaming server, NGINX will receive clients’ requests, process them, and send the queried content to users. To install it in Ubuntu, run the following:
sudo apt install -y nginx
Now, run the following command to start NGINX when your VPS reboots automatically:
sudo systemctl enable nginx
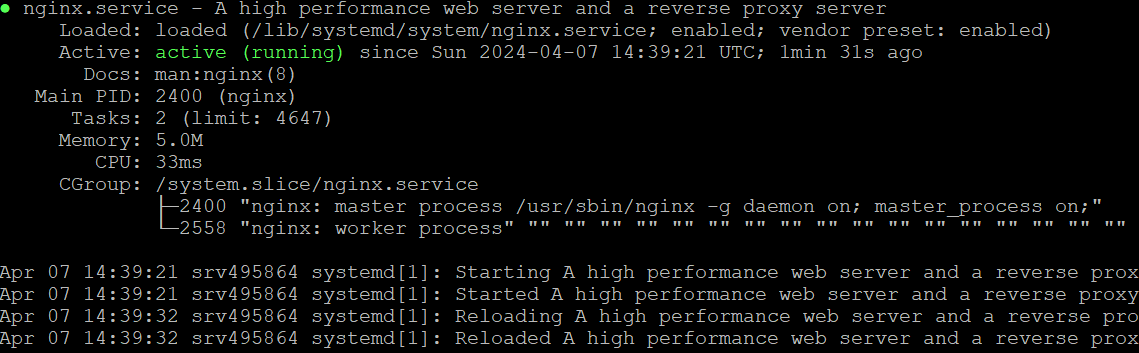
Check whether NGINX is active and configured correctly by verifying its status using this command.
sudo systemctl status nginx
The terminal application should display NGINX as active and running, similar to the example below.
Now, let’s install the real-time messaging protocol (RTMP) module, which enables the NGINX streaming server to transfer video content to client machines with a low latency.
In a live video streaming process, this protocol sends the data packets that your broadcasting software encodes. The user’s machine will then recompile the data to display the requested video.
To install the NGINX RTMP module, run the following command:
sudo apt install -y libnginx-mod-rtmp
Note that all the previous installation commands will retrieve the software from your system’s package manager repository, meaning they might not be the latest release.
If you need the latest version, download NGINX and RTMP directly from their GitHub repositories. Before doing so, install the following dependencies for building the package:
sudo apt install build-essential git libpcre3-dev libssl-dev zlib1g-dev
Now, fetch both software repositories using these Git clone commands:
sudo git clone https://github.com/arut/nginx-rtmp-module.git

sudo git clone https://github.com/nginx/nginx.git
Switch to the NGINX directory and run the compiler script. To do so, run the following series of commands subsequently:
cd nginx

./auto/configure --add-module=../nginx-rtmp-module

make

sudo make install
4. Configure NGINX for Video Streaming
After completing the RTMP server installation, configure NGINX to enable live video streaming. To do so, open the nginx.conf file using a text editor like nano:
sudo nano /etc/nginx/nginx.conf
In the text editor window, add the RTMP configuration block at the end of the file. For example, we will insert these basic settings:
rtmp {

   server {

      listen 1935;

      chunk_size 4096;

      application live {

         live on;

         record off;

      }

   }

}
To help you understand what the configuration code does, here’s the breakdown of each parameter:
- listen 1935 – the port number your RTMP server listens, set to 1935 by default.
- chunk_size 4069 – the size of video chunks the server will send in bytes, set to 4096 bytes or 4 KB by default.
- application live – the live streaming application that will be available at the /live URL.
- live on – the live mode toggle to allow multiple users to connect to your stream simultaneously.
- record off – the RTMP recording functionality toggle. Setting it to off means the server won’t store streamed video locally.
The RTMP module directives’ GitHub page lists other parameters for changing your RTMP settings. For example, add the following into server{} to allow only a specific IP address to stream on your server and deny others:
allow publish 127.0.0.1;

deny publish all;
While you have complete control over your own video server, use these directives carefully since they might impact your VPS performance. To ensure reliable streaming, set the right value according to your needs and the server’s hardware resources.
Here are several important streaming setup parameters and their impact on performance:
- chunk_size – a large data chunk might cause high latency while setting it to low will cause overhead due to extra transmissions.
- max_connections – the maximum number of concurrent connections to your RTMP server, which can consume a high video streaming bandwidth if set too high.
- record – the toggle for recording mode, which will consume extra computing power and storage space when enabled.
- max_message – the maximum size of input data sent as a message. Setting it too high will consume more memory and might cause server instability.
We recommend using the default value and adjusting it gradually to see if the new setting affects your video server performance. Also, remember that broadcasting content on multiple channels will consume extra resources.
Important! To avoid issues, test changes on a testing area before applying them to the live environment. After applying new settings, monitor your server to check for instability.
After adding the RTMP block to the NGINX configuration file, press Ctrl + X → Y → Enter to save the changes. Run the following to validate your settings and detect syntax errors:
sudo nginx -t
Hostinger VPS customers can also use Kodee to verify their NGINX configuration and check for errors like this:
Now, reload the NGINX web server configuration to apply the settings using this command:
sudo nginx -s reload
5. Set Up a CDN
A content delivery network (CDN) is a network of servers that temporarily stores your hosted content across multiple geographical locations. It allows users to retrieve requested data closest to them, reducing latency and loading speed.
Since users connect to the caching server, CDN reduces the load on your VPS. A video streaming server requires this feature since distributing the data stream continuously to multiple devices might cause instability.
In a streaming environment, this caching software stores segments of the broadcasted video in real-time. It will then serve clients content from the temporary data stored in the CDN network instead of the host server.
The easiest way to set up a CDN is by using a service provider like Cloudflare. Before doing so, ensure you have pointed a domain name to your VPS since we will use it for the setup. Then, follow these steps:
- Open the Cloudflare website. Click Sign Up to create a new account and complete the verification process.
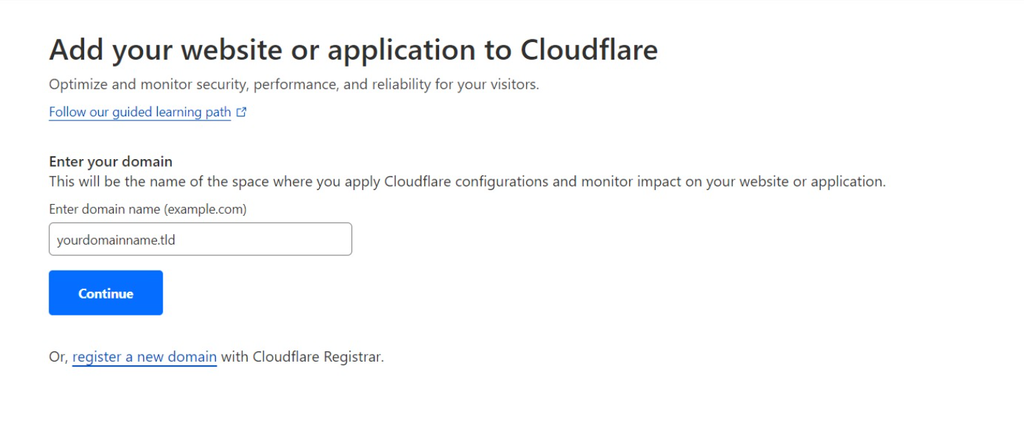
- Log in to your Cloudflare dashboard and click Add site on the top right of your screen.
- Enter your domain name in the provided field and click Continue to confirm.
- Select your preferred plan. We recommend choosing the free one at the bottom since you can upgrade later anytime. Click Continue to proceed.
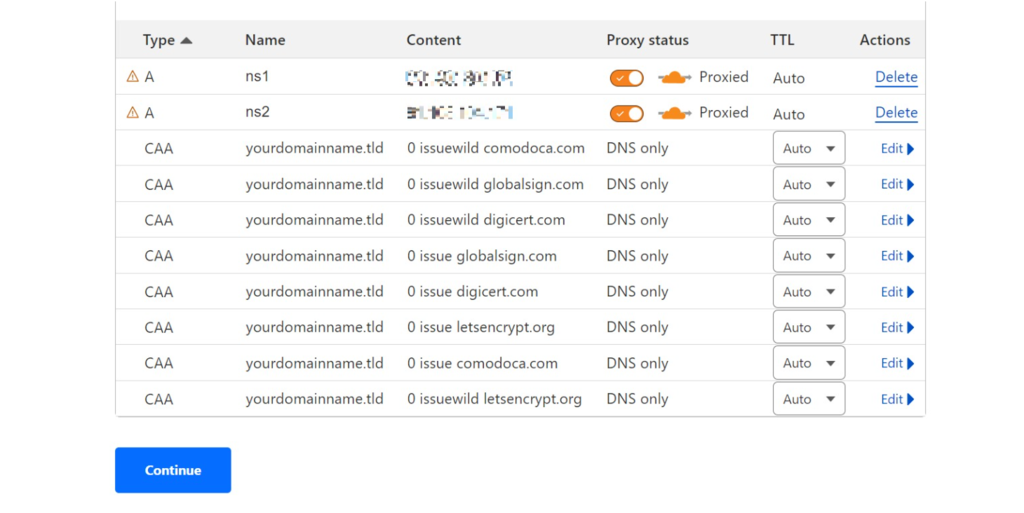
- You will be prompted with the DNS records review page. Ensure all the records point to your domain name and click Continue.
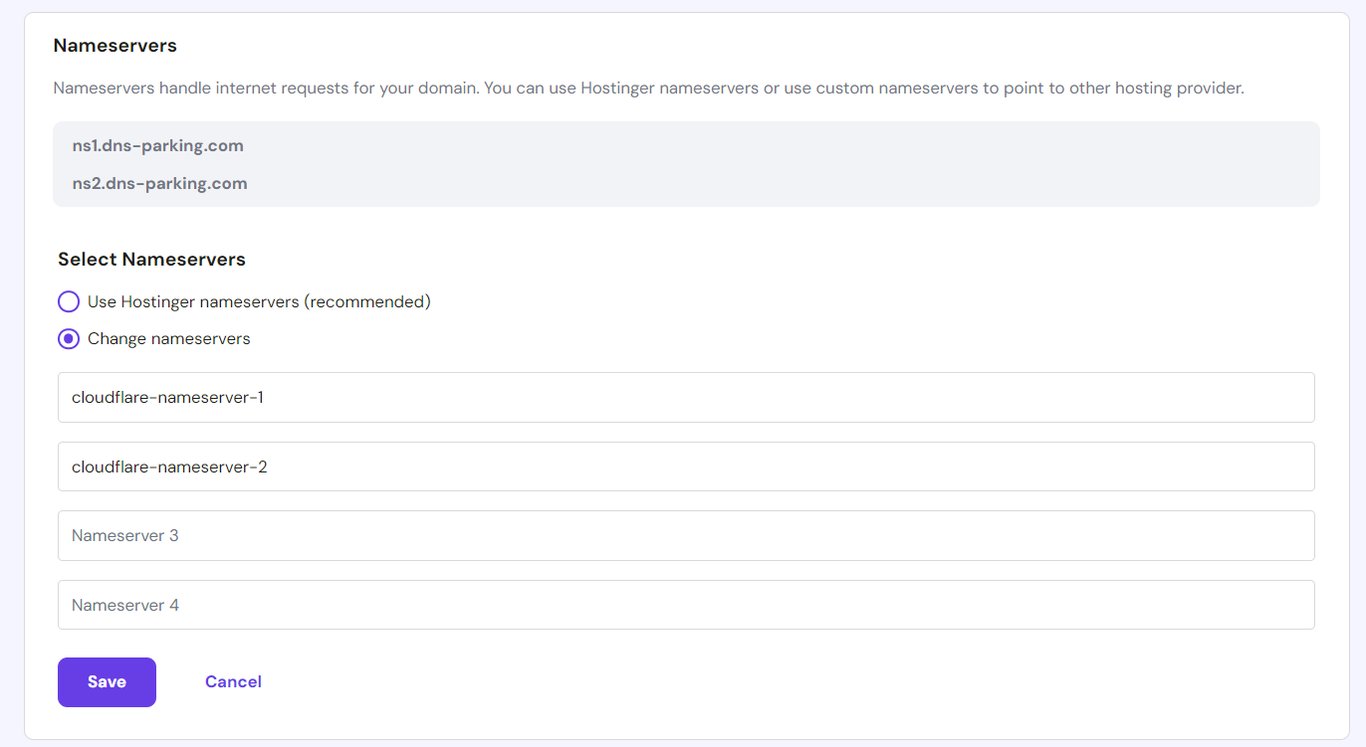
- In the next screen, Cloudflare will provide you with nameservers for your domain. Copy and save them in a safe location.
Don’t close the dashboard since we will use it to check the configuration later. Now, let’s point your domain name to the new nameservers. Here’s how to do so at Hostinger:
- Log in to hPanel and click Domains on the top menu.
- Click Manage on the domain you want to configure and select DNS / Nameservers from the sidebar.
- Click Change Nameservers and select the Change Nameservers bulleted option.
- Enter the Cloudflare nameservers into the first two fields. Click Save.
Return to the Cloudflare dashboard and click Check nameservers now. If a message containing your domain name shows up, click Continue. You will be prompted with a Quick Start Guide, but we’ll choose Finish later.
That’s it! Your video stream is now served via Cloudflare CDN. If you want to learn more about other providers, check out our tutorial on improving website performance using a content delivery network.
6. Set up Streaming Software
Once the streaming server is ready, set up video streaming software on your local machine to cast the content. Since there are various options, we will provide several popular streaming tools to help you choose:
- Open broadcaster software (OBS) – an open-source live streaming software with a user-friendly interface and versatile functionalities.
- Streamlabs – a streaming solution based on OBS with additional features, but more resource-intensive and less reliable.
- Wirecast – a premium live video broadcaster with built-in editing features and extensive media streaming source support.
- XSplit – a popular tool with expandable features via plugins, but complicated to configure due to the lack of presets.
To choose the best streaming software, consider your computer’s operating system, hardware capability, and tool requirements. For this tutorial, we will use OBS as it is free, lightweight, and easy to set up.
Download OBS Studio from the official page and open the installer package. Follow the installation wizard instructions to finish the setup process. Once completed, open the obs64.exe application.
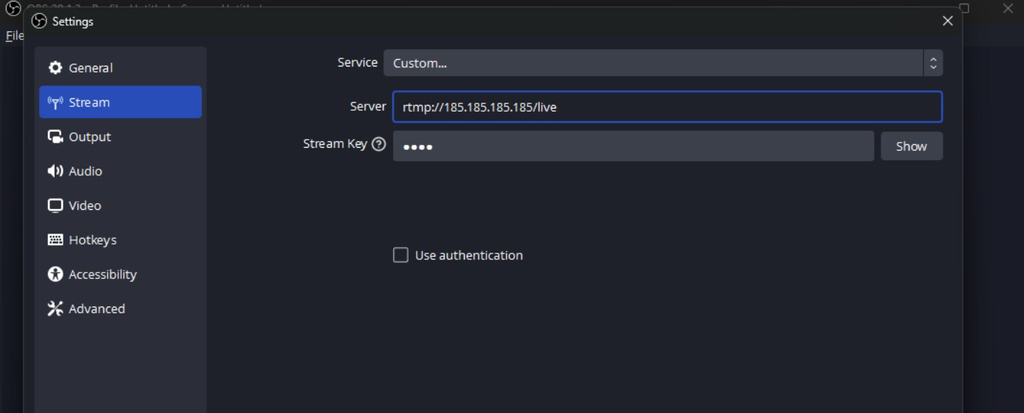
Now, connect OBS with your RTMP server by navigating to Settings → Stream. From the Service drop-down menu, select Custom. In the Server field, enter the following address:
rtmp://your-server-ip/live
Replace your-server-ip with your VPS’s actual IP address. Also, change /live if you modify the application path in the RTMP block.
The Stream Key goes at the end of your RTMP stream URL. For example, if you use test, you will connect to the server using this address:
rtmp://your-server-ip/live/test
We’ll also uncheck the Use authentication option. After entering all the required information, click Apply and OK.
Next, configure your stream’s scenes, sources, and audio settings. If you are unfamiliar with the streaming software, check the OBS streaming setup Quick Start guide to learn more about it. Click Start Streaming to broadcast your video.
Pro Tip
You can also broadcast on-demand video content. However, you must put the video file inside the live streaming server.
7. Test Your Stream
Let’s check if your video streams to the server correctly. You can do so by accessing the URL via a media player like VLC. Here are the steps:
- Download VLC from the official page and install it on your local computer.
- Open the media player, select Media in the top left corner, and click Open Network Stream.
- On the Open Media window, select the Network tab.
- Paste your RTMP stream URL into the provided field and click Stream to start streaming your video.
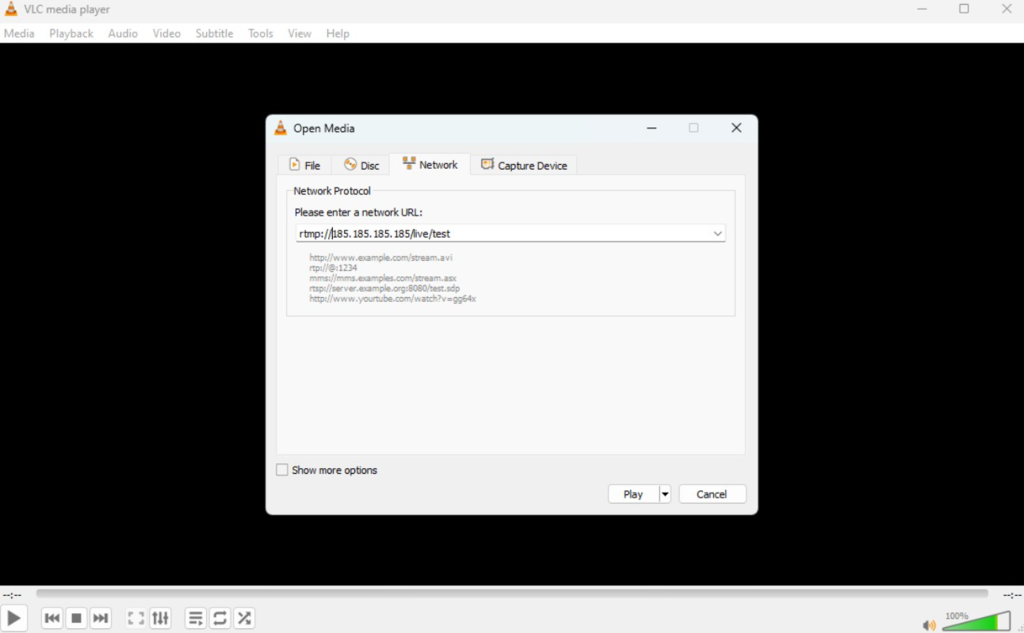
You can use another media player to check if the URL works so long as it supports RTMP. If you encounter an error, ensure the URL is correct, especially if you change the application path in the NGINX configuration and use a specific stream key.
In addition, check whether your configuration file contains settings that permit or block streams from a specific IP address. If so, ensure it puts your VPS and the system that broadcasts the video in the allowlist.
Also, check the correct address using an online tool like whatismyipaddress and see if the value matches. After changing the configuration file, remember to always reload NGINX to apply the changes.
Moreover, ensure your firewall allows NGINX connection via ports 1935, 80, and 443. You can use Linux’s built-in tools like iptables or Uncomplicated Firewall. Alternatively, use hPanel’s Firewall Configuration feature by following these steps:
- Open hPanel, select VPS, and click Manage on the video streaming server.
- From the sidebar, navigate to Settings → Security → Firewall.
- Click Create firewall configuration and enter its name. Click Create.
- Click the three-dot icon on the new rule and select Edit.
- Add a rule that accepts connection from any source via port 1935, similar to the following.

- Click Add rule. Return to the main firewall configuration page and activate your RTMP rule.
Now, return to VLC and try streaming the video to check if the problem is resolved.
8. Secure Your Streaming Server
Once your streaming server is accessible to online users, apply proper security practices to enable secure data transmission and minimize potential entry points for cybercriminals.
Use strong credentials on all users, including root and your hosting accounts. Also, install a secure sockets layer (SSL) certificate to encrypt the connection between your server and clients, enabling secure video streaming.
SSL masks the transmitted data into indecipherable characters, preventing cyber criminals from obtaining raw personal information like the user’s IP address.
The steps to set up SSL on your VPS differ depending on the certificate issuer. For this tutorial, we will configure a free plan from Certbot, which offers the same security level as the paid ones. Here are the steps:
- Connect to your VPS via SSH and switch to a superuser account.
- Install the dependencies using the following command. Remember to replace apt according to your system’s package manager:
sudo apt install python3 python3-venv libaugeas0
- Set up a Python virtual environment by running the following commands:
sudo python3 -m venv /opt/certbot/

sudo /opt/certbot/bin/pip install --upgrade pip
- Install Certbot on NGINX using this command:
sudo /opt/certbot/bin/pip install certbot certbot-nginx
- Now, create a symbolic link, which is a shortcut that lets you execute Certbot from any path:
sudo ln -s /opt/certbot/bin/certbot /usr/bin/certbot
- Install and activate the SSL certificate with the following:
sudo certbot --nginx
Congratulations, your live streaming platform is secured! Remember to update the SSL certificate every 90 days or enable auto-renewal using the following command:
echo "0 0,12 * * * root /opt/certbot/bin/python -c 'import random; import time; time.sleep(random.random() * 3600)' && sudo certbot renew -q" | sudo tee -a /etc/crontab > /dev/null
In addition to SSL, ensure to add the deny directives to your nginx.conf file to prevent other users from streaming to your VPS. Otherwise, hackers might use the unauthorized connection to find security vulnerabilities.
Similarly, properly set firewall rules on your VPS to listen only to the necessary ports and close the others. Leaving all of them open will expose your server to additional exploitable entry points for hackers.
Pro Tip
Now that you've set up your streaming server, read our guide on how to start a video streaming service to help you get started and streamline your streaming business.
How to Use Other NGINX Streaming Protocols
The NGINX web server offers two additional video streaming protocols aside from RTMP, which you can enable via the nginx.conf file.
For example, the HTTP Live Streaming (HLS) protocol is ideal for multi-platform streaming due to its compatibility with any web browser and HTML5 video player. However, it’s not suitable for gaming or interactive broadcasting due to a high latency.
To enable HLS, add the following directives to application live {} in your video streaming server configuration file:
hls on;

hls_path /var/www/html/stream/hls;

hls_fragment 15;
The hls on setting enables the protocol for streaming, while hls_path defines the directory for storing the broadcasted video fragments. The hls_fragment directory sets the length of each video section sent to users.
Another protocol is Dynamic Adaptive Streaming over HTTP (DASH), which is open-source and customizable. It lets you enable adaptive bitrate streaming to maintain optimal video quality over an unstable network.
However, DASH is not compatible with some players and web browsers. In addition, it is an obsolete protocol that might be unreliable for long-term use. Similar to HLS, enable DASH by adding the following configurations:
dash on;

dash_path /var/www/html/tmp/dash;

dash_fragment 15;
You can enable both protocols, which the client will automatically choose based on their media player compatibility or request header requirement. To do so, simply add both directives in your configuration file.
Make Streaming Server Accessible via Web Browsers
Since users are more likely to live stream videos without a dedicated media player like VLC, make your media accessible via web browsers. Before doing so, enable the HLS and DASH protocols since only using RTMP might cause compatibility issues.
You can add the settings to nginx.conf, but we will use a separate file within /sites-available to organize the code and simplify maintenance. It can also apply settings only to a specific site for isolation.
To create the configuration file, run the following command. Note that it may have no extension:
sudo nano /etc/nginx/sites-available/rtmp
In the nano text editor, add the following settings:
server {

    listen 9000;

    location / {

        add_header Access-Control-Allow-Origin *;

        root /var/www/html/stream;

    }

}

types {

    application/dash+xml mpd;

}
Save your changes and close nano. Now, access hPanel’s Firewall Configuration menu and allow any sources to connect to port 9000, which we will use to serve the video. You can use any port except those already reserved for other applications, like NGINX’s 80 and 443.
Also, change the root path based on your protocol path directives. If you haven’t created the folder, make one using the mkdir command like so:
sudo mkdir /var/www/html/stream
Reboot NGINX, and you should be able to access the stream via a web browser using its URL. Note that depending on the protocol, the address differs.
Access the HLS stream via http://your_domain:9000/hls/stream.m3u8. Meanwhile, use http://your_domain:9000/dash/stream.mdp to view the DASH broadcast. Note that you might need to embed the URL into HTML to allow web browsers to display them.
Pro Tip
Check out our handy guide on how to earn money streaming for all the details.
Conclusion
Setting up your own server offers more flexibility and control over third-party video streaming platforms like YouTube. The easiest way to do so is by installing NGINX and the RTMP module in a Linux VPS.
To create a video streaming server, purchase a VPS hosting plan compatible with both software, like Hostinger’s. Connect to it via SSH and switch from root to another superuser account. Update your system’s repository using the upgrade command.
Install NGINX and RTMP from your system repository or their GitHub page if you need the latest release. Then, open nginx.conf and add the RTMP block to set up custom video player configurations.
Configure Cloudflare CDN to improve your live streaming server stability. Now, install video broadcast software on your local system and enter the RTMP server’s URL. Start streaming and check if the video loads properly using the VLC media player.
How to Set up a Video Streaming Server FAQ
In this section, we will answer several commonly asked questions about how to build a streaming service. If yours remains unanswered, ask it in the comment section below!
Why Build Your Own Live Streaming Server?
Building your own streaming server offers more flexibility and control than using platforms like YouTube and Twitch. For example, you can choose different protocols to encode your video, like RTMP, HLS, or DASH. It also allows you to broadcast any content or use monetization options that such platforms may restrict.
How Much Does It Cost to Start Your Own Streaming Service?
A private video streaming server cost varies depending on your VPS hosting provider. For example, you can set one up at Hostinger starting at $6.49/month. Also, consider other services’ prices, like CDN and domain subscriptions.
What Are the Key Features to Look for in Video Streaming Servers?
To choose a VPS for streaming, ensure it provides sufficient bandwidth and computing power to ensure stable performance. Also, it must be compatible with NGINX to enable the RTMP module and offer full root access to avoid permission issues when setting up the software.
All of the tutorial content on this website is subject to Hostinger's rigorous editorial standards and values.

Aris is a Content Writer specializing in Linux and WordPress development. He has a passion for networking, front-end web development, and server administration. By combining his IT and writing experience, Aris creates content that helps people easily understand complex technical topics to start their online journey. Follow him on LinkedIn.

Valentinas Čirba, Hostinger's Head of VPS, is a seasoned product leader specializing in VPS products with over ten years of experience. He's an expert at setting product strategy, leading cross-functional teams, and making smart decisions to deliver innovative solutions. Valentinas is committed to creating products that not only meet business objectives but also truly serve the customer. Follow him on LinkedIn.