How to redesign a WordPress website: A comprehensive guide
Jun 17, 2025
/
Aris S.
/
9 min Read
A WordPress website redesign is a practice of overhauling a website’s appearance, features, and overall functionality to improve user experience and usability.
To achieve these goals, the process requires a clear and structured approach. The steps to redesign a WordPress website are typically as follows:
- Set up a staging environment
- Back up all content and theme configuration
- Revamp the WordPress website design
- Add new content to your website
- Install additional plugins to enhance functionality
- Test the website
- Launch the new design live
In this tutorial, we will explain those steps in more detail, along with WordPress redesign tips and prerequisites. Whether you are a beginner or an experienced web designer, this guide will help streamline the process.
What you need to do before revamping an existing website
To ensure a smooth process, redesigning a WordPress site requires thorough planning and preparation, just like you do when designing the website for the first time. Here’s what you must do before revamping a website.
Evaluate website performance
Evaluating performance provides insights into areas of your website that perform well and should be kept, as well as parts that require improvement. This enables you to focus on those aspects instead of overhauling the entire site.
Website performance here refers to loading speed and user experience, which are closely related, after all. To quantify the website performance, use metrics like bounce rate, time on page, and page load time. This quantitative data helps you easily and objectively determine the baseline for your redesign goals.
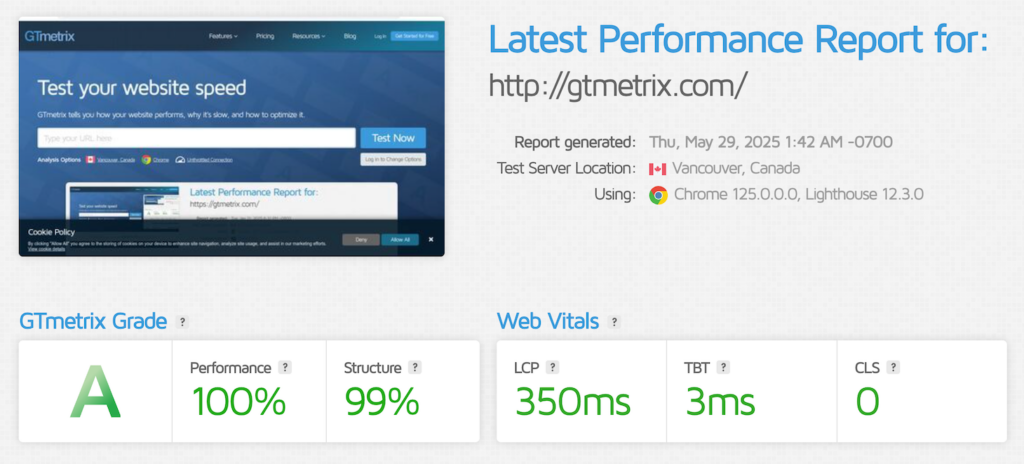
You can use tools like GTMetrix to measure loading speed. Meanwhile, conduct website usability testing to measure user experience and satisfaction.
Set your redesigning goal
Setting goals when redesigning an existing website is important as it makes it easier for you to evaluate whether the revamp is successful and meets your standards.
The easiest way to do this is by setting numbers based on the baseline. Here are some examples:
- Reduce the total website loading speed to less than 2.5 seconds.
- Lower the bounce rate by 25%.
- Increase user session duration by 30%.
- Minimize the form submission errors to less than 2%.
You can also set non-quantitative goals, such as:
- Change all images in the website to a 1:1 ratio.
- Add a night mode to the website.
- Update the website color scheme with the new palette.
Remember that your goals must be measurable, even when they are non-quantitative. Otherwise, you can’t evaluate the redesign’s success objectively.
Depending on the scale of the website redesign, you can set any number of goals. For example, simple visual adjustments may only have three targets, while a complete overhaul can have 20 or more.
Plan your new website structure
To finalize your plan, design your website based on the goals. Like in the previous step, the process in this phase will differ depending on your redesign objectives.
For example, creating a wireframe – a blueprint outlining the basic structure and layout of your website – is essential if you wish to change the images’ aspect ratio to ensure everything looks proportional. Conversely, you can skip this process if you only want to change the website’s color palette.

You can find inspiration for your website on platforms like Dribbble. To simplify the planning process, develop the new design using prototyping tools like Figma or Canva.
Back up your website
Before making any changes, back up your WordPress website to avoid data loss and simplify the restoration process if something goes wrong.
For Hostinger WordPress hosting users, the easiest way to back up your website is to use hPanel’s built-in feature. Otherwise, you can use a plugin like UpdraftPlus, Jetpack, or All-in-One WP Migration.
If you prefer to back up your WordPress website manually, simply copy all the files and folders into another location using your web host’s file explorer or a file transfer protocol (FTP) client like FileZilla.
To learn more about the detailed steps, check out our article on how to back up a WordPress site.
How to implement a WordPress website redesign
Now you have finalized the plan, follow these steps to redesign a website on WordPress.
1. Use a staging environment
A staging environment is an identical copy of your WordPress website that runs independently and privately. It lets you safely test new features or designs in real-world settings without modifying the live site, which helps avoid errors and downtime.
There are three popular methods to create a WordPress staging site:
- Using the web host’s feature – the easiest and most reliable method, given that the feature is usually built into the host’s control panel. However, not all providers have this functionality.
- Via a plugin – suitable for self-hosted WordPress or users whose web hosts lack a staging feature. Relatively easy to use, but can be unreliable because it depends on the third-party extension.
- Manually with a subdomain – the most complicated and time-consuming. Suitable for developers who want complete flexibility and code-level customization on their staging sites.
In this tutorial, we’ll set up a staging environment using Hostinger’s built-in feature on hPanel. Note that this feature is only available for WordPress business and cloud hosting plans. Here’s how to do it:
- Open hPanel and navigate to your WordPress site’s dashboard.
- Navigate to the Sidebar → WordPress → Staging.
- Click Create staging and enter a subdomain for your staging environment.

After a few minutes, your new staging site should appear on the list.
From this menu, you can access the staging environment’s WordPress admin panel, where we will make adjustments during the redesign process. Simply click Manage Staging and hit Staging Admin Panel.

2. Back up any content and custom theme configurations
If you previously modified your website’s theme or functionality by adding custom code, copy the settings because they might get overwritten after the redesign. Even when you have previously backed up your website, it sometimes doesn’t include the custom snippet.
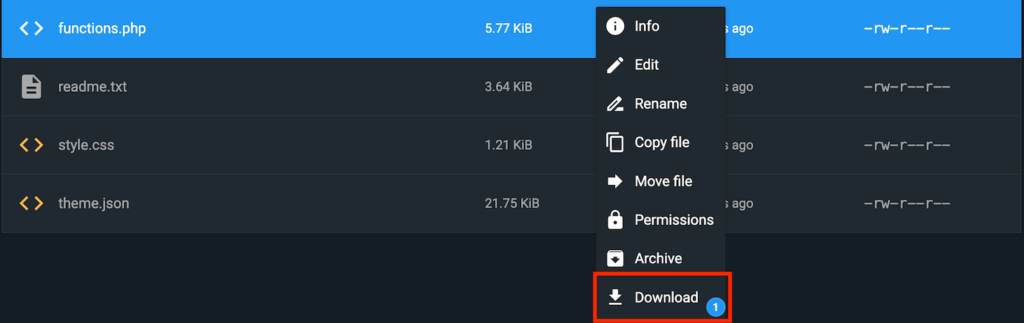
The custom code for your website’s functionality and theme resides inside functions.php. You must access your WordPress installation directory to find and back up this file.
To do this, you can use an FTP client or your web host’s built-in file explorer. Here’s how to do it on Hostinger File Manager:
- Open hPanel and navigate to your WordPress website’s management dashboard.
- Click File Manager.
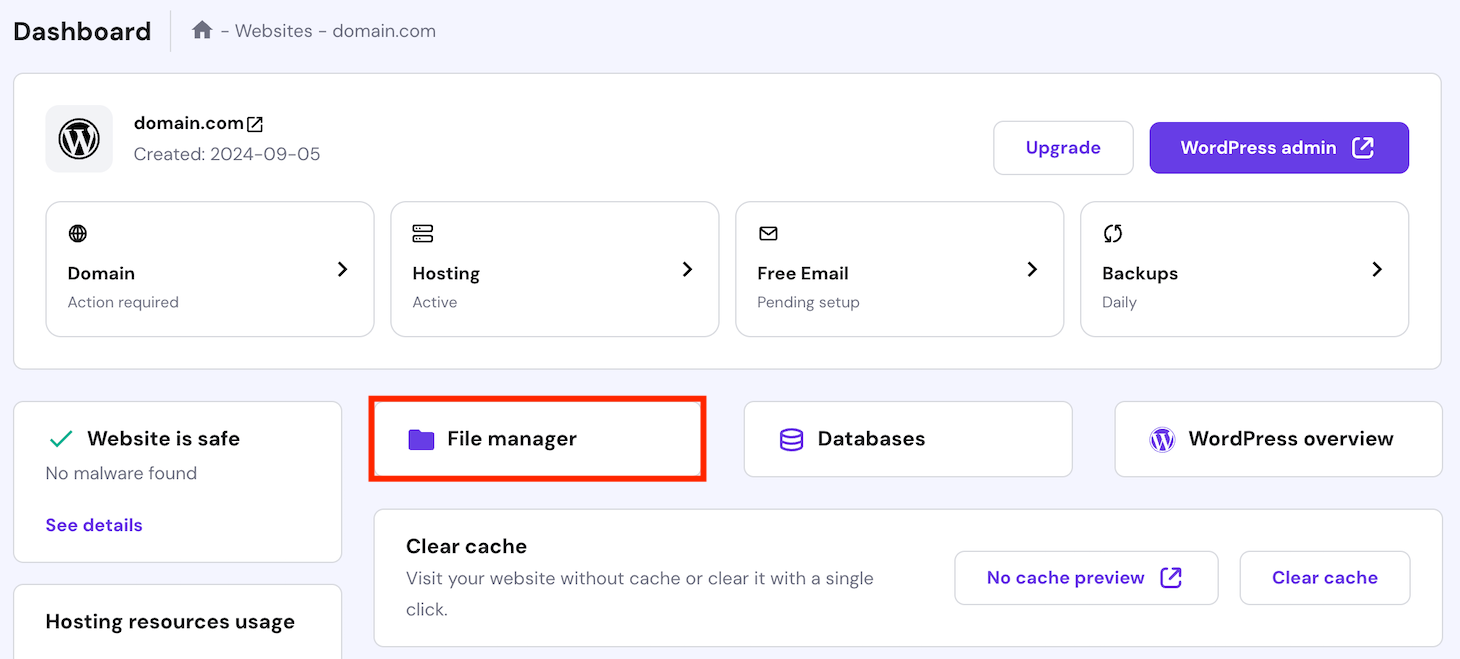
- Navigate to the wp-content/themes/your-theme/ path, with your-theme being the name of your website’s currently active theme.
- Right-click functions.php and select Download.
If you use a child theme to modify your website, back up its functions.php and style.css instead. They are located in the wp-content/themes/your-theme-child/ path.
3. Revamp the WordPress theme
Revamping a theme is the key part of designing a website in WordPress because it defines the overall appearance. You can do this by customizing the existing theme or installing a new one.
Important! Now that we are starting to make changes to the website, remember to use the staging environment instead of the live one.
Editing the current theme is suitable for minor redesigns where you want to keep most elements of your website.
If your current theme lacks the latest functions, is outdated, or has too many areas to modify, installing a new one is the solution. A new theme provides a blank canvas that streamlines the customization process because you don’t have to deal with previous modifications.
Here’s how to find and install a WordPress theme on your website:
- Open your WordPress admin dashboard and navigate to the sidebar → Appearance → Theme.
- Click the Add new theme button.
- In the Add Themes menu, hover over the theme you like and click Install. You can also preview it first.
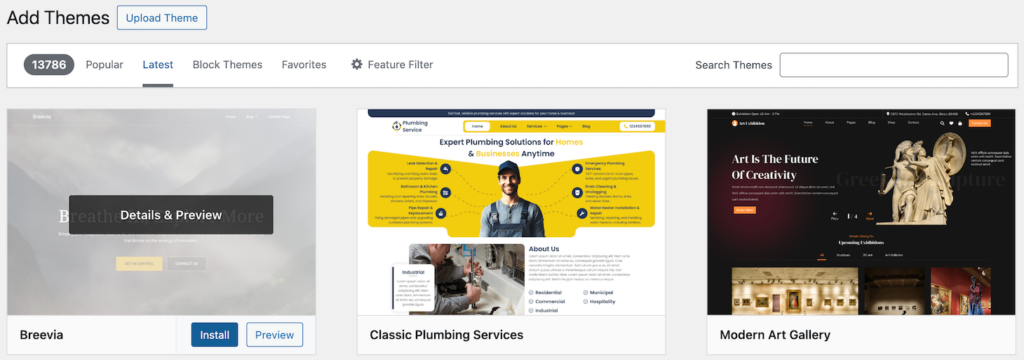
- Once installed, click Activate to replace your current theme.
Aside from the WordPress admin dashboard, you can also find and purchase themes from an online store like Themeforest. Then, install it by clicking Upload Theme from the Add Themes menu.
4. Add new content
After the new theme is installed, you can start customizing it by changing the existing design or adding new content. This process can include adjusting the colors, changing the item paddings, or rearranging the page layout.
For maximum flexibility, you can edit a theme by modifying the code in style.css and function.php. While this method works for all themes and provides limitless customization options, it may be difficult for beginners.
If you aren’t familiar with coding, page builder plugins offer a more beginner-friendly alternative. However, these tools might present incompatibility issues, and you’ll need to keep them active to preserve your design changes. If you deactivate or uninstall them, the design code will disappear and WordPress will revert your website to a basic HTML.
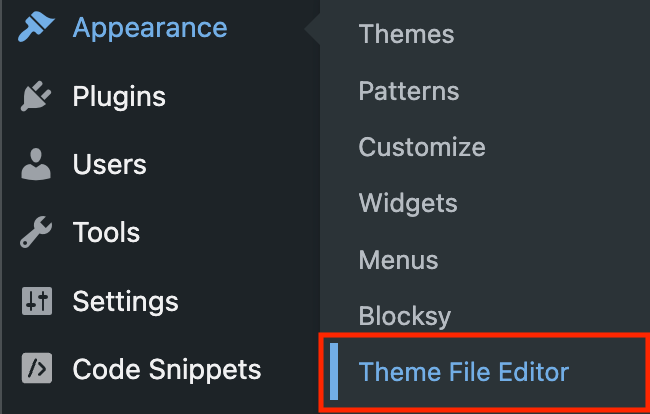
Alternatively, block themes offer a convenient third option using WordPress’s built-in editor. Access it by going to the WordPress admin dashboard → Appearance → Editor.
Regardless of the tool, remember to follow these WordPress web design best practices:
- Modify the child theme – always edit the child theme instead of the main one to preserve the changes after updates.
- Avoid direct edits – use a tool like VSCode to edit your theme code. Unlike WordPress’ built-in code editor, it provides features that minimize errors, like syntax highlighting and undo.
- Use version control – implement WordPress version control to easily track and revert changes in your website code.
- Be mindful of your code – follow the WordPress coding standard, use hooks and filters for modularity, and minimize unnecessary styles to optimize performance.
5. Add additional plugins
After revamping its appearance, adjust your website’s functionality. Based on your redesign plan, you might only need to modify existing features, or you’ll need to add new ones.
If you plan to add new features, the simplest way to do this is to use a plugin. In general, plugins are easy to configure and they’re modular, meaning you can deactivate them without modifying your website.
Here’s how to find and install a WordPress plugin:
- In your WordPress admin dashboard, go to the sidebar → Plugins → Add New Plugin.
- Find the plugin you want to install by entering its name or tags in the search bar.

- Click Install now to set up the plugin.
- Once installed, hit Activate.
Done! Depending on the plugin, the feature might only be active after you complete the setup wizard. Typically, you can do this by accessing its Settings page from the Installed Plugin menu.
You can also use plugins from third-party sources and upload them to WordPress. However, to avoid issues, only choose the reputable and well-maintained ones.
Not sure which plugins to install?
If you need help choosing plugins for your website, check out our WordPress plugin tutorial category. We have tons of articles with plugin recommendations for various purposes.
If you want to readjust plugins’ features, navigate to Plugins → Plugin Theme Editor. Note that since this process involves coding and can cause errors, you’ll need to proceed with caution.
6. Test your website
Test your new design and functionality to verify that all aspects of your website work properly. If left unchecked, the new changes might contain exploitable security flaws or bugs that can ruin the user experience.
The easiest way to check your website’s functionality is to try using it as if you were a visitor. To simplify the process, create a checklist to track things that you must test, such as:
- General site functionality – ensure all pages in your website load properly, don’t return errors or warnings, and are properly linked to.
- Overall appearance – see if your website looks proportional, shows all content properly, and displays color correctly.
- Navigation elements – validate the functionality of drop-down menus, breadcrumbs, and links.
- Forms and interactive items – try using forms and other interactive elements like buttons to see if they function as intended.
- Cross-platform compatibility – check how your website looks and works in different browsers and mobile devices.
- Site-specific features – evaluate unique features like the checkout functionality in an online store or a comment column in a forum site.
Also, rerun the usability testing and performance benchmark to see if other areas still need improvement based on the baseline.
7. Launch the new design to the production site
Now that the new website design is finalized and tested, it’s time to push it to the live site. The steps to do this differ depending on your hosting setup and how you created the staging environment.
Since we created the staging environment using hPanel’s built-in feature, we’ll explain how to launch your WordPress site using it. Here are the steps:
- Open hPanel and navigate to your WordPress site’s dashboard.
- Navigate to the sidebar → WordPress → Staging.
- Find your staging site and click the three-dot icon → Publish.

- On the pop-up window, hit Publish.
That’s it! Your new design is now live.
What you need to do after redesigning a WordPress site
After redesigning your WordPress site, the next step is to evaluate the success of the revamp, verify if the changes work properly, and check whether you need to improve other areas.
Here are several practices you must follow after redesigning a website:
- Retest website functionality – recheck all features and appearance of your website in the live environment to ensure everything works properly. This is crucial because sometimes certain design aspects might change when pushed from the staging site.
- Set up A/B testing – conduct A/B testing to see how your new website design performs against the old one. Also, compare the latest performance to the baseline to see if more adjustments are needed.
- Set up monitoring – regularly check your website performance to see if new changes affect loading speed or uptime. This way, you can quickly identify an issue and take action before it affects more visitors.
- Updating plugins and themes – actively updating your plugins and themes ensures your WordPress website remains secure and bug-free. You can also set up an auto updater if your web host offers such a feature.
- Regenerate XML sitemap – if you modify your website structure, update and resubmit the XML sitemap to search engines. This enables search engines to update their information about your website for indexing and crawling.
Conclusion
Redesigning your WordPress website is not a one-off effort. As your website grows and garners more visitors, regular optimization is crucial to ensure it consistently provides the best user experience.
In addition, redesigning your website regularly helps align your website with the changing business goals and user needs.
Now that you understand how to revamp a website effectively and efficiently, it’s time to get started. For Hostinger users, you can benefit from our built-in backup and staging tools to make the redesign process more streamlined.
WordPress website redesign FAQ
How much does it cost to redesign a WordPress website?
The cost to redesign a WordPress website depends on various factors. It can be free if you handle the process yourself and use free tools. If you have the budget, expect to spend $30/hour on a design service, up to $100 on a theme, and around $200 on a premium plugin. Check out our website development cost to learn more.
Can redesigning a WordPress website affect SEO?
Yes, redesigning a WordPress website can improve its structure, user experience, content, and loading speed, all of which contribute to better SEO. However, a site overhaul can negatively affect SEO if done incorrectly. If issues like broken links and incorrect site structure are present, search engines can’t index your site properly.
How often should I redesign my WordPress site?
You can redesign your website every two to three years, but the ideal frequency depends on your needs. If your website uses the latest technology and performs well, once every five years is acceptable. For older websites, you may do it more often, like every two years. However, avoid doing it too frequently as changing site structure can negatively affect SEO.
All of the tutorial content on this website is subject to Hostinger's rigorous editorial standards and values.

Aris is a Content Writer specializing in Linux and WordPress development. He has a passion for networking, front-end web development, and server administration. By combining his IT and writing experience, Aris creates content that helps people easily understand complex technical topics to start their online journey. Follow him on LinkedIn.


