How to convert HTML to WordPress
Oct 15, 2025
/
Luqmanul M. & Matleena S.
/
9 min Read
Converting HTML to WordPress is a smart move when you want to manage your content more efficiently and take advantage of the CMS’s flexibility.
There are three main methods to make the switch: creating a custom WordPress theme from your HTML site, using a child theme based on an existing template, or importing only the content and keeping the design.
Each approach suits different needs, from full control over design to a quick setup that prioritizes content migration.
3 different ways to convert HTML to WordPress
You can convert your HTML website to WordPress in several ways, depending on your goals:
- Create a WordPress theme from a static HTML site. If you prefer your old HTML website’s design intact, this option is for you. It’s also the most challenging route and requires coding – luckily, all you need to do is copy and paste the old HTML code into several PHP files.
- Use a child theme adapted from an existing theme. This is probably the easiest route if you want to retain the old website’s design. With this method, you’ll use a pre-existing WordPress theme and build upon it. As a bonus, you can use WordPress’ powerful features right away.
- Lose the design and keep the content only. This option is for you if you’re okay with leaving behind your old website design and finding a WordPress theme for a fresh start. You only need to transfer the content to its new home.
1. Create a WordPress theme from a static HTML site
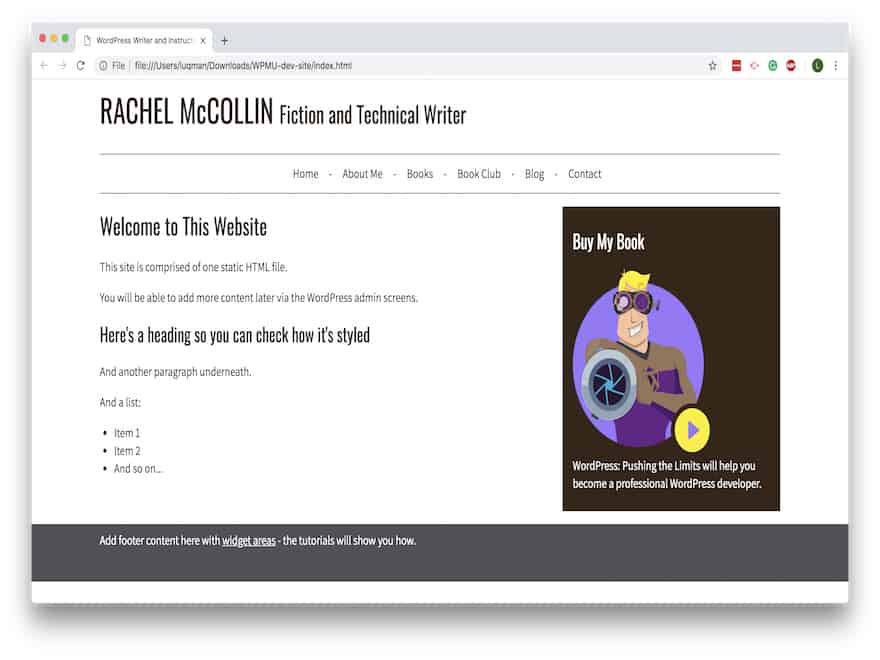
This method is ideal if you want to preserve the design of your current HTML website while gaining access to WordPress’s CMS features. The process involves turning your HTML files into a WordPress theme.
To demonstrate how to do this, we’ll use a static HTML template by Rachel McCollin.
1. Create a theme folder and basic files
Create a new theme folder on your desktop and name it. We’re naming our folder as my-theme. After that, open your code editor and create the following files:
- style.css
- index.php
- header.php
- sidebar.php
- footer.php
Note that some of these files might be optional, depending on your theme’s features and design. To learn more about their purposes, check out our article about creating a WordPress theme using HTML5.
After creating the files, leave the editor open. We’re going to come back to it later.
2. Change old website CSS to WordPress style sheet
Now, we’re going to create a WordPress style sheet by copying your old CSS code into it. Go to the style.css file, and paste this code:
/*
Theme Name: My Theme
Author: LakiGarang
Author URI: https://hostinger.com/tutorials/author/luqman
Description: A development theme, from static HTML to WordPress
Version: 1.0
License: GNU General Public License v2 or later
License URI: http://www.gnu.org/licenses/gpl-2.0.html
*/
This code provides information to WordPress that it’s a theme stylesheet header. You can edit the details like the theme name, author and URL, description, etc.
Right after the header, copy and paste your old CSS code into the file. Save and close it.
3. Split up your old website HTML
WordPress uses PHP to dynamically pull content from its database. To make your old HTML site compatible, you’ll need to break it into separate template files so WordPress can assemble the pages correctly.
Let’s take a look at how our static website and its code are structured:
<!DOCTYPE html>
<!--[if lt IE 7]><html lang="en-US" class="ie6"><![endif]-->
<!--[if IE 7]><html lang="en-US" class="ie7"><![endif]-->
<!--[if IE 8]><html lang="en-US" class="ie8"><![endif]-->
<!--[if IE 9]><html lang="en-US" class="ie9"><![endif]-->
<!--[if gt IE 9]><html lang="en-US"><![endif]-->
<!--[if !IE]><html lang="en-US"><![endif]-->
<head>
<meta charset="UTF-8" />
<meta name="viewport" content="width=device-width" />
<title>WordPress Writer and Instructor | RACHEL McCOLLIN</title>

<link rel="stylesheet" type="text/css" media="all" href="style.css" />
<link href="https://fonts.googleapis.com/css?family=Assistant|Oswald" rel="stylesheet">

</head>

<body>

  <div class="header-bg">

    <header role="banner">

      <hgroup class="site-name three-quarters left">

        <!-- site name and description - site name is inside a div element on all pages execpt the front page and/or main blog page, where it is in a h1 element -->
        <h1 id="site-title" class="one-half-left">
          <a href="https://rachelmccollin.com/" title="RACHEL McCOLLIN" rel="home">RACHEL McCOLLIN</a>
        </h1>

        <h2 id="site-description">Fiction and Technical Writer</h2>

      </hgroup>

      <div class="right quarter">

          <a class="toggle-nav" href="#">☰</a>

      </div> <!-- .right quarter -->

    </header><!-- header -->

  </div><!-- header-bg-->


  <!-- full width navigation menu -->
  <nav class="menu main">

    <div class="skip-link screen-reader-text"><a href="#content" title="Skip to content">Skip to content</a></div>

    <div class="main-nav">
      <ul class="menu">
        <li class="menu-item"><a href="https://rachelmccollin.com/">Home</a></li>
        <li class="menu-item"><a href="https://rachelmccollin.com/about-me/">About Me</a></li>
        <li class="menu-item"><a href="https://rachelmccollin.com/books/">Books</a></li>
        <li class="menu-item"><a href="https://rachelmccollin.com/bookclub/">Book Club</a></li>
        <li class="menu-item"><a href="https://rachelmccollin.com/blog/">Blog</a></li>
        <li class="menu-item"><a href="https://rachelmccollin.com/contact/">Contact</a></li>
      </ul>
    </div>

  </nav><!-- .main -->


  <div class="main">

    <div id="content" class="two-thirds left">

      <article class="post">

        <h2 class="entry-title">Welcome to This Website</h2>

        <section class="entry-content">

          <p>This site is comprised of one static HTML file.</p>
          <p>You will be able to add more content later via the WordPress admin screens.

          <h3>Here's a heading so you can check how it's styled</h3>
          <p>And another paragraph underneath.</p>
          <p>And a list:</p>

          <ul>
            <li>Item 1</li>
            <li>Item 2</li>
            <li>And so on...</li>
          </ul>


        </section><!-- .entry-content -->

      </article><!-- #post-## -->

    </div><!-- #content -->


    <aside class="sidebar one-third right">

      <aside class="widget-area">

        <div class="widget-container">

          <h3 class="widget-title">Buy My Book</h3>

          <img width="242" height="300" src="https://premium.wpmudev.org/wp-content/themes/wpmudev-2015-1/assets/img/projects/snapshot-hero@2x.png?v=1" alt="WordPress: Pushing the Limits by Rachel McCollin" style="max-width: 100%; height: auto;" />

          <p><em>WordPress: Pushing the Limits</em> will help you become a professional WordPress developer.</p>

        </div>

      </aside>

    </aside>

  </div><!-- .main -->


  <footer>

    <div class="fatfooter">

      <p>Add footer content here with <a href="#">widget areas</a> - the tutorials will show you how.</p>

    </div>

  </footer>

</body>
</html>
Now, open your old static website index.html file. We’re going to split that into the newly created WordPress files. (The examples below are our markup).
header.php
Everything from the beginning of your old HTML code up to the main content area goes into this file. The main content area is usually expressed with <main> or <div class=”main”>.
Additionally, right before the </head> element, copy and paste this code <?php wp_head();?>. This ensures WordPress plugins work properly. When you finish, save the file.
<!DOCTYPE html>
<!--[if lt IE 7]><html lang="en-US" class="ie6"><![endif]-->
<!--[if IE 7]><html lang="en-US" class="ie7"><![endif]-->
<!--[if IE 8]><html lang="en-US" class="ie8"><![endif]-->
<!--[if IE 9]><html lang="en-US" class="ie9"><![endif]-->
<!--[if gt IE 9]><html lang="en-US"><![endif]-->
<!--[if !IE]><html lang="en-US"><![endif]-->
<head>
<meta charset="UTF-8" />
<meta name="viewport" content="width=device-width" />
<title>WordPress Writer and Instructor | RACHEL McCOLLIN</title>

<link rel="stylesheet" type="text/css" media="all" href="style.css" />
<link href="https://fonts.googleapis.com/css?family=Assistant|Oswald" rel="stylesheet">
<?php wp_head();?>
</head>

<body>

  <div class="header-bg">

    <header role="banner">

      <hgroup class="site-name three-quarters left">

        <!-- site name and description - site name is inside a div element on all pages execpt the front page and/or main blog page, where it is in a h1 element -->
        <h1 id="site-title" class="one-half-left">
          <a href="https://rachelmccollin.com/" title="RACHEL McCOLLIN" rel="home">RACHEL McCOLLIN</a>
        </h1>

        <h2 id="site-description">Fiction and Technical Writer</h2>

      </hgroup>

      <div class="right quarter">

          <a class="toggle-nav" href="#">☰</a>

      </div> <!-- .right quarter -->

    </header><!-- header -->

  </div><!-- header-bg-->


  <!-- full width navigation menu -->
  <nav class="menu main">

    <div class="skip-link screen-reader-text"><a href="#content" title="Skip to content">Skip to content</a></div>

    <div class="main-nav">
      <ul class="menu">
        <li class="menu-item"><a href="https://rachelmccollin.com/">Home</a></li>
        <li class="menu-item"><a href="https://rachelmccollin.com/about-me/">About Me</a></li>
        <li class="menu-item"><a href="https://rachelmccollin.com/books/">Books</a></li>
        <li class="menu-item"><a href="https://rachelmccollin.com/bookclub/">Book Club</a></li>
        <li class="menu-item"><a href="https://rachelmccollin.com/blog/">Blog</a></li>
        <li class="menu-item"><a href="https://rachelmccollin.com/contact/">Contact</a></li>
      </ul>
    </div>

  </nav><!-- .main -->
sidebar.php
Everything belonging to the section <aside … </aside> in your old HTML code, goes into this file. When you finish, save the file.
<aside class="sidebar one-third right">

      <aside class="widget-area">

        <div class="widget-container">

          <h3 class="widget-title">Buy My Book</h3>

          <img width="242" height="300" src="https://premium.wpmudev.org/wp-content/themes/wpmudev-2015-1/assets/img/projects/snapshot-hero@2x.png?v=1" alt="WordPress: Pushing the Limits by Rachel McCollin" style="max-width: 100%; height: auto;" />

          <p><em>WordPress: Pushing the Limits</em> will help you become a professional WordPress developer.</p>

        </div>

      </aside>

    </aside>
footer.php
Now, everything up to the end of the file should be the footer information, which goes into this file. Just before the closing bracket </body>, add this code <?php wp_footer();?> for the same reason as in header.php. When you finish, save it.
</div><!-- .main -->


  <footer>

    <div class="fatfooter">

      <p>Add footer content here with <a href="#">widget areas</a> - the tutorials will show you how.</p>

    </div>

  </footer>
  <?php wp_footer();?>
</body>
</html>
Now you’re done with the old index.html file. You can close it along with other files in your theme folder, except for header.php and index.php. They still have some work to do.
4. Change the style to WordPress format
In the header, all you need to do is change the style sheet from HTML to WordPress format. Look for an existing link in the <head> section. In our case, it’s something like this:
<link rel="stylesheet" type="text/css" media="all" href="style.css" />
Replace it with this line:
<link rel="stylesheet" href="<?php echo get_template_directory_uri(); ?>/style.css" type="text/css" media="all" />
Now, you can save and close the header.php file.
Let’s turn to the index.php file. It should be blank at the moment, so copy and paste these lines of code:
<?php get_header(); ?>

<?php get_sidebar(); ?>
<?php get_footer(); ?>
This code will call for the rest of your WordPress files. You should notice the space between the header and the sidebar. It’s where you’ll add The Loop.
The Loop will process each post for display, and format it according to how the content matches the criteria within The Loop tags. It’s an important aspect to add dynamic content to your WordPress site.
To do so, paste the following code right after <?php get_header(); ?>:
<?php while ( have_posts() ) : the_post(); ?>
  <article class="<?php post_class(); ?>" id="post-<?php the_ID(); ?>">
    <h2 class="entry-title"><?php the_title(); ?></h2>
    <?php if ( !is_page() ):?>
      <section class="entry-meta">
      <p>Posted on <?php the_date();?> by <?php the_author();?></p>
      </section>
    <?php endif; ?>
    <section class="entry-content">
      <?php the_content(); ?>
    </section>
    <section class="entry-meta"><?php if ( count( get_the_category() ) ) : ?>
      <span class="category-links">
        Posted under: <?php echo get_the_category_list( ', ' ); ?>
      </span>
    <?php endif; ?></section>
  </article>
<?php endwhile; ?>
After you finish, save your index.php file and close it. You have now successfully created a WordPress theme, and you can add it to your WordPress site.
5. Upload your theme to WordPress
Once your basic theme is ready, you can upload it to WordPress. Make sure all files in your theme folder are organized in the same directory, then compress the folder into a .zip file for easy installation.
Go to your WordPress Admin Dashboard. Head over to Appearances → Themes. Click Add New → Upload Themes.
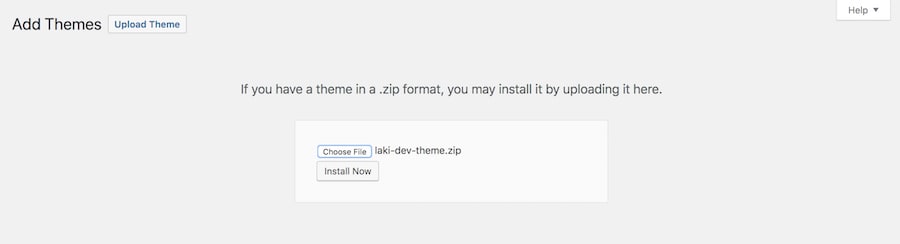
In the menu, locate your theme’s zip file, upload it, click Install Now, and activate the theme.
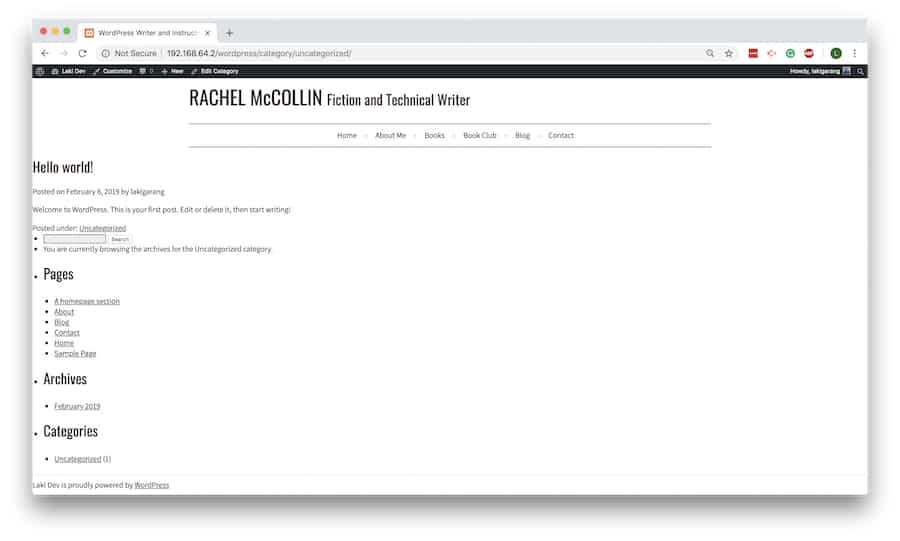
At this point, your front end should resemble your old site. While the basic design is preserved, there are additional steps you can take to fully integrate it with WordPress.
For instance, WordPress features like widget areas won’t automatically work, and you may need to adjust your CSS to align with WordPress’s theme structure and styling conventions.
2. Use a child theme adapted from an existing theme
If you want to retain elements of your old website’s design but find creating a full theme from scratch overwhelming, using a child theme is a simple alternative.
Child themes let you build on top of an existing WordPress theme (the parent theme) without affecting its core. Any customizations you make in a child theme are preserved when the parent theme is updated.
Step 1. Pick a suitable parent theme
Choose a parent theme that closely matches your old site’s layout to minimize design adjustments. Choose a free theme from the WordPress directory that closely matches your desired layout. For example, you could start with a default theme like Twenty Twenty-Five.
Step 2. Create a child theme
You can either set up a child theme manually or use a plugin like Childify Me to automate the process. Both approaches will give you a safe environment to customize your site without affecting the parent theme.
Do not modify the parent theme directly. Instead, create a new folder for your child theme inside the /wp-content/themes/ directory.
Inside this new folder, you’ll need two essential files:
- style.css: This file contains your custom CSS rules and is the only file required to make your child theme recognizable by WordPress. The very top of this file must include a header comment block to identify the parent theme.
- functions.php: This file tells WordPress to load the parent theme’s stylesheet so your child theme can inherit its design.
Step 3. Enqueue the parent theme’s stylesheet
Open your child theme’s functions.php file and add this code:
<?php
add_action( 'wp_enqueue_scripts', 'my_theme_enqueue_styles' );
function my_theme_enqueue_styles() {
    wp_enqueue_style( 'parent-style', get_template_directory_uri() . '/style.css' );
}
?>
Step 4. Customize the child theme
Now you can start making changes to the theme. To add custom styling, add your CSS rules directly to your child theme’s style.css file after the header comment block.
To modify a parent theme’s layout or functionality, copy the specific template file from the parent theme folder (e.g., header.php or page.php) and paste it into your child theme folder. Then, edit the file in your child theme. WordPress will automatically use your modified version instead of the parent’s.
Step 5. Start importing your content
Use the WordPress Importer to import your posts, pages, and media into the new site, or manually add your content by creating new posts and pages within the WordPress dashboard.
3. Forgo design and keep only the content
If your old website’s design is outdated and you want a fresh start, migrate your content into a new WordPress theme using the Gutenberg custom HTML block. This method separates your content from the old design, allowing you to take full advantage of WordPress’s modern features.
This approach is best for websites with just a few pages or for those where a new, modern design is a top priority.
The simplest way to move your content is to use WordPress’s native Custom HTML block. This method does not require any plugins, but it is a manual process that should only be used for small websites or individual pages.
- Open your old HTML files. Open each HTML file from your old website in a web browser.
- Create new WordPress pages or posts. In your WordPress dashboard, navigate to Pages → Add New or Posts → Add New.
- Add a Custom HTML block. In the WordPress editor, click the + icon to add a new block. Search for and select the Custom HTML block.
- Copy and paste the content. Go back to your old HTML file and copy the entire section of content you want to migrate (for example, from the opening <body> tag to the closing </body> tag, or just the main content area). Paste this HTML code directly into the Custom HTML block in WordPress.
- Publish and review. Publish the new page or post and view it to see how it looks with your new WordPress theme.
Important note: While this method preserves the original HTML structure, it has significant drawbacks. The content within a Custom HTML block is treated as a single, static unit. This means you will not be able to edit it using other Gutenberg blocks or features. For a truly dynamic and editable WordPress site, you would need to re-create the content using native blocks manually.
How to get the most out of your WordPress site
Once you’ve converted your HTML site to WordPress, the real advantage comes from what you can do next. WordPress offers endless opportunities – from plugins that extend functionality to themes that transform your design.
Here are a few ways to take your new WordPress site further:
- Explore advanced WordPress features such as caching, SEO plugins, and custom post types.
- Regularly update themes and plugins to keep your site secure.
- Experiment with modern page builders for easier design control.
- Monitor performance with built-in tools and analytics plugins.

All of the tutorial content on this website is subject to Hostinger's rigorous editorial standards and values.

Luqman is a self-proclaimed social scientist. He is passionate about education, technology, and everything in between. He wants to help create a high-quality education system. Having spent the past four years as a social researcher and blog guru, he lends his skills to Hostinger's digital content team. As for free time, he enjoys reading scientific (and not-so-scientific) literature with a cup of black arabica coffee as a companion.

Matleena is a seasoned Content Writer with 5 years of content marketing experience. She has a particular interest in emerging digital marketing trends, website building, and AI. In her free time, Matleena enjoys cups of good coffee, tends to her balcony garden, and studies Japanese. Follow her on LinkedIn


