How do I connect email to a webhook?
Oct 02, 2026
/
By Ariffud M.
/
9 min Read
To connect email to a webhook, configure your email service to send incoming email data to a webhook URL, either directly or through an automation tool.
Once connected, each new email can trigger an action, such as routing a support request or sending a notification to Slack.
Here’s how you can connect an email inbox to a webhook:
- Choose the mailbox whose incoming emails you want to use.
- Create a webhook endpoint that can receive the email events.
- Register the webhook URL in your mailbox or email provider settings.
- Send a test email and confirm that the webhook receives it.
- Add filters when you only want certain emails to continue through the workflow.
- Use the email data in the next action of your workflow.
This article uses Hostinger Agentic Mail to send incoming email events to n8n, then uses Slack as an example of a downstream action. The general process is similar for other email services and automation tools, although the exact settings may differ.
1. Choose the mailbox for the webhook
Choose a dedicated mailbox for the webhook when possible, especially when your existing mailbox also receives unrelated emails. You can use an existing mailbox when it already receives only the messages you want to process automatically.
For example, you can use support@domain.tld when that mailbox only receives customer requests. You can also use addresses such as bookings@domain.tld for reservations or leads@domain.tld for sales inquiries.
A dedicated mailbox prevents unrelated messages from entering your workflow and makes the automation easier to test and troubleshoot.
With Hostinger’s Agentic Mail, you can use an existing Hostinger mailbox or create a new one in Hostinger dashboard. Here’s how:
- Log in to Hostinger dashboard and go to Emails.
- Find the email plan connected to your domain and select Mailboxes.
- Check whether the mailbox you want to use already exists.
- Select Create mailbox when you need to create a dedicated mailbox.
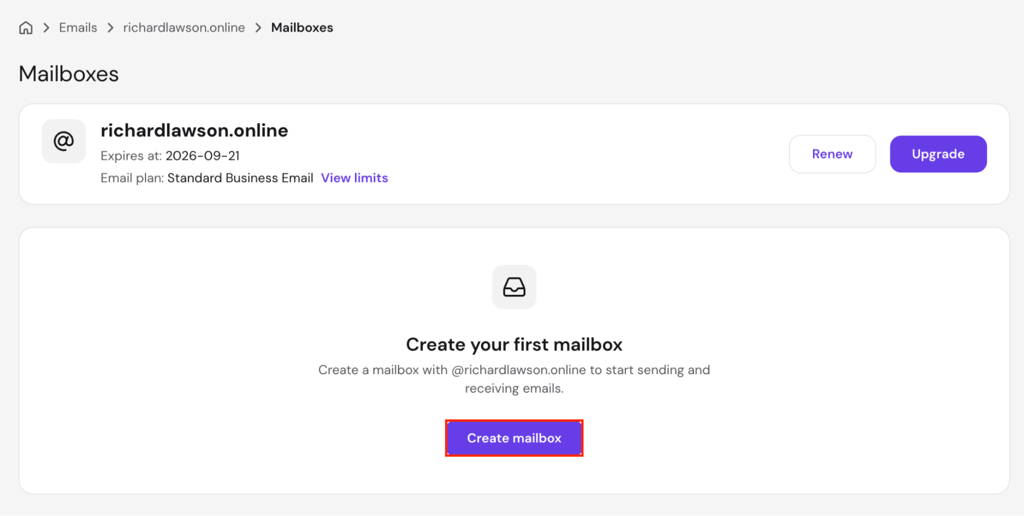
- Enter the email name and password, then select Create.

2. Create the webhook endpoint that will receive email events
Create a webhook endpoint by setting up a public HTTPS URL that your email service can send incoming email events to. In n8n, the Webhook node generates this URL for you.
Before you continue, self-host n8n if you haven’t done so. You can run it on a virtual private server (VPS).
Make sure your n8n instance is also accessible over HTTPS. You can check this by opening n8n in your browser and confirming that its address starts with https://.
To create the webhook endpoint in n8n:
- Open n8n and create a new workflow.
- Add a Webhook node as the trigger.
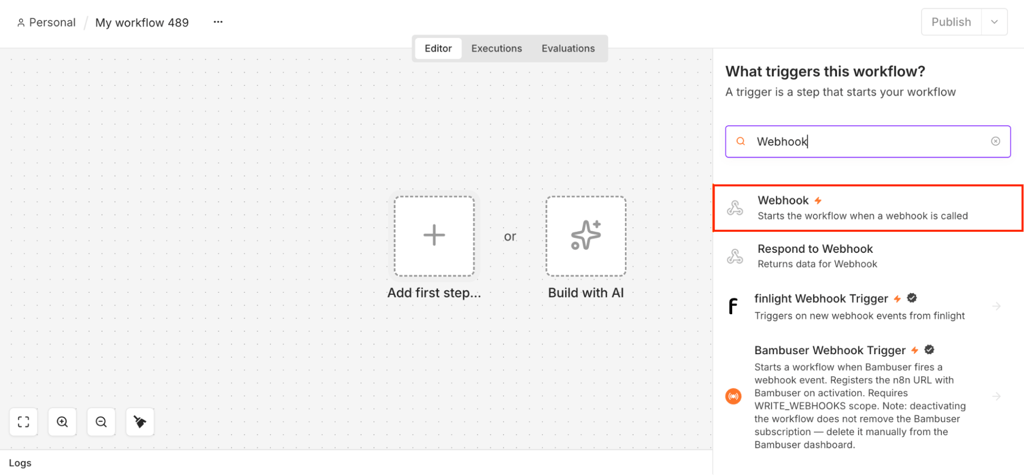
- Set HTTP Method to POST.
- Under Webhook URLs, select Production URL.
- Confirm that the generated URL starts with https://, then copy it.
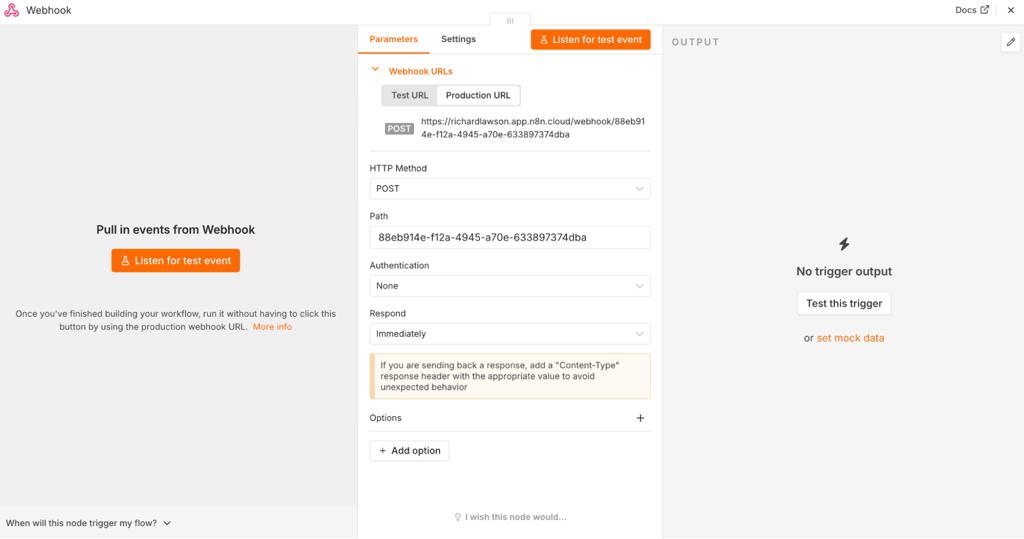
- Select Publish to activate the production webhook.
n8n also provides a Test URL, but it only listens for incoming requests for 120 seconds after you select Listen for test event. Use the Production URL so your workflow can continue receiving email events after you publish it.
These settings meet Agentic Mail’s basic webhook requirements because it uses POST requests and requires a publicly accessible HTTPS webhook URL.
n8n returns HTTP 200 by default when the webhook runs successfully, so you don’t need to configure a separate success response.
3. Register the webhook URL in the mailbox settings
Register the webhook URL by opening your email provider’s webhook or integration settings, pasting the URL you created earlier, and saving the configuration.
This tells your provider where to send email data when a new message arrives. If your provider asks you to select an event, choose the event for incoming emails.
Follow these steps to register the webhook URL in Agentic Mail:
- In Hostinger dashboard, go to Emails → Mailboxes next to your domain, then open Agentic mail → Webhooks.
- Select Add webhook.
- Choose the mailbox you want to monitor.
- Paste the Production URL you copied earlier into the Webhook URL field.
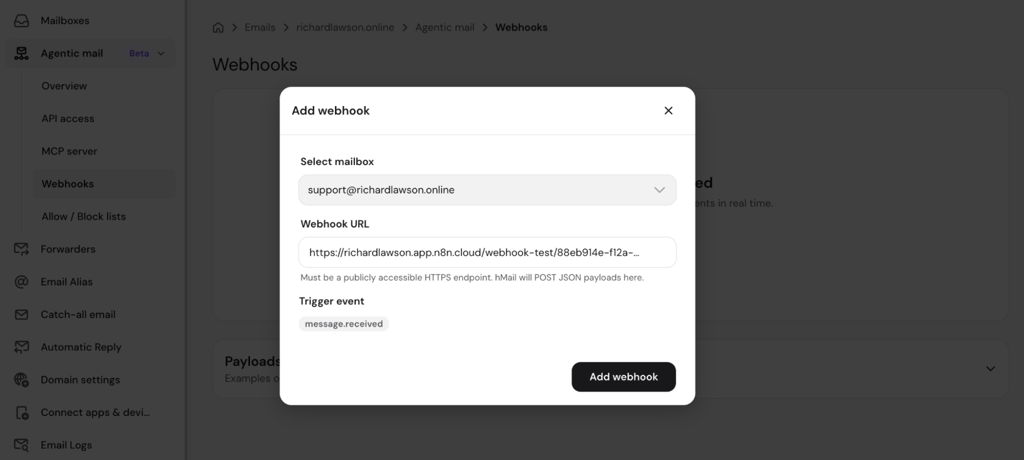
- Click Add webhook.
- Copy the webhook secret when Hostinger displays it and store it securely. Hostinger only shows this secret once.
After you save the webhook, Agentic Mail sends a request to your registered webhook URL whenever the selected mailbox receives a new email.
4. Send a test email to trigger the webhook
Send a test email to the mailbox connected to your webhook, then check your automation tool to confirm that it received the event. Here’s how:
- From another email account, send a message to the mailbox connected to the webhook. Use a recognizable subject, such as Webhook test, so you can identify the message easily.
- Open your n8n workflow and go to Executions.
- Open the latest execution and confirm that the Webhook node ran successfully.
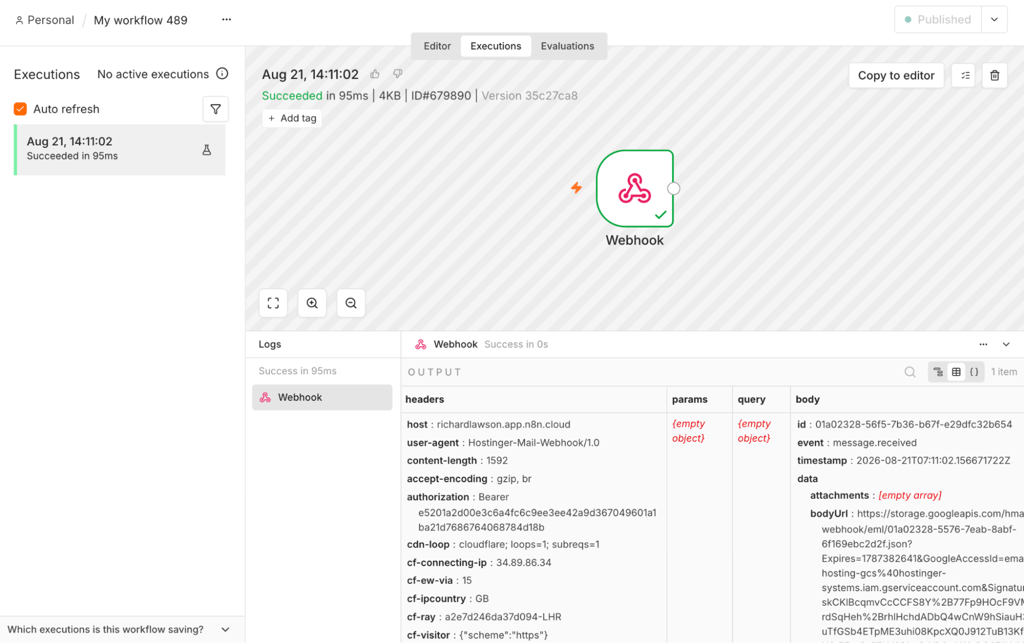
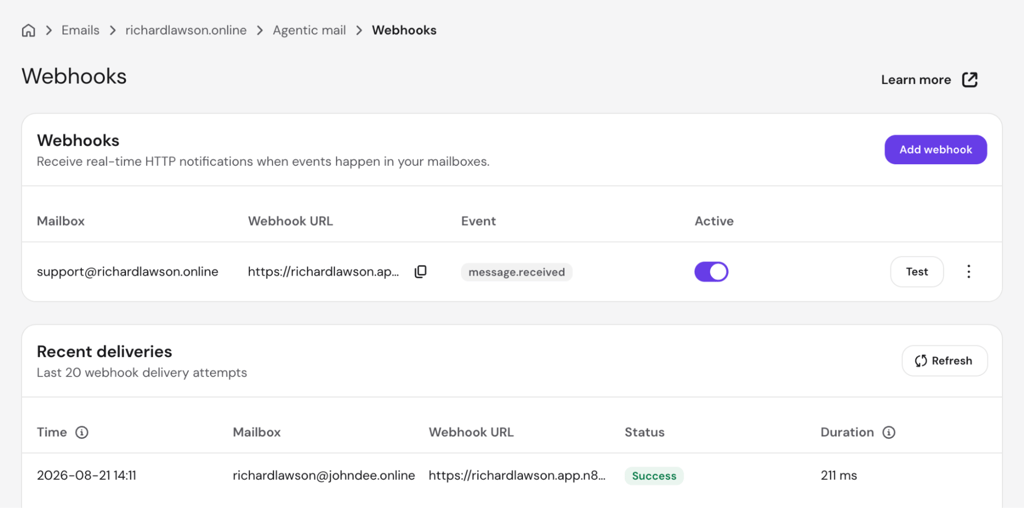
You can also use Agentic Mail’s built-in webhook test to check the connection without sending an email. Go to Agentic Mail → Webhooks, then click Test.
Check Recent deliveries to view the request status and confirm that your webhook returned a successful response.
5. Filter incoming email events when needed
Filter incoming email events by adding conditions so only relevant messages continue through your workflow.
Even with a dedicated mailbox, you may still receive messages you don’t want to process automatically. You can filter them by details such as the sender, domain, or subject.
To filter incoming email events in n8n:
- Add an If node after the Webhook node.
- Select a field from the webhook data you received, such as the sender or subject.
- Choose a matching condition, such as is equal to, contains, or ends with.
- Enter the value you want to match. For example, use @customer-domain.tld to filter by sender domain or support to filter by a subject keyword.
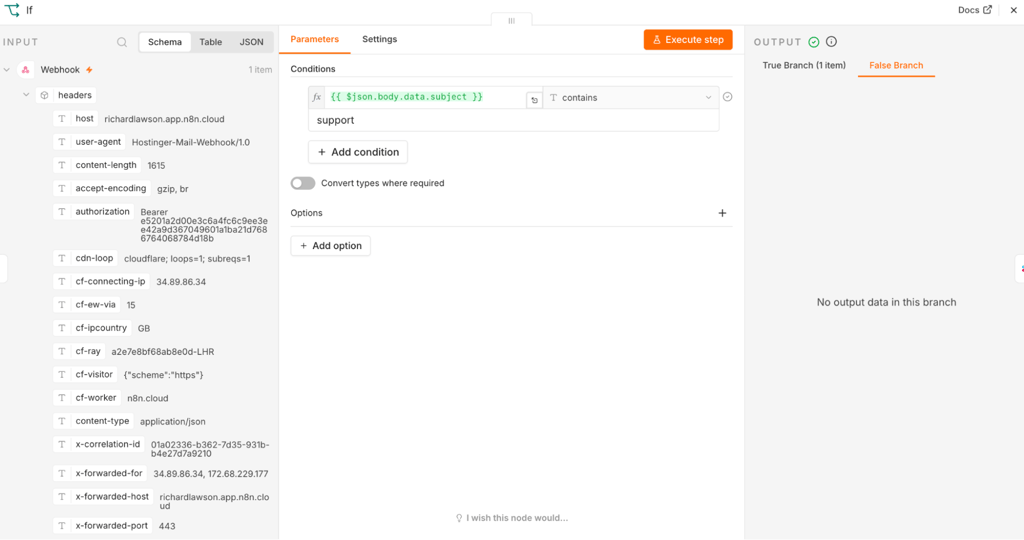
Keep in mind that every new message in the monitored mailbox still triggers the webhook. The If node only determines which events continue through your n8n workflow.
After you set the filter, send another test email that should be excluded. Then open the latest run in Executions and confirm that the If node sends it to the false output.
6. Use the email data in the next workflow action
Map the fields from the webhook payload into the parameters of the next node, so the action can use the details of the message that passed your filter.
For example, here’s how to send the email sender and subject to a Slack channel in n8n:
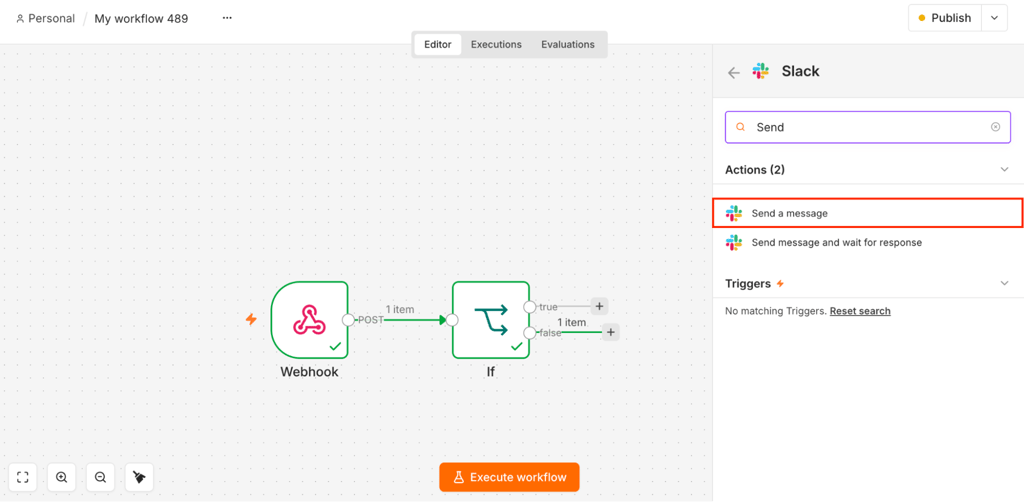
- Add a Slack node to the true output of the If node.
- Select Send a message as the action.
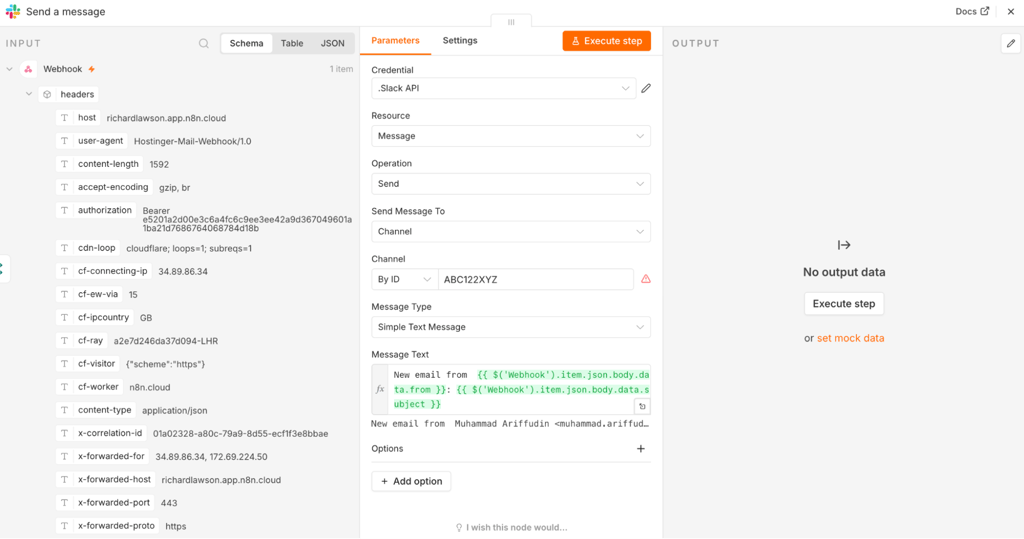
- Select your Slack account, or connect it if you haven’t already.
- Under Send Message To, select Channel, then choose the Slack channel where you want to receive the notification.
- Keep Message Type set to Simple Text Message.
- In Message Text, enter your notification and add the sender and subject from the incoming email. For example: New email from [sender]: [subject].
- Republish your n8n workflow.
- Send another test email that matches your filter, then confirm that the notification appears in Slack.
Why use webhooks for incoming email automation?
Using webhooks for incoming email automation lets your email service trigger a workflow as soon as a new message arrives instead of repeatedly checking the inbox for updates.
This is useful for time-sensitive tasks such as creating support tickets, notifying your team about new leads, or starting an automated reply workflow.
Webhooks also reduce unnecessary requests because your email provider sends data only when an event occurs. This differs from polling, where an app checks for updates at regular intervals.
You can send these events to automation platforms, apps, or custom services that support webhooks.
What is the difference between email webhooks and API polling?
The main difference between email webhooks and API polling is how quickly your workflow receives updates.
Webhooks send data when a new email event occurs, while polling checks for updates at set intervals, which delays detection until the next check.
| Aspect | Email webhooks | API polling |
| How it works | The email provider sends data to the webhook endpoint when an event occurs | The automation app requests data from the email provider at set intervals, even when nothing has changed |
| Timing | Near real time | Delayed until the next scheduled check |
| Data access | The provider determines what data is included in the webhook payload | The automation app requests available data from the API |
| Setup | Requires webhook support and a public HTTPS endpoint | Requires API access and a polling schedule |
| Best for | Workflows that need to react quickly to new events | Periodic checks or synchronization |
The available delivery methods also depend on your email provider. Platforms like Hostinger Agentic Mail and Robotomail both support webhooks for incoming messages, but differ in polling options. This can affect how you design the connection between the mailbox and the application processing new messages.
Webhooks are usually the better choice when a new email should trigger an action right away. API polling still makes sense when your email provider doesn’t support webhooks or when periodic checks are enough.
In that case, you can connect n8n to an API and request email data on a schedule.
What are common email-to-webhook use cases?
Common email-to-webhook use cases include routing support requests, adding leads to a customer relationship management (CRM), notifying your team, handling bookings, processing verification emails, and starting AI workflows.
- Support email automation. An email sent to a support inbox can trigger a workflow that creates a ticket or routes the request to the right team. For example, your workflow can assign the ticket to a specific queue or flag urgent requests for faster handling.
- Email to CRM. A sales inquiry can trigger a workflow that creates or updates a lead in your CRM without manual data entry. The webhook supplies the details to fill in, such as the sender’s address, the subject line, and the time the message arrived.
- Email to Slack or Discord. Selected incoming emails can trigger notifications in Slack or Discord. This works well for messages that need quick attention, such as new leads, urgent support requests, or important account notifications.
- Booking automation. Reservation or meeting request emails can start a workflow in your booking or scheduling system. The workflow can use the email details to create a booking, request missing information, or notify the person responsible.
- Verification email processing. A dedicated mailbox can receive verification codes or confirmation links, and your workflow can extract them the moment they arrive. This keeps automated sign-ups and account checks moving without someone opening the inbox.
- AI agent email workflows. An incoming email can start an AI workflow that classifies or summarizes the message, extracts information, routes it, or drafts a reply. For example, n8n can send relevant email data to an AI model and use the result in later workflow actions.
How do you secure an email-to-webhook connection?
To secure an email-to-webhook connection, protect the webhook endpoint, verify incoming requests, keep your tokens out of reach, and limit how much sensitive email data you share with connected apps.
Because webhook URLs are publicly accessible, anyone who knows the URL can try to send data to it. Your workflow should only process requests that pass your authentication and validation checks.
- Use an HTTPS endpoint. HTTPS encrypts webhook data while it travels between your email provider and the receiving application. This helps protect message content, sender details, and other sensitive information in transit.
- Verify incoming webhook requests. Use your email provider’s authentication method to confirm that each request comes from the expected source. Agentic Mail sends its webhook secret as a Bearer token in the Authorization header. Compare the incoming token with the one you copied when creating the webhook, and reject requests that don’t match.
- Protect webhook secrets and credentials. Keep webhook secrets, API tokens, and other credentials out of source code, workflow descriptions, screenshots, and logs. Store them using your automation platform’s credential or secret management features. Regenerate a webhook secret if you suspect it has been exposed.
- Validate incoming data before using it. Check that the request contains the event type and fields your workflow expects before using the data in another action. Treat email content as untrusted input even after you verify the webhook request. This is especially important when the content reaches an AI agent, where instructions hidden in the body can redirect what the agent does.
- Share only the data and access your workflow needs. Send connected apps only the email fields they need. For example, a Slack notification may only need the sender and subject instead of the full message or its attachments. Give connected accounts access only to the mailboxes and actions the workflow needs.
- Filter unwanted incoming email. Use your email provider’s sender controls, or filter messages in your workflow before they reach sensitive actions. In Hostinger Mail, you can use the incoming Block list in Webmail or Hostinger dashboard to reject known unwanted senders or domains. Use the Allow list when the mailbox should accept email only from approved senders.
Common problems when connecting email to a webhook
Most email webhook problems fall into four cases: the event never arrives, the workflow fails after receiving it, the same event is processed more than once, or the response takes too long.
The basic troubleshooting method is the same for all of them. Trace the process and find where it stops or starts behaving unexpectedly.
- No webhook event arrives. Confirm that the email reached the correct mailbox. Then check your email provider’s webhook delivery history to see whether it tried to send the event. When no delivery appears, check the selected mailbox and confirm the webhook’s Active toggle is on. When the provider shows a failed delivery, use the reported status or error to check the webhook URL, authentication, or endpoint availability.
- The event arrives, but the workflow fails. A successful webhook delivery means the connection works, so check what happens after the event reaches your automation. In n8n, open the failed run in Executions and find the first node with an error. Common causes include missing email data, a filter that doesn’t match as expected, expired credentials, or a connected app rejecting the request.
- The workflow runs more than once. Check whether your email provider sent the same event multiple times or whether different events created separate workflow runs. Webhook retries can cause duplicate notifications, tickets, or other actions. When your provider includes a unique message or event ID, use it to identify events you’ve already processed.
- The webhook takes too long to respond. Check the delivery history to confirm that your email provider reports a timeout. In n8n, open the Webhook node and check the Respond setting. Set it to Immediately so n8n acknowledges the webhook as soon as it arrives instead of waiting for later nodes to finish.
After you make a change, send another test email and compare the webhook delivery status with the workflow execution. This helps you confirm that you fixed the underlying problem rather than just moving the error elsewhere.
How can email webhooks trigger AI agent workflows?
Email webhooks can trigger AI agent workflows by sending incoming email data to an AI model or agent, which can analyze the message and decide what happens next.
This is useful when simple conditional filters aren’t enough or when different types of emails should follow different workflow paths based on context.
In n8n, you can pass the email data to an AI model and use its response to decide which path the workflow should take. For example, ask the AI to determine whether a support request is urgent based on the message content, then route it accordingly.
You can also use OpenClaw when you want an AI agent to handle email tasks without building each action as a separate node, as you would in a typical n8n setup.
Instead, you can tell OpenClaw what you want it to do through prompts and let it handle the email based on your instructions. On Hostinger, you can connect Agentic Mail to OpenClaw so the agent can read, send, and manage emails.
All of the tutorial content on this website is subject to Hostinger's rigorous editorial standards and values.

Ariffud is a Technical Content Writer with an educational background in Informatics. He has extensive expertise in Linux and VPS, authoring over 200 articles on server management and web development. Follow him on LinkedIn.