How to Create Tables in WordPress Using the Block Editor, Plugins, and External Sources
Dec 22, 2025
/
Jordana A.
/
7 min Read
With over a billion active websites today, providing users with a positive experience is crucial to stay competitive. One effective way to achieve this is by optimizing your website’s content readability.
Tables greatly improve information readability, especially if your WordPress site has long paragraphs and complex data. They offer an efficient way to organize and display data, making it easier for users to navigate and understand.
This article will guide you through the step-by-step process of creating tables in WordPress, providing insights into various plugins and methods. Discover the benefits of using tables on your WordPress site and how to effectively leverage them.
How to Add Tables in WordPress
There are three ways to create tables in WordPress ‒ using the block editor, installing table plugins, or importing tables from external sources. We’ll explore these three methods in detail, so feel free to choose the one that best suits your needs.
How to Create Tables in WordPress Using the Block Editor
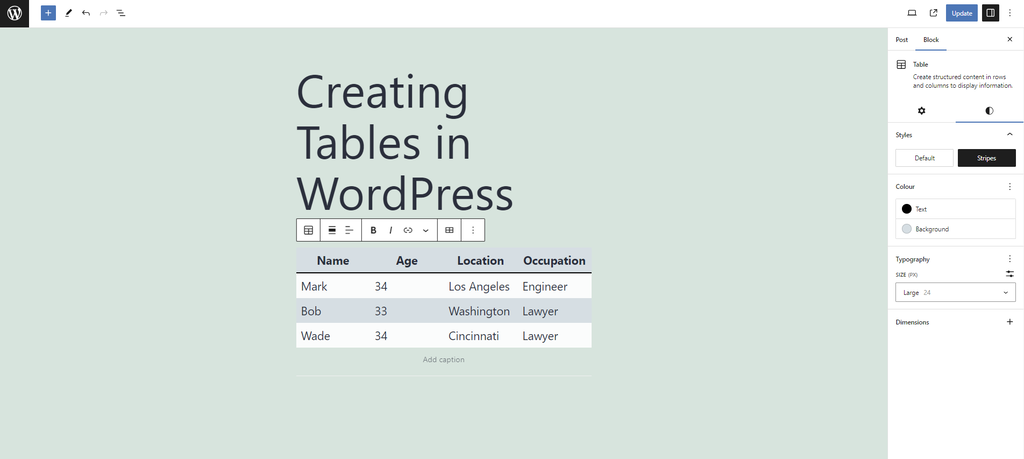
The default Gutenberg block editor is more than enough for creating simple WordPress tables. With the table block, you can add tables directly from the editor to WordPress posts and pages.
Here are the steps for creating a table in WordPress using the block editor:
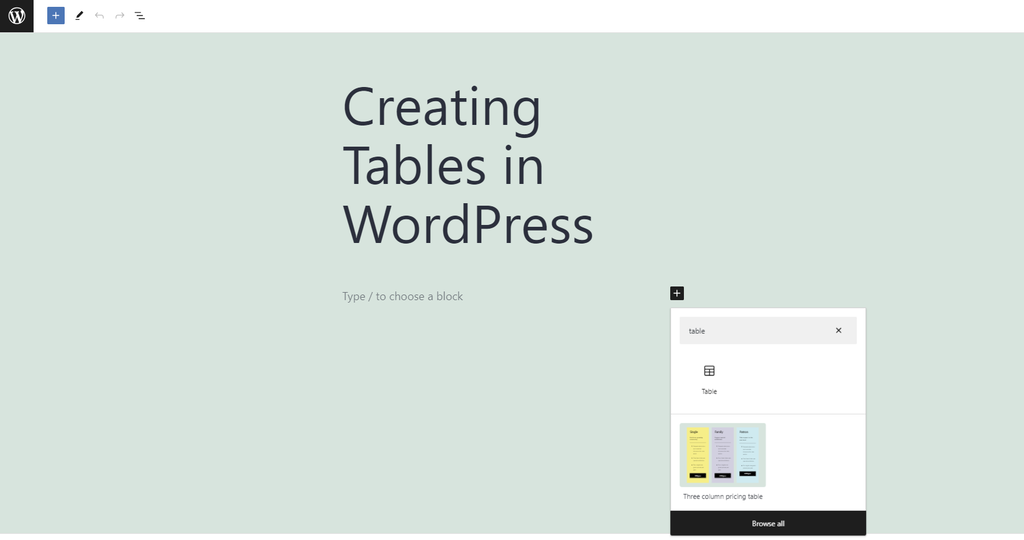
- Log into your WordPress dashboard and head to Posts → Add New.
- Once you’re redirected to the content editor, hit the (+) symbol and select the WordPress Table block.
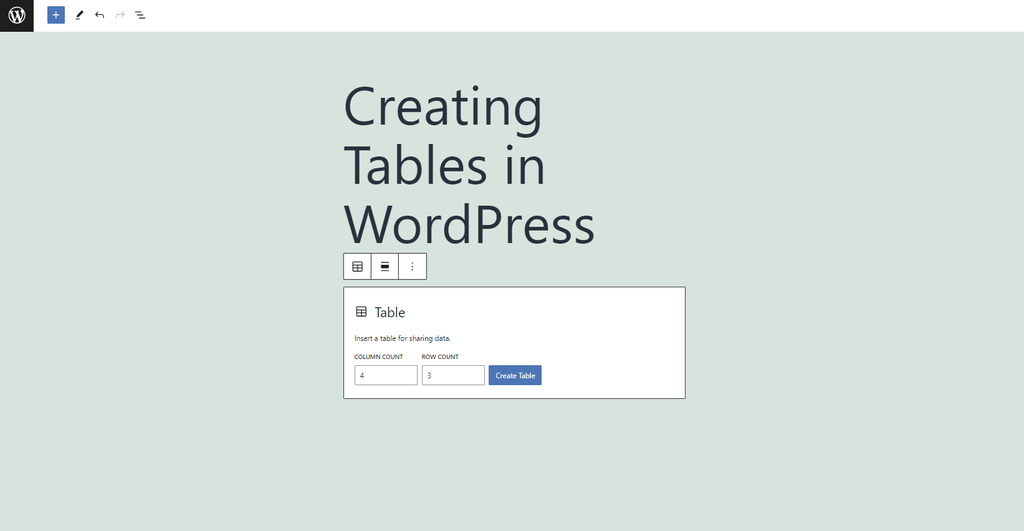
- Enter the number of rows and columns and hit Create Table. You can add more or remove rows and columns later.
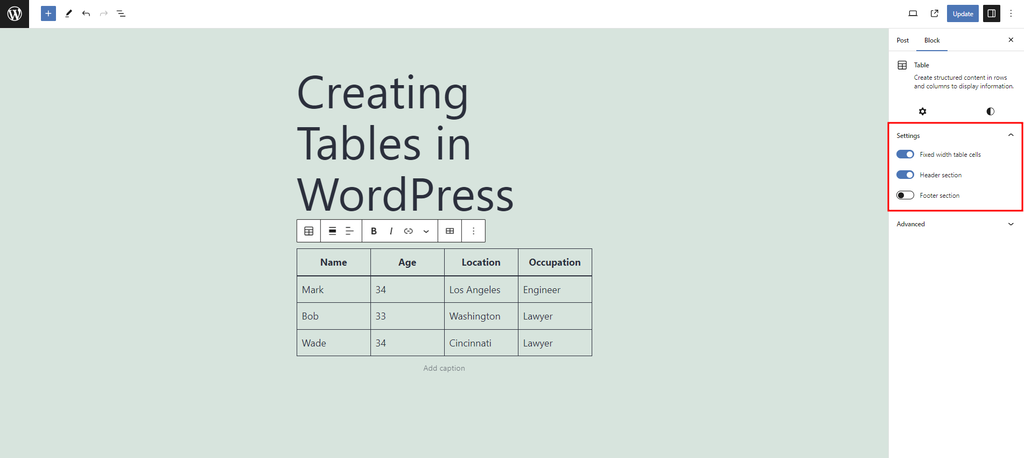
- As you populate the table with data, WordPress will automatically resize the cells accordingly. If you prefer the table cells to have a fixed width, toggle the Fixed width table cells setting in the sidebar. You can also activate the header and footer sections if needed.
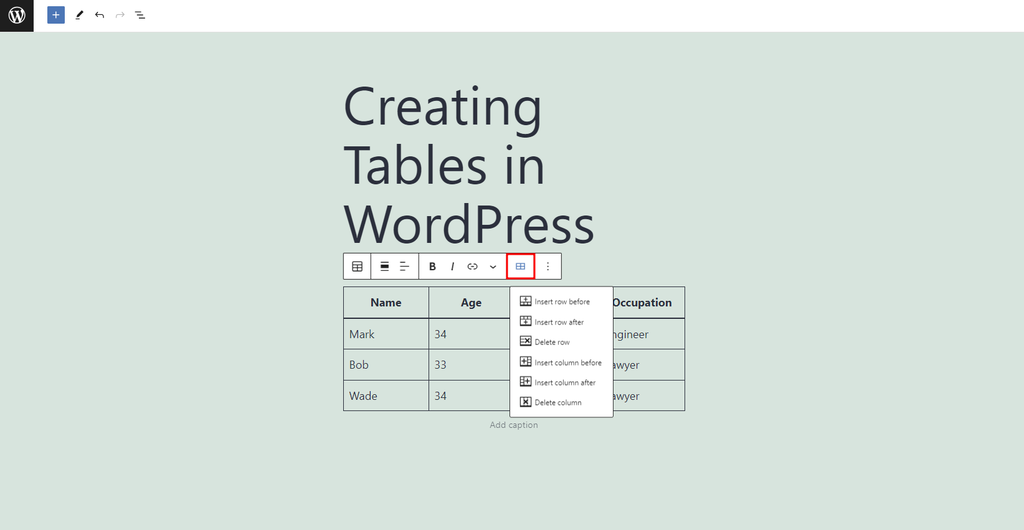
- To change the table’s layout, move your cursor to the desired cell and select Edit Table in the block toolbar. You can insert or delete rows and columns before or after the appointed cell.
- Open the Styles tab in the sidebar and adjust the settings for Styles, Colour, and Typography. Align the table’s style with your website’s design and color scheme for consistency. Other table settings, like column alignment and text styles, are available in the block toolbar.
Although this is the easiest method, it doesn’t create mobile-friendly tables. When a table exceeds the visible area on mobile devices, WordPress adds a horizontal scroll bar below it.
Moreover, tables created with the Gutenberg editor lack advanced features such as custom sorting, filtering, and visualization.
For more features and customization, check out the other methods using a WordPress table plugin or importing from external sources.

How to Add Tables in WordPress Using a Plugin
WordPress table plugins offer advanced features for creating complex tables with ease. They also support advanced customizations, making styling tables in WordPress simpler.
Choosing the right table plugin for WordPress can be difficult. Luckily, we have compiled some of the best WordPress table plugins to narrow your search:
- Ninja Tables ‒ supports various types of SEO-friendly table templates.
- WP Table Builder ‒ provides a drag-and-drop table builder with a cell management mode.
- TablePress ‒ a popular freemium plugin that lets you create and manage tables in a spreadsheet-like interface.
- Easy Pricing Tables ‒ best for creating responsive tables in WordPress eCommerce sites.
- Visualizer ‒ offers responsive and animated charts with cross-browser compatibility.
Looking for More Options?
Explore other recommended table plugins for WordPress, along with their notable features and pricing. All plugins listed on our list are compatible with the latest WordPress version and well-maintained by their developer team.
The following tutorial will show you how to create a table in WordPress using the free version of TablePress:
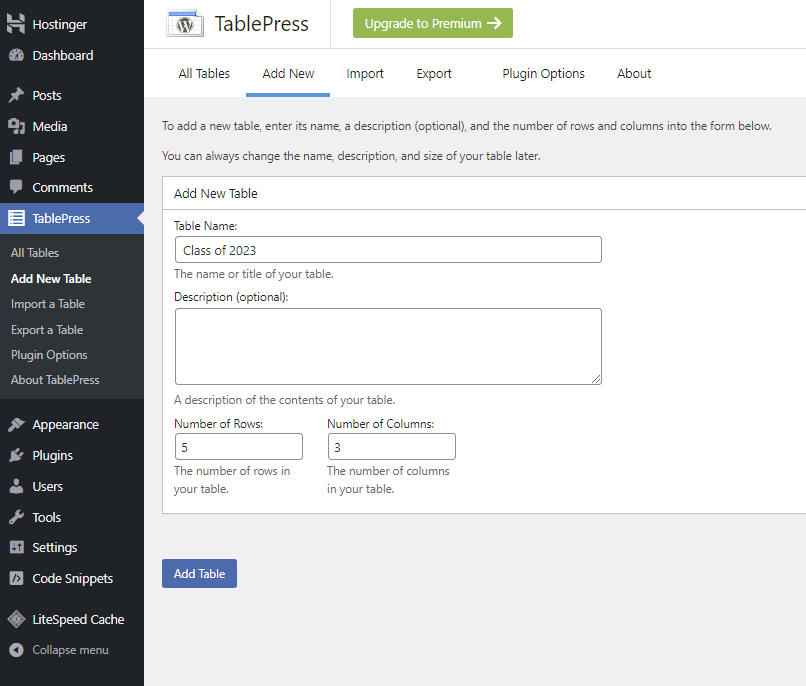
- Install and activate TablePress from your WordPress dashboard. Use other plugin installation methods if you don’t have access to the admin area.
- Head to TablePress → Add New, then enter all the necessary information to create a new table. Hit Add Table.
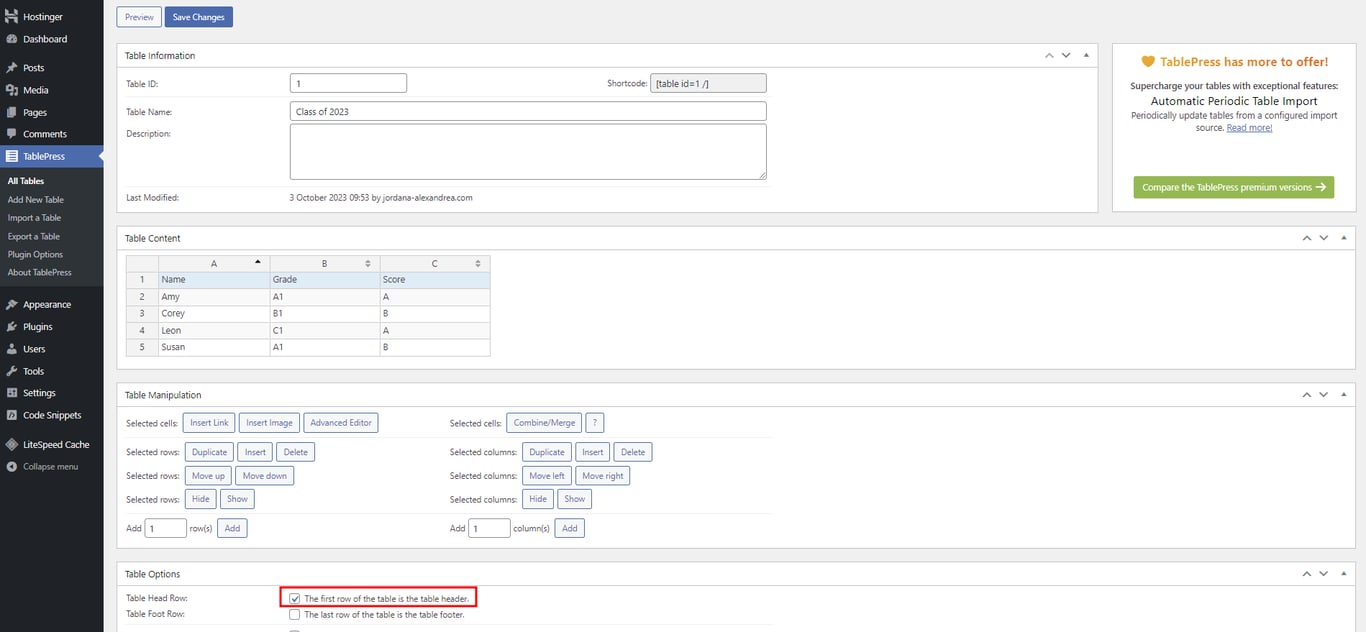
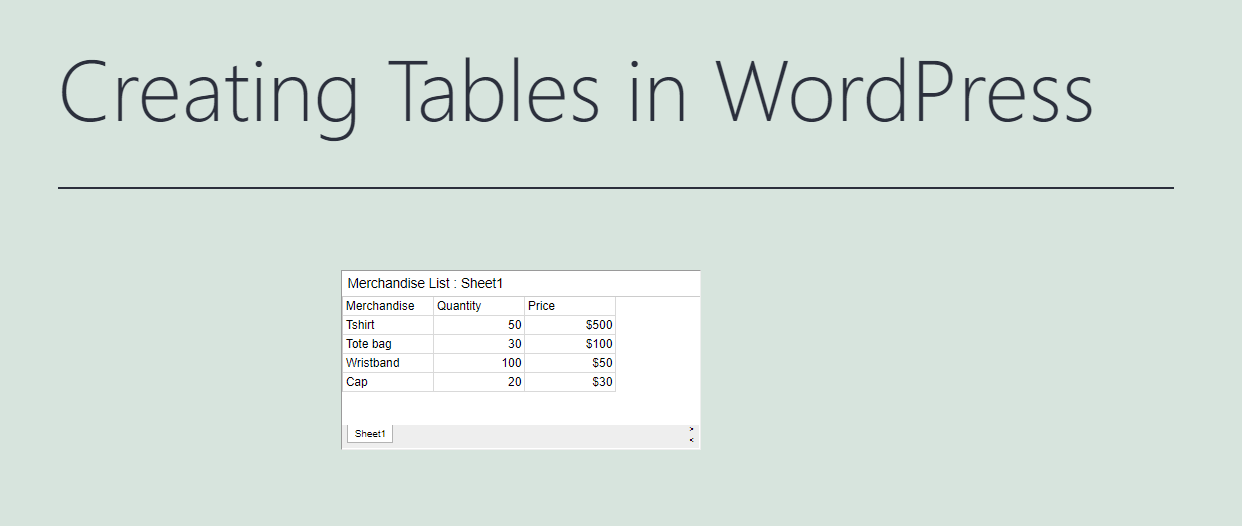
- Once the table is ready, start populating it with data. Add column titles to the first row of the table and fill the rest of the cells with content. Check the Table Head Row option to convert the table’s first row as a header.
- Select the arrows above the table columns to sort your data alphabetically or numerically.
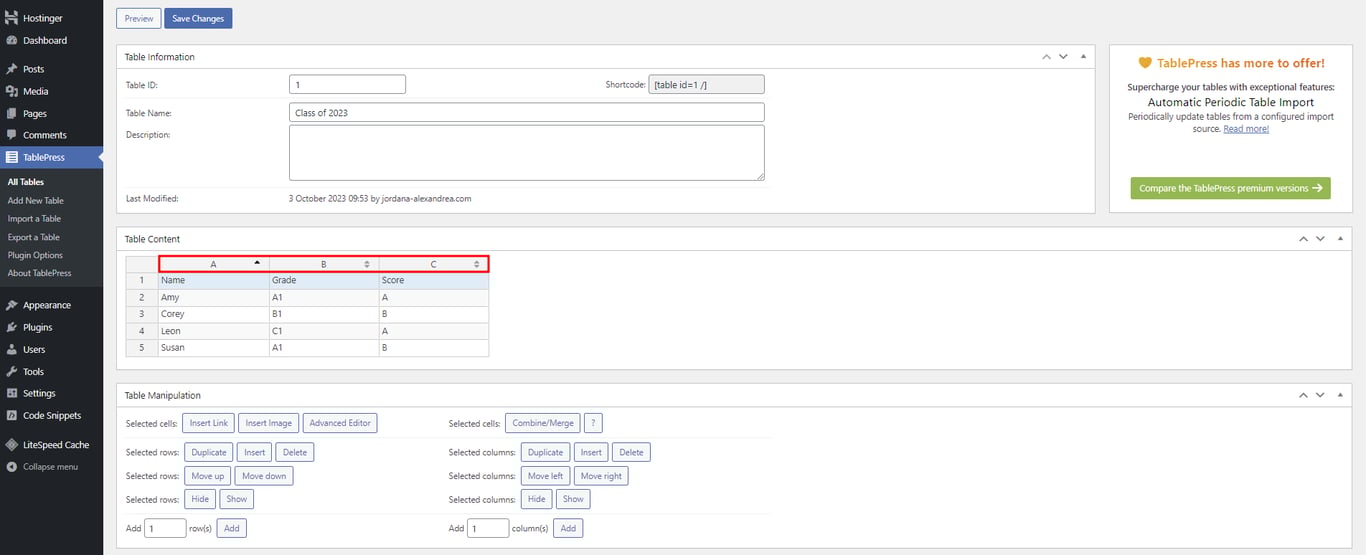
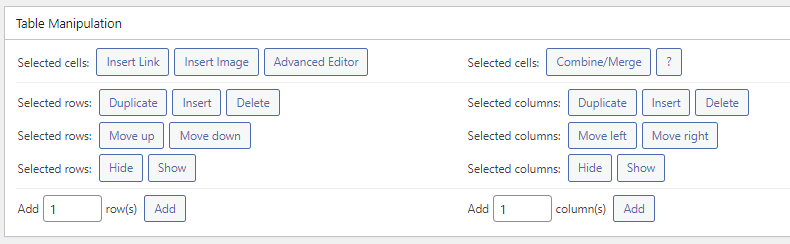
- The Table Manipulation section contains commands to change the table’s layout. You can also hide, merge, and add rows, columns, as well as links.
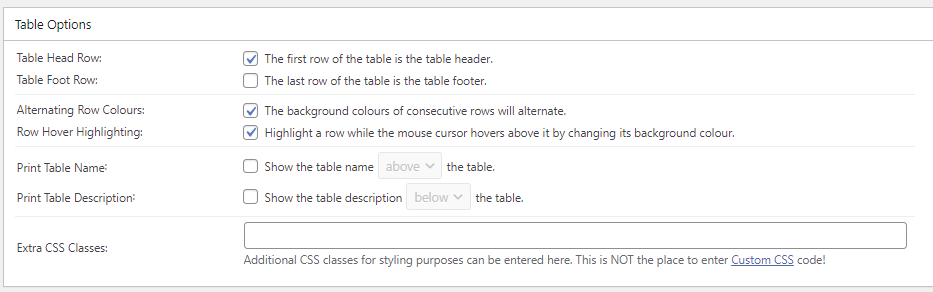
- The Table Options section contains additional table customization settings. Here, you can set the header and footer area, change the background color, and add custom CSS for styling.
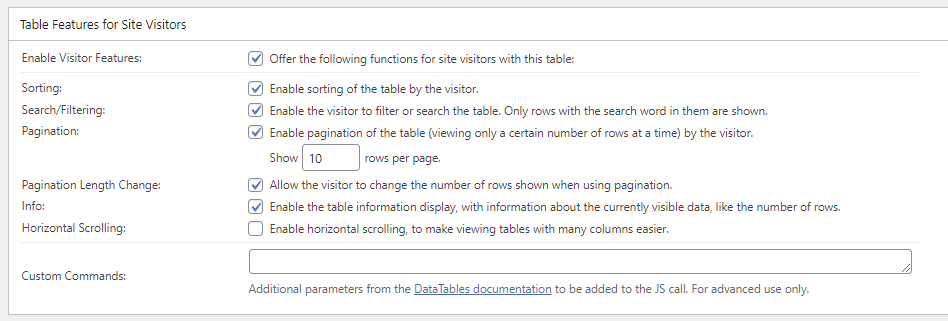
- The Table Features for Site Visitors section lets you have an interactive table, allowing users to sort, filter, and change the number of rows shown. Consider enabling these features to enhance your data’s readability and overall user experience.
- Once you’re done customizing the table, select Save Changes.
- Copy the shortcode in the Table Information section and head to the WordPress editor. Paste the shortcode in your chosen post or page using the shortcode block, and save the changes.
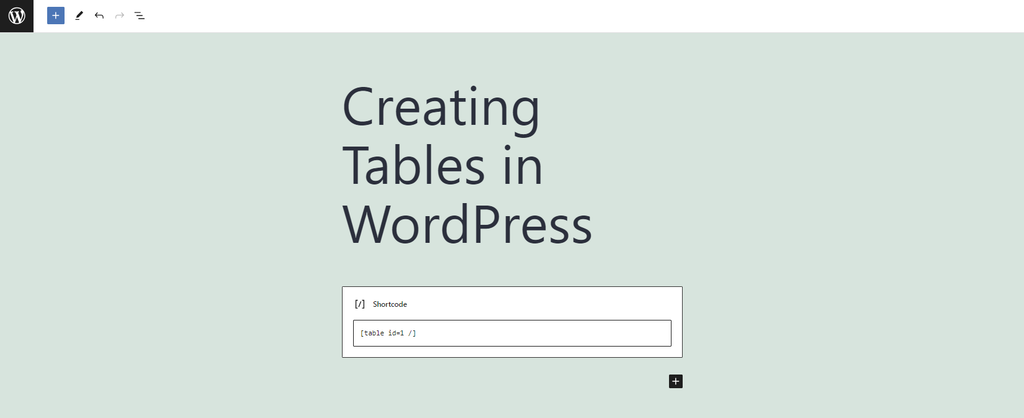
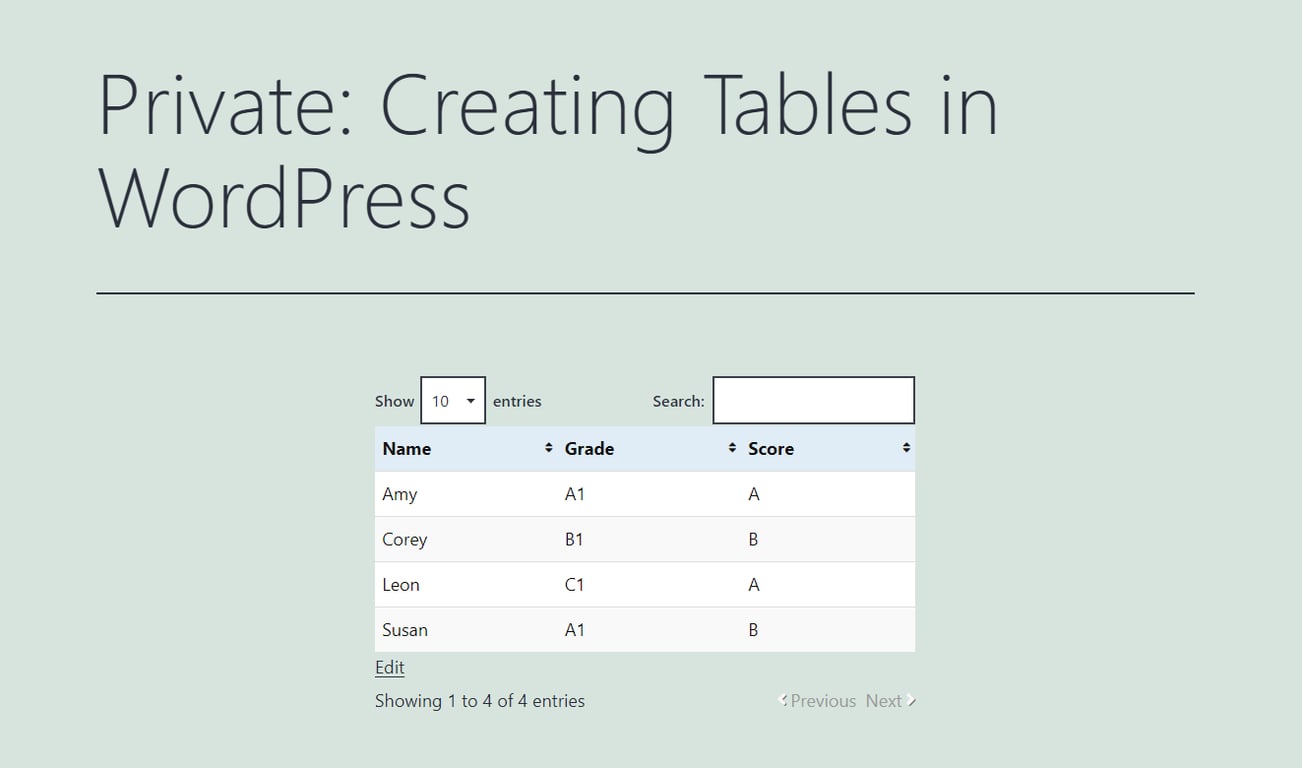
- Here’s what the table looks like:
Improve User Experience Even Further
Deliver an even better user experience by switching to Hostinger’s plans. All plans include WordPress auto-updates, LiteSpeed Cache, and WooCommerce optimization.
How to Insert Tables in WordPress From External Sources
The previous methods work for tables with small datasets. If you work with larger amounts of data, importing from another source can save you time. This method allows you to utilize other platforms for data processing and collaboration, boosting productivity and efficiency.
Instead of replicating the table manually, you can compile the data on your preferred platform and display it on your WordPress site. Here’s how to import an existing table from Google Sheets to WordPress:
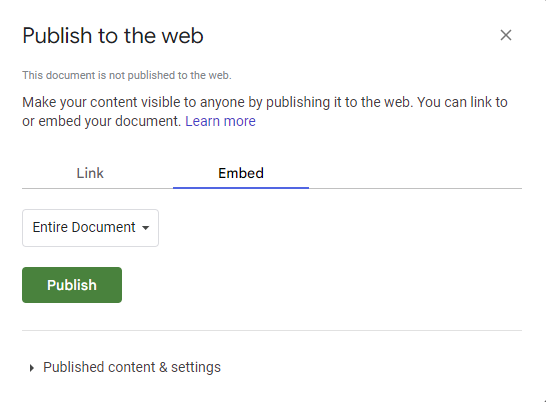
- Open your spreadsheet and select File → Share → Publish to web.
- Switch to the Embed tab and choose whether to import the entire spreadsheet or a specific sheet. Check the automatic republish setting under the Published content and settings section, then hit Publish.
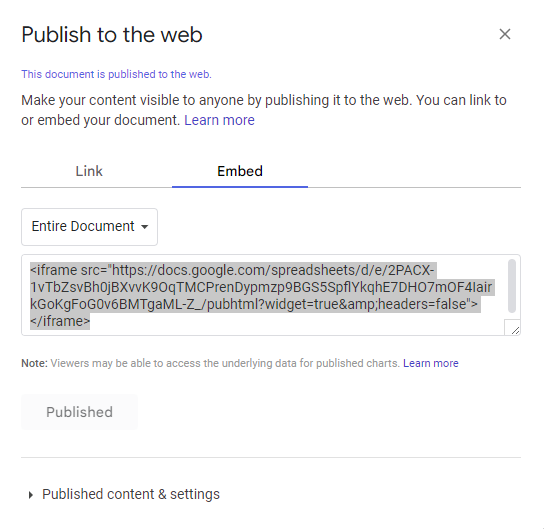
- Google Sheets will generate an iFrame code to embed the table. Copy this code and navigate to your WordPress dashboard.
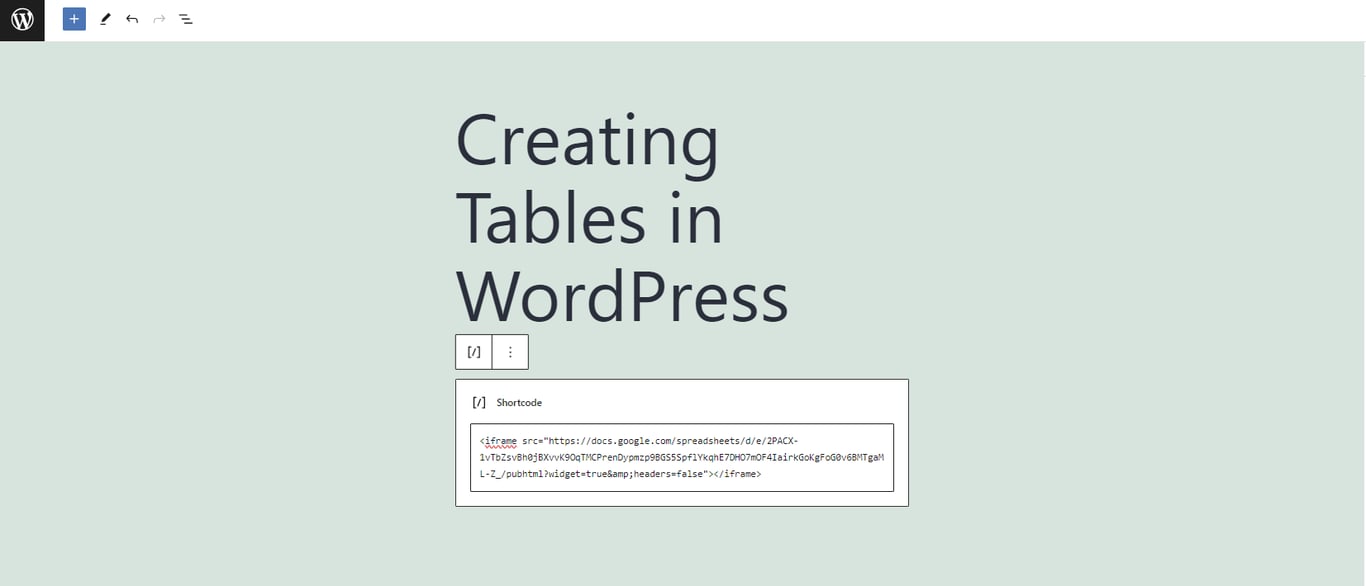
- Open the page or post where you want to display the table and add the code using the Shortcode block.
- If you want to customize the table size, add custom HTML code before the closing tag. The following code snippet sets the table’s dimensions to 400 px wide and 200 px tall. Keep in mind that text formatting, like size and color, should be done in the spreadsheet.
<iframe src="https://docs.google.com/spreadsheets/d/e/2PACX-1vTbZsvBh0jBXvvK9OqTMCPrenDypmzp9BGS5SpflYkqhE7DHO7mOF4IairkGoKgFoG0v6BMTgaML-Z_/pubhtml?widget=true&headers=false" style="height:200px;width:400px"></iframe>
- Once you’re done, click Update. Here’s what our imported table looks like:
While this method saves you the trouble of installing a WordPress plugin, it doesn’t support live data updates. If the data in the spreadsheet changes, you will need to republish the WordPress data table.
With most WordPress table generators available today, you have the option to import datasets from multiple sources, including direct upload and URL. Here’s how to upload a table in CSV format to WordPress using the TablePress plugin:
- Head to TablePress → Import a Table from your WordPress dashboard.
- Select File Upload as the import source and drag and drop your table file to the available field. Hit Import.
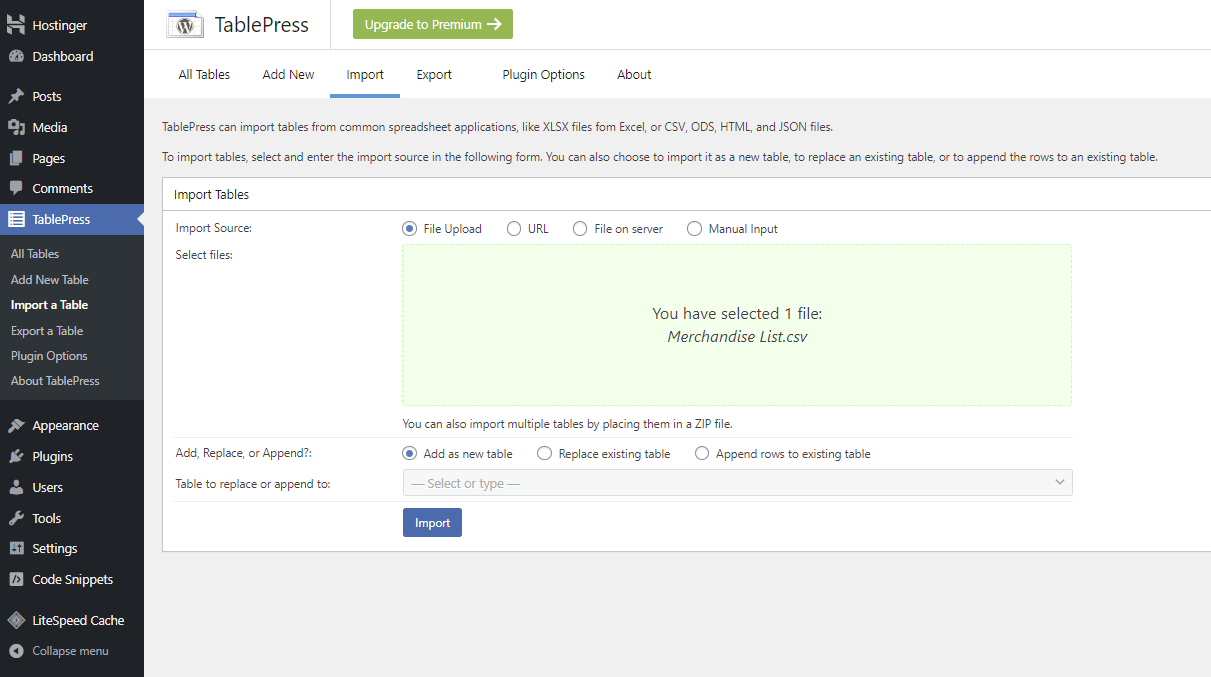
- Adjust the settings in the Table Options and Table Features for Site Visitors sections as needed and click Save Changes.
- Copy the table’s shortcode and place it anywhere on your site using the Shortcode block.
The free version of TablePress doesn’t support live data updates. Consider upgrading to Pro for $79/year to get this functionality, which makes maintaining dynamic tables much easier. You can also get other premium features, like individual column filtering and automatic table export.
Why Use Tables in WordPress?
Tables in WordPress are a powerful tool for improving the functionality and user experience of your website. Here are some common reasons why you should consider embedding tables:
Enhanced Content Readability and Organization
Tables provide a clear structure for presenting information, making complex ideas visually appealing and easier to digest.
Easy Comparison and Data Analysis
The structured layout of tables makes it easier to identify patterns, differences, and relationships within data. They allow readers to quickly analyze and draw conclusions from the data.
Better Visual Appeal and Structure
Tables break up text and make articles appear more organized, making your content more engaging and professional.
Where Can WordPress Tables Be Used?
Here are examples of where WordPress tables can benefit you.
Pricing Tables for eCommerce or Service-Based Websites
Pricing tables in eCommerce sites allow customers to quickly compare products and make informed purchasing decisions. Similarly, service-based websites can use pricing tables to showcase different service packages to educate clients and promote transparency.
In both cases, tables enhance user experience, encourage conversions, and foster trust by presenting product pricing in an organized and accessible manner.
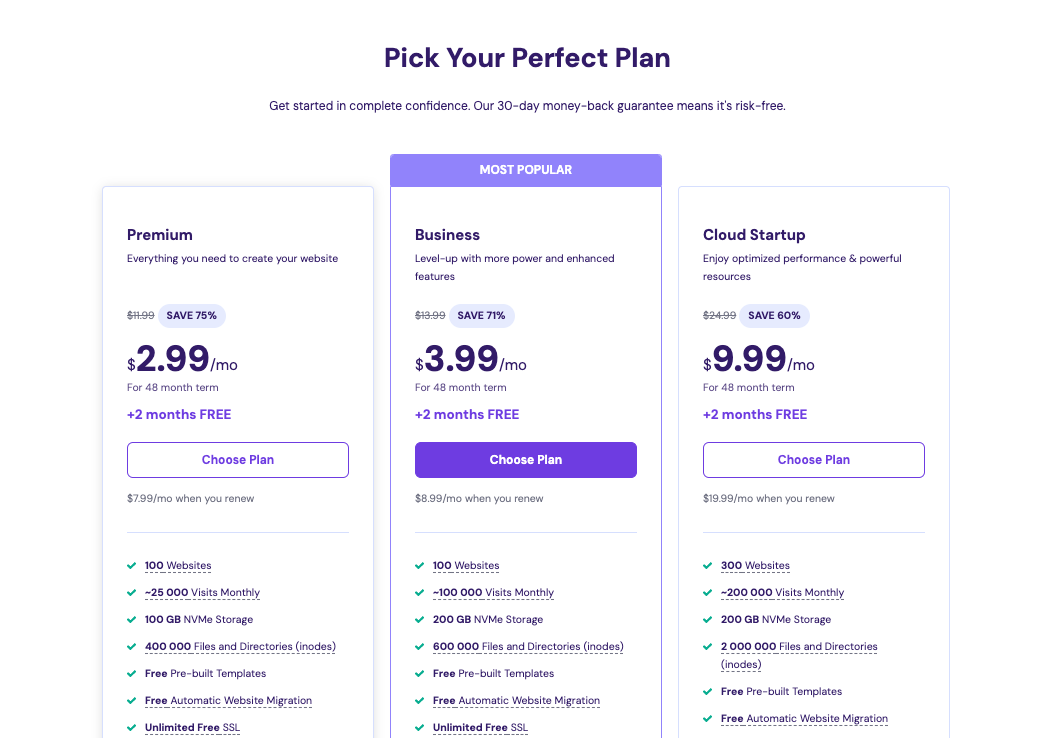
For example, Hostinger uses tables to compare the pricing of our hosting services. Here’s what the pricing table for hosting plans looks like:
Product or Feature Comparison Tables for Businesses
Comparison tables in WordPress offer users an efficient way to evaluate multiple options side by side, helping them make informed choices based on their needs and preferences.
This type of table simplifies the decision-making process, minimizes decision fatigue, and enhances the overall user experience.
Whether you’re selling products or services, this WordPress table formatting can highlight key features, pricing, and benefits to improve user satisfaction and conversion rates.
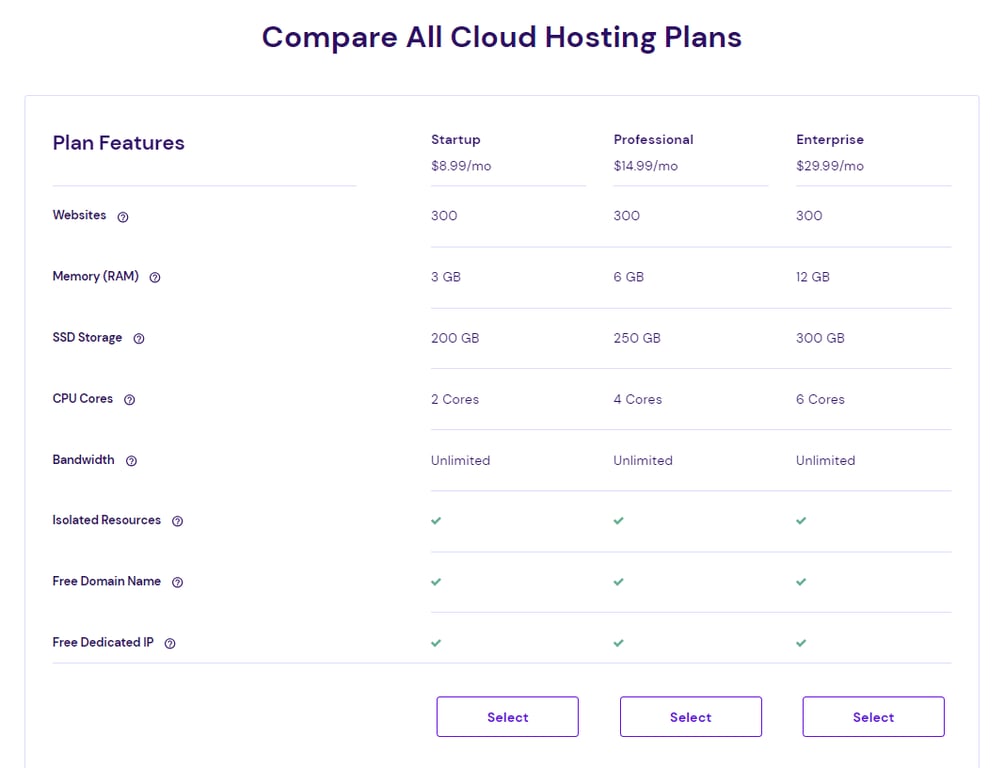
Here’s an example of a comparison table for Hostinger’s cloud hosting services:
Data Tables for Presenting Statistics or Research Findings
Data tables provide a structured format that makes complex information like scientific research, survey results, or market data easy to understand. This type of table helps visualize trends and key insights, allowing users to conclude and make decisions based on the processed data.
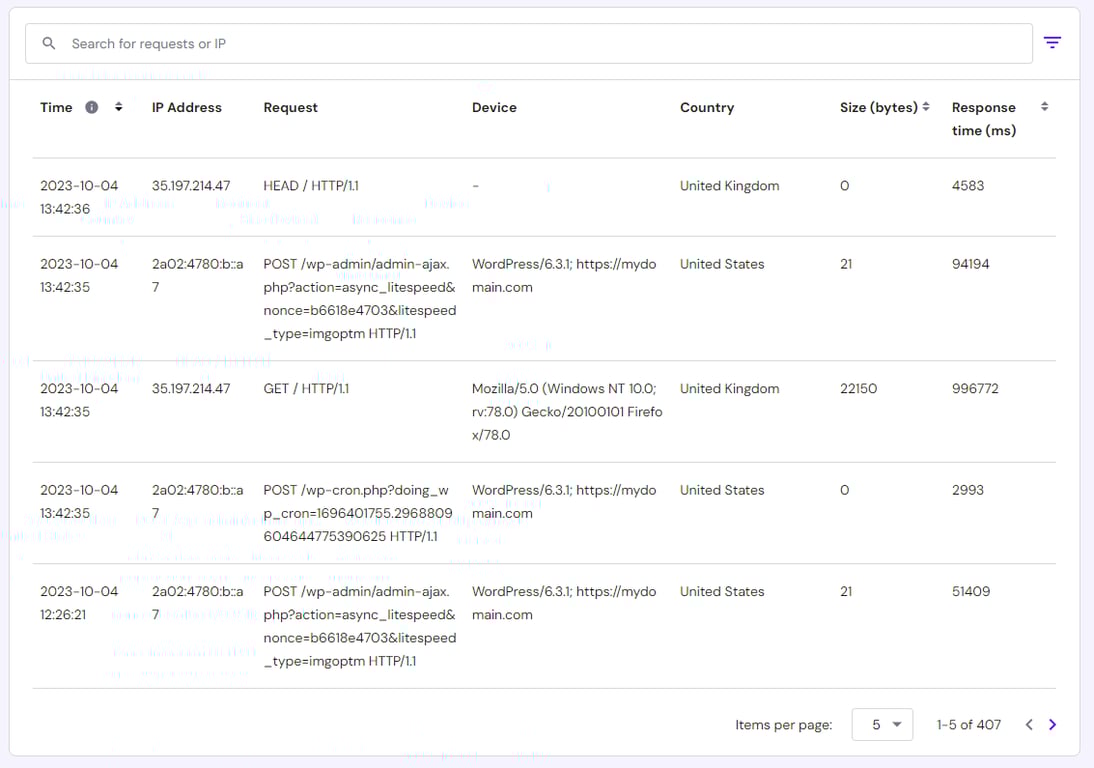
Here’s an example of a data table in hPanel presenting access logs:
Conclusion
Optimizing content readability is crucial for a positive user experience. Tables are essential to content readability as they simplify data presentation and analysis, enhance visual appeal, and facilitate information scanning.
Let’s recap the three effective ways to create WordPress tables:
- Using table tools in the Gutenberg block editor.
- Using a table builder plugin.
- Importing tables from external sources.
We hope this article helps you better understand how to create tables in WordPress. If you still have questions, check out our FAQ section or drop them in the comments section below. Good luck!
Discover Other Ways of Making the Most Out of Your WordPress Website
How to Add WordPress Table of Contents
How to Speed Up a WordPress Website
WordPress SEO Tips
How to Improve WordPress Security
WordPress Hosting vs Web Hosting
Tables in WordPress FAQ
This section answers some of the most common questions about embedding tables in WordPress.
How Can I Create Tables in WordPress Without a Plugin?
You can import tables from external sources or use the Table block in the WordPress block editor. Keep in mind that using a plugin may offer more customization and advanced functionality.
Can I Customize the Appearance of Tables in WordPress?
The WordPress table customization tools are available in the block editor. If you insert tables from external sources in iFrame format, you can add HTML style attributes to the code to resize them. Meanwhile, plugin-based tables can be customized through the plugin’s settings.
Why Is My Table Not Displaying Correctly in WordPress?
Table display issues in WordPress can result from HTML errors, plugin or theme conflicts, or theme limitations. To fix this issue, check the table’s code for errors, deactivate conflicting plugins, or consider a theme better suited for tables.
All of the tutorial content on this website is subject to Hostinger's rigorous editorial standards and values.

Jordana is a Senior Content Writer with a background in Information Systems. She has over five years of experience in WordPress and is casually dabbling with PHP and MySQL. Her passion for writing and technology drives her to create tutorials for anyone wanting to build their online presence. Follow her on LinkedIn.


