How to block emails on different email clients
May 22, 2026
/
Jordana A.
/
10 min Read
There are many reasons to create an email account – from personal to business purposes. However, the constant flow of spam and unsolicited messages can hinder effective email communication.
Fortunately, most email clients allow users to block unwanted emails from specific senders easily. Besides enhancing communication, the block feature also improves security by preventing potential malicious software and phishing emails from reaching your inbox.
This article will cover the process of blocking unwanted emails on popular email providers, including Gmail, Hostinger Email, Thunderbird, and Apple Mail.
How to Block Emails
As each email client has its own settings, the methods for blocking unwanted messages may vary slightly. However, the general process involves adding the sender’s email address or domain to a block list.
Please note that blocking differs from filtering and unsubscribing. Blocking stops all future messages from a specific sender, whereas filtering sorts emails into folders based on rules you set for easier access.
Unsubscribing stops you from receiving marketing emails but doesn’t block the sender. Find unsubscribe links in email footers to opt out of mailing lists.
How to Block Emails on Gmail
Gmail provides two methods to stop unwanted emails ‒ blocking certain senders or entire domain names.
Blocking Unwanted Senders
This method is ideal for blocking unwanted emails from individual email addresses. Here’s how to do it on the Gmail web app:
- Access your Gmail inbox and open an email from the sender you want to block.
- Click More (three vertical dots icon) next to the Reply button and select Block “Sender”.
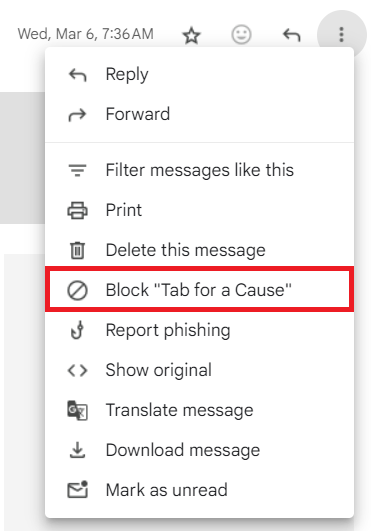
- A pop-up will inform you that Google will mark this sender’s incoming mail as spam. Click Block to confirm.
Follow the same steps to block an email address on the Gmail app.
Blocking Domain Names
Blocking email addresses doesn’t always work because spammers can easily create new ones. Luckily, Gmail lets you block an entire domain to stop all communications from that particular sender.
Follow these steps to block entire domains from reaching your inbox:
- After logging into your Gmail account, select Show search options on the right side of the search bar.

- Enter the domain name you want to block in the From field and click Create filter.

- Check the Delete it option to automatically delete emails from the targeted domain. Click Create filter to apply the rule to future messages.

Managing Filtered Emails and Blocked Senders
If you accidentally blocked an email or filtered out a domain, here’s how to undo it:
- Access Settings (gear icon) on the top toolbar and select See all settings.

- Open the Filters and Block Addresses tab to see all the blocked addresses and filtered domains.

- Select delete to remove the filter and hit unblock to allow emails from a previously blocked sender.
While Gmail allows up to 1,000 filtering rules, having too many of them can slow down your account. Regularly review and delete unnecessary filters for optimal performance.
Suggested Reading
Read our guide to integrating a custom domain with a Gmail account to benefit from the email client’s convenient interface.
How to Block Emails on Apple Mail
Setting up your email account on Apple Mail lets you use the blocking feature across all Apple devices. We’ll explore how to block unwanted emails on mobile and desktop.
Blocking Emails for macOS
Here’s how to block emails on the Mac Mail app:
- Open the email you want to block.
- In the message header, click on the dropdown menu next to their name.
- Select Block Contact.
Like other email clients, you can also create filters to block emails from specific senders automatically. Here’s how:
- Head to Settings (gear icon) → Rules.
- Select Add New Rule, then set its name, rules, and actions. Click Add to save it.
- Apple Mail only applies the first matching rule, so drag and drop your rules based on their priority. Click on a rule to modify or remove.
Blocking Emails for iPhone or iPad
Here’s what you can do to block email senders from the Mail app on iOS:
- Open the spam email you want to block on the Mail app.
- Tap the sender’s name in the message header and choose Block this Contact.
- Read the disclaimer and tap Block this Contact to confirm.

Follow these steps to manage your blocked senders list:
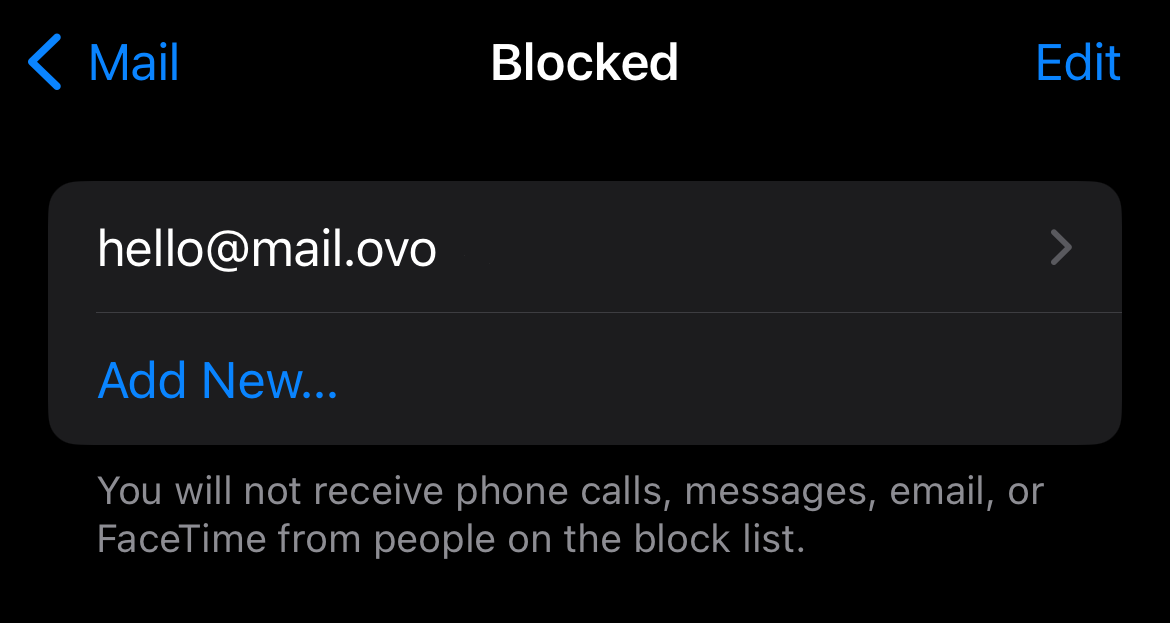
- Go to Settings → Mail on your iOS device.
- Access Blocked under the Threading section.
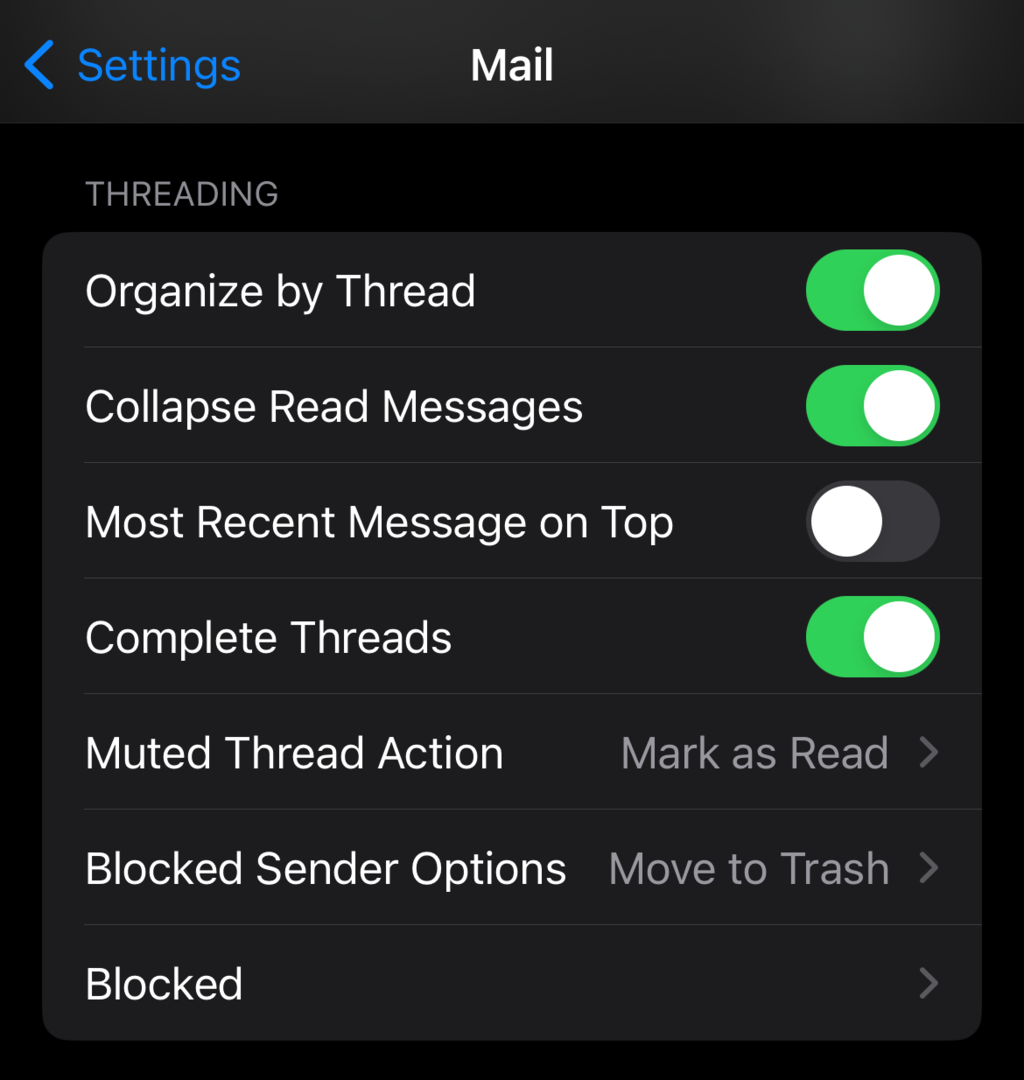
- Tap Edit to manage the blocked addresses or Add New.
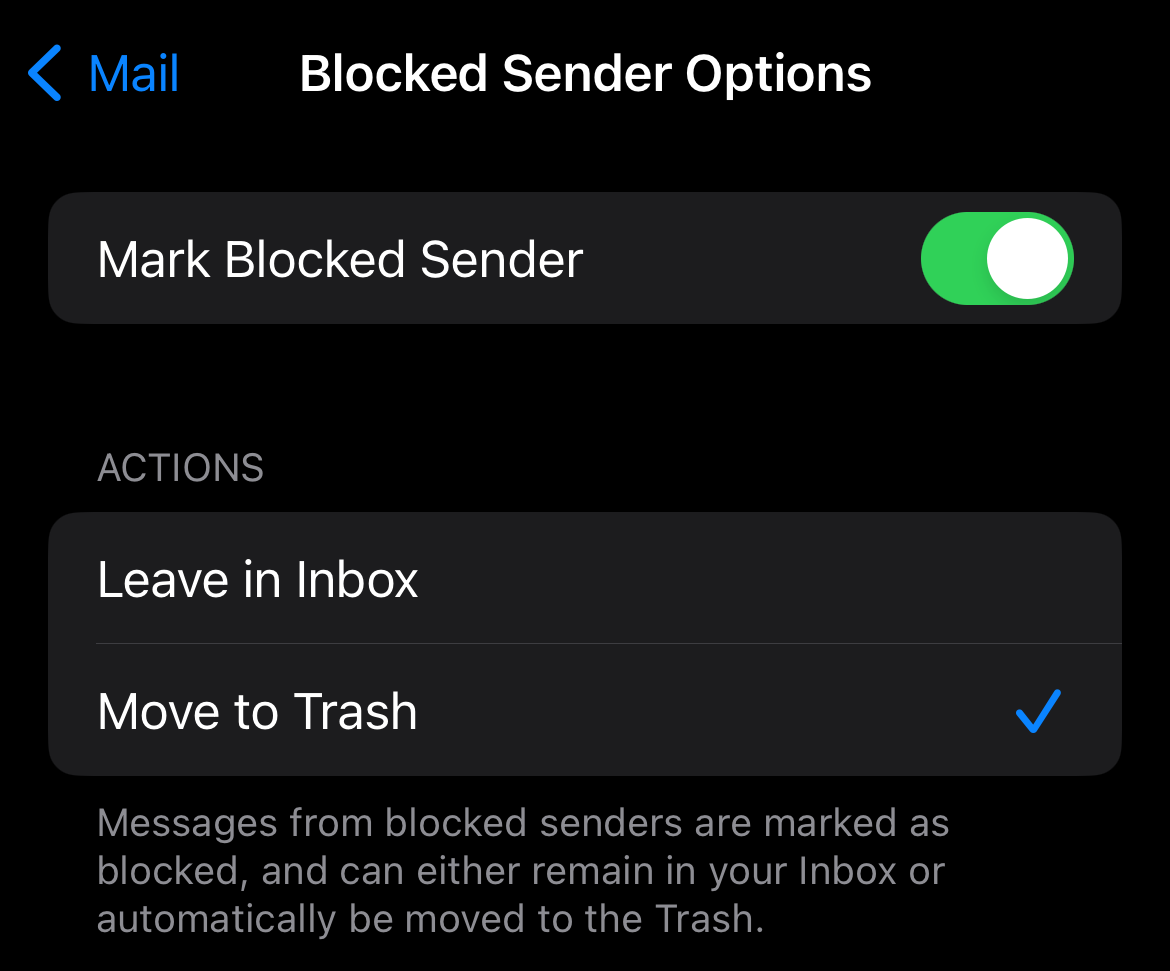
- To customize actions on blocked emails, go to Blocked Sender Options within the Threading section.
- Choose Move to Trash or Leave in Inbox.
How to Block Emails on Outlook
As part of the Microsoft Office Suite, Outlook provides the block functionality to enhance communication quality. Like other email clients, this email client lets you block unwanted emails from specific addresses and senders.
Blocking Unwanted Emails
Here’s how to stop receiving emails from a specific mail address on Outlook webmail and desktop app:
- Log in to your Outlook account and open the email from the sender you want to block.
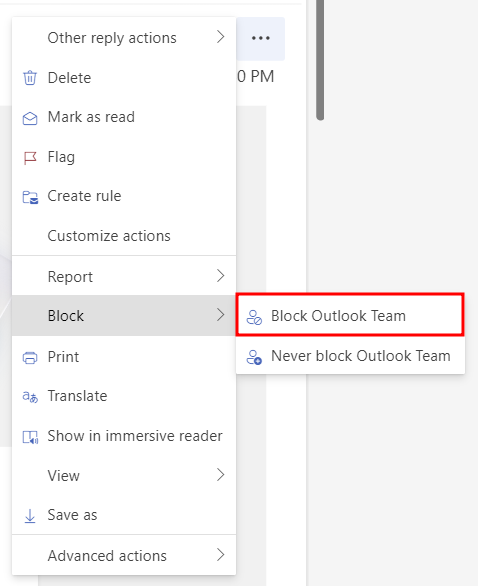
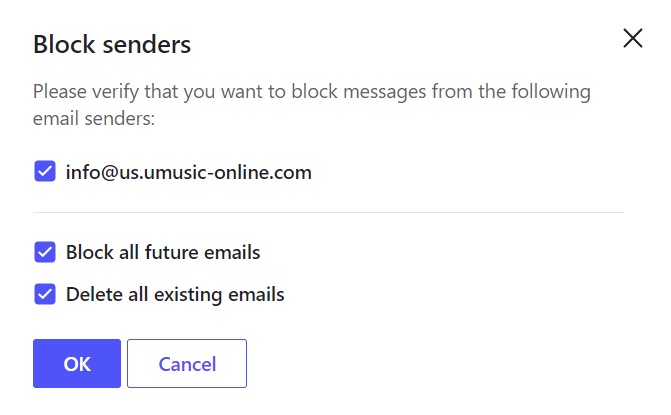
- Select More Actions (three horizontal dots icon) → Block → Block Sender.
Blocking Senders and Managing Block List
To block certain domains, you have to add them to the block list in Junk Mail. You can use the same steps to block emails and manage the blocked senders list.
Here’s how:
- Go to Settings (gear icon) in the top menu bar.
- Within the Mail section, open Junk Mail.
- Under Blocked senders and domains, click + Add.

- Enter the email addresses or domains that send spam to the blocked list.
- Once you’re done, click Save.
Outlook sets the maximum rule size at 256 KB per mailbox. As some rules can take more space than others, it’s best to manage the blocked senders list periodically and remove the ones you no longer need.
Do You Like Outlook’s Interface?
Check out our guide for instructions on setting up a custom email address on Microsoft Outlook.
How to Block Emails on Yahoo
Yahoo’s blocking method is similar to other email clients, allowing up to 1,000 blocked emails per account. However, free users can only block up to three domains. You can upgrade to Yahoo Mail Plus for $5/month to raise the limit to 500 domains per account.
Utilizing Email Blocker
Here’s how to block an email address on the web version:
- Log in to your Yahoo account and open the mail you want to block.
- Access More (three horizontal dots icon) and click Unsubscribe if it’s a marketing email or Block Senders to stop receiving all emails from that address.

- A pop-up will ask whether you wish to block the sender’s address and delete emails you have already received. Check the preferred options and click OK to confirm.
Implementing Sender Blocking
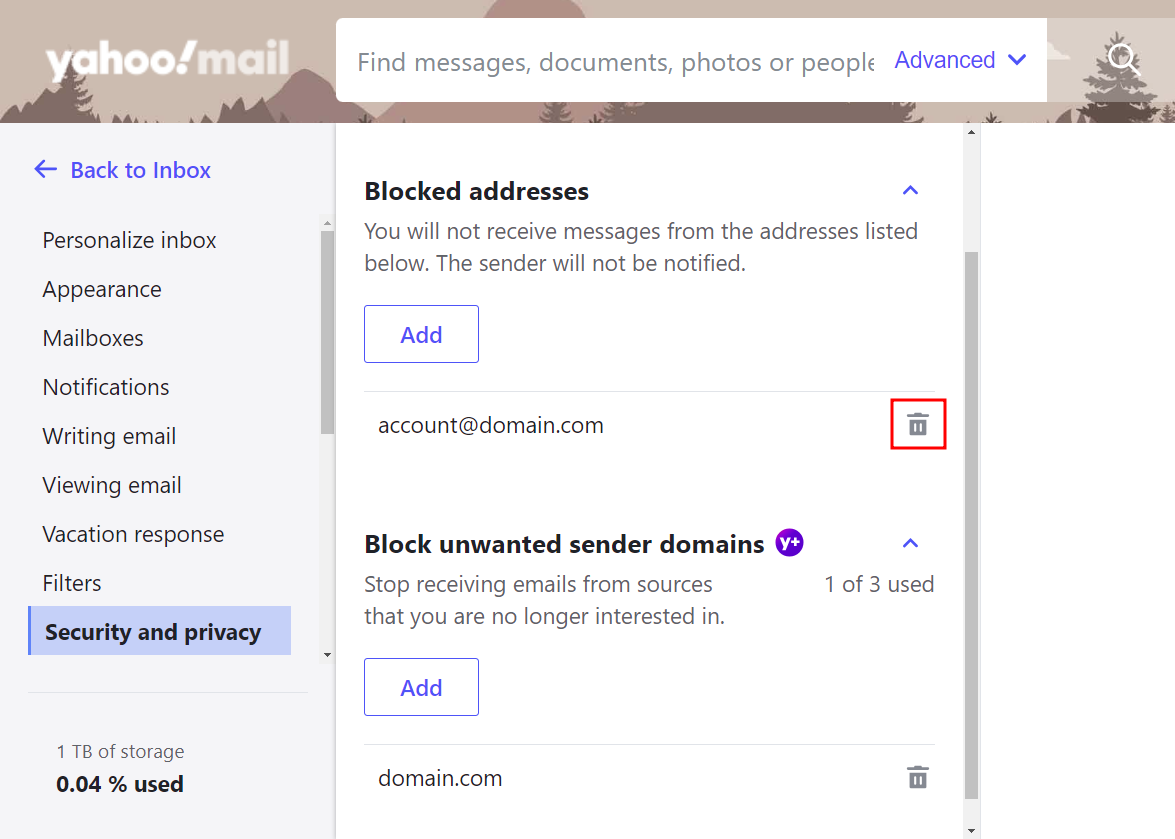
You can also add blocked addresses and domains to security settings. Here’s how:
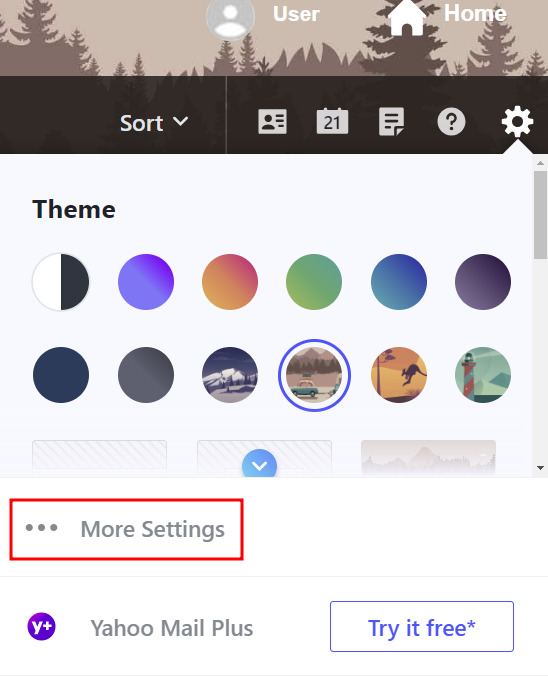
- Navigate to Settings (gear icon) → More Settings from the Yahoo dashboard.
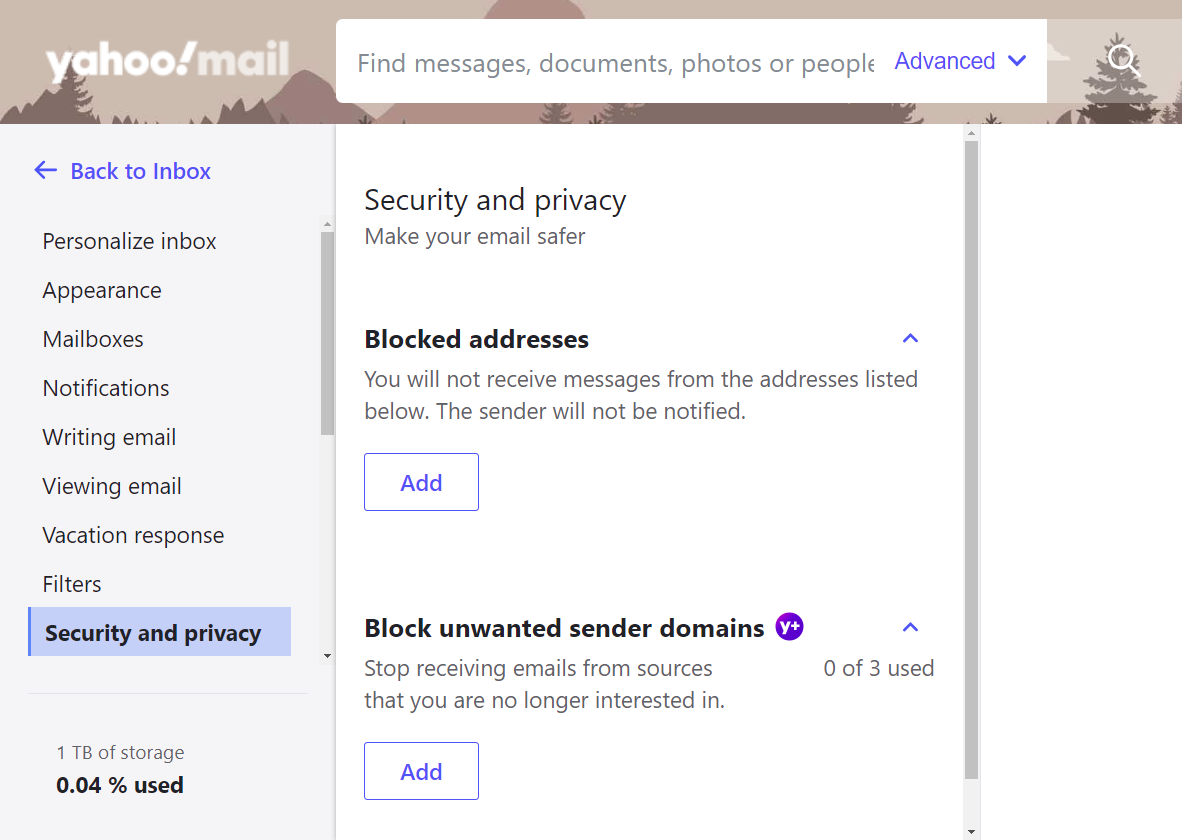
- Access Security and privacy and click Add under Blocked Addresses to target specific emails. Alternatively, add domains under Block unwanted sender domains to stop emails from specific resources.
- Yahoo’s block list lacks an editing feature. If you add the wrong address or domain, click on the trash icon next to it and repeat the steps.
How to Block Emails on Hostinger Email
Hostinger Email includes advanced spam-blocking tools alongside standard anti-spam measures. If you want to stop receiving emails from specific senders, create email filters to delete or redirect them to a separate folder.

Setting Up Email Filters
To set up email filters in Hostinger webmail for blocking unwanted emails and domains, follow these steps:
- Log in to hPanel and go to Emails → Email Accounts.
- Scroll down until you reach the Manage Email Accounts section. Hit Webmail next to your email address.

- Hostinger will redirect you to the webmail login page with the email address already filled in. Enter the password for the email account.
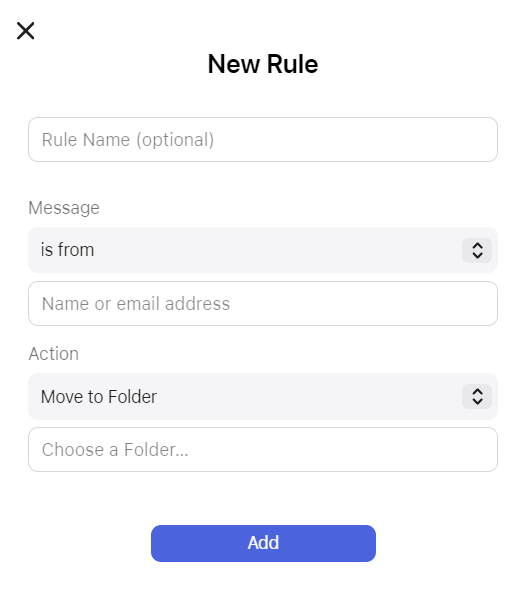
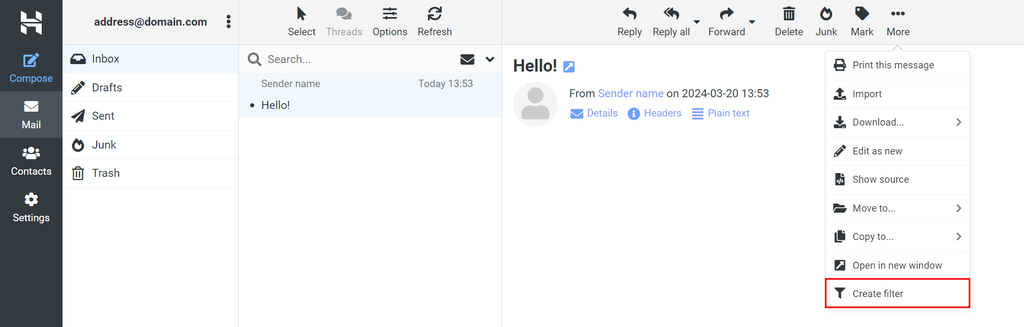
- Once you’re in the webmail dashboard, navigate to Mail → Inbox. Open the message you want to use as the filter basis and select More actions (three vertical dots icon) → Create filter.
- Decide whether to include the email’s subject along with the sender and recipient addresses in the filter settings using the toggle button. Click Next Step.
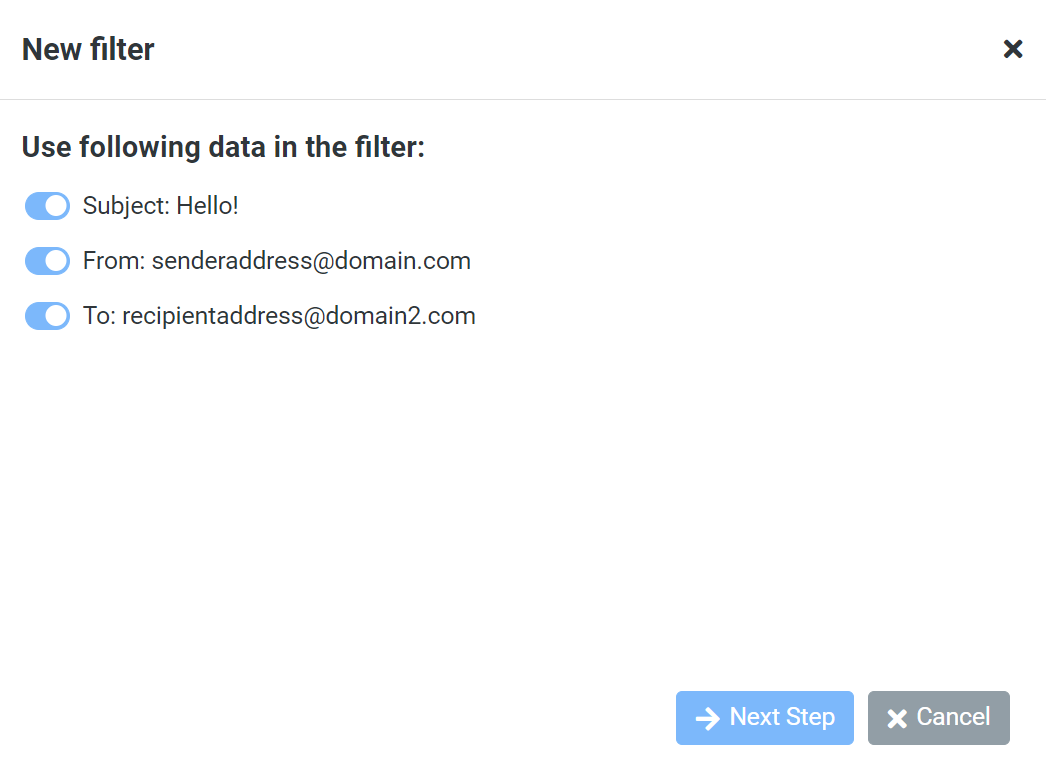
- Configure the filter’s settings as follows:
- Filter name – specify the filter’s purpose or function for easier management.
- Scope – set it to matching any of the following rules to filter out a wider range of messages.
- Rules – determine what kind of email the filter should flag. The first column contains email elements, while the second column presents conditions. Add the email address, domain, or other keywords to trigger the filter on the third column.
- Actions – specify the action for messages that meet the filter’s rules. Set the first action to Delete message to remove incoming messages, then pick Stop evaluating rules to dismiss filtering after the first action.

- Once you’re done, hit Save.
Use an email filter to specify spam senders and keywords. It can also automate archiving and deleting messages as well as flag emails for follow-up, boosting work efficiency.
Managing Email Filters
Here’s how to edit or delete an email filter:
- Head to Settings → Filters from the webmail dashboard.
- Select the filter you want to modify from the list.
- Change the filter’s settings and click Save or Delete to remove it.

Follow the same steps to create new filters without basing them on existing emails.
How to Block Emails on Thunderbird
Unlike most email clients, Thunderbird doesn’t provide the option to block messages. Instead, it features spam filters that you can customize to weed out suspicious emails.
Setting Up Email Filters
As this functionality works per account, configure it for each account in your Thunderbird email setup. Here’s how:
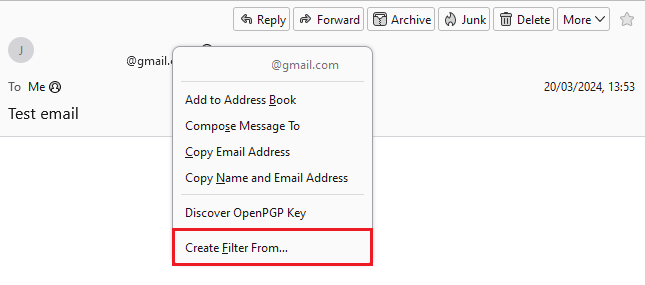
- Log in to your Thunderbird account and open the email you wish to block.
- Right-click on the sender’s address and select Create Filter From.
- A Filter Rules box will appear with the email address already inserted. Configure the filter’s settings as follows:
- Filter name – specify the filter’s purpose or function for easier management.
- Apply filter when ‒ set when to activate the filter. In our example, the filter runs before the built-in spam filter and can be triggered manually.
- Scope – set it to match any of the following to filter out a wider range of emails.
- Rules – like Hostinger Email’s filter creation form, the first table section determines the email types for filtering. The first column has email elements, while the second contains conditions. Include email address, domain, or keywords to trigger filters in the third column.
- Perform these actions – specify the action for messages that meet the filter’s rules. Here, we set it to move the flagged email straight to the trash folder. Click on the plus button to add more actions as needed.

- Once you’re done, click OK.
Managing Existing Filters
Here’s how to create more filters as well as edit and delete existing ones:
- Display the Thunderbird menu (three horizontal lines icon) and select Tools → Message Filters.
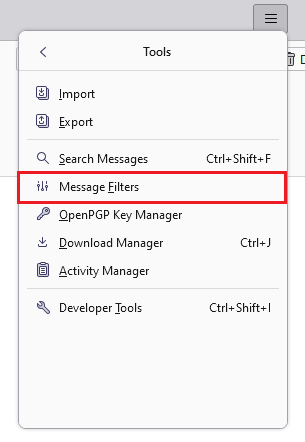
- The Message Filters window is where you can manage all the existing filters. Click a filter to Edit settings or Delete from the list. Uncheck a filter to deactivate it. You can also create New filters and force existing ones to Run Now.

How to Block Emails on Proton Mail
For effective communication Proton Mail allows you to create a block list and filters. The email client doesn’t specify the limit for blocking emails and domains. For best performance, review the block list regularly to keep the number of entries low.
Utilizing the Block Feature
Follow these steps to block an email address on the Proton Mail web app:
- Log in to your Proton Mail account and open the email you wish to block.
- Click the sender’s address and choose Block messages from this sender to stop receiving unwanted emails.
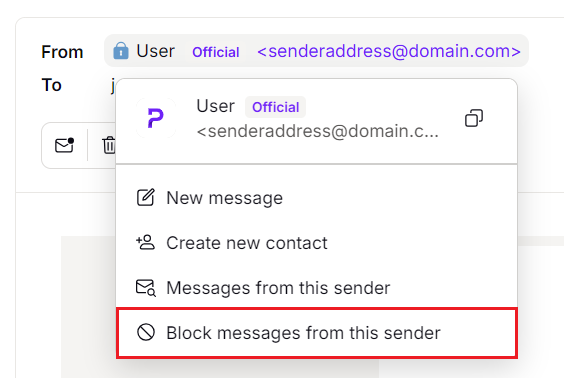
- Read the disclaimer and click Block.
The block will affect all Proton platforms, including the mobile version.
Setting Up Custom Filters
This method involves adding unwanted email addresses and domains to the block list. Here’s how:
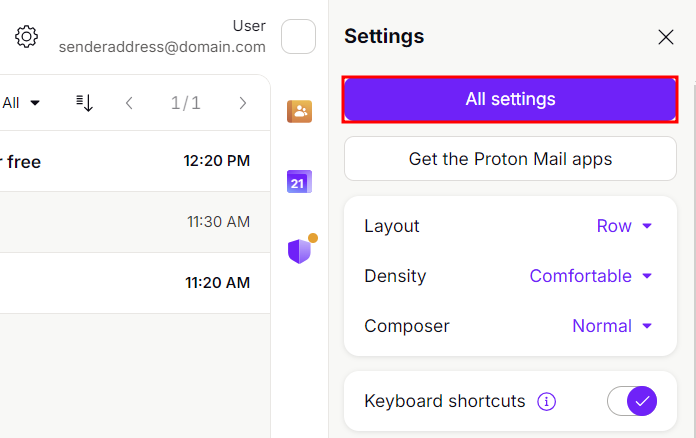
- Go to Settings (gear icon) → All settings from the dashboard.
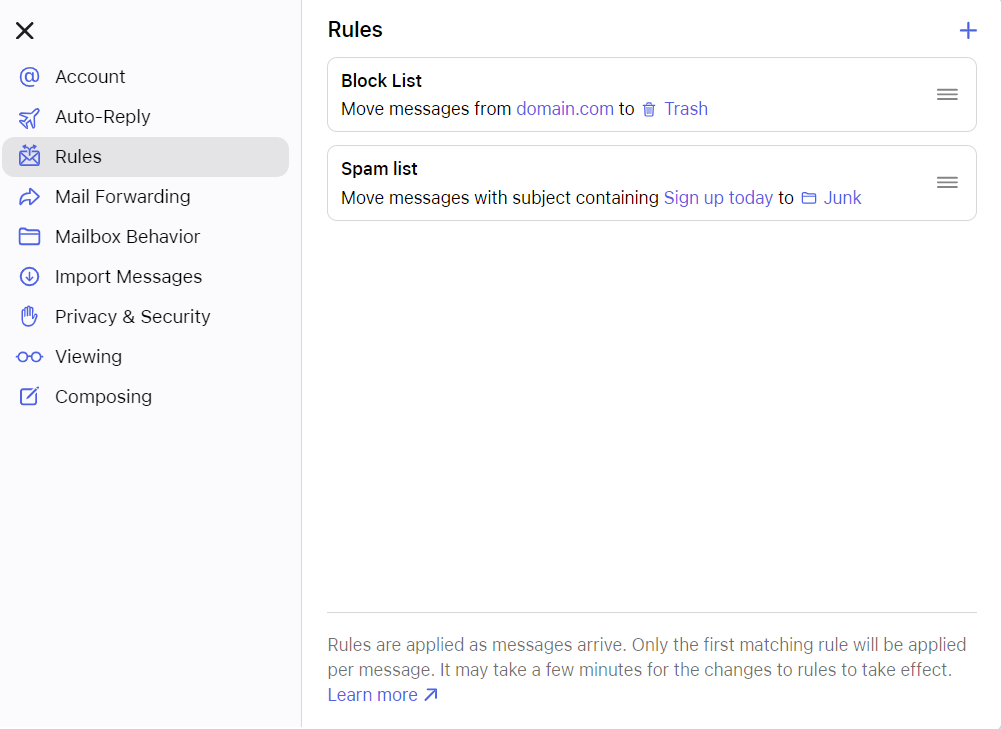
- Open the Filters section, where you can create and manage filters, as well as add addresses and domains to the block list. Let’s do the former by clicking Add filter.

- Enter the filter name and click Next.

- Set the conditions to trigger the filter. In this example, we set the filter to flag messages sent by “domain.com” or containing the phrase “Sign up today” or “Dear recipient” in the subject. Click Next.

- Specify the action for messages that meet the filter’s rules. Here, we set the filter to redirect flagged messages to the spam folder.

- Once you’re done, click Save.
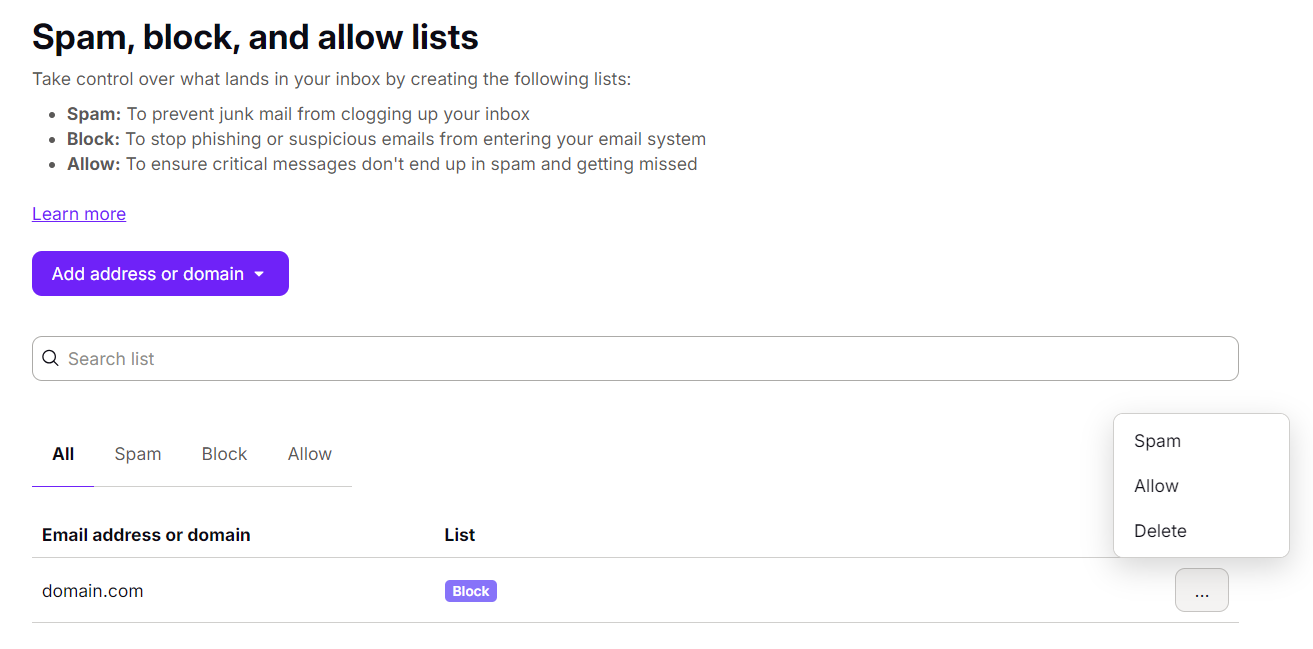
Managing Custom Filters and Block List
Return to the Filters section to add, edit, or remove filters, addresses, or domains.
With custom filters, select the toggle next to your chosen filter to activate or deactivate it. Open the dropdown menu and hit Apply to existing messages to filter emails you have already received. Select Delete to remove the filter permanently.

As for the spam, block, and allow lists, select the three horizontal dots and choose the appropriate label.
How to Block an Email Address in Zoho Mail
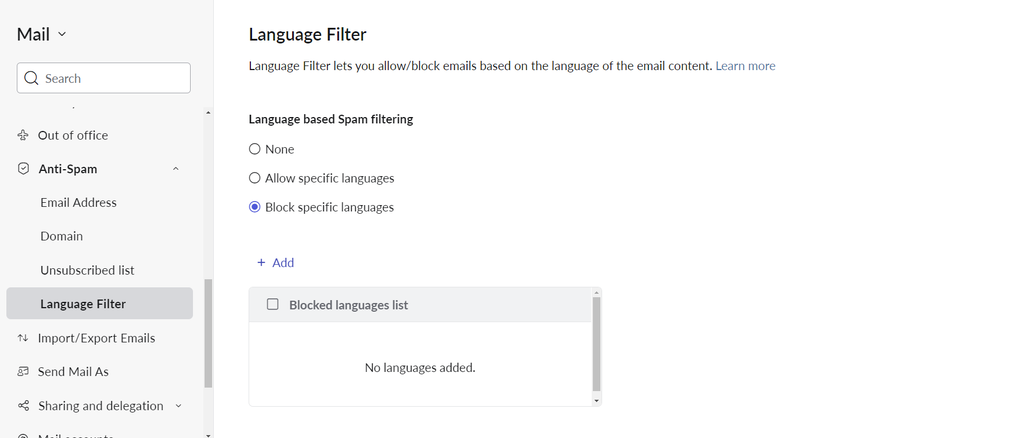
Zoho Mail’s block feature works similarly to other email clients. The only difference is that it also lets you block emails based on their content’s language.
Implementing Sender Blocking
Here’s how to block email in Zoho Mail:
- Log in to your Zoho Mail account and open the email you wish to block.
- Click the sender’s name and choose Block and reject future emails.

Customizing Anti-Spam Feature
Manage your block list and customize the spam filters from Zoho Mail’s anti-spam settings. Here’s how:
- Access Settings (gear icon) on the right sidebar.
- Click Anti-Spam to expand its dropdown menu.
- In the Email Address section, Add addresses to redirect to the spam folder or reject without spam checks.

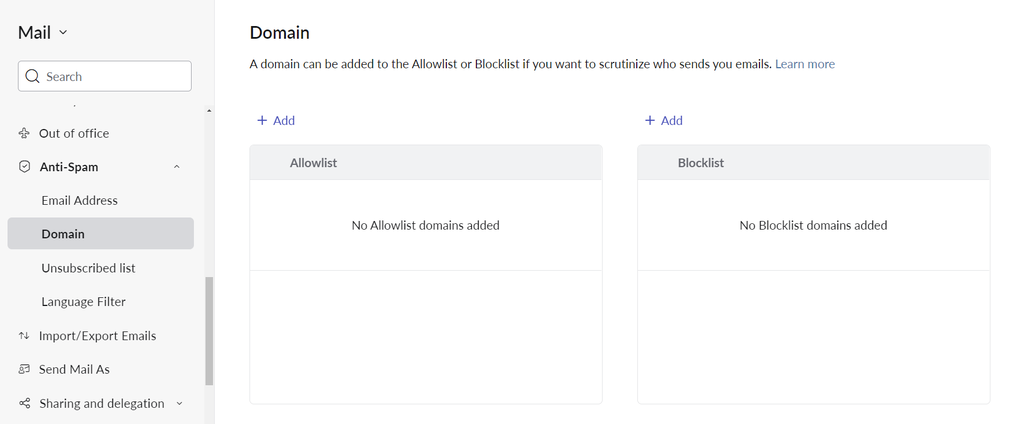
- In the Domain section, Add domains to the block list to stop their emails from reaching your inbox.
- To stop receiving emails in certain languages, open the Language Filter section. Choose Block specific languages, and Add all the languages you want to block.
Creating Filters
Another way to block unwanted emails in Zoho Mail is to set up filters. Here’s how:
- Access Settings (gear icon) on the right sidebar.
- Open the Filters tab and select New Filter under the Incoming Emails Filter section.
- Assign the filter’s name, conditions, and actions. In this example, we set the filter to delete emails sent from “domain.com”.

- Check the Do not process the other filters for matching conditions box to stop emails marked by this filter from going through others. You can also choose to Run existing emails through this filter.
- Save the filter once you’re done.
- Returning to the Filters → Incoming Emails Filter section, drag and drop filters based on their priority.

Conclusion
Most email clients have spam filters to prevent suspicious emails. You can further enhance communication quality by blocking unwanted messages and senders.
Let’s recap three practical ways to keep your inbox clean and organized on the most popular email clients:
- Block an email from the inbox directly ‒ this method stops future emails from that specific address.
- Block a sender via the blocked senders list ‒ effective for stopping emails from a specific source.
- Set up a filter ‒ allows you to apply different actions to emails based on the address, domain, and specific keywords.
We hope this article helped you understand how to block an email address better. If you still have questions, check out our FAQ section or leave a comment below. Good luck!
How to Block Emails FAQ
This section covers some of the most common questions about blocking unwanted emails.
How Do I Permanently Block Unwanted Emails?
To stop unwanted emails for good, go to your email settings and block their senders. Doing so will prevent their emails from reaching your inbox, usually sending them to the spam or trash folder instead.
Can I Block Emails From a Certain Domain?
Yes, you can block emails from an entire domain by adding the domain name to your block or settings. This method will stop all emails from that domain from getting into your inbox, no matter the email address.
Is It Better to Block Spam Emails or Just Delete Them?
It’s better to block spam emails rather than just delete them, as blocking can help prevent future spam from the same source. This practice also helps reduce the risk of encountering malicious software often distributed via phishing emails.
How Do You Let a Sender Know They Are Blocked?
Email providers usually don’t alert senders when they are blocked. However, you can create a filter to send an automated response to specific emails before blocking them.
What Happens to Blocked Emails?
Email clients usually redirect messages from blocked senders to the trash or spam folder, depending on your settings. The built-in spam filter sorts unsolicited messages into the spam folder by default. Setting up custom filters lets you set different actions like immediate deletion.
All of the tutorial content on this website is subject to Hostinger's rigorous editorial standards and values.

Jordana is a Senior Content Writer with a background in Information Systems. She has over five years of experience in WordPress and is casually dabbling with PHP and MySQL. Her passion for writing and technology drives her to create tutorials for anyone wanting to build their online presence. Follow her on LinkedIn.