Hostinger CDN and Cloudflare are both Content Delivery Networks (CDNs) that speed up your website and protect it from attacks. Hostinger CDN is built into Hostinger dashboard and works without any external account, while Cloudflare is a third-party service managed from its own dashboard. Only one CDN should be active for a website at a time, so compare the two options and switch between them safely.
Differences between Hostinger CDN and Cloudflare
| Aspect | Hostinger CDN | Cloudflare |
|---|---|---|
| Setup | Enabled with one click in Hostinger dashboard | Requires a Cloudflare account and nameserver change |
| Nameservers | Domain must use Hostinger nameservers | Domain must use Cloudflare nameservers |
| Management | Hostinger dashboard CDN dashboard | Cloudflare dashboard |
| Caching and analytics | Included | Included |
| Image optimization | WebP compression and smart image optimization included | Cloudflare Images, with usage limits that vary by plan |
| Security | Security levels, Under Attack mode, IP and country blocking, DDoS protection | Similar features managed at Cloudflare |
| SSL | Handled automatically by Hostinger | Managed in the Cloudflare dashboard |
| Availability | Premium Web, Business Web, Cloud, and Agency hosting plans | Any hosting provider |
Why only one CDN should be active for a website
Running Cloudflare in front of Hostinger CDN is not a supported setup — avoid the combination. There are three common problems with a double-CDN setup: redirect loops from conflicting HTTPS rules, stale content because two separate caches must be purged, and incorrect visitor IP addresses in analytics and security tools.
How to identify and resolve a double-CDN rate limit
Run `curl -IL domain.tld` and check the response headers. A domain running both CDNs at once returns both the `x-hcdn-cache-status` and `cf-cache-status` headers in the same response. Choose one CDN to resolve a double-CDN rate limit: use Hostinger CDN only, or use Cloudflare only. See How to switch from Cloudflare to Hostinger CDN or How to switch from Hostinger CDN to Cloudflare below for setup steps.
How to switch from Cloudflare to Hostinger CDN
- Open the DNS (Domain Name System) records of the domain in the Cloudflare dashboard and copy every record you still need, such as MX records for email and TXT records for verification.
- Recreate the copied records in the Hostinger DNS zone, and confirm the A record points to the IP address of your hosting plan.
- Point the domain
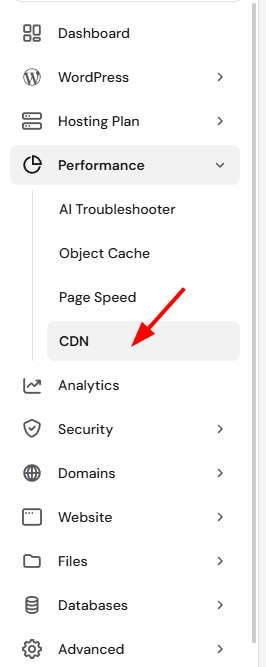
domain.tldto Hostinger nameservers at your domain registrar. Nameserver changes take up to 24 hours to propagate. - After the domain resolves through Hostinger nameservers, go to Hostinger dashboard → Websites → Dashboard → Performance → CDN.
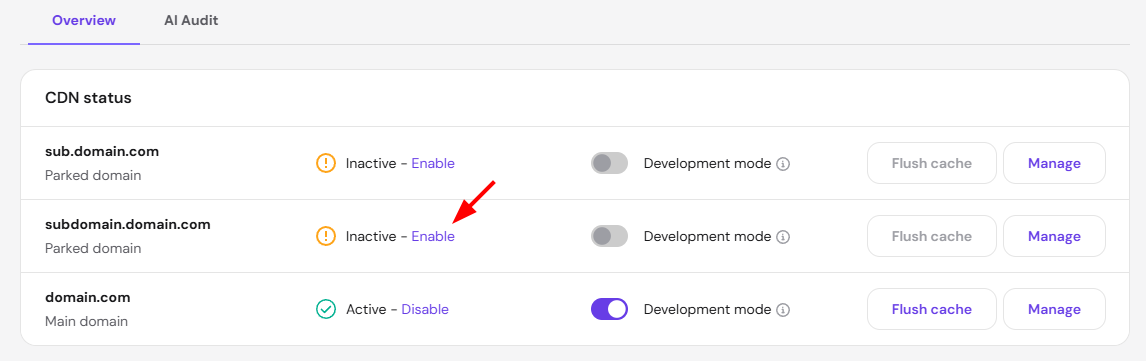
- Click Enable.
- Verify the switch by checking the response headers of your website: responses delivered through Hostinger CDN include the
x-hcdn-cache-statusheader.
How to switch from Hostinger CDN to Cloudflare
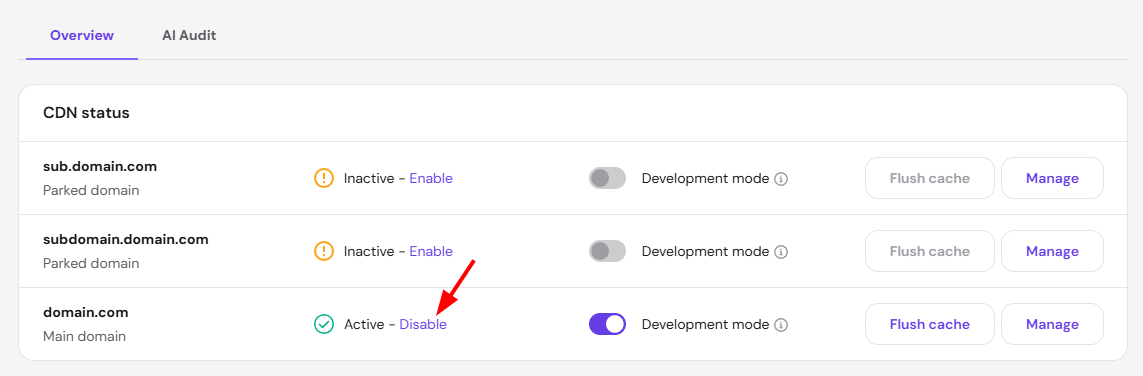
- Go to Hostinger dashboard → Websites → Dashboard → Performance → CDN.
- Click Disable.
- Set up Cloudflare for the domain following the guide How to set up Cloudflare for a domain hosted on Hostinger.
- During the Cloudflare setup, review the DNS records Cloudflare imports and confirm the A, MX, and TXT records are complete before switching nameservers, so the website and email keep resolving.
Both services keep your website fast and protected — Hostinger CDN with zero-configuration integration in Hostinger dashboard, Cloudflare with management in its own dashboard. With one CDN active at a time, your website avoids cache conflicts and redirect loops.