Certification Authority Authorization (CAA) records at Hostinger specify which certificate authorities (CAs) can issue SSL/TLS certificates for your domain. To manage CAA records, add them from the DNS Zone Editor in Hostinger dashboard with the name, flag, tag, CA domain, and TTL values, and keep the default CAA records in place.
How to add CAA records
If your domain is pointing to Hostinger by nameservers and you need additional CAA records – for example, to install a custom SSL, go to your domain’s DNS Zone Editor, scroll to the Manage DNS records area, and choose CAA on the type of record:
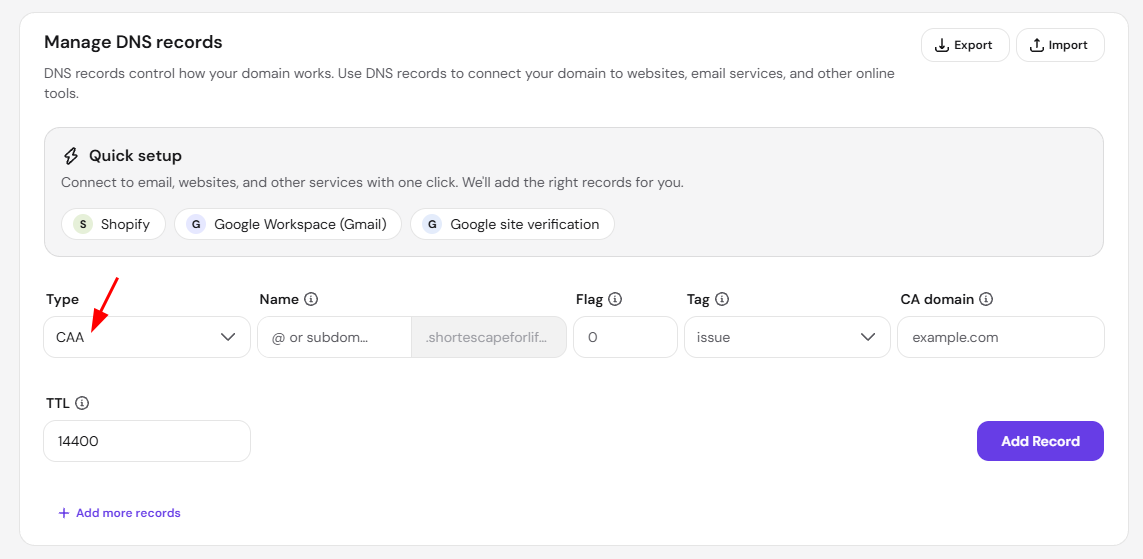
Which values to use?
-
Name
-
For your domain, insert @ as Name
-
For subdomains, insert the subdomain’s name, eg. if you have a subdomain store.domain.tld, use store as name
-
-
Flag – the default value is 0. If you use 1, it can block the validation in case the tag is unknown by the Certificate Authority (CA)
-
Tag – you can choose from the following:
-
issue: The CA is authorized to provide a certificate for this domain
-
issuewild: the CA can issue wildcard certificates for this domain
-
iodef: URL that the CA can use to send an error message
-
-
CA domain – specify the Certificate Authority. Both the tag and the CA domain should be provided by your certificate issuer
-
TTL – the default value is 14400 seconds
How to edit or delete CAA records
To edit or delete a CAA record:
-
For domains pointing to Hostinger by NS records – check this article: How to manage DNS records at Hostinger
-
If your domain is pointing elsewhere by NS records, go to your domain’s DNS Zone management on the provider you pointed the domain to and manage them from there
After you add or edit a CAA record, allow up to 24 hours for the change to fully propagate, after which the authorized CA can issue SSL certificates for your domain.